Welcome to Asset Creation Assignment, the final topic for this Digital Production module. In this topic, you will be given a series of complex asset assignments to practice the skills you have gathered throughout the duration of this module. While complex in nature, the tasks are designed to enhance your skills and enable you to explore your individual creativity.
As you progress, you will learn the integral skills of planning and approaches for lengthier tasks.
The subtopics you will go through have been outlined below.
Subtopics you will explore
Each of the subtopics below pertain to the asset model you will be creating. They will provide you with the brief, planning ideas and suggested approaches you should take when you create each assignment.
- Create Asset – Lego character
- Create Asset – Pop Vinyl figure
- Create Asset – Isometric room.
Learning tasks that will help you develop and practise digital production skills
Practice
Put your skills into practice and extend your knowledge
As you work through the learning, you will encounter a series of learning tasks that you must complete within the Asset creation assignments and showcase on the discussion forums. Keep an eye out for the PRACTICE boxes as you progress through the learning process to identify the learning tasks, resources, and instructions for what you must do. They also house the information regarding the specific subtopics, and how long you will need to allocate for these tasks. This has been briefly outlined below.
Remember, there will be learning tasks that you will need to complete that link directly to your assessment, so please read through them carefully.
| # | Learning Task Name | Duration (Hours) | |
|---|---|---|---|
| 1 | Design and model a Lego Character | 20 |
|
| 2 | Design a Pop Vinyl Character | 20 |
|
| 3 | Model-a-day Challenge | 5 |  |
| 4 | Model a Pop Vinyl FIgure | 20 |
|
| 5 | Design and model an Isometric Room | 20 |
|
Feedback and support are woven through the learning tasks as you complete them. Reach out if you have any questions about what to do!
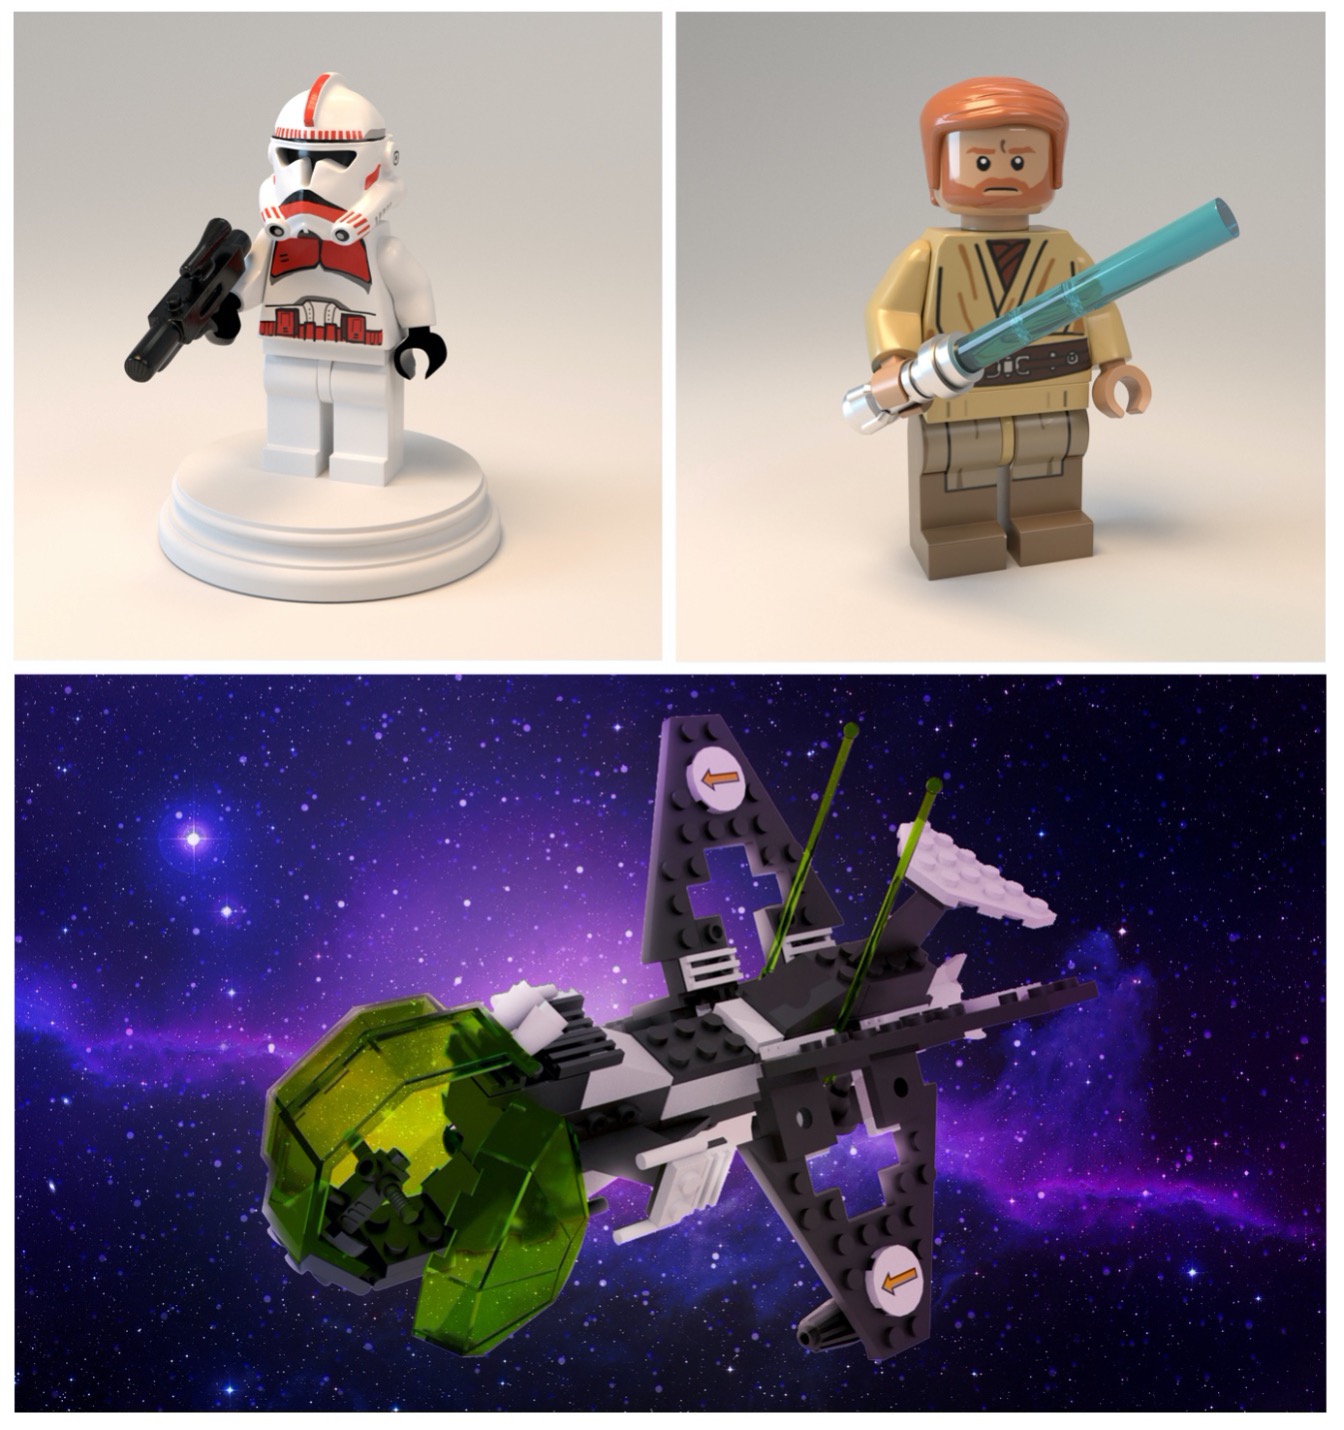
In this first in a series of three asset assignments, your task is to model, texture and present a character model based on a Lego set.
Assignment brief
The type of character model you wish to create is completely up to you, but the main requirement is that your character model must look like it would fit within the Lego family of products.
Tip
Choose an appealing Lego character
Selecting a Lego set that appeals to you is crucial, as it will enhance your enjoyment of the assignment and make the result better.
Once you decide what model you wish to create, you need to consider how you will begin the process.
Approach
To help you model and texture your assets, follow the approach below made up of four key phases:
- Planning
- Modelling
- Assembling the model
- Render and Presentation.
Part 1: Planning
Use your design sketchbook to help plan out your asset. Try to include as much planning detail as possible to help inform the modelling and texturing of your asset.
Follow these pointers to get started:
1. Choose a Lego set
- Select a Lego set that you would like to build in Maya.
- Use the Lego website to get the building instructions for your chosen model.
Some sets will include a list of pieces required for the model, so now is a good time to evaluate the scale of the Lego set and estimate the time it will take to build each individual piece.
2. Create a reference board
- Gather references using these reference resources:
- Lego website: https://www.lego.com/en-us/service/buildinginstructions
- Details of Lego parts: https://brickset.com/
- Create orthographic views of Lego parts for modelling:
https://www.mecabricks.com/en/workshop
- Create a reference board that shows the asset from different viewpoints, including the parts required to build the set:
- colour
- textures
- materials
- any relevant details.
- Include notes on methods to model the shapes.
Tip
Lego character model ideas
Keep your Lego character ideas contained; it is strongly recommended to limit your Lego character choice to a model with 12-15 unique pieces. This will make achieving a good-looking model much more likely.
Keys to success
- It is essential to do each step of the entire process correctly and take your time; doing so will reduce serious problems during the later stages of the project. It is much easier in the long run to solve problems as they occur than to deal with them later.
- If you need more confidence as a modeller, pick a Lego set with fewer unique pieces and concentrate on taking your time to create your pieces correctly. A finished quality model and good work habits are the goals of this activity.
- Keep your orthographic views all on the same image; this saves time importing image planes into Maya.
Part 2: Modelling
Once you complete the initial planning, it’s time to get modelling. Follow the steps below to guide you through the modelling process.
- Create a new Project for your Lego character model
- Ensure that you save your work frequently to avoid loss of work in the event of a crash.
Create your unique bricks in Maya, one at a time
- Import your orthographic images and start to build your bricks out of polygon primitives.
- Cubes work well as a basis for the main brick shapes, and cylinders are the best choice for the studs.
- Selectively adding bevels is the best way to improve the visual appeal of your Lego bricks,
- Don’t make them too thick; Lego typically has sharp edges.
The image below provides you with an example of using bevels and the desired thickness for the Lego brick.
![[ADD IMAGE'S ALT TEXT]](/sites/default/files/Bevels%201.png)
When you have completed assembling each Lego piece:
- Select all parts of the piece
- use the Mesh>Combine tool to create a single piece of geometry.
Keep all your bricks in the same scene
When you have finished with a brick:
- Move it to the side before starting a new brick.
- Keep all your bricks in the same scene to make assembling the model later much simpler.
![[ADD IMAGE'S ALT TEXT]](/sites/default/files/Lego%20Bricks.png)
Keys to success
- A clever approach would be to duplicate bricks and keep some parts off to the side shared by multiple bricks so that you don’t have to build things numerous times. This will save plenty of time and headaches.
- Stay focused when working with more complex bricks; building the topology you need before extruding is the best way to solve your problems. Don’t forget that your bricks do not need to be made from the same piece of geometry.

Complex Lego brick 1
Complex Lego brick 2
Part 3: Assembling the Model
The third part of the process is assembling the model. The steps below will guide you through the process of assembling the model.
Assemble the model according to the instruction booklet
To assemble the model, you need to:
- Duplicate bricks from your main collection as needed and apply a plastic shader depending on the piece's colour and kind of plastic.
- Move individual pieces into position using the Translate tools; if you find any scale inconsistencies, use the scale tool to solve this.
Select the arrows to navigate through the examples of adding shaders and using the translate tools to find inconsistencies.
Keys to success
- If there are any bricks with specific textures, you will have to use UV and apply those specific textures in Photoshop.
The image below provides an example of using UV to highlight specific textures in Photoshop.
![[ADD IMAGE'S ALT TEXT]](/sites/default/files/UV.png)
- Every different colour or material brick will require its own shader. Make sure to name your shaders properly to keep track of them easily in the Hypershade.
The image below highlights where to locate the Hypershade.
![[ADD IMAGE'S ALT TEXT]](/sites/default/files/Menu_0.png)
Part 4: Render and Presentation
Once you have completed the assembling process, the final step is to render and present. The steps below will guide you through the process of rendering and presenting.
Create a light setup and render out a final presentation image.
- A clear, simple presentation best serves the goal of this activity.
- a single point light, and Skydome will do that job well.
- Render out a diffuse and ambient occlusion pass of your model to comp together.
- In Photoshop, combine your renders together and tweak the image for clarity and visual appeal.
The following image provides you with an example of combining renders in Photoshop.
![[ADD IMAGE'S ALT TEXT]](/sites/default/files/Renders.jpg)
Keys to success:
- If your final render appears grainy, turn up the number of diffuse and specular samples in your render settings for Arnold.
- You’ll also need to increase the transmission samples if you have transparent materials.
- Choose a camera angle that shows your model clearly; remember that clarity is key for your presentation.
Practice
Task 1: Design and model a Lego character
This learning task will guide you through the process of selecting a Lego set, planning the model, creating the individual Lego pieces, assembling the model, and finally rendering and presenting their creation.
What tools or resources do you need?
- Maya
- Lego website: https://www.lego.com/en-us/service/buildinginstructions
- Details of Lego parts: https://brickset.com/
- Create orthographic views of Lego parts for modelling: https://www.mecabricks.com/en/workshop
What steps should you take?
20 Hours

Set aside 20 hours to complete steps 2-12 below. Remember to save your work as you go when using Maya.
- Review the learning for Create Asset – Lego Character model to help you with this task.
- Choose a Lego Set from the Lego website provided. Evaluate the scale and complexity of the set. Do not select a set that is too complicated.
- Gather reference images and create a reference board showcasing the Lego set from different angles, details, colours, and textures.
- Create a new project in Maya and set up the workspace. Import your reference images for modelling.
- Model each unique Lego brick one at a time using polygon primitives in Maya.
- Assemble the modelled Lego pieces according to the instructions from the Lego set.
- Duplicate bricks as needed and apply appropriate plastic shaders based on colour and material type.
- Use translation and scale tools to adjust the position and scale of individual pieces to ensure accuracy and consistency.
- Set up lighting and render settings for final presentation.
- Render out final images of the model with diffuse (colour) and ambient occlusion passes. Composite renders together in Photoshop.
- Compile the rendered images and present the final Lego character model with clear and concise visuals.
- Save your scene and export your images as .jpg files.
What can you do after?
- What modelling techniques did you find most effective in creating accurate representations of the Lego pieces?
- Reflect on any insights or lessons learned during the process of designing and modelling the Lego character model. How will these experiences inform your approach to similar tasks in the future?
- Share the Lego Character Model to Forum:
- Select your forum thread in Forum: Final Assets
- Select Reply to your first Forum post.
- Enter the words ‘Task 1 Lego Character’ in your reply.
- Select the Post your response button, then select Edit in your new reply when it shows up.
- Upload your photo(s) or files using the Attachment field.
- Select Save changes to share your coursework to your forum thread.
- Get feedback on this and other learning tasks at the next Live Session – check the Live Session calendar for dates and times. All live sessions are recorded so you can watch them later if you miss a session.
Well done! You have completed your first task for this module. Your next task will involve developing a Pop Vinyl Figure.
Brief
In this modelling and texturing assignment, your task is to design a Pop Vinyl Figure. Below are the steps to guide you through this assignment.
Approach
To help you create the Pop Vinyl Figure, follow the two-part approach below:
- Part 1: Pop Vinyl Design
- Design sketchbook
- Design examples
- Modelling and texturing.
- Part 2: Model and Texturing
- Modelling
- Seek feedback
- UVs and texturing
- Presentation.
Part 1: Pop Vinyl Design
Part 1 requires you to come up with a design for your Pop Vinyl Figure. The type of model you decide to create is completely up to you, but the main requirement is that your model must look like it could be part of the Pop Vinyl Figure range.
![[ADD IMAGE'S ALT TEXT]](/sites/default/files/Pop%20Vinyl.png)
Design Sketchbook
Use your design sketchbook to help plan out your Pop Vinyl Figure asset. Try to include as much planning detail as possible, which will help inform the modelling and texturing of your asset later. Here are some pointers to help you get started:
1. Mind map
Create a mind map where you generate ideas for your Pop Vinyl Figure model.
- Is your model going to be an existing character?
- Or maybe a self-caricature?
2. Reference Board
Gather references and create a high-resolution reference page that shows several different aspects of your idea. For example, you could include possible:
- shapes/silhouettes
- figure details
- colour pallets
- texture and material ideas
- include notes on possible methods to model the shapes or how the materials should react and/or look.
3. Concepts
Create a page of concepts where you explore different ideas and configurations. This is where you can play with different:
- silhouettes
- shape language
- contrasting lines
- volumes
- poses, etc, to create a strong design.
Include notes with your pages that help to explain your thoughts and ideas.
4. Seek feedback on your concepts
Aim to seek feedback on your concepts from your friends/family and in the online space for this course.
- Ask what they like or don’t like about the concepts.
- Record your feedback and find ways to incorporate some or all the suggestions into your work.
5. Development
Select an idea to develop from your initial concept design pages.
- Look for areas in the concept where the idea, shapes, details can be strengthened.
6. Seek feedback on your development
You should seek feedback on your development from your friends/family and in the online space for this course.
- Ask what they like or don’t like about how you have developed your chosen concept.
- Record your feedback and find ways to incorporate some or all the suggestions into your work.
7. Colour/textures
Create a page of examples for the following:
- colour scheme
- materials
- textures that you would like to incorporate into your model
- notations on the colours, materials, and textures
- how do the materials look?
- what attributes will you need to simulate them in 3D?
8. Create Orthographic drawings
Aim to create orthographic drawings for your figure's front, side and back. You will use this to help model your design in part two of this Asset Assignment.
Tip
Keep your ideas contained, focus your energy on strong design and appeal. This will make achieving a good-looking model much more achievable in the limited time frame.
Design Examples
The following examples are those of a previous student's design work on other asset activities, which should give you an idea of how to approach and arrange your design sketchbook pages.
Select the arrows in the slides below for examples.
Practice
Task 2: Design a Pop Vinyl FIGURE
In this task, you will design a Pop Vinyl Figure. The task allows you to explore your creativity and decide on the character or concept you want to bring to life within the Pop Vinyl style. You will develop a robust design for your figure through sketching, referencing, concept exploration, feedback incorporation, and design refinement.
What tools or resources do you need?
Make sure you have access to:
- Sketchbook
- Photoshop.
What steps should you take?
16-20 Hours
Set aside up to 16-20 hours to complete this task.
- Generate ideas and brainstorm various concepts and themes for the figure for the Pop Vinyl model by creating a mind map. Determine if the model will be an existing character or a self-caricature.
- Create a reference or mood board with high-resolution references showcasing different aspects of the idea.
- Include shapes, silhouettes, figure details, colour palettes, textures, and materials.
- Make notes on modelling methods and material reactions.
- Create a page of concept sketches exploring different ideas and configurations.
- Play with silhouettes, shape language, volumes, poses, etc., to develop a strong design.
- Include explanatory notes with each concept page.
- Seek feedback from friends, family, or peers within the course, sharing your design concepts.
- Consider incorporating suggested improvements into the design.
- Collect feedback on the progress made.
- Adapt design based on received feedback.
- Choose a concept to develop further based on initial designs.
- Identify areas for strengthening the idea, shapes, and details.
- Create examples for the colour scheme, materials, and textures.
- Include notations on materials' appearance and attributes.
- Consider how these elements will be simulated in 3D.
- Create orthographic drawings for the front, side, and back of the figure.
- Use these drawings as references for modelling in the next stage of the assignment.
- Review the overall design and make necessary refinements.
- Ensure the design aligns with Pop Vinyl style and appeals to the target audience.
- Compile all design sketches, reference materials, feedback records, and orthographic drawings into a presentation portfolio.
- Prepare for the next stage of the assignment, modelling and texturing the Pop Vinyl Figure based on the finalised design.
- Save your work as .jpeg files.
What can you do after?
Reflect on your experience with this task.
- How did your initial concept evolve throughout the design process, and what factors influenced these changes?
- Reflect on the feedback you received from peers, family, or friends. How did this feedback impact your design decisions, and did you find it helpful in improving your concept?
- Share the Pop Vinyl design drawings to Forum:
- Select your forum thread in Forum: Final Assets
- Select Reply to your first Forum post.
- Enter the words ‘Task 2 Pop Vinyl design drawings in your reply.
- Select the Post your response button, then select Edit in your new reply when it shows up.
- Upload your photo(s) or files using the Attachment field.
- Select Save changes to share your coursework to your forum thread.
- Get feedback on this and other learning tasks at the next Live Session – check the Live Session calendar for dates and times. All live sessions are recorded so you can watch them later if you miss a session.
You have completed your Pop Vinyl design. Your next task will involve a challenge in modelling a series of figures.
Model-a-day Challenge
The next task you will need to complete is a Model-a-day challenge. Using the prompt, Design and model an asset daily during your Pop Vinyl design assignment. You should spend no more than one hour on each model. This will give you a break from work on your pop vinyl design and give you some much-needed modelling and topology practice.
Render your completed model using a simple flat material and a wireframe render to show your topology.
Practice
Task 3: Model-a-day Challenge
This task will enhance your modelling skills and topology understanding through regular practice. In this challenge, you will design and model an asset alongside your Pop Vinyl design assignment. The goal is to spend 1 hour on each model at most, providing a break from the main project while offering valuable practice in modelling and topology.
The objects you are to model include:
- A Bladed Implement/Weapon
- Tomb stone
- An Old Book/Tome
- A Lamp
- Piggy Bank.
What tools or resources do you need?
Make sure you have access to:
- Maya
What steps should you take?
5 Hours
5 hours (1 hour per model)
Model an object using the prompts. Aim to spend no more than 1 hour per model.
- Design and sketch your object using the prompts provided.
- Model your object using your design sketch as your inspiration.
- Pay attention to the level of detail and topology used in your model.
- Render the model in two passes, AmbientOcclusion and Wireframe.
- Save your model and post your renders to the forum as .jpg files.
What should you do next?
Reflect on your experience with this task.
- Evaluate the quality of your models in terms of accuracy, detail, and topology. Which model do you feel most satisfied with, and why?
- What approach did you take to manage your time when designing each of these models?
- Share Models to Forum:
- Select your forum thread in Forum: Final Assets
- Select Reply to your first Forum post.
- Enter the words ‘Task 3 Model a day challenge’ in your reply.
- Select the Post your response button, then select Edit in your new reply when it shows up.
- Upload your photo(s) or files using the Attachment field.
- Select Save changes to share your coursework to your forum thread.
- Get feedback on this and other learning tasks at the next Live Session – check the Live Session calendar for dates and times. All live sessions are recorded so you can watch them later if you miss a session.
Well done! You have completed this challenge! Let’s move on to your next challenge: model a Pop Vinyl character.
Part 2: Pop Vinyl Figure, Modelling and Texturing
Now that you have completed the design of your Pop Vinyl Figure, it is time to complete the modelling and texturing.
Brief
Using the orthographic drawings you created during part one of this Pop Vinyl Asset assignment, model, UV, texture, and present your Pop Vinyl figure.
Approach
You will need to plan your time carefully to complete this activity within the time allotted. The steps below will guide you through the process of modelling and texturing your Pop Vinyl.
Modelling
The following steps take you through the modelling process.
- Create a new Project for your Pop Vinyl Figure.
- Start by creating the base mesh for your design.
- Focus on keeping the topology clean and simple with evenly spaced loops and faces.
Important
Ensure that you save your work frequently to avoid loss of work in the event of a crash.
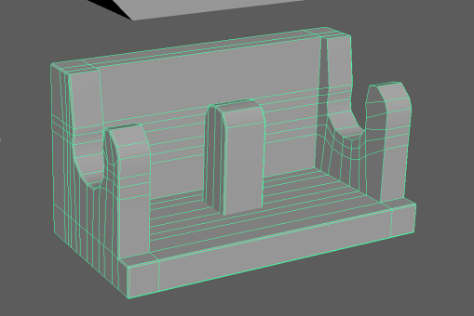
The following are two examples that provide you with a visual of the base mesh shape before and after it has been smoothed.
![[ADD IMAGE'S ALT TEXT]](/sites/default/files/Base%20Mesh%20Shape.png)
![[ADD IMAGE'S ALT TEXT]](/sites/default/files/Base%20Mesh.png)
Seek Feedback
Throughout this assignment, you may seek feedback from the Yoobee online community and your online facilitator on the following:
- modelling
- topology
- texturing
- lighting, etc.
![[ADD IMAGE'S ALT TEXT]](/sites/default/files/Before%20Details.png)
![[ADD IMAGE'S ALT TEXT]](/sites/default/files/With%20Details.png)
UVs and Texturing
The next step you will need to take is to create a UV layout for your model and spend time working on the shaders to simulate that distinct pop vinyl look.
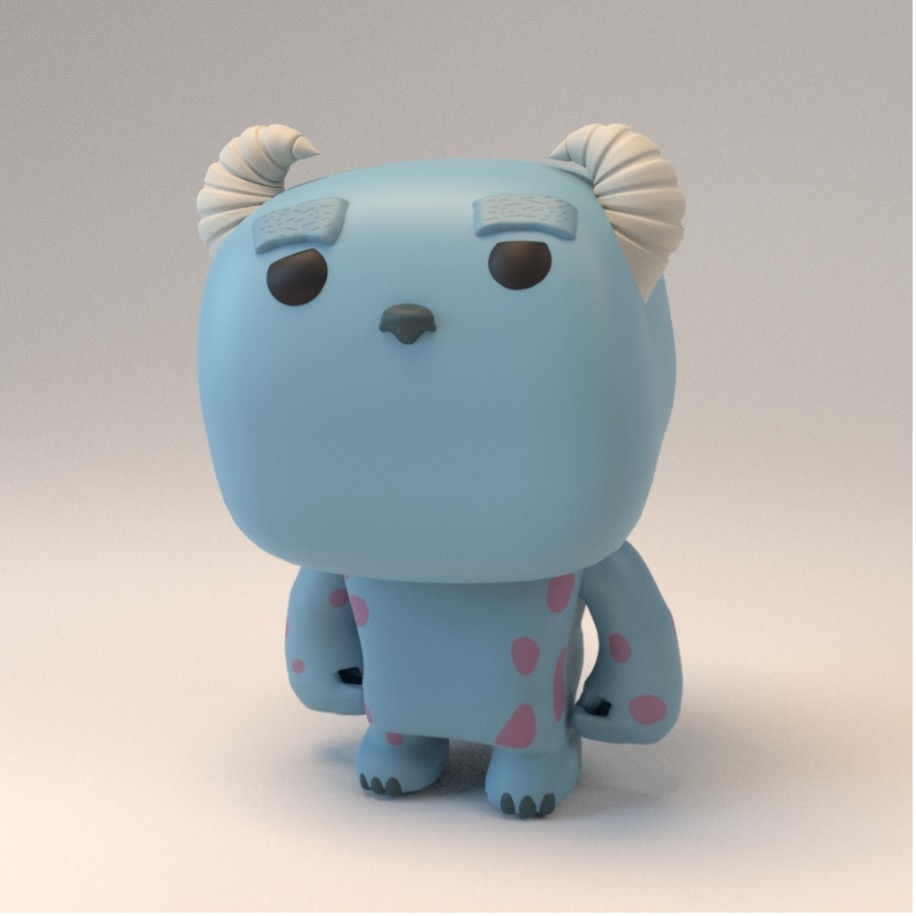
Presentation
When you have completed work on your model and textures, you will need to create a lighting setup and render out a final presentation image.
Use the following pointers to help you with your presentation.
- A clear, simple presentation best serves the goal of this activity; a single point light and Skydome will do that job well.
- Render out a diffuse and ambient occlusion pass of your model to comp together.
- In Photoshop, combine your renders together and tweak the image for clarity and visual appeal.
- Include a wireframe render which shows the topology for your model.
![[ADD IMAGE'S ALT TEXT]](/sites/default/files/Completed%20Pop%20Vinyl.jpg)
Keys to success:
- If your final render appears grainy, turn up the number of diffuse and specular samples in your render settings for Arnold. You’ll also need to increase the transmission samples if you have transparent materials.
- Choose a camera angle that shows your model clearly, remember that clarity is key for your presentation.
Practice
Task 4: Model a Pop Vinyl Character
In this task, you will model, UV, texture, and present your Pop Vinyl Figure character based on the orthographic drawings created in the first part of the Pop Vinyl Figure Asset Assignment.
The task involves:
- creating a clean and simple base mesh
- seeking feedback from the online community and facilitator
- creating UV layouts
- texturing to achieve the distinct Pop Vinyl look
- presenting the final model with a clear, simple lighting setup and render.
Ensure you manage your time effectively to complete the activity within the allotted time.
What tools or resources do you need?
Make sure you have access to:
- Maya
- Photoshop
- The Pop Vinyl Figure design you created.
What steps should you take?
20 Hours
Set aside 20 hours to complete this task.
- Open Maya and create a new project dedicated to your Pop Vinyl Figure character.
- Save your work frequently to prevent loss of progress.
- Begin by using the orthographic drawings as a reference to create the base mesh for your Pop Vinyl Figure character.
- Focus on maintaining a clean, simple topology with evenly spaced loops and faces.
- Refer to Pop Vinyl Topology Examples in the learning for guidance if needed.
- Throughout the modelling process, actively seek feedback on your progress from the online community and your facilitator.
- Incorporate suggestions and critiques to improve your model's quality and topology.
- Create a UV layout for your model to ensure efficient texture mapping.
- Spend time working on shaders to achieve the distinct Pop Vinyl Figure look, considering materials and surface properties.
- Once modelling and texturing are complete, set up a simple lighting environment for presentation.
- Use a single point light and a Skydome to illuminate your model clearly and effectively.
- Render out a final presentation image, including a diffuse (colour) and ambient occlusion pass of your model to the composite.
- In Photoshop, combine your renders and tweak the image for clarity and visual appeal.
- Include a wireframe render to showcase the topology of your model.
- If your final render appears grainy, adjust the number of diffuse and specular samples in your render settings for Arnold.
- Increase transmission samples if transparent materials are used to maintain quality.
- Choose a camera angle or series of angles that clearly showcase your model, ensuring clarity and visibility in the presentation image.
- Review your final presentation image and make any necessary adjustments for clarity and visual appeal.
- Ensure that the model, textures, and presentation meet the desired standards and specifications.
- Save your final project files and presentation image.
- Submit your completed Pop Vinyl character assignment for evaluation and feedback.
What should you do next?
- Reflect on your experience with modelling, texturing, and presenting your Pop Vinyl Figure character. Identify strengths, areas for improvement, and lessons learned for future projects.
- Consider the importance of seeking feedback and collaboration in the creative process. How did engaging with the online community and facilitator enhance your learning experience and contribute to the overall quality of your work?
- Share your pop vinyl model to Forum:
- Select your forum thread in Forum: Final Assets
- Select Reply to your first Forum post.
- Enter the words ‘Task 4 Pop Vinyl Model’ in your reply.
- Select the Post your response button, then select Edit in your new reply when it shows up.
- Upload your photo(s) or files using the Attachment field.
- Select Save changes to share your coursework to your forum thread.
- Get feedback on this and other learning tasks at the next Live Session – check the Live Session calendar for dates and times. All live sessions are recorded so you can watch them later if you miss a session.
Well done! You have completed this challenge! Let’s move onto your next challenge, design and model an Isometric room.
In this third and final asset assignment, your task is to design, model, texture and present an isometric room (IsoRoom) render.
Brief
The type of IsoRoom you decide to create is entirely up to you. However, the main requirement is that your model fits within the isometric template in the IsoRoom project file and be rendered and presented using the provided ShotCam.
Approach
You must plan your time carefully to complete this activity within the time allotted. To help you create your IsoRoom, follow the approach below made up of four key phases.
- Design Sketchbook
- Design Examples
- Modelling and texturing
- Presentation.
Design Sketchbook
Use your design sketchbook to help plan out your IsoRoom asset. Try to include as much planning detail as possible, which will help inform the modelling and texturing for the parts of your asset.
Here are some pointers to help you get started.
1. Mind map
Create a mind map where you generate ideas for your IsoRoom. Consider the following when you are creating your mind map.
- What type of room will you design?
- Is it contemporary, stylised, or something else?
- What assets will you need to create for your room?
2. Reference Board
Gather references and create a page showing several aspects of your idea. For example, you could include possible:
- shapes/silhouettes
- details
- colour pallets
- texture and material ideas.
Include notes on possible methods to model the shapes or how the materials should react and/or look.
3. Concepts/Room layouts
Create a page of concepts where you explore different ideas and configurations for the space you must work within. This is where you can play with different ideas, room layouts, etc, to create an appealing design.
Include notes with your pages that help to explain your thoughts and ideas.
6. Seek feedback on your concepts/layout
Ensure you seek feedback on your concepts/layout from your friends/family and in the online space for this course. Ask what they like or don’t like about the concepts/layout. Record your feedback and try to find ways to incorporate some or all the suggestions into your work.
7. Development
Select a concept to develop from your initial ideas. Look for areas where the initial idea, shapes, and details can be strengthened.
8. Seek feedback on your development
Ensure you seek feedback on your development from your friends/family and in the online space for this course. Ask what they like or don’t like about how you have developed your chosen concept. Record your feedback and find ways to incorporate some or all the suggestions into your work.
Colour/textures
Create a page of examples for the following:
- colour scheme
- materials, and textures
- any other ancillary details that you would like to incorporate into your model.
Create notations on the colours, materials, and textures.
- how do the materials look?
- what attributes will you need to simulate them in 3D?
Tip
Keep your ideas contained and focus your energy on strong design and appeal. This will make achieving a good-looking model much more feasible in the limited time frame.
Design Examples
The following examples are that of a previous student’s design work for the IsoRoom assignment, which should give you an idea of how to approach and arrange your design sketchbook pages.
Modelling and texturing
You have been provided with an isometric room template file with a ShotCam with which to render out your final scene. You may modify this Geometry to create any windows or doors needed for your design but the room itself must stay the same shape and size.
Now go forth and create all the assets required to populate this empty template!
Presentation
When you have completed work on your models and textures take the following steps.
- Reference them in the IsoRoom project file and arrange them according to your planning and design.
- Create a lighting setup and render out a final image using the Shotcam included within the IsoRoom project file.
- Render out a diffuse and ambient occlusion pass of your IsoRoom to composite together.
- In Photoshop, combine your renders and tweak the image for clarity and visual appeal.
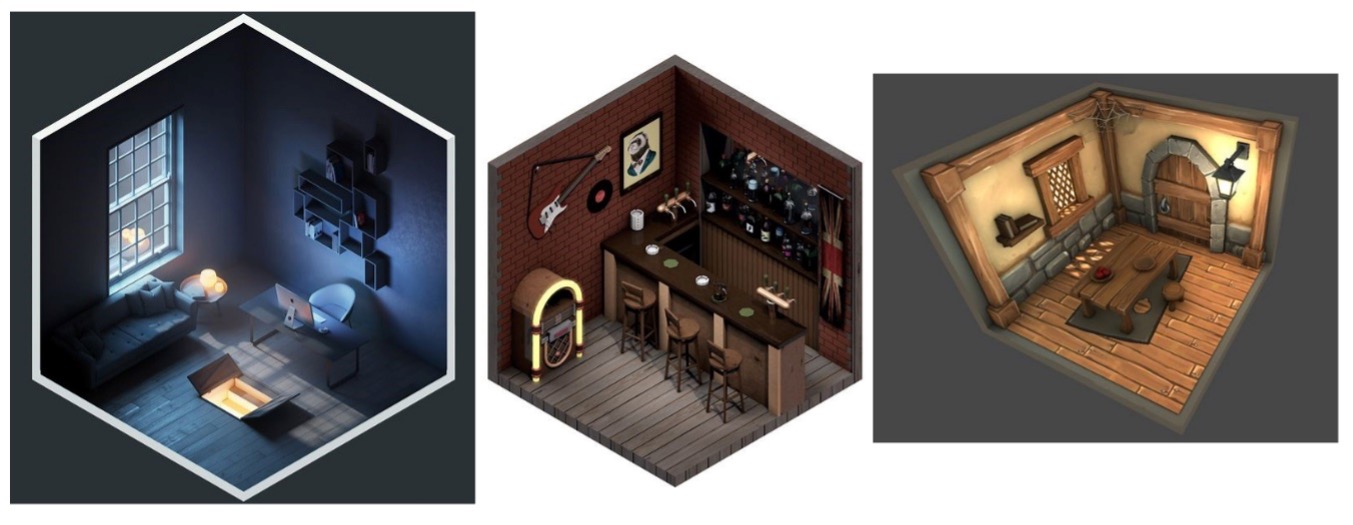
Take a look at the following examples of a completed IsoRoom.
Notes
- If your final render appears grainy, the solution is to turn up the number of diffuse and specular samples in your render settings for Arnold.
- You’ll need to increase the transmission samples as well if you have transparent materials.
- Make sure to render your scene from the provided ShotCam for the Isometric perspective.
Practice
Task 5: Design and model an Isometric Room
In this assignment, you will design, model, and texture and present an isometric room render. Your task is to create an isometric room within the provided template, incorporating elements of design, modelling, texturing, and rendering techniques.
What tools or resources do you need?
Make sure you have access to:
- Maya
- Sketchbook
- IsoRoom_StudentStart.mb
- Photoshop.
What steps should you take?
20 Hours
Set aside 20 hours to complete this task.
- Create a mind map brainstorming different ideas for your IsoRoom design.
- Use pen and paper or digital tools to sketch out your ideas. Consider the type of room, its style (contemporary, etc.), and necessary assets.
- Gather references and create a board displaying various aspects of your design idea.
- Include images or sketches representing shapes, details, colour palettes, textures, and materials relevant to your concept. Organise them into a reference board with accompanying notes.
- Generate different layout ideas for your IsoRoom.
- Sketch out various room configurations and layouts. Experiment with different arrangements of furniture, objects, and architectural features. Annotate your sketches to explain your thought process.
- Share your sketches and ideas with peers, family, and peers. Record feedback regarding likes, dislikes, and suggestions for improvement.
- Select one and refine one of your initial ideas it by strengthening shapes, details, and overall design elements. Consider feedback received during the feedback solicitation step.
- Share your refined concept with peers. Collect feedback on the improvements made and consider suggestions for further enhancements.
- Create examples of colour schemes, materials, textures, and other details you wish to incorporate into your model. Make notes on how these elements will be simulated in 3D.
- Use 3D modelling software to create assets such as furniture, fixtures, and decor elements. Apply textures and materials to achieve the desired look and feel.
- Reference your models in the IsoRoom project file and set up the scene for rendering.
- Reference your 3D models in the provided template file.
- Arrange them according to your design plan.
- Set up lighting and camera angles using the ShotCam provided.
- Render out a diffuse (colour), ambient occlusion, and wireframe pass of your IsoRoom scene. Composite the renders in Photoshop, adjusting for clarity and visual appeal.
- Ensure the scene is rendered from the provided ShotCam for the isometric perspective.
- Adjust render settings as needed to improve quality.
- Save your IsoRoom as a .jpg to upload to the forum.
What should you do next?
Reflect on your experience with this task.
- Consider the feedback received during the feedback solicitation stages. How did you prioritise and incorporate suggestions while staying true to your original vision for the IsoRoom design?
- Reflect on the effectiveness of your time management throughout the entire project. Were there areas where you could have allocated your time more efficiently? How will you adjust your time management strategies for future projects?
- Share your Isometric Room model to Forum:
- Select your forum thread in Forum: Final Assets.
- Select Reply to your first Forum post.
- Enter the words ‘Task 5 Isometric Room in your reply.
- Select the Post your response button, then select Edit in your new reply when it shows up.
- Upload your photo(s) or files using the Attachment field.
- Select Save changes to share your coursework to your forum thread.
- Get feedback on this and other learning tasks at the next Live Session – check the Live Session calendar for dates and times. All live sessions are recorded so you can watch them later if you miss a session.
Congratulations on completing this final Digital Production topic!
You have covered:
- the briefs and approaches for creating three assets:
- Lego character
- Pop Vinyl figure
- Isometric Room
- the considerations and steps required to bring your pieces together with appropriate details
- the learning tasks associated with each model for practical experience and implementation.
Remember, challenges will help you grow, and practice makes perfect. Patience is a virtue when dealing with complex and detailed animation work!
Reflect on what you’ve learnt, practiced, and achieved
As you complete this topic, take a moment to reflect on all that you have practiced, learnt, and achieved.
Lastly, look at how you have grown as an animator, your challenges, your wins and what you will take with your future self as you progress into the last module.