Ingesting threat datasets to an analytical platform involves systematically importing diverse threat intelligence data, such as indicators of compromise and attack patterns, into the platform. This task enhances the platform's capabilities to analyse, correlate, and identify potential security threats, facilitating proactive defense measures and informed decision-making in cybersecurity operations.
In this topic, you will learn about:
- collecting data from alerts and reported events
- creating a dataset
- using the ‘Splunk’ analytical platform
- ingesting the dataset.
Let us begin.
Logging from whole organisation devices
Whole organisation devices include Security Information and Event Management (SIEM) systems, which aggregate and analyse logs from multiple sources, offering a holistic view of an organisation's security posture.
Whole organisation device logging aggregates data from various security devices, providing a comprehensive view of network activities. Centralised logs enable holistic threat detection, incident response, and compliance monitoring across the entire organisational infrastructure.
Port scans
Port scans involve systematically probing a target's network for open ports, revealing potential vulnerabilities. Threat actors use port scans to gather data on the target's system architecture, aiding in identifying weak points and potential entry points for unauthorised access, and facilitating subsequent cyber threats and attacks.
TCP scanning with Nmap
TCP port scans involve systematically checking a target's open ports to identify services and potential vulnerabilities. Analysing TCP port scan data helps bolster security measures against unusual port scanning activities.
The following video demonstrates how to use nmap to conduct TCP port scans on a host system.
Practice activity 1
Complete the four (4) tasks in the following practice activity using the required tools in your virtual lab environment. The tasks in this activity will help you develop the practical skills required for the formal skills assessments in this module.
Task 1: Conduct a TCP port scan on the Metasploitable virtual machine in your virtual lab environment using the Nmap tool in Kali Linux.
Task 2: Experiment with different types and variations of TCP port scans using the available nmap command options.
Task 3: Save the scan results into a file in XML format and name it as ‘nmap-tcp.xml’.
Task 4: Examine the generated results and try to interpret the meaning. Make a list of the information that can be obtained from the results.
UDP scanning with Nmap
UDP port scans involve systematically probing a target's open User Datagram Protocol (UDP) ports to identify potential vulnerabilities and assess network weaknesses. Monitoring and analysing UDP port scan patterns are essential for effective threat detection and mitigation in cybersecurity.
The following video demonstrates how to use nmap to conduct UDP port scans on a host system.
Practice activity 2
Complete the four (4) tasks in the following practice activity using the required tools in your virtual lab environment. The tasks in this activity will help you develop the practical skills required for the formal skills assessments in this module.
Task 1: Conduct a UDP port scan on the Metasploitable virtual machine in your virtual lab environment using the Nmap tool in Kali Linux.
Task 2: Experiment with different variations of UDP port scans using the available Nmap command options.
Task 3: Save the scan results into a file in XML format and name it as ‘nmap-udp.xml’.
Task 4: Examine the generated results and try to interpret the meaning. Make a list of the information that can be obtained from the results.
To learn more about port scanning read the article Metasploitable2 enumeration
Vulnerability scans
Scanning with Nikto
Nikto is a web server vulnerability scanning tool that identifies potential security issues. It analyses a web server for known vulnerabilities, misconfigurations, and outdated software. Nikto's extensive database aids in comprehensive assessments, helping administrators proactively address weaknesses and enhance the security posture of their web servers.
The following video demonstrates how a tool called Nikto can be used to conduct vulnerability scans on web servers.
Practice activity 3
Complete the three (3) tasks in the following practice activity using the required tools in your virtual lab environment. The tasks in this activity will help you develop the practical skills required for the formal skills assessments in this module.
Task 1: Find out the IP address of the https://preview.owasp-juice.shop/#/ website using an appropriate command-line tool.
Task 2: Conduct a vulnerability scan on the https://preview.owasp-juice.shop/#/ website using the Nikto tool in Kali Linux.
Task 3: Save the scan results into a file in CSV format and name it ‘nikto-webscan.csv’.
Scanning with ZAP
OWASP ZAP (Zed Attack Proxy) is a security tool for vulnerability scanning in web applications. It identifies and assesses potential weaknesses, such as SQL injection and cross-site scripting, by actively testing the application for vulnerabilities. ZAP helps developers and security professionals enhance the overall security posture of their web applications.
The following video provides a brief overview of the ZAP tool and what it can be used for.
OWASP ZAP Demo
The following video demonstrates how to install and use the OWASP ZAP tool to conduct vulnerability scans.
Practice activity 4
Complete the three (3) tasks in the following practice activity using the required tools in your virtual lab environment. The tasks in this activity will help you develop the practical skills required for the formal skills assessments in this module.
Task 1: Use the ZAP tool from the Kali Linux virtual machine in your virtual lab to conduct a vulnerability scan of the https://preview.owasp-juice.shop/#/ website.
Task 2: Investigate the types of alerts generated from the scan.
Task 3: Save the scan result into a file in CSV format and name it ‘ZAP-webscan.csv’.
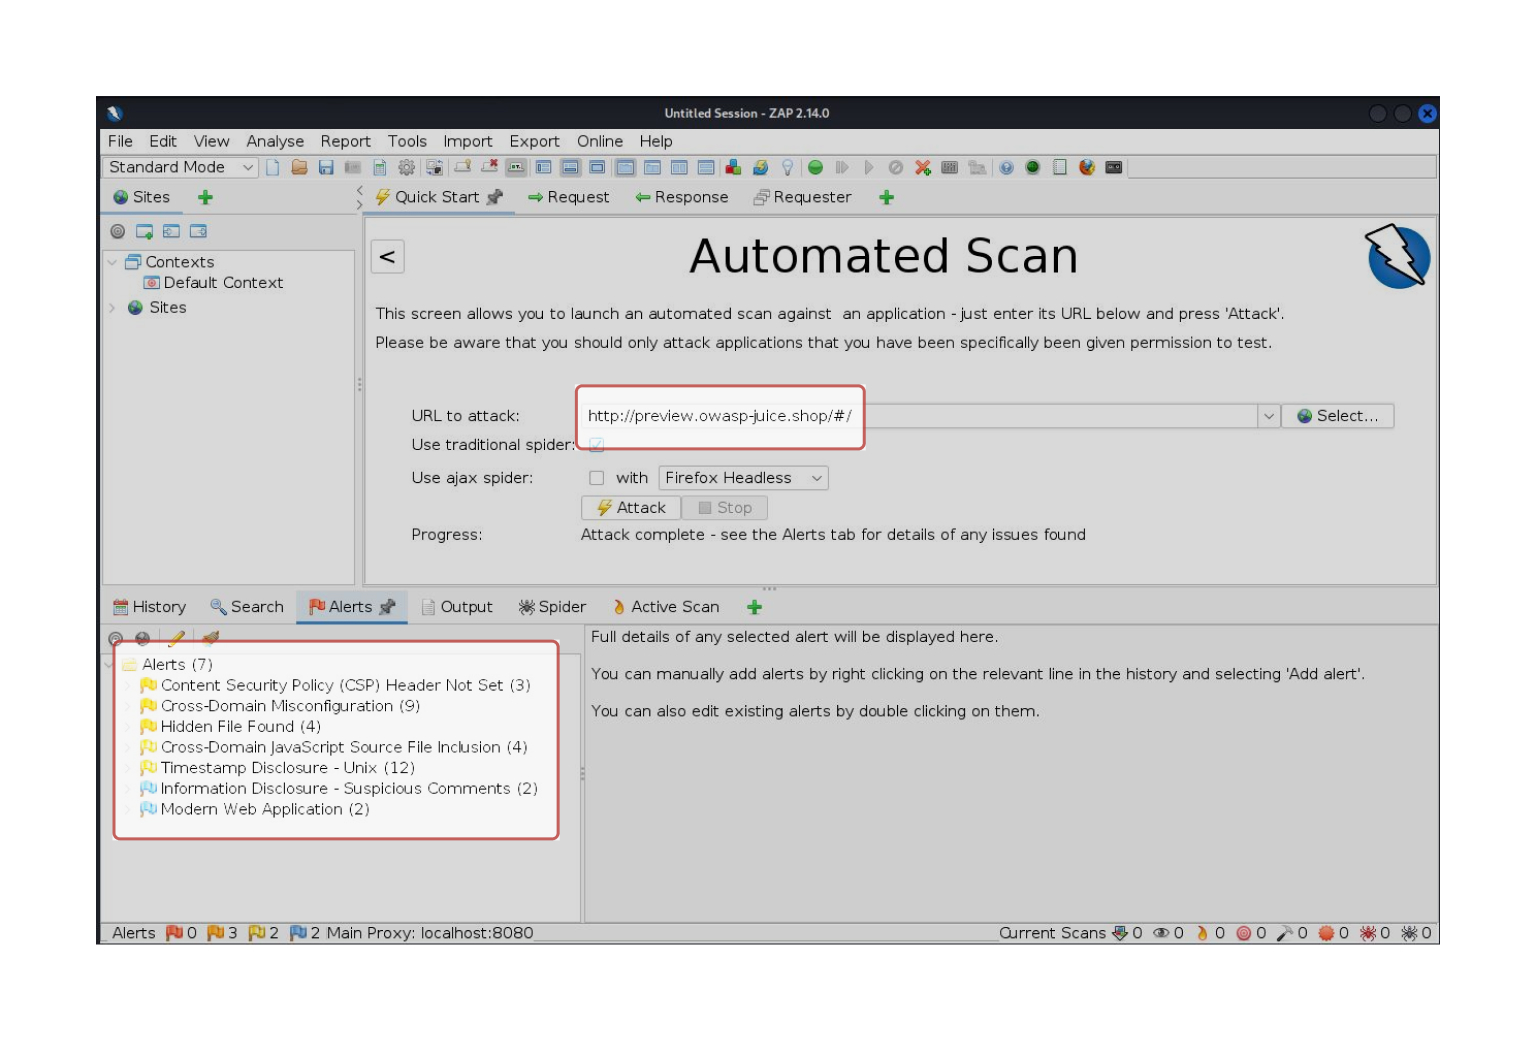
The following screenshot demonstrates how the ZAP tool is used to conduct a vulnerability scan of the https://preview.owasp-juice.shop/#/ website and the scan results show eight (8) types of alerts.
Gathering reported events
Linux iptables
iptables is a Linux firewall tool that filters network traffic. By configuring rules, it can log specific events, providing valuable threat data. iptables records information on connection attempts, helping analyse potential security threats. Monitoring these logs enhances threat detection, aiding in proactive responses to suspicious activities on the Linux system.
The following video demonstrates the iptables in a Linux system.
Practice activity 5
Complete the four (4) tasks in the following practice activity using the required tools in your virtual lab environment. The tasks in this activity will help you develop the practical skills required for the formal skills assessments in this module.
Task 1: Execute the following command in the ‘Metasploitable’ virtual machine to enable firewall logging.
sudo iptables -A INPUT -j LOG --log-prefix “## iptables ##”
Task 2: Generate some traffic to and from the ‘Metasploitable’ virtual machine using a basic command line tool such as ‘ping’. You may ping the IP address of the Kali Linux VM from the Metaspoitable VM and visa versa to generate input and output traffic.
Task 3: View the /var/log/kern.log file in the ‘Metasploitable’ virtual machine using the following command:
cat /var/log/kern.log | grep “## iptables ##”
Task 4: Examine the log file to interpret the meaning of the results. Make a list of the information that can be obtained from the results.
Task 5: Save the scan result into a file in CSV format and name it 'iptables-log.txt' using the following command:
cat /var/log/kern.log | grep “## iptables ##” >> iptables-log.txt

Threat datasets
Threat data can be gathered from various sources using different tools and in a variety of data formats, such as .csv, .txt, etc. A threat dataset, when ingested into an analytical platform for analysis helps in proactive threat detection and response.
Creating a threat dataset is crucial for enhancing cybersecurity through analytical platforms. It aggregates diverse threat intelligence, such as indicators of compromise and attack patterns, providing a comprehensive view of potential risks. Ingesting this dataset into analytical platforms empowers security teams to correlate and analyse data, identify emerging threats, and formulate effective defence strategies.
Creating a compressed archive file
Creating threat datasets as archived files streamline storage, distribution, and management. Archiving reduces file size, making it easier to share and store datasets efficiently. Moreover, archiving ensures data integrity and preserves historical threat information, enabling retrospective analysis and maintaining a valuable record of evolving cybersecurity landscapes.
Refer to the following article from linuxfoundation.org on How to create and manage archive files in Linux.
Practice activity 6
Complete the three (3) tasks in the following practice activity using the required tools in your virtual lab environment. The tasks in this activity will help you develop the practical skills required for the formal skills assessments in this module.
Task 1: Create a folder called ‘Dataset’ in the Kali Linux VM.
Task 2: Copy the data source files captured in the previous Practice activities 1-5 into the ‘Dataset’ folder.
Task 3: Create a compressed archive file of all the files contained in the ‘Dataset’ folder called ‘Dataset.tar.gz’.
Splunk overview
Splunk is a powerful data analytics platform used for monitoring, searching, and analysing machine-generated data. It collects and indexes log files and various data sources in real-time, offering insights into system performance, security, and operational efficiency. Splunk helps organisations gain valuable intelligence and make informed decisions based on their data.
We will use Splunk as the analytical platform to demonstrate threat data ingestion in this module. The following video discusses the features and functions of various Splunk deployment types.
Splunk cloud platform
The following video demonstrates how to deploy Splunk cloud platform. Pay close attention to the features and options available in the Splunk Cloud environment.
Create an index to facilitate searching
Creating an index in an analytical platform enhances search efficiency by organising and optimising data retrieval. It accelerates query performance, enabling quick access to specific information within large datasets. Indexing significantly improves the platform's responsiveness, making it easier for analysts to extract relevant insights, aiding in timely threat detection and effective decision-making.
The following video explains the importance of having multiple smaller indexes rather than one large index when searching data, with examples of how searches can be performed using indexes.
Practice activity 7
Complete the four (4) tasks in the following practice activity using the required tools in your virtual lab environment. The tasks in this activity will help you develop the practical skills required for the formal skills assessments in this module.
Task 1: Create a Splunk user account using your student email.
Task 2: Sign-up for a Splunk Cloud Trial.
Task 3: Explore the features and functionality available in the Splunk cloud environment.
Task 4: Create a new index called ‘Test-index’ in the Splunk analytical platform.
Ingest the dataset
The following video explains various data sources to consider when ingesting data into an analytical platform called ‘Splunk’ and how the ingested data can be used for searching and filtering.
Verify the ingested data
Verifying ingested threat data is vital for ensuring its accuracy, relevance, and reliability. Inaccurate or compromised data can lead to false conclusions, hampering effective threat detection and response. Validating the data enhances the platform's trustworthiness, enabling organisations to make informed decisions and strengthen their overall cybersecurity defences. Verifying the consistency of threat data after ingestion is crucial for ensuring the accuracy and reliability of insights derived from the analytical platform.
Therefore, once the dataset is ingested, it is important to conduct a sample search to check whether:
- the ingested data is searchable using the index name
- all the ingested data is available in the analytical platform (this can be checked by comparing the number of records in the dataset against that which is ingested into the analytical platform.
Practice activity 8
Complete the two (2) tasks in the following practice activity using the required tools in your virtual lab environment. The tasks in this activity will help you develop the practical skills required for the formal skills assessments in this module.
Task 1: Ingest the threat dataset (i.e. ‘Dataset.tar.gz’ compressed archive file) created in Practice activity 6 into the Splunk analytical platform using the index name ‘Test-index’.
Task 2: Verify the ingested dataset by conducting a search using the configured index name.

How did you go?
Congratulations on completing the topic Ingest dataset to analytical platform. You should now understand the procedures for creating datasets using the information collected from alerts and reported events.
In this topic, you learnt about:
- collecting data from alerts and reported events
- creating a dataset
- using the ‘Splunk’ analytical platform
- ingesting the dataset.
Assessments
Now that you have learnt the basic knowledge and skills for this module, you are ready to complete the following assessment event.
Assessment 4 (Portfolio)