When using Excel as software, linking spreadsheets is a form of automation that will streamline your workflow and minimise errors in entering and processing data.
However, in terms of automation, you are not limited to the use of functions and formulas. Automation also involves programming Excel to perform tasks for you, such as formatting cells and updating values in cells. By automating routine spreadsheet tasks, you are also standardising these tasks. For example, based on how you automate a task, certain cells can always be formatted the same way without manually formatting each cell or group of cells.
This will be helpful for addressing repetitive tasks so that you can focus your time and energy on more complex spreadsheet problems.
In this topic, you will learn how to automate and standardise spreadsheet operations, including how to:
- evaluate and identify tasks requiring automation
- create, use and edit macros to fulfil the requirements of the task and automate spreadsheet operation
- develop, edit and use templates and ensure consistency of design and layout according to task requirements.
The following is an example of automation within Excel:
The following 6-minute video tutorial explains three (3) strategies for automating any complex process in Excel.

Automation is one of the key features of spreadsheet software that makes it much more powerful in tackling everyday spreadsheet tasks. The process of automation involves feeding Excel a set of instructions on how to perform certain tasks. This works best when you create multiple spreadsheets with similar task requirements.
Types of spreadsheet automation
There are two (2) primary types of spreadsheet automation:
- programming-based automation, and
- non-programming-based automation.
Programming-based automation:
- Macros
- Add-ins
Non-programming-based automation:
- Functions
- Formulae
- Linking
- Templates
- Conditional formatting
Programming-based automation involves customising and personalising Excel commands to perform specific tasks. The two types of programming-based automation are macros and add-ins:
- A macro is a set of instructions that can be triggered by a keyboard shortcut, toolbar button, or a clickable button placed in a spreadsheet. Macros are used for automating a series of steps that are frequently used in the same way for speed and consistency.
- An add-in is a third-party software that introduces new features to Excel that are not in the base program.
Non-programming-based automation uses features that are already built into Excel without programming the software itself to do tasks. Your spreadsheet workflow can further improve by integrating templates with automated tasks through linking, functions and formulae, which will be discussed in this topic.
By utilising automation, you are minimising the time you spend on setting up your spreadsheet. This means that you have more time to focus on more important tasks such as data entry and presentation.
Explaining Macros
Automation is a convenient feature of Excel, but its effectiveness will depend on how you integrate it into your tasks. Automation works well for some tasks more than others. For more complex spreadsheet tasks, automation may not be useful at all.
To determine if a task would require automation, ask yourself, ‘Is this task repetitive?’. Evaluate tasks by determining what benefits you can gain from automating the tasks. Based on your evaluation, identify if the task will require automation.
Here are some examples of spreadsheet tasks that may need automation:
Formatting and layout
Your organisation will follow formatting and layout guidelines to make spreadsheet documents look consistent. Keeping the format standard will also help others navigate through the document with ease.
For example, say you are trying to determine whether or not to automate the formatting of your monthly sales report. First, evaluate the task by determining if the report changes in format every month. If you conclude that you will be using the same format for the report every time you make it, then you can identify formatting and layout as a task that will require automation.
Conditional formatting can help make patterns and trends in your data more apparent. To use it, you create rules that determine the format of cells based on their values, such as the following monthly temperature data with cell colours tied to cell values:

Source: Microsoft Support
The following 1-minute video explains conditional formatting:
Inputting functions and formulae
When inputting data in your spreadsheet, if you notice that there are certain functions and formulae that are used repeatedly and in the same manner, it may be best to apply automation. Following the previous example, evaluate the functions and formulae used in your monthly sales report spreadsheet by checking if the same computations reappear throughout the spreadsheet. If so, then you can identify functions and formulae input as a task that will require automation.
Assigning commands
While there are some tasks that cannot be completely automated, you may automate some actions or steps within a task if they become repetitive. This can be done by assigning commands to shortcuts or buttons.
For example, if you want to clear specific cells in a worksheet, your common process would be to select these cells individually and press [Del]. Evaluate this process by checking how often you delete the values in these particular cells. If you notice that you clear these same cells often, then this process may require automation.
As you learn how to use automation in this topic, keep in mind the possible tasks where you can apply these methods. Remember to make these automation features work for you.

In Excel, a macro is a series of instructions that can be triggered by a keyboard shortcut, toolbar button, or a clickable button placed in a spreadsheet. They are primarily used for repetitive tasks that can take a significant amount of time to perform manually. By using macros, these manual tasks can be completed in seconds with the click of a button. Macros can be created quickly in Excel by using the Record Macro feature.
Before using macros, you must first access the Developer tab of Excel, which contains the tools you need to use macros. The default Excel application will not display the Developer tab. To display this tab, follow these steps:
- Go to File>Options to open the ‘Excel Options’ dialogue box.
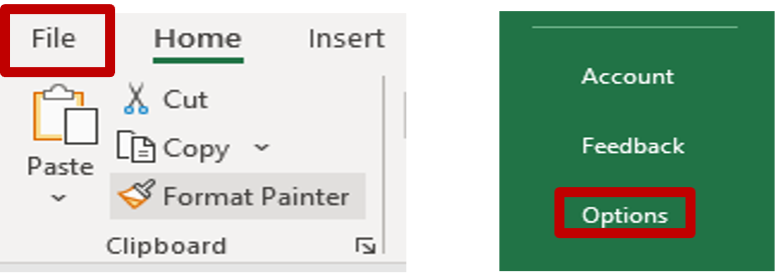
- Click on ‘Customize Ribbon’.
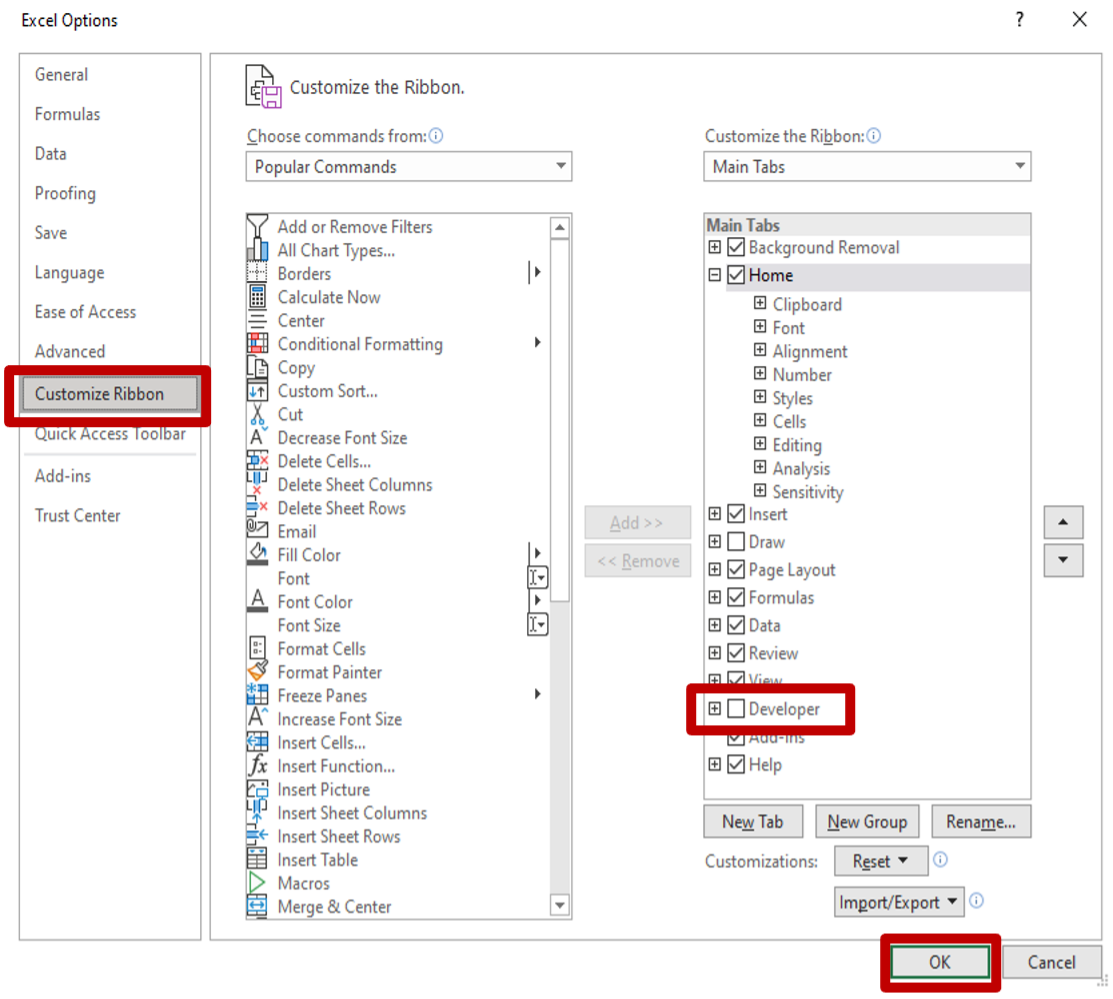
- Under ‘Main Tabs’, check the tick box for ‘Developer’ and click OK
After following these steps, the Developer tab will now appear on your interface.

Creating Macros
The simplest way to create a macro is to use the ‘Record Macro’ button to record your mouse clicks and keystrokes. This enables you to record a series of commands. Running the macro will execute the commands in the same sequence you recorded them.
Since the macro recorder records everything you do, it is important to plan out your macro so as not to record unnecessary steps.
For example, imagine that you were tasked to create different worksheets, all of which follow the same formatting requirements. You can record a macro once and then just run the macro every time you need to create a similar worksheet.
You may follow these steps to record a macro that can be used to complete the given formatting task:
- Open a new workbook.
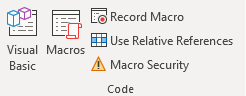
- On the ‘Developer’ tab, under the ‘Code’ group, click on ‘Record Macro’.
- Type a name for your macro in the ‘Macro name’ field. Your macro name must start with a letter and cannot include spaces. It must contain only letters, numbers and underscores.
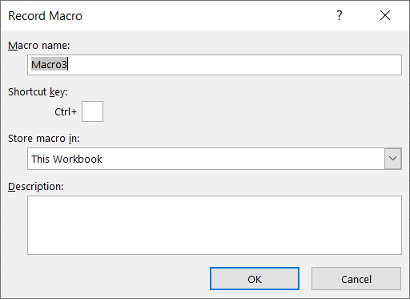
- Descriptions are useful to help you keep track of what each macro does. Sometimes it is useful to also put the creation date in the description.
- Click OK.
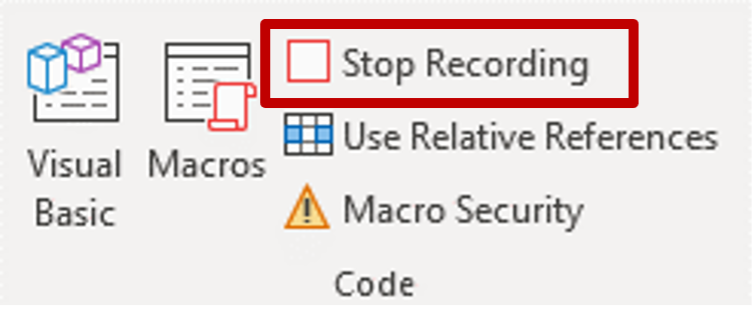
- Format the cells as per the specification, fonts, text, colours, borders, etc. When you are done, click on the ‘Stop Recording’ button on the Develop Tab.
You now have a macro that can be used to perform all the mouse clicks and keystrokes it took to format that page.
For the next similar spreadsheet that you will make, you can now use your macro to format the sheet. To run the macro, follow these steps:
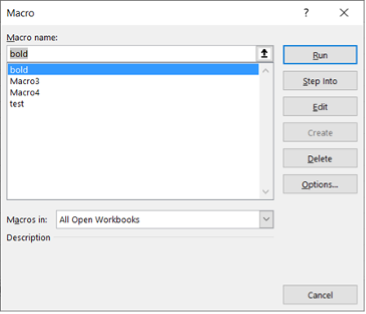
- Go to the ‘View’ tab and click on ‘Macros’. Select ‘View Macros’ from the drop-down list.
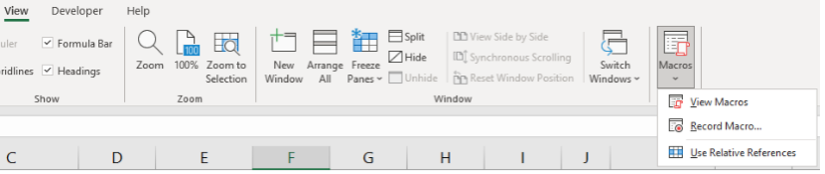
- The ‘Macro’ dialogue box will appear. Select the macro that you want to run from the list and click ‘Run’.
Notice that the macro will always run from the exact same place. By default, macros use absolute cell referencing.
Assigning Macros
You can assign macros so that they can be run using the following options:
- Shortcut key (ctrl-key)
- quick access toolbar button
- from control button
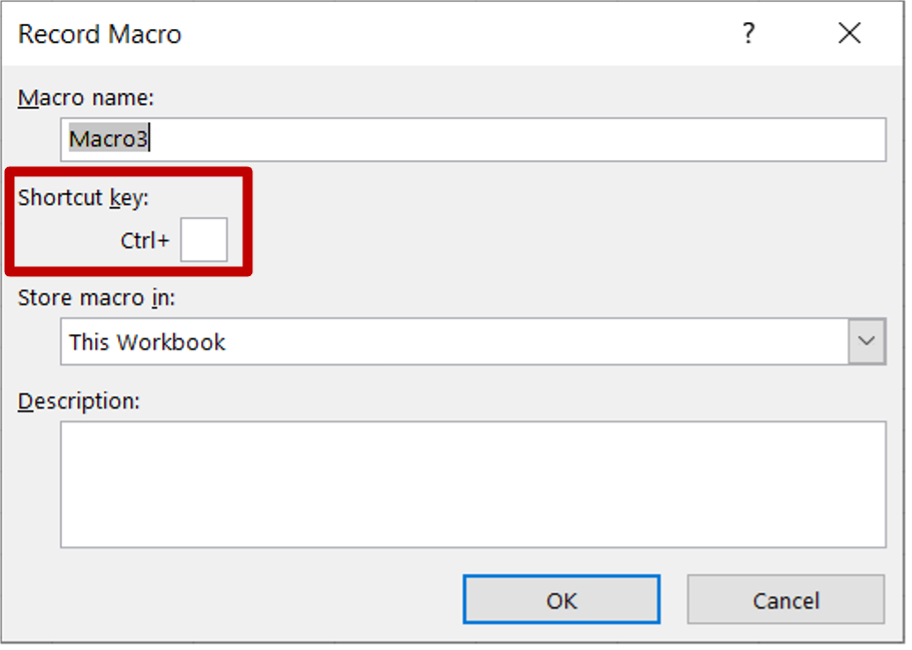
Shortcut Key
The simplest way to assign a Macro is to a shortcut key. When you are creating the macro, and the ‘Record Macro’ dialogue box comes up, enter the key you wish to assign to the macro on the text field beside ‘Ctrl+’.
Quick Access Toolbar Button
Assigning a macro to the Quick Access Toolbar is almost as easy. Simply take the following steps:
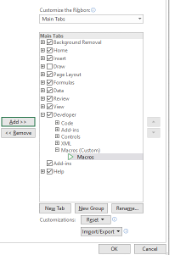
- Go to File>Options to open the ‘Excel Options’ dialogue box. Click the ‘Customize Ribbon’ menu option on the left.
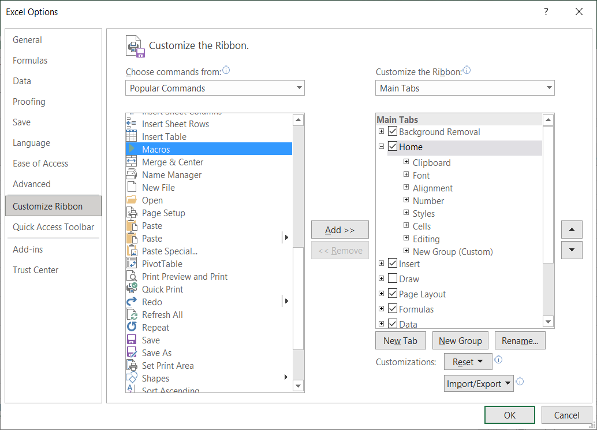
- Click ‘Macros’ in the ‘Choose commands from’ drop-down list.
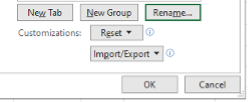
- Click the ‘New Group’ button and click the ‘Rename…’ button. Rename the group to ‘Macros’. You also have the option to choose an icon for the group.
- Click the ‘Add’ button, then click OK. You will notice that ‘Macros’ has been added to your custom group. It will now appear in the Developer tab.
The following 9-minute video explains how to create macros in Excel.
Form Control Button
Assigning a Macro to a Form Control button is just as easy; simply take the following steps:
- On the ‘Developer’ tab, in the ‘Controls’ group, click ‘Insert’. Under ‘Form Controls’, click on the icon shown on the right. Hovering your pointer over this icon will show that it is the ‘Button (Form Control)’ button.
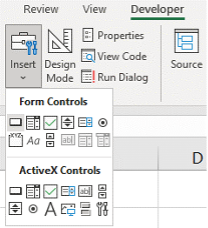
- Click the worksheet location where you want the upper-left corner of the button to appear and drag out to where you want the bottom-right corner to be. A box will appear to help you determine the size and location of your button.
- The ‘Assign Macro’ dialogue box will appear. Assign the macro that you want to use to the button.
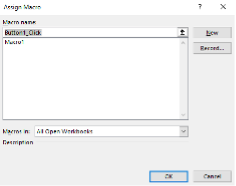
- Edit the text to name the button appropriately.
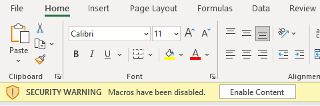
When you record macros, the default setting is to store it as ‘Just this Workbook’. For security reasons, standard files are not macro-enabled in Microsoft Office. To save a file so that it is macro-enabled, you must specifically save the file as an Excel Macro-Enabled Workbook (.xlsm file extension).

A macro-enabled workbook can still be opened with Excel, like other workbooks. However, when you open a .xlsm file, the macros will be disabled by default. Excel will show a security warning to inform you of this. To enable macros, click on the ‘Enable Content’ button beside the security warning.
Using and Editing Macros in Automating Tasks According to Task Requirements
Now that you know how to create and assign macros, your next step is to figure out how to apply these macros to your spreadsheet tasks.
Using Macros According to Task Requirements
Earlier, you identified that tasks related to formatting layout and spreadsheet linking benefit the most from automation. Once you have clarified the formatting, layout and linking requirements for your task, you can apply macros to finish these tasks faster. To use macros to address certain task requirements, follow these steps:
- Create the macro. Keep in mind that this macro should apply to every occurrence of the task.
- Assign the macro to a shortcut key or button.
- Run the macro as needed.
For example, suppose you are given multiple workbooks that do not follow the correct formatting per the organisational style guide. Without using macros, you would need to manually adjust the formatting of each workbook. Alternatively, you could open one of the workbooks and record a macro before fixing the formatting. After that, simply run the macro for the remaining workbooks that you must reformat.
The following 14-minute video explains how to build shortcuts in Excel.
Editing Macros According to Task Requirements
While using macros, you may notice that some of the macros you created work better than others. In some cases, your task requirements may have changed, which means that you also must edit the macro you created for that task. In Excel, you can edit a macro by using Microsoft Visual Basic for Applications (VBA). However, VBA is beyond the scope of this module. As an alternative, you can simply record a new macro to address the change in your task requirements. If you want to view and edit the code associated with your macro, follow these steps:
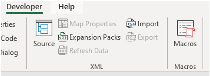
- Go to the Developer tab and click ‘Macros’.
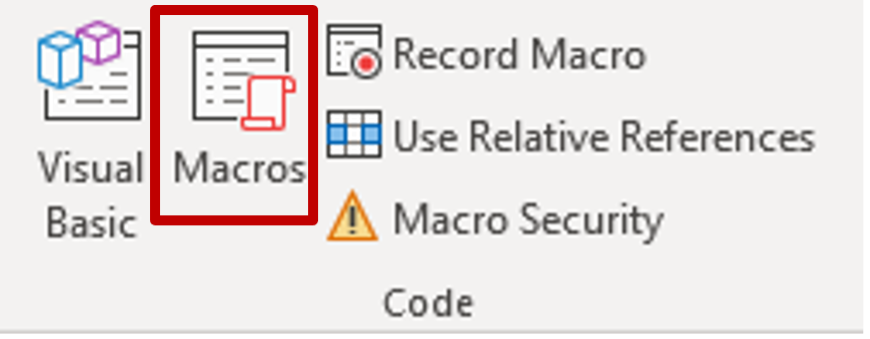
- Select the macro you want to edit from the list and click ‘Edit’.
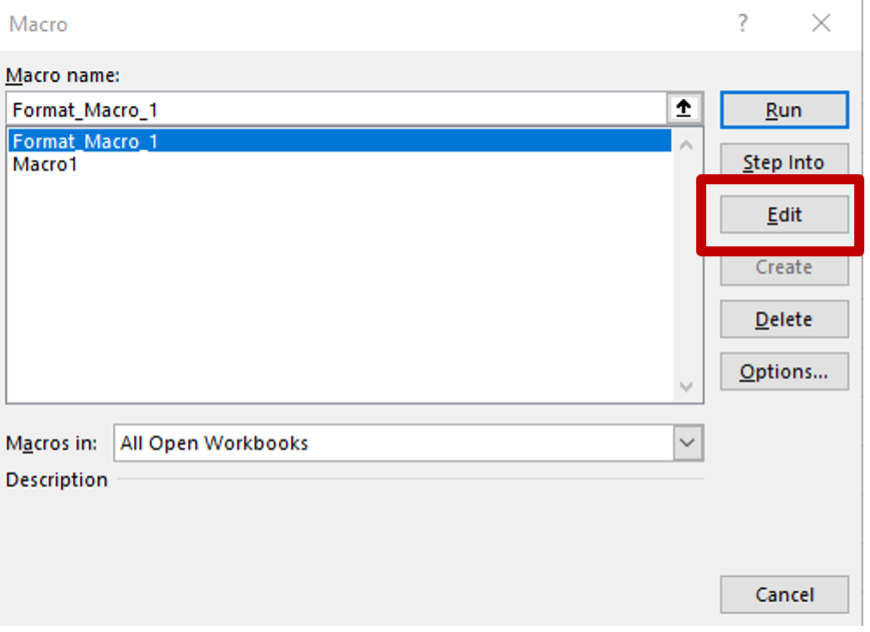
- This will open the Microsoft VBA dialogue box. Every time you record a macro, Excel stores it as a VBA code which you can view and edit.
Practice Exercise
Download the following Excel file and the Computer Software Pty Ltd practice exercise instructions to complete this exercise:
After you have completed the practice exercise, check the Computer Software Pty Ltd answer sheet.

When you regularly use numerous spreadsheets with very similar layouts or structures, you may find it valuable to create a template. A template is a workbook that is used as a starting point in creating other similar workbooks. You can create templates for both workbooks and worksheets.
You may notice that when you open a new workbook in Excel, it is called ‘Book#’, where the # is a digit that indicates how many workbooks you currently have open. Similarly, the worksheets are also called ‘Sheet#’. These names come from the default templates for workbooks (Book.xltx) and the default template for worksheets (Sheet.xltx). In effect, a template is a completed workbook without any variable data.
In the previous section, you learned how to use macros to automate the formatting and linking of your spreadsheet. When you work on documents that you regularly use and edit, you will save even more time by using templates. Templates are important for standard workplace documents to ensure consistency in design and layout. Templates are used so that even if there are multiple employees working on the same documents, the spreadsheet output will still look and function the same.
It is important to ensure the consistency of design and layout as it reflects on the brand of your organisation. It also makes your documents easier to record and archive. From a quick look, the template will visually inform your reader what the document is. Imagine if you and your co-workers were asked to produce your individual sales reports, but the documents you submit follow different formats. You can avoid inconsistencies like this by using a template that follows the style guide of your organisation.
Developing a Template
You can develop a template by following these basic steps:
- Create a new workbook.
- Complete all formatting for the workbook.
- Input all formulae and functions you intend to use in the workbook.
- Input all static data (i.e. any data which never changes).
- Save it as an Excel template (.xltx).
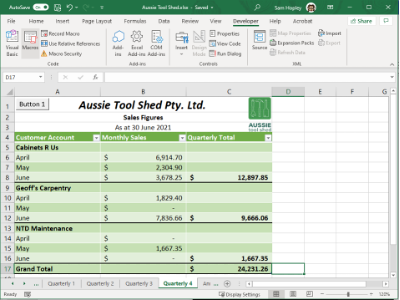
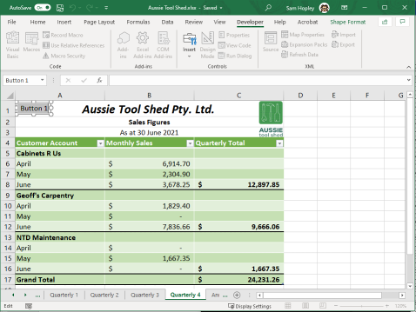
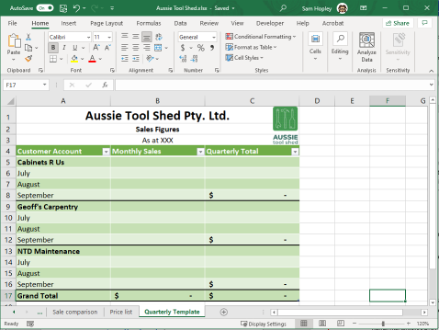
For example, as an employee at Aussie Tool Shed, one of your regular tasks is to create spreadsheets reflecting monthly sales figures. You need to complete a new worksheet for sales figures every month, but you notice that you use the same formatting, functions and formulae requirements every time. This is the perfect opportunity to create a template for the sales figures.
- Create the workbook
- Format the workbook
- Enter the functions and formulae to calculate sales totals.
- Add the static data: regular clients, months, etc.
- Save the Workbook as a template by selecting Excel Template in the Save as type drop-down menu. Ensure that you name the workbook so that it is easy to find. You can also save the workbook as an Excel Macro-Enabled Template in the case of templates that contain macros.
The following 6-minute video tutorial demonstrates how to create Excel templates.
You do not always have to develop templates from scratch. If you already have completed workbooks that would work well as templates, you can easily turn them into templates by taking the following steps:
- Open the workbook.
- Select the data and press the [Del] button on your keyboard. This will delete the data but leave any formulae intact.
- Save the workbook as a template.
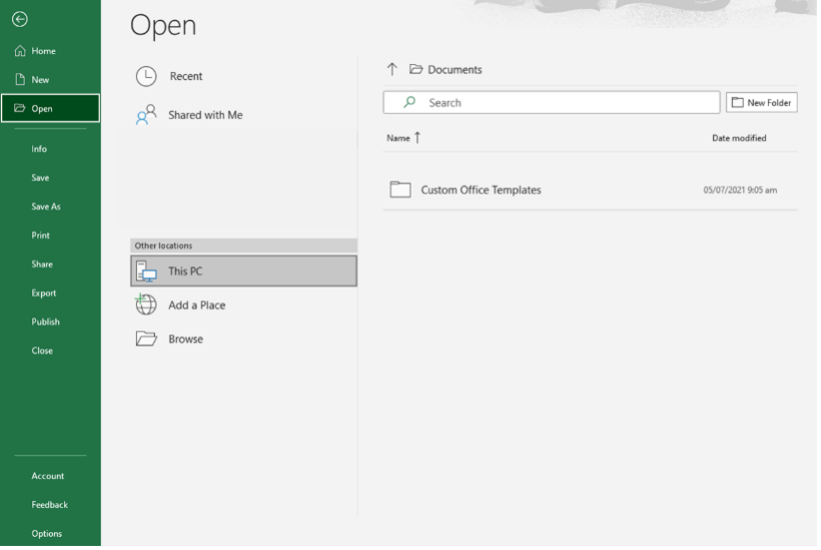
When you save a template, the ‘Custom Office Templates’ folder will appear on the ‘Save As’ window by default. It is important to save your template here so that you can easily access it from your Excel application. Name the template so that it is easy to find when you need to. However, if your organisation has set a specific file directory for templates, save your template in that folder instead.
Editing and Using a Template
Once you have a template ready, you may now use this template for similar spreadsheets that you produce. When you save a template in the ‘Custom Office Templates’ folder, it will appear as a default option when you create a workbook. To access and work from a template:
- Open a new workbook and go to File >New.
- To work from a default MS Office template, go to the ‘Office’ tab and select the template you need.
- To work from a template that you created, go to the ‘Personal’ tab and select your template.
- Excel will open a new workbook that uses the template you selected. Save your workbook.
The template you use for a spreadsheet will depend on your task requirements. To identify which template to use for your spreadsheet, go back to your planning document and determine:
- What data will you enter into the spreadsheet?
- What standard functions and formulae will be used?
- What are the formatting, design and layout requirements?
- What are the presentation requirements?
The answers to these questions will help you identify which template to use for your new spreadsheet.
You may need to regularly update templates based on changing tasks and organisational requirements. Excel allows you to edit saved templates by following these steps:
- Go to File > Open > This PC > Custom Office Templates. Excel will show all templates you saved in this folder. Select the template you want to edit.
- Edit the data, formulae, formatting and other details in your template as needed.
- Save the new template by going to File > Save (if you want to overwrite the existing template) or File > Save As (if you want to save it as a new template).
If you want to learn how to create a fillable form in Exel, watch the following 29-minute video tutorial.
Ensuring Consistency of Style, Design and Layout According to Task Requirements
While working on a spreadsheet, the style, design, and layout can sometimes be neglected as you focus on more complex tasks. Another advantage of using a template is that you lessen the chances of making formatting errors as the document format is already set when you start working. However, there may be times when you unintentionally make changes to the template as you input data into your spreadsheet. Simple errors such as subtle changes in text font, face, size or colour may also go unnoticed. To ensure the consistency of style, design and layout across your workbook and other similar workbooks, it will help to:
- look at your document side-by-side with the template to spot differences
- have a co-worker check your document for inconsistencies
- refer to the organisational style guide for specific design details (e.g. font, colour hex codes, etc.)
- consult your supervisor when unsure about consistency issues.
Practice Exercise
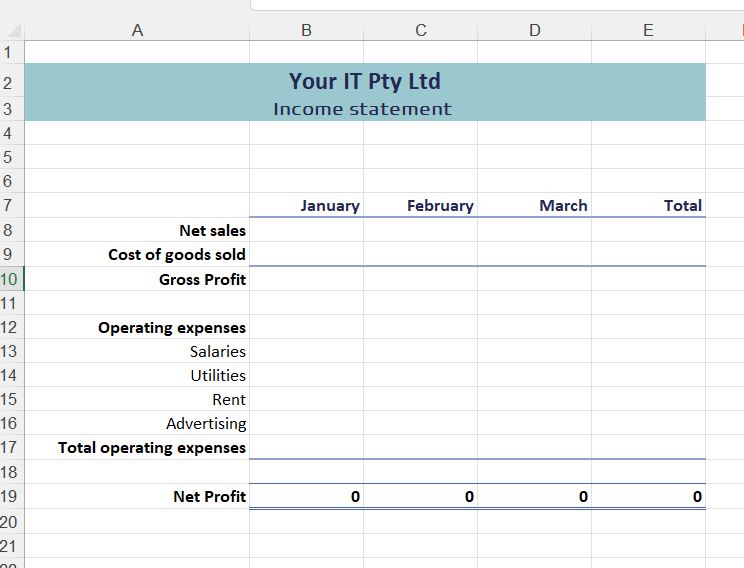
Create an Income Statement template in Excel based on Your IT Pty Ltd Income Statement below.
Template requirements
- Use Font Calibri
- Column A must be wide enough to fit all data
- Columns B-E must be the same width and wide enough to fit the months of the year as in the example below.
- The total column must AutoSum.
- Format cells B10 - E10 as currency with no decimal places to calculate Gross Profit. (Net Sales minus Cost of Goods Sold)
- Use the Sum Formula to calculate Total Operating Expenses. (B17 - E17)
- Use a formula to calculate Net Profit. (Gross Profit minus Total operating expenses)
- Save the file as a template using the file name Your IT Pty Ltd Income Statement Template.
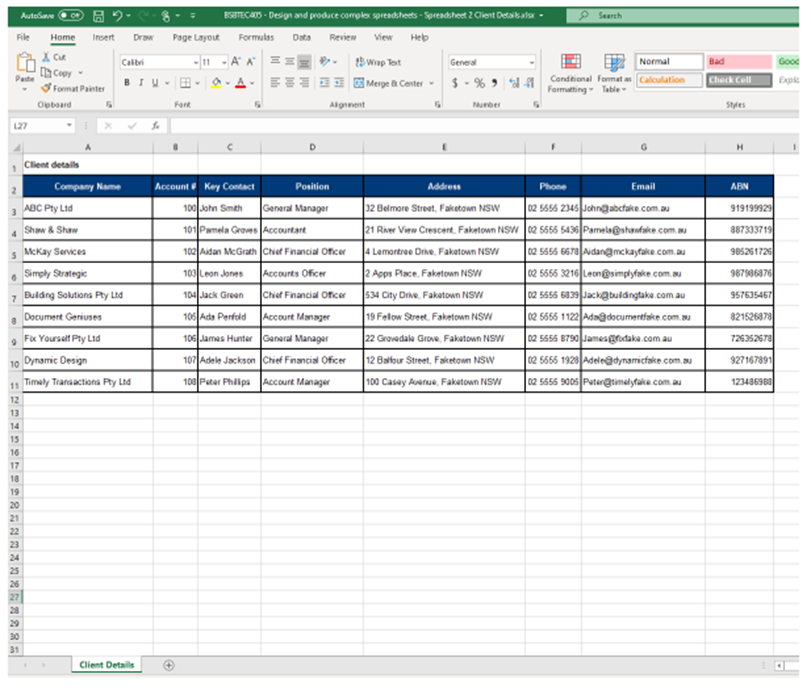
For this activity, you will create your second spreadsheet, which will contain client details. Again, through this activity, you will demonstrate your ability to use basic design features to enhance the readability and appearance of the spreadsheet.
To begin with this task, carefully follow the steps below:
- Open Microsoft Excel
- Open a new workbook
- Save the workbook as ‘BSBTEC402 – Design and produce complex spreadsheets – Spreadsheet 2 Client Details’
- In cell A1, write the title of the workbook as ‘Client Details’
- Copy and paste the following table into the spreadsheet from cell A2 onwards
| Company name | Account # | Key contact | Position | Address | Phone | ABN | |
|---|---|---|---|---|---|---|---|
| ABC Pty ltd | 100 | John Smith | General manager | 32 Belmore st, Faketown NSW | 02 5555 2345 | john@abcfake.com.au | 919199929 |
| Shaw & Shaw | 101 | Pamela Groves | Accountant | 21 Riverview crescent, Faketown NSW | 02 5555 5436 | john@abcfake.com.au | 887333719 |
| McKay Services | 102 | Aiden McGrath | CFO | 4 Lemontree Drive, Faketown NSW | 02 5555 6678 | john@abcfake.com.au | 985261726 |
| Simply Strategic | 103 | Leon Jones | Accounts officer | 2 Apps Place, Faketown NSW | 02 5555 2136 | john@abcfake.com.au | 987986676 |
| Building Solutions Pty Ltd | 104 | Jack Green | CFO | 534 City Drive, Faketown NSW | 02 5555 6389 | john@abcfake.com.au | 957635467 |
| Document Geniuses | 105 | Ada Penfold | Accounts manager | 19 Fellow St, Faketown NSW | 02 5555 1122 | john@abcfake.com.au | 821526878 |
| Fix Yourself Pty Ltd | 106 | James Hunter | General manager | 22 Grovedale Grove, Faketown NSW | 02 5555 8790 | john@abcfake.com.au | 726352678 |
| Dynamic Design | 107 | Adele Jackson | CFO | 12 Balfour St, Faketown NSW | 02 5555 1928 | john@abcfake.com.au | 927167891 |
| Timely Transactions Pty Ltd | 108 | Peter Phillips | Accounts manager | 100 Casey Ave, Faketown NSW | 02 5555 9005 | john@abcfake.com.au | 123486988 |
Format the text so that it contains:
- The same colour scheme as the Aged Debtor Report
- Arial font
- Size 10
- Format the ‘Client Details’ heading so that it is bold
- Adjust the rows to size 25
- Adjust the columns to fit the text
- Right align ‘Account #” and ‘ABN’
- Left align all other text
- Right-click on the worksheet tab at the bottom of the document, currently titled ‘Sheet 1’ and rename the tab ‘Client Details’
- Save your work (it is good practice to do this as you go)
Learning Checkpoint Answer
This is an example of how your spreadsheet should look.