In this topic we will cover the following:
- Types of cameras
- How cameras work
- Exposure
- Lighting
- Composition
- Photography styles.
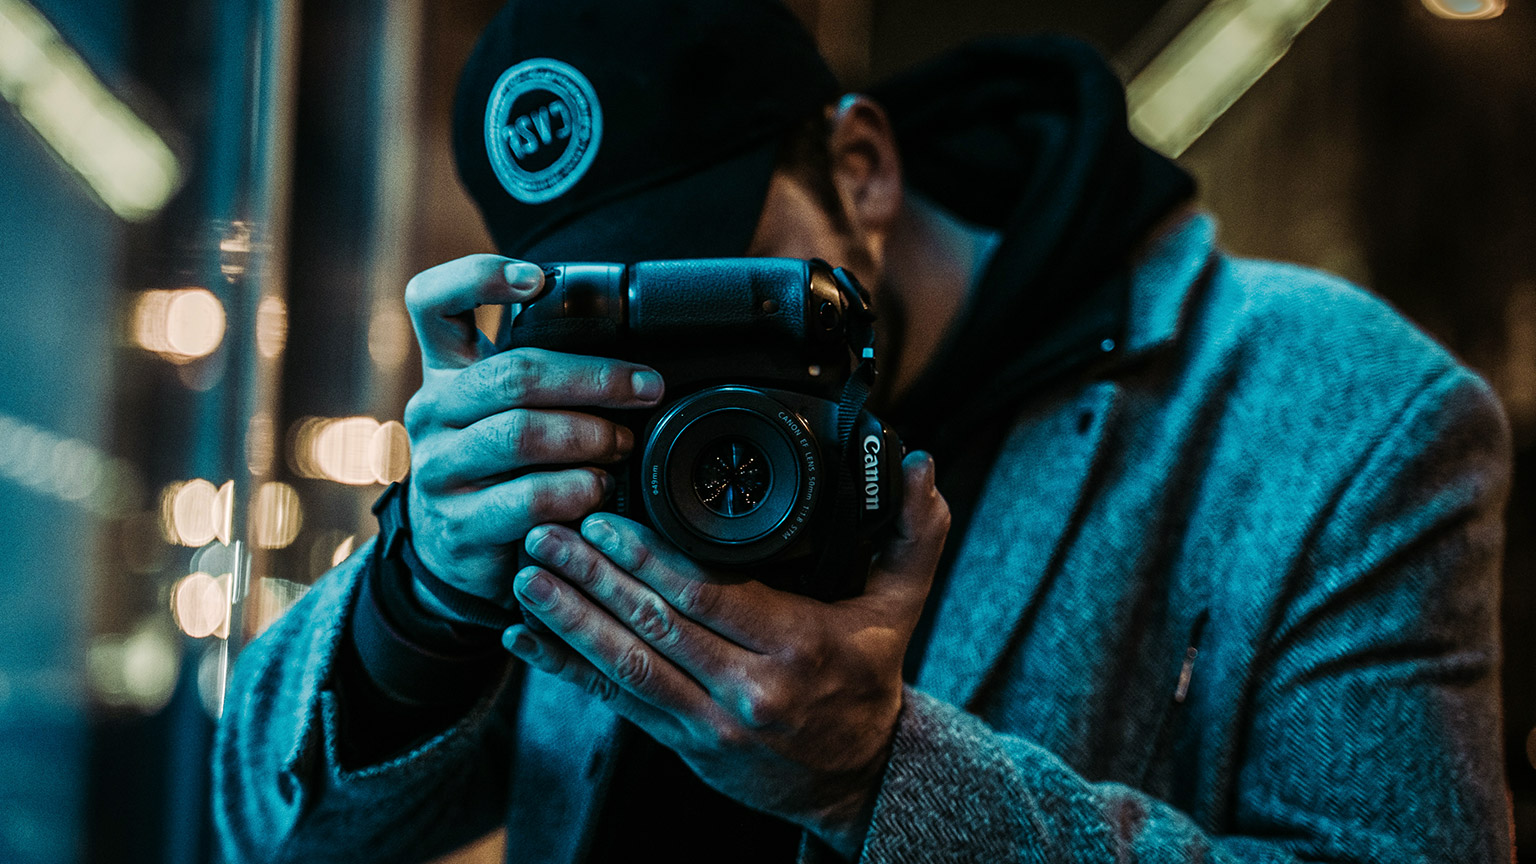
There are many types of cameras on the market and within camera types, a wide variety of brands and models. In this subtopic, we will consider phone, compact digital (point and shoot), digital single lens reflex (DSLR), mirrorless (compact system), and film cameras.
Phone cameras

While not dedicated cameras, some phone cameras are sophisticated and have the features required to take particularly good photos.
Features may include metres to adjust white balance, depth of field, ISO levels, and shutter speed. Some phone cameras can shoot in RAW format and all offer auto mode.
Arguably one of the best advantages of phone cameras is that you always have your phone with you allowing you to take photos anytime, anywhere. They are small, (some) can fit in a pocket, they have good playback abilities, and it is easy to share images. However, the lenses on phone cameras are less versatile than those on dedicated cameras and the image quality is lower.
Compact digital cameras (point and shoot)

These cameras are small, compact, and produce good images. They are user-friendly and affordable. Compact digital cameras do not require extra lenses or film, and settings are automatically adjusted to produce well-exposed photos.
Compact digital cameras lack manual controls instead they rely on scene and auto modes such as landscape, portrait, and sports. The photographer cannot usually customise shutter speed and aperture, and the zoom range is limited. Therefore, compact digital cameras are not for people wanting full control.
Digital single lens reflex (DSLR) cameras

DSLRs are the most versatile, advanced cameras on the market. They range in price and your kit (such as lenses and filters) can grow as you progress in photography and your budget allows.
DSLR cameras are much larger than phone cameras and compact digital cameras. They offer full manual and auto control, sophisticated exposure metering, image stabilisation, auto focus systems, optical viewfinders, high-resolution image output, and a wide variety of camera bodies and lens choices.
The larger sensors in a DSLR offer better image quality. When comparing cameras, sensor size rather than megapixels is a better indicator for how good the image will be.
Mirrorless cameras (compact system cameras)

Mirrorless cameras offer DSRL quality but with a light, compact body. There are fewer moving parts, they are quieter than other cameras, and there is no camera shake due to the absence of mirror movement. It is possible to change lenses to suit needs but as mirrorless cameras are newer to the market, the lens selection is limited. Not all models allow for manual control and the battery life can be short.
Film cameras

Most photographers use digital cameras, but film still has a place in photography. It is even possible to buy new film cameras. Film cameras can have all the technology bells and whistles of DSLR and can take excellent photos. Film cameras such as instant and lomography cameras, can produce vintage-style, artistic photos, although the quality of these images is often low.
Medium and large format film cameras are fairly niche for professionals and enthusiasts. They are large and allow the photographer to have better control of the depth of field. They produce images with high resolution and size and are often used by gallery artists.

Film cameras require more effort to achieve the desired image and knowledge of analogue settings. Images can be unpredictable, and film is an ongoing expense.
Your camera
Any camera can take great photos if you know its limits and can use it well. Researching and describing your own camera will help you learn a little more about its strengths and capabilities.
Consider your own camera(s). Can you answer the following questions?
- What brand and model is your camera?
- What lenses do you have?
- What is the sensor size of your camera?
- If you have more than one camera/lens combination, which is your favourite and why?
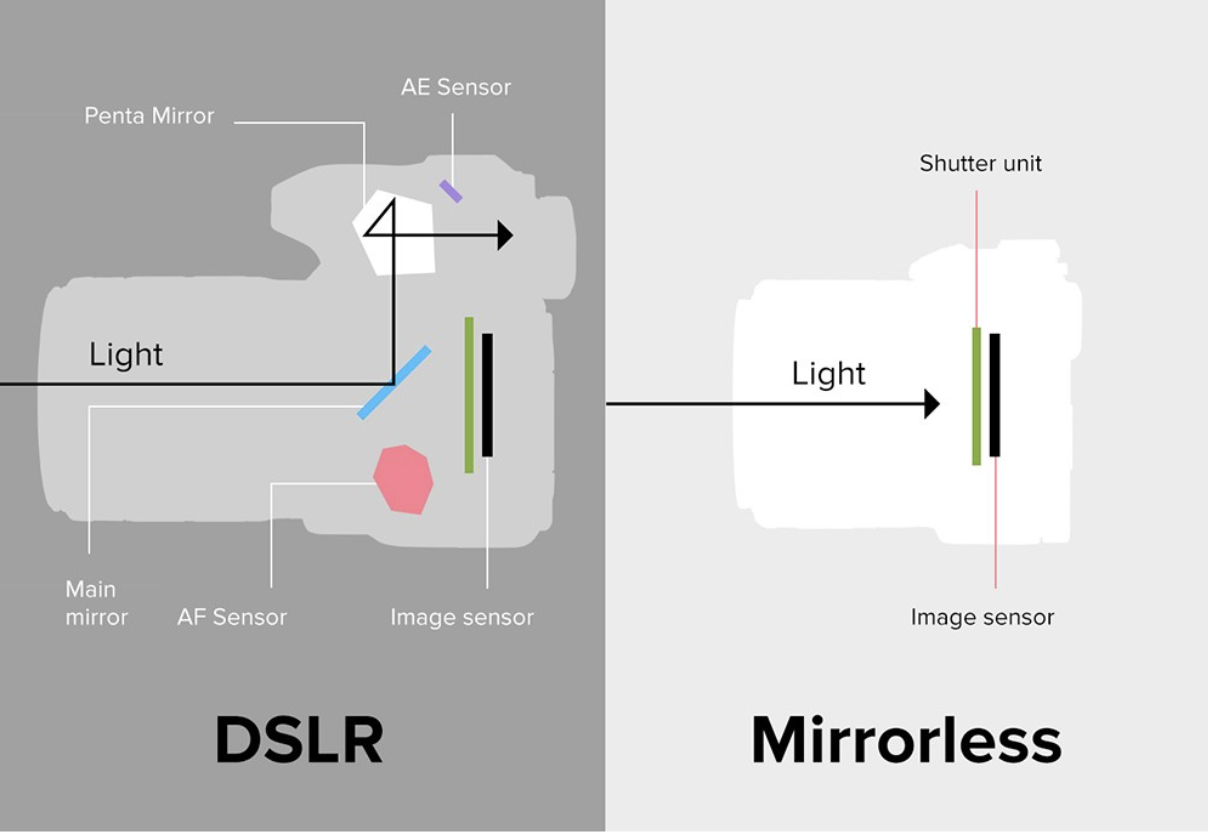
In a DSLR camera, light passes through the lens. A (reflex) mirror reflects this light to form an image on the focusing screen. A pentaprism reflects the light to the viewfinder allowing the photographer to view the image.
From DSLR Camera Functioning by School of Digital Photography 2014, © School of Digital Photography
When the shutter button is pressed, the shutter opens, the mirror flips up and the light can reach the image sensor to record the image. The viewfinder will go blank while the shutter is open, and the mirror is in the up position.
A mirrorless camera does not have a reflex mirror. The sensor is always exposed to light and there is no optical viewfinder. Instead, the photographer can view a preview of the image on an electronic viewfinder.
Sensors CCD and CMOS
The sensor in a camera captures light and converts it into an image. The two main image sensors in digital cameras are:
- Charged-couple device sensors, referred to as CCD.
- Complementary metal-oxide semiconductor sensors, or CMOS.
Most digital cameras were equipped with CCD sensors up until the mid-2000s. Now, most digital cameras are fitted with CMOS sensors. Both CCD and CMOS sensors are monochromatic. A colour filter array (CFA), usually a RGB Bayer mosaic, installed over the sensor, captures colour.
During exposure
CCD and CMOS sensors are made up of a grid of silicon pixels (photosites). During exposure, light hits the silicon pixels and the electrons in the silicon substrate jump into a higher energy state and move through the sensor. After this point, CCD and CMOS sensors differ in how they convert this process into an image or “read the sensor”.
After exposure
In a CCD sensor, the electrons move down each row and the charge from each pixel is gathered. An amplifier at the end of each row, measures the charge collected and converts it into voltage and eventually to the ADC (analogue to digital converter). Because only one row is read at a time, a mechanical shutter is required to avoid smear.
In a CMOS sensor, each pixel has its own amplifier and each column has its own ADC. Each pixel is read out in parallel. There is no need for a shutter and the sensor is significantly faster.
CCD versus CMOS
CMOS sensors are faster, more compact, can have uninterrupted live-view, less camera shake, and less distortion of moving objects. CMOS sensors produce less heat and require less power.
However, some argue that CCD sensors produce better, more accurate colour output.
Camera navigation
The following images show the parts on a Canon DSLR. Your camera may be different so spend some time now identifying the equivalent parts on your camera, including how to read the playback screen.

- Menu button
- Info button
- Viewfinder
- Video start/stop
- AF on button
- Focus lock
- Focus point selection

- Mode selection dial
- Flash hotshoe
- White balance/metering
- Autofocus/drive selection
- ISO/exposure compensation
- Shutter release

- Aperture
- Shutter speed
- ISO
- Drive mode
- Battery level
Timer delay
Timer delay is useful for self-portraits or where the photographer needs to be one of the subjects for example, in a group shot or in a how-to shot where you see the photographer’s hands. It is also useful if the photographer needs to operate another piece of equipment during the shot.
Another benefit, often overlooked, is that a timer delay can help with reducing noise in macro shots or low light shots with long exposure, such as nightscapes. In these situations, even the slight movement of pushing the shutter can result in camera shake and noise.
Lenses
After the camera body, camera lenses are the most important piece of photography equipment. The ability to switch lenses makes the camera more flexible and gives the photographer the ability to select the perfect lens for different situations.
Anatomy of a lens

The following image of a lens is representative of most modern zoom lenses. Parts of the lens include:
- Filter thread
- Focus ring
- AF/MF selector switch
- Lens name
- Zoom ring
- Zoom amount (in mm)
In the following video, the photographer explains how lenses work, briefly touching on focus, aperture, and lens types.
Zoom and focal length
Lenses have a millimetre number which is called the focal length. The focal length indicates how “zoomed-in” a lens is. The following numbers are a general guide.
- Telephoto lenses are those lenses with a focal length above 85mm. They magnify things in the distance.
- Wide-angle lenses have a focal length of less than 28mm. They show a more sweeping view.
- Anything in-between these two is considered a normal lens, for example, a 50mm.
There are two classes of lenses: zoom lenses and prime lenses. Zoom lenses cover multiple focal lengths whereas prime lenses are fixed at a single focal length. For example, the Canon 55-250mm f/4-5.6 is a telephoto zoom lens whereas the Canon 20mm f/2.8 is a wide-angle prime lens.
If you have ever taken photos that appear too light and bright or conversely too dark, the photo was likely not well exposed.
Photos that are dark and not bright enough, are referred to as underexposed. It is difficult to make out details in underexposed photos because it is too dark. Not enough light was allowed to get to the sensor.
Photos that have a blown out look and are too bright are referred to as overexposed. It is difficult to make out details in these photos because it is too bright. Too much light was allowed to get to the sensor.
Compare the following three photos. The first is underexposed, the second is overexposed, and the third is well (or “correctly”) exposed.
Exposure is the process of allowing light to reach the camera’s sensor or with film cameras, the film surface.
There are three main factors that affect exposure: Shutter speed, Aperture and ISO.
Shutter speed
Shutter speed determines how long your camera's sensor is exposed to the light coming in through the lens. Shutter speed is how long in seconds or fractions of a second that the shutter takes to open and close. A shutter speed of ½ a second is quite slow, whereas a shutter speed of 1/4000 of a second is very fast.
- A fast shutter speed is good for freezing motion or if it is very bright, but you need a wider aperture or higher ISO, to compensate for the very brief exposure.
- A slow shutter speed is useful when your scene is dark and you need to let in more light, but you need to adjust aperture or ISO to make sure you do not overexpose your shot. A slow shutter speed can also be used to capture motion as a blur for artistic shots.
Compare the following four photos taken with various shutter speeds.
Aperture
Aperture is the size of the opening (or hole) inside your lens. It controls how much light is allowed to reach the sensor when the shutter is open.
Aperture in a camera lens is very similar to the iris in your eye. In a dark environment, your iris opens wider to let in more light so you can see things clearly. If you are in a really bright environment, your iris reduces to a smaller area to restrict the amount of light coming in. It is the same with the aperture in a camera.

Aperture is measured in F stops. On your camera screen, it can be identified as the number preceded by the letter F. This number is a fraction, 1/x. Sometimes the slash is included, but not always. The smaller the F stop number, the larger the aperture. f/5.6 is larger than f/22.

A small aperture, for example f/22, will allow less light into your camera. So, you will need to use a slower shutter speed, to ensure your photo is not too dark or underexposed.
A large aperture, for example f/2.8, will allow more light into your camera. So, you will need to use a faster shutter speed, to make sure your shot is not too light or overexposed.
Apertures also affect the depth of field. Smaller apertures give a wider focal depth or depth of field, where you can make out a lot of detail in the shot. Conversely, a larger aperture results in a shallow depth of field where the subject is in focus, but the rest of the scene is not. Compare the following two images.
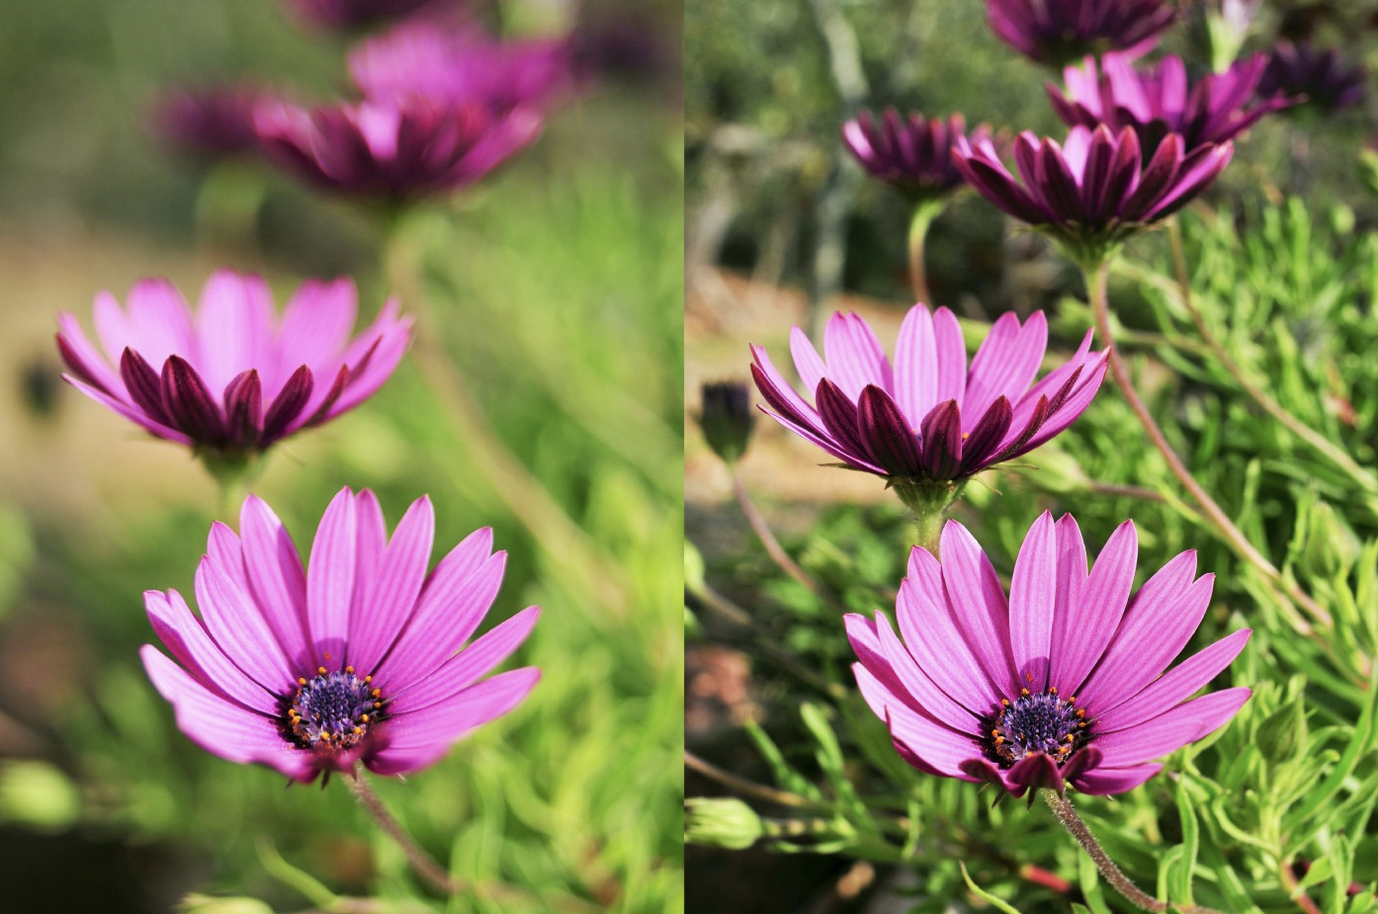
The image on the left has a large aperture of f/2.2 and the image on the right has a small aperture of f/9.
Remember, a bigger F number is a smaller aperture and results in a greater depth of field.
A smaller F number is a bigger aperture and results in a shallow depth of field.
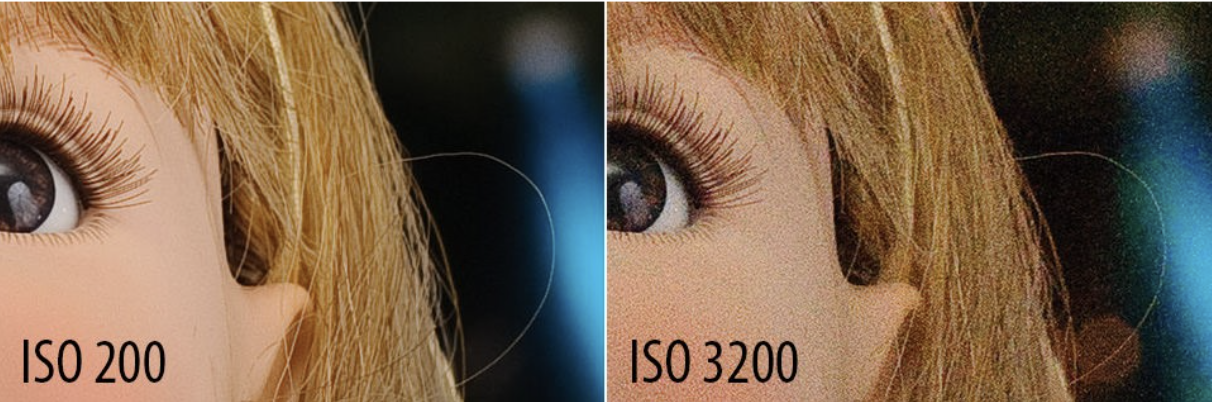
ISO
Your camera's ISO setting determines the sensitivity of your camera's sensor to collecting the available light. A sensor can be made more sensitive by increasing the ISO value.
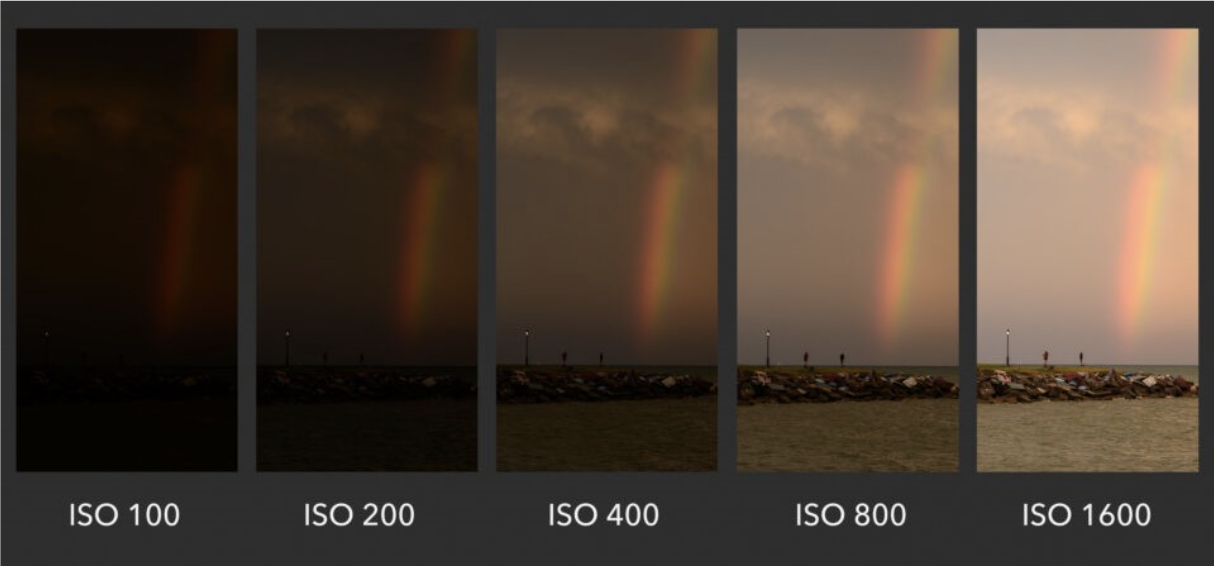
Using a low ISO setting such as ISO 100, results in an image with almost no noise or grain. This is great for high-quality images but means your camera's sensor is not very sensitive to light, so you will need to use a slower shutter speed or a wider aperture.
Using a high ISO setting such as ISO 3200, will make your camera's sensor much more sensitive so you can use a faster shutter speed or a smaller aperture. However, the higher ISO setting will make your images more noisy or grainy.
Exposure triangle

The exposure triangle is a useful way of describing the relationship between your camera's aperture, shutter speed, and ISO settings. Adjusting one of these settings will require an adjustment of the others.
If the shutter speed is the most important thing in your shot, consider using shutter priority mode (TV) and letting the camera work out the aperture and ISO settings.
If the aperture is the most important thing, use aperture priority mode (AV) and let the camera figure out the shutter speed and ISO setting.
In the following video, the photographer explains the relationship between aperture, shutter speed, and ISO.
The tap analogy
The tap analogy is another way of visualising the interaction between aperture, shutter speed and ISO.
Imagine filling a glass with water from a tap. The flow of the water (how much you open the tap) represents your camera's aperture. The time that the tap is open represents the shutter speed.
To fill a glass exactly to halfway requires you to balance these two settings: the flow of water and how long the tap is open. It is the same with your camera's aperture and shutter speed. Increasing one of these will require you to decrease the other, to result in a correctly exposed image.
Light metering
Light metering is also known as exposure metering, camera metering, or metering. Light metering helps photographers control the exposure of photographs in different lighting conditions with minimal effort. Metering is the camera’s way of determining what shutter speed, aperture, and ISO settings would be best for the light available at the time of taking the photo.
In manual mode, the light meter indicates if the photo will be under or overexposed. Below zero, the image will be underexposed. Above zero, the image will be overexposed. If the meter indicates the image will be under or overexposed, decide which setting is the most important, and adjust the other settings until the meter indicates the image will be well exposed.

Metering modes
There are various types of metering, and each metering mode will try to analyse your photograph in a different way, resulting in differences in exposure. It is recommended to experiment with your camera's metering modes, so you know which ones to use in different shooting situations.
Evaluative or matrix metering
This mode is good for evenly lit shots where there is not too much contrast between the background and subject.
Centre-weighted metering
This mode is good for when the subject is taking up most of the frame and is centred. Centre-weighted metering is ideal for close up portraits, food, and product shots.
Spot metering and partial metering
These modes are good for when the subject is much darker or brighter than the background and you need to see detailing. Use spot or partial metering when the subject is taking up only a small part of the frame and is not necessarily in the centre.
In the following video, the photographer explains light metering and how to use metering to improve exposure and capture better images.
In this activity, you will use what you have just learned about exposure, aperture, shutter speed, ISO, and light metering.
Part A: CameraSim
CameraSim is a DSLR camera simulator. It allows you to play with ISO, aperture, and shutter speed on desktop or web. You can change the lighting, distance, focal length, and mode to see how variables affect the settings you choose.
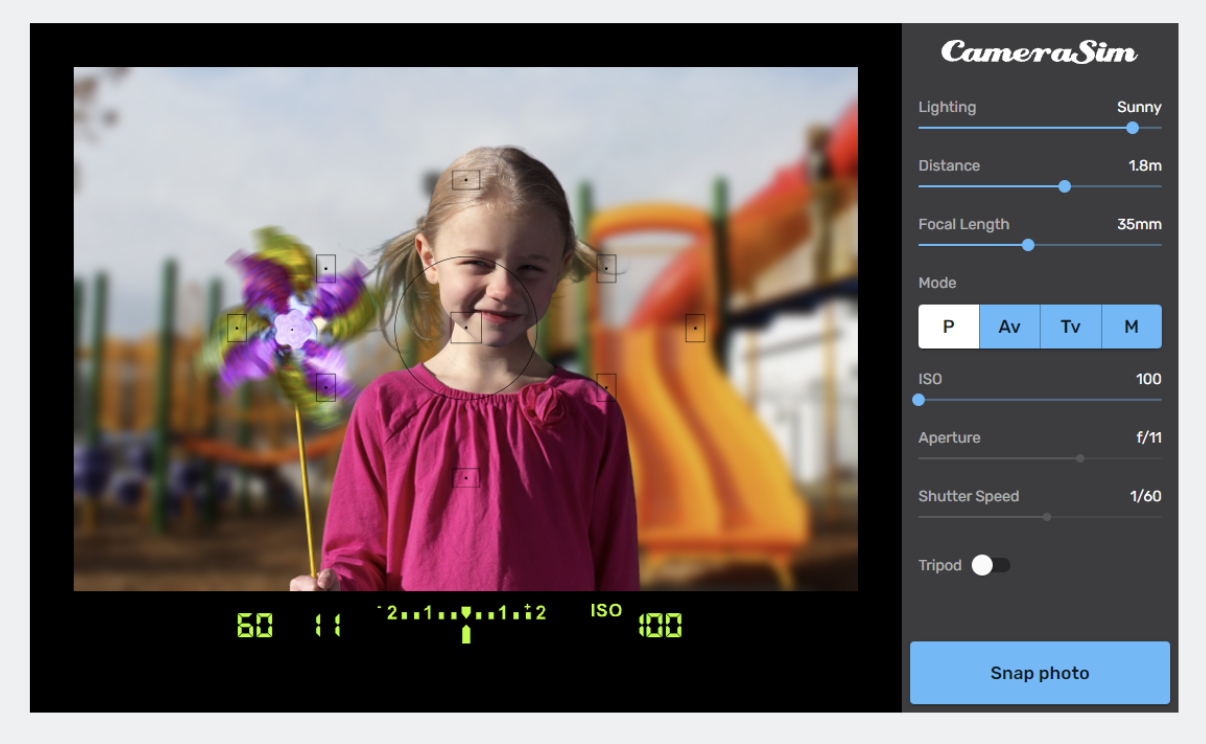
Your task
Have a play with CameraSim. Use the light meter while you are setting up your shots.
- Take photos with dim light, overcast, and sunny lighting.
- Change the distance.
- Take photos with focal length 18mm and 55mm.
- Use different modes including aperture priority and shutter priority.
- Try using the tripod.
If you want to try out another camera simulator, check out the Play section on the Canon Outside of Auto website.
Part B: Take a series of images
This is an opportunity to practice using aperture, shutter speed, and ISO settings with your own camera.
To get the most out of this activity, try using the Manual mode on your camera. This way you will see how each setting affects the exposure of your photos.
Your task
Capture a photo with good exposure for each of the following scenarios.
- A photo using the smallest aperture possible with your camera lens.
- Fast shutter speed to freeze motion.
- A photo with shallow depth of field, to isolate a subject from the background.
- A photo that uses a low ISO setting and a small aperture.
- An indoor shot, using a fast shutter speed (1/500 second or faster).
- A photo that uses a wide (large) depth of field.
- A photo using the largest aperture possible with your lens.
- A photo with as slow a shutter speed as you can use, without any camera shake. A tripod helps here but if you do not have one, is there something else you can place your camera on to reduce camera shake?
Can you take comparable shots using your smartphone’s camera? Adobe Lightroom: Photo Editor is available for free on Android and iPhone. The app gives you more control over camera settings and editing.
Share your photos in the forum.
Natural and artificial light sources each have benefits – and some disadvantages.
Natural
Natural lighting is produced by the sun or moon and is free. It can be easy to use when you are starting out and have limited gear. Natural light can be manipulated with diffusers and reflectors. However, natural light can change very quickly with time of day and weather. It can also be very unpredictable.

Natural lighting is good for street and documentary photography, and times when you do not have the luxury of setting up controlled lighting.
Artificial
Artificial lighting is produced by lamps, flash units, and other artificial sources. It is easy to control and available whenever you want it. Artificial lighting can mimic natural light if you have the right equipment. With the exception of inbuilt flash, artificial lighting is not free and requires kit which is not always very portable.

Artificial lighting is good for product and fashion photography, or when natural light is not available.
Artificial lighting can be continuous or strobe (flash) lighting.
Continuous lighting
Continuous lighting is constant. Once they are turned on, they stay turned on and illuminate the area until turned off. Because the light is constant, you can see exactly how the light affects the image. Being able to see the light continuously means you can make adjustments easily.
Strobe lighting
Strobe lighting works in bursts, such as the flash on your camera. You can only see how the light affects the image in the short period that the strobe lighting bursts on. Some strobe lights have modelling lights which are continuous and allow you to preview the light, but these are weaker than the actual strobe light and expensive.
Strobe lights are generally more powerful than continuous lights. This is useful if you need to overpower ambient light or are trying to make dramatic effects. In outdoor photography, strobe lighting can help overpower harsh sunlight so the sky is not overexposed and the subject is well lit.
Lighting setup
High key and low key
Lighting can be high key or low key, and everything in between. In the following video Lindsay Adler, a fashion and portrait photographer, explains the difference between the two.
High key and low key lighting create different moods.
High key
Associated with a lot of whites and light tones. Everything is brighter. High key images have an optimistic, youthful, happy mood and are light and airy.
Low key
Associated with darker tones, shadows, and deep blacks. Images are dramatic, mysterious, and moody.
Three-point lighting
While you could use any number of lights in photography, three-point lighting is considered standard. Each light in a three-point lighting set up has a distinct role: Key light, fill light, and backlight. If you have fewer than three lights available, understanding three-point lighting will allow you to prioritise and manipulate the lights you do have.

Key light
Primary and brightest light source. The key light provides the overall exposure. It is usually positioned off to the side of the subject, creating shadow on the opposite side.
Fill light
Mirrors the key light and fills in shadow, illuminating details. This light is less bright than the key light. The difference in brightness between the key and fill lights can be manipulated to impact the feel and mood of a shot. The fill light is not necessarily a light. It could be a reflector, bounce card, or anything else that bounces light back onto the subject.
Backlight
Also known as the rim light or hair light. This light source shines on the subject from behind. It creates depth in the image by creating a rim of light around the subject, differentiating them from the background.
Watch the following video to see how the key light, fill light, and backlight work in practice.
Photography helps you capture anything you feel is important to remember. It can transport a viewer to a place they have never been or make them feel intense emotions. A great photograph is powerful enough to not only remind the viewer of an event or detail but can bring them right back to the feelings, sounds, and even smells of the moment.
Composition is often the difference between an okay photo and a great photo.
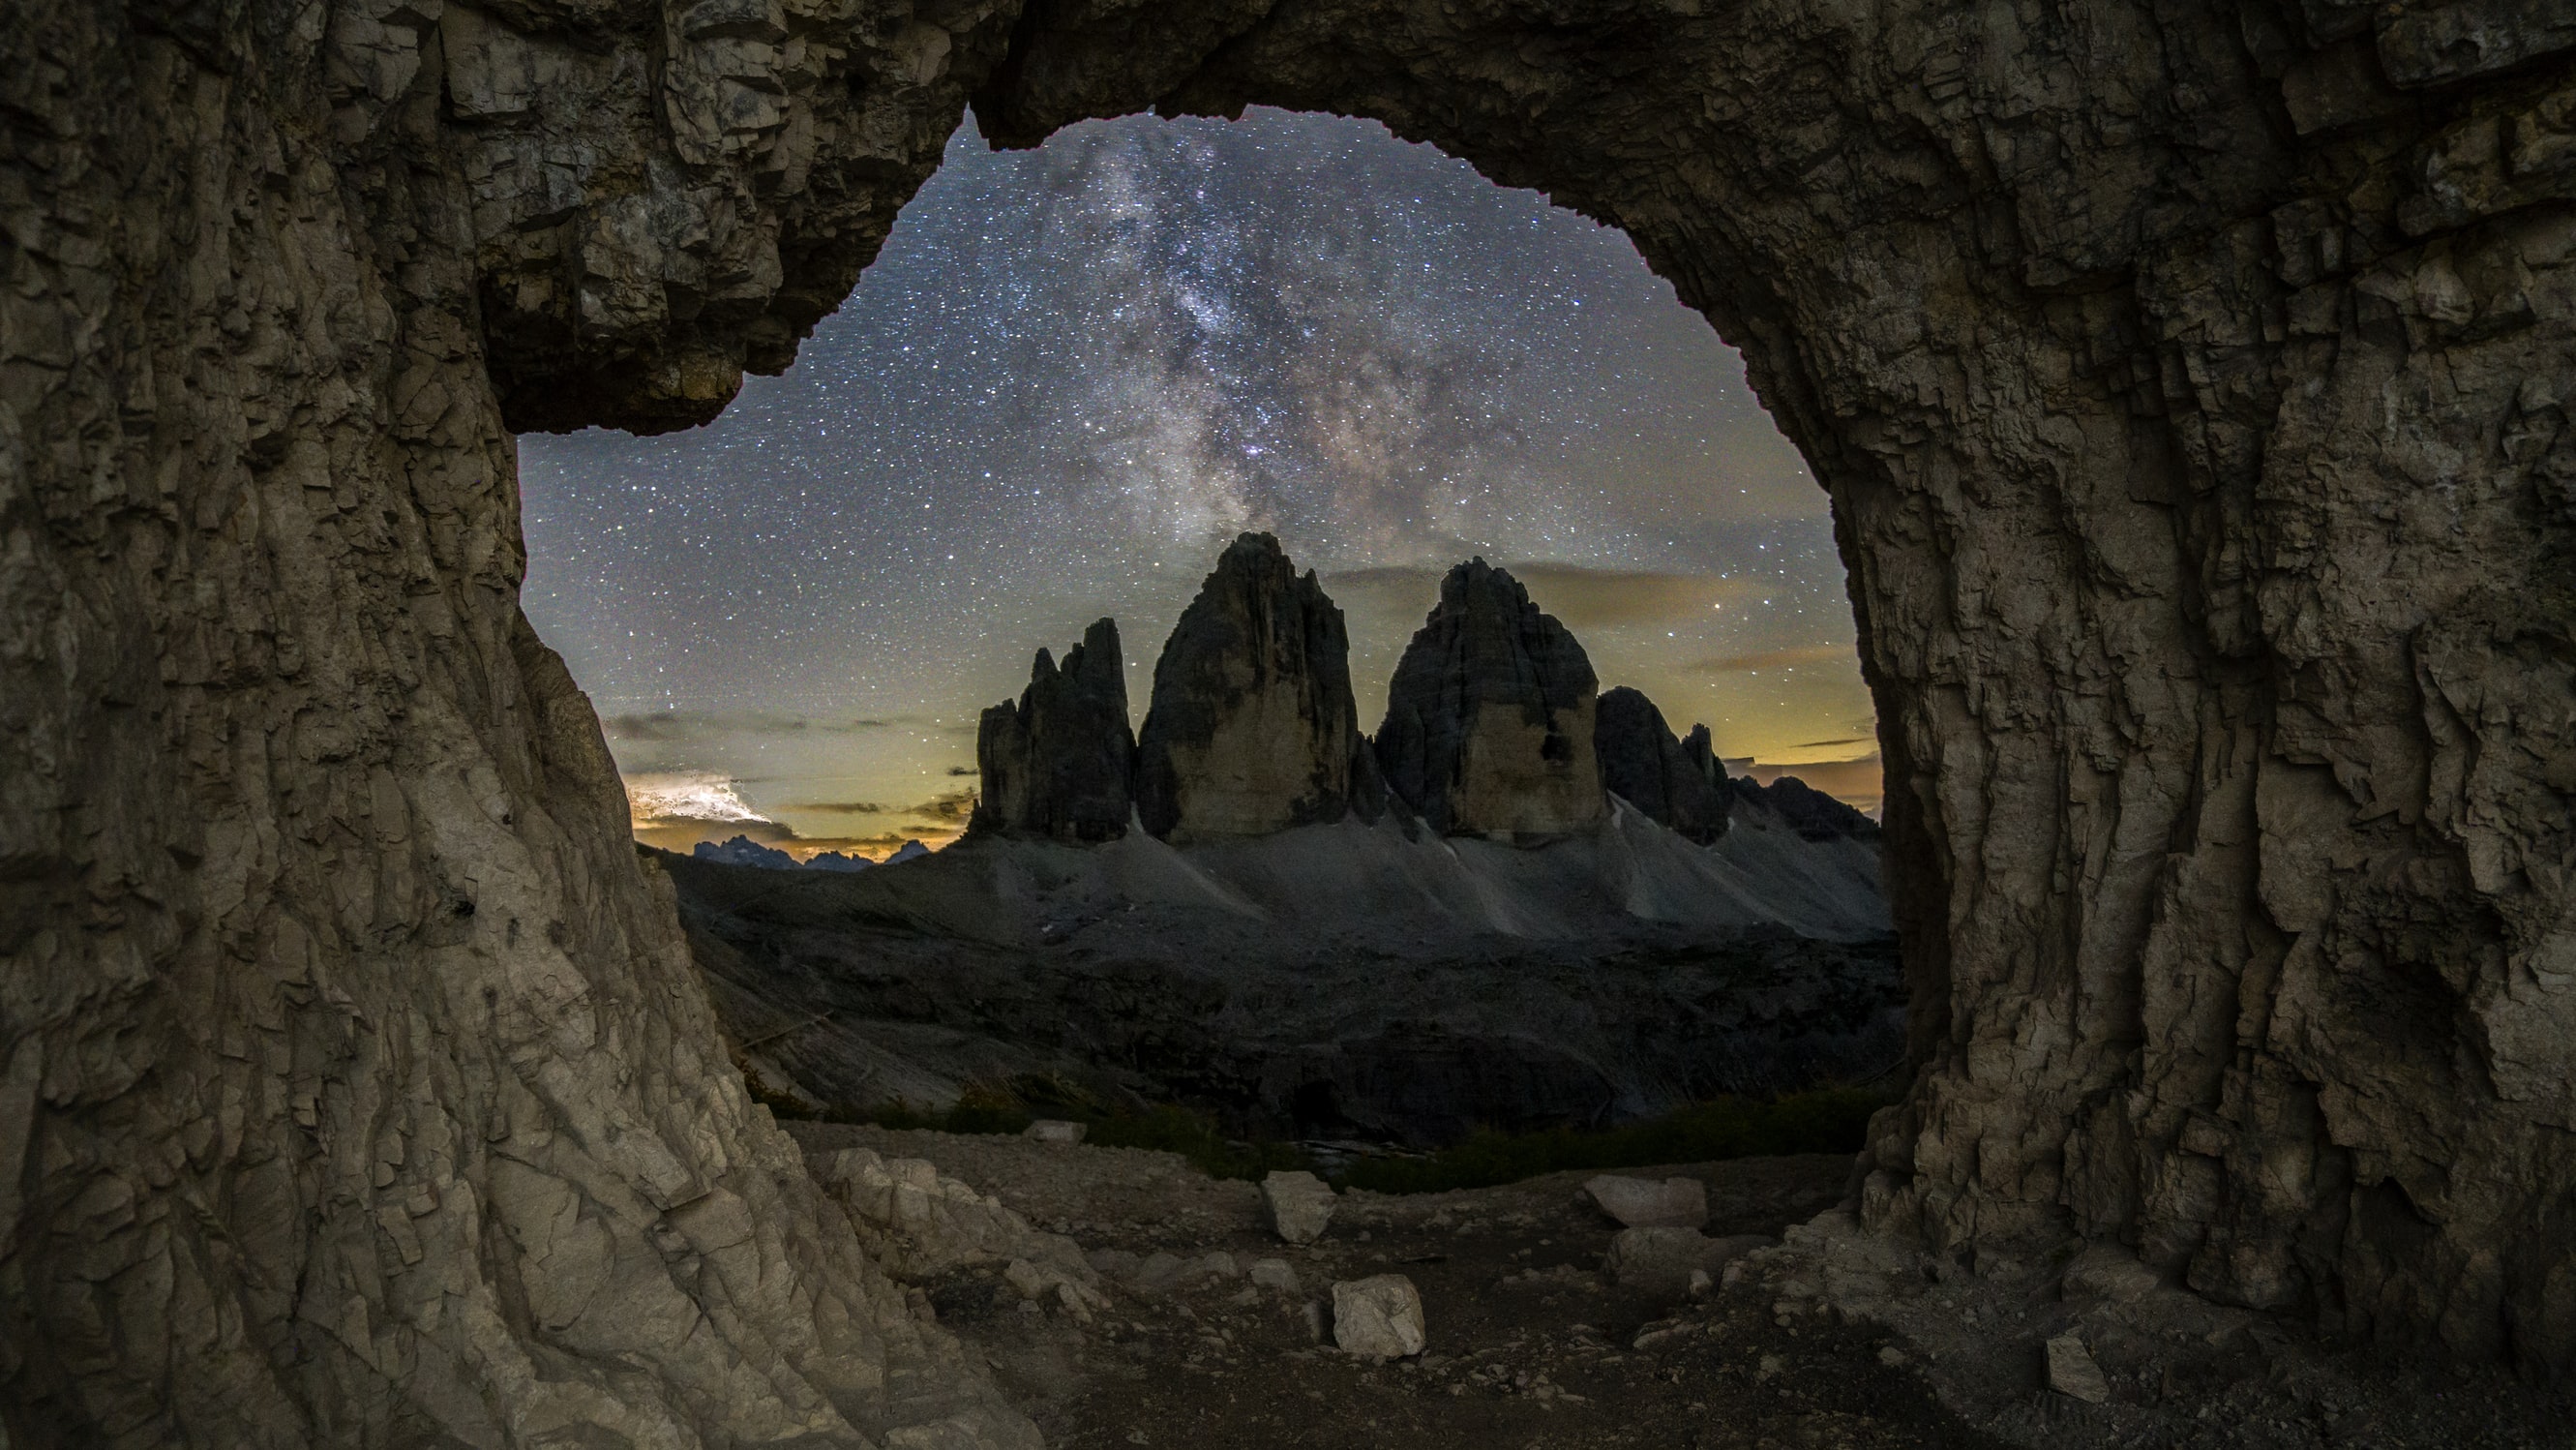
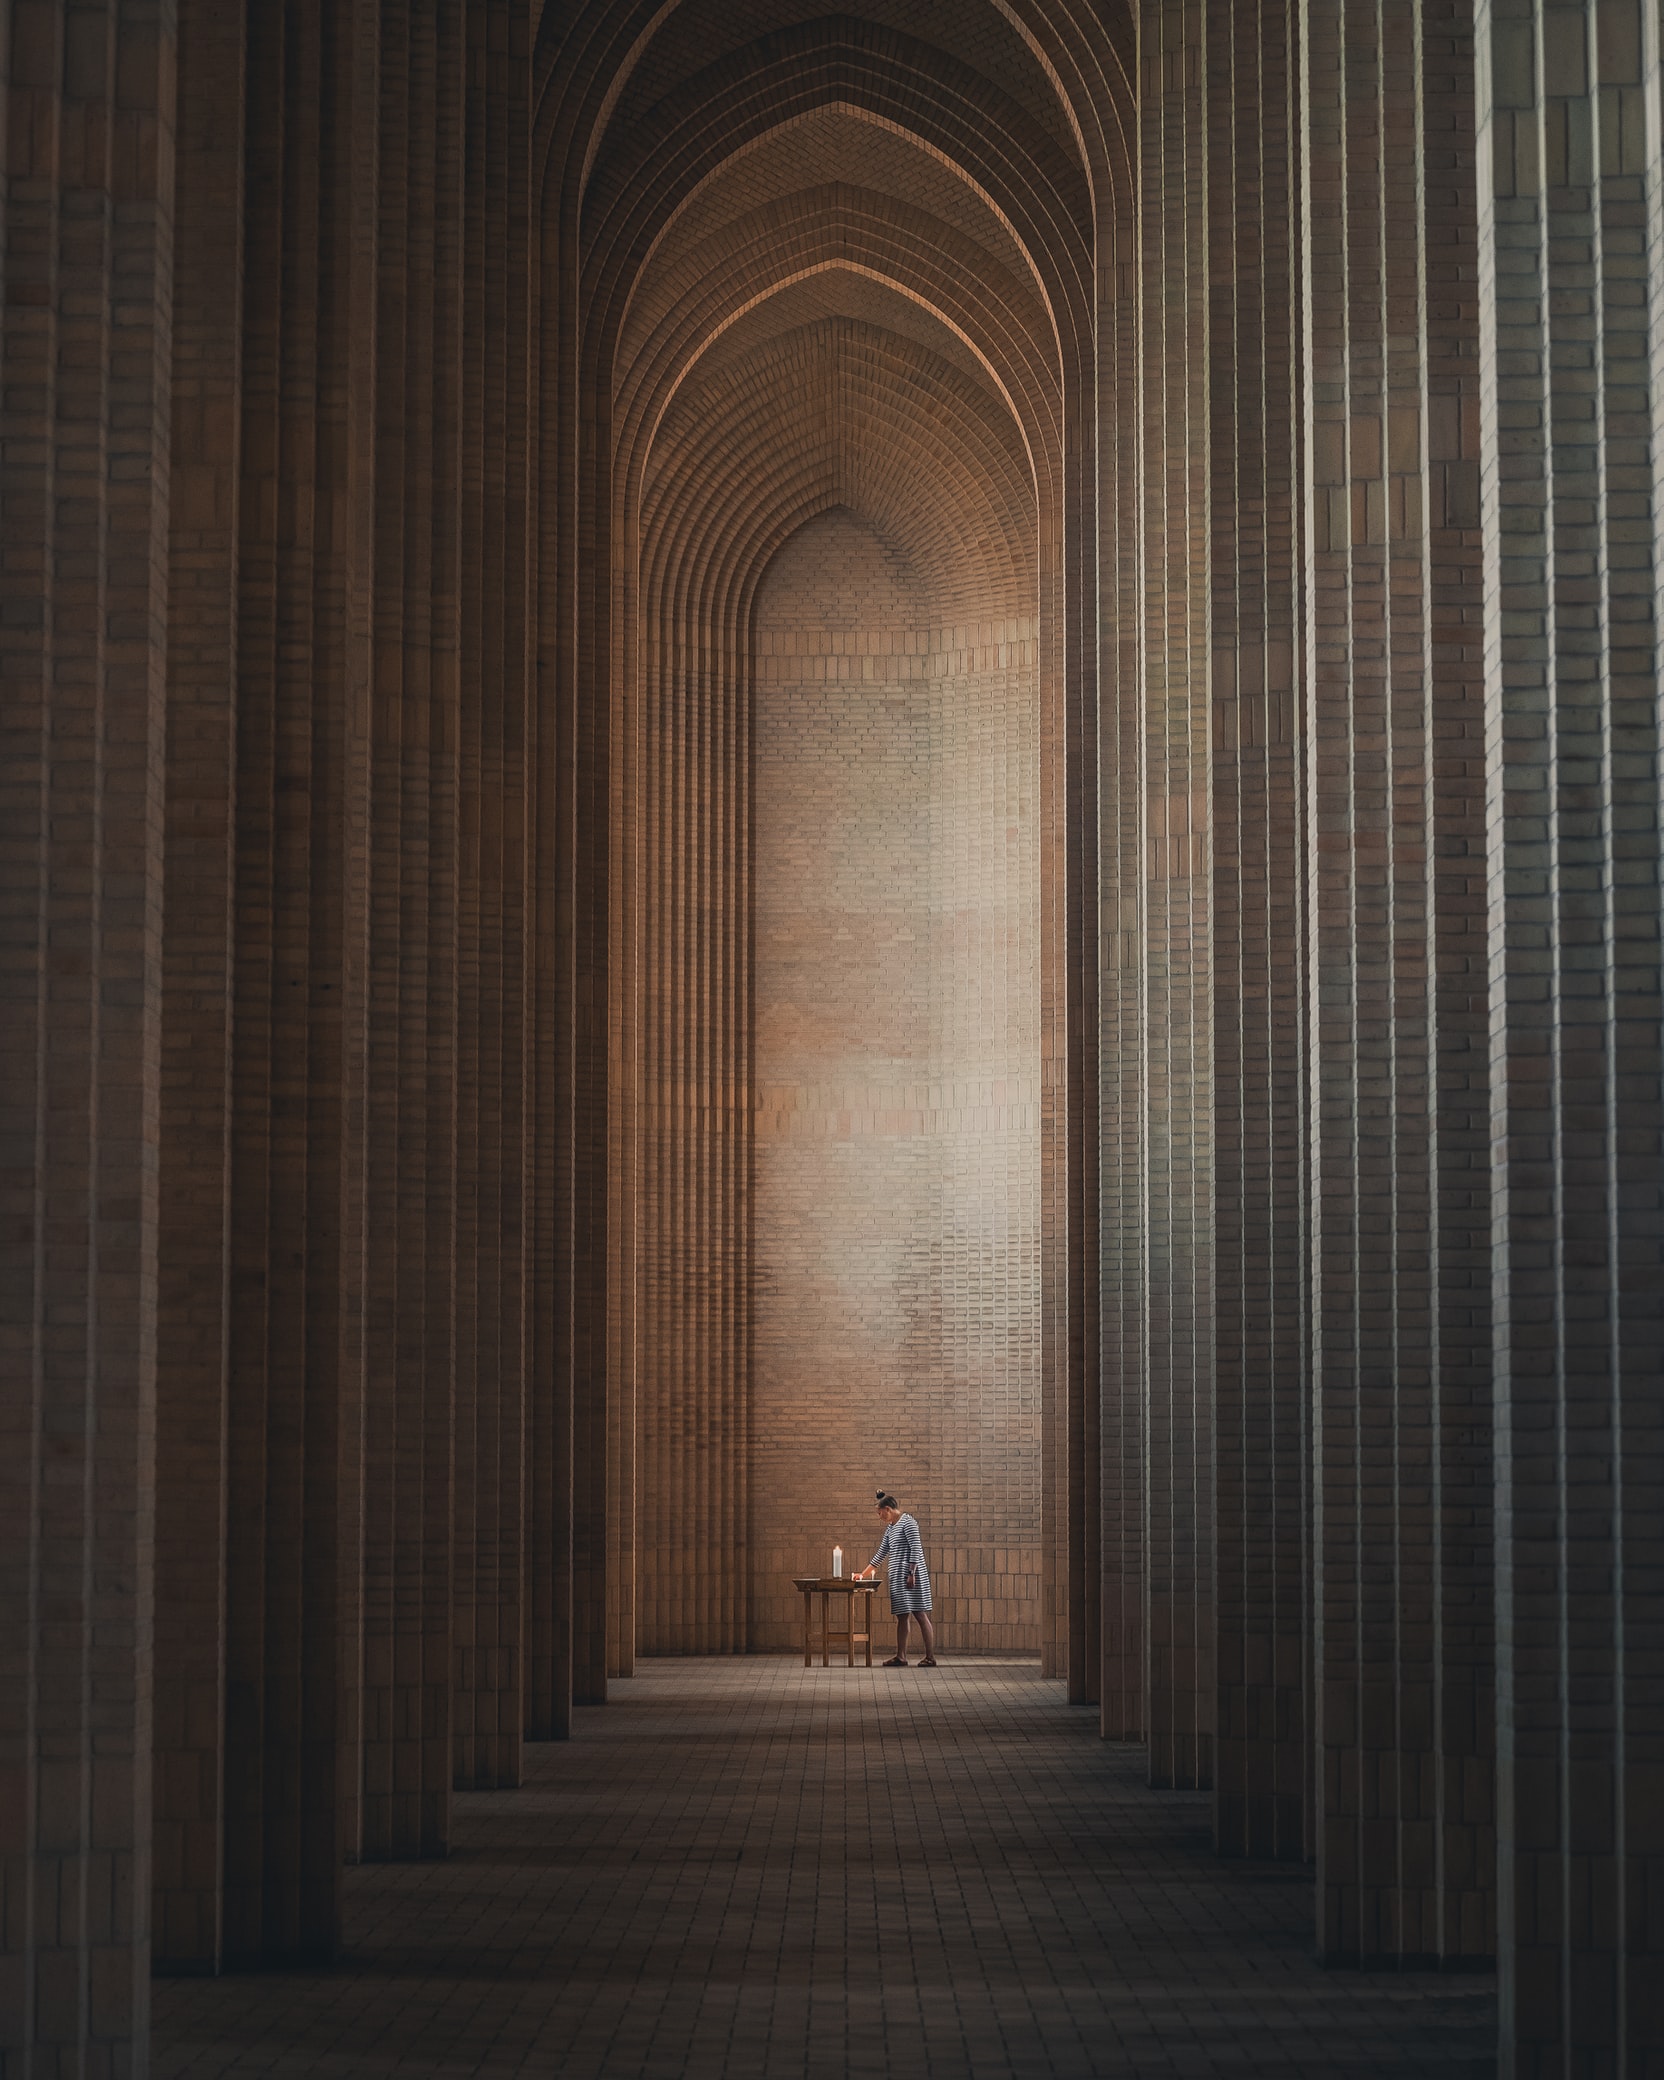
Framing
Framing shots allows you to control what information the viewer receives and how they interpret what they see. These two photos are examples of good framing—looking past and looking through other objects captures the main focus of the photo.
Framing can be used to:
- Create mystery.
- Withhold information so that the audience speculates on what could be happening.
- Give information about what is about to happen.
- Point of view framing- this is when the photos are taken from the point of view of the character they are portraying.
Rule of thirds
The rule of thirds refers to a composition which is roughly divided into 3, horizontally and/or vertically. Place your subject in the left or right third of the shot, where the horizontal and vertical lines intersect, leaving the remaining two thirds open.

We have a natural tendency to want to place the main subject in the middle however placing it off centre using the rule of thirds will lead to a more attractive composition.
Other composition guides
As well as the rule of thirds, it is worth experimenting with other composition guidelines such as the phi grid, symmetry, golden or Fibonacci spiral, and golden triangles.
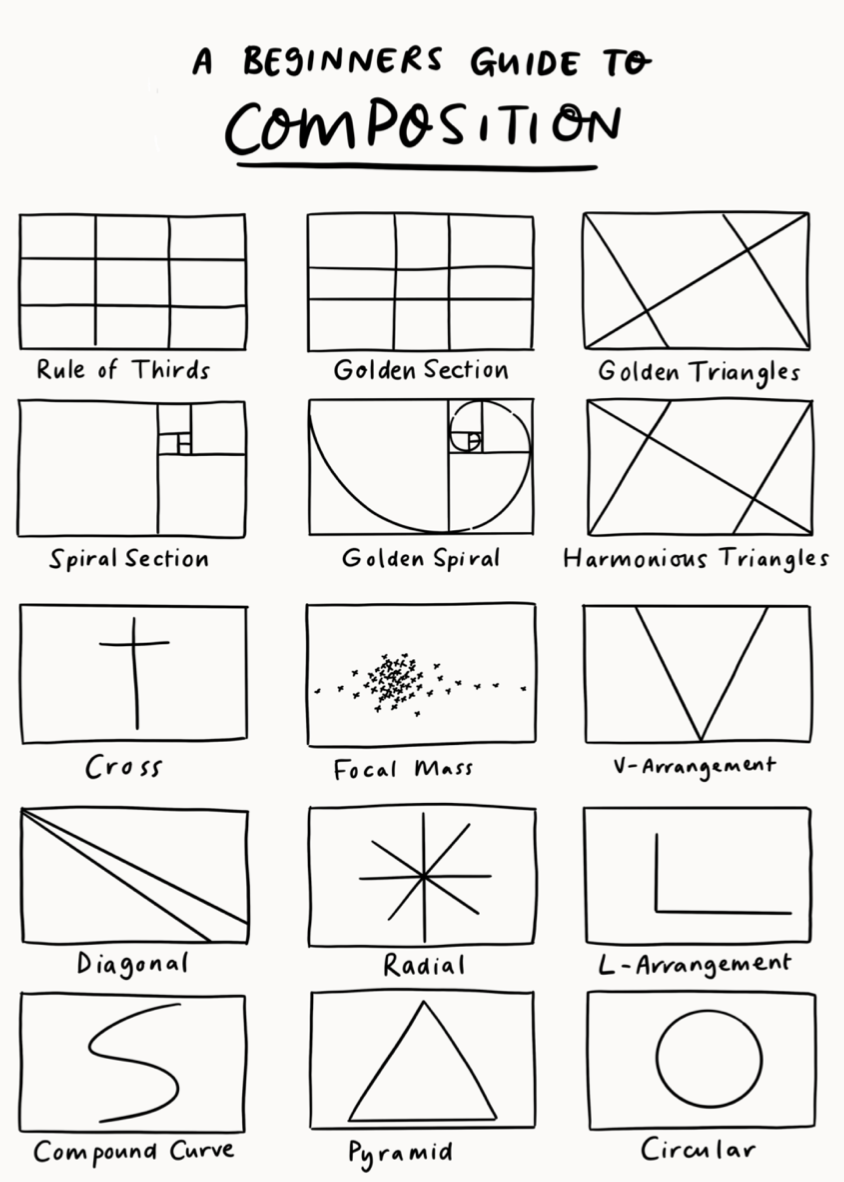
Watch the following video for an overview with examples of the golden spiral in photography. The photographer highlights other composition guides and how they compare with the golden spiral.
Eye-level
Eye-level shots refer to when the level of your camera is placed at the same height as the eyes of the characters in your frame. They can be extreme close ups, medium level, and different angles.
The reasons why people may use eye-level shots include:
- Dissolve the barrier between viewer and story.
- Helps you empathise with the character and shows them in a more vulnerable state- "eyes are the gateway to the soul".
- Humanize characters with a neutral camera angle.
- Simulate human vision and familiar composition.
Consider the following images. What emotions and messages do they convey? Do they help you empathise or understand the character?
Focal point
The focal point is the part of the image that you want the audience to focus on. A central focal point can seem very formal whereas an asymmetrical focal point usually adds interest to the image.
The audiences’ eyes generally need to focus on one area in the photo - the focal point. Without a focal point, you may find they simply glance at your shots with minimal interest before they move on. A focal point can draw the viewer into the image.
Natural lines and shapes can help guide the audience to a focal point. In the following image, the jetty and mountain ridges all lead to one central focal point.

Depth of field
We previously looked at how aperture not only affects exposure, but also depth of field. Manipulating the depth of field is another useful composition tool. Depth of field is an important creative tool used to define subjects within a photograph by choosing what to show sharply and in detail, and what to hide or obscure.
- A wide depth of field, achieved with a small aperture, results in an image in focus from foreground to background. A lot of detail is visible.
- A shallow (or narrow) depth of field, achieved with a large aperture, results in only part of the image being in focus.
Landscape photography often uses a wide depth of field, whereas macro photography, such as a close up of a flower, uses a shallow depth of field.

Orientation
When composing your images, you also need to consider orientation. Should the photo be oriented portrait or landscape? The default orientation using a DSLR camera is landscape, and smartphone cameras default to portrait.
Usually, horizontal (landscape) orientation is used for landscape photography, and vertical (portrait) orientation is used for portrait photography - hence the names. However, this is not always the case and image composition is worth considering to maximise impact of a photo and ensure it is fit for the application it will be used in.
It is useful to identify where the strongest line is that you want to emphasise. Subjects with strong vertical lines such as people, waterfalls, and tall buildings, suit portrait orientation. Strong horizontal lines are highlighted with landscape orientation such as a mountain range, sunset over an ocean, group shots, and event photography.
It is becoming increasingly important to consider the application and format the image will be used in. For example, if you are posting to Instagram, it is preferable to shoot in portrait format.
Of course, the aspect ratio and orientation can always be changed post-shoot with photo editing software.
There are many different photography styles, but most photographers specialise in one or two. Some categories and styles include;
- The natural world: Nature, landscape, astrophotography, macro, flower, storms, and animals.
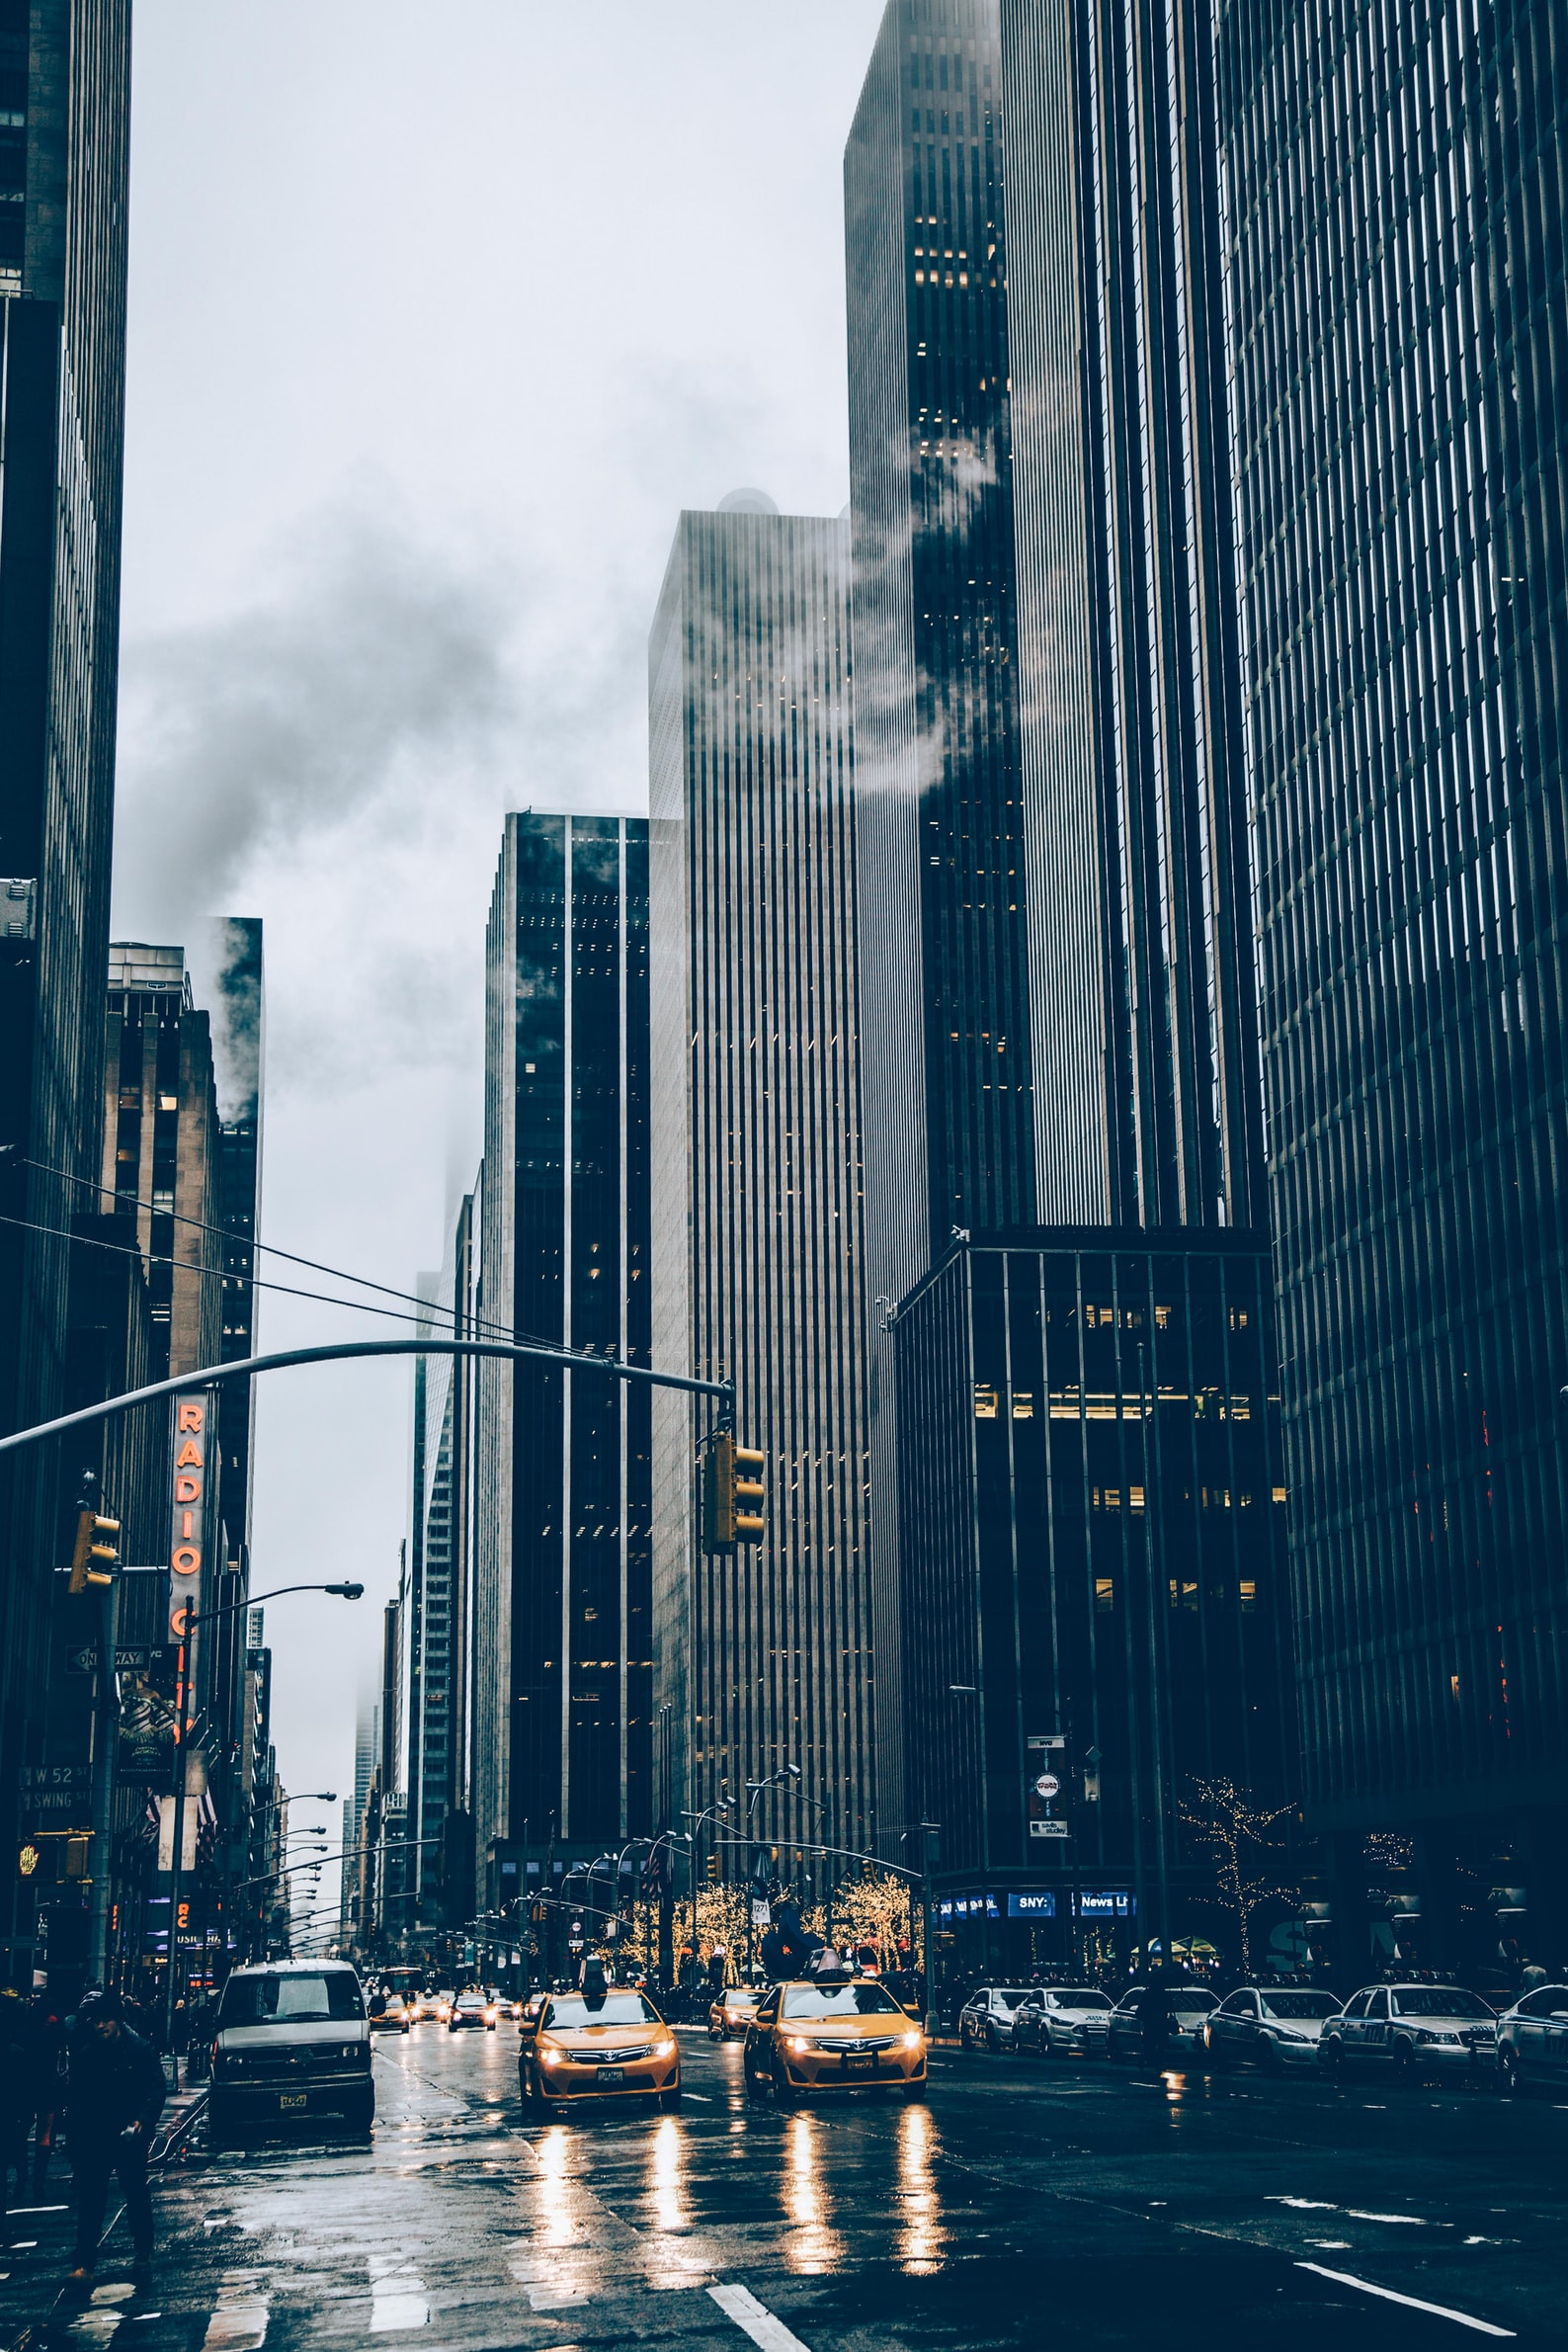
- Cityscapes and structures: Architecture, real estate, drone, and aerial.
- People: Portrait, headshot, fashion, sports, and documentary.
- Lifestyle: Street, event, and wedding.
- Commercial: Food, fashion, and product.
- Artistic: Still life, fine art, black and white, abstract, and surreal.
We will take a closer look at three popular and important styles: Landscape, portrait, and product photography. You can read more in this article from Adobe: ‘Explore many different types of photography.’
Landscape
Landscape photography captures the outdoors and natural surrounds.
Composing a landscape shot requires the photographer to move around, rather than the subject. Analyse your surroundings and look for shapes, lines, and layers that you want to highlight and balance. Use layers to create depth and look for natural lines to draw the viewer’s eye to a focal point.
If you are using a digital camera, check your composition regularly on playback and think about different opportunities. Can you lie down and get your camera very low to the ground, or climb a boulder to get a higher angle?
Consider the rule of thirds and other composition guides. Depth of field is usually wide and orientation often landscape, although this is not always the case. If you want to highlight vertical lines such as waterfalls or a sharp, vertical drop/cliff, portrait orientation may be more suited.
Be patient
Landscape photography requires a good understanding of natural light, timing, and patience to get the right lighting. Shutter speed can also be creatively used to create or freeze motion such as a blurred river or sprays of water that appear frozen in time. Analyse the photographs in the image slider. How have the photographers used composition, exposure, and lighting in their shots? Pay attention to framing and the use of natural lines.
Portrait
People are the subject of portrait photography. A great portrait does not only capture the subject, but also tells the subject’s story.

Portrait photography is a collaboration between the photographer and the subject. Building rapport and mutual trust is essential so that the subject relaxes and shows their true self. Allow yourself time to make a connection and get to know each other. You may need 30 minutes shooting before the subject relaxes, connection is made, and you start getting the shots you want so always schedule plenty of time. When people are watching the clock and feeling rushed, they are not present and it will be noticeable in your photos.
Tell their story
Consider what lighting will best tell the person’s story – harsh or soft, direct or indirect? If you are shooting using artificial light, will high key or low key better represent what you are trying to say? Remember high key photos are lighter and brighter. They imply optimism, youthfulness, and happiness. Whereas low key photos are darker, with more shadows. They are dramatic, powerful, and mysterious. Consider three-point lighting and whether you want to hide or highlight skin texture and shadows. If you are shooting outdoors using natural lighting, is there something you can use to diffuse or filter the light such as trees?
The eyes have it
The focal point in portrait photography is often the eyes. Recall the benefits of shooting eye-level photos including that it helps the audience empathise with the subject. A telephoto lens with a long focal length can be quite complimentary in portrait photography and allows you to get up tight and close to the subject without distorting them. A shallow depth of field will keep the focus on the subject. You see this in action on smartphones which often have an in-built portrait mode. If you have not used the portrait mode of your phone, test it out now.
Analyse the following photographs. How have the photographers used composition, exposure, and lighting in their shots? Pay attention to depth of field, eye-level, and high and low key lighting.
Product
Product photography is a commercial form of photography where you shoot anything from shoes to perfume to water bottles. The goal is to take clear, attractive photos showcasing a brand’s product.
It requires knowledge of product styling, lighting set-up and composition. Product photography can be divided into two sub-genres:
- Simple product-only photos for e-commerce and photo editing.
- Styled lifestyle photos to show the product in used.
Product-only photos
Product-only photos are commonly shot with a simple, white background. The image focuses only on the product allowing consumers to focus on the specifics of the product without distractions. These shots can be clean-cut and photoshopped onto a variety of backgrounds or have text and assets overlayed.
Styling your product is not only about composition but also about making the product as beautiful as it can be. Have a cleaning kit to remove fingerprints and dust, and scissors for loose thread or labels. Ensure clothing and material is free of wrinkles. You could edit in post-production, but it will save a lot of time and ensure consistency if the product is clean when shooting.
Before you shoot, know the client’s expectations and brand guidelines. How much of the label and branding needs to be visible in each shot? Are there particular angles required? For example, do you need to show the tread of a hiking boot?
It can be useful to have various lenses so you can capture wide-angle shots, but also small, fine details. As the subject is stationary, you can use manual focus. A tripod and shutter release or timer delay is useful to avoid accidentally shifting the camera and losing focus.
Product-only photography often uses artificial lighting as it is consistent and easier to control. Products should be well lit so consumers can easily read labels and see details. Diffused light reduces harsh shadows. You may need to take several photos at the same angle with different exposures to capture different details of the product. Multiple exposures can then be composited into one shot in post-production.
Lifestyle photos
Lifestyle photos help consumers visualise how the product will fit into their lifestyle. It sells an idea, often aspirational. To achieve this, often models are employed. However, they are not the focus of the shoot, the product is. They are there to make the product look good.
Natural light can be used effectively for lifestyle product photography, but you may need to manipulate it with diffusers or reflectors to create a soft light so the product does not appear reflective or overly shiny.
Analyse the following images. How have the photographers used composition, exposure, and lighting in their shots? Pay attention to product styling.
Camera types include phone, compact digital (point and shoot), DSLR (digital single lens reflex), mirrorless, and film cameras. We looked in detail about how DSLR and mirrorless cameras work including CCD and CMOS sensors, timer delay, and lenses.
Exposure is how lit a photo is. A photo can be under, over, and well exposed. You can control the amount of light that comes through the lens and hits the sensor by adjusting shutter speed, aperture, and ISO settings. Light metering provides an indication of how exposed the photo will be and the exposure triangle can aid photographers in adjusting settings.
Lighting can be natural using the sun or moon, or artificial using lamps, flash units, and other artificial sources. Artificial light can be continuous (always turned on) or strobe/flash (short bursts of powerful light). Mood of a photo can be manipulated by choosing either high key or low key lighting. High key lighting produces bright, optimistic images whereas low key lighting produces moody and mysterious images. Three-point lighting is industry standard consisting of a key light, fill light, and back (rim) light.
Composition provides structure to images and helps direct the audience’s eyes. When composing photos pay attention to framing, composition guides (rule of thirds, phi grid, golden spiral), eye-level, focal point, depth of field, and orientation.
There are many photography styles to specialise in. We explored landscape, portrait, and product photography including specific considerations for each.