Two terms that you encounter when dealing with plans, specifications, and contracts are Provisional Cost (PC) and Prime Sum (PS). In general, PC and PS are reasonable allowances made by builders for the different construction items in a building project. The difference between the two is as follows:
- Prime Cost (PC) – These are reasonable allowances for the supply and installation of items whose prices cannot be determined when the contract is entered.
- Provisional Sum (PS) – These are reasonable allowances for the elements of construction work to be carried out that are not yet defined in detail for builders to establish the cost accurately.
With that logic, PC and PS items can be defined as follows:
- PC items are items that are not yet selected or whose prices cannot be determined at the time the contract is entered. This requires the builder to make a reasonable allowance (i.e. PC) to supply and install these items. For example, PC is used in contracts where a particular fixture or fitting (such as tiles or the basin) is required as part of the works in a contract, but the exact specification (brand/model/style) and cost is yet to be confirmed at the date of the contract. The PC allows the builder to allocate a 'budget' in the contract for the item, rather than specifying the exact cost.
- PS items refer to particular works or services whose cost of carrying out related elements of work (including the supply of materials needed) are not yet defined in detail for builders to establish accurately. This requires the builder to make a reasonable allowance (i.e. PS) for the particular work itself, the supply of materials needed and other corresponding elements of work involved. A PS may be used where certain items of work are required as part of a contract (for example excavation for a pool), however the builder is unable to provide an exact cost at the date of the contract. The provisional sum may be for both material and labour.
It is essential to identify and differentiate PC items from PS items as this may be a potential cause of dispute between parties. These items are carefully agreed upon and are specified in the contract to serve as a reference for all parties involved.

In identifying PC and PS items, you must first refer to the building plans and specifications for the building project. Although PC items vary from project to project, these usually are fixtures and fittings such as kitchen appliances, light fittings, floor tiles, etc.
For the sake of example, say you selected the items below from the plans and specifications:
- Kitchen oven
- Multimedia room floor tiles
- Pool excavation
- Front yard landscaping
In order to identify whether these items are PC or PS items, you must refer to the construction contract. Although the details and format of a construction contract vary from project to project, a section covers the discussion related to PC and PS items. That section may contain details that look like the one below:
Supply and install the following:
- Kitchen oven and cabinetry
- Floor tiles for living room and multimedia room
Perform the following works:
- Pool construction
- Equipment rental
- Pool tiling
- Repair works for possible issues
- Front yard landscaping
- Layout of ornamental plants
- Transfer of existing trees to architect’s specifications
Other contract formats may explicitly state what items are included under PC items and PS items.
Based on the sample details of the construction contract above, you can say that PC items are items under the ‘Supply and install the following:’ heading, while PS items are under the ‘Perform the following works:’ heading.
Therefore, going back to the items you selected from the plans and specifications:
- Kitchen oven – PC item
- Multimedia room floor tiles – PC item
- Pool excavation – PS item
- Front yard landscaping – PS item
Building services refer to systems installed in the buildings that provide building occupants with necessities that promote comfort, functionality, efficiency, and safety. These necessities include, but are not limited to, the following:
- Water supply
- Drainage
- Power supply
- Gas supply
- Energy distribution
- HVAC systems
- Fire alarm systems
Installation points of these services are points in the building where the supply for these services is located. Usually, these points exist at the connection of a fixture and the medium or material used for the supply. For example, with air conditioning to be incorporated in the building, electrical supply is transported through ducting and wires to the air conditioning units. The point of installation for the air conditioning system (service) is the point where the ducting or wires are connected to the air conditioning unit.
On the other hand, connection points of services to the building refer to points usually found outside the building (but within or adjacent to the property) that connects supply from the main supplier or distributor to the building. For example, a utility pole usually found near the building property serves as the connection point for the power supply from the local power distributor to the building itself.
Apart from utility poles, other connection points of services include sewer connection points, gas supply connection points, and water supply connection points. These can be seen in the site plan for a building project.
The following plan14 will be used to illustrate how to locate installation points of services to the building.

The actual plan can be accessed here. You may want to open the plan in a new window and zoom in to analyse the details of the plan.
The fixtures present in the ‘Ensuite’ of the building all contain the location of the installation point of the drainage system (service). If you look closely at ‘Ensuite’ of the floor plan, you can see plumbing fixtures installed. Water closet (WC), floor waste (FW) drains, and bath drains, and shower recess (SHR) drains are fixtures installed in the room to collect waste. The waste is then transported through pipes towards the main sewer. On the other hand, vanity basins (VB) contain the pipes for water to be supplied, as well as the drain for waste to be transported towards the sewer. 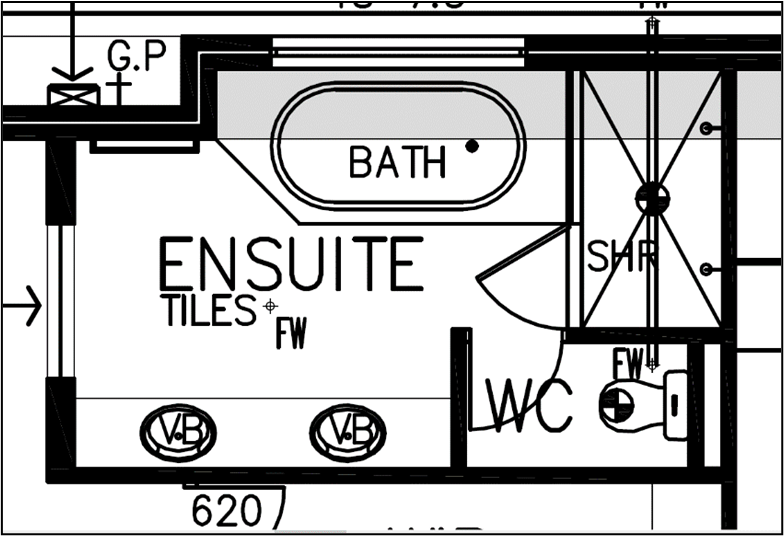
Additionally, you can see in the plan ‘hard wired smoke detector/alarm’ labelled ‘SA’, which indicates that a fire alarm system is installed in the building. The connection between the smoke alarm and the wires that carry electricity for the smoke alarm to function is the installation point of the fire alarm system.
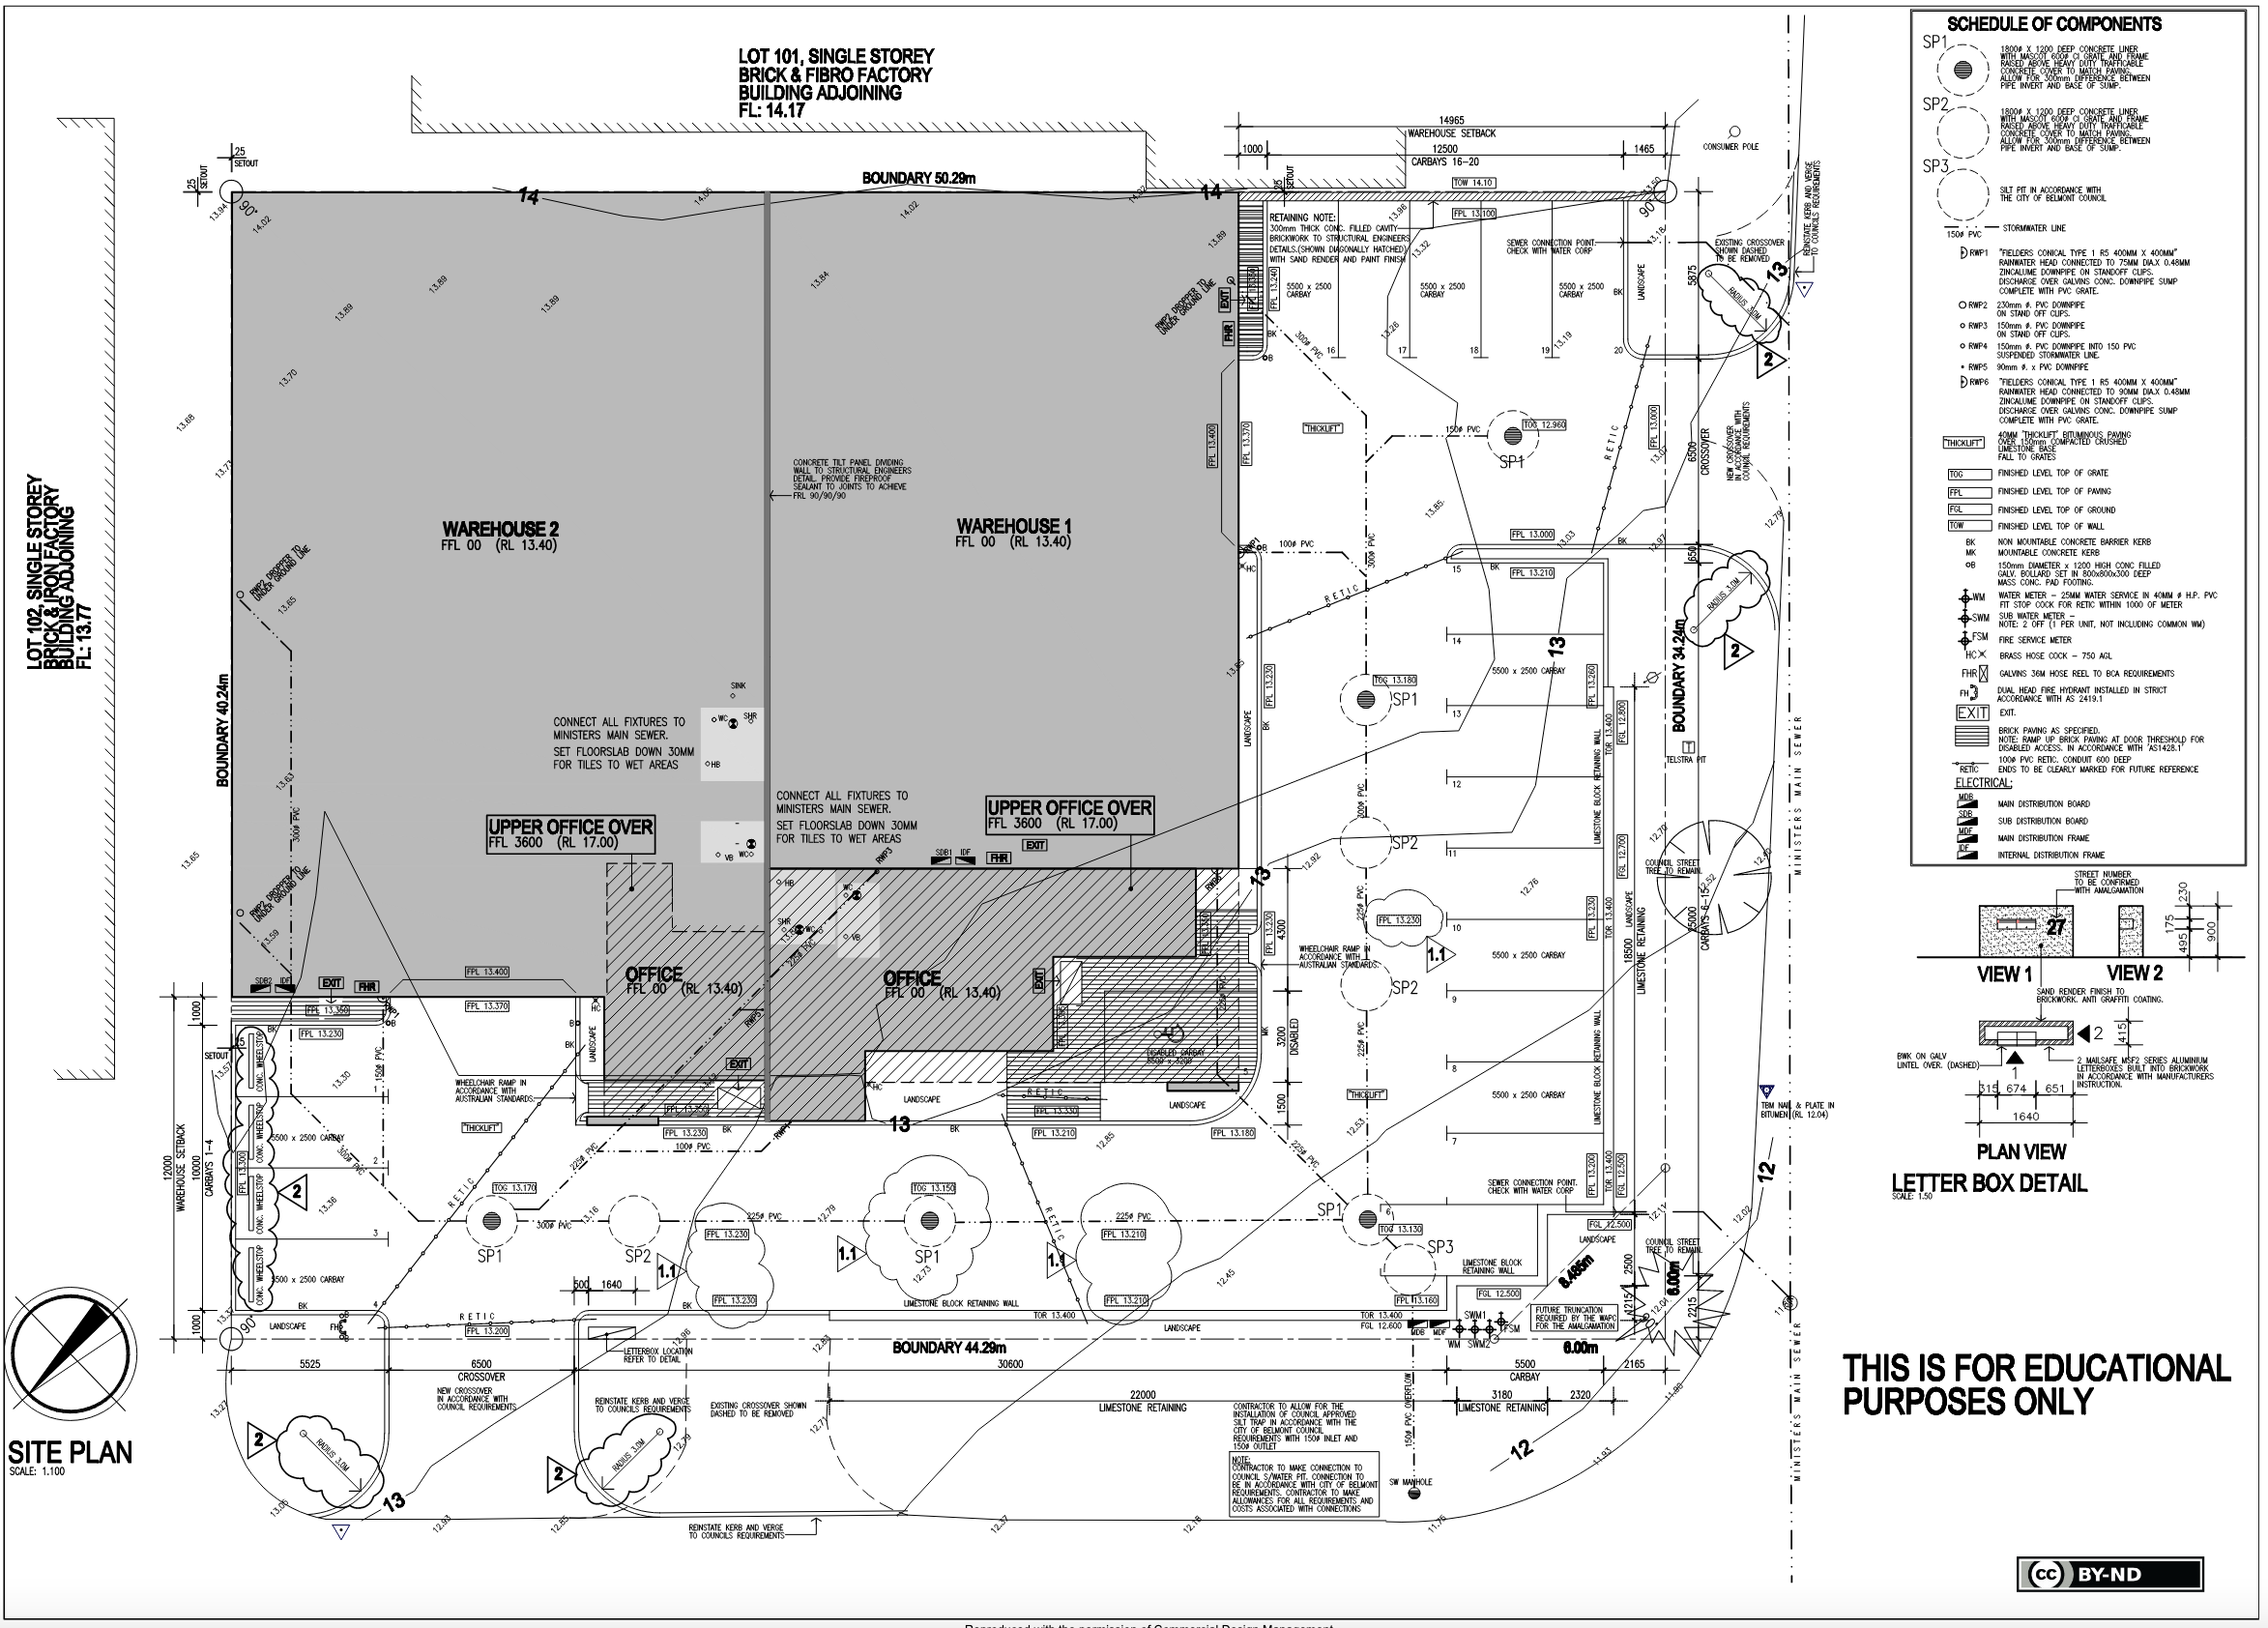
The following plan15 will be used to illustrate how to locate connection points of services to the building.
The actual plan can be accessed here. You may want to open the plan in a new window and zoom in to analyse the details of the plan.
To locate the connection points, you need to look at the labels in the plans and the schedule of components attached at the upper right portion of the sheet.
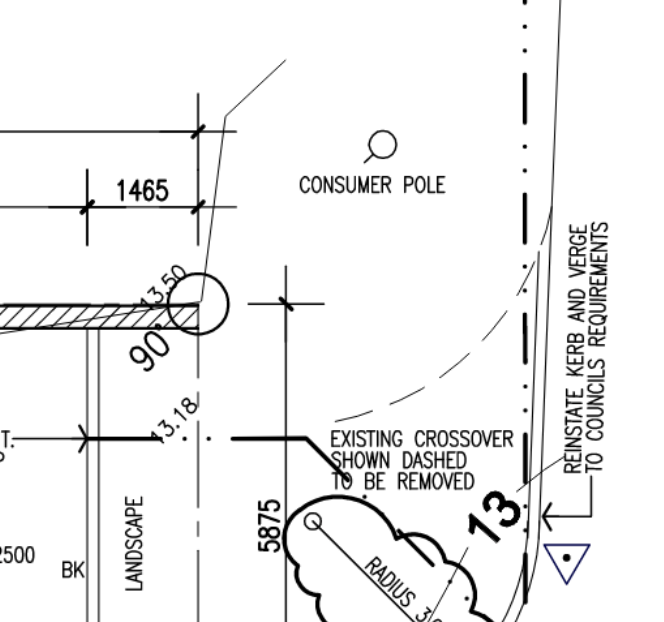
As you can see on the plan, the consumer pole or utility pole is situated at the upper right corner of the building property. This consumer pole serves as the connection point for the supply of power to the building.
Furthermore, you can see the sewer connection point from the plan. This connection serves to transport wastewater from the building to the main sewer.

For the water supply connection, you can see from the plans those symbols labelled as ‘WM’, ‘SWM1’, ‘SWM2’, and ‘FSM’. Based on the schedule of components, these are water meter, sub water meter 1, sub water meter 2, and fire service meter, respectively, indicating the connection of water supply.

Two of the non-structural details you have to examine are the location of fixtures and the details of finishes. These two details are important since they are major factors that contribute to the convenience of building occupants and the visual appeal of the building.
Identifying the location of fixtures from plans
Fixtures are objects or assets installed in a building that are considered to be fixed and irremovable. Examples of common building fixtures include the following:
- Electrical installations (e.g. light fittings, sockets)
- Fire detection and alarm
- Bathroom suite (i.e. shower, tub, sink)
- Built-in furniture and cabinetry
- HVAC systems
- Fixed partitions
- Doors and windows
- Sanitaryware (e.g. water closet, urinal, floor drains)
- Plumbing installations (e.g. water supply pipes)
Identifying the location of fixtures from plans follows the same process for locating installation points of services discussed in the previous section. In doing so, you need to refer to the construction plans and take note of the labels and legends.
Examine the middle portion of the floor plan16 showing the utility, bath, WC, etc.

From the image above, you can immediately locate the fixtures installed in the building by referring to the drawings and the labels. The fixtures installed are:
- Wall partitions – Shown as thick dark lines separating the different rooms or spaces in the building.
- Bath fixtures – Includes the sink, bathtub, shower, and floor waste (FW) drain.
- Water closet (WC) fixtures – Includes the water closet and floor waste (FW) drain.
- Smoke detector
- Walk-in linen cabinetry
- Doors
- Windows
Identifying details of finishes from specifications
Finishes refer to applications such as painting, varnishing, plastering, and others to protect building components from the damaging effects of rain, heat, etc. Additionally, they provide decorative effects to improve the appearance of the building as a whole. They are applied during the final parts of the construction of the building.
Note that sometimes, materials that may be categorised as finishes may be considered under a different categorisation. Such is the case of plasters. While they may be categorised as building finish, they may also be considered as building lining.
Other building finishes include, but are not limited to, the following:
- Painting
- Wallpapers
- Tiles (e.g. brick, stone)
- Windows (refer to orange circles)
- Glass
- Resin flooring
In identifying details of finishes from specifications, you must refer to the section in the specifications document that covers the specifications for finishes.
The requirement stated in this sample specification17 is for a proposed single store residence. The sample specification document can also be found at the Additional Resources, at the end of the module.
To find the plaster and paint finish details, for example, go to Part L ‘Plasterer & Tiler’ of the document. You will find the specifications for the plaster and paint finish for internal and external walls in this part. Refer to the following image:
As the specification shows the external walls are a painted rendered finish, and the internal walls are plaster smooth float and set.
Details for the paint can also be identified by referring to Section O ‘Painter’. Below are the details of the paint to be applied for the building project.
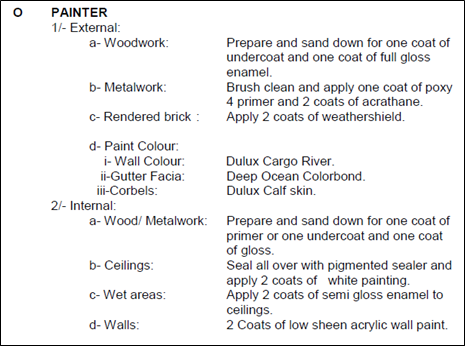
The specifications for both external and internal elements related to the paint finish. For external aspects:
- Woodwork must be prepared and sanded down for one coat of undercoat and one coat of full gloss enamel.
- Metal work must be brushed clean and applied with one coat of poxy four primer and two coats of acrathane.
- Rendered brick must be applied with two coats of weathershield.
- Wall paint colour must be Dulux Cargo River.
- Gutter fascia paint colour must be Deep Ocean Colorbond.
- Paint colour for corbels must be Dulux Calf skin.
On the other hand, for internal aspects:
- Wood/metalwork must be prepared and sanded down for one coat of primer or one undercoat and one coat of gloss.
- Ceilings must be sealed all over with pigmented sealer and applied with two coats of white painting.
- Wet area ceilings must be applied with two coats of semi gloss enamel.
- Walls must be applied with two coats of low sheen acrylic wall paint.