In this topic we will cover the following:
- Use cases
- User, task, and wire flows
- Creating flow diagrams
- Wireframes.
The topic ends with an opportunity to create a user flow diagram and wireframes and share them in the forum.
Use cases tell the story and typical sequence of events that describe a user's involvement with the product. They tell the story from the customer's perspective from customer acquisition, to purchase, and on to engagement. How do the user and system interact with each other?

Use cases consider the goal, stakeholder, normal events, and alternative events.
- Goal: What are the specific goals of the user? Define specifically the goals of the primary user of the system.
- Stakeholder: Who is going to be using the website? Identify the stakeholders. Identify who is going to be using the website. Pick one of those users.
- Normal events: Describe the basic course of events. What does the user do and how does the system respond? Describe the basic course in the description for the use case. Describe it in terms of what the user does and what the system does in response that the user should be aware of.
- Alternative events: Consider alternate courses of events. Add those to "extend" the use case.
Anatomy of a use case
A use case is made up of the following sections.
- Name: A clear descriptor that communicates the scope of the use case.
- Brief description: A brief paragraph of text describing the scope of the use case.
- Actors: A list of the types of users who can engage in the activities described.
- Preconditions: Anything the solution can assume to be true when the use case begins.
- Post conditions: Anything that must be true when the use case is complete.
- Basic flow: The set of steps the actors take to accomplish the goal of the use case.
- Alternate flows: Capture the less common user/system interactions.
Look at the following example of a use case and take note of the detail specified in the basic and alternate flows.
| Name | Place Order |
|---|---|
| Description | After the user has selected items to purchase and then order the items. The user will provide payment and shipping information. The system will respond with confirmation of the order and a tracking number that the user can use to check on order status in the future. The system will also provide the user with an estimated delivery date for the order, which will include all selected items. |
| Actors | Registered Shopper (Has an existing account). Non-registered Shopper (Does not have an existing account). |
| Preconditions | User has selected the items to be purchased. |
| Post-conditions | The order will be placed in the system. The user will have a tracking ID for the order. The user will know the estimated delivery date for the order. |
| Basic Flow | The user indicates she wants to order the items that have been selected. The system presents the billing and shipping information that the user previously stored. The user will confirm that the existing billing and shipping information. The system will present the amount that the order will cost, including applicable taxes and shipping charges. The user will confirm that the order information is accurate. The system will provide the user with a tracking ID for the order. The system will submit the order to the fulfillment system for evaluation. The fulfillment system will provide the system with an ETA. The system will present the estimated delivery date to the user. The user will indicate that the order should be placed. The system will request that the billing system should charge the user for the order. The billing system will confirm that the charge has been placed for the order. The system will submit the order to the fulfillment system for processing. The fulfillment system will confirm that the order is being processed. The system will indicate to the user that the user has been charged for the order. The system will indicate to the user that the order has been placed. The user will exit the system. |
| Alternate Flows | 3A1: The user enters billing and shipping information for the order. The user desires to use shipping and billing information that differs from the information stored in her account. This alternate flow also applies if the user does not maintain billing and/or shipping information in their account, or if the user does not have an account. The user will indicate that this order should use alternate billing or shipping information. The user will enter billing and shipping information for this order. The system will validate the billing and shipping information. The use case continues. |
Flow diagrams take user stories and scenarios and develop them further, providing a technical solution to our user stories.
Scenarios versus flows
Flow diagrams are the paths a user follows through your website or app to complete a task.
Flow diagrams help designers think at a system level. They detail all possible choices, outcomes, scenarios, and errors. User flows can highlight any potential problems with the user journey and provide a clear picture of navigation hierarchy.
Scenarios:
- All about the context.
- Describes the situation and need for a user to interact with product.
- Shows the different stages and scenarios of a users interaction.
- Not specific in terms of functionality.
- Maps out a particular journey of a user meeting a specific goal.
- Uses a theoretical, empathetic persona to figure out potential needs of our user.
Flows:
- Maps out a specific path or flow from within a product from a system standpoint.
- Shows the details within a product: screens, pages, interactivity and functionality.
- Prioritises functionable paths to meet all goals.
- Uses wireframes to figure out the logistics of including all features in a way that makes sense.
We start the prototyping process looking at how users will “flow” through an interface. There are three types of flow we will consider: user, task, and wire.
User versus task flows
User flows focus on how a user moves (“flows”) through an interface. They communicate the intended flow of a user through various pages and actions in an app or website. User flows consider what the user wants to achieve and how they will achieve it. They illustrate the navigation, organisation, and interaction of an interface. We can think of a user flow as a flowchart showing how the user will interact with the interface.
User flows show how different users travel in different paths due to differing entry points and behaviours. Typically, user flows are attached to a persona and/or a specific entry point.
Whereas user flows focus on specific users (perhaps different personas) and how they interact with an interface; task flows concentrate on single tasks. They are often linear, simple pathways with no branches.

From A Venn diagram showing the differences and similarities between task flows and user flows by E Harano, 2019, https://medium.com/erika-harano/ux-task-flows-versus-user-flows-as-demonstrated-by-pancakes-896e78a98026, © Erika Harano
| Task flows | Task flows/user flows | User flows |
|---|---|---|
|
|
|
Compare the user and task flows below showing how to search for a pancake recipe.

From Task flow: finding a pancake recipe by E Harano, 2019, https://medium.com/erika-harano/ux-task-flows-versus-user-flows-as-demonstrated-by-pancakes-896e78a98026, © Erika Harano
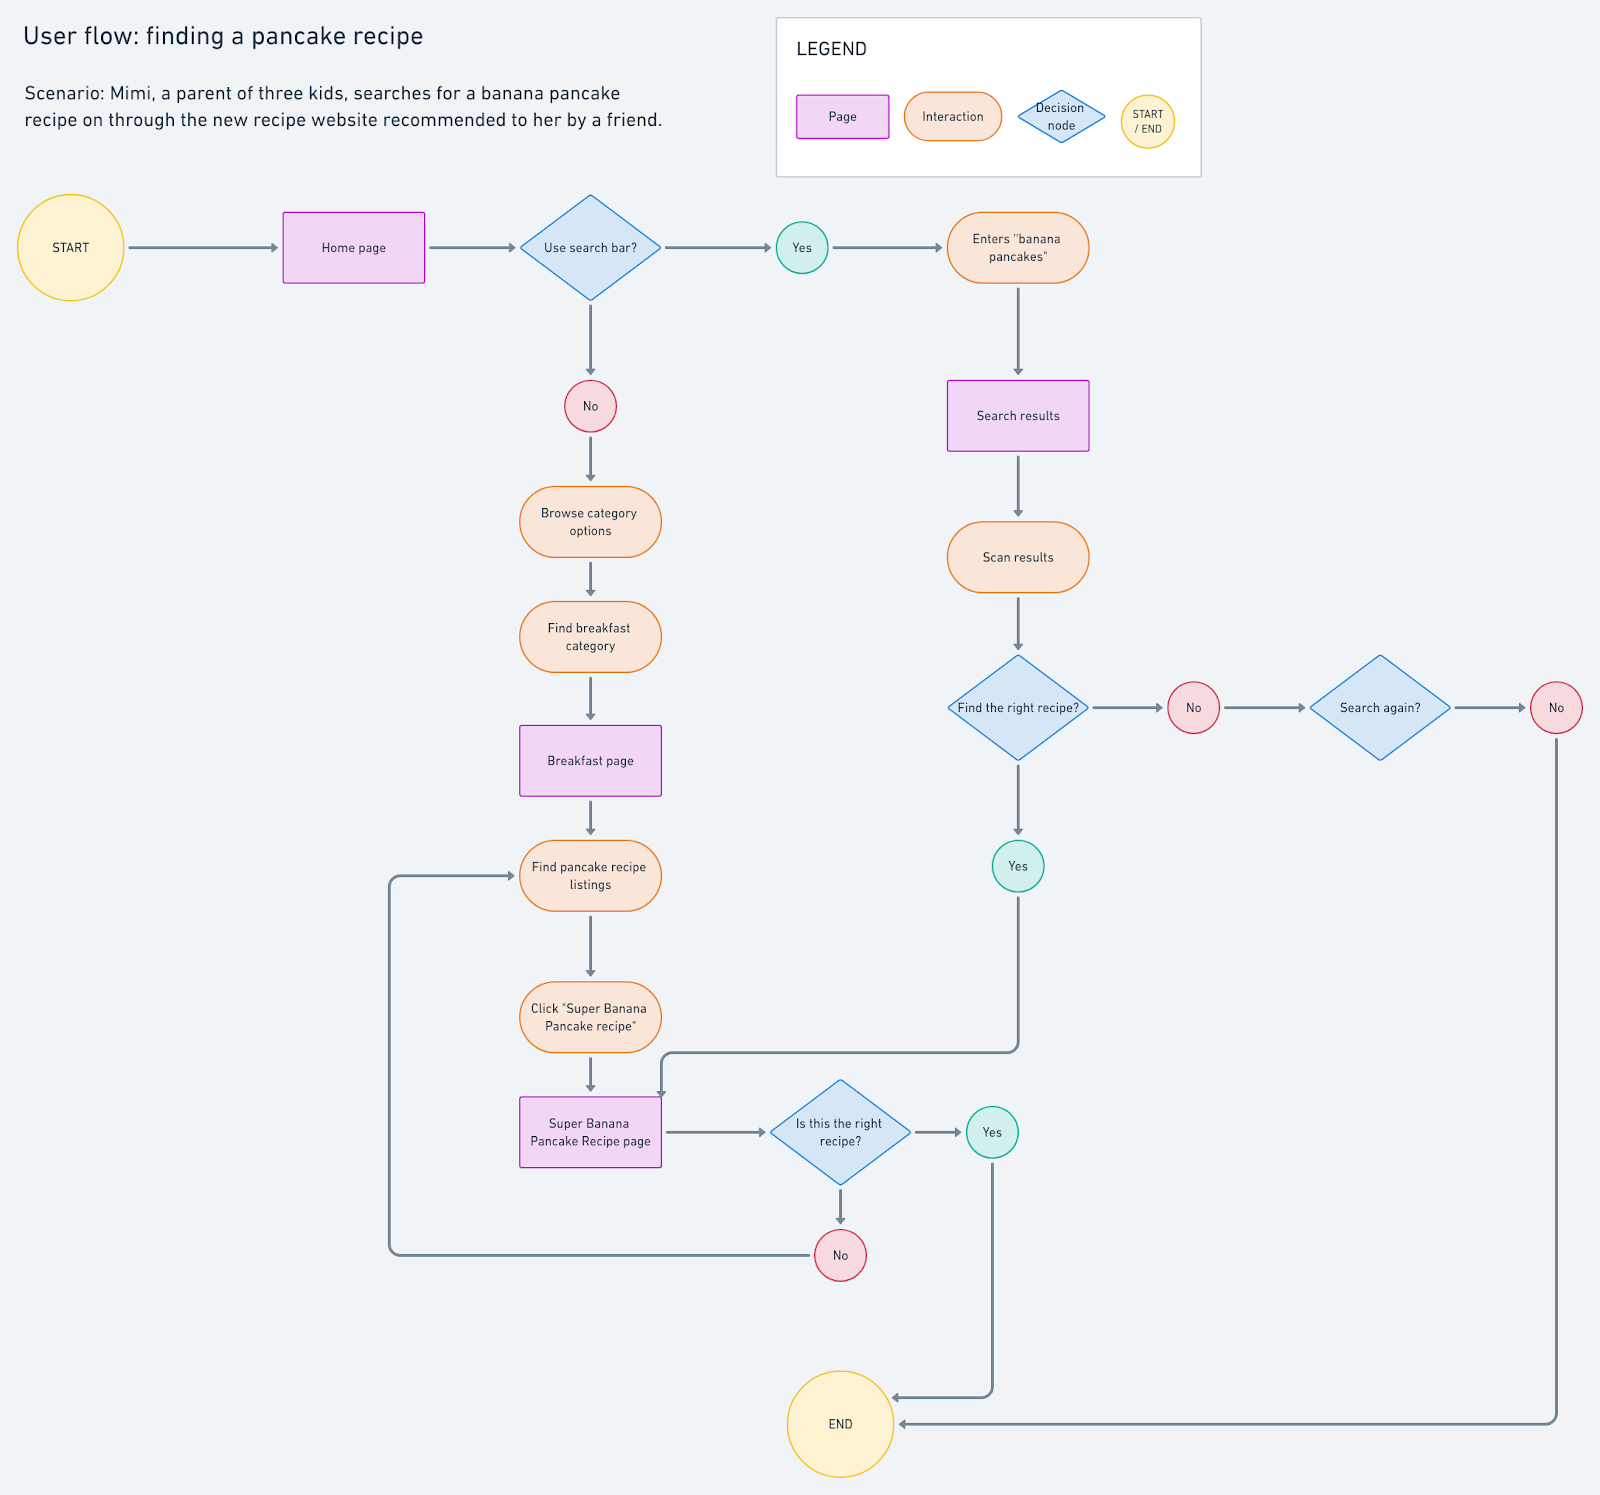
From User flow: finding a pancake by E Harano, 2019, https://medium.com/erika-harano/ux-task-flows-versus-user-flows-as-demonstrated-by-pancakes-896e78a98026, © Erika Harano
Wire flows
Wire flows combine wireframe-style page layout designs with a simplified flowchart-like way of representing interactions. Wireframes communicate layout and static content but not interactions. Flowcharts do cover interactions in detail, but they leave out the user context.
Essentially wire flows are a combination of the information covered in user and task flows, with the benefit of seeing layout in a wireframe.

Successful user and task flows
The success of your website or app is often dependent on how well your modelled flows meet the needs of your targeted users and your business. The goal is to create flows that are simple, effective, and efficient so the user can easily get from A to B in as few steps as possible.
Lo-fi prototypes lack visual detail, so the flows really become the heart of your prototype. They allow you to focus on creating the smoothest flows for users to accomplish their goals.
Why do user flows work?
The main reason seems to be that they tell a story. Our brains are hardwired to remember stories and the people involved.

Flow diagram basics
When creating user and task flows ask yourself the following questions.
- What does your app do?
- Who uses it?
- Where does the user start?
- What are they trying to achieve?
A user or task flow can simply be a flowchart, with different actions and stages represented by specified shapes. With that in mind let us start with a basic representation of user flows, without any wireframes or prototypes attached to it.
The following shapes and what they mean are reasonably consistent across programs used to create flow diagrams (including hand-drawn). However, it is advisable to include a legend if sharing a user flow diagram with others.
| Symbol | Description |
|---|---|
 |
Start/end: A circle/oval represents the user entry and exit points of a site, app, or system. This is also known as a terminator. |
 |
Arrows: Arrows or flowlines connect one symbol to another. They show the directional relationship between elements. |
 |
Decision: A diamond represents a decision. These typically contain a Yes/No question or True/False test. The outcome if the decision dictates the next step. There will be multiple arrows leaving a decision shape representing the different paths a user may take depending on which decision is made. |
 |
Input: Data entry is required from the user. External information is coming into the process or information is leaving the process. Sometimes this is called an Input/Output shape. |
 |
Process: Indicates any type of action or step in the flow. |
Watch the following video to see how a user flow diagram is created.
You can create user flow diagrams in a variety of programs. The following are a selection of free and paid programs.
- Adobe XD
- Whimsical
- Microsoft PowerPoint
- FlowMapp
- Miro
- Draw.io
- Lucidchart
- InVision Freehand.
Creating great user and task flows
Follow these guidelines to create great user and task flows.
Show the purpose
The name describes the purpose of the flow. What is the goal your users achieve by completing the steps? By naming your flows you design from the user’s perspective and split your flows based off their goals.
Go in one direction
User and task flows are not sitemaps or high-res prototypes. It is far easier for the reader to remember than a sprawling map of possible flows.
Represent a complete task
The scope of each user or task flow should be a single goal or task for your user. Avoid adding in detail that does not help to communicate the flow and actions of the user.
What are wireframes?
Wireframes are a visual guide that bring together the structure, navigation, hierarchy, and interactions to give an overall sense of how all the distinct parts of an interface will look together. Sometimes they are referred to as skeletons.
Wireframes are generally created after your initial persona, user flow, information architecture, and other research activities are completed. Wireframes can be hand-drawn or created using specialist software. Quickly sketching multiple wireframe options is a great way to ideate layout possibilities.
You can use an ideation process called Crazy 8s to quickly sketch and ideate multiple wireframes. Take a piece of paper, fold it into eight sections, and give yourself eight minutes to produce eight unique layouts for a UI page. You can do this activity with a team, each creating eight wireframes. At the end of the activity, the team will have many ideas, some great, some not so much. You may even find that some people in the team had similar ideas. Look at all the wireframe sketches and select the best ideas to explore further.
After you have completed your rough sketches, the wireframes should be created with more detail, precision, and time. They should be created with actual design ideas in mind including hierarchy, spacing, and layout.
Benefits
There are many benefits to creating wireframes including:
- Allow you to add information hierarchy to your design.
- Easier to plan the layout according to how you want your user to process the information.
- Provides a basis to begin creating prototypes.
- As a reference point for function specifications.
- Communicating functionality with stakeholders without the distractions of UI elements.
- Exploring ideas without the difficulty of change inherent in detailed UI mockups.
- A basis for prototyping and for user testing ideas early in the process.
Before we jump into types of wireframes, watch the following video for an overview of wireframing: what it is, and how to get better at it.
Types of wireframes

Hand-drawn
Hand-drawn wireframes are very quick to produce. They are a fast way to convey a layout to others that can be changed rapidly.
They are the best precursor to computer-aided drawing and their low-fidelity format encourages experimentation and honest critique.

Annotated
Annotated wireframes are produced to describe the functional elements to development teams.
Elements are explained in small paragraphs alongside and this enables the wireframe to be understood without verbal explanation.
They are valuable tools to clarify functions and focus on a page.
High fidelity
High fidelity wireframes are produced to canvas opinions from users in interviews about a layout or concept.
They should always require a usability expert to explain the context and purpose. It really is the last step before presenting the surface design of the solution.
The line between high fidelity wireframe and functional prototype is a thin one, so it may be better to use resources on a working prototype.
Responsive
It is essential that designers ensure that their content, layouts, and pages fit the devices that they might be viewed on. Responsive wireframes show how these components appear on different devices.

Other details may include zoom functionality and annotations.
How to create wireframes
As you can see, wireframes can be created using just pen and paper, or a variety of digital programs. When you wireframe keep in mind the following:
- Use greyscale with no colours or images which may distract from focusing on the layout and navigation.
- Use actual content where possible.
- Be generous with your spacing allowance where no content is available.
- Determine layout widths using a 12-column grid.
Bookmark 20 Free Printable Sketching and Wireframing Templates from Tripwire for hand-drawn wireframes and ideation.
Bookmark Wireframe Templates for UX Designers from Adobe for when you are ready to move on to digital wireframing.
Watch the following video to see how to wireframe a website.
Flow diagrams and wireframes are important in the early stages of prototyping. User flows show how a user will interact with (or flow through) an interface while the wireframe illustrates the layout.
Part one: User flow
Your task is to create a user flow for an existing mobile app.
Choose a mobile app that you use regularly. Identify a simple task that a user can complete using the app.
Create a user flow for your chosen task using either Whimsical or Adobe XD.
Apply the following guidelines when creating your user flow diagram.
- Show the purpose. What goal is the user trying to achieve?
- Go in one direction. This is not a hi-fi prototype or sitemap. Follow the main path necessary to complete the task.
- Represent a complete task.
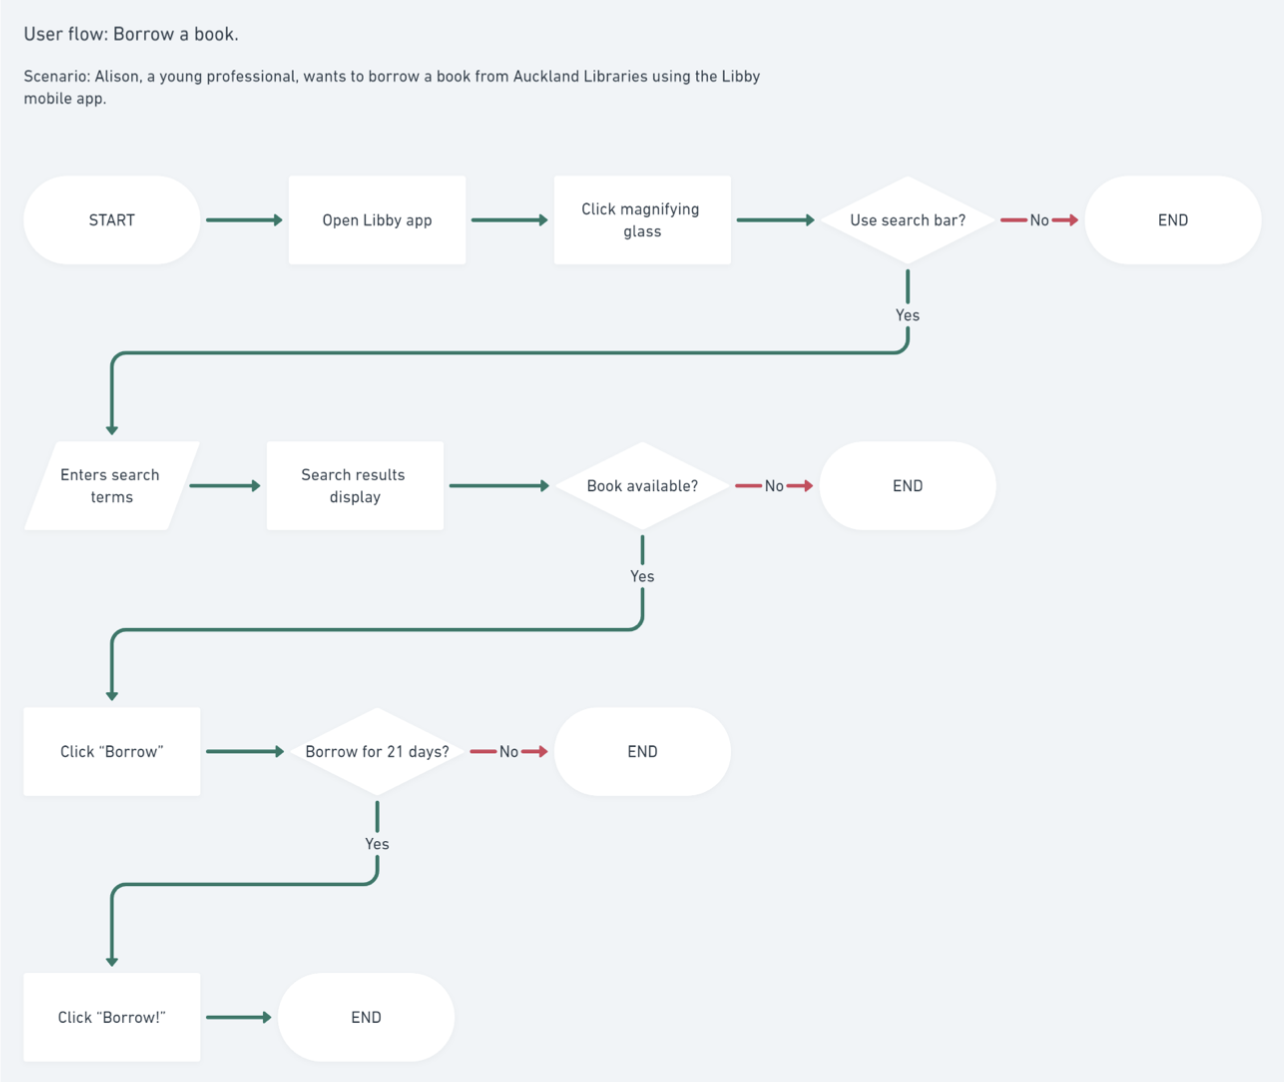
Here is an example of a user flow created in Whimsical. The user flow shows how a user borrows a book using the Libby app. Included in the user flow is a short sentence about the scenario including a reference to a persona.
Part two: Wireframe
Now that you have completed a user flow diagram, it is time to create associated wireframes.
Create wireframes for your chosen task. Aim to create a minimum of three (3) wireframes, but no more than five (5). Use Whimsical or Adobe XD to create your wireframes.
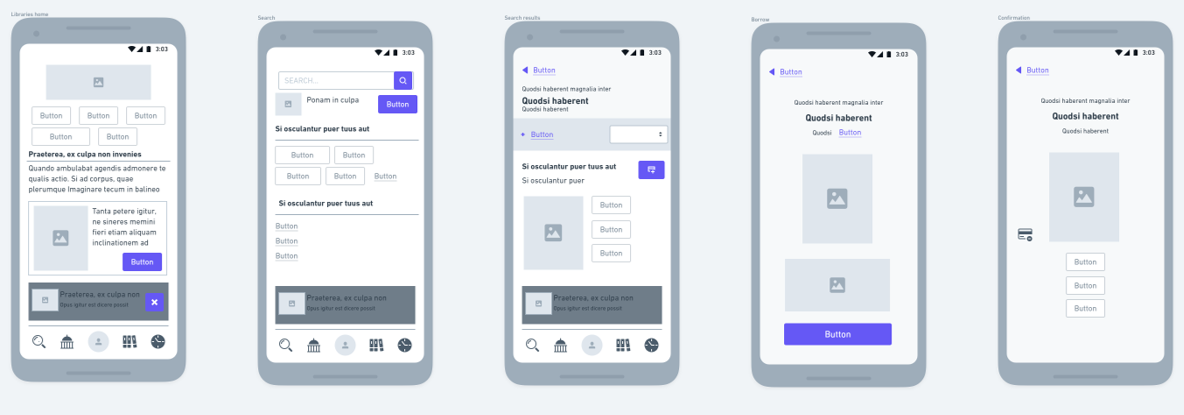
Take a look at the following example to see the level of detail expected. The wireframes illustrate the layout of the pages a user goes through when borrowing a book in the Libby app.
Part three: Discussion
Reflect on the user flow and wireframes you have created. Could the task or layout be simplified to a minimum viable product (MVP)? What could you remove from the UI to make it simpler?
Share your user flow and wireframes in the forum. Discuss any strengths and weaknesses of the interface you noticed while completing the user flow and wireframes.
User flows focus on how a user moves (“flows”) through an interface. They communicate the intended flow of a user through various pages and actions in an app or website. A task flow focuses on simple, single pathways whereas a user flow may be more complex with branching and consider user behaviour. A wireflow combines the concept of a flow diagram with wireframes showing layout and content hierarchy.
Wireframes are a visual guide that illustrates the structure, navigation, hierarchy, and interactions of a user interface. Wireframes can be hand-drawn, annotated, high fidelity, and responsive.
Whether wireframes are hand-drawn or digitally produced, you should:
- Use greyscale with no colours or images which may distract from focusing on the layout and navigation.
- Use actual content where possible.
- Be generous with your spacing allowance where no content is available.
- Determine layout widths using a 12-column grid.
Check your knowledge of flow diagrams and wireframes by answering the following questions.
Additional resources
Here are some links to help you learn more about this topic.
It is expected that you should complete 12 hours (FT) or 6 hours (PT) of student-directed learning each week. These resources will make up part of your own student-directed learning hours.
User flow
- Pintrest UX user flow
- Library of mobile user flows
- Inspiring sitemaps, user flow maps
- Site flows vs user flows
- Hotel booking from start to finish
- Make my trip - user flows wireframes
Card sorting
- WATCH Card sorting
- WATCH 10 Common wayfinding mistakes
- WATCH Journey Mapping
Wireframing
- Wireframing, prototyping, mockuping - What's the difference?
- A beginner's guide to wireframing
- Web design tutorial: Getting started with wireframes
- Why the best wireframe style is no style
- The best wireframe tools in 2022
- 20 steps to better wireframing
- UX 101: The wireframe
- Sneakpeekit sketch sheets
- Free wireframe toolkit for Adobe Illustrator
- Website wireframe