Submitted by sylvia.wong@up…
on Mon, 01/31/2022 - 17:38
In this topic, we will cover:
Overview
Introduction to WordPress
Installation
Admin dashboard
Web portfolio.
Sub Topics
A content management system (CMS) is a software application, or toolset and capabilities, that allow you to create, manage, and deliver digital content. Think of it as the middleman between an organisation and the web experience it provides consumers – the CMS is the mechanism used to deliver digital content to a site visitor.
One of the major benefits of using a CMS is virtually anyone can create, edit, and publish content efficiently. It gives site administrators greater control over how the web experience looks and autonomy to make changes as needed. While traditional platforms were intended to deliver HTML-based web experiences, modern CMS has evolved to be multifunctional and cross various channels. The top CMS also have workflow management tools to store and retrieve assets easily, integrate with other systems, and deliver personalised user experiences.
Several CMS platforms are now available, from free open source systems like WordPress, Joomla, and Drupal, to paid software like Hubspot CMS Hub and Squarespace.1
How does a CMS work?
Creating a website from scratch requires extensive manual coding (HTML, CSS, and JavaScript) to structure and style the content and make it interactive. Not only is this difficult to set up, but updating and expanding your website later becomes incredibly time-consuming. A CMS is an automated top layer for website development; it streamlines the process by providing a simple user interface to deliver content. Users can create all the common features of a website (titles, text, headers, navigation bars, and more) directly in the CMS, and reuse components to create new pages or update existing ones. These components are the foundation of your website, and developers do not need to hard-code to utilise basic functionality.1, 2
Why use a CMS?
The key characteristic of CMS is the ease of use. This is the main reason people choose to build with them, and a good CMS should be intuitive. All major CMS platforms will have essential development tools such as drag and drop components and design and editing features.
The following are five characteristics of a CMS.
Workflow management tools
Some CMS also have workflow management tools. Large businesses in particular may want this capability if they have several people/teams working to deliver content. CMS workflow tools can help organise competing priorities, manage deadlines, and provide gate checks to ensure content is approved, reviewed, or removed by the right people.
Ease of integration
CMS can also integrate with other systems easily. A common example is eCommerce. Many companies nowadays have a shop attached to the website they host their business documentation or use their website primarily for retail. Several of these companies’ websites will be built on a CMS, and integrate commerce features (such as checkout buttons and available inventory) through extensions or plugins. A business’ CMS will need to be compatible with their commerce system to start selling on the same platform.
Analytics and personalisation
In addition to delivering content, businesses will also be interested in analytics and personalisation. These help businesses understand how their content is received and better target audiences. Some CMS will have analytics and personalisation functionality inbuilt, but integrating third-party tools for such purposes is quite simple if needed.
Asset management
A CMS may have an asset library for storing content, known as a digital asset management (DAM) system. Alternatively, it could allow integration with a third-party system like Dropbox.
Multi-channel delivery
Another primary aspect of a CMS is the ability to deliver content to multiple channels. Early CMS were designed to deliver content through the web, but contemporary CMS can deliver through mobile apps, voice assistants, applications, and smart devices (such as watches or appliances).1
CMS benefits
There are a few different types of content management systems, each with its own benefits:
Web-based CMS
A web-based CMS is a system that can be accessed from any internet-enabled device. This type of CMS is usually hosted by the provider, which means that you do not need to worry about hosting fees or maintenance. Web-based CMS are often subscription-based, with different levels of features and support.
Self-hosted CMS
A self-hosted CMS is a system that you host on your own server. This type of CMS gives you more control over your website but also comes with more responsibility. You will need to take care of hosting, updates, and security.
Decoupled CMS
A decoupled CMS is a system where the content management system and the website are not tightly coupled. This means that the CMS can be used to manage content for multiple websites or applications.
Headless CMS
A headless CMS is a system that does not have a front-end interface. This type of CMS is often used to power mobile apps or other digital experiences. The content is stored in a database and delivered through an API.1
Proprietary versus third-party CMS
It is common for large businesses to utilise a third-party CMS. As these enterprises have a greater volume of content, they benefit from the accessibility and reusability of CMS components when updating that content.
Small companies may want a bespoke system if they have very specific business needs. While a proprietary CMS can afford greater personalisation, it comes at huge time and resource costs to maintain and manage the system.
For business sustainability, stakeholders should factor in compatibility with growth when deciding whether to create their own CMS or use a third-party system.1
Limitations of CMS
While CMS nowadays are built with responsive design and can adapt to a range of channels, new avenues for delivering content are rapidly appearing all the time. It can therefore be difficult to reorientate your CMS or scale your content to serve new channels with the changing landscape.
Over customisation can be another limitation. All web experiences will require some level of customisation, but this always introduces variability to the system, which increases the risk of bugs. The more customised features you build, the more time and resources you need to spend testing and troubleshooting components. Customisation can thus become expensive to maintain and require additional security measures.1
WordPress is an open source software built on PHP and MySQL, and licensed under the General Public Licence (GPLv2). As of 2022, It is also the platform of choice for over 43% of all sites across the web. WordPress’ mission statement is “to democratize publishing and eCommerce one website at a time.” This includes the freedom to build, change, and share.3 WordPress powers all kinds of digital experiences, from blogs to simple and complex websites, to applications.
WordPress.com versus WordPress.org
Early users may remember WordPress.com as a blogging platform. The platform has evolved over the years to adapt to different kinds of website builds, but is only a hosted version of the WordPress software mentioned earlier. WordPress.com was created by Automattic and is unaffiliated with the WordPress Foundation, which developed the WordPress project and software.
WordPress.com is a good hosting option for beginners and those who need a website for personal use, but WordPress.org is the way to go for self-hosting, as this is where developers are afforded more freedom. Although users can unlock more features with paid WordPress.com plans, you should consider self-hosting if you are building a commercial website to take advantage of the plethora of WordPress.org plugins. These will allow you to customise exactly for your business needs.4
WordPress.org (which we will refer to as ‘WordPress’) is the focus of this module.
18 Reasons to use WordPress over other CMS
WordPress has a simple user interface for publishers, and a complex backend to be leveraged by developers. The following listed features are ready to use “out of the box,” but can be extended with the thousands of plugins available, meaning practically infinite CMS functionality.
Simplicity
WordPress is designed for everyone, emphasising accessibility, performance, security, and ease of use. It has minimal set-up requirements, so you can focus on delivering content with ease.
Flexibility
WordPress allows you to create whatever web experience you want: blogs, websites, portfolios, online magazines, news channels, or even an application or a network of sites.
Accessibility
WordPress is intuitive and functions like general document builds. Drawing on their experience in other software, most users will be familiar with basic functions like creating and formatting posts/pages, and inserting media. This content can then be published on the web at the click of a button.
Publishing tools
WordPress offers one of the cleanest and fastest ways to write and publish web content. It also has a range of publishing tools including a draft mode, scheduling publications, and logging post revisions. You can also make your content public/private, and password protect posts/pages.
User management
Different members of an organisation can have differing levels of access to content. For example, product owners may have administrator access, content writers may have editing access, and subscribers may have viewing access. WordPress allows businesses to manage membership access by defining writing privileges for contributors and viewing access for the wider community.
Media management
Media management is simple with WordPress’ drag and drop media uploader, which allows users to add images and other media, or build galleries. The CMS also features image editing tools, and an option to add alt text for accessibility.
Full standards compliance
All WordPress-generated code is in full compliance with W3C standards. This means your WordPress site will be compatible with browsers in their current version, and future generations. Stakeholders can rest assured the website will continue functioning when new browser versions are released.
Simple theme system
Changing themes in WordPress is a simple way to re-vamp your site design. Out of the box, WordPress provides 3 default themes. You can browse from thousands of themes through the theme directory and change yours at any time. Alternatively, users can develop and upload their own themes. Theme development is a key aspect of this module.
Plugin extensions
The standard WordPress package provides tools for building a simple website. However, if you need more complex functionality, the plugin directory offers thousands of extension options, including the ability to add more intricate galleries, forums, widgets, calendars, and forms; social media integration, and custom search engine optimisation (SEO).
Built-in comments
Like other media platforms, WordPress has an in-built comments section for followers to interact with content. This acts as a community forum, and administrators can moderate discussions on their posts.
Optimised search engine
WordPress is optimised for search engines by default. However, many plugins are available from the plugin directory if you need specific search engine controls.
Language
WordPress is available in over 70 languages. Opportunities are also available for contributors to translate WordPress into more languages.
Easy installation and upgrades
Installation and upgrades are simplified with WordPress. Several web hosts offer one-click installers. You can also use a file transfer protocol (FTP) programme: create a database, upload WordPress using FTP, and run the installer. If a new version of WordPress is released, users are notified through the dashboard and can update the software in less than a minute.
Importers
If you are currently hosting a web experience on an alternative platform and want to migrate to WordPress, importers for Blogger, LiveJournal, Moveable, Typepad, and Tumblr are available to simplify the transition. An importer is also available to migrate content from WordPress onto other platforms.
Freedom
Software freedom is the foundation of WordPress. It is free software not just in terms of monetary cost, but also regarding freedom of use. The GPL protects this freedom. Developers have complete autonomy in how they use, extend, modify, or distribute WordPress code. This includes use in commercial projects without licencing fees.
Data ownership
In line with WordPress’ desire to give users freedom of control, when you create with WordPress, your information belongs to you (website, content, data). You are the owner and responsible for your own data permanence. WordPress also gives you control over advertising on your site.
Community
As the most popular open source web-based CMS, the community is at the centre of WordPress. Contributors and developers can ask peers questions on support forums, seek advice from volunteers, or learn about WordPress through WordCamps or Meetups, reading online documentation/blogs, and watching tutorials.
Contribution
If you are already familiar and confident in developing with WordPress, jump on a forum and help answer questions from other developers. WordPress also has opportunities for community members to write documentation and share their knowledge.5
WordPress developer features
Several “under the hood” features are available for developers to extend WordPress. Here are some of them.
Plugin system
WordPress APIs allow you to create extension plugins. The platform’s extensibility is supported by access to thousands of hooks. You can also host the plugins you have created on the plugin repository.
Theme system
A site’s theme is the foundation of its design. Part of WordPress’ flexibility is the ability to create all kinds of themes for yourself, clients, or other users. Users can distribute custom themes in the theme repository.
Application framework
WordPress has backend features for app development: translations, user management, HTTP requests, databases, URL routing, and many more. It also has its own REST API for applications to interact with a site.
Custom content types
WordPress has default content types, but you can create your own custom post types, taxonomies, and metadata by writing a few lines of code. This gives users greater flexibility to personalise their content, whilst retaining the efficiency of a CMS. We will cover custom post types and taxonomies later.5
Why use WordPress?
With the statistics and features covered prior, you can understand why someone would choose WordPress to build their web experience, and why it is our preferred CMS in this module.
WordPress offers superior text publishing functionality without sacrificing design flexibility. It is one of the most diverse website builders available, so unless you are looking for niche functionality, it is a good starting point for most projects. It also has plugins to extend text/media-based sites with a web shop if required, and developers have dedicated support for themes if you need assistance.4
Alternative CMS
One of the major advantages of WordPress is it is open source. We already know about the benefits of an open source community from previous modules. In the context of CMS, non-open source platforms like Squarespace, Shopify, and Wix give developers less freedom to control features in premium bundles. These limitations include the following.
Several other CMS have eCommerce functionality in-built, so there is less room for expansion/customisation.
Other CMS are often only compatible with their own web host, which dictates where you can serve your content, and may limit performance.
Non-open source software will limit what codes are available, and what developers can do to modify or use that code. Some platforms even have their own coding language (like Shopify which uses Liquid), meaning modifications require specialist knowledge and resources.
Other platforms give users less data ownership. In many cases, you are renting a website from a company, so once you are no longer paying that data is lost or retained by the host.
If you just need an online shop, a CMS like Shopify may be a good alternative because it has the eCommerce functionality (you would not expect to host a blog site on Shopify). However, most other website builders (including WordPress) will support a standard interactive website's core functionality and offer extensions for more specialised functionality.
Managing a WordPress site
WordPress sites are easy to manage. Website management usually involves the following:
Making sure the server is okay
Security checks
Running backups
Updating themes, plugins, and the WordPress software
Managing spam
Testing functionality and broken links
Improving speed and SEO
Most of these things can be managed with a robust hosting plan and plugins. Updates to the WordPress software itself happen occasionally and can be set up to process automatically.
SEO is built into the platform. WordPress automatically generates title tags and meta descriptions for all pages and posts. This means search engines know about your content and get indexed to move ranks.6
There are many ways to install WordPress. We will cover both local installation and installation with a web host.
To start off, we recommend installing locally. This will allow you to create a local site that can be accessed offline on your computer. The benefit is you can play around and test changes before implementing them on a live web-hosted site.2, 7
LocalWP
It is useful to learn how to use a dev server and install WordPress using MAMP or WAMP (depending on if you are using Mac or Windows respectively). However, there is also a greater potential for error. The potential for errors can be mitigated by using a bespoke dev tool for WordPress development, such as LocalWP.
We recommend using LocalWP installer. It is more modern and easier to start a WordPress site using LocalWP than using MAMP/WAMP.
This video takes you through setting up the Local installer. Follow along and set up your own LocalWP account.
Next, watch this video to go through the steps in creating a WordPress website inside the local free app or the local freewheel app.
For the sake of comprehensiveness, you may also wish to learn how to use MAMP/WAMP, although this is not required.
Installing WordPress locally for Mac using MAMP
MAMP is an acronym for Macintosh, Apache, My SQL, and PHP. It is a tool for creating a PHP and My SQL server on your computer, which will allow you to run a local WordPress site.
The first step is to install MAMP and create a database.
Follow the installation wizard until the setup is complete. You do not need any custom settings at this stage.
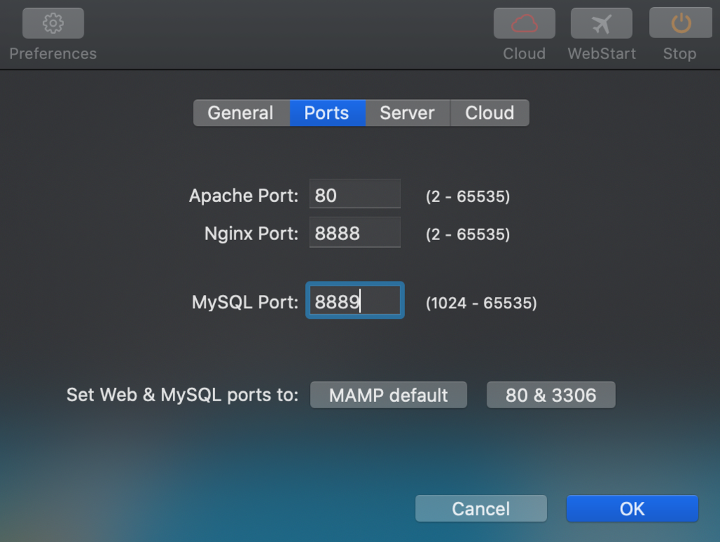
Then, launch the Preferences menu and select the Ports tab. Enter 80 for Apache Port to access local sites from http://localhost instead of http://localhost:8888. Click the OK button to continue.
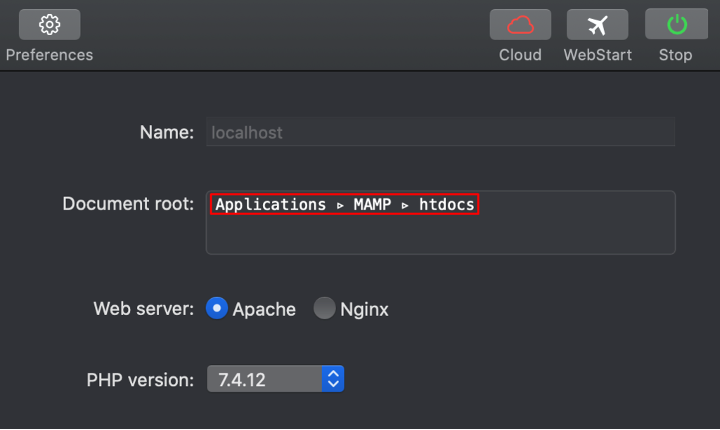
Check your Document root directory to create and store your website. By default, it will be in the Applications/MAMP/htdocs folder. If you are installing WordPress in a subdirectory, you will want to change this.
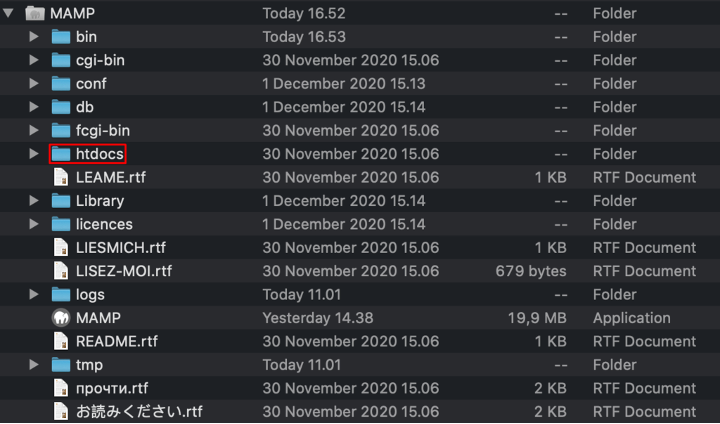
Move the WordPress folder to the default MAMP document root: Applications/MAMP/htdocs.
Click WebStart on MAMP to open the MAMP application window on a browser. Go to Tools > phpMyAdmin to create new database information.
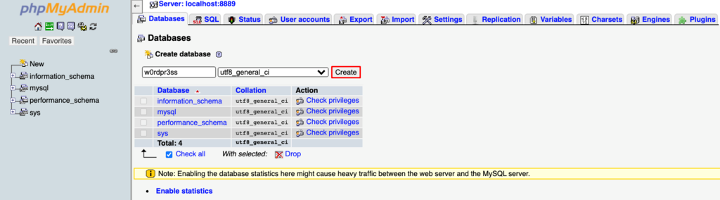
Select the Databases tab to create a database. Fill out the section under Create database, then click the Create button. The following example uses w0rdpr3ss as the database name and selects utf8_general-ci in the section next to it.
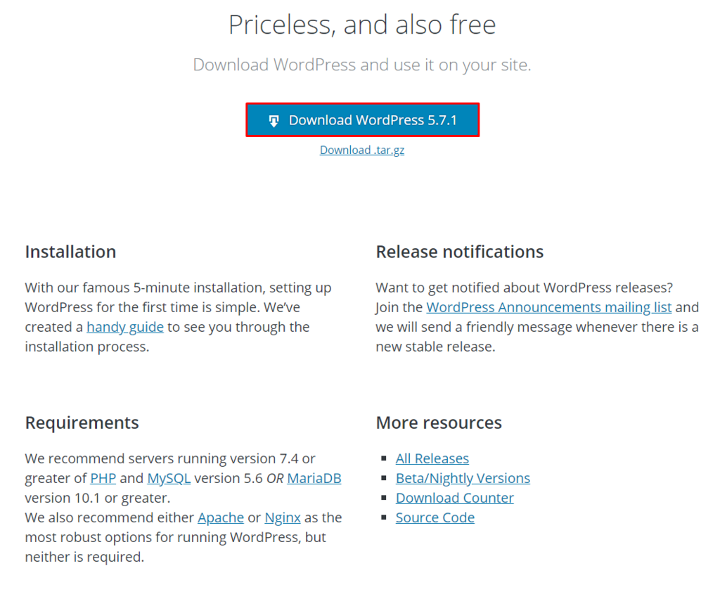
Now we are ready to install WordPress. You can download the latest version of WordPress from the official website.
Select your preferred language. A Welcome to WordPress message will appear. Click on the Let’s go! button to continue.
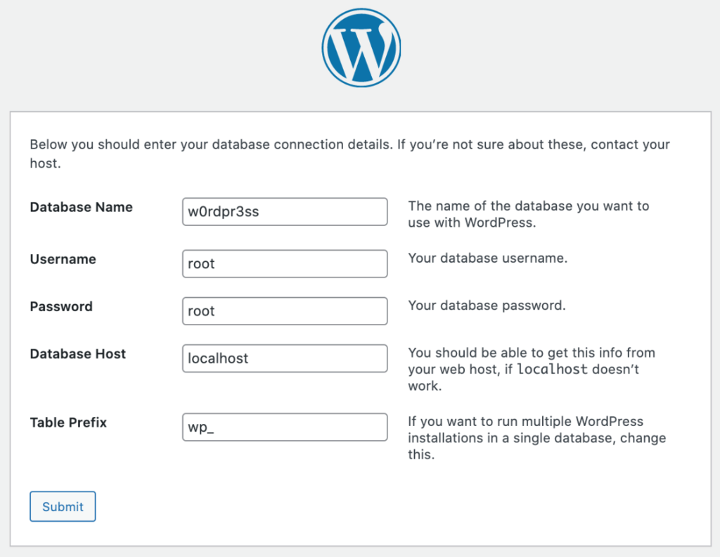
When prompted for database and user connection details, enter your database name. Then, use root as the username and password. Click Submit to continue. WordPress will use this data to create a wp-config.php file automatically.
If WordPress does not automatically create a file, go to wp-config-sample.php in your htdocs folder. Manually change database_name_here, username_here, and password_here with the information from your form and save it as wp-config.php.
On the next screen, choose a username, password, and email address, then click Install WordPress. A success message should appear. Click the Log in button to access WordPress Admin.
Installing WordPress locally for Windows using WampServer
We will use WampServer to set up WAMP (Windows, Apache, MySQL, PHP) on Windows.
The first step is to install WampServer and create a database.
WampServer will only ask to choose a default browser and text editor for the webserver to use. No other custom configuration is needed.
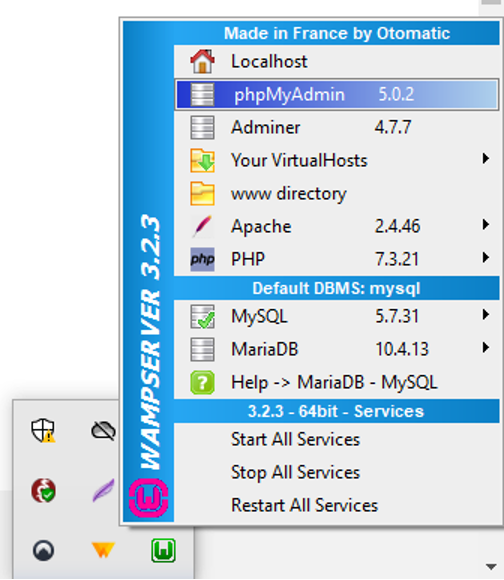
Access WampServer from your taskbar and launch phpMyadmin. Make sure to wait until the WampServer icon is green to complete this step.
On your login screen, enter root as Username. Leave the Password blank and click Go.
Navigate to the Databases tab, enter a name and create a database for your WordPress. The following example uses w0rdpr3ss as the database name and selects Collation in the section next to it.
Now we are ready to install WordPress. You can download the latest version of WordPress from the official website.
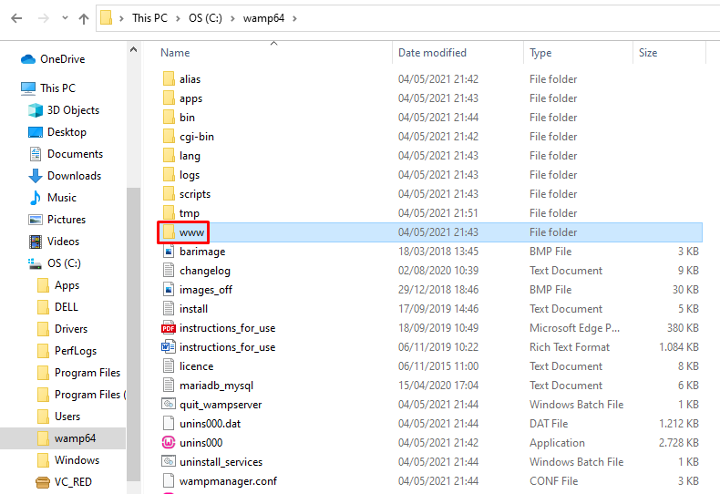
After downloading WordPress, move the WordPress package to the document root web directory of C:/wamp64/www on your computer. Change the WordPress folder name to whatever you want. The following example renames it testsite.
Open your web browser and enter http://localhost/[folder name] to open the setup page (replace [folder name] with your own folder name from the previous step).
Choose the Language and fill in the database details. Use root again as your Username and leave the Password field empty.
Complete the remaining setup steps and WordPress will be installed on your computer in a few minutes.
If you want to produce a live site straight away, several web hosting providers have WordPress auto installers, which is the easiest way to install the software. However, you can still install manually with a web host to better understand how WordPress works.
To run WordPress on a web server, you must select a hosting provider to host your website. We recommend Hostinger and will be using it to demonstrate the installation. Before you start, go to the Hostinger site, choose a plan, and create an account.2, 7
Domain names
Before you download and install WordPress, you should decide what kind of domain you want. This determines how visitors access your website. You can choose to have a:
domain name root (example.com)
subfolder (example.com/blog)
subdomain name (blog.example.com) – this option requires an additional step.
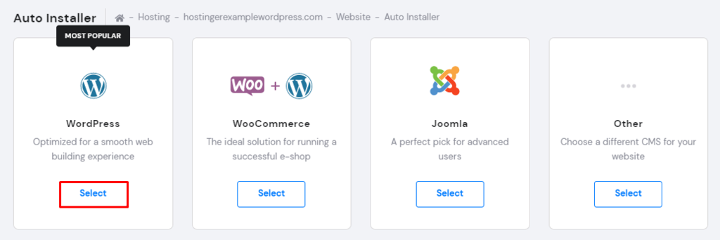
Installing WordPress on Hostinger using auto-installer
Follow these steps to auto-install WordPress on Hostinger.7
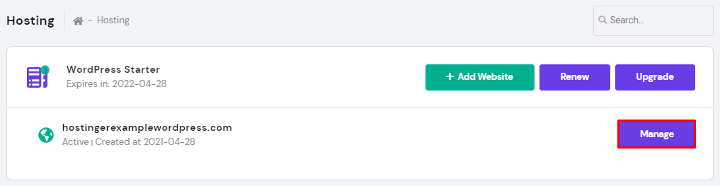
Log in to your web hosting account and click Hosting on the main menu.
Choose the domain name for your new WordPress-powered website and click the Manage button to access your hPanel.
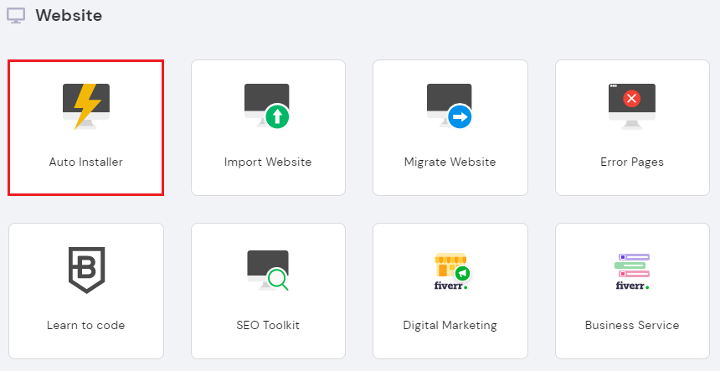
On your hPanel Dashboard, locate the Auto Installer button under the Website section.
Under Auto Installer, choose WordPress and click the Select button.
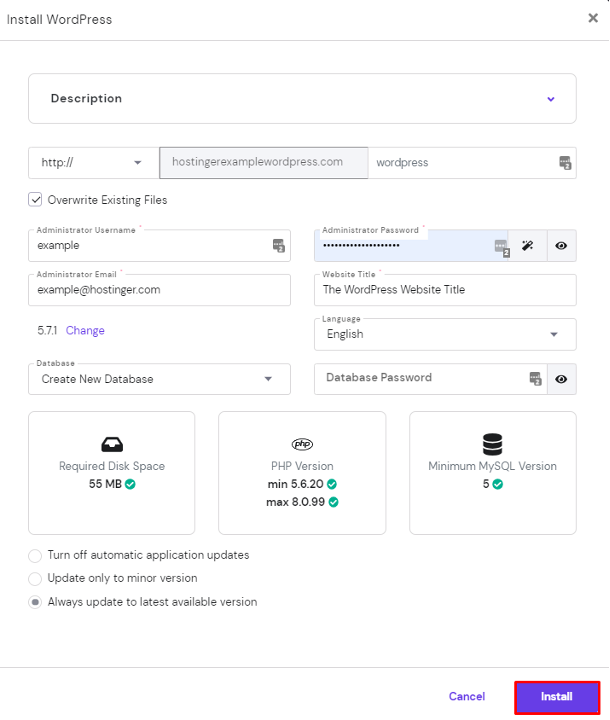
Fill out the Install WordPress form:
Make sure your custom domain name says “wordpress” next to it.
The Administrator Username, Password, and Email are for the WordPress login. They do not need to be the same as the web hosting login information. Choose a strong password to prevent security breaches.
Create a WordPress site title.
Choose your preferred Language.
Select the Always update to latest available version option for automatic updates.
After filling out all the necessary information, hit the Install button.
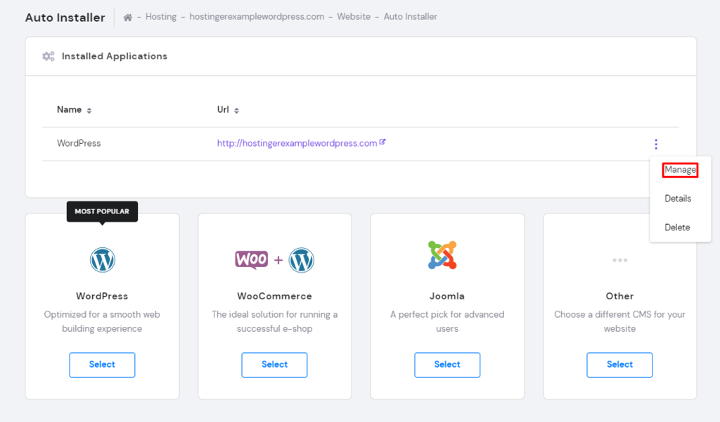
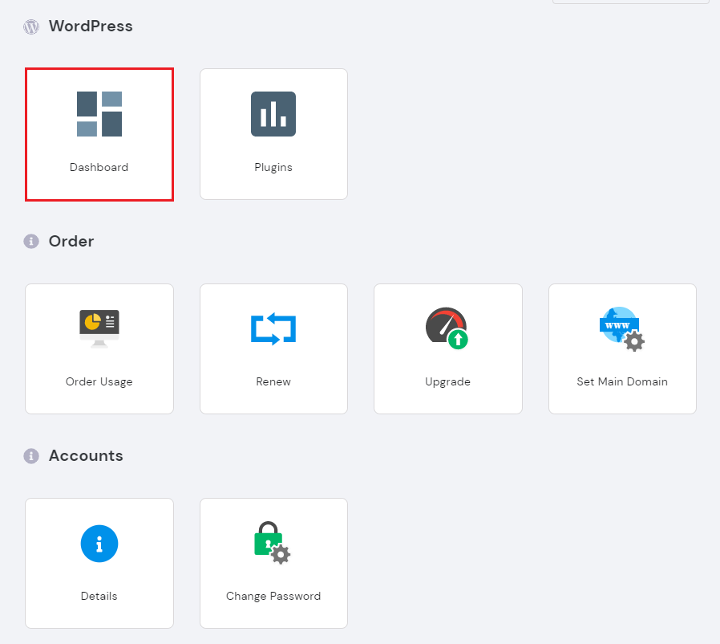
Hostinger will show Installed Applications. Click on the 3 dots next to your WordPress URL. Select Manage to go to My WordPress Dashboard.
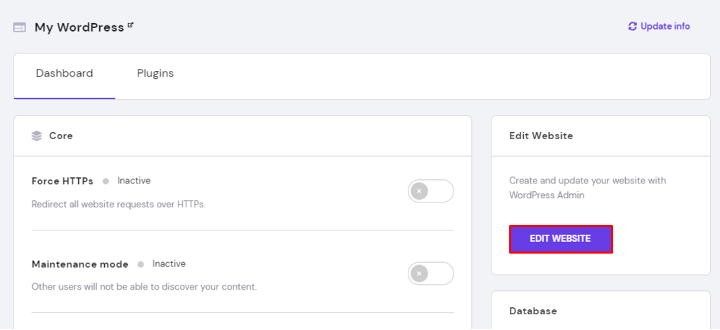
On the WordPress Dashboard, click Edit Website to access WordPress Administration Dashboard.
Another way to access the WordPress Admin Dashboard is by clicking the Dashboard button under WordPress on hPanel.
If you do not notice any changes on your WordPress site after following these instructions, clear your browser cache.
Installing WordPress manually with a web host
Installing WordPress manually is still quite simple and like other software installations.2, 7
Preparing for installation
Before we begin this installation process, we need to set up a few things.
Ensure you have the following system requirements to run the CMS on a web server:
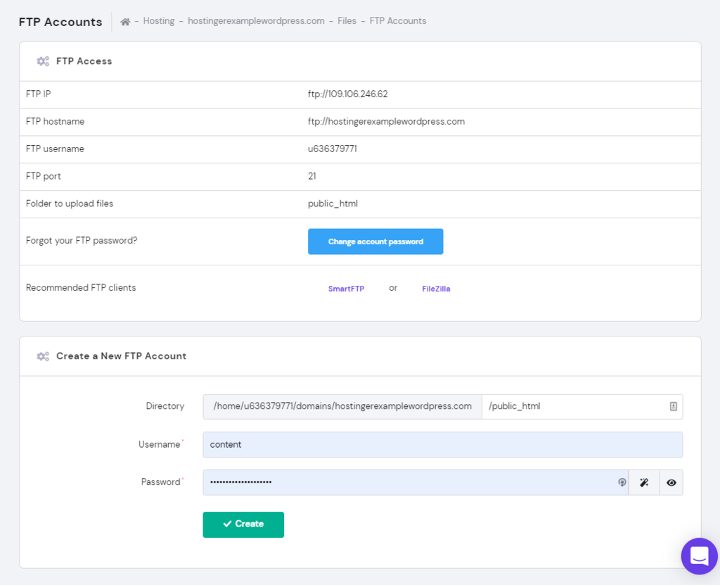
Upload your website files from the extracted WordPress folder into your public_html file using Hostinger’s File Manager, or an FTP Client like FileZilla.
Important: If you are using an FTP Client, find the Create a New FTP Account section on your web hosting account control panel beforehand.
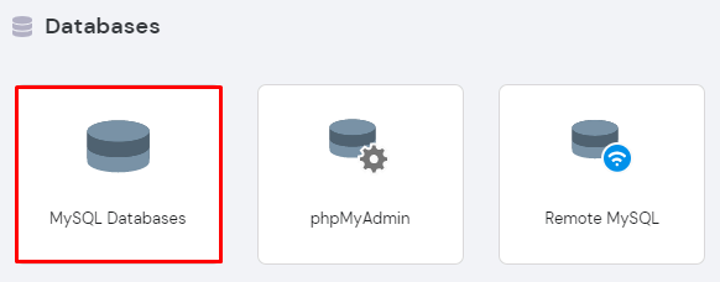
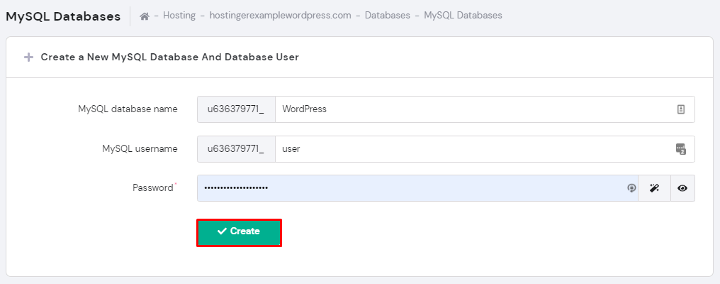
Create MySQL database and user
Now we need to create new MySQL credentials.
Log in to your hPanel and go to MySQL Databases under the Databases section.
Create a new MySQL database name, username, and password. After filling out all necessary information, click the Create button.
Make sure to copy the MySQL credentials complete with the alphanumeric string – you will need them later.
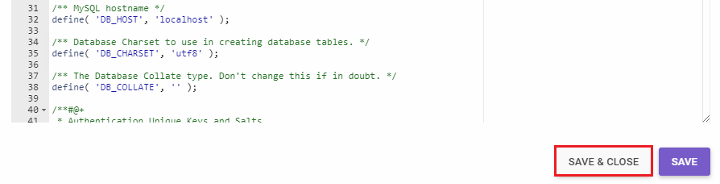
Configure wp-config.php
wp-config.php is a configuration file that lets WordPress know your database server settings. It is made specifically for you. Follow these instructions to configure your WordPress files.
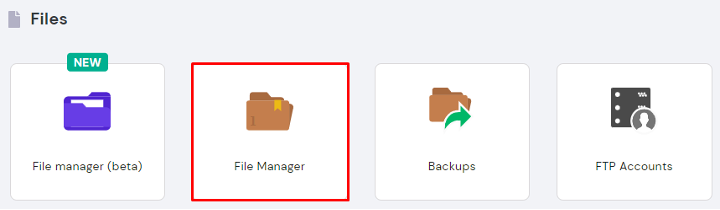
Log in to your hosting account. On your hPanel, click on File Manager under the Files section.
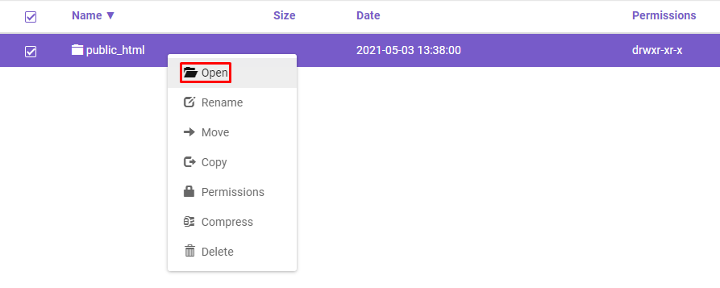
Click and expand public_html and open the folder containing the WordPress installation.
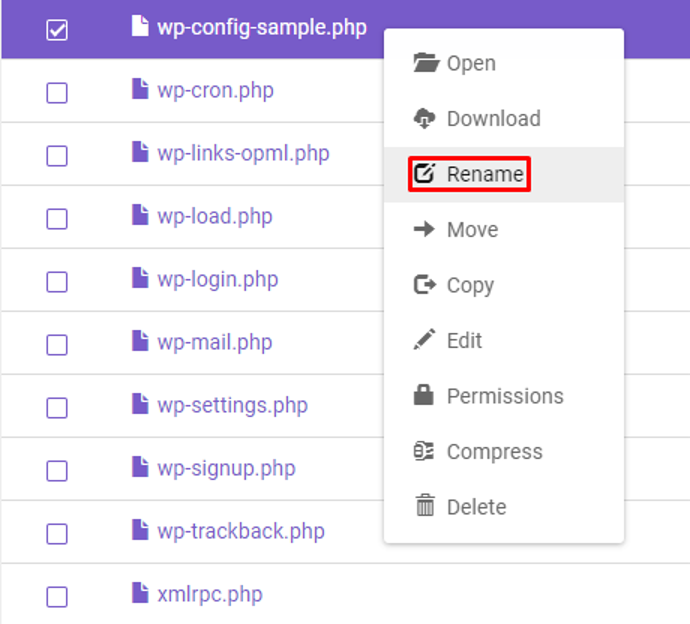
Locate the sample configuration file, wp-config-sample.php, and rename it wp-config.php.
Right-click on the file and select the Edit button.
Once open, locate the following information:
// ** MySQL settings - You can get this info from your web host ** //
	/** The name of the database for WordPress */
	define( 'DB_NAME', 'database_name_here' );
	/** MySQL database username */
	define( 'DB_USER', 'username_here' );
	/** MySQL database password */
	define( 'DB_PASSWORD', 'password_here' );
	/** MySQL hostname */
	define( 'DB_HOST', 'localhost' );
Replace database_name_here, username_here, and password_here with the MySQL credentials you created earlier. Remember to include the alphanumeric strings.
When you have finished editing, click the Save & Close button.
Run WordPress Install Script
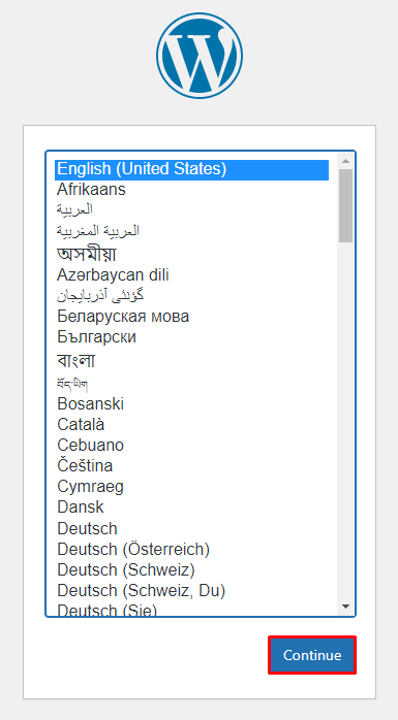
To install WordPress script, type your domain name in a browser to proceed with the manual installation. You can also do this by going to yourdomain.tld/wp-admin/install.php. This will open the WordPress setup page.
WordPress will first ask you to select the language for your site. Do so and press Continue.
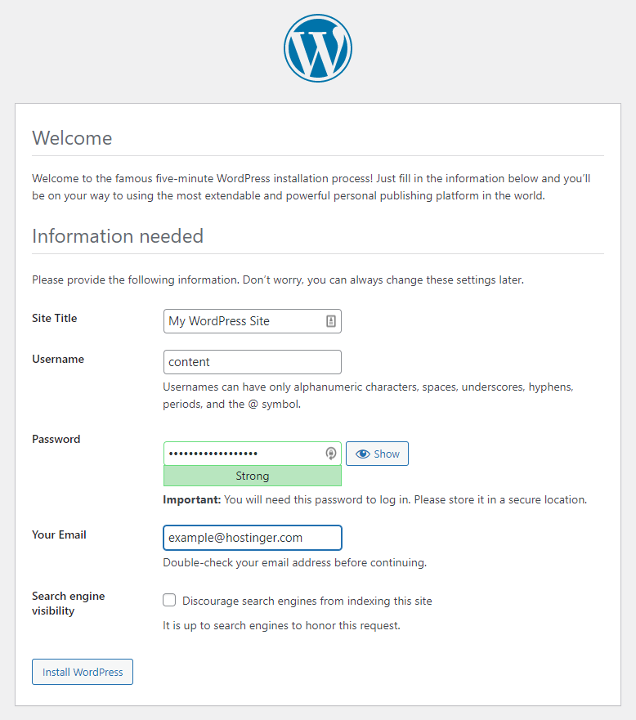
Fill in your website and administrator information:
Create a new site title for your WordPress site.
Set the WordPress Username, Password, and Email which will be used later to login to the WordPress Admin Dashboard.
We suggest only checking the box next to Search engine visibility if you do not want the website to be visible on search engines.
Click the Install WordPress button to finalize the process.
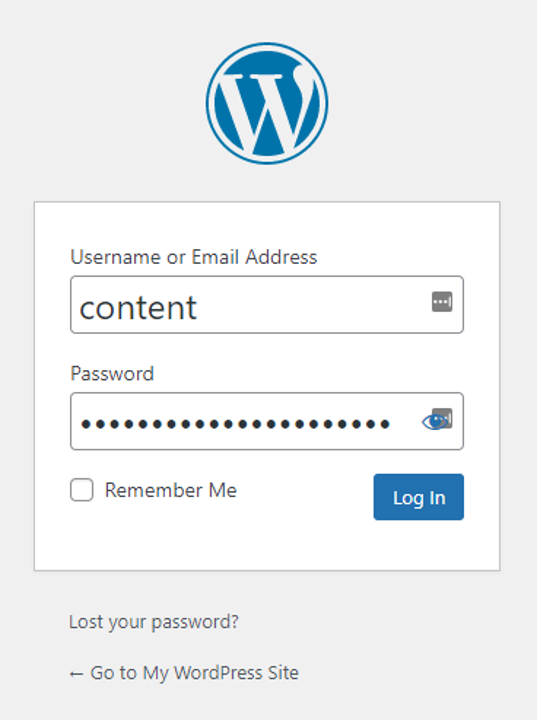
Then, fill in your login information and press the Login button to access WordPress Admin.
Sometimes, WordPress might also ask to collect your MySQL details after selecting the language. Because you already have them, press Let’s go!
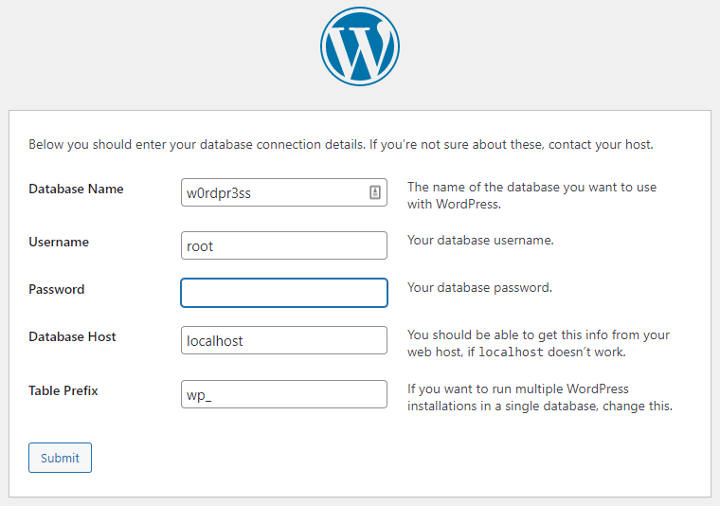
Enter your MySQL database credentials. Leave the Database Host and Table Prefix fields as they are. Only change them if you want to run multiple installations with one database. After filling in all the necessary information, click Submit.
WordPress will check whether it is possible to connect to the MySQL database you have created. If there are no errors, select Run the installation.2, 7
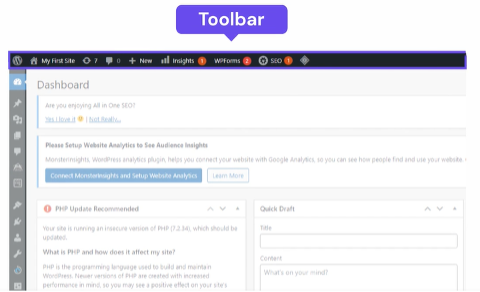
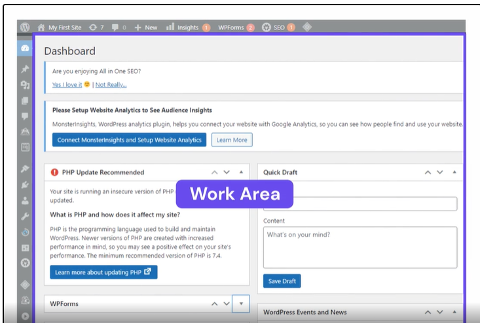
The admin dashboard provides an overview of your site and can be divided into 3 main sections:
Toolbar
Navigation menu
The main work area.
Toolbar
At the top of the page is a toolbar. It contains links to the common administrative functions and resources. For example, if you hover over your website’s name, you will get a link to the public view of your site. It also displays simple notifications like updates and new comments count.
Navigation menu
On the left-hand side is the navigation menu. It contains links to all the administrative screens of WordPress. If you hover over a menu item, a submenu with additional items will appear.
The main work area
Inside the toolbar and navigation menu is the main work area.
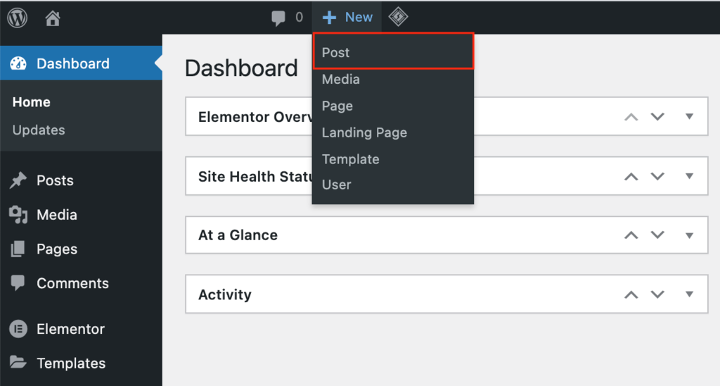
Publishing content
You can create WordPress content by publishing a new post or a new page.
WordPress posts – time-sensitive content which can be categorised, tagged, and archived.
WordPress pages – static, dateless content without categories or tags (for example, Contact us or About pages).
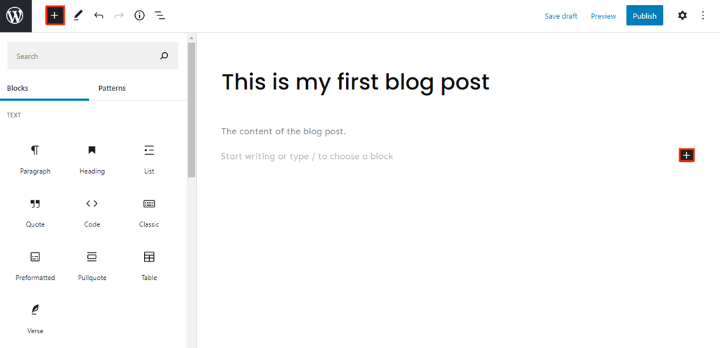
Gutenberg block editor versus classic editor
The WordPress Classic editor is designed for text-based content, and similar to the text editor in Microsoft Word or any other popular text editor.
The Gutenberg editor (named after German inventor Johannes Gutenberg who invented the printing press) is a new editing experience that allows you to create and modify content elements using “blocks”. You can add blocks for paragraphs, images, videos, galleries, audio, lists, and more with plugins.8
Watch this video for an introduction to the Gutenberg editor, and to see it in action.
Enter the content of your post in the field below. If you want to format your text, use the toolbar options.
At the right-hand side of the screen, you can see the “meta-boxes”. Each box has a particular function.
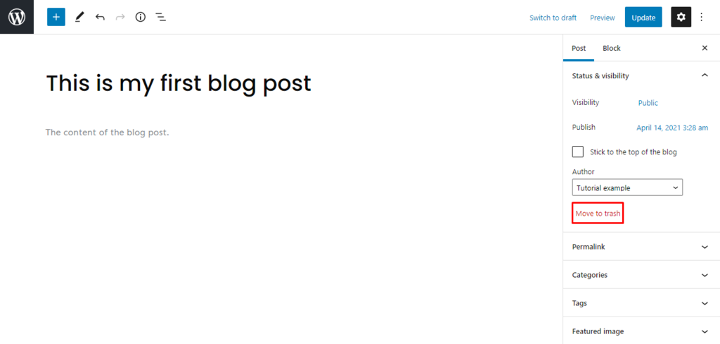
Publish: Here you can change the status and visibility of your post, and schedule it. You can make your post live by clicking the Publish button. If you decide to delete the post, press the Move to Trash button.
Categories: This box allows you to add, delete, or edit the category of your post.
Tags: This box allows you to add new tags.
Featured Image: Here, you can assign a featured image to a post. It will usually be visible at the very top of the post, but the image location can differ depending on the theme.
Now that you know how to make a post, read about each aspect more in-depth.9
Adding a title and content
Your post’s title and content are essential to optimising the website’s search engine. If you publish a post without a title, it will be harder for site visitors to find the post.
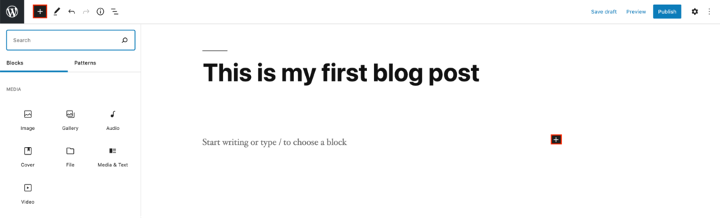
In the content field, you can write, or click the “+” to pull up a Blocks toolbar, which allows you to add different content.
There are blocks for all common content types, including paragraphs, columns, and headings. You can also add widgets such as Latest Comments and Search. Furthermore, there are blocks to embed third-party content.
Some blocks can be transformed. Start with a paragraph block, then change it into a column, heading, or quote by clicking on the block icon button.
To make further edits, click on the Settings icon at the top right corner of the screen, then select the Block section. This will provide more editing options for all blocks.
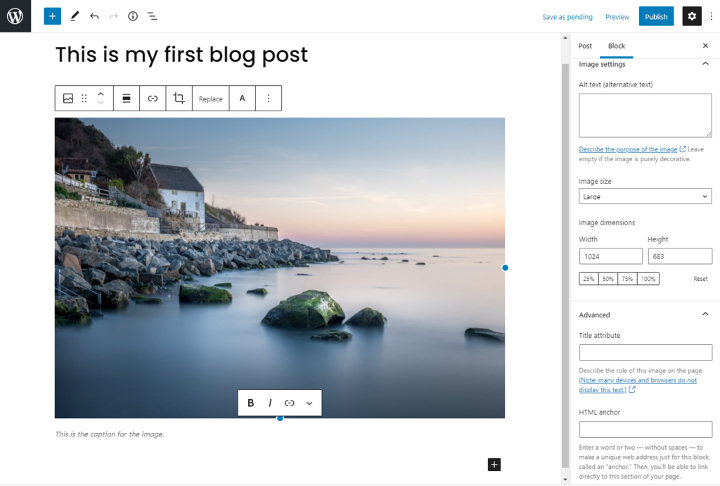
Adding images
On any site, images are important to create visual interest. You can optimise your images on WordPress to make your content more appealing, increase site speed, and improve SEO.
WordPress provides 2 main blocks for images:
The image block – for single uploads
The gallery block – for multiple images.
There are 3 ways to upload images using the WordPress Block Editor:
Drag and drop the media directly into the chosen block.
Add existing media from the Media Library.
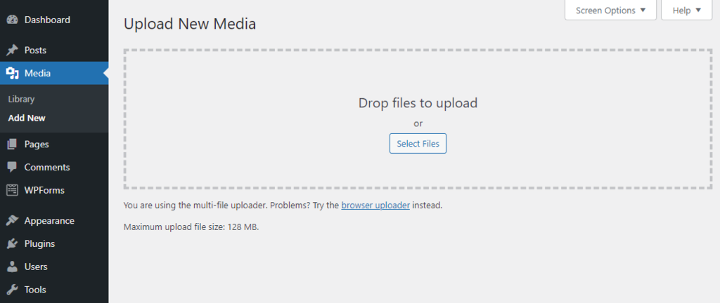
Insert a new image by going to Dashboard > Media > Add New.
To edit the image, click on it and go to Settings > Block. There, you can change the style, size, and dimensions.
Adding other media files
Adding different media files makes your site dynamic and engaging. You can add all kinds of files, including video, audio, and downloadable documents.
To add media, navigate to Dashboard > Media > Add New, OR click on the “+” sign on the header and select Media.
You can also add images, audio, and videos by copy-pasting the URL in the block. This option is helpful if you want to make posts and pages load faster.
Adding a featured image
A featured image appears on search engines or when sharing a post on social media platforms. It helps attract visitors and improve SEO. Choose your featured images carefully, as it is the first thing visitors will see before opening posts.
Once you have selected an image, you can edit it using the tools on the right side of the Media Library, and change the alt-text, caption, and description. You can also change the image by clicking Replace Image under Settings.
Some WordPress themes do not support featured images, so depending on which theme you are using, there may be additional steps to add featured images.
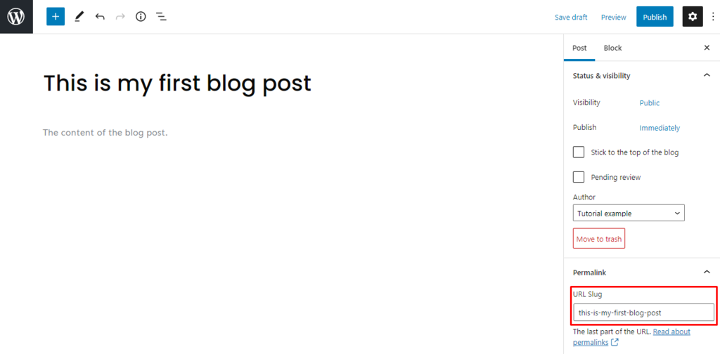
Setting permalinks or slugs
Permalinks or slugs help increase a post’s ranking on search engines. Permalink is short for permanent link. It is a post URL auto-generated from the post title.
The part of the link that follows the domain name is called a post slug or URL slug.
Domain name
slug
You can edit slugs by clicking on Settings > Post > Permalinks.
Punctuations like commas, quotation marks, and apostrophes are invalid URL characters, and will automatically be substituted with dashes.
You can change a slug anytime, including after a post is published. If you change the title of a post after it has been published, check the slug.
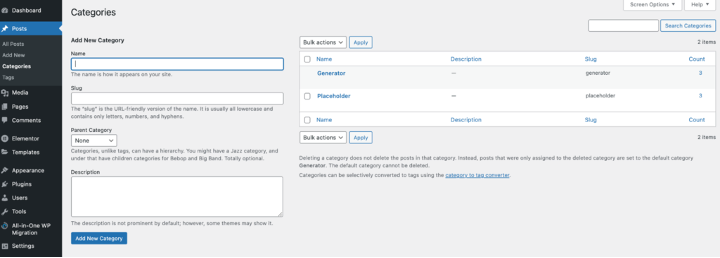
Adding categories and tags
Categories and tags are essential for SEO and keeping your site organised.
Categories cover general topics on the site, while tags are more specific to posts. For example, a recipe post could have the category “recipe”, and the tag “noodles”. It is possible for a single post to have multiple categories and tags.
To add a new category or tag, go to Dashboard > Posts > Categories or Tags. From there, edit the name, URL slug, and description; and view all the posts under the categories and tags.
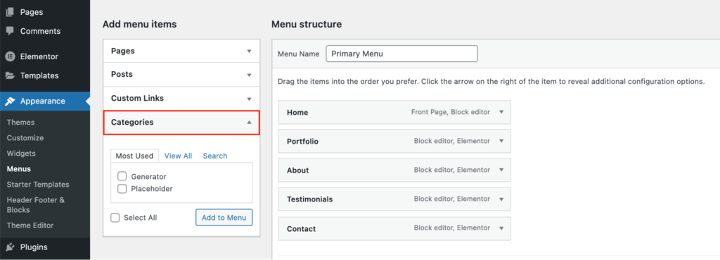
Categories can also be added to the website menu, just like pages. Go to Dashboard > Appearance > Menus and you will find Categories under Add menu items.
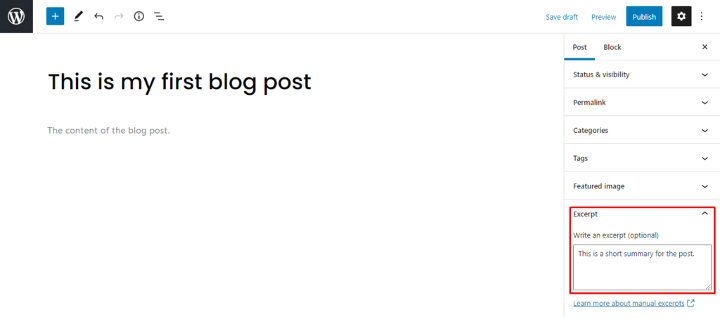
Adding an excerpt
An excerpt is a summary or sample of the post. It is another way to draw the reader in.
WordPress automatically uses the first 55 words of a post to generate an excerpt, but you can create your own. To do so, go to Settings > Post > Excerpt, and write whatever you want. You can also customise the word limit with HTML or plugins.
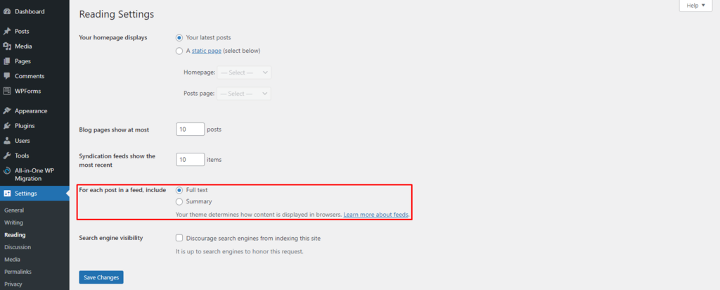
On the posts page, you can choose to display the full content of your post or just the excerpt. To display excerpts on the blog page, go to Dashboard > Settings > Reading. Then, For each post in a feed, include, select Summary.
The benefit of showing just excerpts is you can display more posts on the page, and increase your chances of generating more interaction.
Choosing the author
Choosing an author for each post will be an important feature if your site has multiple content creators.
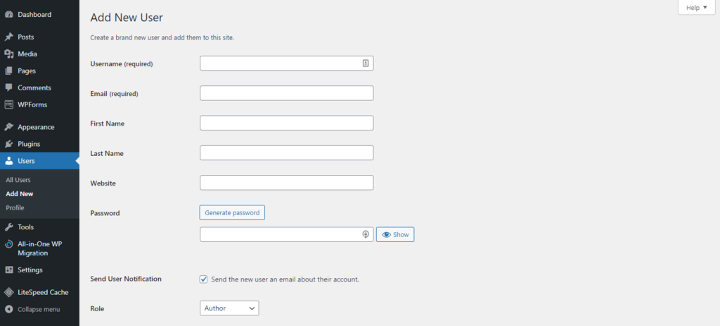
WordPress uses the site creator as the main author of posts by default, but you can add users and select different authors for different posts. To do so, go to Dashboard > Users > Add New. Fill out the username displayed on the site, the email address, and set the role to Author.
You can view your site's users and roles by navigating to Users. Make sure you have the Role checked on the Screen Options tab. There, you will see all the authors. 9
Publishing options
Now you know how to create posts, we can break down the publishing process.
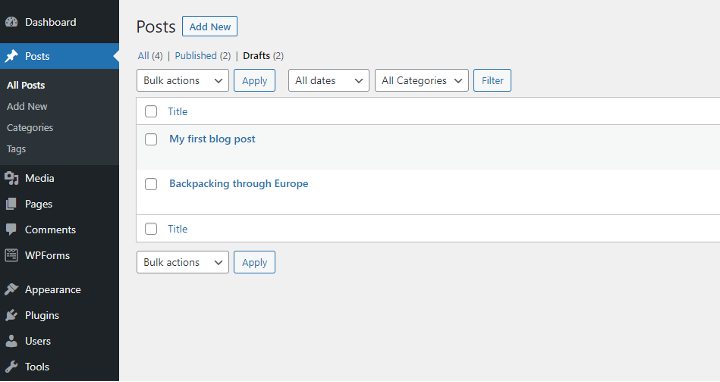
Draft
WordPress has an auto-save function, but it is good practice to manually save by clicking Save draft at the top right corner every so often, just to be safe. Drafts allow you to leave the text editor without publishing. You can find saved drafts by navigating to Dashboard > Posts > All Posts > Drafts.
You can also revert a published post back to draft by clicking Switch back to draft at the top right corner of the screen.
Preview
The Preview button shows you what the post will look like on the website. Some themes can radically change the display of content, so it is useful to view the post in context and adjust before publishing.
The preview option shows you the desktop editor view by default, but there are also options to see the editor in tablet or mobile view.
Likewise, you can adjust the post preview for different screen sizes by going to Dashboard > Appearance > Customize, and alternating between the 3 icons at the bottom left corner.
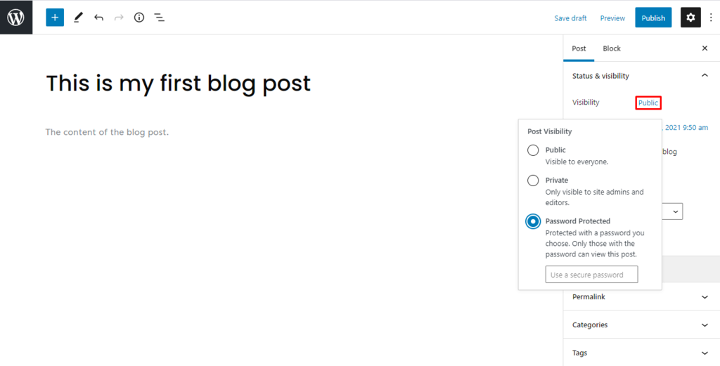
Status and visibility
WordPress offers 3 options for post visibility:
Public – makes the post visible to anyone.
Private – makes the post visible only to authorized users who are logged in to the dashboard.
Password Protected – allows you to create a unique password and give access only to those who know it.
You can change the visibility of a post at any time, including after it is published, by going to Settings and clicking the link next to Visibility.
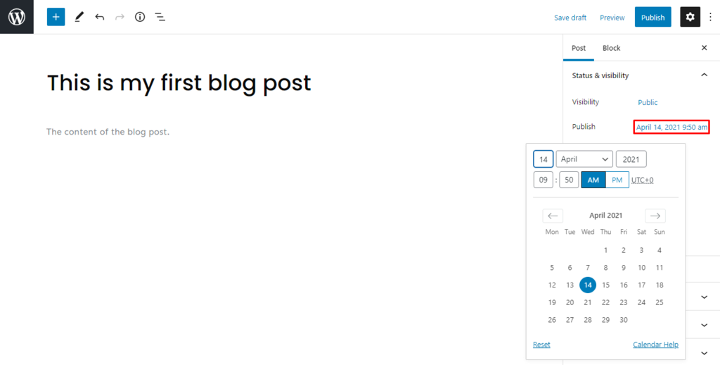
Scheduling
Scheduling posts helps regulate the output and timing of content.
To schedule a post, click the Settings icon, then the link next to Publish. You will see a calendar and options to change a post's exact time and date. Note the time zone before saving.
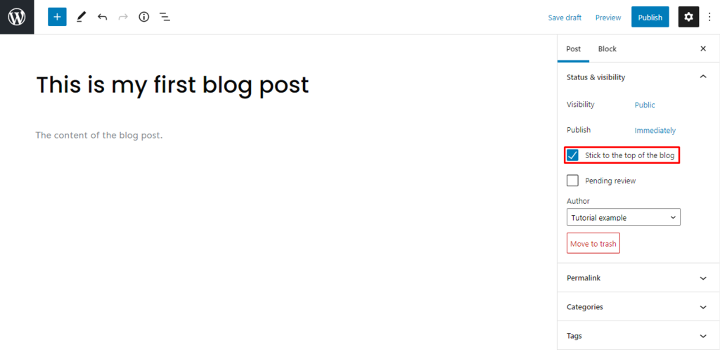
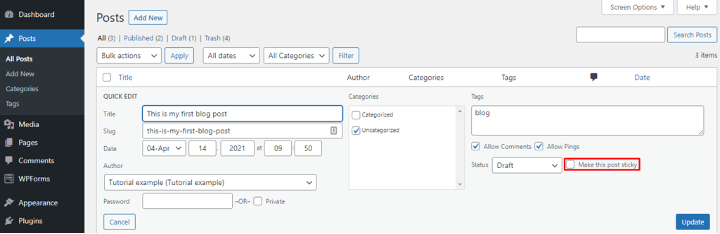
Sticky post
The sticky post feature allows you to highlight select articles by pinning them to the top of your blog page.
To make a post sticky, go to Settings > Status & Visibility, and check the Stick to the top of the blog option. Alternatively, go to Dashboard > Posts > All Posts. From there, click on Quick Edit under the article, and tick the Make this post sticky option. This automatically puts the post above others, including newer posts.
There is no limit to the number of posts you can make sticky, but this feature should be used sparingly to maintain effectiveness. For example, it is a good idea to make posts with an expiration date sticky – like a giveaway – and stop highlighting it once the deadline has passed.
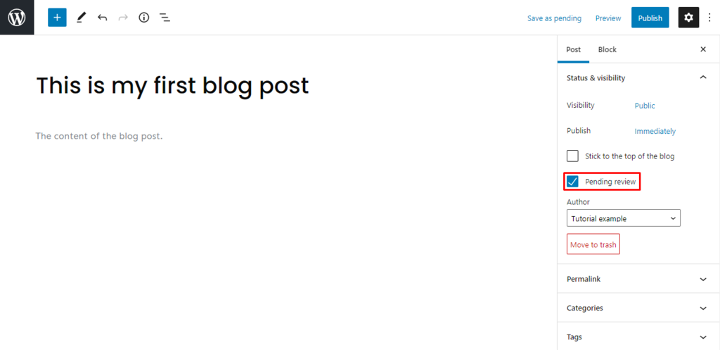
Pending review
Pending review tells backend users a post has been drafted and is awaiting review before publishing. Using this feature adds a custom status to your post: Pending. This is another beneficial feature for sites with multiple content creators, or teams with people who hold different publishing responsibilities, as it informs members which stage of publication the post is sitting in. Single-author sites can also use this feature as a gate-checking reminder to review posts before publishing.
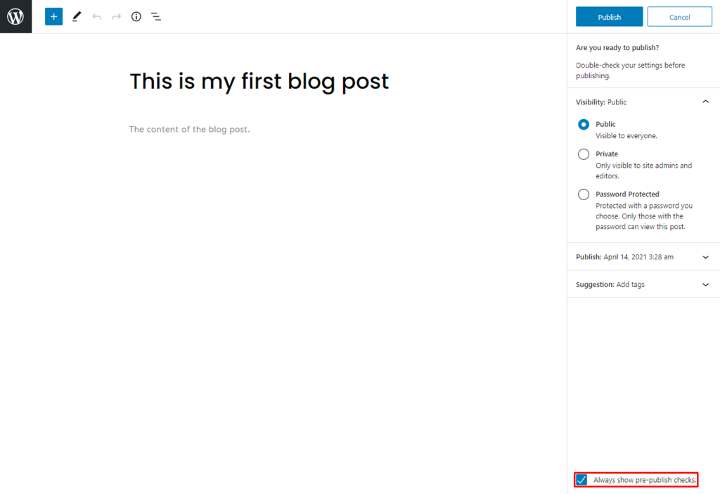
Publish
When you click the Publish button, it will show the visibility of the post, the publishing date and time, and suggestions from WordPress.
If you do not want to do pre-publish checks for your posts, uncheck the box on the bottom right side of the screen.
Deleting a post
There are a couple of ways to delete a post:
Go to Settings > Move to trash, OR
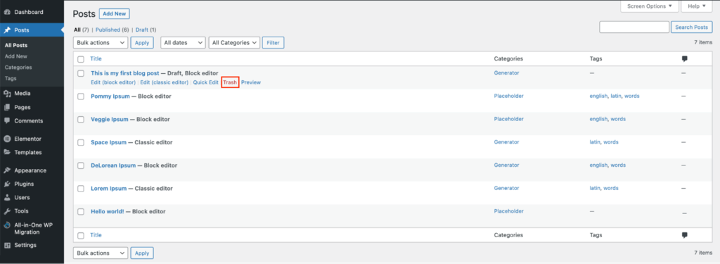
Go to Dashboard > Posts > All Posts, hover over the post, and click Trash.
By default, WordPress saves deleted posts in the trash folder for 30 days before deleting them permanently. To restore a deleted post, just click the Restore button.9
Creating a new page
Follow these steps to create a new page.
Open the Add New section under Pages menu or click New > Page at the top toolbar.
The Add New page section has a WYSIWYG text editor identical to the Posts section, so the text input and formatting process are the same.
You may also notice the Pages section does not have Tags and Categories meta-boxes. Instead, it has a box called Page Attributes. Here, you can change the order of your pages and set parent pages. This is useful if you want to have several pages under one parent page.9
As this is the final module before completing your diploma, you should take this opportunity to build an online web portfolio.
Purpose
An online web portfolio is a perfect way to showcase your work and provide a way for potential clients to contact you. A web portfolio:
Presents your professionalism and dedication to mastering your skills better than any CV or cover letter can.
Is entirely yours. You can create a brand and curate your work to create a unique identity.
Makes you searchable and available to potential clients.
Start by defining the purpose of your portfolio. Think about the message you want to convey. Perhaps you want to build relationships with your clients or, on the flip side, you only want to sell your products and services.
Do you want to be hired as part of a team or work freelance on ad-hoc projects?
Are you ready to present not just a final product, but also the process, difficulties, and failures in a blog?
What do you want your personal brand to be?
Depending on what you want to achieve, your portfolio website may include:
A showcase of your work
An “About” page
Testimonials
Case studies
Call to action
Blog.93
The designer just needs some way of showing previous works without me asking for it. There are so many designers out there, if I can’t find their “portfolio” publicly I can’t reach out to them for work.
Mat Vogels, Founder, Zestful
Showcase your best work
It is not necessary to include all your work. Instead, select the work that you are most proud of and work that illustrates a wide breadth of skill and experience. Consider the type of work you want to be doing in the future and highlight work that supports that goal.
Give readers an explanation of the work you choose to showcase. Provide context. What were the challenges you were trying to solve, and can you share insight into how you came to the final product?94
Create a compelling about page
The “About” section is your chance to tell potential clients who you are and what you do. It complements your portfolio and provides background information about you.
Start by being clear about what people are hiring you to do. Provide a couple of examples of that and work them into your statement.
Sarah Doody, founder of UX Portfolio Formula explains. ‘If you’re a web designer, you might be tempted to write something like, “I’m experienced in designing websites, and I’m skilled at different software and mobile design and app design.” That’s not specific enough because it doesn’t distinguish you by showing what you can accomplish for clients. Instead, the same web designer could write something like this: “I’ve helped decrease the shopping cart abandonment rate for an e-commerce store by 30% after conducting usability tests, and doing a complete redesign of checkout on the site.”’94
Your bio should be concise and help clients get to know you as well as your work. Include your strengths, experience, and background, and detail some of your biggest accomplishments.
A good logo will help you stand out and make a great first impression. Think of your web portfolio as a key asset in growing your personal and professional brand.95
Gather testimonials
Testimonials can help assure potential clients that you are trustworthy and capable, with a proven track record of satisfied clients.93
Likewise, if you have received any awards and qualifications – put them on display too.
Case studies
Case studies provide context which can be very helpful in presenting your work the right way. Tell the story behind your most successful projects, including the process and anything you learned along the way.
Remember to include information about the client or project’s goals and explain how you met them. Case studies show the progress from beginning to final outcome.95
Think about creative ways to showcase your work, such as video clips, showreels, and animated GIFs.
A strong call to action
A straightforward call to action is to include your contact information and a button or form directing potential clients to reach out by email or phone.
Blog
You may want to consider including a blog on your portfolio. This encourages you to keep adding fresh content and can help with SEO. You can also use this as a space to educate clients and share your knowledge, which helps strengthen your brand and be recognised as an expert.95
What platform?
Your online web portfolio needs to be publicly available. Take some time to research platforms, before choosing one and setting up your portfolio. Here are some suggestions to get you started:
Behance
GitHub
Wix
Dribble
WordPress
As you progress through this module, collate work from earlier modules and this final module, to include in your portfolio.
And of course, remember to apply best practices of web and UX design to your own site!