In this topic, we will cover:
- WordPress backups
- Themes and plugins overview
- Implementing WordPress themes
- Implementing WordPress plugins
- PHP
- Extending a CMS theme
- CMS security.
To back up your site means creating a copy of its files and data in case the originals are lost or damaged. This includes all the posts, comments, links, plugins, themes, and uploads on your site.10
You can back up your site manually by downloading the files and MySQL database of your WordPress site, but this can be time-consuming if your site is large and updated frequently.
Most hosting providers will automate account backups.
You can also install a plugin to automate backups. Here are a couple of options:
- UpdraftPlus: A plugin with the ability to backup WordPress to a remote location (such as DropBox) and restore it. This is the plugin we will be focusing on.
- BackUpWordPress: A lightweight backup plugin that allows you to exclude certain folders, schedule the execution time, and has support for several different languages.2
For best practice, you should keep at least 3 backups in 3 different locations (for example, hard drive, email, and cloud storage).
Why do you need to back up a WordPress site?
A WordPress site is an investment, and a backup is protection for or insurance on that investment. Backing up your site is crucial site management. It will increase your security and ensure you can restore your site in case of unexpected but inevitable errors/issues.2
Files and databases can get erased or corrupted for several reasons, some of which are out of your control. A backup is invaluable in the following circumstances.11
Updates gone wrong
WordPress software, plugins, and themes will have regular updates to improve performance and security. Although it is uncommon, there is potential for errors that make you lose some data or functionality. You might also find some updates are undesirable or incompatible, in which case having a backup allows you to restore previous versions.
Cyberattacks
Because WordPress powers so many websites, it is also a common target for cyberattacks. Cyberattacks are not just for stealing sensitive information – some hackers hack to spread malware or spam, to use your site to attack another, or even for no reason. By backing up your site, you will be able to restore anything that is lost or damaged because of the attack.

Server outages
When a site “goes down” and cannot be reached, it is likely because of a server outage. These can happen for various reasons, including cyberattacks, traffic overload, and hardware malfunction.
If you are using a hosting provider, you will not be able to control their server, you can take precautions in case of server outages occur. Some hosting providers have their own solutions to restore your site, but using your own plugin and settings means you will have better control over what is backed up, and can restore from the most up-to-date version.11
UpdraftPlus WordPress backup plugin
UpdraftPlus is the highest ranking and most popular scheduled backup plugin, with over 3,000,000 active installs. It is simple to use, allowing you to back up your files and database into the cloud, and restore them with a single click.
You can back up directly to Dropbox, Google Drive, Amazon S3 (or compatible), UpdraftVault, FTP, email, and more. The paid version allows you to back up to additional places such as Microsoft OneDrive, Microsoft Azure, and Google Cloud Storage.
The free version:
- restores as well as backing up
- backs up to more cloud options than any other plugin
- allows you to set up automatic backup schedules at your convenience
- is faster than other plugins and uses fewer server resources
- has been tested on over 3,000,000 sites.10
How to back up a WordPress site
The following walkthrough uses UpdraftPlus to back up a website.
Before you start, make sure you have UpdraftPlus installed and activated. You do this the same way you would install and update other plugins.
- Once installed, select Settings > UpdraftPlus Backups in your WordPress menu. This will open your UpdraftPlus settings page.
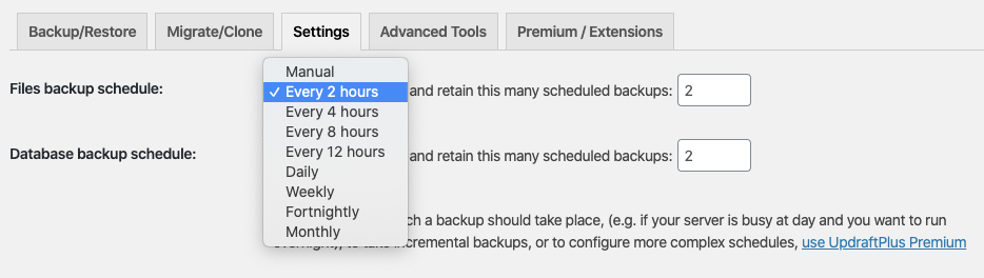
- Select Settings tab at the top.
- Here, you can schedule how often UpdraftPlus creates a new backup. Set a schedule that suits your needs. For example, more frequent backups are recommended if you regularly update your site with new pages and posts.
- You can also adjust how many backups should be stored at a time. Any new backups will then override the old ones.
- Select where you want your backups stored.
- Scroll down the page and choose from the listed options. UpdraftPlus can integrate with numerous remote storage options, so pick the one that suits you best.
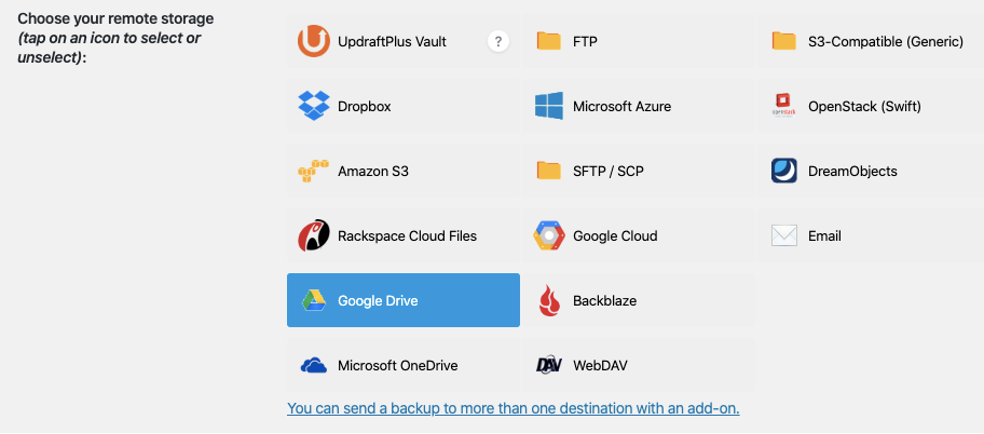
- Scroll down the page and choose from the listed options. UpdraftPlus can integrate with numerous remote storage options, so pick the one that suits you best.
- Once selected, each storage option will have its own set of instructions. Simply follow these and press the blue Save Changes button at the bottom of the page.
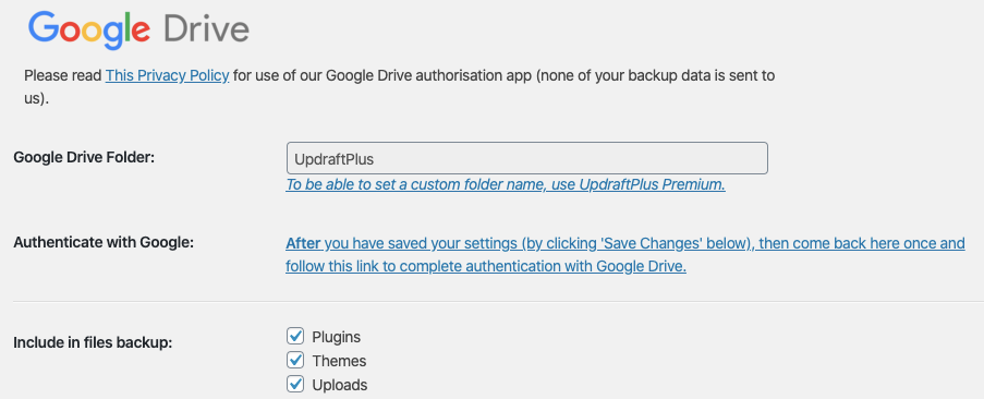
Once you have saved these settings, UpdraftPlus will automatically carry out the backups on its own.
If you want to back up to multiple locations or further customise the settings, you can upgrade to UpdraftPremium.11

How to restore a WordPress site from a backup
Follow these steps to restore your WordPress site from a backup using UpdraftPlus.
- Go to Settings > UpdraftPlus Backups in your WordPress menu. This again will open your UpdraftPlus settings page.
- Scroll down the page to the Existing Backups section.

- Find the backup you want to restore and press the blue Restore button.
- You will be presented with a pop-up that asks which elements of your database you want to restore. Select the ones that apply and press Restore.
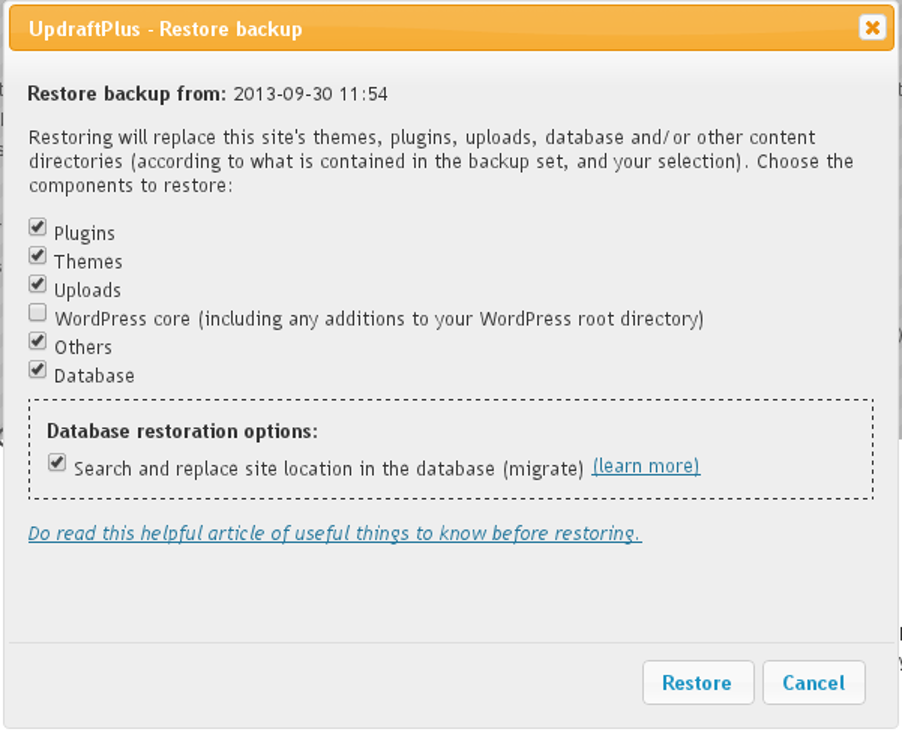
When your restore is complete, a message will appear letting you know the restore has been successful.11

WordPress sites are made up of 3 components:
- WordPress – The software (CMS) itself is the engine and database behind the site.
- Plugins – These provide functionality (for example, forms or eCommerce)
- Themes – These are responsible for the look and feel of the site.
Explore what each of these things are, and how they interact with your site.
Themes versus plugins
Although themes are undoubtedly primarily concerned with displaying your content, they can be more powerful than they appear on the surface, and some can enable theme-specific functionality on your site.
Remember one of the key benefits of a CMS is it separates design from content. Themes should not provide critical functionality to the site, because users will lose that functionality if they change themes. Instead, reserve critical functionality for plugins. This allows users to easily change the site design while site functionality remains the same.12
Although themes and plugins can sometimes achieve the same outcome, they are intrinsically different.
WordPress themes are a collection of template files that work together to produce a cohesive website design. A theme modifies the way the site is displayed, without modifying the underlying software.
What is a theme?
A theme is a collection of files that include HTML, CSS, JavaScript, and PHP code, which controls how your site’s information is displayed. Think of a theme as the ”skin" of your site – it is the frontend; the layer you see on the outside.
The analogy of a theme as the “skin” of your site is twofold: A theme is a “skin” in that they are the presentation layer of your site, but they also contribute to the responsive design of your UI – think of “skin” here as an organ that adapts to its environment. WordPress themes can also control the behaviour of certain site elements while interacting with visitors.13
Theme frameworks
The term “theme framework” refers to code base we can extend to create a custom theme for our site. This can come in a few different forms:
- A “drop-in” code library for theme development (such as Bootstrap or Foundation).
- A standalone base/starter theme to be forked into another theme (such as _s Underscores).
- A parent theme template (such as Genesis).13
What is a child theme?
A child theme is a theme that is built from another. We create child themes by modifying or adding to an existing “parent theme”. Instead of editing a theme directly, we can make child themes and edit the code there. This is the easiest and safest way to modify a theme, and the changes can be minimal or substantial.
Child themes are not intended to be used as standalone themes. If you are using a child theme, the parent theme also needs to be installed for the child theme to function properly.13
Theme types
WordPress and its themes have evolved over time. The Gutenberg block editor introduced the use of blocks to compose posts and pages, and for Full Site Editing (FSE). With FSE, the experience and extendability of blocks can be leveraged by other parts of your site. This includes a collection of features that can be adopted by classic themes.

There are 4 types of WordPress themes:
- Block theme – Uses blocks for all parts of the site (navigation, menus, header, content, footer). This type of theme is built for Full Site Editing, which allows you to customise any part of your site with the newest WordPress features. In FSE, the Site Editor manages theme settings rather than the Customizer, by using HTML templates and theme.json.
- Classic theme – Uses the Customizer rather than the Gutenberg block editor to manage site layout. Classic themes are made with PHP templates, functions.php, and more. They use menus and widgets to change theme settings. Classic themes are the original theme type, so there is a wider range to choose from compared to other types.
- Hybrid theme – A classic theme that uses some features of FSE, like theme.json or the template editor. Hybrid themes use the Customizer to make changes, but leverage new features for better control over block settings and styling.
- Universal theme – A theme that can be configured both ways: using the Customizer, widgets, and menus as in a classic theme, or using the Site Editor with blocks as in a block theme.14
What makes a good theme?
When choosing a theme, consider what aesthetic you want for your site, and what theme type you want to work with.
A photo gallery and eCommerce site will each benefit from different features. How many columns do you want? Do you want full site editing or a custom header?
By default, WordPress comes with a set of default themes named after the year they were released. The WordPress theme directory is the official site to search for more themes. Here, you can filter themes by features, layout, and subject. You can click Details and Preview to find out more about the site, and test it before activating.
When choosing a theme, check the popularity, version updates, and ratings to get a sense of other users’ experiences and if it supports updates to the core WordPress software. Like the CMS, themes need to be updated to leverage new features and security fixes.14
Premium themes
The WordPress.org theme directory is recommended to find themes for your WordPress site. Themes in the directory go through a review process to ensure they meet code and security standards.
However, there may be situations where a premium or third-party theme is the best option to meet your needs. When considering premium or third-party themes, do your research.
Whenever you install additional themes or plugins to your site, you add additional code to the core WordPress software. Any additional code can introduce new bugs or security issues. For example, a third-party theme or plugin may cause problems if they do not meet coding standards, are incompatible, or contain bugs due to human error.
When considering a premium or third-party theme, check the ratings, update frequency, and available support.14
Installing a theme
There are 3 ways to install a theme.
- Install from the dashboard
- Install from a ZIP file
- Upload via FTP.
Install from the dashboard
Go to Appearance > Themes > Add New. Here you will find a display of themes. You can install a theme directly from this page, or preview and install. After installation, click the Activate button – this will return you to the Themes dashboard, where you will see the theme activated.
Install from a ZIP file
If you have a theme as a ZIP file, you can install it manually. Go to Appearance > Themes > Add New to upload the ZIP file from the dashboard. Click the Upload button at the top of the page, choose your ZIP file, and select Install Now. After installation, click the Activate button – this will return you to the Themes dashboard, where you will see the theme activated.
Upload via FTP
You can also upload ZIP file themes through an FTP if you do not want to use the web dashboard. We recommend using a secure FTP (SFTP), which will require SFTP credentials from your web host (for example, username, password, and server information).
Once you are logged in, navigate to the /wp-contents/themes/ directory and upload the theme. The unzipped form should sit in this directory. Once it is done, open your WordPress dashboard in a web browser, and navigate to Appearance > Themes. The theme you just uploaded should be listed there and can be activated.14
Setting up a new theme
Once you have installed a theme, you can set it up. There are different ways to do this depending on whether you use a block or custom theme.
Setting up a block theme
Block themes rely on the Site Editor to edit any part of your site. You can find the Site Editor under Appearance > Editor (beta). Here, you can set up:
- style settings for your website and blocks, including sitewide colours and typography
- theme blocks, including Navigation and Site Title
- traditional blocks and themes to use as templates for making pages or posts
- template parts for managing smaller, reusable sections of pages (such as the footer or header) – the main purpose of these is site structure.
Setting up a classic theme
You can use the Customizer to set up classic themes under Appearance > Customizer in your Dashboard. Here, you can set up:
- site colours.
- custom header images (if supported by the theme)
- background images
- widgets (if the theme has widget areas)
- menus (which can vary depending on the theme).
Because each theme has its own design and related features, some of the features outlined may not apply. There may also be additional steps to set the theme up in the way it is previewed. If in doubt, consult the developer’s documentation to understand the intended setup better. You can also ask other WordPress developers for advice in the WordPress forums.14
Updating a theme
WordPress themes are regularly updated like other software with bug fixes and new features. You will be notified of available updates through your dashboard, and can choose to install updates automatically or manually.
If you are updating from a ZIP file or FTP, follow the same process for installing a theme, using each relevant option covered previously.14
Uninstalling a theme
It is good practice to delete or uninstall themes you are not using.
To uninstall a theme, go to Appearance > Themes for a list of themes you have installed. Make sure any theme you want to uninstall is deactivated first (not in use). Once the theme is deactivated, click on Theme Details. You will see a Delete link to delete or uninstall the theme in the pop-up.14

The core WordPress software provides the primary functionality for publishing content and managing users. WordPress plugins are additional software that can be easily installed to extend the functionality of WordPress core.
What is a plugin?
Plugins are PHP scripts. They enhance the features of WordPress or add entirely new features to your site. Volunteers and free-to-use often develop plugins.
There are all kinds of plugins to help you to customize your WordPress site with your desired functionality. The great thing about WordPress core is that it is fully functional on its own but also flexible in its customisation, so you can use as many or few plugins as you like.15
Plugin types
Examples of WordPress plugins include:
- SEO
- Backup
- Security
- Sliders and galleries
- Bulletin board forums/social network
- API plugins (such as Twitter, Instagram, and Flickr)
- Tutorials.15
Default plugins: Akismet and Hello Dolly
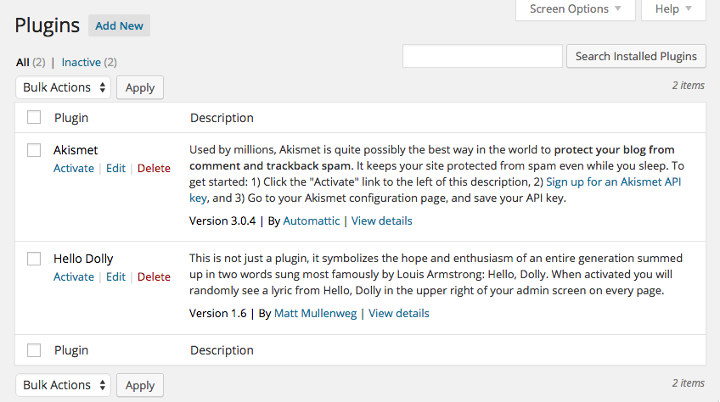
Choosing And Installing Plugins by Wordpress, © WordPress
There are 2 plugins that come with WordPress by default:
- Akismet – an anti-spam plugin that checks your comments against the Akismet web service to see if they look like spam, and allows you review spam caught under your blog’s “Comments” admin screen.
- Hello Dolly – a simple plugin that when activated, generates a lyric from “Hello, Dolly” by Louis Armstrong, in the upper right of your admin screen on every page.
To activate these plugins, go to Plugins from the Dashboard menu. Locate the plugins, and click the Activate button/s.
- For Akismet, after clicking Activate, you will need to follow the prompts to activate your Akismet account.15
Installing a plugin
The WordPress Plugin Directory is the official and safest place to get plugins.
Some plugins may cause your site to become inoperable, so it is best practice to fully back up your site before any installation.
We will cover 2 installation methods: automatic installation from the Plugin Directory, and installation via an external ZIP file.15
Automatic plugin installation from the Plugin Directory
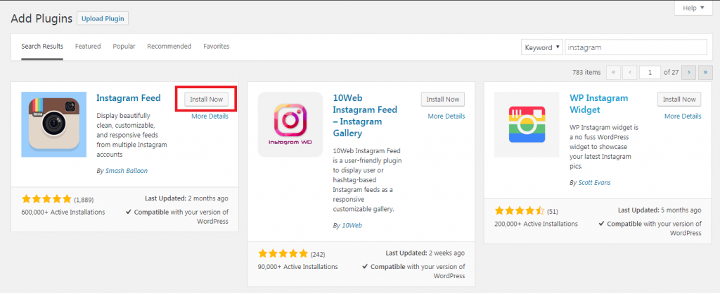
Choosing And Installing Plugins by Wordpress, © WordPress
- Go to Plugins > Add New on the Dashboard menu.
- Search for the plugin by name or type, or browse one of the categories or tags.
- Review the standard information: star rating, last updated, number of downloads, compatibility, author information (including other plugins they may have developed), and available support.
- If you have decided to install the plugin, click the “Install” button.
- Once the plugin is installed, click the “Activate” link.15
Installing a plugin via an external ZIP file
If you have downloaded a plugin from a third-party, this will likely be in the form of a .zip file to be installed through the dashboard.
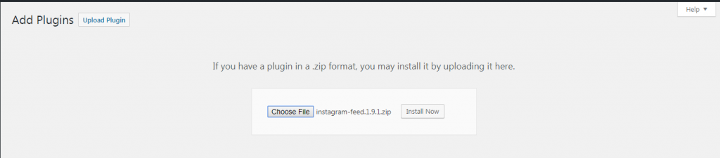
Choosing And Installing Plugins by Wordpress, © WordPress
- Go to Plugins > Add New on the Dashboard menu.
- Click on “Upload Plugin” at the top of the page.
- Click “Choose File”, then browse to select the .zip file.
- Click the “Install Now” button, then click on the “Activate” link.15
Recommended WordPress plugins
Here are some WordPress plugins we recommend installing.
Advanced Custom Fields
Advanced Custom Fields allows you to take full control of your WordPress data by adding fields on demand. The field builder lets you add fields to edit screens with just a few clicks.
There are over 30 field types, and these can be added anywhere, including posts, users, taxonomy terms, media, comments, and even custom options pages.
You can load and display your custom field values in any theme template file with Advanced Custom Field’s developer-friendly functions.16
Contact Form 7
Contact Form 7 can manage multiple contact forms, and facilitates flexible form and mail contents customisation with simple markup. The form supports Ajax-powered submitting, CAPTCHA, Akismet spam filtering, and so on.17
Flamingo
Flamingo is a message storage plugin originally created for Contact Form 7, which does not store submitted messages.
After activating the plugin, you will find Flamingo on the WordPress admin screen menu. All messages through contact forms are listed there and searchable. With Flamingo, you do not need to worry about losing important messages due to mail server issues or set up misconfiguration.18
Yoast SEO
Yoast SEO is the #1 WordPress plugin. The free version has everything you need to manage your SEO, while the premium version and extensions grant access to more tools and functionality.
Free features include:
- Automated technical SEO improvements, like canonical URLs and meta tags.
- Advanced XML sitemaps, making it easy for Google to understand your site structure.
- Title and meta description templating, for better branding, and consistent snippets in the search results.
- An in-depth Schema.org integration that will increase the potential for rich results, by helping search engines understand your content.
- Full control over site breadcrumbs, so users and search engines always know where they are.
Free functionalities include:
- SEO analysis: an invaluable tool while writing SEO-friendly content with the right (focus) key phrases in mind.
- Readability analysis: ensures humans and search engines can read and understand your content.
- Full language support: including English, German, French, Dutch, Spanish, Italian, Russian, Indonesian, Polish, Portuguese, Arabic, Swedish, Hebrew, Hungarian, Turkish, Czech, Norwegian, Slovak, and Greek.
- A Google preview: which shows what your listings will look like in the search results (even on mobile devices!)
- Innovative Schema blocks: for the WordPress block editor, so your FAQ and How-To content display directly in the search results. In addition, a breadcrumbs block is available to guide your users.19
Learning activity: Implement a plugin to add functionality to your site
Now it is your turn to try installing a plugin of your choice.
- Think of any additional functionality you would like to add to your website.
- Go to the WordPress Plugin Directory and see if you can find a plugin to meet your needs.
- Do your research by reviewing the available information: description, star rating, last updated, number of downloads, compatibility, author information, and available support. You might also consider external reviews and articles in your research.
- Once you have settled on a plugin, install and activate it.
- Play around to test its features.
- What advantages and disadvantages do you think the plugin has?

PHP is an open source, backend programming and scripting language to create dynamic interactive websites. Whenever someone visits your website, their browser contacts your server to request the page. The PHP code runs on the server and generates an HTML page to send to the visitor. The visitor then sees the HTML page in their browser, but they cannot see the PHP script because it is only on the hosting server.20
The significance of PHP in WordPress
WordPress is written using PHP as a scripting language. A WordPress website stores all its data in a MySQL database. This data includes everything from your blog name and post content, to plugin settings and user profile information.
PHP gets specific information from the database and organises it into a cohesive HTML web page. The code is contained in files that end in the .php extension. If you open a WordPress zip file, you will see that most of the files are PHP files.
Just like other programming languages, there are several versions of PHP that you can use. You should use the latest version of PHP, to stay protected against security issues and improve site performance. Before migrating your site to the web, check that your web host is using the most current version of PHP.
While you do not need to know PHP to use or manage a WordPress site, it is necessary for developing plugins, themes, and making more complex customisations, which we will do in this module.20
Anatomy of a theme
As part of its flexibility, WordPress pages are built in "blocks". A common arrangement of these blocks includes the header.php, sidebar.php, index.php, and footer.php files, and looks like this:

These files (and their corresponding blocks) can be moved around, replaced with other files, have additional files added, or be removed entirely. For example, an alternative way to arrange the blocks would be:

So how does WordPress do this? It starts with the URL. Your web browser knows that when you type “www.wordpress.org” in the address bar, you are really asking to go to https://www.wordpress.org/index.php. All web browsers have default files they look for at a web address, and for a WordPress site, that default is the index.php file.
The most basic index.php file looks like this:
Notice that it calls the header (header.php), then it calls the sidebar (sidebar.php), then it runs the loop and grabs the content, and finally adds the footer (footer.php).
Many themes include much more than these bare minimum files, such as additional stylesheets and JavaScript files. With larger themes, it is imperative to keep files organized using folders. The recommended folder structure includes:
- /css/ – additional CSS files (such as mobile.css) that the theme uses; NOTE: The style.css file must remain in the main theme folder
- /js/ – JavaScript files
- /img/ – for images that are embedded in the theme, such as icons (different to Media Gallery images found in the uploads folder)
- /language/ – for translation files.
Here is an example of the files and folder structure for a simple theme:
▼ CSS
│   ├── mobile.png
│   ├── print.png
▼ img
│   ├── facebook.png
│   ├── twitter.png
├──  index.php
▼ js
│   ├── lightbox.js
│   ├── slider.js
└──  style.css
Files needed to make a theme
There are only 2 basic files required to make a WordPress theme:
- index.php – Creates the blog.
- style.css – Includes styling information for the site.
Most themes also include:
- header.php – Generates a page’s first elements, such as a header image and top-level menu.
- footer.php – Generates a page’s final elements, such as widgets and menus.
- sidebar.php – Generates a page’s sidebar, usually including widgetized areas.
- functions.php – Adds features and functions to your site (works like a WordPress plugin).
- screenshot.png – Graphic thumbnail image representing the theme.
The following files should also be included:
- single.php – Generates a blog post.
- page.php – Generates a static page.
- archive.php – Generates a page displaying posts by date published.
- category.php – Generates a page displaying posts by category.
- tag.php – Generates a page displaying posts by tag.
- comments.php –Generates a page displaying posts by comments.
Also remember:
- 404.php – Generates a page when a page or post does not exist.
- search.php – Generates a page displaying search results.
- front-page.php – Used in Settings > Reading to set a static page or the blog as the home page.21
Templates
Templates are the WordPress theme files used to render website pages. It is important to be familiar with templates before learning to build themes for WordPress.
A template is a PHP file that controls how your website’s content will be displayed in a web browser. They are the building blocks of your WordPress site. These files draw information like page or post title, content, and custom fields from your WordPress database, or other WordPress files, and generate the HTML code dynamically (“on the fly”).
A template can control all or part of a page. It can have a high level of customisation or be quite minimal. Depending on the theme you are using or developing, you can define as many or few templates as you need.
WordPress templates commonly feature:
- Template Tags: Code that instructs WordPress to “do” or “get” something.
- The Loop: To gather information from the database (for example, posts, pages, categories). We will look at The Loop in greater detail later.22
Case study: page.php in Twenty Thirteen
We can use the page.php template in the default theme Twenty Thirteen to break down template parts.
The template starts with:
?php
This identifies the template as a PHP file so the browser knows how to process it.
Next there is a block of comments:
Comments are usually included at the top of a template file to describe its specific function.
Then we have the first template tag:
get_header(); ?>
This tells WordPress to insert all the information from the template file header.php at that point.
Next in this template file is some HTML. Usually, we create template files because we need a specific way to display content, which is tied to how the HTML is written and arranged. The HTML included in this template starts with and determines how the content of the specific template will be displayed.
Next is The Loop. This is a core part of the template and how WordPress works. It is PHP code that displays WordPress database information, like a blog post title or content. Essentially, it says “while there are posts available, then use those posts” for whatever the code does next.
After that comes a few lines of HTML.
Then the file asks if the post has a featured image (such as a thumbnail image), and if so, displays that image.
Then the file displays the post content. The template deals with how to display content pages if there are several posts available. In the Settings > Reading menu on the left-hand side, there is a place to determine how many posts should be shown on a page. If that number is exceeded, this code kicks in and displays pagination links to view additional content.
After that, there are a few housekeeping items, such as a link on the frontend that allows those who are logged in to click on a link to edit the page.
The tags that were opened at the beginning of the file need to be closed as this is the end of that data type.
If there are comments, they should appear here. This template tag calls in the comments.php file and displays its code and output.
This is done only if there are posts available. Remember the while ( have_posts() ) : the_post(); statement earlier that opened The Loop? Now is the time to close The Loop.
Next, the HTML tags that are open need to be closed as the browser continues to read the page.php template. It is important to close the HTML tags after closing The Loop.
Finally, 2 more template tags are included, which get the code and output from the sidebar.php and footer.php files respectively.
Ta da! That is how a page template is created in WordPress. They are the files, along with their corresponding CSS files, that determine how your site will look.22
Template hierarchy
WordPress uses the Query String to decide which template or set of templates should be used to display the page. The query string in your URI comes after the initial question mark, and may contain several parameters separated by ampersands. Put simply, WordPress searches down through the Template Hierarchy until it finds a matching template file. To decide which template file to use, WordPress:
- matches every query string to a query type to decide which page is being requested (such as a search page or a category page)
- selects the template in the order determined by the template hierarchy
- looks for template files with specific names in the current theme’s directory, and uses the first matching template file as specified by the hierarchy.
Except for the basic index.php template file, you can choose whether or not you want to implement a particular template file. If WordPress cannot find a template file with a matching name, it will skip to the next file in the hierarchy. If WordPress cannot find any matching template file, the theme’s index.php file will be used as default.23

Case study: Template hierarchy
Imagine you have a blog, and a visitor clicks on a link to a category page such as http://example.com/blog/category/unicorns/. WordPress looks for a template file that matches the category’s ID in the current theme’s directory to generate the correct page as follows.
- WordPress looks for a template file in the current theme’s directory that matches the category’s slug. Here the category slug is “unicorns,” so WordPress looks for a template file named category-unicorns.php.
- If category-unicorns.php is missing and suppose the category’s ID is 4, WordPress looks for a template file named category-4.php.
- If category-4.php is missing, WordPress will look for a generic category template file, category.php.
- If category.php does not exist, WordPress will look for a generic archive template, archive.php.
- If archive.php is also missing, WordPress will fall back on the main theme template file, index.php.
Now we will study the template hierarchy in detail.
Home Page Display
Home Page Display is a template file is used to render the Blog Posts Index, either on the site’s front page or on a static page. On the Site Front Page, the Front Page Display Template following takes precedence over the Blog Posts Index (Home) template.
- home.php
- index.php
Front Page Display
This template file is used to render the Site Front Page, whether the front page displays the Blog Posts Index or a static page. The Front Page template takes precedence over the Blog Posts Index (Home) template.
- front-page.php – Used for your latest posts, or a static page as set in the front page displays section of Settings > Reading
- The Page display is used when the front page is set in the front page displays section of Settings > Reading
- The Home Page display is used when the posts page is set in the Front page displays section of Settings > Reading
Single Post Display
This template file is used to render a single post page.
- single-{post_type}.php – If the post type is “product”, WordPress will look for single-product.php.
- single.php
- index.php
Page Display
This template file is used to render a static page (“page” post-type).
- custom template file – The page template assigned to the page.
- page-{slug}.php – If the page slug is recent-news, WordPress will look for page-recent-news.php
- page-{id}.php – If the page ID is “6”, WordPress will look for page-6.php
- page.php
- index.php
Category Display
This template file is used to render a Category Archive Index page.
- category-{slug}.php – If the category’s slug is “news”, WordPress will look for category-news.php
- category-{id}.php – If the category’s ID is “6”, WordPress will look for category-6.php
- category.php
- archive.php
- index.php
Tag Display
This template file is used to render a Tag Archive Index page.
- tag-{slug}.php – If the tag’s slug is “sometag”, WordPress will look for tag-sometag.php
- tag-{id}.php – If the tag’s ID is “6”, WordPress will look for tag-6.php
- tag.php
- archive.php
- index.php
Custom Taxonomies Display
This template file is used to render the Archive Index page for a custom taxonomy.
- taxonomy-{taxonomy}-{term}.php – If the taxonomy is “sometax” and taxonomy’s term is “someterm”, WordPress will look for taxonomy-sometax-someterm.php. In the case of post formats, the taxonomy is ‘post_format’ and the terms are ‘post-format-{format}. i.e. taxonomy-post_format-post-format-link.php
- taxonomy-{taxonomy}.php – If the taxonomy is “sometax”, WordPress will look for taxonomy-sometax.php
- taxonomy.php
- archive.php
- index.php
Custom Post Types Display
This template file is used to render the Archive Index page for a custom post type.
- 1. archive-{post_type}.php – If the post type is “product”, WordPress will look for archive-product.php.
- archive.php
- index.php
For rendering a single custom post type, refer to the Single Post Display section previous.
Author Display
This template file is used to render an Author Archive Index page.
- author-{nicename}.php – If the author’s nice name is “Rami”, WordPress will look for author-rami.php.
- author-{id}.php – If the author’s ID is “6”, WordPress will look for author-6.php.
- author.php
- archive.php
- index.php
Date Display
This template file is used to render a Date-Based Archive Index page.
- date.php
- archive.php
- index.php
Search Result Display
This template file is used to render a Search Results Index page.
- search.php
- index.php
404 (Not Found) Display
This template file is used to render a Server 404 error page.
- 404.php
- index.php
Attachment Display
This template file is used to render a single attachment (“attachment” post-type) page.
- MIME_type.php – Can be any MIME type (image.php, video.php, application.php). For text/plain, in order:
- text.php
- plain.php
- textplain.php
- attachment.php
- single-attachment.php
- single.php
- index.php
Filter hierarchy
The WordPress templates system allows you to filter the hierarchy. The filter (located in the get_query_template() function) uses this filter name: “{$type}_template” where $type is the file name in the hierarchy without the .php extension. Here is the full list:
- index_template
- 404_template
- archive_template
- author_template
- category_template
- tag_template
- taxonomy_template
- date_template
- home_template
- front_page_template
- page_template
- paged_template
- search_template
- single_template
- text_template, plain_template, text_plain_template (all mime types)
- attachment_template
- comments_popup
Case study: Filter hierarchy
Take the default Author Hierarchy as an example:
- author-{nicename}.php
- author-{id}.php
- author.php
To add author-{role}.php before author.php, we can manipulate the hierarchy using the ‘author_template’ hook. This allows a request for /author/username where username has the role of editor to display using author-editor.php if present in the current theme’s directory.
The Loop
This is The WordPress Loop:
Loops allow a repeating structure to be applied to content appropriate for the current page. The default WordPress Loop’s structure shows content that WordPress gets automatically based on the requested page, while custom loops are used to display content of your choice.
The Loop is a way of displaying repeating blocks of content on your site. When your site shows a template that displays multiple posts in a similar format, the loop sets up the structure that each post will follow, then repeats that structure until all posts have been displayed. It is an essential part of WordPress.24
Why use The Loop?
Several places on a website display lists of content excerpts rather than the full content of a single post, including:
recent blog posts on the home page article lists on a category archive alternate content styles, such as thumbnails for a gallery custom post type.
Where to use The Loop
In its default form, The Loop is used on archive pages, which displays lists of posts. Some of these templates include:
- Home Page, if displaying recent posts
- index.php, front-page.php, home.php
- Category Archives
- Tag Archives
- Custom Taxonomy Archives
- Search Results
- Author Archives
- Date Archives
How The Loop works
When you visit an archive page on your site, WordPress creates and populates a default query with the posts that should display on the page. Functions for The Loop allow you to repeat information for each of those default posts, or for a custom query of your choice.
Setting up a default loop
The simplest loop you can use is the default loop, because it will automatically use the posts WordPress has retrieved for the current page request. For example, on the home page, this might be 10 recent posts. On a category archive, this might be 10 recent posts for a specific category, like “Puppies”.
Look at the loop in wp-content/themes/twentythirteen/index.php. The code below is a copy of that loop, with comments explaining each step.
Choosing which template to repeat in The Loop
Once inside The Loop, we can include a section of repeating code using get_template_part(). In its most basic form, we might always include content.php.
A second argument can be added to get_template_part(), to allow switching between different templates based on some changing information. For example: Display content-alternate.php if exists in this theme or a child theme. Otherwise display content.php.
If the current post uses a post format such as “Gallery” and content-gallery.php exists, display it. Otherwise display content.php.
If the current post uses a custom post type such as “Event” and content-event.php exists, display it. Otherwise display content.php.
While in The Loop, template tags will display information about the current post.
Using additional loops
Loops do not just have to display content from the default query. The structure we looked at earlier can be combined with a custom query to display any list of posts.
Functions.php
The functions.php file is used to add, remove, or otherwise change the default behaviours of WordPress. The file resides inside the theme’s folder. functions.php behaves like a WordPress Plugin, allowing the author to add custom features and functionality to a WordPress site. A child theme can have its own functions.php. However, unlike style.css, the functions.php of a child theme does not override the parent theme’s functions.php. Instead, it is loaded in addition to the parent’s functions.php.25
Functions.php versus plugins
Both functions.php and plugins allow you to create custom functionality and modify default behaviour in WordPress. As such, it can be challenging to know when to use functions.php, and when to create or use a plugin to add functionality. We can investigate both methods in more detail to get a better understanding of when each solution is appropriate.
In general, plugins are independent modules that can be downloaded and installed on your WordPress website. The purpose of a plugin is to extend WordPress’ functionality or add new features. No modification of the active theme is required to activate plugins.
In contrast, themes are a group of files designed to modify the way WordPress looks. While themes can include custom functionality (such as custom post types or a visual configuration panel), for the most part you select themes based on how they modify user experience.25
| WordPress plugin: | Functions.php file: |
|---|---|
|
|
When to use functions.php
To determine when to use functions.php, as yourself: Should the added functionality be tied to one specific theme, or should the functionality support the content or structure of the site regardless of what theme is enabled? For example, you may want to have a unique excerpt length for posts on a specific theme based on its design and layout. Therefore, excerpt functionality should be added to functions.php. If you want to implement a “read more” link for all posts regardless of which theme you use, this function should be added as a plugin.
Because functions.php sits in a theme folder, that theme must be active for any custom functionality to work. On the other hand, if such custom functionality were stored in a plugin, you could switch themes and still retain the functionality.25
| Functions.php can be used for: | Functions.php should not be used for: |
|---|---|
|
|
Custom post types
There are default post types in your WordPress installation such as post and page, but a post can relate to any kind of content. Custom post types (introduced in WordPress 3.0) are new post types that you can configure yourself. You can create your own post types with different custom fields and characteristics, and call them whatever you want. For example, if you create a website that hosts your professional portfolio, you may want to create a custom “Portfolio Item” post type.26
When do you need a custom post type?
Post types are intended to distinguish between different WordPress content types. You might need a custom post type if a post:
- Is not required to be a part of a chronological series of entities
- needs to be displayed differently from posts and/or pages
- does not look and feel like a post/page
- needs some additional fields and characteristics.26
How to approach creating custom post types
There are several ways to create a custom post type.
Modifying child theme
The easy way to register your new custom post is via your child theme’s function.php. However, this can cause issues if you decide to change themes. While your data will still be in the database, you will not be able to access it when the custom post is not registered in the new theme. Your configuration will be tied to your theme, breaking the WordPress’ “portability principle, which is about being able to access your data regardless of the theme in use.
Creating a plugin
If you create your own plugin out of your custom post, it will be portable between themes, which avoids the drawback described earlier.
Premium and free plugins
There are lots of existing plugins that allow you to create a custom post type. Among the most popular are Custom Post Type UI, Custom Post Type Maker, and Advanced Custom Fields – which we will discuss later.
Let us look at the first option, creating a custom post type by modifying a child theme, in more detail.
Developing a custom post type
Imagine you want to develop a theme for an online portfolio website. You want a new post type “Portfolio item”, which should be public, editable from the admin dashboard, and have some custom labels on the menu. The following tutorial uses WordPress default theme Twenty Sixteen as an example.
Registering a custom post type: The basics
- Make sure you have activated the WordPress Twenty Sixteen theme.
- Open its function.php file in your text editor. The theme’s function.php file’s path should be:
/wp-content/themes/twentysixteen. - Add the following piece of code to the very end of the file:
The first line is just a comment to describe what the modifications are. Further on, you may describe the new post type’s settings and register it. - Finally, add_action directive is meant to add a described function to WordPress via the init hook, which runs after WordPress itself has finished loading, but before any headers are sent. Make sure you save the file.
- Now, check out your site’s dashboard. Although you registered the new post, you will not see any changes. That is because you have not configured your post to be public and visible in the dashboard explicitly, and it is not by default.
Registering a custom post type: Adding arguments
- To adjust the new post type to your needs, explore some of the most frequently used options and add them to the $args array. This is how the previously added post should look now.
You have added:
- the label – an array defining the different labels a new custom post type can have.
- the description – a short explanation of the new type’s purpose, such as what it is supposed to contain.
- public – controls how the post is visible to authors and readers. It can be further adjusted to customise visibility, searchability, and queriability of the post.
- menu_position – the position in the menu list.
- supports – lists the default WordPress edit screen controls that need to be set up this custom post type. The default settings are to show the title field and editor. You may want to add support for comments, revisions, and others.
- has_archive – determines whether to create a specific post type archive.
- Save the functions.php file.
- Refresh your site’s dashboard page. You should see a menu entry for the newly created custom post type, with options to add new portfolio items, and view them in both the admin section and on the website as they are published.26
Custom Post Types by WordPress, © WordPress
Custom taxonomies
A WordPress taxonomy is a way to organise groups of posts and custom post types. The word taxonomy comes from the biological classification method called Linnaean taxonomy.
By default, WordPress comes with 2 taxonomies called categories and tags. You can use them to organize your blog posts. However, if you are using a custom post type, categories and tags may not be suitable. You can then create custom taxonomies to further customize the way you sort your content.
For instance, you can create a custom post type called ‘Books’ and sort it using a custom taxonomy called ‘topics’. You can add topic terms like Adventure, Romance, Horror, and more. This allows you and site visitors to easily sort books by topic.
Taxonomies can also be hierarchical, meaning that you can have main topics like Fiction and Nonfiction, then subtopics under each category. For example, Fiction could have Adventure, Romance, and Horror as subtopics.
There are 2 ways to create custom taxonomies: using a plugin or using code.27
Creating custom taxonomies with a plugin
Creating custom taxonomies with a plugin is the simple way. Watch this video for a tutorial which uses the Simple Taxonomy plugin.
Creating custom taxonomies manually
We will cover how to create both hierarchical taxonomies and non-hierarchical taxonomies manually.
Creating a hierarchical taxonomy
Start with a hierarchical taxonomy that works like categories and can have parent and child terms.
Add the following code in your theme’s functions.php file or in a site-specific plugin (recommended) to create a hierarchical custom taxonomy like categories:
Remember to replace the taxonomy name and labels with your own taxonomy labels. Notice this taxonomy is associated with the Books post type. Change that to whatever post type you want to use it with.
Creating a non-hierarchical taxonomy
To create a non-hierarchical custom taxonomy like Tags, add this code in your theme’s functions.php or in a site-specific plugin:
Notice the difference between the 2 blocks of code. The hierarchical argument value for category-like taxonomy is true, and false for tags-like taxonomies.
Furthermore, in the labels array for non-hierarchical tags-like taxonomy, we have added null for parent_item and parent_item_colon arguments, which means nothing will be shown in the UI to create the parent item.
Troubleshooting themes and plugins
Themes and plugins from the WordPress directory usually have related support forums maintained by the development teams. If you have installed a theme or plugin from the directory and run into problems, this is the best place to go to report technical issues.
When reporting a bug, it is helpful to describe the exact actions you took when the error occurred, other plugins you have installed, and the version of WordPress and the plugin/theme in question.
There may be instances where you activate a new plugin and it breaks your site. For example, your site may start acting ‘strangely’, the plugin may not function the way it is supposed to, or you could get the “white screen of death,” which prevents you from accessing your site from the frontend or backend. This may be because the plugin installed in incompatible with the current WordPress version. If that happens, do not worry – there are a few common troubleshooting techniques that will help you determine the cause of the error, and debug it.12

The first rule of WordPress development is never change WordPress files. This means do not edit:
- WordPress core files
- Plugin files
- Theme files* – An exception to this is starter themes that have been intentionally created by theme builders to be modified.
Why use a child theme?
There are a few reasons to use a child theme for theme customisation rather than editing WordPress files directly.
Updates wipe out customisation changes
If you update modified themes, plugins, or core files, all the customisations you have made will be overwritten by the update.
Themes can break
If theme files are edited directly and you make a mistake past the “undo” point, you will be stuck with a broken theme.
WordPress and WordPress plugins may not work with theme hacks
Elements that WordPress and WordPress plugins look for in a theme can be accidentally removed if you edit WordPress files directly, so the software or plugin may no longer work.
You then have 2 options to customise a theme:
- Use a starter theme or create your own one from scratch.
- Create a child theme from a ”parent" theme.
We will cover the second option now, first looking at classic themes, then block themes. Starter theme development will be covered in a later topic.28
How classic child themes work
A classic child theme loads first, before the parent theme, and only contains overrides and additions to the parent theme.

All your CSS, templates, images, and other files are kept in the child theme’s folder, while the original parent theme’s files are left intact. If something breaks, you can easily delete or fix the offending file in the child theme folder.28
Creating a classic child theme
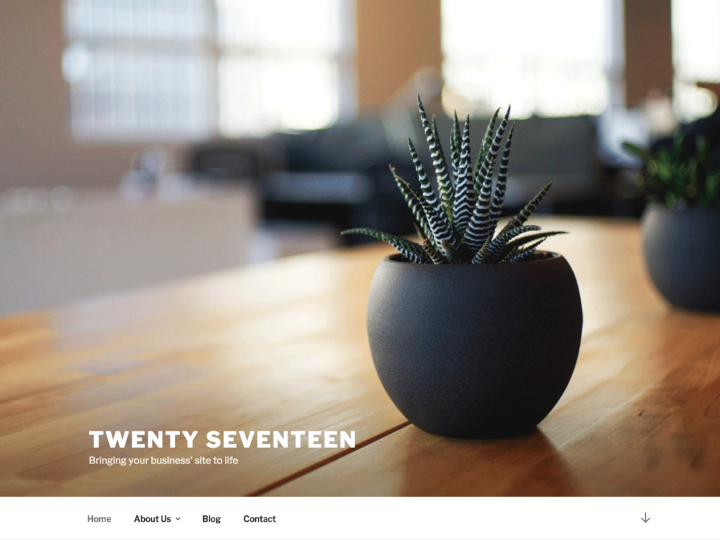
The following tutorial uses the default WordPress theme Twenty Seventeen. You can follow along with the same theme, or another classic theme.
We will name the classic child theme ”MyChildTheme”.
To start, we will need a theme folder, a CSS file, and a screenshot file.
1. A theme folder
Every WordPress theme needs its own folder. If you look at the WordPress folder structure, you will see a folder for each installed theme in /wp-content/themes.
Create a folder for your child theme. The folder name should be all lowercase with no spaces. In this example, the folder is called “mychildtheme”.
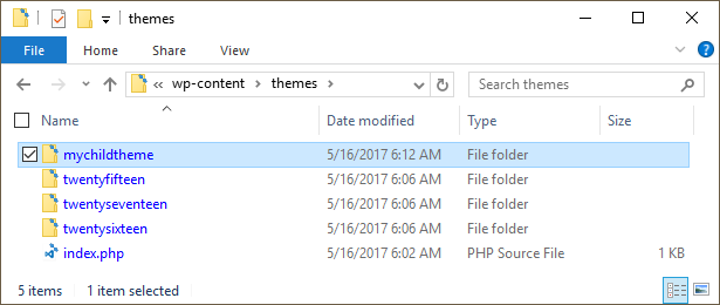
Classic Child themes by WordPress, © WordPress
2. A style.css file
At a minimum, your classic child theme needs a style.css file, which tells WordPress to load the parent theme’s files after the child theme. Place this file inside the classic child theme’s folder. Make sure it is in the root level of the folder and not inside a subfolder. The style.css file needs the following code at the top:
- Theme Name: The Name of the theme. This shows up in the WordPress Dashboard under Appearance > Themes.
- Description: A brief description of the theme – you can put anything you like here. This shows up in the WordPress Dashboard under Appearance > Themes once the theme is activated.
- Author: The author of the theme, which can be a person or company name.
- Author URI: The URL for the author of the child theme.
- Template: The folder name of the parent theme.
- Version: The version of the child theme.
All these variables are optional, except for **Template:**. If this line is not present or contains typos, the child theme will not work.
3. Enqueue parent and child theme style sheets
Your child theme needs to call the style.css files using a method called “enqueueing scripts.” To add the calls for the parent and child theme stylesheets to your child theme, you first need to create a functions.php file. Place this file inside the child theme’s folder – ensure it is in the root level of the folder and not inside a subfolder.
Functions.php in the child theme does not replace functions.php in the parent theme. The child theme’s functions.php is where you can put hooks, actions, and filters that modify or add functionality to the parent theme, rather than replacing it.
The first line of your child theme’s functions.php will be an opening PHP tag (<?php), after which you can enqueue your parent and classic child theme stylesheets. The correct method of enqueuing the parent theme stylesheet is to add a wp_enqueue_scripts action, and use wp_enqueue_style() in your child theme’s functions.php.
The following example function will only work if your parent theme uses just one main style.css to hold all the CSS. If your theme has more than one .css file (for example, ie.css, style.css, main.css), then you need to make sure to maintain all the parent theme dependencies.
This line needs to point to the parent theme’s style.css file. Your child theme’s style.css file can be empty, but if it contains CSS code (as it usually will), you will need to enqueue it too. Setting ‘parent-style’ as a dependency will ensure the child theme stylesheet loads after it.
This is the recommended way to enqueue the styles for your classic child theme.
The old way of enqueuing scripts and styles was to use @import url("../parentfolder/style.css"); and you will still see old articles online that show that technique. This is very inefficient, so a better way is to use the wp_enqueue_style() method.
4. A screenshot.png file
The screenshot.png file is the thumbnail image that appears under Appearance > Themes in the Dashboard. It is not required for a child theme, but recommended for visual interest.
Classic Child themes by WordPress, © WordPress
The recommended image size is 880×660. The screenshot will only be displayed as 387×290, but the larger image allows for high-resolution viewing on HiDPI displays. Create an 880px by 660px image file, name it “screenshot.png”, and place it in the child theme’s folder.28
Activating a classic child theme
Well done – you have created a classic child theme! Now we can activate it.
Make sure the child theme folder containing at least style.css is uploaded or pushed to /wp-content/themes on the web server, or your computer if you are working on a local WordPress install. After you add the theme folder to /wp-content/themes, go to Appearance > Themes in the Dashboard. You should see your theme listed.
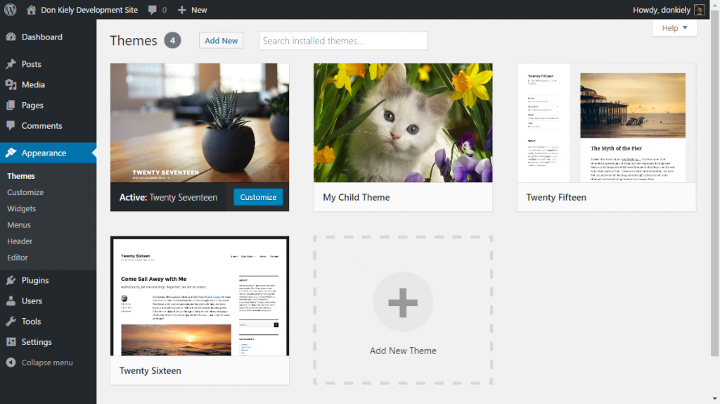
Classic Child themes by WordPress, © WordPress
Hover over your theme to reveal the “Activate” button. Click to activate your theme. Once activated, the site will look the same on the frontend, but the child theme is in charge. You should see your theme labelled as “active”.28
Classic child theme files
Classic child themes either override parent theme elements and add functionality to its identically named file, or completely replace it.

In the previous example, style.css in MyChildTheme overrides elements and adds to style.css in Twenty Seventeen, while screenshot.png completely replaces the copy of screenshot.png in Twenty Seventeen.28
Overriding the parent theme’s CSS
The classic child theme’s style.css file will override any styles in the parent theme’s style.css file that have the same selectors.
Say you want to change the size of the Site Title in the header. If we inspect that element, the CSS selector .site-title reveals the Parent Theme sets the font size at 2.25rem. (This is using the inspector in Google Chrome, but all the major browsers show this information in different formats.)
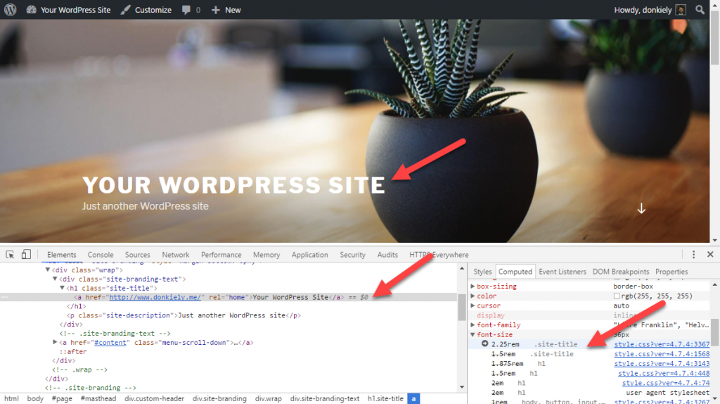
Classic Child themes by WordPress, © WordPress
In the child theme’s style.css file, add the selector and the new font-size you want for the site title:
Now the site title is 4.75rem instead of 1.75rem.
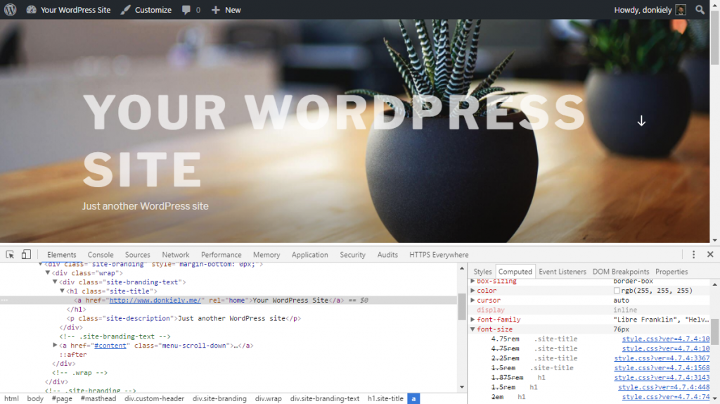
Classic Child themes by WordPress, © WordPress
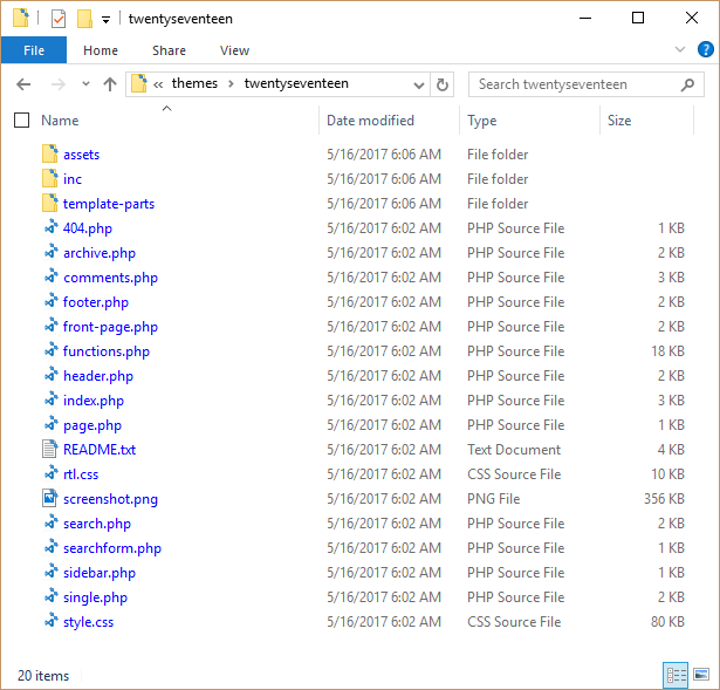
Overriding the parent theme’s templates
Templates files control how your WordPress site will be displayed on the web. The twentyseventeen folder contains all of Twenty Seventeen’s template files. You can create your own versions of these files in your child theme.
Classic Child themes by WordPress, © WordPress
Say you want to replace the text “Proudly powered by WordPress” in the footer with copyright.
Open footer.php in the twentyseventeen folder. You will see the following line of code that needs to be replaced. This statement pulls in a template with the “Proudly powered by WordPress” message.
Save a copy of footer.php in the child theme folder. You can safely edit this file, leaving the original copy in wp-content/themes/twentyseventeen intact. Just like your other classic child theme files, wp-content/themes/mychildtheme/footer.php will override the parent copy. To display a Copyright line, replace the previous code in the child theme’s footer.php with the following:
This is how it will look on the frontend:

Classic Child themes by WordPress, © WordPress
Adding new templates
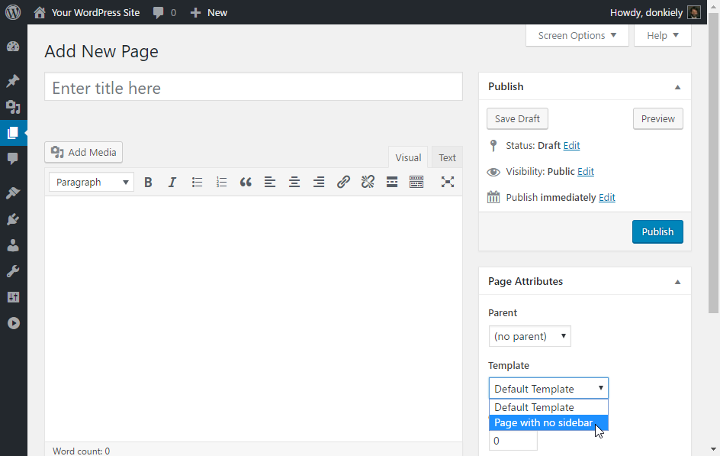
In addition to overriding existing templates with a classic child theme, you can also create new templates. Say you want to add a new template without a sidebar. Make a copy of index.php in your child theme and rename it index-nosidebar.php. You should see the following code at the top:
Edit the existing code to the following:
The name of the template goes after the variable Template Name:. Finally, find and remove the line of code near the end of the file which loads the sidebar. This is called get_sidebar();:
The new template will appear under Page Attributes on the Edit Page screen:
Classic Child themes by WordPress, © WordPress

One of the most important aspects of maintaining any site is keeping it secure. You may think this is a step you can overlook, but the truth is cyberattacks can happen to anyone. In fact, just as WordPress is the most popular CMS in the world, it also turns out to be the most hacked.2 Hackers often target sites with low security, so stay vigilant! Take precautions, and set up a robust security system to ensure peace of mind.29
CMS security best practices
Here are some elements to help strengthen CMS security. We recommend implementing all of these elements to stay safe and secure.29
Sign in and out
One of the easiest but most important ways to keep your site secure is always logging out of your site when you are finished with your session. This is particularly important if you are working from a shared or public computer. Failing to log out is like leaving your front door open when you go out: anyone can access your account (including the dashboard) by just going back and viewing your browser history.
To log out, simply click on your Gravatar in the upper right corner. This will open your Profile page, and then you can hit the sign out button in the left corner under your Gravatar. Alternatively, if you are on your blog dashboard, you can hover over your Gravatar on the grey toolbar at the top right, and click “Sign Out”.
Use strong usernames and passwords
It is also important to maintain a unique username and strong password.
Admin is the username set by default in all WordPress installations. Leaving the value as “admin” can make a hacker’s job that much easier, so it should always be changed.2
A weak password also makes it easier for hackers to gain access to your website. A strong password should include capital letters, lowercase letters, and a number and/or a symbol. DO NOT use the same password for every instance that you need one.
It is wise to change your password frequently. Nowadays, there are tools available to help you create strong passwords, and keep track of them.
Set-up 2-factor authentication
To reinforce security measures, set up 2-factor authentication. This will require additional evidence of identity (for example, a code via text/email or a security question) before login, so you stay protected even if your password is breached.
Stay on top of WordPress updates
WordPress is quick to keep their updates current, which includes fixing security problems that arise. To make the most out of WordPress’ security features, try to update the software as soon as updates become available.
Protect your personal information
The fewer people that have access to your security information, the safer your site will be. If you are the sole owner of your site, you should be the only person who had access to login details. If you maintain a site with a group of people (such as for job purposes) and need to share login information, keep the number of people sharing those details to a minimum. Always be careful of whom you give your security information to, and only share if it is absolutely necessary.
Use anti-malware
Anti-malware is an essential to protect both your computer and WordPress site. There are a variety of anti-malware products available, so choose one that will work best for your circumstances. Some products work continuously in the background, while others need to be run periodically to check for malware that may be lurking. If you are using the latter kind, be consistent. Try to schedule your program to run at least once a week.
Use a reputable web host
Hosting providers are responsible for protecting the security of their clients at the server level. Your host should be proactively monitoring and addressing security holes. This is particularly important on low-budget “shared hosting” providers, where hundreds or thousands of sites share the same server. In some cases, one “bad neighbour” can cause all the sites to get hacked – even if you did everything right. That is why picking the right host is so important. While it sounds extreme, you should always hope for the best while preparing for the worst.
Use WordPress security plugins
A variety of security plugins are available through WordPress. Each plugin will offer its own unique features, so do your research before deciding which to install. Here are some options to consider.
- WordFence: This is one of the most popular security plugins. It continuously checks for malware infections, and will notify you if anything is found. WordFence is free, but there are a few advanced features available for a price.
- BulletProof Security: This is another popular choice. Bulletproof adds firewall security, login security, database security, and much more. It too is free, but extra features can be added at a cost.
- Sucuri Security: This plugin offers various security features, including malware scanning, security activity auditing, blacklist monitoring, and a website firewall. Sucuri is a paid service.
- iThemes Security: iThemes Security is a paid plugin that offers over 30 ways to secure and protect a WordPress website.
- Acunetix WP Security: The Acunetix plugin helps secure your WordPress website, and suggests various guidelines to improve site security.
- All In One WP Security & Firewall: All In One is great for checking for any vulnerabilities on your site, and is easy to use. It protects against hackers, and goes into lockdown if someone tries to use brute force on your site. There is a cost attached to this plugin, but it is the one we recommend.
- Source Code Protection: Source Code Protection is a simple and effective plugin that uses common techniques to protect your code from being stolen. You can disable the CTRL+A, CTRL+C, CTRL+X, CTRL+S, or CTRL+V keys, and no one can right-click images on your site if you want.
Watch the following video for a quick overview of All In One WP Security & Firewall.
File permissions
The default permission scheme should be:
- Folders – 750
- Files – 640
Check with your host before making permissions changes as they can have adverse effects on the performance and availability of your site.
Avoid having any file or directory set to 777.
Changing file permissions
You can run the following commands via command line to change permissions recursively.
For Directories:
find /path/to/your/wordpress/install/ -type d -exec chmod 750 {} ;
For Files:
find /path/to/your/wordpress/install/ -type f -exec chmod 640 {} ;
You can also do this via an FTP/SFTP client.
WP-Config.php
If you use a server with .htaccess, you can put the following code at the very top of that file to deny access to anyone surfing for it:
order allow,deny
deny from all
Disable file editing
It is recommended to disable file editing within the WordPress Dashboard. WordPress has a constant that disables this editing via the wp-config.php file. Append the following 2 lines to the middle of your wp-config file, with all the other defines. The require_once line should always remain last in the file:
## Disable Editing in Dashboard
define('DISALLOW_FILE_EDIT', true);
Knowledge check
Configure a theme
The Twenty Twenty-Two theme takes advantage of the Full Site Editing features introduced in WordPress 5.9.
Have a go at customising this block theme. You can customise colours, typography, and the layout of every single page on your site. Do not be afraid to make changes – it is just a sandbox project!
Explore the Customize panel, and the rest of the functionality provided in the left-hand menu.
Explore the dashboard. Configure the website to have:
- multiple pages
- multiple menus and a logo
- an icon
- a custom primary colour
- widgets
Also try:
- overriding some CSS
- adding another (fake) user with editing rights
- setting New Zealand time zone
- setting New Zealand English language.
Gutenberg editor
Format a post using the Gutenberg editor. Add a featured image, tags, and set it to belong to a category.
Premium theme
Now try changing the theme to another free (not default) theme. Explore what the theme offers. Assess how well it meets common use cases, and uses common design patterns. Share your findings in the forum.