In this topic, we will cover,
- Libraries
- jQuery concepts
- jQuery events method
- jQuery plugins
- Map user interfaces.

Third-party JavaScript libraries
Third-party JavaScript libraries are code libraries written and maintained by another party. These can be easily implemented in your own code, instead of always writing your own from scratch. This means you can avoid reinventing the wheel for common tasks. These libraries also allow you to implement cross-browser scripting and complex UI elements without having to be an expert in JavaScript.
Using libraries
JavaScript has some useful in-built functions, like the Date function which convert dates between formats, so you do not have to. Third-party libraries serve a similar purpose: They enable you to do complicated things with only a small amount of code. That small amount of code refers to something much bigger and more complex that someone else has already created.
Libraries can be really helpful. But you should be aware of some downsides.
- You are just employing someone else’s algorithms and functions – so you will not ever really know how the code works.
- The browser has to download a lot of code – most of which you will never use.
Implementing code without knowing what it means is never a good thing. Try to understand what is happening behind the scenes when you use any library. You do not have to understand it in-depth (after all, you are using it due to its complexity), but understand enough to implement it appropriately and know any possible weaknesses.
Libraries have a lot of extraneous code and you should keep this in mind if your users have limited bandwidth. If your code requires the browser to load a 1MB library for one function, consider if you can use only the sections you need, or identify other features in the library you could use to justify it, or look for another library that does what you want with less code.
Advantages of using libraries include:
- Removing some of the pain of writing cross-browser JavaScript. The library writers and contributors will have tested using several versions of all major browsers.
- Why invent code that somebody else has already written? The thousands of downloads and pages of online documentation and commentary generated by the most-used libraries are good indicators that the code these libraries contain will be more thoroughly tested and debugged than the ordinary user’s hand code would be.
- Advanced functionality like drag and drop and JavaScript-based animation is quite complex, especially to achieve this cross-browser. Libraries allow you to achieve these types of advanced functionality, saving you time and effort.
Using a third-party JavaScript library is as simple as copying one or more files to your server (or linking to an external but stable location) and including a <script> tag in your document to load the library. This makes the code available to your own scripts.7
jQuery
"jQuery was introduced in 2006 and has grown from an easy, cross-browser means of DOM manipulation to a stable, powerful library. This library contains not just DOM manipulation tools but many additional features that make cross-browser JavaScript coding much more straightforward and productive. In fact, many JavaScript frameworks rely on the jQuery library for their functionality.
jQuery also has an advanced user interface extensions library, called jQuery UI, that can be used alongside the existing library to rapidly build and deploy rich user interfaces or to add various attractive effects to existing components. In addition, jQuery Mobile is a touch-optimised mobile framework that helps designers make responsive apps and websites that work on mobile devices as well as laptops and desktops.
You can even extend jQuery yourself by writing further plug-ins, or you can use the thousands already submitted by other developers. Browse plugins.jquery.com to see lots of examples in searchable categories."7
Getting started with jQuery
"Getting started with jQuery can be easy or challenging, depending on your experience with JavaScript, HTML, CSS, and programming concepts in general...

One important thing to know is that jQuery is just a JavaScript library. All the power of jQuery is accessed via JavaScript, so having a strong grasp of JavaScript is essential for understanding, structuring, and debugging your code. While working with jQuery regularly can, over time, improve your proficiency with JavaScript, it can be hard to get started writing jQuery without a working knowledge of JavaScript's built-in constructs and syntax."27
"jQuery is a lightweight, "write less, do more", JavaScript library... The purpose of jQuery is to make it much easier to use JavaScript on your website.
jQuery takes a lot of common tasks that require many lines of JavaScript code to accomplish and wraps them into methods you can call with a single line of code.
jQuery also simplifies a lot of the complicated things from JavaScript, like AJAX calls and DOM manipulation.
The jQuery library contains the following features:
- HTML/DOM manipulation
- CSS manipulation
- HTML event methods
- Effects and animations
- AJAX
- Utilities.
Tip: In addition, jQuery has plugins for almost any task out there."28
jQuery is used by some of the biggest companies on the Web, such as:
- Microsoft
- IBM
- Netflix.
jQuery will run exactly the same in all major browsers, so cross-browser issues are not a problem.
"There are several ways to start using jQuery on your website. You can:
- Download the jQuery library from jQuery.com
- Include jQuery from a CDN, like Google.
Downloading jQuery
There are two versions of jQuery available for downloading:
- Production version - this is for your live website because it has been minified and compressed
- Development version - this is for testing and development (uncompressed and readable code).
Both versions can be downloaded from jQuery.com. The jQuery library is a single JavaScript file, and you reference it with the HTML <script> tag (notice that the <script> tag should be inside the <head> section):
<head>
  <script src="jquery-3.5.1.min.js"></script>
</head>
Tip: Place the downloaded file in the same directory as the pages where you want to use it.
jQuery CDN
If you do not want to download and host jQuery yourself, you can include it from a CDN (Content Delivery Network).
Google is an example of a company which hosts jQuery:
Google CDN:
<head>
  <script src="https://ajax.googleapis.com/ajax/libs/jquery/3.5.1/jquery.min.js"></script>
</head>
One big advantage of using the hosted jQuery from Google:
Many users already have downloaded jQuery from Google when visiting another site. As a result, it will be loaded from cache when they visit your site, which leads to faster loading time. Also, most CDN's will make sure that once a user requests a file from it, it will be served from the server closest to them, which also leads to faster loading time."29
jQuery syntax
"With jQuery you select (query) HTML elements and perform "actions" on them.
The jQuery syntax is tailor-made for selecting HTML elements and performing some action on the element(s).
Basic syntax is: $(selector).action()
- A
$sign to define/access jQuery - A
(selector)to "query (or find)" HTML elements - A jQuery
action()to be performed on the element(s).
Examples:
$(this).hide()– hides the current element.$("p").hide()– hides all<p>elements.$(".test").hide()– hides all elements withclass="test".$("#test").hide()– hides the element withid="test".
The Document Ready Event
You might have noticed that all jQuery methods in our examples, are inside a document ready event:
$(document).ready(function() {
  // jQuery methods go here...
});
This is to prevent any jQuery code from running before the document is finished loading (is ready).
It is good practice to wait for the document to be fully loaded and ready before working with it. This also allows you to have your JavaScript code before the body of your document, in the head section.
Here are some examples of actions that can fail if methods are run before the document is fully loaded:
- Trying to hide an element that is not created yet
- Trying to get the size of an image that is not loaded yet.
Tip: The jQuery team has also created an even shorter method for the document ready event:
$(function() {
  // jQuery methods go here...
});
Use the syntax you prefer."30
Other libraries
jQuery is the most reliable, up-to-date, and comprehensive third-party library. Other libraries you may come across include Prototype, script.aculo.us, Dojo, and MooTools. However, these libraries are no longer maintained so it is recommended to stick to jQuery.
Attributes
"An element's attributes contain helpful information for your application, so it is important to be able to get and set them.
The .attr() method acts as both a getter and a setter. As a setter, .attr() can accept either a key and a value, or an object containing one or more key/value pairs.
.attr() as a setter"31:
$("a").attr("href", "allMyHrefsAreTheSameNow.html");

$("a").attr({
  title: "all titles are the same too!",
  href: "somethingNew.html",
});

// .attr() as a getter
$("a").attr("a"); // Returns the href for the first a element in the document
Selectors
In jQuery, the most basic concept is the need to select some elements and do something with them. jQuery supports most CSS3 selectors, as well as some non-standard selectors. You can access the complete selector reference on api.jquery.com/category/selectors/.
All selectors in jQuery start with the dollar sign and parentheses: $().
Some selectors include:
| Select element by... | Example |
|---|---|
| ID | $("#myId"); // Note IDs must be unique per page. |
| Class name | $(".myClass"); |
| Attribute | $("input[name='first_name']"); |
| Compound CSS selector | $("#contents ul.people li"); |
| Comma-separated list of selectors | $("div.myClass, ul.people"); |
| Pseudo-selectors |
$("a.external:first"); $("tr:first"); // Select all input-like elements in a form (more on this below). $("#myForm :input"); $("div:visible"); // All except the first three divs. $("div:gt(2)"); // All currently animated divs. $("div:animated"); |
"When using the :visible and :hidden pseudo-selectors, jQuery tests the actual visibility of the element, not its CSS visibility or display properties. jQuery looks to see if the element's physical height and width on the page are both greater than zero.
However, this test does not work with <tr>; elements. In the case of <tr>, jQuery does check the CSS display property, and considers an element hidden if its display property is set to none.
Elements that have not been added to the DOM will always be considered hidden, even if the CSS that would affect them would render them visible."32
The element selector
"The jQuery element selector selects elements based on the element name.
You can select all <p> elements on a page like this:
$("p")
For example, when a user clicks on a button, all <tr> elements will be hidden:
$(document).ready(function() {
  $("button").click(function() {
    $("p").hide();
  });
});
The #id selector
The jQuery #id selector uses the id attribute of an HTML tag to find the specific element.
An id should be unique within a page, so you should use the #id selector when you want to find a single, unique element.
To find an element with a specific id, write a hash character, followed by the id of the HTML element:
$("#test")
For example, when a user clicks on a button, the element with id="test" will be hidden:
$(document).ready(function() {
  $("button").click(function() {
    $("#test").hide();
  });
});
The .class selector
The jQuery .class selector finds elements with a specific class.
To find elements with a specific class, write a period character, followed by the name of the class:
$(".test")
For example, when a user clicks on a button, the elements with class="test" will be hidden:
$(document).ready(function() {
  $("button").click(function() {
    $(".test").hide();
  });
});
More jQuery selectors
| Syntax | Description |
|---|---|
$("*") |
Selects all elements |
$(this) |
Selects the current HTML element |
$("p.intro") |
Selects all <p> elements with class="intro" |
$("p:first") |
Selects the first <p> element |
$("ul li:first") |
Selects the first <li> element of the first <ul> |
$("ul li:first-child") |
Selects the first <li> element of every <ul> |
$("[href]") |
Selects all elements with an href attribute |
$("a[target='_blank']") |
Selects all <a> elements with a target attribute value equal to "_blank" |
$("a[target!='_blank']") |
Selects all <a> elements with a target attribute value NOT equal to "_blank" |
$(":button") |
Selects all <button> elements and <input> elements of type="button" |
$("tr:even") |
Selects all even <tr> elements |
$("tr:odd") |
Selects all odd <tr> elements"33 |
Choosing selectors
"Choosing good selectors is one way to improve JavaScript's performance. Too much specificity can be a bad thing. A selector such as #myTable thead tr th.special is overkill if a selector such as #myTable th.special will get the job done."32
Once you have made a selection, you will want to know whether you have anything to work with. Do not make this common mistake:
// Does not work!
if ($("div.foo")) {
  // ...
}
When a selection is made using $(), an object is always returned, and objects are always evaluated to true. The code inside the if statement will still run, even if the selection does not contain any elements.
To determine if there are any elements, test the selection's .length property, which tells you how many elements were selected. If the .length property evaluates to false when used as a boolean value, the answer is 0.
For example:
// Testing whether a selection contains elements.
if ($("div.foo").length) {
  // ...
}
Saving selections
jQuery does not cache elements. If you have made a selection that you might need to make again, save the selection in a variable rather than making the selection repeatedly.
var divs = $("div");
Once the selection is stored in a variable, it is possible to call jQuery methods on the variable just like you would have called them on the original selection.
A selection only fetches the elements that are on the page at the time the selection is made. If elements are added to the page later, you will have to repeat the selection or add them to the selection stored in the variable. Stored selections do not automatically update when the DOM changes.
Refining and filtering selections
jQuery has several methods for refining and filtering selections. This is useful when the selection contains more than what you require.
For example:
// Refining selections.
$("div.foo").has("p"); // div.foo elements that contain <p> tags
$("h1").not(".bar"); // h1 elements that do not have a class of bar
$("ul li").filter(".current"); // unordered list items with class of current
$("ul li").first(); // just the first unordered list item
$("ul li").eq(5); // the sixth
Selecting form elements
"jQuery offers several pseudo-selectors that help find elements in forms. These are especially helpful because it can be difficult to distinguish between form elements based on their state or type using standard CSS selectors.
Not to be confused with :checkbox, :checked targets checked checkboxes, but keep in mind that this selector works also for checked radio buttons, and <select> elements (for <select> elements only, use the :selected selector):
$("form :checked");
The :checked pseudo-selector works when used with checkboxes, radio buttons and selects.
Using the :disabled pseudo-selector targets any <input> elements with the disabled attribute:
$("form :disabled");
In order to get the best performance using :disabled, first select elements with a standard jQuery selector, then use .filter(":disabled");, or precede the pseudo-selector with a tag name or some other selector.
Basically the inverse of the :disabled pseudo-selector, the :enabled pseudo-selector targets any elements that do not have a disabled attribute:
$("form :enabled");
In order to get the best performance using :enabled, first select elements with a standard jQuery selector, then use .filter(":enabled");, or precede the pseudo-selector with a tag name or some other selector.
Using the :input selector selects all <input>, <textarea>, <select>, and <button> elements:
$("form :input");
Using the :selected pseudo-selector targets any selected items in option elements:
$("form :selected");
In order to get the best performance using :selected, first select elements with a standard jQuery selector, then use .filter(":selected"), or precede the pseudo-selector with a tag name or some other selector.
jQuery provides pseudo-selectors to select form-specific elements according to their type:
:password:reset:radio:text:submit:checkbox:button:image:file"32

Working with selections
Getters and setters
"Some jQuery methods can be used to either assign or read some value on a selection. When the method is called with a value as an argument, it is referred to as a setter because it sets (or assigns) that value. When the method is called with no argument, it gets (or reads) the value of the element.
Setters affect all elements in a selection, whereas getters return the requested value only for the first element in the selection, with the exception of .text(), which retrieves the values of all the elements.
Example 1:
// The .html() method sets all the h1 elements' html to be "hello world":
$("h1").html("hello world");
Example 2:
// The .html() method returns the html of the first h1 element:
$("h1").html(); // => "hello world"
Setters return a jQuery object, allowing you to continue calling jQuery methods on your selection. Getters return whatever they were asked to get, so you cannot continue to call jQuery methods on the value returned by the getter.
// Attempting to call a jQuery method after calling a getter.
// This will NOT work:
$("h1").html().addClass("test");
Chaining
If you call a method on a selection and that method returns a jQuery object, you can continue to call jQuery methods on the object without pausing for a semicolon. This practice is referred to as "chaining":
$("#content").find("h3").eq(2).html("new text for the third h3!");
It may help code readability to break the chain over several lines:
$("#content")
.find("h3")
.eq(2)
.html("new text for the third h3!");
jQuery also provides the .end() method to get back to the original selection should you change the selection in the middle of a chain:
.find("h3")
.eq(2)
.html("new text for the third h3!")
.end() // Restores the selection to all h3s in #content
.eq(0)
.html("new text for the first h3!")
Chaining is extraordinarily powerful, and it is a feature that many libraries have adapted since it was made popular by jQuery. However, it must be used with care – extensive chaining can make code extremely difficult to modify or debug. There is no hard-and-fast rule to how long a chain should be – just know that it is easy to get carried away."34
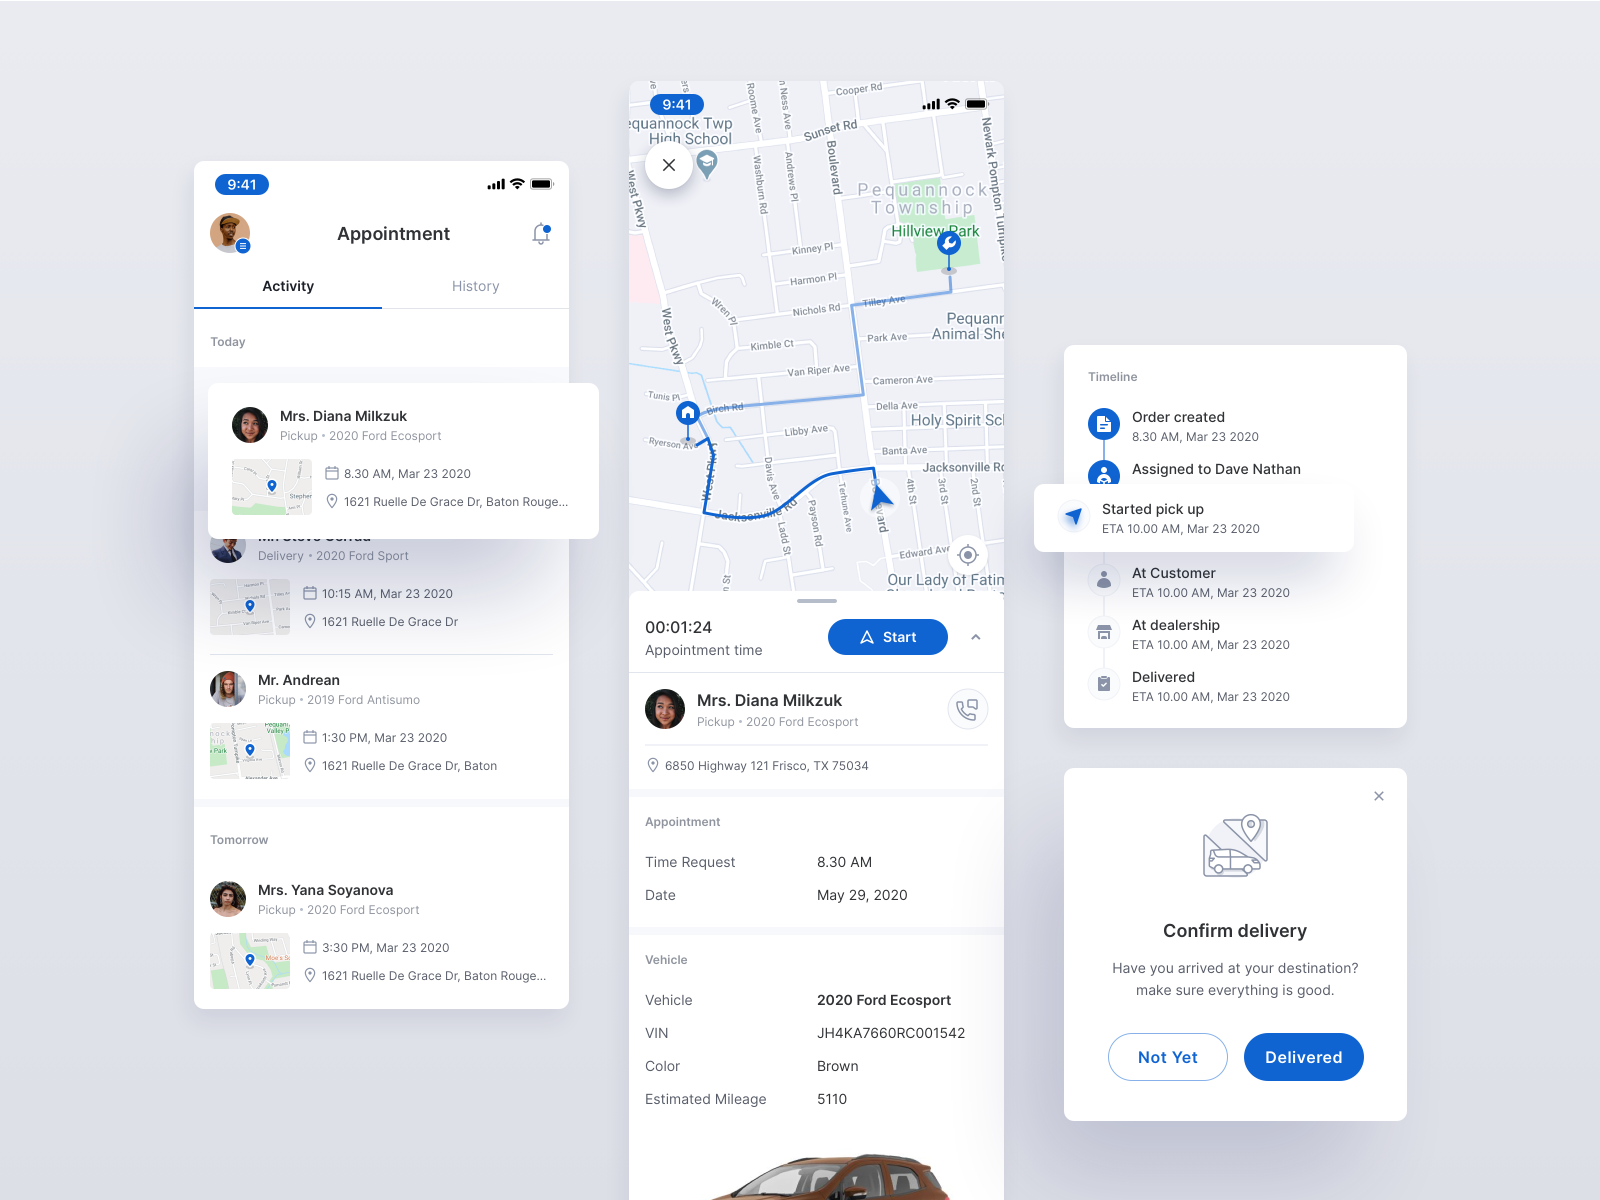
Events
"jQuery provides simple methods for attaching event handlers to selections. When an event occurs, the provided function is executed. Inside the function, this refers to the DOM element that initiated the event.
The event handling function can receive an event object. This object can be used to determine the nature of the event, and to prevent the event’s default behaviour."35
You can access events documentation on api.jquery.com/category/events/ and event object documentation on api.jquery.com/category/events/event-object/.
Setting event responses on DOM elements
It is straightforward to set up event-driven responses on page elements using jQuery. These are often triggered by the end user's interaction with the page. For example, when text is entered into a form element, or the mouse pointer is moved. With things such as the page load and unload, the browser itself will trigger the event.
"jQuery offers convenient methods for most native browser events. Methods including .click(), .focus(), .blur(), .change(), and so on are shorthand for jQuery's .on() method. The .on() method is useful for binding the same handler function to multiple events, when you want to provide data to the event handler, when you are working with custom events, or when you want to pass an object of multiple events and handlers.
For example:
$("p").click(function() {
  console.log("You clicked a paragraph!");
});
Compared to:
// Equivalent event setup using the `.on()` method
$("p").on("click", function() {
  console.log("You clicked a paragraph!");
});
Extending events to new page elements
It is important to note that .on() can only create event listeners on elements that exist at the time you set up the listeners. Similar elements created after the event listeners are established will not automatically pick up event behaviours you have set up previously.
For example:
$(document).ready(function() {
  // Sets up click behavior on all button elements with the alert class
  // that exist in the DOM when the instruction was executed
  $("button.alert").on("click", function() {
    console.log("A button with the alert class was clicked!");
  });

  // Now create a new button element with the alert class. This button
  // was created after the click listeners were applied above, so it
  // will not have the same click behavior as its peers
  $("<button class='alert'>Alert!</button>").appendTo(document.body);
});
Inside the event handler function
Every event handling function receives an event object, which contains many properties and methods. The event object is most commonly used to prevent the default action of the event via the .preventDefault() method. However, the event object contains a number of other useful properties and methods, including:
pageX,pageY– The mouse position at the time the event occurred, relative to the top left corner of the page display area (not the entire browser window)type– The type of the event (e.g., "click")which– The button or key that was presseddata– Any data that was passed in when the event was bound.
For example:
// Event setup using the `.on()` method with data
$("input").on(
  "change",
  { foo: "bar" }, // Associate data with event binding
  function(eventObject) {
    console.log("An input value has changed! ", eventObject.data.foo);
  }
);
target- The DOM element that initiated the eventnamespace- The namespace specified when the event was triggeredtimeStamp- The difference in milliseconds between the time the event occurred in the browser and January 1, 1970preventDefault()- Prevent the default action of the event (e.g. following a link)stopPropagation()- Stop the event from bubbling up to other elements.
In addition to the event object, the event handling function also has access to the DOM element that the handler was bound to via the keyword this. To turn the DOM element into a jQuery object that we can use jQuery methods on, we simply do $(this), often following this idiom:
var element = $(this);
A fuller example would be:
// Preventing a link from being followed
$("a").click(function(eventObject) {
  var elem = $(this);

  if (elem.attr("href").match(/evil/)) {
    eventObject.preventDefault();
    elem.addClass("evil");
  }
});
Setting up multiple event responses
Quite often elements in your application will be bound to multiple events. If multiple events are to share the same handling function, you can provide the event types as a space-separated list to .on():
// Multiple events, same handler
$("input").on(
  "click change", // Bind handlers for multiple events
  function() {
    console.log("An input was clicked or changed!");
  }
);
When each event has its own handler, you can pass an object into .on() with one or more key/value pairs, with the key being the event name and the value being the function to handle the event.
// Binding multiple events with different handlers
$("p").on({
  "click": function() { console.log("clicked!"); },
  "mouseover": function() { console.log("hovered!"); },
});
Namespacing events
For complex applications and plugins you share with others, it can be helpful to namespace your events so that you do not accidentally disconnect events that you did not or could not know about.
// Namespacing events
$("p").on("click.myNamespace", function() { /* ... */ });
$("p").off("click.myNamespace");
$("p").off(".myNamespace"); // Unbind all events in the namespace
Tearing down event listeners
To remove an event listener, you use the .off() method and pass in the event type to off. If you attached a named function to the event, then you can isolate the event tear down to just that named function by passing it as the second argument.
// Tearing down all click handlers on a selection
$("p").off("click");
Setting up events to run only once
Sometimes you need a particular handler to run only once — after that, you may want no handler to run, or you may want a different handler to run. jQuery provides the .one() method for this purpose.
// Switching handlers using the `.one()` method
$("p").one("click", firstClick);

function firstClick() {
  console.log("You just clicked this for the first time!");

  // Now set up the new handler for subsequent clicks;
  // omit this step if no further click responses are needed
  $(this).click(function () { "You have clicked this before!" });
}
Note that in the code snippet above, the firstClick() function will be executed for the first click on each paragraph element rather than the function being removed from all paragraphs when any paragraph is clicked for the first time.
.one() can also be used to bind multiple events:
// Using .one() to bind several events
$("input[id]").one("focus mouseover keydown", firstEvent);

function firstEvent(eventObject) {
  console.log(
    "A " +
    eventObject.type +
    " event occurred for the first time on the input with id " +
    this.id
  );
}
In this case, the firstEvent() function will be executed once for each event. For the snippet above, this means that once an input element gains focus, the handler function will still execute for the first keydown event on that element."36
Callback
"A callback is a plain JavaScript function passed to some method as an argument or option. Some callbacks are just events, called to give the user a chance to react when a certain state is triggered. jQuery's event system uses such callbacks everywhere:
$("body").click(function (event) {
  console.log("clicked: " + event.target);
});
Most callbacks provide arguments and a context. In the event-handler example, the callback is called with one argument, an Event. The context is set to the handling element, in the above example, document.body.
Some callbacks are required to return something, others make that return value optional. To prevent a form submission, a submit event handler can return false:
$("#myform").submit(function () {
  return false;
});
Instead of always returning false, the callback could check fields of the form for validity, and return false only when the form is invalid."37
What are events?
"All the different visitors' actions that a web page can respond to are called events. An event represents the precise moment when something happens.
Examples:
- Moving a mouse over an element
- Selecting a radio button
- Clicking on an element.
The term "fires or fired" is often used with events. For example: "The keypress event is fired, the moment you press a key".
jQuery syntax for event methods
In jQuery, most DOM events have an equivalent jQuery method. To assign a click event to all paragraphs on a page, you can do this:
$("p").click();
The next step is to define what should happen when the event fires. You must pass a function to the event:
$("p").click(function() {
  // action goes here!!
});
Commonly used jQuery event methods
$(document).ready()
The $(document).ready() method allows us to execute a function when the document is fully loaded.
click()
The .click() method attaches an event handler function to an HTML element. The function is executed when the user clicks on the HTML element.
The following example says: When a click event fires on a <p> element; hide the current <p> element.
For example:
$("p").click(function() {
  $(this).hide();
});
dblclick()
The .dblclick() method attaches an event handler function to an HTML element. The function is executed when the user double-clicks on the HTML element.
For example:
$("p").dblclick(function() {
  $(this).hide();
});
mouseenter()
The .mouseenter() method attaches an event handler function to an HTML element. The function is executed when the mouse pointer enters the HTML element.
For example:
$("#p1").mouseenter(function() {
  alert("You entered p1!");
});
mouseleave()
The .mouseleave() method attaches an event handler function to an HTML element. The function is executed when the mouse pointer leaves the HTML element.
For example:
$("#p1").mouseleave(function() {
  alert("Bye! You now leave p1!");
});
mousedown()
The .mousedown() method attaches an event handler function to an HTML element. The function is executed, when the left, middle or right mouse button is pressed down, while the mouse is over the HTML element.
For example:
$("#p1").mousedown(function() {
  alert("Mouse down over p1!");
});
mouseup()
The .mouseup() method attaches an event handler function to an HTML element. The function is executed, when the left, middle or right mouse button is released, while the mouse is over the HTML element.
For example:
$("#p1").mouseup(function() {
  alert("Mouse up over p1!");
});
hover()
The .hover() method takes two functions and is a combination of the mouseenter() and mouseleave() methods. The first function is executed when the mouse enters the HTML element, and the second function is executed when the mouse leaves the HTML element.
For example:
$("#p1").hover(
  function() {
    alert("You entered p1!");
  },
  function() {
    alert("Bye! You now leave p1!");
  }
);
focus()
The .focus() method attaches an event handler function to an HTML form field. The function is executed when the form field gets focus.
For example:
$("input").focus(function() {
  $(this).css("background-color", "#cccccc");
});
blur()
The .blur() method attaches an event handler function to an HTML form field. The function is executed when the form field loses focus.
For example:
$("input").blur(function() {
  $(this).css("background-color", "#ffffff");
});
The on() method
The .on() method attaches one or more event handlers for the selected elements. Attach a click event to a <p> element.
For example:"38
$("p").on("click", function() {
  $(this).hide();
});
What is a jQuery plugin?
"A plug-in is a piece of code written in a standard JavaScript file. These files provide useful jQuery methods which can be used along with jQuery library methods.
There are plenty of jQuery plug-ins available which you can download from the repository link at jquery.com/plugins.
How to use plugins
To make a plug-in's methods available to us, we include a plug-in file very similar to the jQuery library file in the <head> of the document.
We must ensure that it appears after the main jQuery source file, and before our custom JavaScript code.
The following example shows how to include jquery.plug-in.js plugin:"39

Animate On Scroll (AOS) library
Animate On Scroll, or AOS, is a library created by Michał Sajnóg which triggers animations when users scroll.
Most libraries that animate elements on scroll do so by handling the animations completely by JavaScript, and inserting inline CSS. These can be hard to control and override. Unlike these libraries, AOS splits the responsibilities.
- All the logic is inside the JavaScript
- The animations are all in the CSS.
This allows you to easily add your own animations and do things like change them according to the viewport.
How does it work?
The idea behind AOS is straightforward. Watch all elements and their positions based on the settings you provide them, then add or remove the class .aos-animate. Of course, in practice, it is not always that easy, but the idea behind AOS is as simple as that. Every aspect of animation is handled by CSS.
There are lots of different animations ready to use, but it is also simple to create new ones. For example:
[aos="fade"] {
  opacity: 0;
  transition-property: opacity;
}

[aos="fade"].aos-animate {
  opacity: 0;
}
You do not have to worry about duration or delay. In the CSS, you only:
- Add styles for the attribute aos with the name of your animation
- Set the transition-property (by default this is all, so it is more performant and more predictable if you narrow the transition to the intended properties)
- Add the post-transition properties on
.aos-animate
Things like duration, delay, and easing are set independently of the animation.
Additional features
Other features in AOS include:
- Anchor – Animate one element based on position of another element.
- Anchor placement – Animate an element based on its position on the screen. The animation is not limited to animate only when it appears in the viewport, but for example when the bottom part of it hits the middle of the screen.
- Both way animations – By default elements animate while you scroll up and down, but you can force it to animate only once.
- Easy disabling – Disable animations on mobile devices using predefined options like mobile, phone, tablet or with a custom condition/function.
- Async aware – Recalculates positions of elements on DOM changes, so after loading something using Ajax, you do not have to worry about anything.
- No dependencies – This library is written in pure JS and does not rely on any dependencies.
Get AOS
AOS is fully open source, so if you have an interesting idea or something is not working how you would expect, you can open an issue and contribute on GitHub.
Download AOS and see examples on michalsnik.github.io/aos/.
CDN sources
CSS:
<link href="https://unpkg.com/aos@2.3.1/dist/aos.css" rel="stylesheet">
JS:
<script src="https://unpkg.com/aos.2.3.1/dist/aos.js"></script>
Initialise AOS
Initialise the library:
<script>
  AOS.init();
</script>
jQuery validation plugin
"This jQuery plugin makes simple client-side form validation easy, whilst still offering plenty of customization options. It makes a good choice if you’re building something new from scratch, but also when you’re trying to integrate something into an existing application with lots of existing markups. The plugin comes bundled with a useful set of validation methods, including URL and email validation, while providing an API to write your own methods. All bundled methods come with default error messages in English and translations into 37 other languages.
For a quick overview of what this plugin provides, check out this Webucator video."40
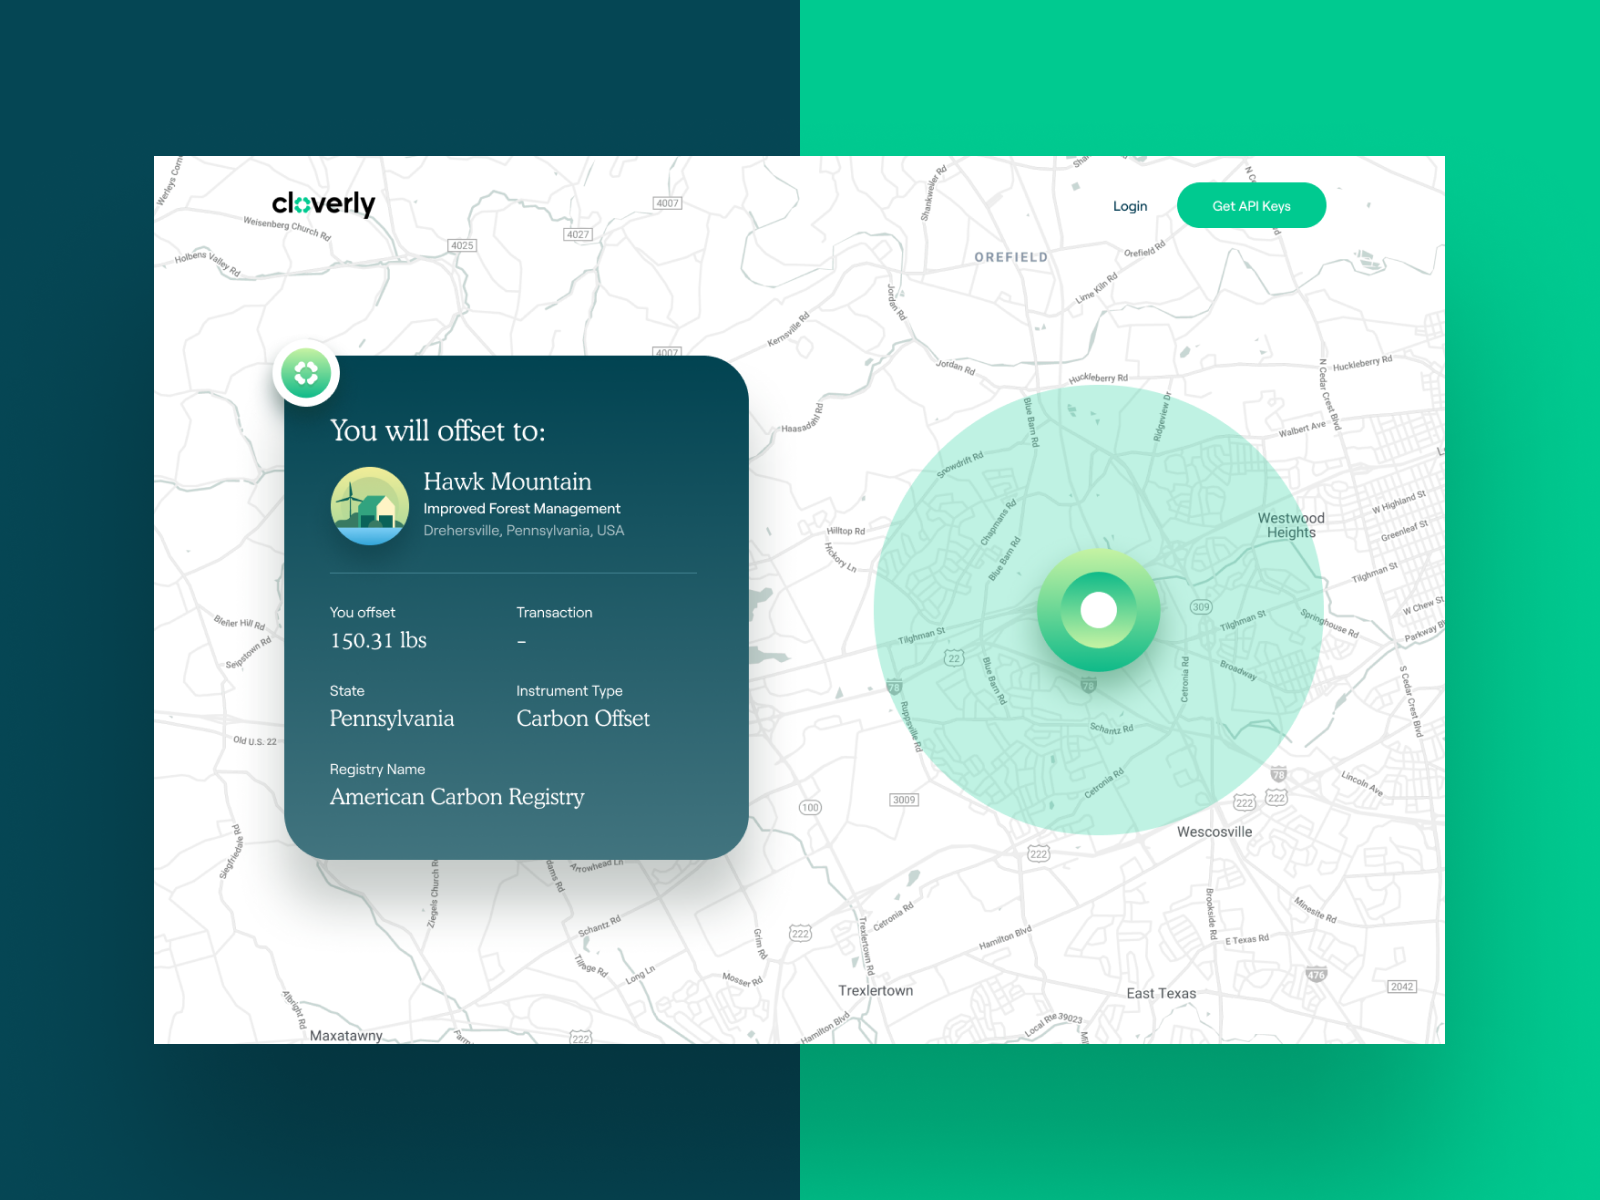
What is UI mapping?
Maps are an essential element of user interface design. From maps to explore content, get directions, and find locations of interest, to even providing a visual confirmation of a shipping address in e-commerce.
Map UI design can appear simple and do not have many elements. But every map UI consists of multiple layers of information. Generally, there are three defined layers of information:
- Basemap layer. Layer on which you display your features.
- Feature layer. This layer has features (usually points of interest such as buildings, places, or anything else that is valuable for the user) that designers place on top of the basemap layer.
- Layer of controls. This is the layer with controls that allow users to interact with the map.
Create a UI map
If you have cartography skills and want to design a unique map, you could build one from scratch. For most developers, it is better to avoid creating your own basemap style from scratch. Remember this from when Apple Maps first launched and tried to take on Google Maps?
Services like Google Maps or Mapbox offer good, ready-to-use mapping tools. Mapbox even provides various templates so you can create a visual appearance that works best for your site.
Good map design
Good map UI design is a balance of design and data.
The following are some good design recommendations based on Mapbo’s Guide to Map Design and Google Material Design.
Limit the number of colours
Colour is a powerful tool. It can attract attention, group objects, or improve the overall aesthetics of a map. Keep in mind the following when selecting colours for map UI:
- Use a limited colour palette. Create visual harmony with a limited colour palette. Depending on the complexity of your map, use between 10 to 12 colours for a full-body colour palette.
- Use the same hue for similar features. For example, features related to transportation (bus stops, railway stations, and so on) should share the same hue. This gives a visual clue to users without reading text and helps to create a more cohesive UI.
- Always remember accessibility. Select colours with accessibility in mind.
When you finish your palette, review it. Are the colours harmonious?
Typography
Typography is essential for map design. Readability of labels can determine whether your map is success or not.
- Select sans serif fonts. They have a lower DPI on screens making it preferable for map UI.
- Control the spacing. Proper spacing (120% to 145% of the point size) guarantees good readability.
- Use uppercase for small elements such as road labels. It will help you avoid descenders and improve readability.
- Consider the font’s personality. What mood do you want to convey in your map?
Contrast
Contrast helps users interact with the user interface and makes features stand out from the base layer.
Keep the basemap subtle (just enough contrast to create proper context and help users understand what they are looking at) to avoid distracting the viewers from the content or points of interest.
Visual hierarchy
Create hierarchy using text or colours to help comprehension. For example, we can use bold font-weight for city names and normal font-weight for suburbs.
Information density
Information density is how much information the user sees on the map and is often connected to zoom level. The more you zoom in, the more detail appears. Design with proper information density to prevent overwhelming users with too much information. You can achieve this by applying a progressive disclosure technique, which gradually discloses the information as a user interacts with a screen.
Icons
Icons are a part of visual language that designers use to communicate with their users. Map icons typically indicate points of interest.
- Use familiar icons. Users should be able to decode quickly and easily.
- Use icons with the same visual style. This makes the aesthetic cohesive and interactions predictable.
- Scale well. Icons should be legible at sizes as small as 11px.
Creating both light and dark themes
Providing light and dark themes make your map accessible for a range of people and environments.
Predictable controls
Finally, digital maps respond in real-time to user input. Typically features of control include zooming in and out, a search box (for address or point of interest), a location indicator, and a way to change the basemap. When designing controls, you should:
- Place controls inside the bounds of your map.
- Design finger-friendly touch targets for touch screen devices.41
Watch the following to discover what is possible with Google Maps Platform.
Using the Google Maps Platform, you can:
- Help users find locations and points of interest
- Display and analyse geospatial data
- Provide local information to help users make decisions
- Enable asset tracking for e-commerce
- Offer users efficient routes
- Build interactive experiences to increase engagement, communicate dynamic information, and delight users – think about virtual experiences and immersive worlds
- Simplify address entry on forms
- Help users identify and understand transactions.
Watch the following video to learn how to set up a free account on the Google Cloud Platform, or follow the instructions at Getting Started with Google Maps Platform. You will need to set up a billing account and project. There is a Google Cloud Platform $300 no-charge trial and Google Maps Platform recurring $200 monthly credit.
Once you have set up an account, watch the following video for an introduction to the Google Maps Platform.
You can learn more and read about use cases relating to these benefits on
mapsplatform.google.com.
Further resources to assist in using Google Maps Platform include:
Knowledge checks
jQuery plugin – trial and review
Trial a jQuery plugin or combination of jQuery plugins and then present your findings to the class in the forum.