In this topic, we will cover:
- Version control
- Open source
- GitHub
- Agile meetings
- Project scaffolding
- Project management tools.
The task of managing many contributions to shared working documents is one of the most difficult aspects of working with many people on a single project. Contributors can add to the project in different ways. They can:
- Be spread all over the world
- Work in the same room
- Work in tandem
- Work asynchronously.
The work of multiple contributors must be wrangled into a single project, regardless of how your group is organised. To stay on top of the most recent version, version control makes sure everyone is on the same page and following updates at the same time.
Process of version control
‘The following diagram explains the process of version control.

Three workstations are located in three different places, and one repository serves as a server. That repository is used by the workstations for either the committing or updating of tasks.
This allows any user to easily access the job that is being completed using the repository. If a user's system fails, the work will continue since a copy of the source code will be kept in the central repository.’66
Benefits of version control
The Version Control System's job is to ensure that everyone in the team is on the same page and working on the most recent version of the file.
Some benefits of version control are:
- Manage and protect source code
- Keep track of modifications to the code
- Support the developer’s workflow.
Manage and protect source code
By keeping track of all code modifications, the Version Control System helps to manage the source code. It also protects the source code from unintended human error.
Keep track of modifications to the code
Codes are continually being developed, and existing codes are being updated. If you keep track of the modifications and save them, you can refer to them in the future if there are any problems with the code that needs debugging.
Support developer’s workflow
Any acceptable Version Control software will not force you to work in a specific way.’66 Instead, it will give you the freedom to make changes to the code and collaborate on the latest version.
Version control best practices
Every team's toolkit should include version control. Version control is used by software development teams to improve cooperation and break down information silos. Teams may coordinate all changes in a software project using best practices, which support swift interaction and sharing of feedback, resulting in instant, actionable improvements. Here is a list of recommended practices.
When using version control for a project, you should:
- Back up elsewhere
- Avoid working directly on the master/main branch. Use a separate branch called “dev” for merging features and bug fixes. When the dev branch is fully tested and stable, it can be merged into the master/main branch
- Make commits of small, logical, complete units
- Commit early and often, perfect later, and publish once
- Write good commit messages
- Test thoroughly before committing
- Use a branching strategy to prevent mixing up different lines of development
- Follow the style guide of an existing project or create one for a new project
- Review the CONTRIBUTING.MD file associated with an existing project or create one for a new project
- Look at existing pull requests and issues to make sure that you are not duplicating effort.
Collaborative version control
Here are seven steps to successful collaborative version control. Which of the steps do you think is the most important? Is there anything else that you feel should be added to the list?
- Agree on workflow
- Keep to your own unit of work
- Decide who is allowed to publish to the master repository
- Use a branching strategy to prevent mixing up different lines of development
- Keep to a naming convention for branches. For example: “name/feature/short-description” would be a naming convention for a following branch called “bob/contact-us/contact-form”
- Engage in peer review for prospective changes
- Consider using a pull request template.

An open source code is any database application that has a codebase that is free to view, download, alter, distribute, and re-use. Developers can use open source licences to create new apps based on existing database systems.
Open source your projects
Open sourcing your project is a great place to start. Place it on GitHub and ask for help from the community. Not only will this bring value to your project, but it will also enable you to collaborate with a large number of developers all around the world.67
There are several great reasons for businesses to use open source software effectively. Some of the advantages of open source code are:
- Open source unleashes creativity
- Open source proves the power of diversity and inclusion
- Open source reveals the real value of a project
- Open source allows companies to serve customers better
- Open source challenges us to rethink work.
Open source code unleashes creativity
Most businesses prioritise intellectual property protection, yet open sourcing could help entrepreneurs refine and expand their ideas far quicker than if they worked in isolation.
Open source proves the power of diversity and inclusion
Open source projects are viewed by developers from all over the world and from a variety of industries. This diversity of viewpoints drives progress forwards beyond what was previously possible. Diverse voices in a project team help to create inclusive and accessible design.
Open source reveals the real value of a project
Businesses may find it challenging to assess the true value of something in isolation. However, with open source, the community's response is more dynamic.
Open source allows companies to serve customers better
A better experience and better value for money for clients can be accomplished by using and building on open source software. Most types of software have administration and support costs beyond the cost of the initial software licence and annual maintenance fees—costs that open source software reduces.
Open source challenges us to rethink work
The overall quality of code increases as a result of more collaboration and work in the public sphere. The technology industry as a whole benefits. Important issues are resolved more promptly, making consumers' lives easier.
Case study: Adobe
Adobe is committed to open source and has over 250 public repositories on its GitHub site. Some of its best-known open source projects are developer tools such as the PhoneGap web development framework, Topcoat CSS library, and the Brackets text editor.68
Take a look at how Adobe uses GitHub as an open source repository at github.com/adobe/adobe.github.com.

GitHub is a fantastic tool for collaborating on development projects. Many significant open source projects have made GitHub their principal location for collaboration and contribution.
Identifying your role is one of the most crucial things to remember when starting with open source collaborations. There are a lot of things you can accomplish as a developer that do not require you to be an expert programmer. Do not be afraid to start small: rather than solving a large bug, look for things like documentation gaps, cross-device testing and patching, or even simple syntax.
Take a look at the following steps that you can take when creating a new project.
Bourne Again Shell (Bash)
Bash is an acronym for Bourne Again Shell. A shell is a terminal application used to interface with an operating system through written commands.69 Before we begin, Windows users will need to download Git Bash, which provides an emulation layer for a Git command line experience. MacOS users will have Bash by default.
Create a Personal Access Token (All platforms)
Before you can 'push' to GitHub, you must be signed in and authenticate your account. You only need to do this once – the terminal will remember you across sessions.
Creating a Personal Access Token (PAT) is the recommended most secure authentication method for all platforms.
You can create a PAT using the GitHub website and specify the exact permissions that it provides your computer when interacting with GitHub in the cloud. We will create a token that allows for access and modifications to the repository.
Step 1: Create PAT on the GitHub website
- In the GitHub website, click on your profile picture in the top-right corner and go to Settings.
- In the left sidebar, go to Developer settings. Then, again in the left sidebar, click Personal access tokens.
- Click Generate new token. Give the token a name (something that describes what you will use it for, e.g. “Local machine token”).
- Select an Expiration time. You can set to no expiration so that you will not have to re-authenticate.
- Then, select the permissions you grant to this token. Simply select the “repo” group in bold.
- Click Generate token. Make sure to copy the token and store it securely, since the website will not show it to you again. (If something goes wrong, you can always generate a new one.)
Bookmark this guide complete with screenshots: Creating a personal access token.
Step 2: Authenticate (within RStudio)
On Windows, once you interact with a private repository you should get a prompt looking like this:
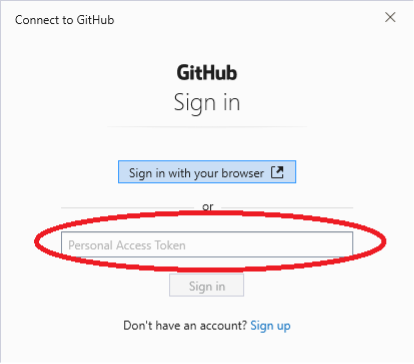
Simply paste the token into the Personal access token field and continue.
On Linux/macOS, you should get a prompt for your username and then for your password. Input your GitHub username, and under password, input your PAT instead.
Your authentication should now be successful, and you can interact with GitHub repositories directly from RStudio.
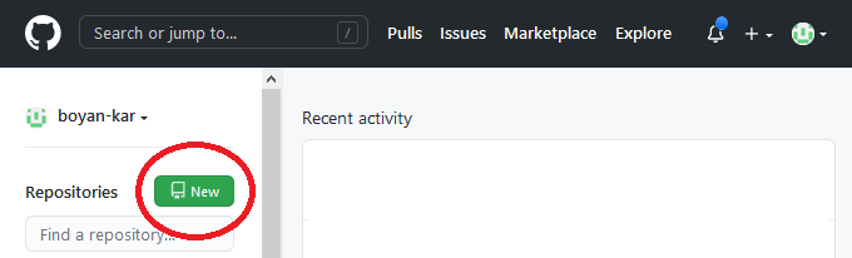
Create a new project
- To create a repository, go to Repositories/New repository and give it a name that is not too long or does not contain any spaces or strange characters. This can be your central repository for past and current research, data, scripts, and publications.70
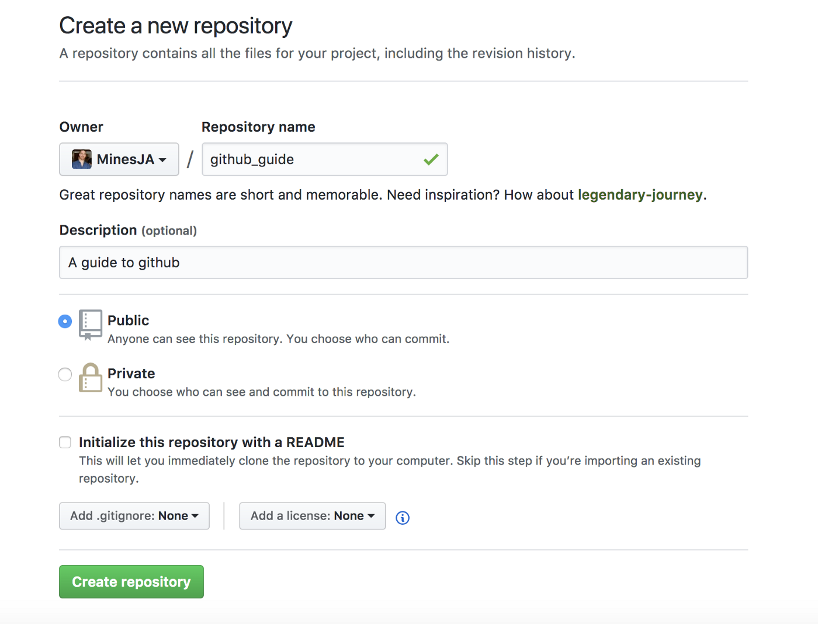
- Make a name for your file. You may call it whatever you like.
- Create your repo, add a description, make it public, and create a README file.
The Ultimate Github Collaboration Guide by Jonathan Mines, © Jonathan Mines
- The setup page will appear next. These are the steps for linking the GitHub (Remote) repo you just created to the directory you made in your terminal (Local).
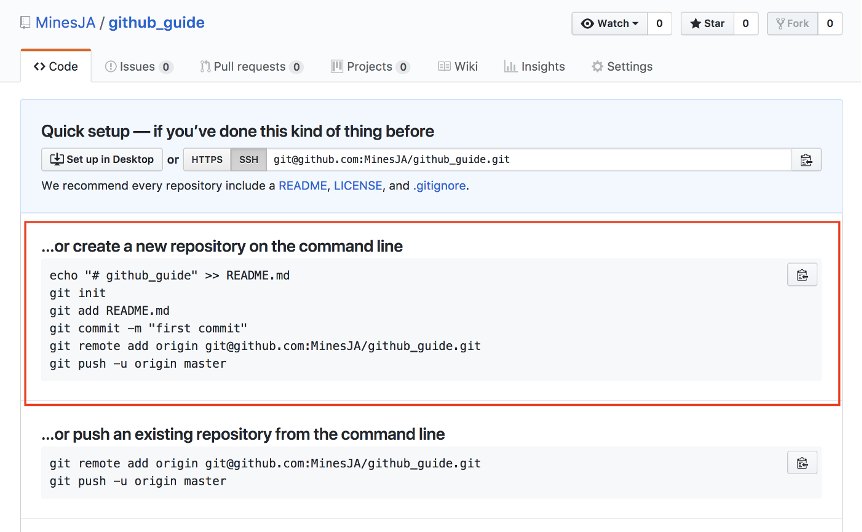
The Ultimate Github Collaboration Guide by Jonathan Mines © Jonathan Mines -
Line by line, starting with "echo...", paste the lines in the red box into the terminal – the command line (Terminal for macOS, or Git Bash for Windows) – while cd'ed into the directory you just established locally:
echo "# github_guide" >> README.md
git init
git add README.md
git commit -m "first commit"
git remote add origin git@github.com:MilnesJA/github_guide.git
git push -u origin master
-
When you are finished, your terminal should look like this:
[13:51:37] github_guide
// ❤️ echo "# github_guide" >> README.md
[13:51:49] github_guide
// ❤️ git init
Reintialized existing Git repository in /Users/jmines/Development/code/practice/github_guide/.git/
[13:51:54] github_guide
// ❤️ git add README.md
[13:52:00] github_guide
// ❤️ git commit -m "first commit"
[master (root-commit) 168e94f] first commit
1 file changed, 25 insertions(+)
create mode 100644 README.md
[13:52:04] (master) github_guide
// ❤️ git remote add origin git@github.com:MinesJA/github_guide.git
[13:52:08] (master) github_guide
// ❤️ git push -u origin master
Counting objects: 3, done.
Delta compression using up to 4 threads.
Compressing objects: 100% (2/2), done.
Writing objects: 100% (3/3), 465 bytes | 465.00KiB/s, done.
Total 3 (delta 0), reused 0 (delta 0)
To github.com:MinesJA/github_guide.git
 * [new branch]        master -> master
Branch 'master' set up to track remote branch 'master' from 'origin'.
[13:52:15] (master) github_guide
// ❤️
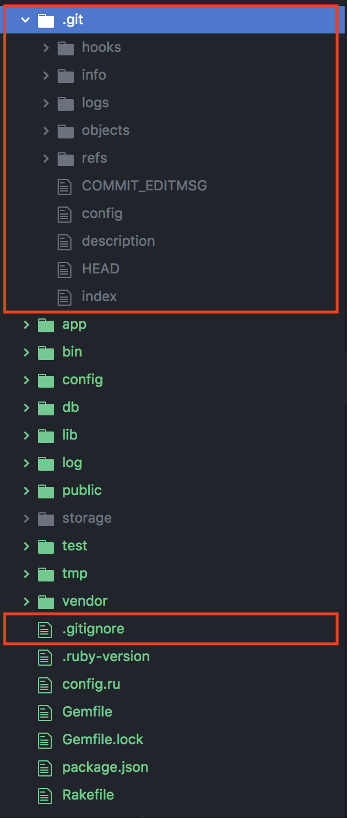
- This creates a '.git' folder in your repository, links you to your remote GitHub repository, and creates a '.gitignore' file for you.
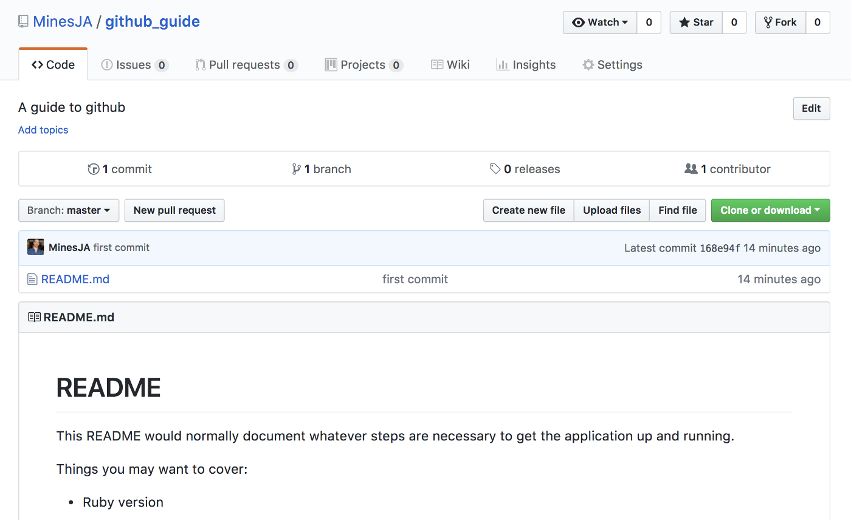
The Ultimate Github Collaboration Guide by Jonathan Mines, © Jonathan Mines - If you go to your GitHub Repo page, you'll see the ReadMe you created as well as a link to the first commit you made.
The Ultimate Github Collaboration Guide by Jonathan Mines, © Jonathan Mines - Let us bring this repo up to date now. Return to your terminal and run the following commands: git add, git commit, and git push:
$ git add .
$ git commit -m "second commit"
$ git push
The Ultimate Github Collaboration Guide by Jonathan Mines, © Jonathan Mines
Set up a team
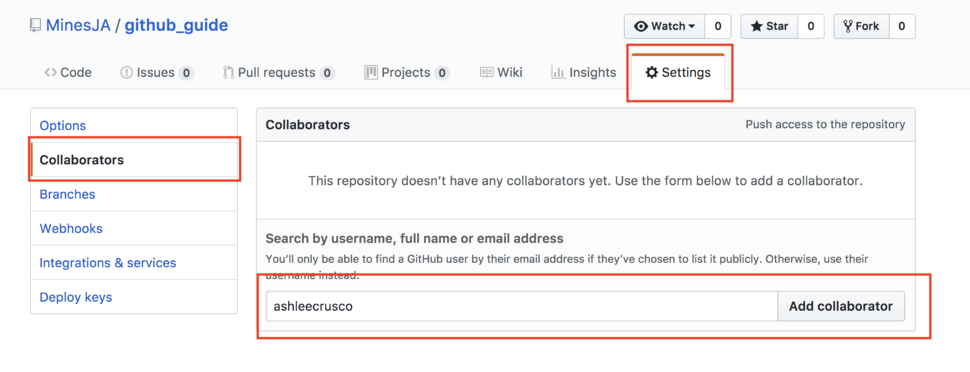
Because you are part of a team, you will want to add your co-workers to your repository so they can collaborate. Make sure you are only adding them as collaborators because they will be able to push or merge.
- Search for GitHub users and add them by selecting "Add Collaborator" on the "Settings" tab of your rep, then "Collaborators":
The Ultimate Github Collaboration Guide by Jonathan Mines, © Jonathan Mines
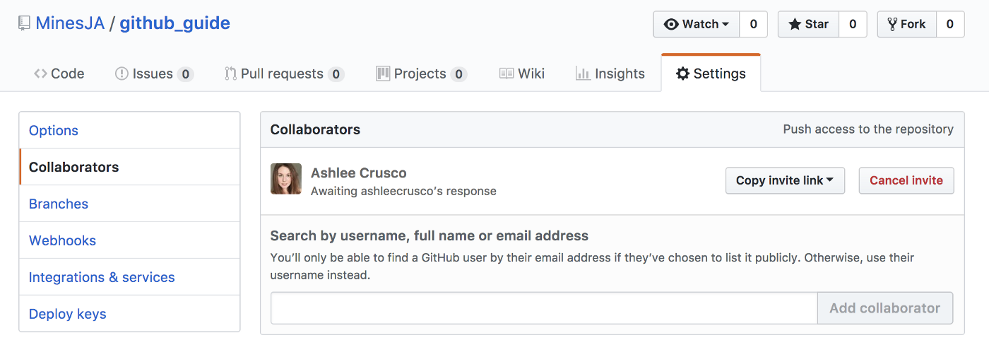
- An email will notify them that they have been added as a collaborator.
The Ultimate Github Collaboration Guide by Jonathan Mines, © Jonathan Mines
You are now ready to collaborate!

Collaborating
There is one rule you must follow when using git to collaborate on a project with numerous people:
The master/main branch should be deployable at all times. Create new branches for new features and merge them into master/main once they are finished to keep master/main deployable.
To begin, features should always be represented by branches. If you want to add the ability for a user to log in, you should definitely create a branch called "user authentication," and just change what you need to enable a user to login to that branch.
Let us assume you want to build a User model. Create a new branch in your terminal:
$ git co -b create_user
The abbreviation "co" stands for "checkout," and it is used to transition between branches. Adding the "-b" and a name to the end of the command establishes a new branch and then transfers us into it. You should be able to confirm this with the following command:
$ git branch
It should produce:
[14:48:31] (new_feature) github_guide
// ❤️ git branch
    master
  * new_feature
The new branch is ready for coding.
Go to the GitHub Repo's page now. The branch you pushed up should appear in a yellow bar at the top of the screen, along with a button that says "Compare & pull request."
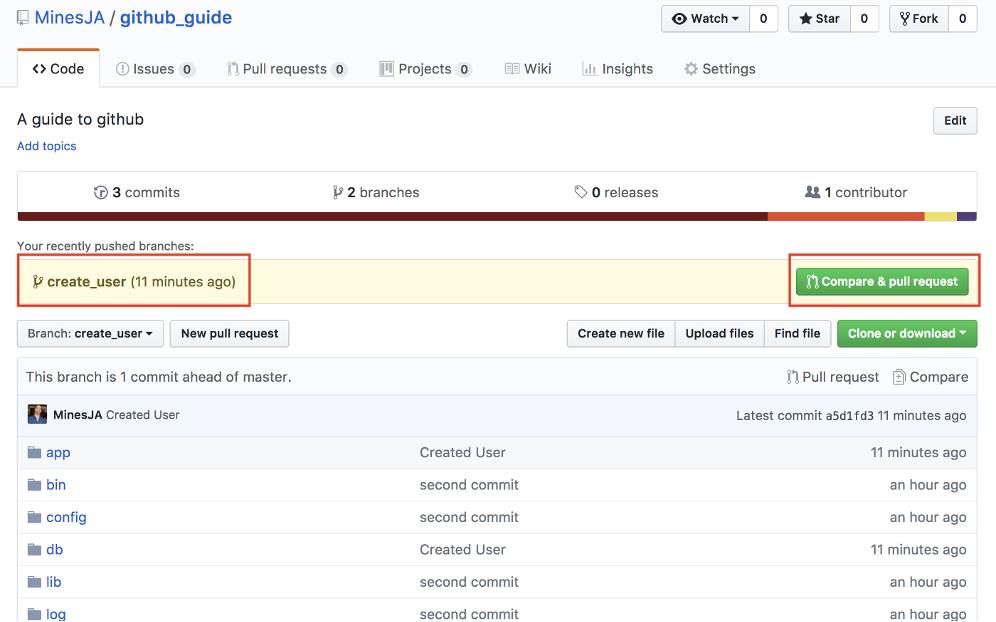
The Ultimate Github Collaboration Guide by Jonathan Mines, © Jonathan Mines
Select "Compare and pull request" from the drop-down menu. This will take you to the page where you may "Open a pull request." From here, you should give a concise summary of the changes you made. You should also go to the "Reviewers" page and choose the "Merge Master" your team decided on. Click "Create pull request" after you are finished.
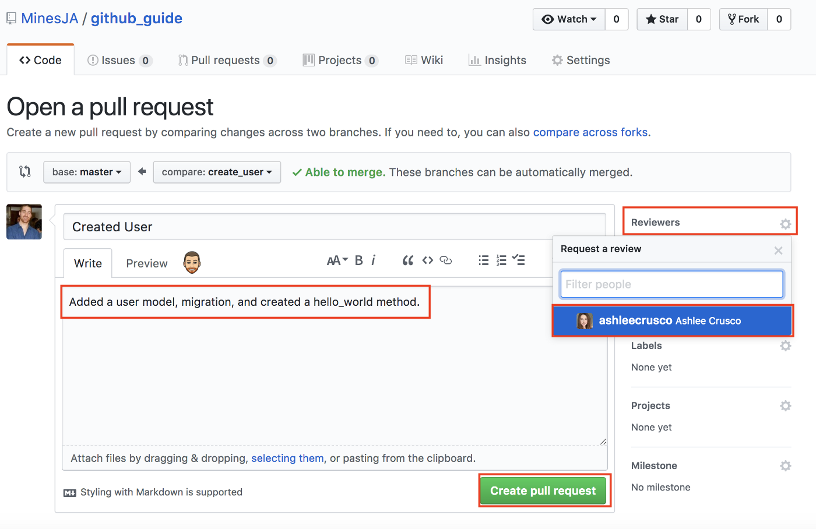
The Ultimate Github Collaboration Guide by Jonathan Mines, © Jonathan Mines
Click on the add your review button.
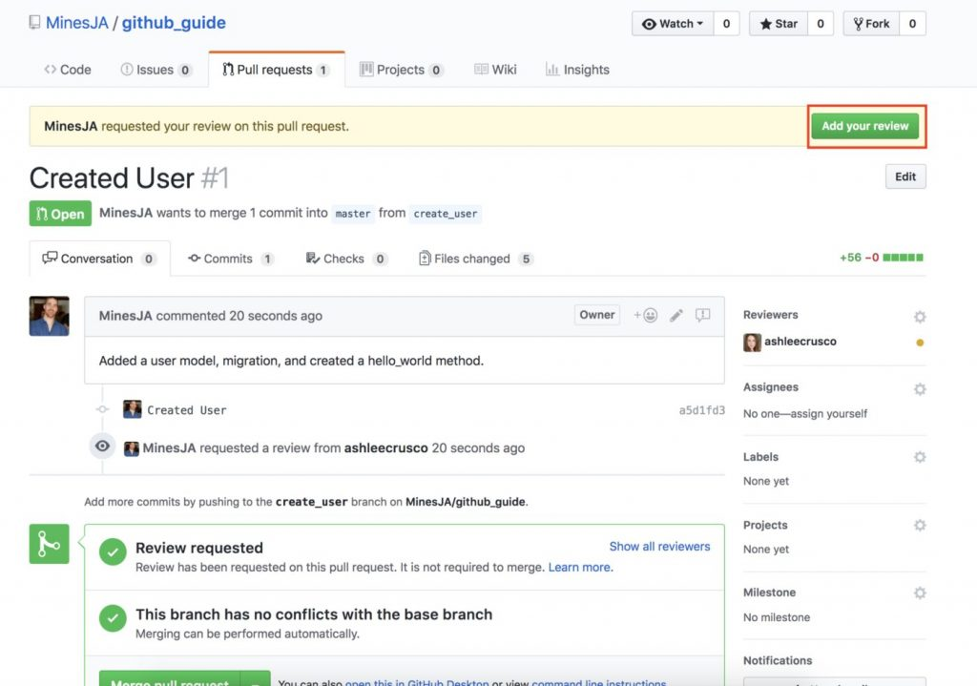
The Ultimate Github Collaboration Guide by Jonathan Mines, © Jonathan Mines
This will take you to the page where you may submit a Pull Request. If you are working remotely, this will be your primary means of informing the requester if they need to adjust, or if their request will be merged.
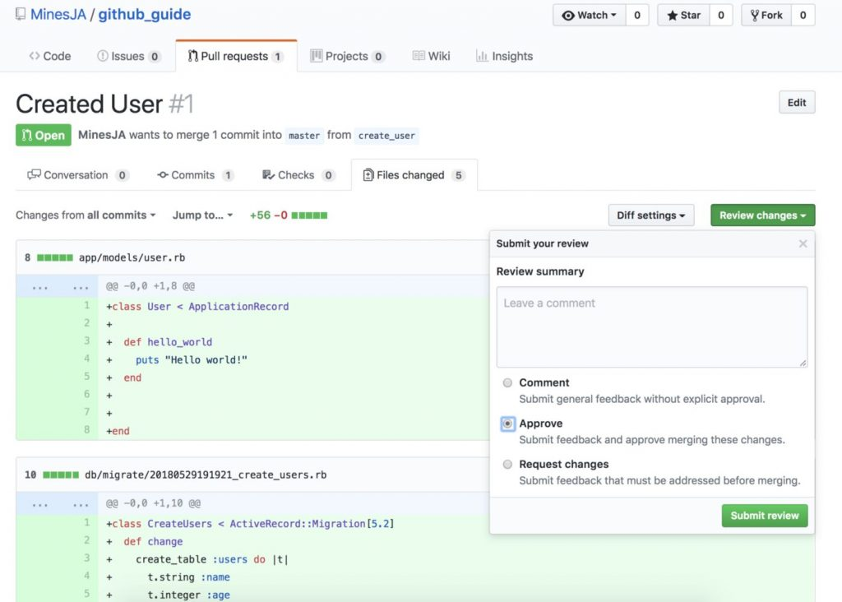
The Ultimate Github Collaboration Guide by Jonathan Mines, © Jonathan Mines
When you are finished with the pull request, scroll down to the bottom, and click "Merge pull request."
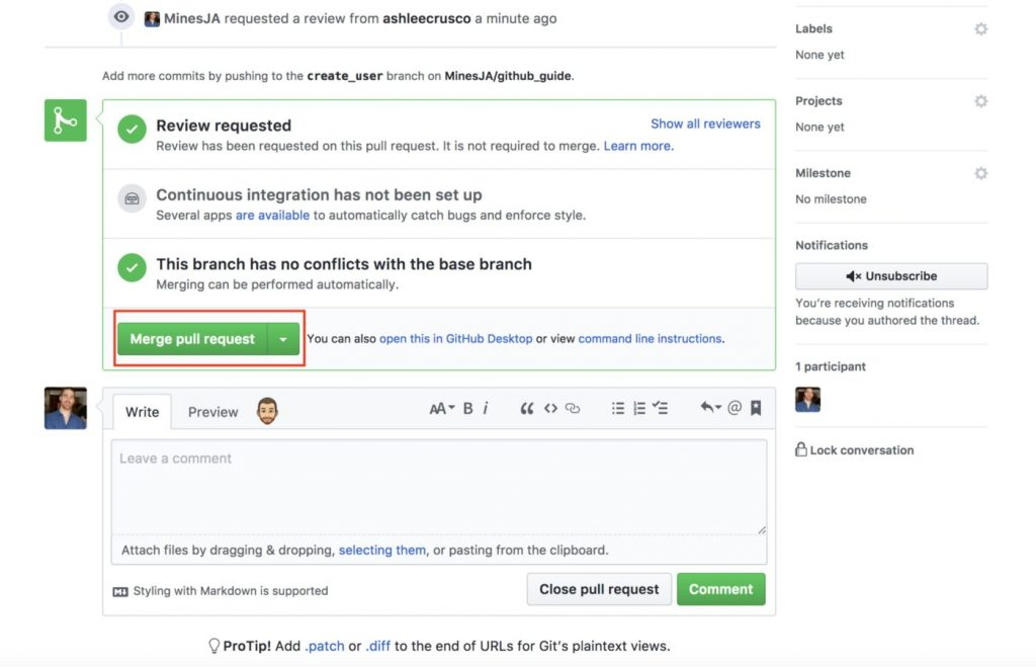
The Ultimate Github Collaboration Guide by Jonathan Mines, © Jonathan Mines
After that, you will see a notice that says "Pull request successfully merged and closed," and a button that says "Delete branch," which you should click.71
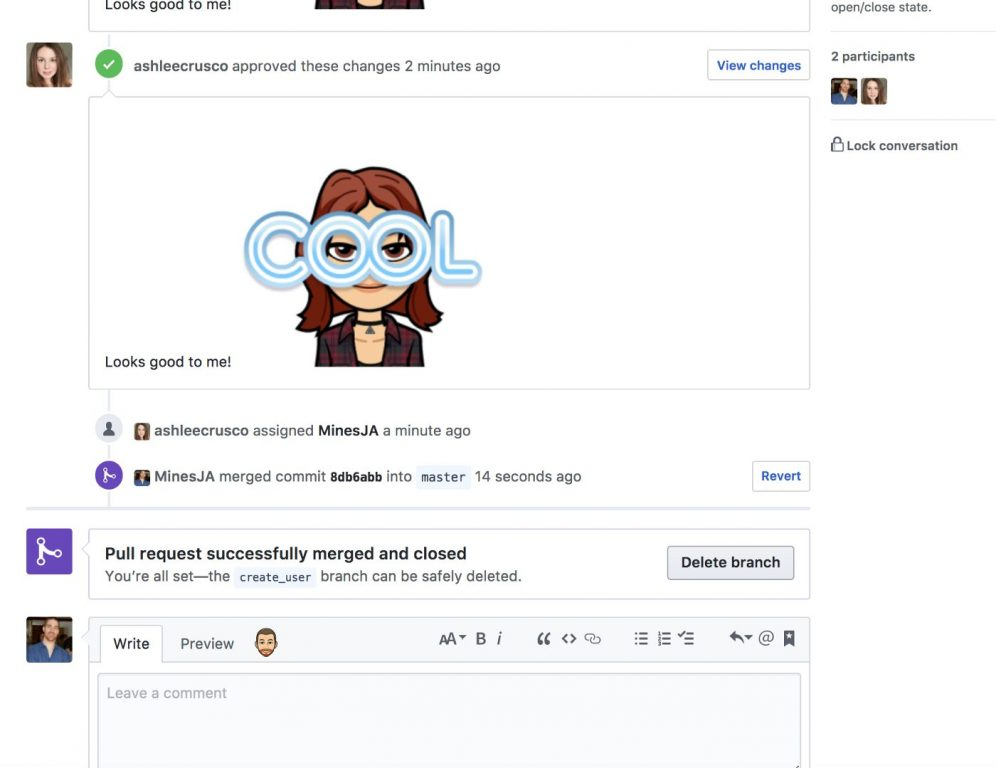
The Ultimate Github Collaboration Guide by Jonathan Mines, © Jonathan Mines
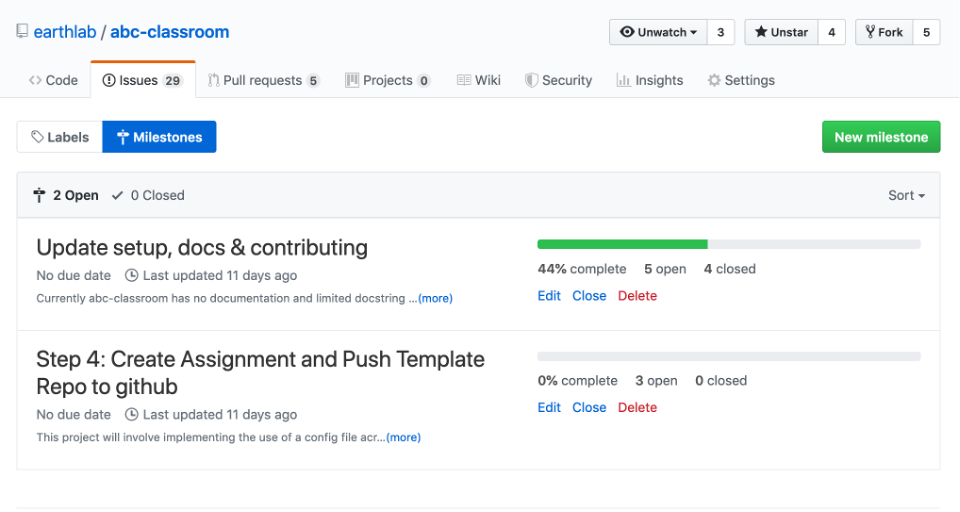
Project milestones on GitHub
Other project management features within GitHub, like milestones and even Trello-style project boards, can help you manage your project as it grows more complex.
If you are working on a large project, you can utilise milestones to group together relevant difficulties. Deadlines can be related to milestones.
Earth Data Analytics Online Certificate by Earth Lab © 2022 EARTH LAB

Agile meetings are a meeting framework based on the Agile methodology, which was founded by a team of software developers known as the original Agile Alliance.
The key values of the Agile Manifesto are:
- Individuals and interactions over processes and tools
- Working software over comprehensive documentation
- Customer collaboration over contract negotiation
- Responding to change over following a plan.72
Agile is designed to support teams in working to tighter timeframes and adapting to change. It is an iterative process that gives development teams time to reflect, adjust, and be more effective. This in turn fosters better engagement and collaboration among stakeholders and sets out more accurate cost estimates and predictable timelines.

Scrum
The Scrum methodology is the most common type of Agile meeting framework. This project management strategy focuses on continuous improvement, and guides teams to be flexible in their specific projects and working environments.
Scrum teams
Each scrum team consists of the following roles:
- Product owner – The product owner is a key stakeholder and oversees the product development.73 They are accountable for the work of the scrum team. A product owner is responsible for prioritising the workload and has executive decision-making power.
- Scrum master – The scrum master is the project manager. They are the team leader responsible for coordinating and facilitating all scrum meetings. Scrum masters manage the development team’s performance and help eliminate any barriers to progress, to ensure the team is working to agreed timelines/meeting deadlines.
- Development team – The development team members are the foundation of the scrum team (for example, designers, programmers, and writers). They are responsible for determining how to complete the work and carrying it out. Development teams are largely autonomous, allowing for greater collaboration, purpose, and better working relationships among team members.74
Other stakeholders may also attend relevant scrum meetings. These are people who have an interest in the work of the scrum team but are not directly involved in creating the product.73
Scrum events

Scrum meetings, also known as Scrum ceremonies, are generally organised around four main scrum events that make up a full sprint cycle.75
Sprint planning meeting
All scrum team members attend the sprint planning meeting (development team, scrum master, product owner). At this meeting, the scrum team discusses and prioritises work for the next sprint. The intentions of the meeting are to set objectives and divide up tasks and responsibilities.
Daily standup meeting
The daily standup is an everyday meeting for the scrum team to check in with each other and track progress. Standups are short meetings (no more than 15 minutes total) where each team member answers simple questions such as:
- What they worked on yesterday
- What they are working on today
- What challenges are they experiencing and what support do they need to complete that work.
Sprint review meeting
The sprint review meeting is an opportunity for the development team to present/demonstrate work produced during the sprint (for example, new product features/functionality). The aim is to collect feedback from the product owner and/or stakeholders.
Feedback received may generate additional work to be factored into the next sprint. The product owner and scrum master may decide to hold a backlog refinement meeting in between sprints to prioritise tasks ahead of the next sprint planning meeting.
Sprint retrospective meeting
The sprint retrospective is an internal review meeting at the end of the sprint cycle. It is an opportunity for the scrum master and development team to address what worked well, what did not go well, and what they should do differently in the next sprint. In keeping with the values of the Agile methodology, the purpose of these meetings is to evaluate team interactions and processes, and reflect on how to be more effective in the future.76
Project scaffolding is a technique that allows developers to generate ready-made CRUD (create, read, update, delete) applications. Its key function is automation.
Scaffolds form the basic visual layout design of an application interface. In short, they are a structure defined by a framework that contains the basic elements needed to build a user interface.77
Scaffolding manages frontend deployment and is usually part of the application stack. It prevents repetition and enhances workflow.78
This 30-minute video provides a simple step-by-step tutorial in scaffolding three pages for a portfolio site. Use the timestamps to skip to different sections:
- Intro: 00:00–4:38
- Gallery page (image): 4:38–17:20
- About page (image and text): – 17:20–20:57
- Contact page (text and form): 20:57–29:31
- Outro: 29:31–30:50
The key concepts and processes are outlined in the following bullet points
- Scaffolding is the process of getting your HTML code onto the page with very limited CSS styling. This makes it easier to do your visual styling later.
- Before your start, think about how you want to contain the content in rows and columns – building a mental image helps minimise the task in your head.
- Remember to keep your code clean and readable – adding comments to indicate each section may be useful.
- Think about responsive design for block grids – how many columns you want in each row, and stacking elements on top of each other for different screen sizes.
- Once you define your components, you can copy and paste to duplicate them as needed.
- Duplicate HTML files for different pages – this allows you to maintain a consistent header and footer throughout.
- Use placeholder images and text as visual aids.

Project management tools are useful in helping individuals and teams manage and organise their workload efficiently. They can be adapted to different teams, projects, and environments; and facilitate:
- Planning – Scheduling and delegating work
- Collaboration – Communicating with team members
- Documentation – Editing, versioning, and storing files on a centralised platform
- Evaluation – Tracking and reviewing progress through reporting.79
Tools can come in the form of simple spreadsheets, or various software and online platforms like the following.
Microsoft Teams
Microsoft Teams is a business communication platform that became a standard across industries as more people started working from home. However, aside from its chat, voice calling, and video conferencing capabilities, the platform is also a productive collaboration tool. It allows you to organise people into teams, share your Outlook calendar, integrate other Microsoft products, share and collaborate on documents, and features reporting capabilities.80
Trello
Trello is an online project management tool inspired by the Kanban Agile model, designed to plan, collaborate, organise, and track progress visually. The application is suitable for large scale projects or day-to-day tasks. It offers a streamlined overview of project boards, with the option to click into cards for more extensive detail (team members, labels, comments, and so on). Like the Kanban method, Trello helps users prioritise their workload and limit in-progress tasks. One of the benefits of Trello is that it features a range of template boards, including Agile and sprint templates.
Asana
Asana is another popular online work management platform. This collaborative tool is also compatible with the Agile methodology. Scrum teams can support their meetings by using Asana to create sprint plans, respond to feedback, streamline work requests, and more. The platform also offers hundreds of integrations, allowing teams to consolidate existing applications, to communicate, collaborate, and coordinate tasks.
Knowledge check
Contributing.md and style guide documentation
When collaborating on a team project, it is important that all the team members are on the same page regarding how to contribute. A CONTRIBUTING.md file is a markdown file kept in the root of a project that outlines these details. It is generally made up of a set of instructions.
The contibuting.md file contains guidelines about:
- How to write effective Issue: Bug reports and Pull requests
- How to write clear log messages in commits
- Coding conventions and style guides
- Community behavioural expectations (code of conduct)
Before contributing to an existing project, you should review the CONTRIBUTING.MD file associated with it. If you are starting a new project, you need to create a CONTRIBUTING.MD file first.
Part A – Review contributing.md examples
Read GitHub’s documentation on ‘Setting guidelines for repository contributors.’
Check out the following examples of contributing.md files. Which one do you like the best? Why?
- The 30 seconds of code contribution guidelines.
- The Axios contribution guidelines.
- The Open Government contribution guidelines.
Part B – Create a contributing.md
This is a group task. Use the forum to find one or two peers to collaborate with on this task.
Your group’s task is to create a contributing.md file.
To prepare your teams CONTRIBUTING.md file:
- Create a nice introductory message thanking people for wanting to contribute.
- Your contributions to this file should come through what you have learned in the course and your own self-directed learning.
- You should only add instructions that you understand and that make sense to you.
- You should put everything out for discussion to make sure there are no objections before modifying the file.
- Keep it concise – use bullet points and short instructive sentences. "Do this, do that".
- Refrain from just adding links – only add them to expand on something or back it up.
For your team's CONTRIBUTING.md file, please follow these steps:
- Use a real-time online app like Google Docs. Each team member should use a different colour for what they write. Create a colour key for this at the top of the document.
- Create a draft. Drafts should be:
- a product of suggestions/comments
- written in markdown (a good online markdown editor is dillinger.io)
- pasted into a file and uploaded as a blog post
- Iterate until done.
If you are not sure what to contribute, get in early and make some suggestions that are easy to understand before someone else does! Conversely, if you have a lot of ideas, let someone else contribute the easy ones.
Share your team’s final draft in the forum.