Before you start recording sales in MYOB, it is strongly recommended you fill in information about your business. While many tasks can be done on the fly, you gain the efficiency of MYOB's functionality if you, at least, set up these areas.
- Details
- GST settings
- Email settings
- Header and detail accounts for allocation
- Opening balances
- Journals specific to your structure
- Tax codes
- Customers
- Suppliers
- Field layouts
- Email defaults for purchase orders and remittance advices
- GST codes
GST and Invoices
As you know, if your business reports GST on an Accrual basis, it means you account for the GST when you issue an invoice to a client, not when you receive payment for the Goods or Services sold.
Similarly, you can claim a credit for any GST included in the price of any goods and services you buy for your business. This is called a GST credit or input tax credit. You must have a tax invoice to claim a GST credit for purchases that cost more than A$82.50 (including GST).
The actual date you can claim the GST credit is the invoice date.
Items are the products and services that your business offers for sale to customers.
MYOB doesn't currently have an inventory management system, but it does allow you to account for the items that you purchase for resale using their Items feature. This allows you to maintain important details such as cost, price of sale, supplier, and GST.
Activities: Setting up items in MYOB
MYOB's help center has an excellent short course on this activity. Please click the link below and complete the course. It will take between 10 and 20 minutes. You will be asked to confirm your login when you access the link below. Go ahead and skip the "NZ calculations" when you get there.
When you return, answer the questions below to check your understanding before continuing with additional step-by-step instructions.
MYOB's Help Centre Short Course on setting up items.

A step-by-step guide to the process of setting up Items
If you don’t yet know all the details of the item you’re creating, or you need to create it quickly, you can start by entering only the required details—the Item name, Item number, Allocate to and Tax Rate (Australia) fields. You can add the other details later.
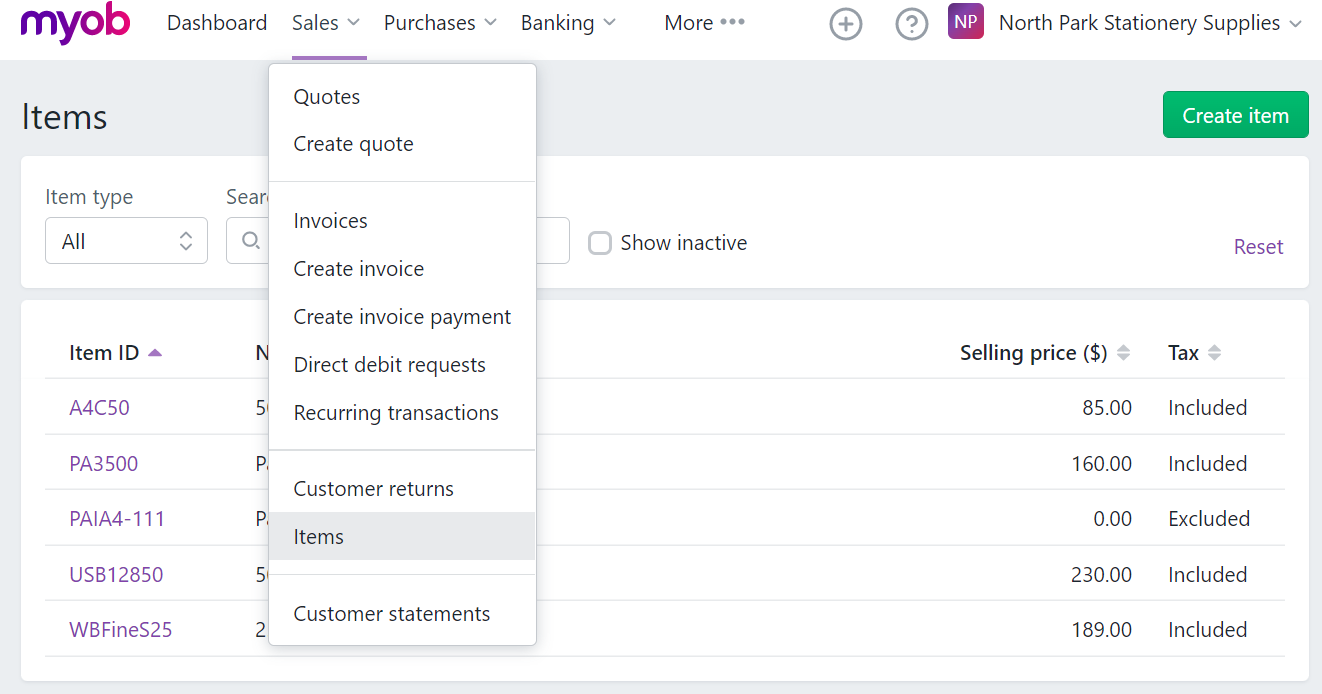
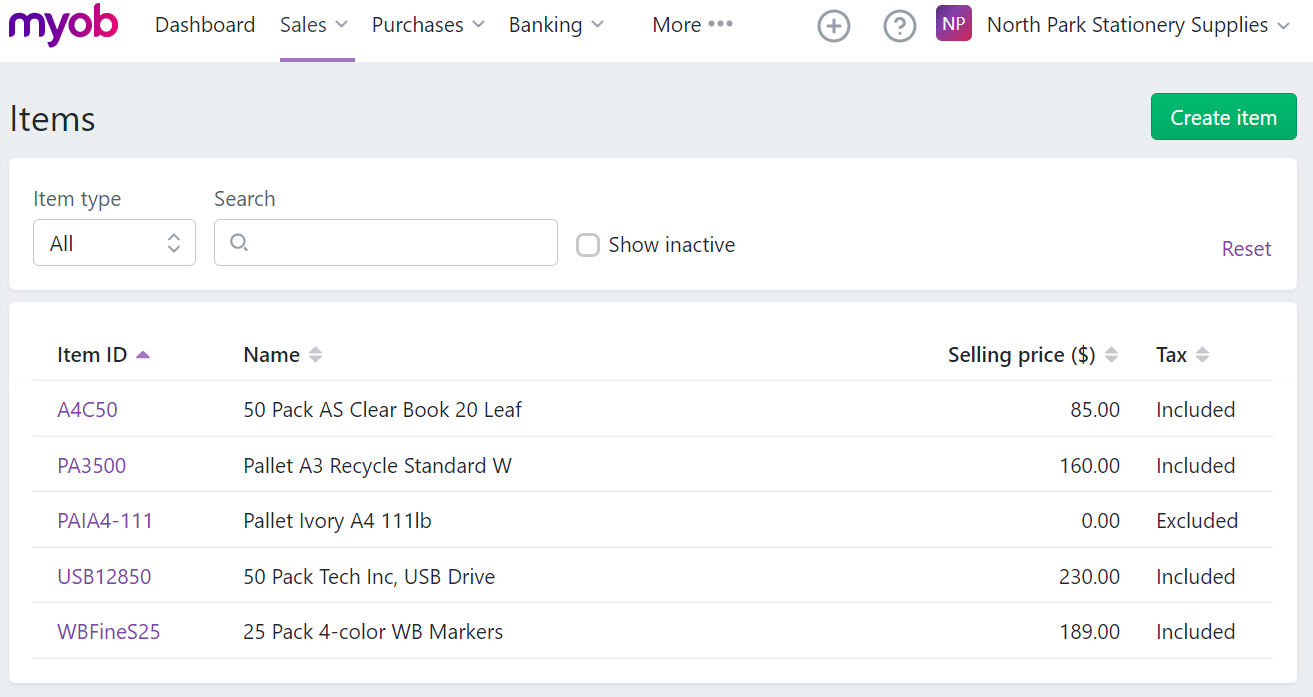
- From the Sales or Purchases menu, choose Items. The Items page appears.
- Click Create Item. The Item page appears.
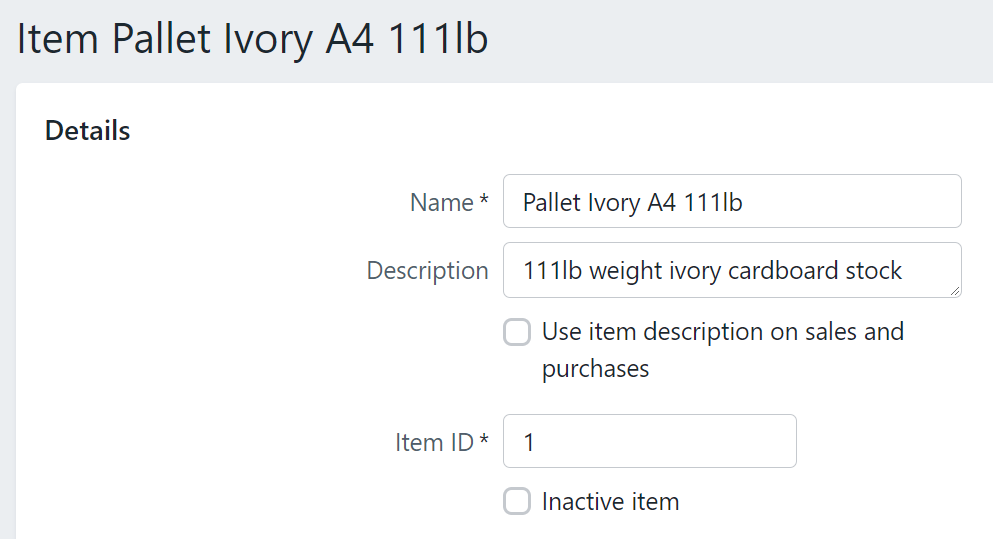
- Complete the fields in the Item Details section:
- Name - enter a short item name.
- Description - enter a detailed item description, for use on invoices and bills. Note: If you leave this field blank, the Name will be used as the description.
- Select whether to Use item description on sales and purchases. If you leave this option deselected, only the item's Name will show in sales and purchases.
- Item ID - enter a unique identifier for the item.
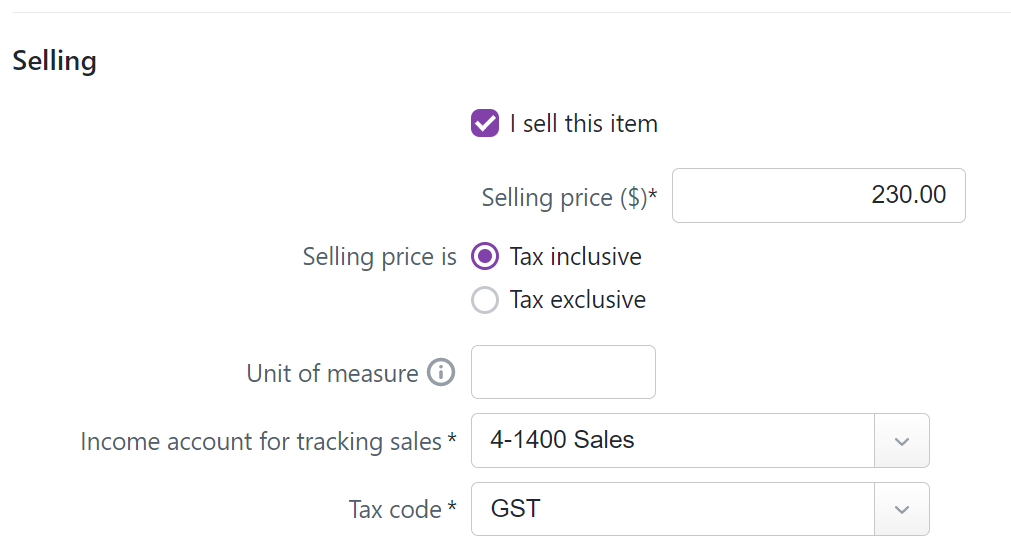
- If you sell this item, complete the fields in the Selling Details section:
- Select the option I sell this item. The fields in this section become active.
- Selling price ($) - enter the price of the item, excluding tax or GST.
- Selling prices is - select either Tax inclusive or Tax exclusive.
- Unit of measure - enter a unit of measure for the item, such as boxes, cans, hours, kg, etc.
- Account for tracking sales - choose the account to which you want sales of this item allocated.
- Tax code - select the relevant tax code to be applied when selling this item. If unsure, check with your accounting advisor or the ATO.
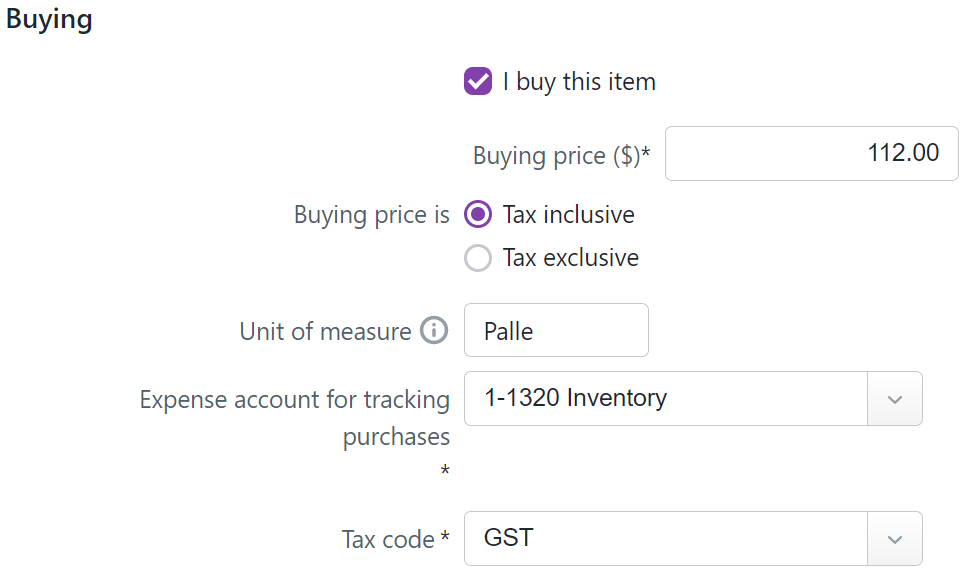
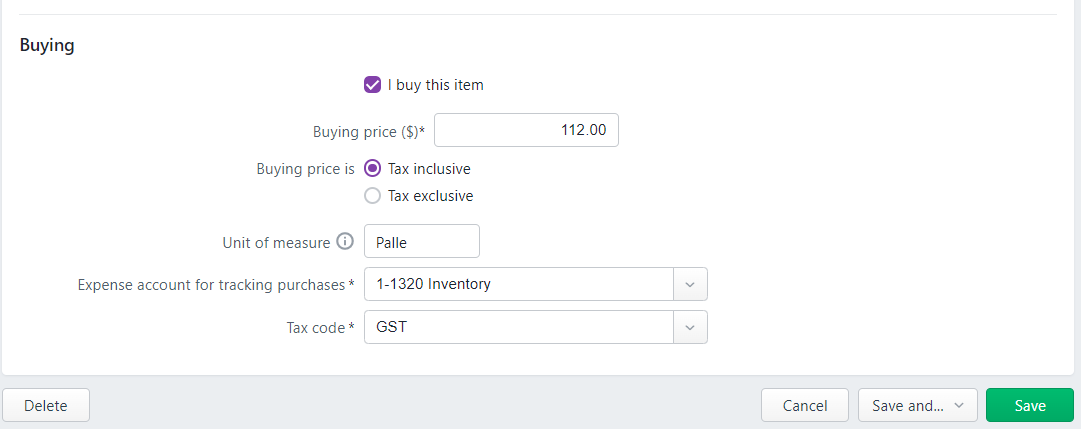
- If you buy this item, complete the fields in the Buying Details section:
- Select the option I buy this item. The fields in this section become active.
- Buying price ($) - enter the cost of the item, excluding tax or GST.
- Unit of measure - enter a unit of measure for the item, such as boxes, cans, hours, kg, etc.
- Account for tracking purchase - choose the account to which you want purchases of this item allocated.
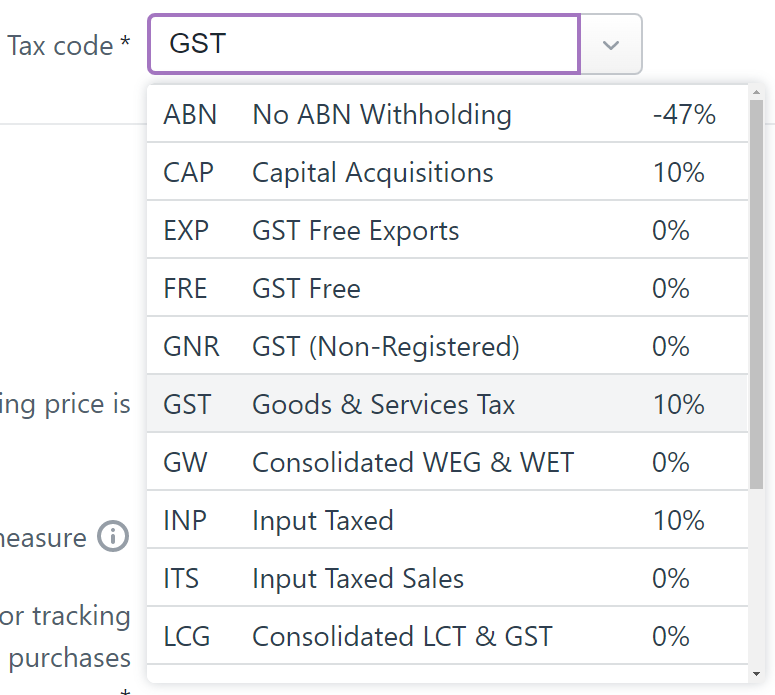
- Tax code - select the relevant tax code to be applied when buying this item. If unsure, check with your accounting advisor or the ATO.
- Click Save.
Assigning tax codes to items
You can assign tax codes as shown above in the Buying and Selling section of the Item detail screen. In this case, the item is taxable, so a GST tax code is applied.
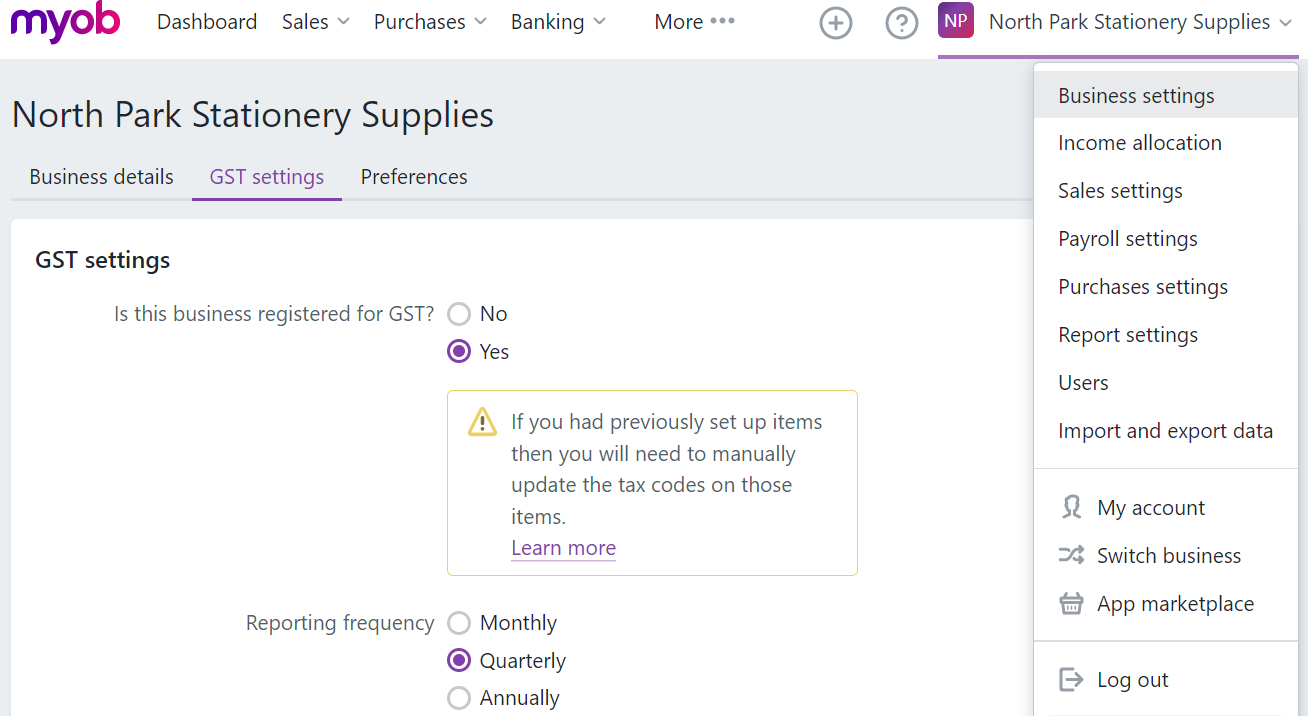
You can also assign a tax code once that covers all items sold from the Business Name Menu > Business Settings > GST settings tab.
Editing and deleting Items
Note: Once you use an item in a transaction, you can't change its inventory method. For example, if you create an item that you buy, but don't sell — by selecting the option, I buy this item and not selecting the I sell this item option — and then use that item in a purchase, those selections are locked in and you're not able to later select I sell this item.
To edit an item
Once you've set up your items, you can change some of its details, such it's name, description, ID or buying and selling prices.
- From the Sales menu, choose Items. The Items page appears.
- Click the item you want to edit. The Item page appears, showing the item details.
- Make your changes.
- Click Save to save your changes.
Deleting items
You can delete an item if it hasn't been used in a transaction. When an item is deleted, it's completely removed along with all its details.
Instead of deleting an item (which removes it from MYOB), it's a good idea to make an unused item inactive instead. This removes the item from reports and some selection lists.
Inactive items retain details you may need someday, and you can always reactivate the item later if you need to.
To deactivate an item:
- From the Sales menu, choose Items. Your list of items appears.
- (Optional) Find an item by selecting the Type or entering all or part of the item's name in the Search field. As you type, matching items are shown.
- Click the item you want to make inactive. The item's details are shown.
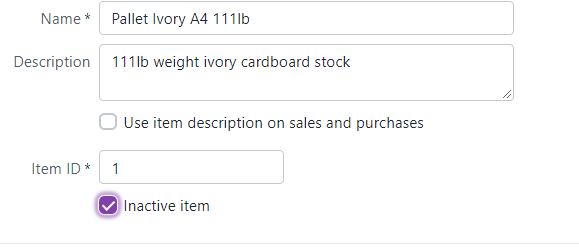
- Select the option Inactive item.
- Click Save to deactivate the item. To see deactivated items in your item list, select the option Show inactive items.
To reactivate an item:
- From the Sales menu, choose Items. Your list of items appears.
- Select the option Show inactive items. Your deactivated items are now included in the item list.
- (Optional) Find an item by selecting the Type or entering all or part of the item's name in the Search field. As you type, matching items are shown.
- Click the item you want to reactivate. The item's details are shown.
- Deselect the option Inactive item.
- Click Save. The item is reactivated and appears with your other active items on the Items page.
If you really want to delete an item, here's how:
- From the Sales menu, choose Items. The Items page appears listing all your active items.
- Click the item you want to delete. The Item page appears, showing the item details.
- Click Delete. A confirmation message appears.
- Click Yes to delete the item. If the item can't be deleted (if it's been used in a transaction) you'll see a message about it. Note the options across the bottom of the image to Delete, Cancel, Save and...(create new or duplicate) and Save the item.
Find an item used in a sale:
Simply run the Item sales report to find the sales containing that item. You'll find this report via the Reporting menu > Standard > Item sales.

Previously, we introduced the Business settings. In this section, templates can be created and personalised for branded customer and supplier communications, without having to leave your accounting system. We'll provide more detail here.

Sales Settings
The Sales settings page, gives you a number of customisable options for your business's invoices, quotes and statements, payment terms, emails and customer payment details. You can choose a pre-designed template and select the colours you want to use. The layout you choose for your invoices and quotes will automatically be used for all invoices you print and send to your customers until you change it.
You can sign up for online payments, or access your Merchant Portal to edit your online payment details. We'll provide more information about Merchant Portal a bit later in the topic.
You can also enter the details of how your customers can pay you. This information will be included in the How to pay section of your invoices.
And if you email invoices, quotes or statements to your customers, you can change the default content of the email you send.
Activity
Take a few moments now and go to MYOB > Business name menu > Sales settings then click each of the tabs to see what options there are for branding business communications.
Before a business issues an invoice they are often asked to provide a quote.
The lifecycle of a sale
- Quote - (optional) create a quote and send it to your prospective or existing customer.
- Invoice - turn the quote into an invoice when the sale is confirmed
- Record payment against the invoice
1. Creating a quote
Quotes provide your customers with a price that’s guaranteed for a specified period. When the customer accepts or declines the quote, you can update its status. You can also turn a quote into an invoice with just one click.
Remember that you can add your branding and personal messages to the quote from Sales settings, under the business name menu.
You can see a list of your quotes via the Sales menu > Quotes. On this screen, you can also edit, delete, reprint, and resend quotes by selecting their ID.
Getting started:
- Go to the Sales menu and choose Create quote.
- Select the Customer you're quoting for. If it's a new customer, click + Create customer then enter their details and click Save.
- If you want, edit the number in the Quote number field. If you change the number, future quote (and invoice) numbers will increment from this new number.
- Check or change the Issue date.
- Check or change the Expiry date. This defines how long the quote is valid for.
- From the Amounts are list, choose if the quote is Tax / GST inclusive (includes tax) or Tax / GST exclusive (excludes tax).
-
If the quote will contain items, click Field layout and choose the Services and items option.
-
If you're adding items to the quote, select the item you're quoting for from the Item ID field and the number of Units of that item. If the item doesn't exist, add it by clicking + Create item, enter the item details, then click Save.
- The following details appear, based on what you entered when you created the item: Description, Account, Unit price and Tax code/GST code. The default quantity you're selling (No of units) is 1, but you can change this.
- There's a built-in calculator in the No of units, Unit price, Discount and Amount fields. Just enter a calculation in the field and tab out of it:
- If you're quoting for a service, enter a Description and complete the Account, Amount and Tax code / GST code details.
- To remove a line from the quote, click the delete icon (x) to the right of the line.
- Choose a Job if the line item relates to a specific job and you are using that feature.
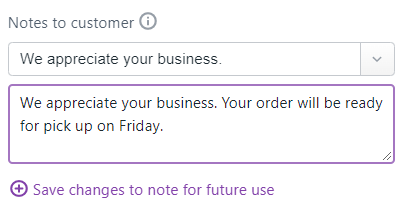
- If you want to add a note about the quote, choose a Note from the dropdown list and enter any additional notes in the box below it.
- Be careful, if you update your selection from the list of notes after customising the box below it, the change will overwrite anything that you had entered in the notes box.
- These notes will appear on the customer's quote. For example, you could use this area to add additional details about payment.
- Repeat from step 8 for each item or service you want to include on the quote.
- Enter any charges for Freight, and if required, change the default Tax/GST code. If you can't enter Freight, you'll be prompted to specify a linked account for freight.
- Use the buttons across the bottom of the page to choose an action, such as to email the quote or to save the existing quote and create a duplicate from it.
- When you create or send a quote, or convert the quote to an invoice, this is recorded in the Activity history section at the bottom of the quote. (You can see the Activity history in the image in the following section.)
- Click Save.
2. Turn a quote into an invoice
When a customer decides to buy what you've quoted, you can quickly turn a quote into an invoice.
- Go to the Sales menu and choose Quotes.
- Click the quote you want to turn into an invoice. The Quote page appears, showing the quote details.
- Click Convert to invoice.
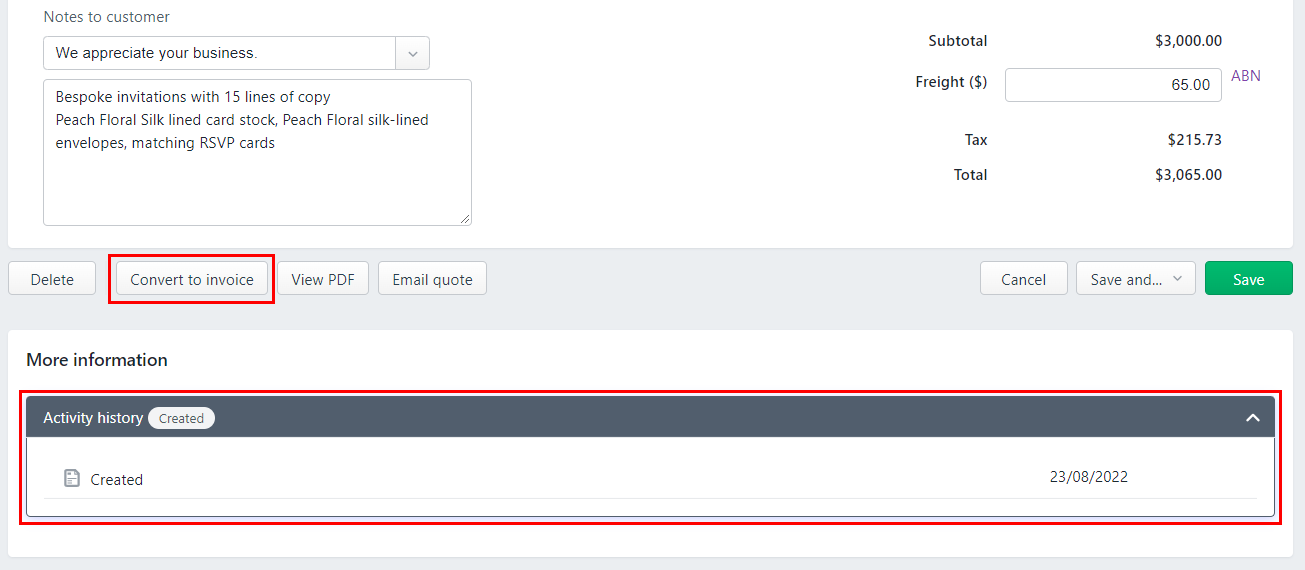
The Invoice page appears, containing the items and/or services and prices from the quote. As noted above, this screenshot also shows the Active History of the quote for easy tracking and follow-up. - Make any required changes to the invoice, click Save, or click Email invoice to send it to the customer.
3. Record the payment against the invoice
This will be covered in the next subtopic, Customer Payments.
Invoicing
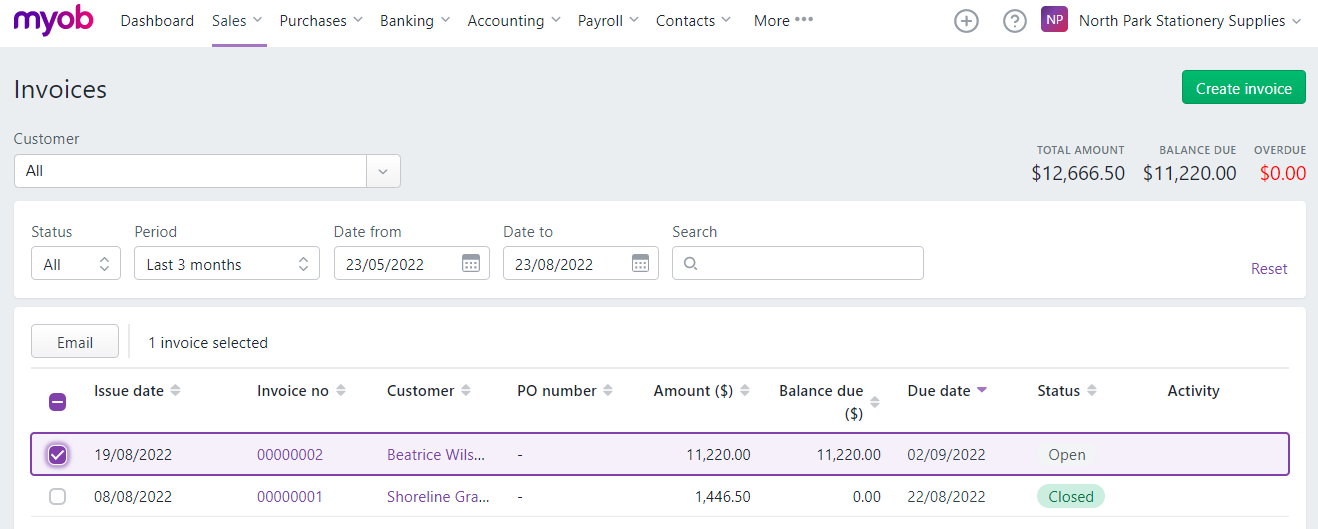
The invoicing page (shown above) provides a list of all invoices, details about them, and their status. From this screen you can create, edit and delete invoices. You can also copy an invoice, email previously created invoices and create a customer return for an item that was refunded.
Activity: Review the required elements of an invoice at the ATO
The ATO requires information to be included in an invoice. Check out this page to review each of the elements of a legal invoice.
Creating an invoice
Not all sales start with a quote of course. You can create an invoice without starting with a quote.
Watch this MYOB Help Centre video to see how to create an invoice in MYOB.
And here is the step-by-step instructions to creating an invoice.
- From the Sales menu or the Invoices page, click Create invoice. The Invoice page appears.
- Choose the Customer you're selling to. The customer’s address details appear in the field below. If you've entered a shipping address when you created the customer, this will appear on PDF copies of the invoice.
- If you want to:
- Add a new customer: Click the Customer dropdown arrow and choose +Create customer. Enter as much (or as little) info as you like and click Save. You can always go back later and fill in additional details.
- Add missing details to an existing customer: Select your customer from the dropdown, and then click +Create Customer. This will load the customer detail screen where you can make your changes without stopping your flow of work. Click Save to return to the invoice.
- Create a cash or one-off sale: If you want to keep track of cash sales, set up a contact called "Cash Sales" and choose this contact when making a cash sale.
- The status of the ABN you've entered in the customer's record will checked, and the status shown. Click the status to see more details.
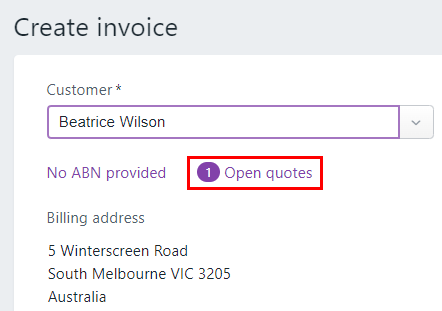
- You're notified if the customer has any open quotes.
- If you want to convert any of the quotes (one is shown in the screenshot below) click Open quotes, select an invoice and click Convert.
- The invoice is completed with the details of the quote. You can change these details if you want.
- If necessary, change the Invoice number. This number is automatically generated, based on the last number you used.
- Remember, if you change the invoice number, you’ll change the automatic numbering. For example, if you change the number from 1001 to 101, the next time you create an invoice, the new invoice number will be 102 (even if you already have one!).

- Remember, if you change the invoice number, you’ll change the automatic numbering. For example, if you change the number from 1001 to 101, the next time you create an invoice, the new invoice number will be 102 (even if you already have one!).
- If you have one — or you're entering an eInvoice — enter the Customer PO Number. (eInvoices is a very useful feature, but is beyond the scope of this class to cover in detail.)
- Check the date in the Issue date field.
- Click the date in the Due date field to set the terms for this invoice. If you want to make these your default payment terms, click Save as default.
- Note: You can also set default payment terms in your sales settings.
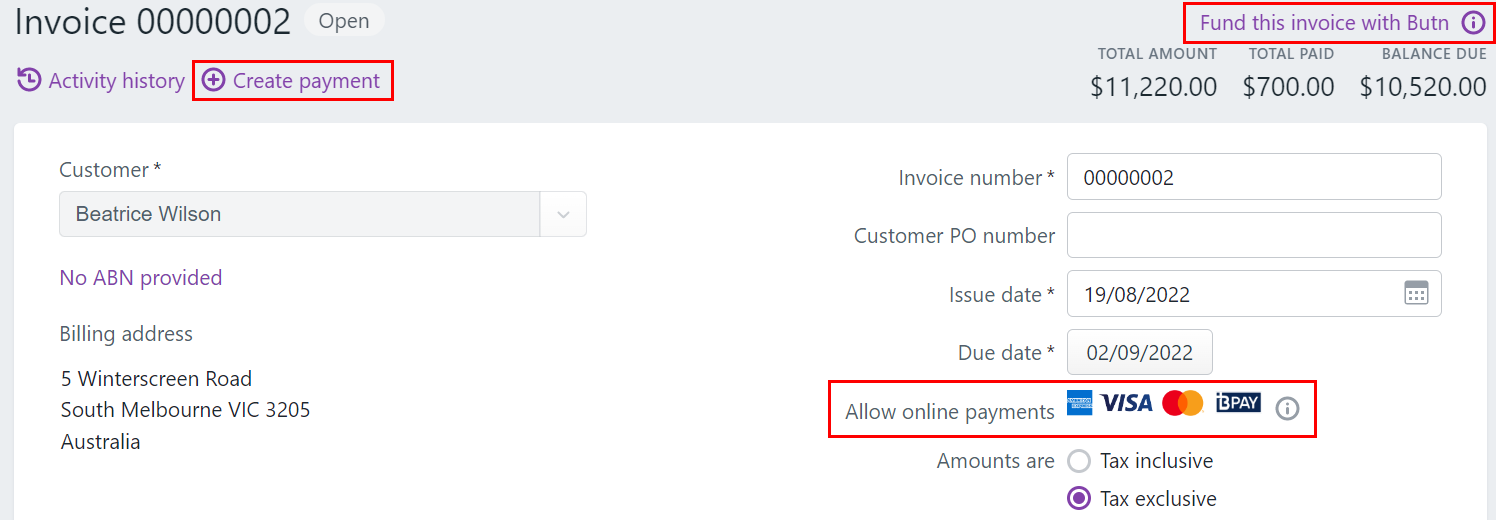
- If your business is set up for online payments (Online payments is a very useful feature, but is beyond the scope of this class to cover in detail.)
- Select the option Allow online payments to allow the customer to pay you straight from their invoice. If you haven't signed up yet, click Start getting paid online to get started.
- Select the option Apply Surcharge to pass the 1.8% online payment transaction fee (for credit or debit card payment) onto the customer.
- Select an option from the Amounts are list.
- If you want the prices to include tax or GST, choose Tax inclusive. Note that this is the default tax preference.
- If you want the prices to exclude tax or GST, choose Tax exclusive.
- Click the Field layout cog icon and change the option based on what you are selling, Services or Services and items. If you are selling items, you will notice the fields change slightly so you can enter the items.
- If you're selling items:
- In the Item ID column, enter or choose the item you're selling.
-
Or, select +Create item to add the item directly from this screen.
- The Description, Unit price and Tax code appear, based on the details you entered when you created the item.
-
- Enter the number of Units of this item you're selling. The calculated Amount is displayed.
- There's a built-in calculator in the No of units, Unit Price, Discount and Amount fields. Just enter a calculation in the field and tab out of it:
- There's a built-in calculator in the No of units, Unit Price, Discount and Amount fields. Just enter a calculation in the field and tab out of it:
- Repeat this step for each item you're selling
- If you need to add or remove lines, you can view this MYOB Help Centre page, Adding or removing lines in invoices.
- In the Item ID column, enter or choose the item you're selling.
- If you're selling services:
- In the Description column, enter a description of the service you're providing.
- Choose the Account the income from this service will be allocated to. If you're not sure, check with your accounting advisor.
- Enter the Amount of this service.
- If required, change the Tax code. If you're not sure, check with your accounting advisor.
- Repeat step 11 for each service you're selling.
- If you need to add or remove lines, you can view this MYOB Help Centre page, Adding or removing lines in invoices.
- Enter any charges for Freight, and if required, change the default Tax/GST code. If you can't enter Freight, you'll be prompted to specify a linked account for freight.
- The following totals are automatically calculated:
- Subtotal—the total for the items added to the invoice
- Tax—the amount of tax applied to the invoice
- Total—the subtotal amount plus the tax amount
- Amount paid—the dollar amount that's already been paid to the invoice.
- Balance due— the amount owing.
- (Optional)
- Choose a Job if the line item relates to a specific job. Learn more about jobs.
- If you want to add a note about the quote, choose a Note from the dropdown list and enter any additional notes in the box below it.
- Be careful, if you update your selection from the list of notes after customising the box below it, the change will overwrite anything that you had entered in the notes box.
- These notes will appear on the customer's quote or invoice. For example, you could use this area to add additional details about payment.
- Check that all the information in the invoice is correct.
- Use the buttons across the bottom of the page to choose an action.
- Notes:
- View PDF: Allows you to print, download a PDF copy, or send an invoice link
- Save as recurring: Enter the recurring transaction Schedule name and choose the Frequency, such as Daily, Weekly or Monthly.
- Prefill the invoice from a *recurring transaction: Select a recurring transaction and click Prefill. The invoice is updated with information from the recurring transaction.
- Notes:
*If you have transactions that you record regularly—for example, a rent invoice—you can set them up as recurring transactions and get them to record automatically. More detail will be provided about this in the banking subtopic.
Managing customer payments includes accounting for income received, and tracking the payment against the invoice.
When you receive payments from customers, you enter the details on the Invoice payment page (via the Sales menu). A payment can be partial or full payment for one or more invoices. If a single payment is made for several invoices, you can allocate the individual amounts on the same page.
If you need to change a customer payment, you can edit or delete it.
Reminder: Bank Feeds, the In-Tray and Online Payments are very useful features of MYOB to help automate some of the tasks involved with allocating banking activity to bills and invoices. Feel free to learn more about them at the MYOB Help Centre as they are beyond the scope of this course.
Entering customer payments
MYOB works with several third-party companies that you and your customers can use to streamline the payment process. When the customer payment screen is accessed, these are shown on the right of an invoice, along with links for more information (i) about them:
Learn more about these payment avenues:
To record a customer payment
- From the Sales menu, choose Create invoice payment. The Record payment from customer page appears.
- You can only enter a customer payment for an invoice you’ve already created.
- You can also enter a payment by clicking Create payment at the top of an open invoice, as shown above.
- Select the customer making the payment from the Customer field list.
- If you’re entering a customer payment from the Invoice page, the customer will already be selected.)
- All the unpaid invoices for the selected customer appear in the list.
- If you’re entering a customer payment from the Invoice page, only the relevant invoice will appear in the list.
- In this example, the customer, Beatrice Wilson has one open invoice.
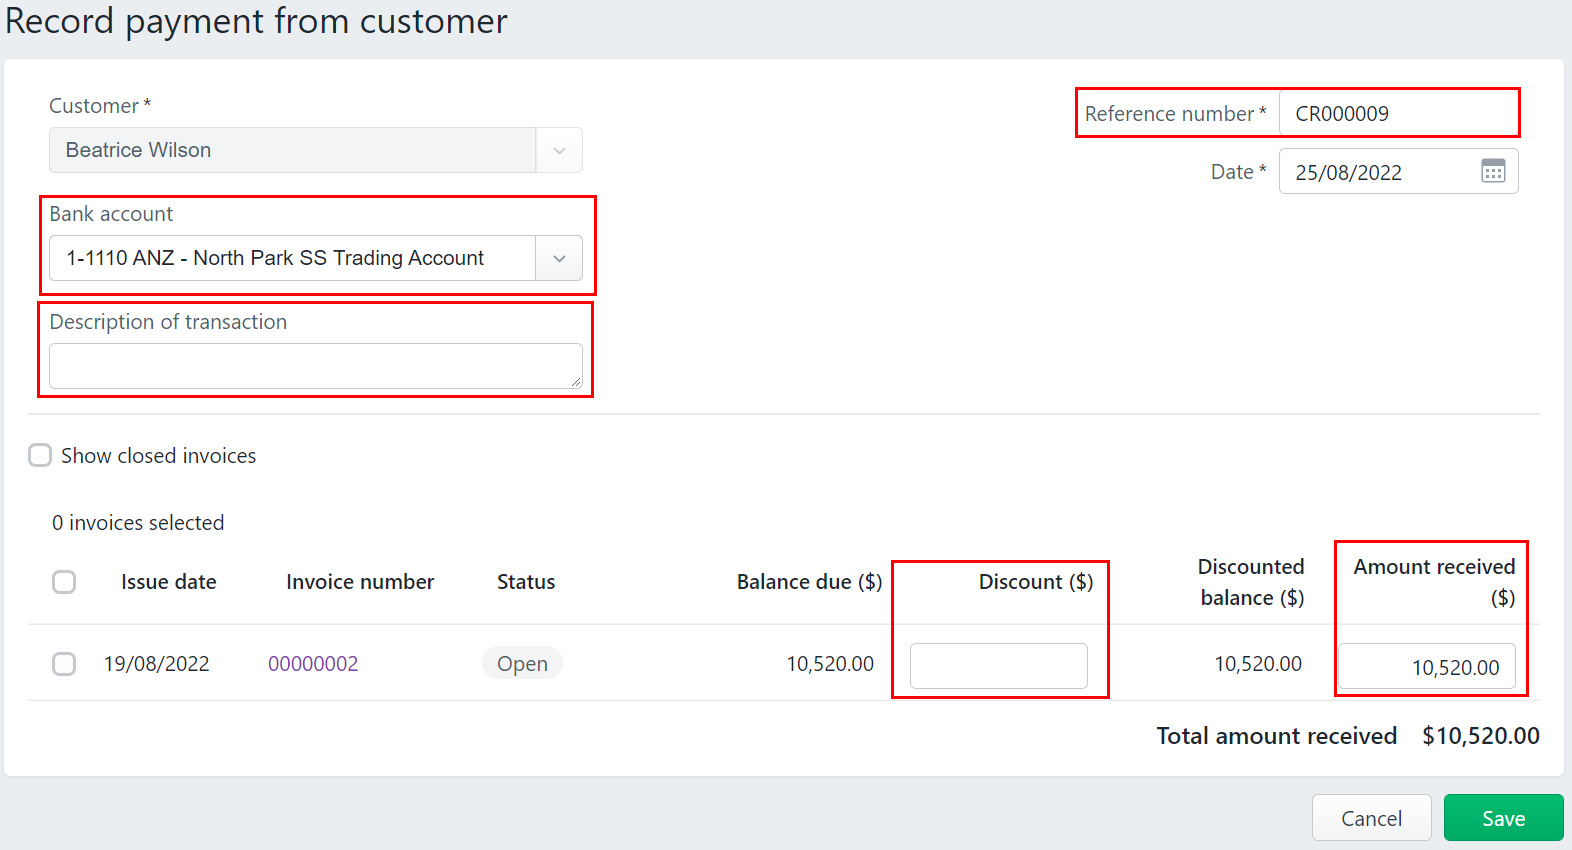
- In the Bank account field, enter or select the bank or credit card account to receive the payment into.
- If you want, enter a Description of transaction.
- Make sure that the reference number is correct. If not, enter a new reference number in the Reference field.
- If you change the number in the Reference field, you’ll change the automatic numbering. For example, if you change the number from 2000 to 3000, the next time you enter a customer payment, the new reference number will be 3001 - even if you already have that number.
- Make sure that the payment date is correct. If not, enter a new date in the Date field, or click the icon next to it to select the date from a calendar.
- If you want to give the customer a discount, enter the amount in the Discount ($) field for the applicable invoice.
- Note that MYOB recalculates the balance due.
- Enter the Amount received against the relevant invoices.
- Click Save.
Provide a receipt to your customer
When a customer makes a payment, provide them a copy of the updated invoice as a receipt. To do this, open the invoice and use the buttons at the bottom of the page to send or print the invoice with the new amount paid value.

To change a customer payment
You can only change customer payments that haven’t been reconciled or matched to a bank transaction. If you want to change a reconciled or matched payment, you need to unreconcile or unmatch it first, using the Bank reconciliation or Bank transactions page. We'll cover bank reconciliations in the Banking section.
Note: The only details you can change are the bank account the payment went into, the description, reference number and date.
- From the Banking menu, choose Find transactions. The Find transactions page appears.
- Click the applicable tab for a simplified view (Transactions tab) or a detailed view (Debits and Credits tab).
- Filter the list of transactions as required.
- Choose the Period for the transaction you're looking for. The From and To dates change accordingly. To enter custom dates, choose Custom as the Period.
- In the Source Journal field, choose Cash Receipts.
- If you're on the Debits and Credits tab, choose the Account the transaction was allocated to.
- Enter all or part of the transaction's description or amount in the Search field.
Transactions that meet your search criteria will be displayed (limited to 50 transactions). To see additional transactions, click Load More at the bottom of the list.
- Click a transaction's reference number to view its details.
- Make your changes then click Save.
To delete a customer payment
- From the Banking menu, choose Find transactions. The Find transactions page appears.
- Click the applicable tab for a simplified view (Transactions tab) or a detailed view (Debits and Credits tab).
- Filter the list of transactions as required.
- Choose the Period for the transaction you're looking for. The From and To dates change accordingly. To enter custom dates, choose Custom as the Period.
- In the Source Journal field, choose Cash Receipts.
- If you're on the Debits and Credits tab, choose the Account the transaction was allocated to.
- Enter all or part of the transaction's description or amount in the Search field.
Transactions that meet your search criteria will be displayed (limited to 50 transactions). To see additional transactions, click Load More at the bottom of the list.
- Click a transaction's reference number to view its details.
- Click Delete (at the bottom of the page).
- At the confirmation message, click Delete.
Provide customers with a statement
A statement is a summary of a customer's invoices and payments and is typically sent on a regular basis, such as monthly. Statements help your customers keep track of their account and how much they owe you.
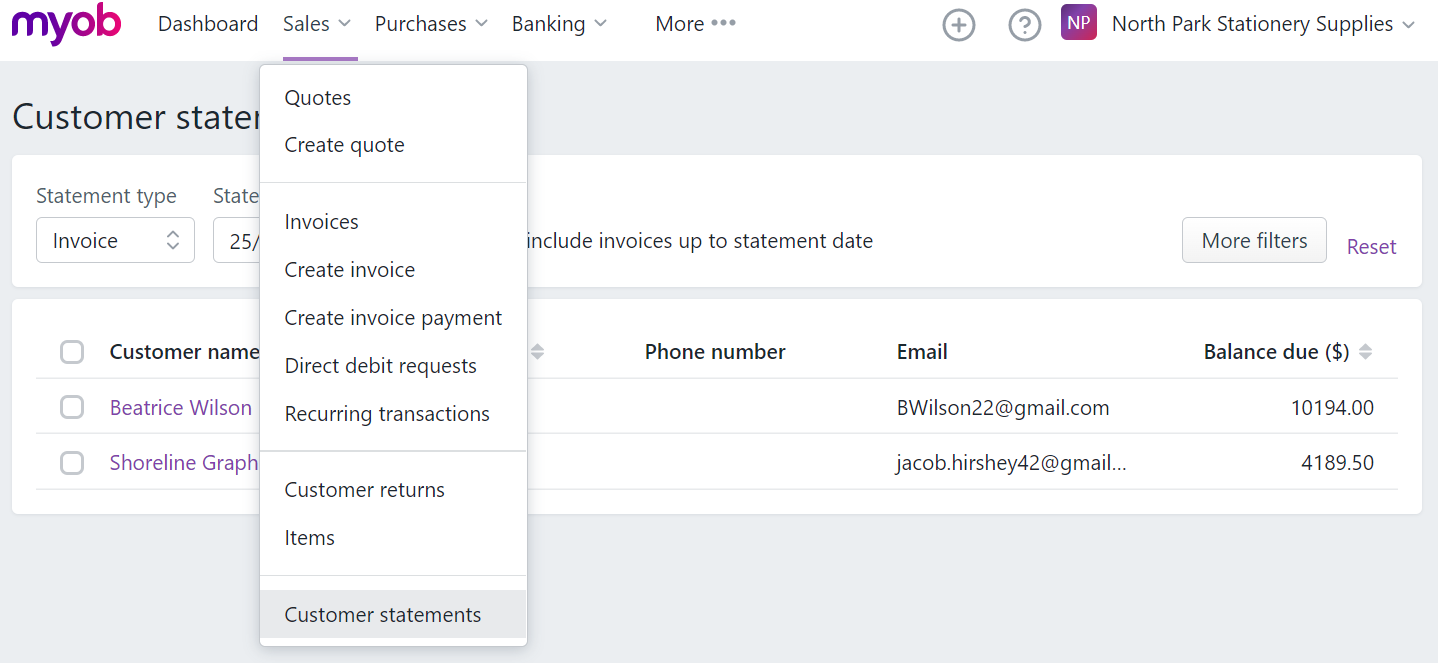
On the Customer statements page (accessible from the Sales menu) you can review, print and email customer statements for one or more customers.
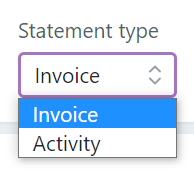
There are two statement types:
- Invoice statements list all unpaid invoices as at a specified date.
- Activity statements list all invoices and payments within a specified date range and include a running account balance.
Sending the Statement
- In the Sales menu, choose Customer statements. The Customer Statements page appears.
- Choose the Statement type.
- Invoice statements list all invoices aged as at a specified date.
- Activity statements list all invoices and payments within a specified date range and includes a running account balance.
- Specify the statement period.
- For Invoice statements:
- Enter or choose the Statement date. This will include invoices on the statement which are outstanding as at the statement date.
- To include only invoices recorded up to the statement date, select the option Only include invoices up to statement date.
- For Activity statements, enter the statement date range in the From date and To date fields.
- For Invoice statements:
- In the Customer field, choose a single customer or choose All. Both active and deactivated customers will be shown.
- To include customers with a zero balance, select the option Show $0.00.
-
Select the customers you want to produce statements for, or click the topmost box to select all. The Download PDF and Email buttons appear.
- Produce the statements using the buttons that appeared in the gif above.
If you want to: Select: Preview, save or print the statements Click Download PDF and choose:
- Use default template to produce statements on the default statement template
- Choose template to choose which statement template to use, then click Download PDF.
The statements are downloaded as PDFs contained in a ZIP file.
Remember: Statements can be customised in the Business Sales settings. (Business name > Sales settings)
Email the statements Click Email
- If required, change the default email text.
- Choose the statement Template.
- Click Send statements.
The statements are emailed as PDFs to your selected customers.

Occasionally you will need to return money to customers.
Customer returns refers to situations where the customer:
- overpaid an invoice by paying the wrong amount
- paid an invoice twice
- not included a discount that was given
- returned an item
- service not received, used, or disputed.
To manage the overpayment, MYOB generates customer credits, which can happen automatically and manually to handle the reimbursement to the customer or apply the payment to an outstanding invoice.
If a customer pays more than they were invoiced: (start the record payment process as usual)
- From the Sales menu, choose Create invoice payment. The Record payment from customer page appears.
- You can only enter a customer payment for an invoice you’ve already created.
- You can also enter a payment by clicking Create payment at the top of an open invoice.
- Select the customer making the payment from the Customer list.
- If you’re entering a customer payment from the Invoice page, the customer will already be selected.
- All the unpaid invoices for the selected customer appear in the list.
- If you’re entering a customer payment from the Invoice page, only the relevant invoice will appear in the list.)
- In the Bank account field, enter or select the bank or credit card account to receive the payment into.
- If you want, enter the Description of transaction.
- Make sure that the reference number is correct. If not, enter a new reference number in the Reference field.
- If you change the number in the Reference field, you’ll change the automatic numbering. For example, if you change the number from 2000 to 3000, the next time you enter a customer payment, the new reference number will be 3001 - even if you already have that number.
- Make sure that the payment date is correct. If not, enter a new date in the Date field, or click the icon next to it to select the date from a calendar.
- To give the customer a discount, enter the amount in the Discount ($) field for the applicable invoice.
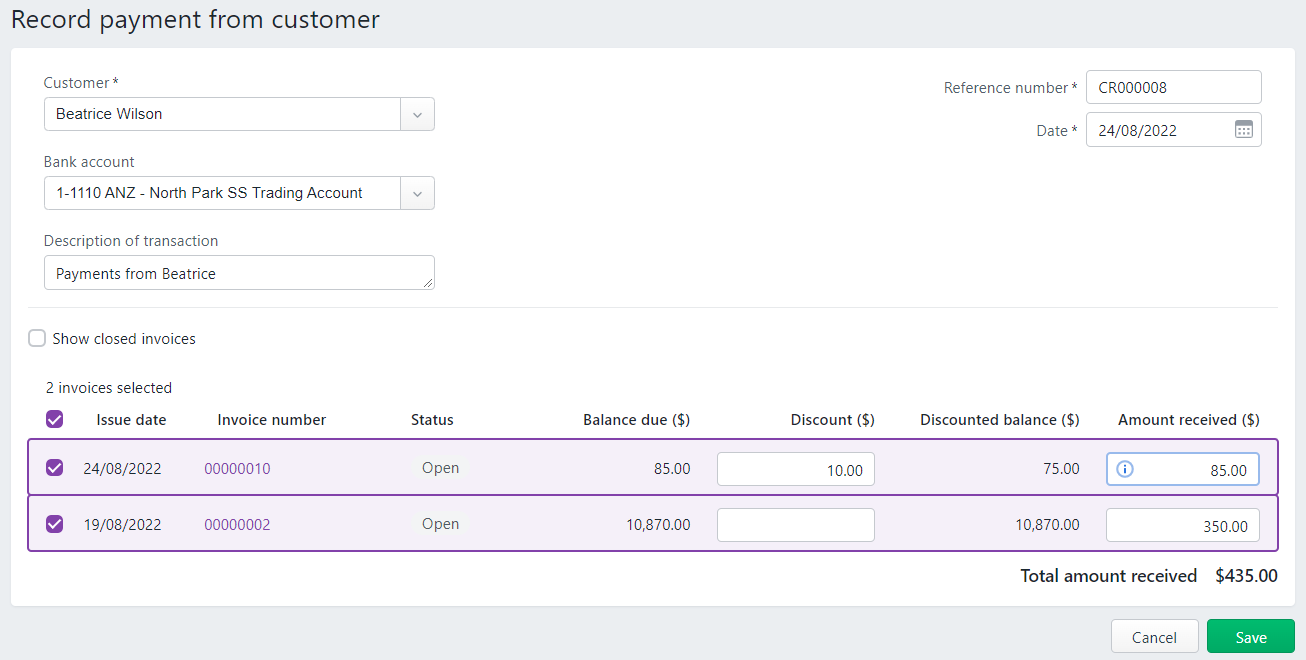
- Enter the Amount received against the relevant invoices. Here's an example where two invoices are being paid. Note that one of them is being paid in full, with a discount attached, but the customer paid in full anyway. Then, there will be a $10 credit for the customer.
- If the amount received from the customer is more than the sum of their unpaid invoices, enter the total you've received against one or more invoices. A credit will be automatically created for the customer.
- Record the whole payment in MYOB
- There's a built-in calculator in the Discount and Amount Received fields. Just enter a calculation (i.e, 85-10) in the field and tab out of it:
- When you're done, click Save.
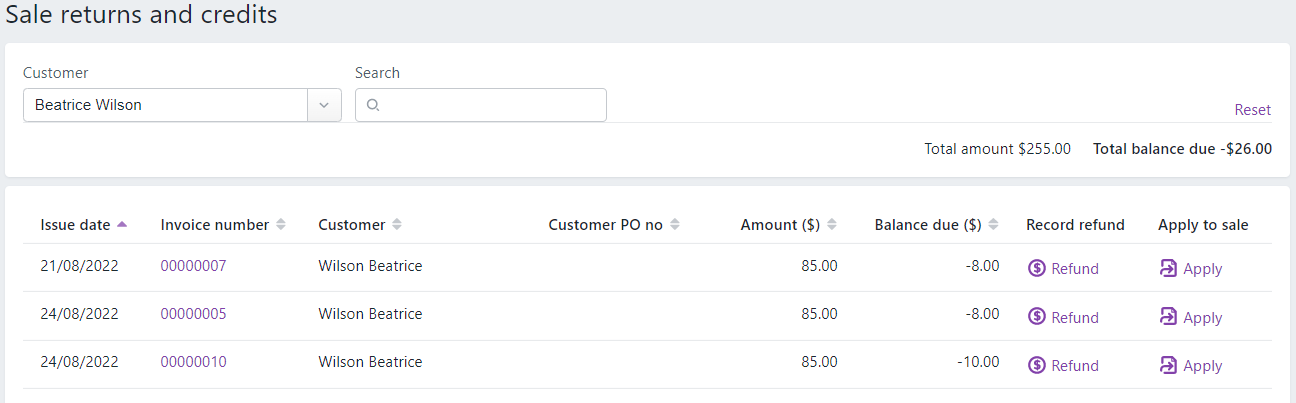
- When an overpayment is recorded, a customer credit is created for the overpaid amount
- Credits can be refunded or applied to other open invoices
- You can see here that Beatrice Wilson keeps forgetting she's been getting a discount.
- Also note that you can record the refund, or apply the refund to a different invoice.
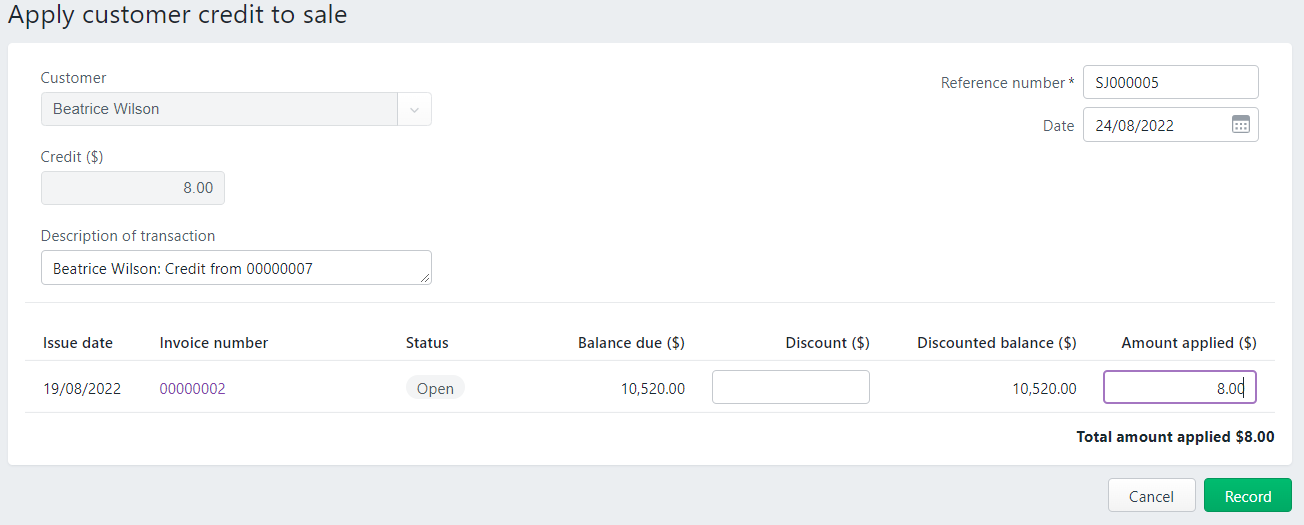
- Here is the screen if the credit was applied to a sale, and you can indicate how much of the credit is used.
- If a customer has paid an invoice twice, record the first payment normally then create a customer return for the second payment.
Create a customer return
First, you need to create the return by creating a negative invoice (an invoice where the total amount is a negative value). Then you can either apply the return to an unpaid invoice or issue a refund. Creating a return is very similar to creating a regular invoice, but the values will be negative.
How to process the overpayment
- Start the process to create an invoice as usual (Sales > Invoices > Create invoice > Select customer from the list in the customer field)
- If applicable, choose a Message to customer. You can also add a note about the return in the field below. The message and notes will appear on the customer's return.
- Check the date in the Issue date field.
- Select an option from the Amounts are list.
- If you want the prices to include tax or GST, choose Tax inclusive (Australia) or GST inclusive (New Zealand). Note that this is the default tax preference.
- If you want the prices to exclude tax or GST, choose Tax exclusive (Australia) or GST exclusive (New Zealand).
- Click the Field layout wheel cog icon and select the applicable option based on what you're creating the return for:
- If you're creating a return for items:
- In the Item column of the list, enter or select the item being returned. The Description, Unit price and Tax code fields appear, based on the details you entered when you created the item.
- In the Units field, enter how many of the item are being returned (as a negative number). For example, if 5 items are being returned, enter -5.
- If you're creating a return for services:
- In the Description column, enter a description of the service.
- Choose the Account the income from this service is typically allocated to.
- Enter the Amount of the service as a negative value. If required, change the Tax code.
- If you're creating a return for items:
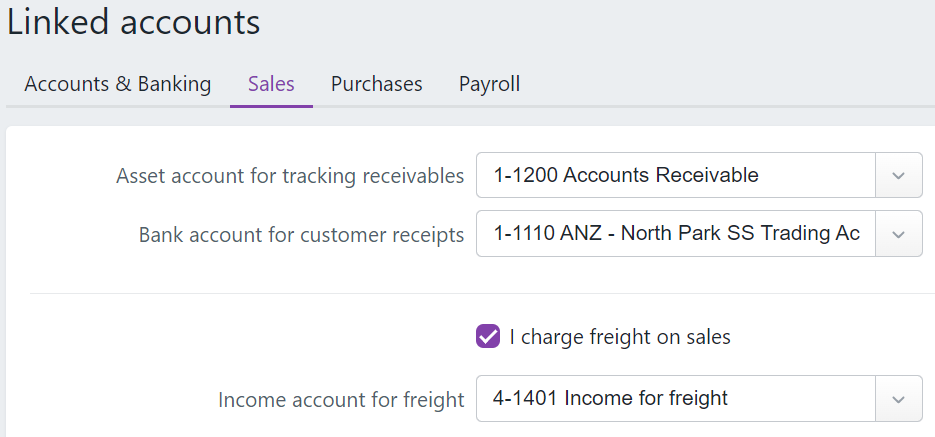
- Enter any charges for Freight, and if required, change the default Tax/GST code. If you can't enter Freight, you'll be prompted to specify a linked account for freight. If you haven't set one up yet, go to Accounting > Manage Linked Accounts to specify the correct account.
- The following totals are automatically calculated:
- Subtotal—the total for the items added to the return
- Tax—the amount of tax or GST applied to the return
- Invoice total—the subtotal amount plus the tax or GST amount
- Amount paid—the total of any return amount paid
- Amount due—the total minus the amount paid.
- Select the Customer and choose the Bank account the payment is going to.
- Enter the total amount of the payment (including the overpayment) in the Amount received field against the open invoice as shown in the screenshot above.
- If the customer has no open invoices, create a credit for the overpaid amount, then refund the credit to the customer (or hold onto it to apply to a future invoice). See below for customer credits and refunds.
- Click Save. A return (credit) will be created for the overpaid amount.
- Process the customer return (Sales menu > Customer returns) and choose whether you want to apply the overpaid amount to an invoice or refund the customer, as shown above. You can also hold onto the credit to apply to a future invoice.
- Enter the total amount of the payment (including the overpayment) in the Amount received field against the open invoice as shown in the screenshot above.
Activity: Entering Sales from various sources
1. Enter Sales
Practice entering sales for North Park Stationary Supplies using these four scenarios. Add new customers and items to the system on the fly while creating the quote or invoice. Important note: Use today's date for all these entries.
A: Website order receives a discount and pays a deposit with the balance due before shipment.
Beatrice Wilson, a wedding planner who often uses your services for bespoke invitations, placed an order from your website. She has asked for a quote for 120 invitations and indicated the design and text.
The website generated an email with these field values:
- Customer Name: Beatrice Wilson
- Email: BWilson22@gmail.com
- Issue date: [today]
- Expiry date: 90 days from today
- Amounts are: Tax Inclusive
- Item ID: RP120
- Name: Rose cardstock invitation
- Unit: 1
- Unit price: $688.00
- Go ahead and create a quote for Beatrice and save it. (If this were real, you would likely email it to her). Your quote includes a 5% good customer discount. Use the notes section to indicate terms: $200 deposit due now, balance due in 90 days. (Note: if you first enter a comment in the freeform box as suggested and then select an item from the pulldown above it, MYOB will overwrite your comments and replace them with the default option you selected.)
- Beatrice got back to you, accepting the quote. You can now use MYOB to turn the quote into an invoice and save it.
- The next day, Beatrice paid a deposit of $200.00. Enter the payment against the invoice. (Hint, you need to overwrite the amount that appears by default since she is not paying off the entire invoice.)
B. Purchase Order received, create invoice
In your email inbox, you received a purchase order from Mackey Law Ltd. Create an invoice from the information contained in the purchase order. Shipping is taxed as a service in Australia, so you will need to assign the GST tax code to the freight on the invoice. Save the invoice. You have not received payment yet.
To: North Park Stationery
From: Mackey Law Ltd
Subject: Purchase Order #100-98
-----
| Item | Cost |
|---|---|
| 50 Pack AS Clear Books containing 20 leaves. | $85 |
| 25 Pack 4-color WB Markers. | $189 |
Please ship to our office at:
Charles Mackey
Mackey Law Ltd
1888 Queen Street, North Sydney, NSW 2055
Tel: 407519382
We will remit payment in full upon receipt of the invoice, including the shipping cost.
Thank you.
C. Enter a sale to a walk-in customer
Usually, the sales from the North Park Stationery shopfront are automatically entered, but one of the items slipped through. You need to enter the completed sale with these details:
Customer: Walk-In Customer
Purchase: 1 PON Mechanical Pencil - 0.3 mm
Price: $58.50 GST Inc.
Cost (for entering the item): $30.00 each GST Inc. Use the "Stock purchasing" expense account. Create one if you don't have one already.
Payment: The customer paid via EFT (Electronic Funds Transfer.)
D: Order received from Shoreline Graphics via phone call to Sarah, our customer service agent
You will need to take the notes Sarah wrote from the phone call and create an invoice. A quote is unnecessary since this is a common request from this company. What can you do while entering this invoice to add efficiency for the next time you need to enter this order?
The note you received says:
Gary from Shoreline graphics called, and asked to be invoiced for their usual shipment of paper: 5 Pallets of A3 Recycled Standard thickness in white. He'll send his truck over on Friday to pick up the order. He paid via credit card on the phone.
- Sarah
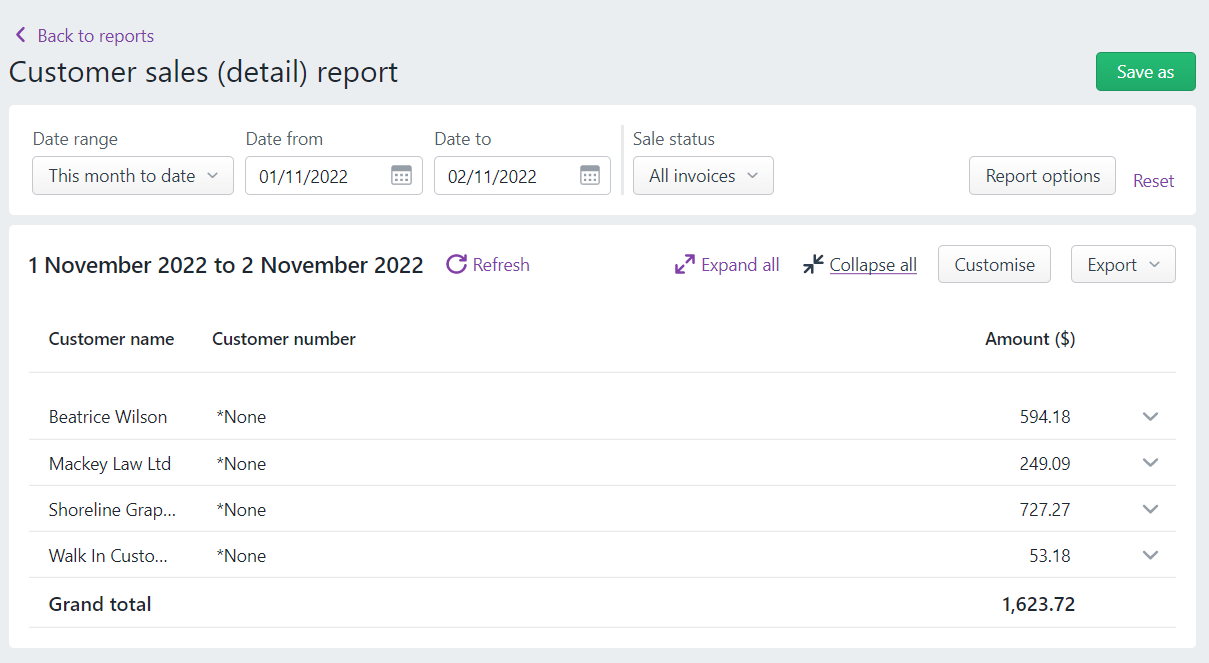
2. Check your data
Reports > Sales > Customer sales report
Run the Customer Sales report for today (if the dates enter span multiple days, only include the time period they cover) and compare it to ours by clicking the (+) sign below.
 - Items that you sell will be allocated to the Sales income account.
- Did you remember to use the tickbox at the bottom of the invoice for Shoreline Graphics to Save as recurring because it is frequently repeated?
- Did you add the Walk in Customer (no other details but the name are necessary) and Mackey Law as new customer contacts?
- Did you add the mechanical pen as a new item and remember to use the correct linked accounts?
- Did you notice that you can indicate that the customer paid some or the full amount directly in the invoice template while it is being created?
- If you struggled, use the forum to indicate where you looked for help.
3. Share your experience
Please discuss any problems or successes you had while doing this task in the forum.
MYOB Help pages accessed in this topic: