Historically, accounting was tied to books and paper. With the advent of computers, the activities of accountants and bookkeepers to manage the financial picture of a business got much easier. Calculations could be done within spreadsheets, and paper-based information could be stored electronically. Now that cloud computing is an option — the ability to share information strategically, run reports quickly, and ramp up security has made the bookkeeper's role more efficient and secure.
This section will run you through the steps and knowledge you need to operate and maintain MYOB Business™.
If you haven't seen it, please watch this video welcoming you to MYOB.
MYOB provides one of the leading cloud-based accounting programs in Australia and New Zealand. Software World ranks MYOB #2 out of the top 10 Accounting software - Free and Paid.
The dashboard
The first stop when you land at MYOB is the dashboard. You can also return to this page by selecting Dashboard from the main navigation menu across the top or the MYOB logo on the top left of the main navigation menu. On this page, you will see a list of invoices, your equity amount, sales, expenses, and a quick view of how your business is tracking.
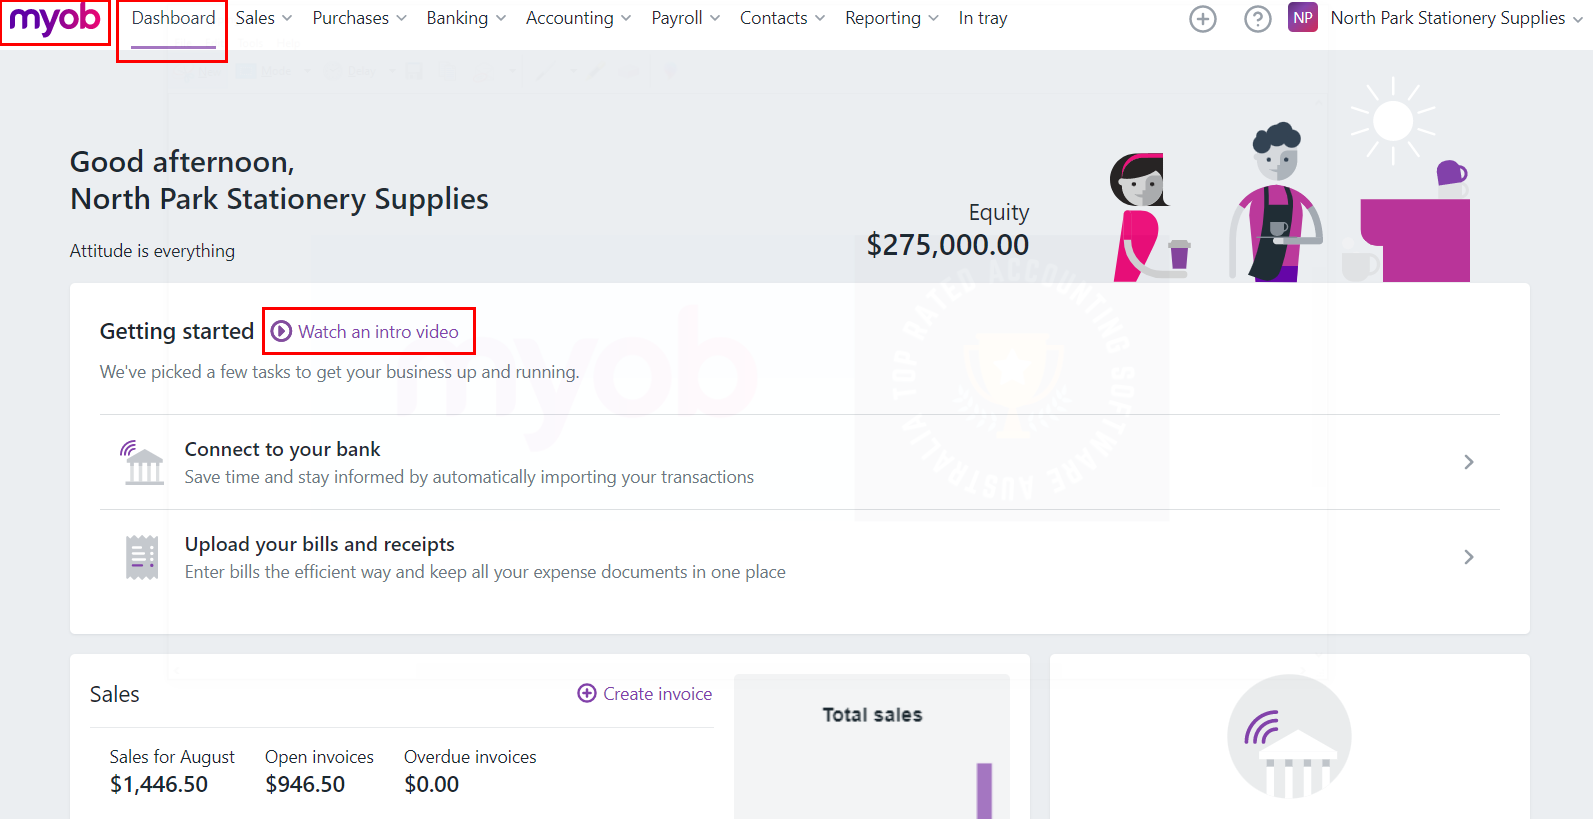
Welcome to MYOB
Start with the video in the Getting Started section, Welcome to the MYOB Dashboard.
You are welcome to review the entire page. If you do, please be aware that some of the items mentioned there are beyond the scope of the course, such as bank feeds and the in-tray.
Main Navigation Menu

There are two primary areas of navigation on the Dashboard page, the main navigation across the top, as shown above, and the Business name drop-down, which we will cover next.
1. Sales
From here, you can manage your entire sales operation and customer base, starting from the quote to the invoice and, ultimately, the payment.

From this drop-down menu, you can:
- Generate and review Quotes
- Generate and review Invoices
- Record a customer's payment against an invoice
- Manage direct debit requests from customers
- Manage customer returns of products or refunds on service
- Manage items for inventory management
- Review and send customer statements
Note: Recurring transactions appears on several menus and brings up a list of transactions you have noted in the system are recurring. We will explain more when covering how to enter transactions.
2. Purchases

Keep track of your purchases, whether they be for office supplies, materials, or inventory, it's all kept in one spot. Purchase orders are editable at any time, and you can turn a purchase order into a bill with one click.

From this drop-down menu, you can:
- Create and view purchase orders.
- Create and view bills. You can convert a P.O. into a pre-filled bill to record purchases.
- Record the payment made to a supplier.
- Generate a list of bills paid to a selected supplier within a defined date range.
- Manage items and the value of merchandise returned to supplier.
- Another link to manage items the business sells and purchases.
3. Banking
The banking section is where you keep track of and record all of the financial movements of the business.

Keeping your system well maintained and managed means that your financial snapshot can be taken anytime and you trust the information is correct.
From this drop-down menu, you can:
- Create a list of the bank and credit card transactions brought into MYOB via bank feeds or by importing a bank statement.
- Reconcile your account balances, ensuring that the bank account balances in MYOB match your bank statements.
- Set up rules for how MYOB automates the activity of matching or allocating a transaction to a bank account.
- Record a payment made, a purchase, or anything else the business spends money on by creating a spend money transaction.
- Record a payment received from a customer.
- Transfer money between MYOB bank accounts.
- Recurring transaction brings up a list of transactions that have been flagged as recurring. This menu item is also available on Sales and Purchases.
Note: MYOB has entered the banking market and now offers business loans and financing directly to its clients. Information about this is beyond the scope of this class.
4. Accounting
Keeping all the accounting tasks together makes maintaining the system efficient. MYOB uses a double entry system of accounting.

From opening balances to managing employee payments, it all comes down to accounting for the transactions in the correct account to ensure everything balances and is accessible for reports.
From this drop-down menu, you can:
- Record and view general journal entries.
- View the hierarchical list of accounts with tax codes and current balances.
- Manage linked accounts. Linking accounts ensures you are allocating transactions consistently and correctly.
- Manage jobs, a feature that allows you to allocate expenses and revenue to specific jobs for comparison purposes.
- Review and manage the tax codes and rate% associated with receivable and payable accounts. You can even create a tax code if a custom or unique code is required.
- With a few clicks, you can prepare your Business Activity Statement (BAS) or Instalment Activity Statement (IAS).
5. Payroll
MYOB has created a complete payroll system inside its accounting system for Australia. That means more automation with reporting, communicating, paying and tracking employee payments. It makes fulfilling the business requirement, PAYG, a much easier burden to bear.

Keep track of salary and wages, payments, leave accruals, and PAYG burdens. It's intuitive and time saving.
From this drop-down menu, you can:
- Create and manage employee information and compensation package.
- Create a pay run on a usual schedule or as a one-off.
- Set up pay items to lump the same compensatory benefits together and assign to employees in bulk.
- Manage Timesheets for employees paid on an hourly basis.
- Set up the system to pay your employees using electronic payments.
- Go straight to your account at PaySuper, MYOB's portal for managing Super payments.
- Manage the business requirement of Single Touch Payroll for easy reporting to the ATO with every pay run.
6. Contacts
Keeping track of customer and supplier details and VIPs for your business is easy with MYOB.
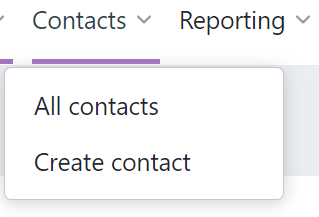
You can add suppliers and customers within the sections for purchases and sales, then use this section to view them all. You can see how much each of them owes or are owed money and create a personal contact here.
7. Reporting
MYOB comes into its own with its extensive reporting functionality. The reports section is separated by the nature of the report, and each one can be filtered, customised, saved, and even grouped to run together for time saving efficiency.

We cannot stress enough that your system is only as truthful as the information entered. You can help ensure you are balanced, current, and correct by running the numbers regularly.
From this drop-down menu, you can:
- Run, flag as a favourite, and customise your reports in one place.
- Use the exceptions dashboard to highlight potential errors before running your financial reports.
- Group the reports you regularly run together. MYOB starts you off with a group of the three reports that comprise the common Financial Reports.
- Manage the formatting of your PDF reports with this cool tool.

The business-name drop-down
This section of the dashboard page is where you can find the links to most global settings. Most sections of MYOB are customisable to your specific business needs.
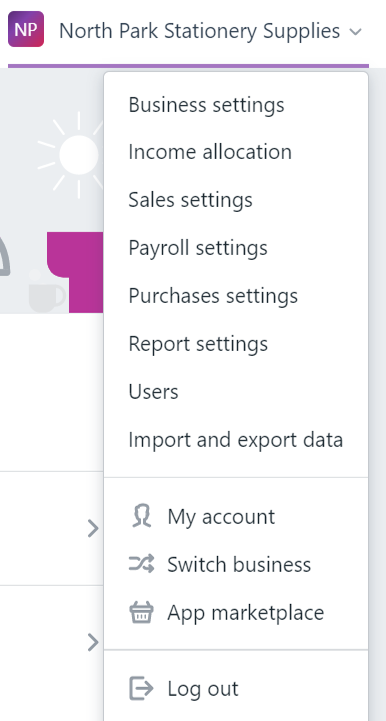
- Business Settings
- Business details, such as name and trading name
- The ABN for the business
- Industry type and code
- Contact information for your customers and contacts
- Specify important dates for the financial year
- Add a lock date to protect data that has already been reconciled and "Start new financial year" to prepare your books for the next year.
- Income allocation
- Record the type of entity your business is, and allocate linked accounts in case of Unit Trust and Partnership.
- Sales settings
- Automate the layout of invoices for items and/or services your business provides.
- Create and access templates for invoicing
- Indicate payment terms for invoicing
- Store and/or select a personal note to show up on invoices
- Enter and select the Email addresses, names and even the email message text to accompany the invoice
- Setup reminders
- Explore a new way of invoicing called elnvoicing. Covering this feature is outside of the scope of this course.
- Payroll settings
- Define the work week hours
- Add a Withholding payer number (WPN)
- Tax table revision date
- Default Superannuation fund
- Turn on timesheets
- Create and review employment classification items
- Payslip settings for the emailed payslip.
- Purchase settings
- Review and create templates to use for bills and purchase orders
- Add in contact details for the email that accompanies the purchase orders and/or remittance advices.
- Users
- Create roles and invite people into your MYOB account. We will discuss this in detail later in this section under Technical help and security.
- Import and export data
- Import - this is especially useful for businesses that are moving to MYOB from another system:
- Opening balances
- Importing your opening balances will establish your Chart of Accounts. Once that is set up, you will need to enter transactions that may include data previous to the creation date. This is called 'historical data'. When entering these transactions you will need to consider the GST implications.
- If the business accounts on an accrual basis, the GST would have been accounted for when the invoice or bill was originally generated or entered into the system. As such, when entering historical data, the tax code would be NT. If the business accounts on a cash basis, when entering historical data, the tax code would be as appropriate to the item or service, since it will not have been accounted for previously.
- Learn how to manage historical data at MYOB's help centre page, Entering historical sales and purchases
- Importing your opening balances will establish your Chart of Accounts. Once that is set up, you will need to enter transactions that may include data previous to the creation date. This is called 'historical data'. When entering these transactions you will need to consider the GST implications.
- Contact list (suppliers, customers/clients, and personal)
- Employee
- Item
- Timesheets
- Opening balances
- Export:
- Chart of accounts
- Data for your accountant
- Items list
- Import - this is especially useful for businesses that are moving to MYOB from another system:
- My account
- Here you can customise your MYOB account details, such as login, personal contact information, reset 2FA. This is the place you can alter your billing and payment details for your MYOB account as opposed to your customers and contacts.
- Switch business
- If you have more than one MYOB Business account, you can switch between them here.
- App marketplace
- View and connect with the third-party apps that integrate with MYOB to expand y our online functionality. Select MYOB Business from the Apps by product list on the left to see what's on offer.
- Serial number
- You will need your serial number when you call in for support. It's a good idea to note it somewhere outside of MYOB in case you need to call in for support to inquire about a rare service outage.
Linked accounts are used for various functions in MYOB and add to the efficiency of using a computerised system.
As you know, every transaction that is entered in MYOB needs to have debits and credits posted to accounts to satisfy the rules of double-entry bookkeeping. Linked accounts are set up so that when you complete a transaction, amounts are automatically posted to the correct accounts without needing to specify the accounts each time.
When a business is set up in MYOB, and the selection of an industry is chosen, linked accounts are set up by default. You can change these linked accounts if you are not satisfied with the default selection.
Once set up, they link transactions and activities to the correct account automatically to make sure that the correct accounts are updated consistently and correctly. This saves you from needing to choose an account every time you use a function.
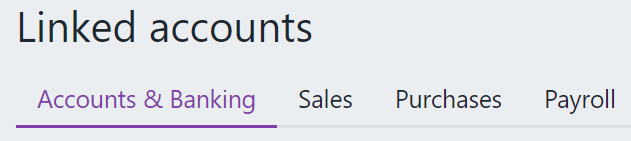
There are two types of linked accounts used in MYOB:
- feature-level linked accounts
- record-level linked accounts
You can change the default linked accounts and turn some off. However, some feature-level accounts can't be changed or turned off, even if you don't use the feature they're linked to.
Feature-level linked accounts
Feature-level linked accounts come with the system as the default accounts that MYOB uses for some of its main features. For example, there’s a linked account for tracking receivables (your trade debtors) and a banking account for receiving customer payments. So whenever you record a credit sale, MYOB knows which account you use to track what customers owe you and will update it automatically. Likewise, when you receive a customer payment, the linked bank account you’ve selected will be used by default.
Set or change feature-level linked accounts:
- Go to the Accounting menu
- Select Manage linked accounts.
From here, you can set up the following linked accounts.
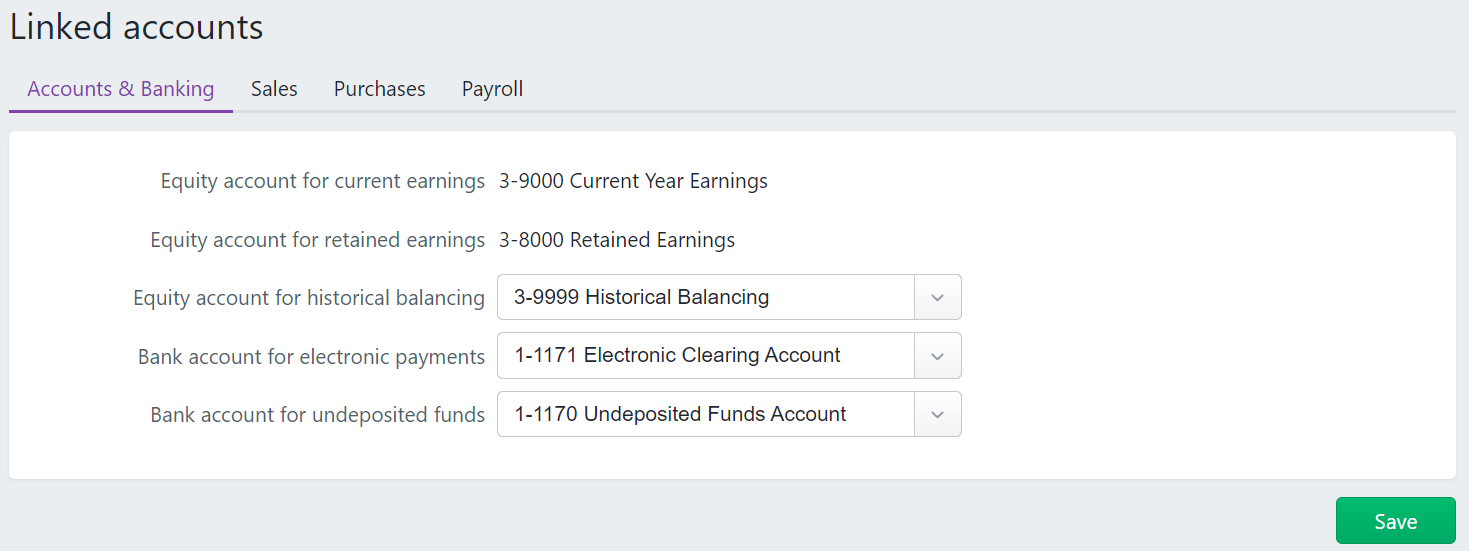
- Equity account for current earnings: This account helps you track your profit (or loss) for the current financial year. At the start of a new financial year, the balance of this account is transferred to the equity account for retained earnings. You can’t change this account. See also Income allocation on MYOB's help centre.
- Equity account for retained earnings: This account helps you track the business's cumulative profit (or loss) up to the start of the current financial year. At the start of a new financial year, the balance of the equity account for current earnings is transferred to this account. You can’t change this account. See also Income allocation on MYOB's help centre.
- Equity account for historical balancing: This account is used to balance your accounts list and balance sheet report. As a rule, the value of your assets must equal the combined value of your liabilities and equity. If you haven’t entered all of your opening balances or a value was entered incorrectly, a “balancing” amount will be allocated to the Historical Balancing account. Once you accurately enter all your opening balances, this account will return to zero.
- Bank account for electronic payments: This is a clearing account that’s used to keep track of electronic payments that haven’t been processed yet. The payments are cleared from this account and withdrawn from your bank account when you pay your employees or suppliers electronically.
- Bank account for undeposited funds: (feature not yet available) This is a clearing account that you use to keep track of receipts that haven’t been deposited directly to your bank account (such as cash and cheques).
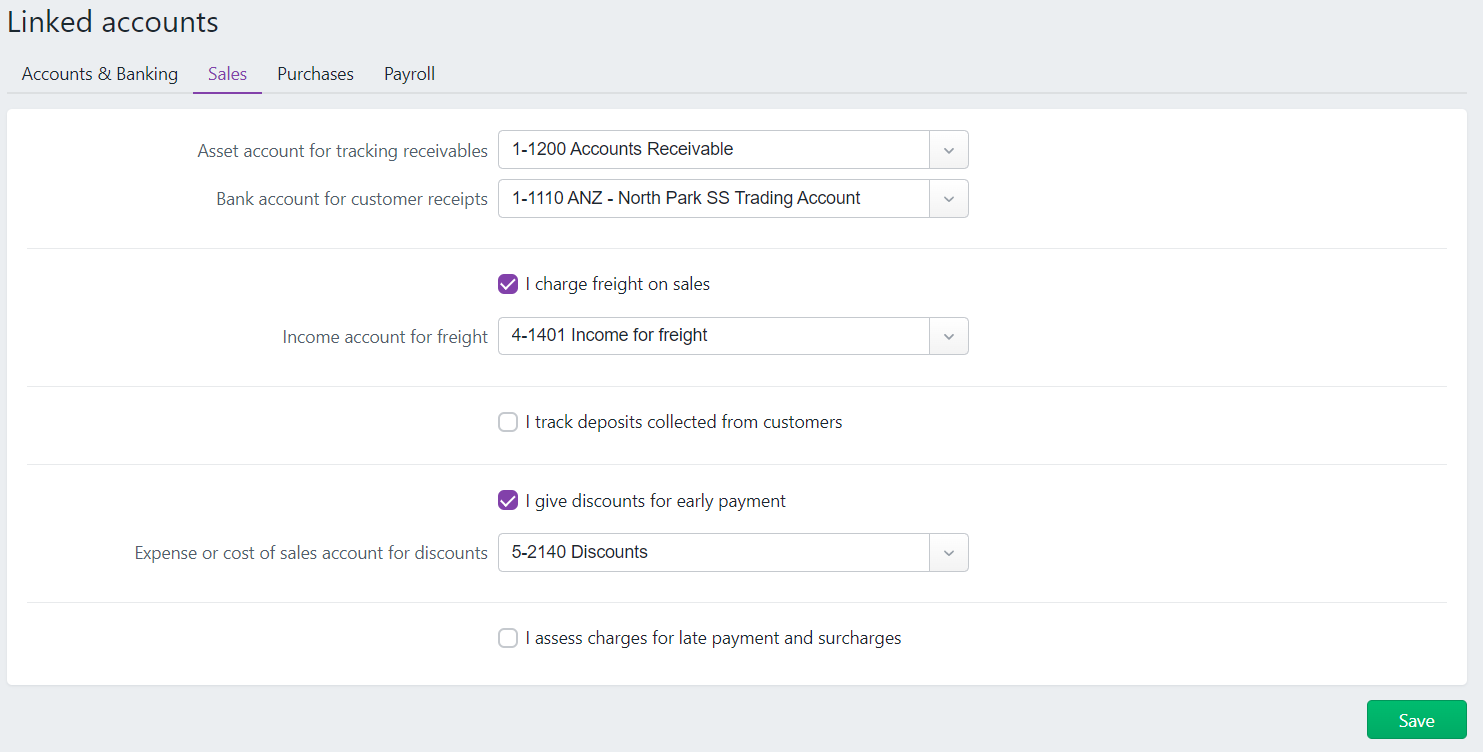
- Asset account for tracking receivables: This account is used to track the total amount that customers currently owe you. The balance will increase automatically when you record an invoice and decrease when a payment is made.
- Bank account for customer receipts: This is the default bank account into which customer payments are deposited. If you have more than one bank account for this purpose, select the one that will be used most. You can select a different bank account when recording the receipt.
- Income account for freight: This is the account you want to use for freight you charge to customers on invoices. Amounts you enter into the Freight field on a sale will be allocated to this account.
- Liability account for customer deposits: (feature not yet available) This account is used to track deposits you collect from customers when recording a sales order. If you enter an amount in the Paid Today field of a sales order, the amount will be allocated to this account.
- Expense or cost of sales account for discounts: This account tracks payment discounts you give to customers when entering their payments.
- Income account for late charges and surcharges: This account is used to track finance charges you collect from customers. By default, this account is used for customer surcharge payments for online invoice payments.
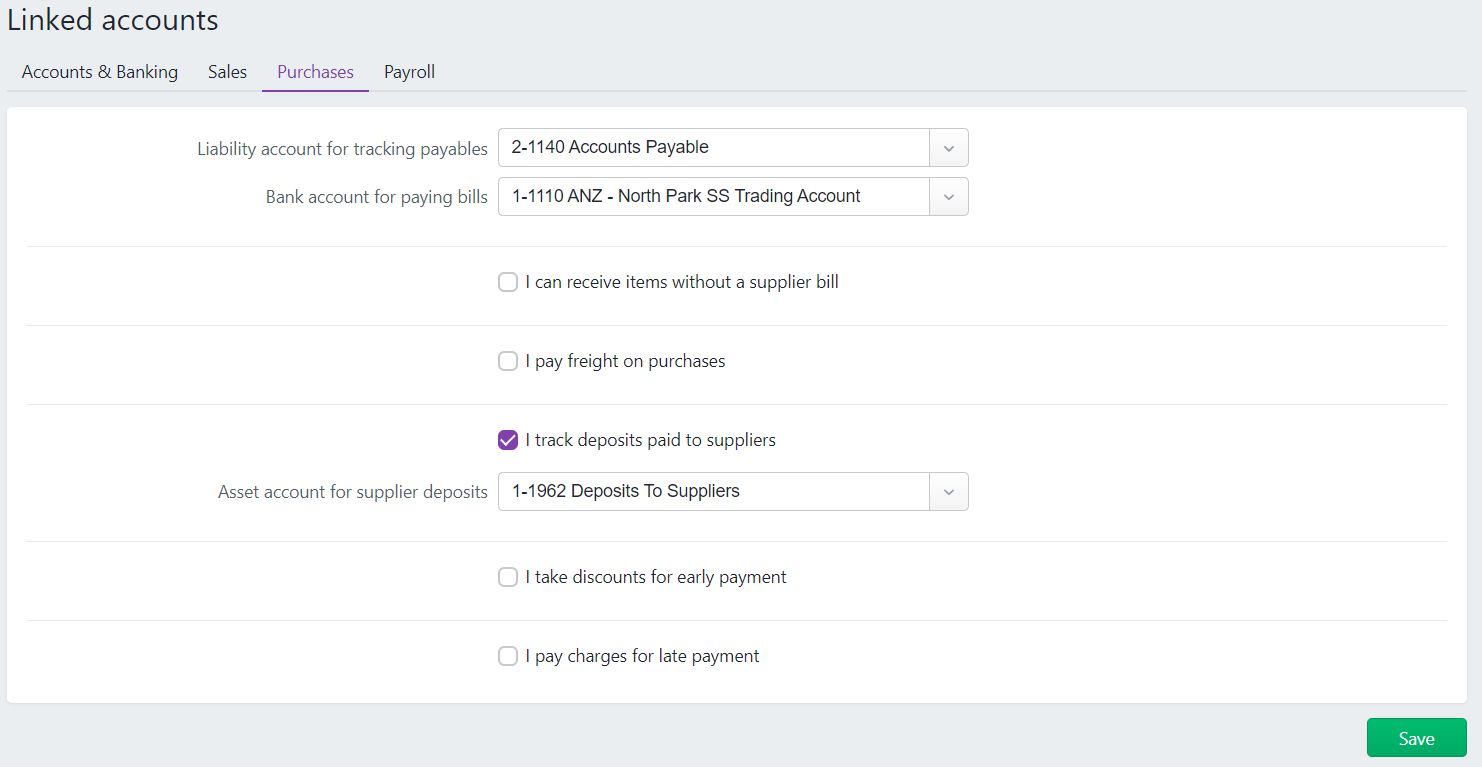
- Liability account for tracking payables: This account is used to track the total amount you currently owe to suppliers. The balance will increase automatically when you record a bill, and decrease when you make a payment.
- Bank account for paying bills: This is the default bank account from which bill payments are made to suppliers. If you have more than one bank account for this purpose, select the one that will be used the most. You can select a different bank account when recording the payment.
- Liability account for item receipt: (feature not yet available) This account tracks the stock you receive from a supplier without a bill on a Receive Items transaction. This account will be cleared when you record the bill for the stock received.
- Expense or cost of sales account for freight: This account is used to track freight amounts you pay to suppliers.
- Asset account for supplier deposits: This account is used to track deposits you make on purchase orders. If you make a payment against a purchase order, it's considered a supplier deposit and the amount will be allocated to this account.
- Expense (or Contra) account for discounts: This account is used to track payment discounts suppliers give you which you enter when making a supplier payment. Learn about Supplier discounts.
- Expense account for late charges: (feature not yet available) This account is used to track finance charges you pay to suppliers.
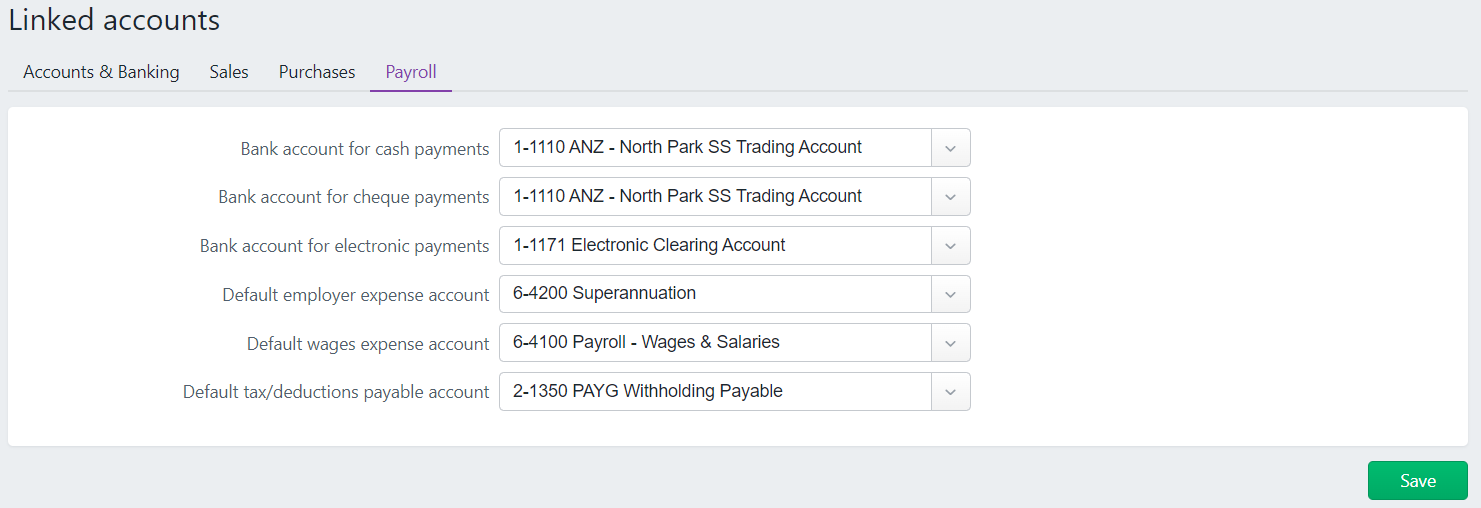
- Bank account for cash payments: This is the bank account from which you withdraw cash to pay employees. The account will automatically be adjusted when you record a pay run. Alternatively, this can be a clearing account that helps you track the total cash that needs to be withdrawn from your bank account.
- Bank account for cheque payments: This is the bank account from which you write cheques to pay employees.
- Bank account for electronic payments: This is a clearing account that’s used to keep track of electronic payments that haven’t been processed yet for your employees. The payments are cleared from this account and withdrawn from your bank account when you process your employees' electronic payments. We will provide additional information about EPs in the Banking topic later in this module.
- Default employer expense account: This is the default account that’s used for Employer Expense type pay items. Employer Expense pay items are used to track payments you make on behalf of your employees, eg. WorkCover Insurance. You can specify a different account when setting up the pay items.
- Default wages expense account: This is the default account that’s used for Wages type pay items. Wages pay items are used to track employee wage and salary expenses. You can specify a different account when setting up the pay items.
- Default tax/deductions payable account: This is the default account used for Deductions and the Tax type pay items. You can specify a different account when setting up these pay items.
Record-level linked accounts
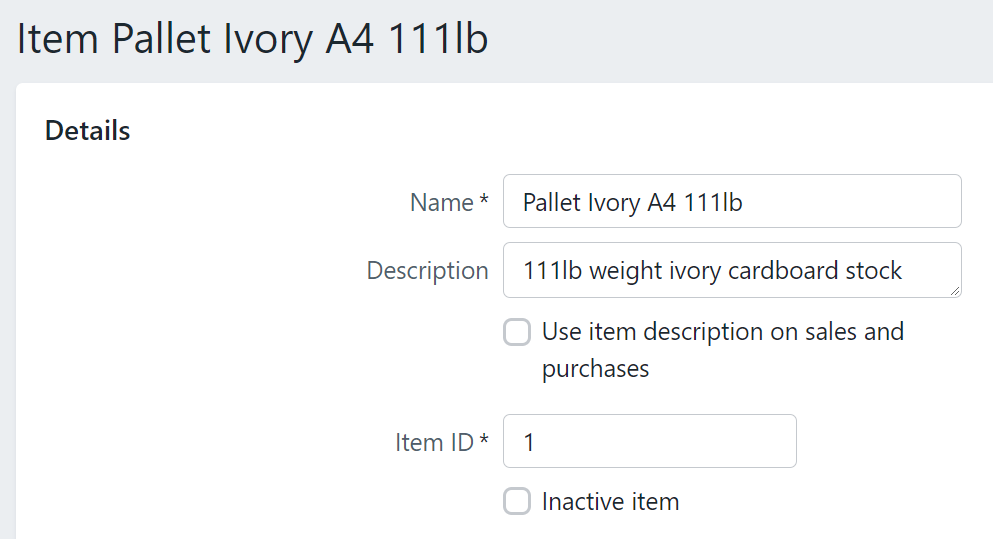
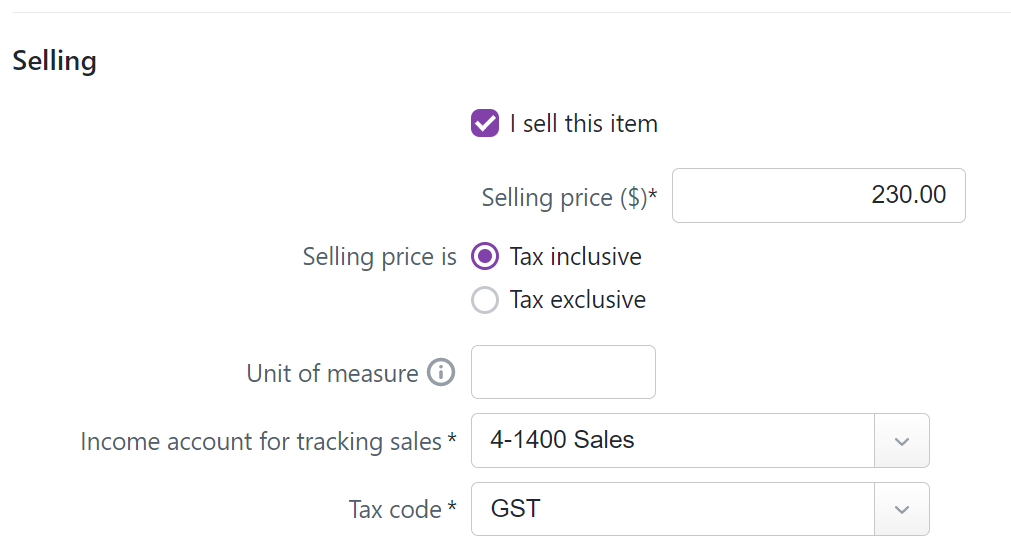
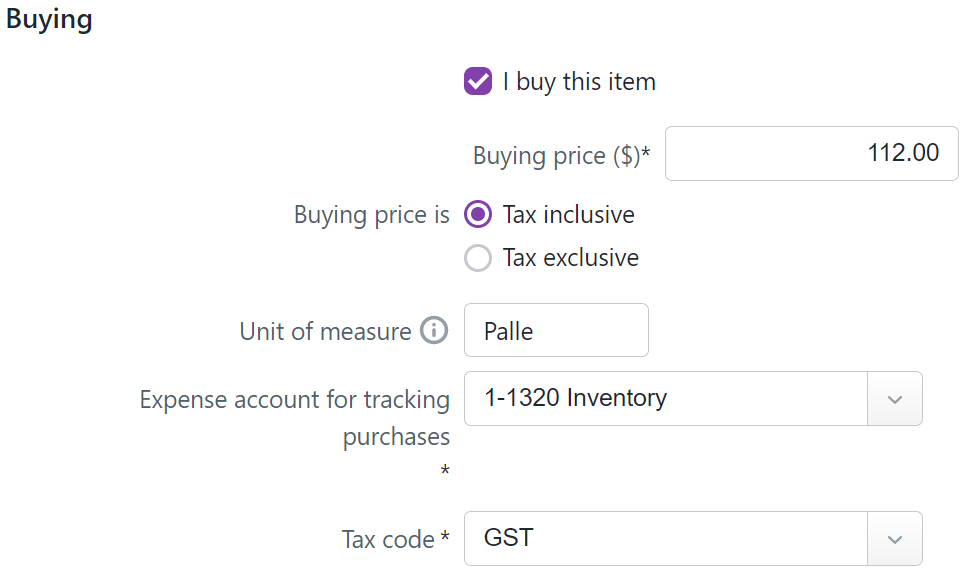
Accounts linked at the record level are those that you’ve selected as the default accounts used for particular records, like inventory items or pay items. For example, when setting up an inventory item, you can choose a default account to use for tracking sales of that item and a different account for tracking purchases of that item. Likewise, when setting up a wage pay item, you can choose to track payments of that wage pay item by using a specific expense account.
Here is an example of the linked accounts fields for an Item (of inventory). In this case, it is for a pallet of North Park's standard A4 paper. They purchase it for $112.00 and sell it for $230.00, so sales and inventory accounts have been linked.
For more information about linked accounts, review the FAQs directly in MYOB's help centre.
Setting up your contacts as part of your setup tasks will save time when you are ready to enter your first transactions. Please note that employees are treated separately and are not considered contacts by MYOB.
You need to create a contact if you want to:
- create invoices and keep track of how much customers owe you
- create bills and keep track of how much you owe suppliers
- store a contact’s name, address or other details.
You can import contacts or manually enter their details.
To import your list of contacts
You'll need to prepare your import file so the fields match with the system's contact fields. MYOB offers a template file that you can use.
- Download the sample contact file.
- Open a blank workbook in Excel.
- Click and drag the downloaded sample file onto the workbook. The file should open in Excel, and the contents of the template will be displayed in rows and columns as expected. Or, use excel to open the file directly as a tab delimited text file.
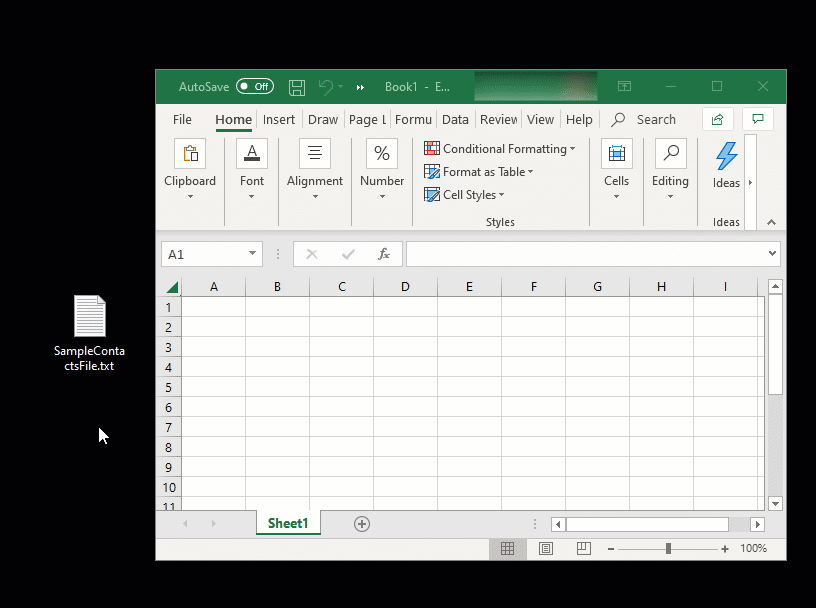
- When looking at the file in Excel, note the following:
- the first cell (A1) contains parentheses (brackets) - these need to remain, as they indicate that the import file is for MYOB.
- the second row (beneath the row with the brackets) is labelled so you can work out what type of information is displayed in each column.
- Enter your data in each applicable column. See the FAQs below for details about how the columns in the sample file correspond to the fields in MYOB.
Remember:- each column in the import file represents a field in MYOB
- each row in the import file represents a different contact
- leave the brackets on the first row and the headings on the second row.
- When you're done, save the template as a tab delimited text (.TXT) file. If you like, you can give the file a meaningful name, such as "Customer Import" or similar.
To import the file
If you're not importing a prepared sample file, make sure your import file:
- is a CSV or TXT file
- is in tab-separated format
- contains a header row for all mandatory fields (see the FAQs below)
- contains brackets {} in cell A1
- is under 25MB
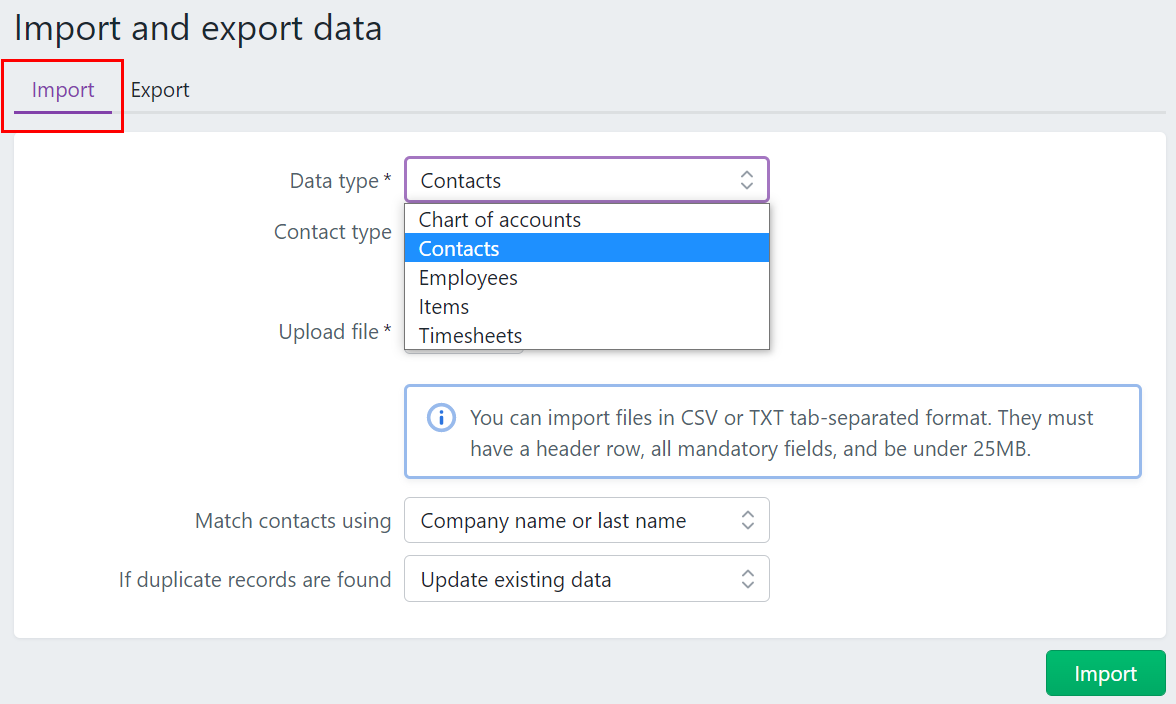
Import instructions:
- Click your business name and choose Import and export data.
- On the Import tab, for the Data type, choose Contacts.
- For the Contact type, select Customer or Supplier.
- Click Browse and locate the import file.
- Click the import file then click Open.
- For the Match contacts using, choose how you'll match imported information with existing contacts.
- Only choose Record ID if importing data which came from the same MYOB business you're importing into.
- If you're importing new contacts, choose Company name or last name.
- Choose the method for handling duplicate records.
- Click Import.
- After importing, you can check the imported contacts and add or update any of their details.
To view, edit, or manually add your contacts
You can see a list of your contacts on the Contacts page (Contacts menu > View contacts).
- To include deactivated contacts in the list, select the option Show inactive.
- Choose the Contact type.
- Enter all or part of a contact's details in the Search field. As you type, matching contacts are shown.
- Click a column heading to sort by that column.
Contact types
When you add a customer or supplier into MYOB, you need to specify what type of contact they are.
The available contact types are:
- Customer—Someone who buys products or services from you
- Supplier—Someone who sells products or services to you
- Personal—Any other contacts you want to record, but who do not buy or sell from you.
Once you've saved a contact, you can't change the type.
Reportable contacts
A growing list of Australian businesses need to report the payments they make to contractors. To see if your business needs to report, check the ATO website. If you need to report a supplier's payments, you can identify this in the supplier's record by selecting the option Report payments to ATO via TPAR. If a supplier is marked as reportable, you'll need to enter their ABN.
All bills and spend money transactions using a reportable supplier will be automatically marked as reportable and included in the Taxable payments annual report, which you can use when sending your information to the ATO.
If you need to enter a non-reportable transaction involving this supplier, you can deselect the Report to ATO via TPAR option on the transaction page.
Learn more about Reportable contractor payments.
Activity: The MYOB Dashboard

MYOB is a cloud-accounting powerhouse, and as such has many different products on offer. The one we are using, MYOB Business, is currently only available in Australia. When seeking online help, you will want to ensure you are looking at the correct product and not one of their others. Some are offered exclusively in New Zealand or Australia:
- MYOB Essentials (Offered in New Zealand)
- MYOB Business (Offered only in Australia) - this is the product we are using for this course. It was previously called MYOB Essentials.
- MYOB AccountRight (A desktop accounting solution that is slowly being phased out.)
- MYOB Accountants Office (AO), EXO, Practice, and a few others designed for large scale accountants and enterprise level businesses.
MYOB Help
Technical help can come from an assessor, a workplace supervisor, a colleague, a friend, and a search engine. On top of all that, when you need support using MYOB, they have several excellent options.
Self-help online
With the popularity of MYOB, you can simply type in any question into a search engine, and the results will show help coming in from industry professionals, learning courses, and support directly from MYOB.
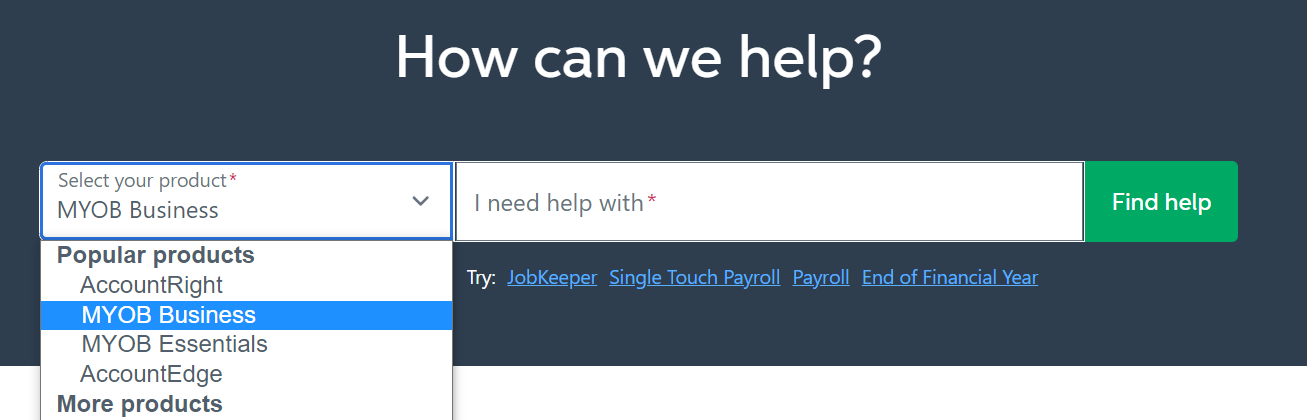
MYOB Help Centre is a treasure trove of help for nearly every aspect of their product. They have tutorials, knowledge base answers, and videos. Be sure to select MYOB Business from the drop-down.
MYOB YouTube channel: Flick through the videos to see what may help augment your learning, or simply add "YouTube" to a specific search to see if they have a video about it.
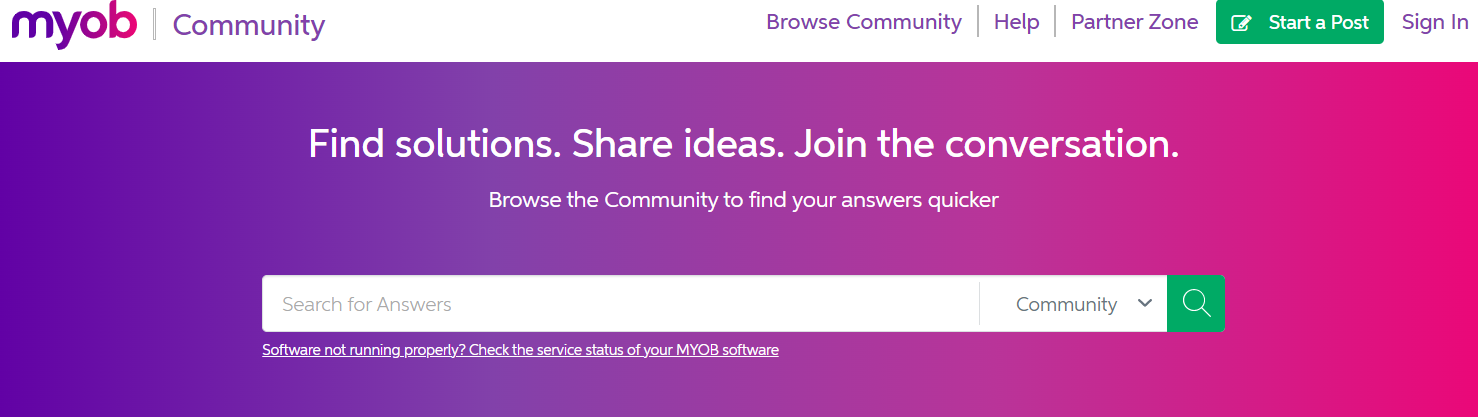
MYOB Community: The community questions and answers are like a window into what it is to be a professional accountant, bookkeeper, or business owner. If you have the question, you can be fairly sure someone else has had it before you. Select these options when you do a google search to see how MYOB support staff and other professionals provide specific solutions to questions.
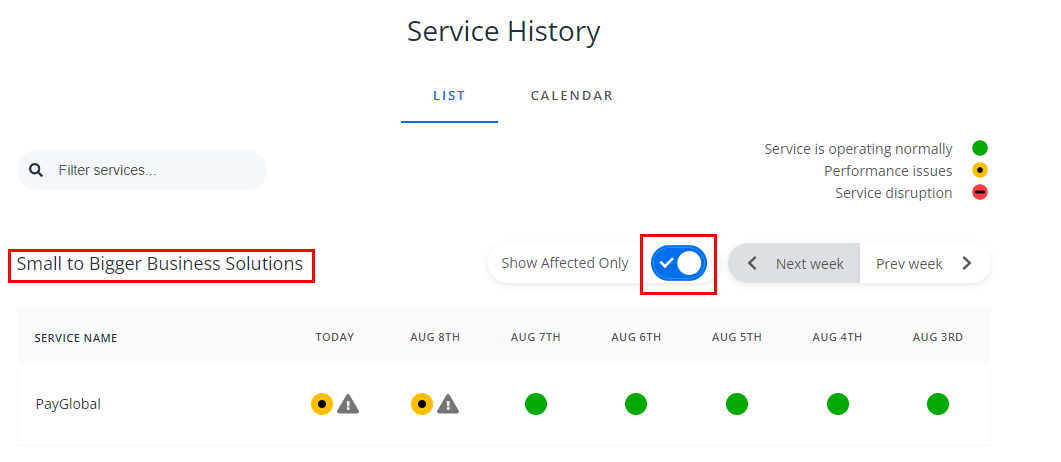
MYOB Status check: If you suspect the entire system is unavailable due to an outage, you can check the status of service. If you don't see your product, that would indicate it is not affected by a service outage. However, if you want to be sure, just switch the toggle as shown here to show all of their products in the category of Small to Bigger Business Solutions.
MYOB's Call Centre
When you need help with Accounting software, you usually need it now. MYOB's last line of defence to get you back up and running is their call centre. With employees across New Zealand and Australia, the team is often available when you need someone.
At the time of writing, phone support hours are Mon-Fri: 7am-7pm | Sat-Sun: 9am-5pm (AEST)
- General contact page - provides contact information for various products.
- MYOB Business support phone: 1300 555 123
- MYOB Login/2FA support: 1800 411 641
- MYOB Billing support: 1300 793 130
MYOB Users
Your system — whether it's computerised or not — is only as secure as the people that access the data. MYOB Business provides two categories for the people with access — Users and Advisors.
When you invite someone to access your MYOB business, you'll choose whether they'll be a user or an advisor. They'll be sent an invitation to access your MYOB business, with all the info they'll need to get started.
User - This is the default user type for most of your staff members.
Advisor - This could be your accountant advisor, bookkeeper or any other person that you may want to help manage your books.
Not everyone has permission to invite others into an MYOB business. To invite users, you must be either be:
- the owner of the business (the person who created the subscription)
- a user with the Administrator role and have been invited to access All businesses under this serial number.
Take a look at the users page:
Go to your Business Name menu > Users

The Users page is where you can:
- invite users and advisors to access to your MYOB business
- choose which parts of your MYOB business users can access
- check a user's status
- edit and delete users.
Everyone you invite to access your data will be able to access your MYOB business at the same time, and there are no user limits. But you'll keep your data safe by choosing which parts of your MYOB business each user can access.
Back-up and recovery
Every business needs a strong disaster recovery plan. Disaster recovery is the ability to continue work after any number of catastrophic problems, ranging from a computer virus or hacker attack to a natural disaster such as flood, fire, or earthquake.
Having a disaster recovery plan in place takes a little time and effort, but the peace of mind it brings and the ability to continue work after the unthinkable are well worth it.
Security and disaster recovery is mostly a breeze for most Cloud-based systems, such as MYOB. They take full responsibility for backing up business data and providing access at all times. There are still the paper-based source documents that must be protected and kept confidential.
- MYOB | Security and Trust Centre - Highlights MYOB's security commitment to its clients.
- MYOB | Status of products - Indicates the status of service for all of their products. If you don't see MYOB Business at first, select the toggle for Show Affected Only, next to Small to Bigger Business Solutions, so it shows all products in their Small business range.
- MYOB | Phone support if the problem occurs during support service hours.
Throughout the module, we will refer to a fictitious business, North Park Stationery Supplies. We strongly suggest you work through the exercises with us on MYOB Business as this will enhance your ability to remember and understand the material.
North Park Stationery Supplies Background Information

Marsha Bing is the sole proprietor of North Park Stationery Supplies, a GST-registered organisation. The company focuses solely on promoting Australian paper and stationery suppliers. They work with Australian vendors that promote sustainable practices. They have three retail outlets that each have an on-site manager. Since its formation, the company has been relatively profitable. Currently, the business uses a manual accounting system managed by an external accounting firm, Alex's Accounting Services, to manage its accounts.
Marsha has decided to install a trial version on MYOB to test its suitability as a computerised accounting system for the business.
Set up MYOB with business data
During the course, you will be asked to complete activities to practice your knowledge and understanding of the topic. The practice exercises will be completed using MYOB Business™.
To complete the practice exercise, you will need to create a business in MYOB for North Park Stationery Supplies.
If you have not done so already, activate your MYOB Business Education trial now.
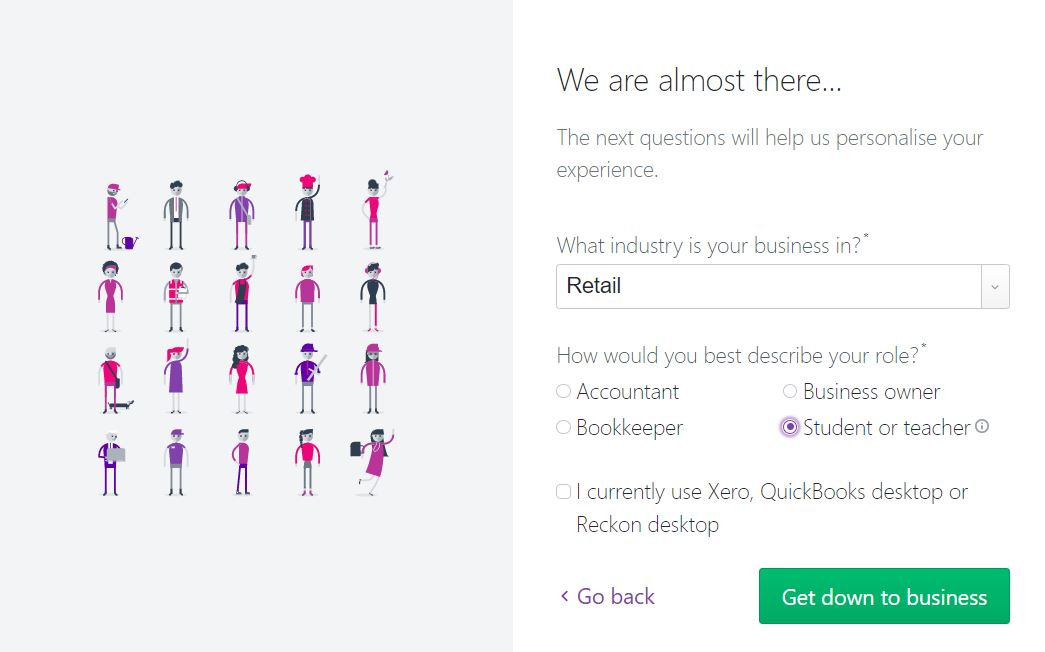
Use the email address you use to access your Swinburne Open Education course, and when asked ‘How would you best describe your role?’ select ‘Student or teacher’.
Create a new trial for North Park Stationery Supplies by adding your first name, last name, and phone number and setting your password.

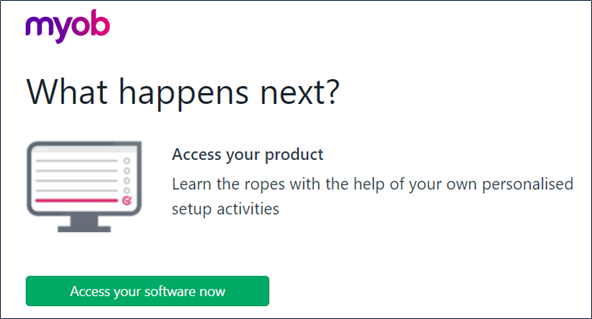
Access your software.
Sign into MYOB and add:
- Name of the business - North Park Stationery Supplies
- ABN - 26008672179
Answer yes when asked if the business is registered for GST and click next.
Use Retail to describe the industry your business is in and use Student or teacher to describe your role.
Business Settings
Select Business Settings from the Business-Name drop-down and go through the sections adding fictitious information for the address, phone etc.
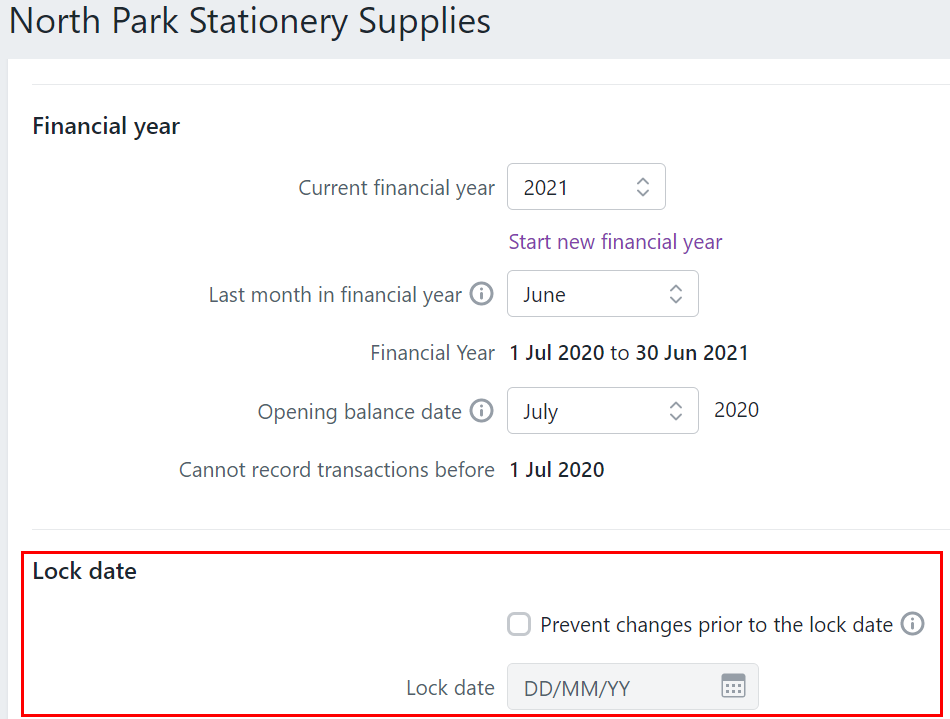
Financial Year: Set the dates to the current financial year.

Lock Date: You can set a date to prevent transactions before this date from being edited or deleted. For more details, see Locking transactions. This step was more important when it was part of the end of year tasks to 'roll over' the financial year, which included locking the previous year in preparation for the new year. Why? Imagine if your account reconciles and all is balanced and ready for the new year, but someone enters an invoice dated September of the previous year (within the same FY). All of the numbers will now be off. To prevent that from happening, MYOB users usually change the lock date after the year has been balanced and finalised.
Set up Chart of Accounts:
You may have completed this task in a previous module. If so, your Chart of Accounts is already set up, and you can skip this. Otherwise, please complete this activity so you can follow along with the training while using MYOB in a different browser tab or window, which will increase your understanding and help ensure the learning sticks.
Download this balance sheet report containing North Park Stationery Supplies' opening balances as of 31 May 2022. Enter the opening balances to the accounts in your MYOB Business system, as would be done in a real-life situation when a business is setting up its accounting software.
The following link provides information on Importing your chart of Accounts:
MYOB- Importing and Exporting an Accounts List.
Visit the link and practice using the following steps.
- Select ‘To import accounts using a sample template’ and follow the instructions
- Go to the FAQ for information regarding what is required in each column of the template
- Select ‘Import the prepared template’ and follow the instructions.
Notes:
- When adding the capital assets into MYOB, such as plant and equipment, motor vehicles, land, and buildings, the tax code to use is CAP. To learn more, MYOB provides helpful information about tax codes.
- Depreciation has not been recorded for the 2022 financial year as of yet.
Take the quiz: Opening balances
MYOB Help pages accessed in this topic: