The features and functions that allow a bookkeeper to maintain balanced books are at the heart of an accounting system. This is the area to manage:
- money that flows in or out of a business that is not directly linked to a purchase or a sale
- money movement between accounts
- troubleshooting errors between the general journal and subsidiary ledgers
- real life banking activity as compared to the accounting system
- and lock that information when it reconciles (balances), which will help future investigations.
Statements are available from your bank for each of your banking, credit card and loan accounts. These statements are usually available in both printed and electronic formats. MYOB can communicate directly with the bank using bank feeds, or they can be imported into the system.
About bank and credit card statements
A statement contains the bank's information about the transactions made on an account.
Each transaction is listed with details like the date, amount, whether it is money in (credit) or money out (debit), the type of transaction (direct deposit, point of sale, cheque, bank charge, interest, and so on), and a transaction name and description. Some banks provide more information, but the minimum is usually enough for MYOB to identify your transactions.
The way to ensure that your bank account in real life matches the transactions in your accounting system is to literally match them up. If your credit card statement says you purchased a wall clock for the office, then there must be an equivalent transaction in your accounting software.
If you enter every transaction for your business in MYOB, no matter how small, you may only need statements to check bank charges and your keyboard accuracy. But, if you only have time to enter your invoices and major purchases in MYOB, you can use imported statements to add all other transactions for you.
It helps if the business always pays for purchases with a card, cheque or direct deposit, and avoids using cash — cash transactions are not as traceable as other payment methods.
While bank feeds are a useful feature, they are beyond the scope of this course. This section will introduce the next best option - uploading the statements yourself. While it isn't as seamless as the bank feeds — where the bank and MYOB communicate directly, you can get a lot of functionality by being the person in the middle.
Activity: Opening balances refresher
Before matching transactions, it's important to understand the significance of an account's opening balance.
When importing an electronic bank statement, each transaction can be automatically matched or allocated by a set of rules you create. Rules are covered below.
How to import the statement into MYOB
Download the statement from the bank
- Download it from an internet banking website
- Bank statement files must be less than 10MB to import into MYOB
- Save the bank statement as a .QIF or .OFX file
- If you require, there are options online to convert from a PDF
- Select the date format, dd/mm/yy (if you have a choice.)
Import the statement into MYOB
Tips for importing (uploading) statements:
- You don't need to import statements in date order. You can import statements from earlier or later than the last one imported.
- If you're importing several months’ worth of statements, it's best to import and reconcile them one month at a time. This will make it easier to manage a large backlog of transactions.
- Your account opening balances are directly related to the Opening balance date specified in your Business settings, so don't change your opening balances without considering the implications.
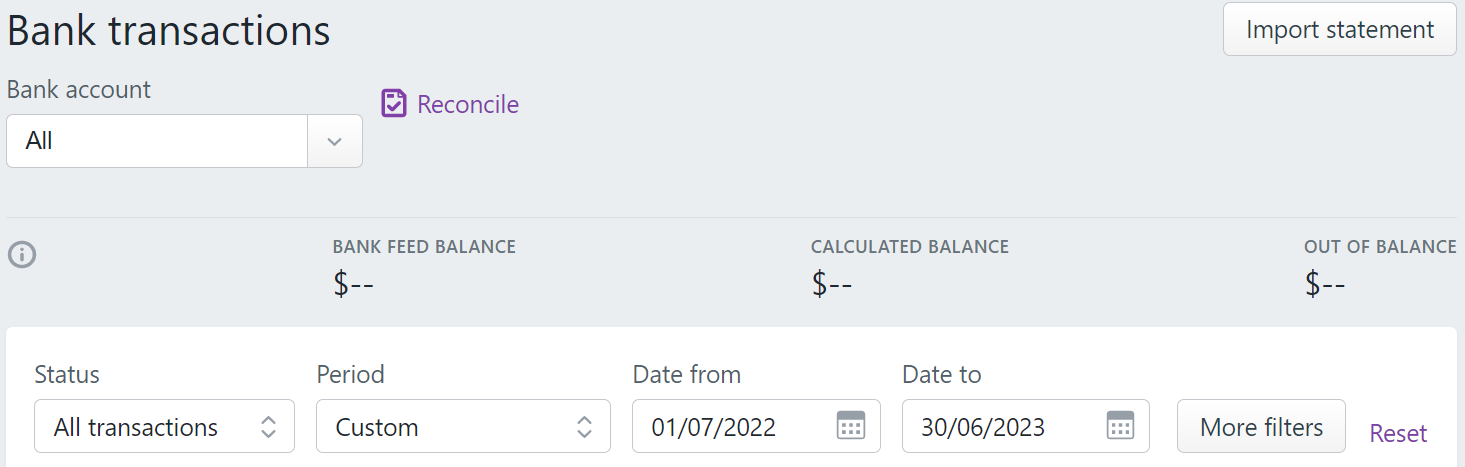
How to import statements
- Go to the Banking menu and choose Bank transactions.
- Click Import statement.
The Bank statement import history page appears. - Click Import statement file. A pop-up appears:
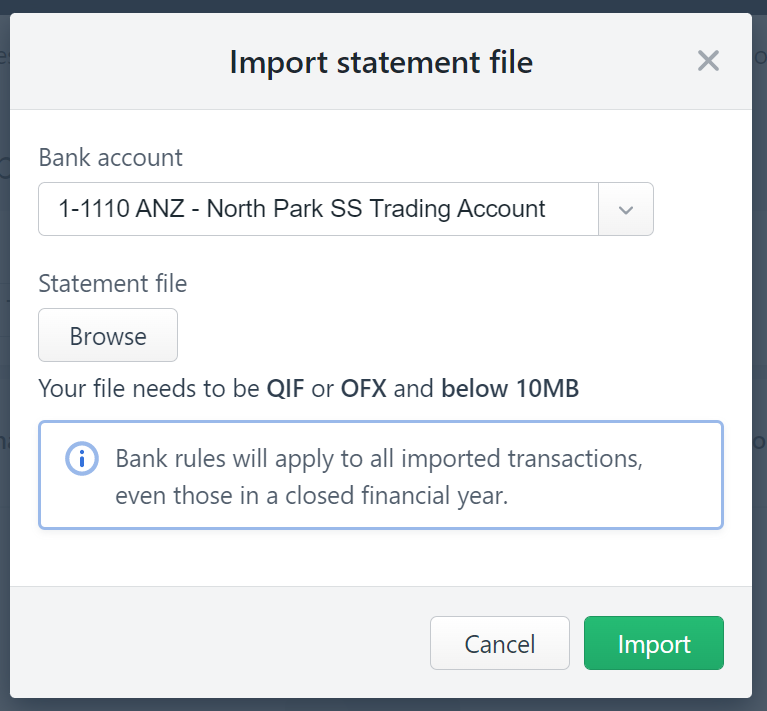
- Choose the Bank account you want the imported transactions to go into.
- Click Import statement file. The Import statement file page appears.
- Click Browse. The Open window appears.
- Select the statement file you want to import and click Open.
- Click Import. The Bank statement import history window reappears, showing the statement file you chose, and a message appears at the top of the screen, telling you how many statement lines were imported successfully. Imported transactions will show on the Bank transactions page.
- To import more statements into this or another account, repeat from step 2.
View the page on MYOB's Help Centre, Entering opening balances for further detail.
Setting up rules
Rules help you deal with transactions coming into MYOB from bank feeds or imported statements. They're a great time-saving feature that automates a lot of manual data entry.
You can set up rules to:
- allocate transactions to your MYOB accounts
- match transactions to open bills or invoices
- create spend money or receive money transactions.
For example, you might create a rule to identify fuel purchase transactions and allocate them to the correct account. Or you could create a rule to identify a customer's payments and match them to their open invoices.
How rules work
When you create a rule, you'll set up the criteria or conditions, which must be met for the rule to be applied. You can specify the rule to look for certain words in the transaction description or a specific transaction amount.
If you want to refine the rule, you can add additional conditions.
When a bank transaction enters MYOB and matches a rule's conditions, the rule will be automatically applied, and the transaction will be allocated to the account or accounts you've selected in the rule.
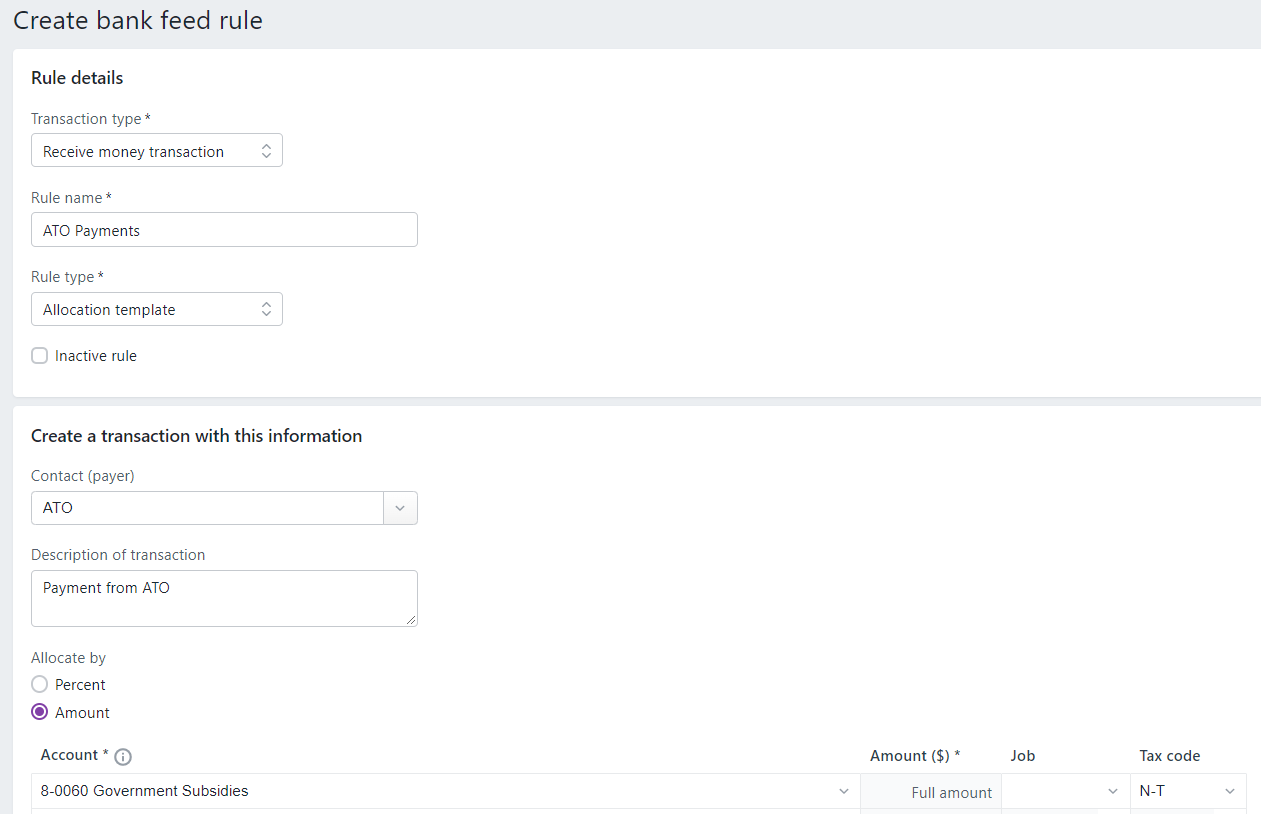
Rules for varying transactions (allocation templates)
There may also be transactions that vary in their description or amount that cannot be allocated using an automatic bank rule, but you want to allocate them the same way each time, for example, ATO payments. For these, you can set up an allocation template. This is a rule without conditions that you can choose to manually apply to any transaction when you're working with your bank transactions on the Bank transactions page.
Ways to create rules
If you have some idea of the sort of transactions, you'll need a rule for, you can create a rule from scratch, as shown below. Or, if an example of the sort of transaction you want to create a rule for already exists in your software, you can use that transaction to create a rule from it.
To create a rule from scratch
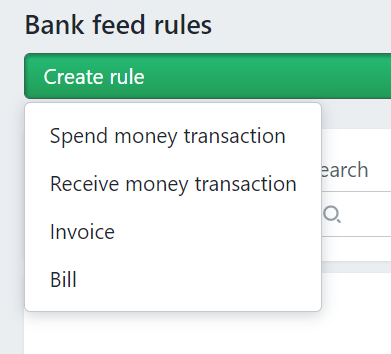
- Go to the Banking menu and choose Bank rules.
- Click Create rule and choose the type of rule you want to create. The list of options is shown in the screenshot above.
- Enter the Rule name. This will make it easy to identify later.
- For the Rule type, choose Automated rule. This rule will be automatically applied to transactions matching the criteria you enter. See the instructions below if you want to set up an Allocation template.
- Select if the rule will apply to All bank accounts or One bank account.
- In the When money spent on the bank statement matches these conditions section, enter the rule conditions. These decide when the rule will be applied and how the bank transaction will be matched or allocated.

- If you need to make the rule conditions more specific, click Add condition and enter an additional rule condition. All conditions must be met for the rule to be applied.
- Specify what happens when the rule is applied.
Type of Rule Specification Bill Choose a Supplier. If the rule is applied, MYOB will suggest matches from this supplier's unpaid bills. Invoice Choose a Customer. If the rule is applied, MYOB will suggest matches from this customer's unpaid invoices. Spend or Receive money transaction Specify the details of the transaction that will be created if the rule is applied.
- Choose a Contact (optional).
- Enter a Description of transaction (optional).
- Select whether the transaction will be allocated by Percent or Amount.
- Enter the allocation details:
- Select an Account.
- Specify the Amount to be allocated to the chosen account.
- If required, choose a Job that the amount relates to.
- If required, change the Tax code.
- To allocate to an additional account, repeat these steps on the next row. To delete a row, click the delete (x) icon at the end of the row.
- When you're done, click Save.
- Received the error message, One or more fields contain a trailing space?
- Check that there are no spaces after fields in the rule, such as the rule Rule name. Delete these and save again.
To create a rule from a bank transaction
- Go to the Banking > Bank transactions. The Bank transactions page appears, showing your bank transactions from your bank feed or imported bank statements. (We'll describe how to upload your bank statements shortly.)
- Find the bank transaction you'd like to base your allocation rule on and click the down arrow
 in the right column to expand the transaction.
 - Click Create rule.
- Choose the Transaction type.
- For the Rule type, choose Automated rule. This is a rule that will be automatically applied to transactions matching criteria you enter. If you want to set up an Allocation template, see the task below.
- Confirm the Rule name. The default name will be based on the transaction's description.
- Select whether the rule applies to All bank accounts or One bank account.
-
In the When money spent on the bank statement matches these conditions section, enter the rule conditions. These decide when the rule will be applied and how the bank transaction will be matched or allocated:
Description If the bank transaction description is likely to be same each time the transaction comes from the bank, you can choose to match on Description. This field is not case-sensitive. Depending on where the words appear in description, choose Contain, Starts with or Ends with. If the words or phrases are found in the bank transaction, the rule will be applied. Amount ($) If the amount is likely to be the same each time the transaction comes from the bank, you can choose to match on the Amount. If a bank transaction for that amount is found, the rule will be applied. - If you need to make the rule conditions more specific, click Add condition and enter an additional rule condition. All conditions must be met for the rule to be applied.
-
Specify what happens when the rule is applied.
For this type of rule... Specify this Bill Choose a Supplier. If the rule is applied, MYOB will suggest matches from this supplier's unpaid bills. Invoice Choose a Customer. If the rule is applied, MYOB will suggest matches from this customer's unpaid invoices. Receive money transaction or Spend money transaction Specify the details of the transaction that will be created if the rule is applied.
- Choose a Contact (optional).
- Enter a Description of transaction (optional).
- Select whether the transaction will be allocated by Percent or Amount.
- Enter the allocation details:
- Select an Account.
- Specify the Amount ($) or Percent (%) to be allocated to the chosen account.
- If required, change the Tax code.
- To allocate to an additional account, repeat these steps on the next row. To delete a row, click the delete (x) icon at the end of the row.
- When you're done, click Save.
Need to change or delete a rule? See Managing rules.
To create an allocation template
Unlike a rule that applies automatically, an allocation template is for you to use manually whenever you want to allocate a transaction the same way each time. For example, if you regularly receive a payment from the same supplier but the amount or description varies each time, you can create an allocation template that you can use to allocate that supplier's payments.
Allocation templates can only be set up for Receive money transaction or Spend money transaction types.
- Go to the Banking menu and choose Bank rules.
-
Click Create rule and choose the Transaction type. This type of transaction will be created when you apply the allocation template to a bank transaction.
Transaction type Does this Receive money transaction Creates a receive money transaction for a specific contact (payer) and allocates funds across one or more accounts. Spend money transaction Creates a spend money transaction for a specific contact (payee) and allocates funds across one or more accounts. -
Enter the Rule name. This will make it easy to identify later.
-
For the Rule type, choose Allocation template. If you want to set up an Automated rule, see the instructions above to create a rule from scratch.
- In the Create a transaction with this information section:
- Choose the Contact. This will be the customer or supplier that will appear in the receive money or spend money transaction that's created when you apply this allocation template.
- Enter a Description of the transaction. This will appear in the receive money or spend money transaction created when you apply this allocation template.
- Select whether the transaction will be allocated by Percent or Amount.
- Enter the allocation details:
- Select an Account.
- Specify the Percent or Amount to be allocated to the chosen account.
- If required, choose a Job that the amount relates to.
- Choose the Tax code.
- To allocate to an additional account, repeat these steps on the next row. To delete a row, click the delete (x) icon at the end of the row.
- When you're done, click Save. Here's our example for an allocation template we can use whenever a payment from the ATO is deposited into the bank account we have specified:
You can apply this allocation template to transactions on the Bank transactions page.
Be aware that duplicate transactions can result from importing statements with overlapping dates or importing a statement already brought over by bank feeds. If that occurs, you'll need to delete the most recent imported statement and upload a new one ensuring the dates don't overlap with transactions already in MYOB.
Zero transactions were recorded after uploading a statement
Transactions won't be imported if they're:
- dated before the Opening balance date set in MYOB
or - dated before a lock date that's been set in MYOB.
To check these details in MYOB, click your business name and choose Business settings. In the Financial year section, you'll see the Opening balance date set in your file.
Below that, in the Lock date section, you'll see if a lock date has been set, which prevents transactions from being entered (or imported) before that date.
When you've imported your bank transactions, all you need to do is tell MYOB what to do with them.
If a bank transaction is a payment for an invoice or bill you've entered in MYOB, just match it to the invoice or bill. In some cases, MYOB will automatically match your transactions.
Otherwise, you can allocate it to one of your MYOB accounts. You can set up MYOB to automatically allocate transactions based on the transaction description or other features. This is especially useful when you know certain details ahead of time, like for recurring transactions.
Automatic matching and allocating
By default, MYOB will automatically match a transaction if there's an exact match available. Transactions that are automatically matched or allocated based on your rules appear in the Bank transactions page with a magic wand icon next to them.
If a match or allocation is wrong, you can unmatch or unallocate the transaction.
If you want to turn off automatic matching, deselect the option, Automatically match bank transactions to MYOB bills and invoices, on the Bank rules page.
You can reconcile any transactions that remain after you’ve allocated all of your bank transactions.
Watch video
Watch this video from the start until 2.09, to see how she uses MYOB to allocate transactions from her statement to her MYOB accounts, and investigate transactions for clues when she is unsure where to allocate an item.
![]()
There are situations when the transaction on a bank statement isn't reflected in your system, or you don't want to upload bank statements or set up bank feeds, so you'll need to enter manual transactions.
You can manually enter the following types of bank transactions:
- Spend money — Record the money you spend (that’s not a payment for a bill entered in MYOB).
- Receive money — Record the money you receive (that’s not a payment for an invoice entered in MYOB).
- Transfer between bank accounts — Record transfers of funds between your bank accounts.
Spend Money
As you know, businesses need to make purchases in order to sell products. But sometimes businesses spend money that doesn't result in a physical purchase. For example, if MYOB matches money spent only to purchases, then where would the business record donations, bank charges, and petty cash withdrawals?
You use the Spend money page to record any money you spend that is not a payment to a supplier for a bill you’ve created.
You can apply a spend money payment to a single account, or you can split the payment between two or more accounts. You can also track any tax or GST associated with the money spent. As you may expect, given the nature of these transactions, MYOB doesn't have the functionality to send remittance advices for spend money transactions.
How to enter a Spend Money transaction

- From the Banking menu, choose Spend money.
- In the Bank account field, choose how the payment is to be made.
- If you are paying electronically — that is, you're paying a supplier directly into their bank account — choose your electronic clearing account as the Bank account. The Bank statement text will then become available.
- If you're paying by some other means — such as by cash, credit card, or internet banking, choose the account you're paying from. Note that only a banking account (that is, a credit card or bank account) can be selected.
- If you want, choose the Contact (payee). To add a new contact, click the dropdown arrow for the Contact field and choose Create contact.
- The status of the ABN you've entered in the contact's record will be checked and shown. Click the status to see more details.
- If this is a reportable contractor payment, select the option Report to ATO via TPAR.
- Enter a Description of transaction. This should describe the overall nature of the transaction — for example, one payment may be for a number of items (e.g. a monthly invoice for office supplies).
- If you're paying a supplier directly into their bank account by generating an electronic payment file for this payment, enter your own unique reference in the Bank statement text field. This text will appear on the payee’s bank statement.
- Make sure the Reference number is correct. If not, enter a new number.
- If you change the reference number, you’ll change the automatic numbering. For example, if you change the number to 1, the next time you enter a spend money transaction the new reference number will be 2.
- Check that the correct date is chosen in the Date field. If not, enter a new date or click the icon next to it to display the calendar and choose a date.
- Choose whether the transaction amounts are Tax inclusive or Tax exclusive.
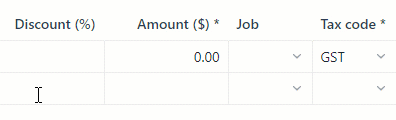
- Enter the details of the transaction:
- In the Account column, choose the account to which the payment amount will be allocated. The tax code for the chosen account will appear in the Tax code column (but you can change this if needed).
- If you'd like to add a new account, click the dropdown arrow for the Account field and choose Create account.
- In the Amount column, enter the amount you want to allocate to this account.
- If you need to record the quantity of this expense, enter it in the Quantity column.
- In the Description column, add a short description of the item.
- (Optional) Choose a Job if you are using that feature.
- If required, change the Tax code.
- If you’re making a payment for more than one item in this transaction, repeat step 9 for each item. To delete a line, click the delete icon (x) for that line.
- In the Account column, choose the account to which the payment amount will be allocated. The tax code for the chosen account will appear in the Tax code column (but you can change this if needed).
- To attach a related document to this spend money transaction, you may upload or drag files into the Attachments section. Learn more about attaching documents to spend money transactions.
- Check that the total amount you’re paying is equal to the total amount displayed at the bottom of the page, including tax or GST. If it’s not, check that you’ve entered the correct amounts.
- If you want, you can save this transaction as a recurring spend money. This is ideal for recurring expenses, like subscriptions or rent payments.
- Click Save as recurring.
- Enter the recurring transaction Schedule name.
- Choose the Frequency, such as Daily, Weekly or Monthly.
- Choose the date the recurring transaction will start.
- Select how many times you want the transaction to recur.
- Click Save.
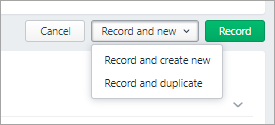
- When you're done, click Record, or if you need to create another spend money transaction, choose an option under Record and new:
- Click Record and create new to record the transaction and create a new one
-
Click Record and duplicate to record the transaction and create a new one with the same details (which you can then edit).
How to edit a Spend Money transaction
- From the Banking menu, choose Find transactions.
- Filter the transaction list as required.
- For the Source Journal, choose Cash Payments.
- Enter a From and To date to find transactions within a date range.
- Enter all or part of the transaction's Description. Matching transactions will be displayed.
- Click the transaction's Reference number to display its details.
- Make the required changes to the transaction. If the transaction:
- has not been reconciled or matched, you can change any details you require.
- has been reconciled or matched, you can change everything except: the account you're paying from, the date, the reference number and the total amount of the transaction. You can change the amounts of individual line items, as long as the Total Amount shown at the bottom of the page remains the same.
- If you need to change any other details, you’ll need to unreconcile or unmatch the transaction before editing it.
- Click Save.
How to delete a Spend Money transaction
- From the Banking menu, choose Find transactions
- Filter the transaction list as required.
- For the Period, choose the time frame that suits.
- Enter a From and To date to find transactions within a date range.
- For the Source Journal, choose Cash Payments.
- Choose the correct Account.
- Enter all or part of the transaction's description in the Search field.
- Click the transaction's Reference number to display its details.
- Click Delete at the bottom of the page. A confirmation message appears. If the transaction has been reconciled, deleting it will affect your next bank reconciliation.
- Click Delete to the confirmation message.
If the deleted spend money transaction was created from a bank feed transaction, you'll need to allocate the transaction again.
Activity: Consider a way to handle petty cash
There isn't one single way to handle petty cash. You need to account for reimbursing the petty cash, and also record what the petty cash was used for.
1. Take a moment and think of a way that you could manage petty cash and then check what MYOB suggests might be right for many businesses by clicking the (+) sign on the right.
One way to handle this is to create a "Cash on Hand" bank account in MYOB, for this purpose, MYOB provides a "Petty Cash" account as a default account when the system is set up. This account is used as the allocation account when you withdrawal the funds from the ATM or get cash out, which in turn will increase the amount in the Cash on Hand account. You can then use the Cash on Hand (or Petty Cash) bank account as the Bank account when you record the spend money transaction.
MYOB provides additional instruction around the accounting of petty cash.
Receive money
Now that you know that MYOB has a function for spending money that isn't connected to the output of the company product or service, it shouldn't surprise you that there is a function to manage money received that is not connected to an invoice you have issued.
If all the money received by a company had to be matched to a corresponding invoice than how would the business record interest received from the bank, sales of fixed assets or surplus tools and machinery, tax refunds, or government grants, for example?
You can apply a receive money amount to a single account, or you can split the amount between two or more accounts. You can also track any tax or GST associated with the money received.
How to enter a Receive Money transaction
- From the Banking menu, choose Receive money.
- In the Bank account field, select the account the money is being deposited into. This must be an account with the type Banking or Credit Card. Learn about your accounts list.
- If you want, select the Contact (payer) you're receiving the payment from. If you'd like to add a new contact, click the dropdown arrow for the Contact field and choose Create contact. Find out more about Adding, editing and deleting customers and suppliers.
- Enter a Description of transaction. This should describe the overall nature of the transaction — for example, one deposit may be for a number of items (e.g. a monthly deposit for bank interest).
- Make sure the Reference number is correct. If not, enter a new number.
- If you change the reference number, you’ll change the automatic numbering. For example, if you change the number to 1000, the next time you enter a spend money transaction the new reference number will be 1001.
- Check that the correct date is selected in the Date field. If not, enter a new date or click the icon next to it to display the calendar and choose a date.
- Choose whether the transaction amounts are Tax inclusive or Tax exclusive.
- Enter the details of the transaction:
- In the Account column, select the account to which the deposit amount will be allocated. The tax code for the chosen account will appear in the Tax code column (but you can change this if needed). If you'd like to add a new account, click the dropdown arrow for the Account field and choose Create account. Find out more about Adding, editing and deleting accounts.
- In the Amount column, enter the amount you want to allocate to this account
- There's a built-in calculator in the Amount and Quantity fields. Just enter a calculation in the field and tab out of it.
- There's a built-in calculator in the Amount and Quantity fields. Just enter a calculation in the field and tab out of it.
- (Optional) If you need to record a quantity associated with this receipt, enter it in the Quantity column.
- In the Description column, add a short description about the item for which you’re receiving a deposit.
- (Optional) Choose a Job if the line item relates to a specific job.
- If required, change the Tax code.
- If you’re receiving a deposit for more than one item in this transaction, repeat step 8 for each item. To delete a line, click the delete icon (x) for that line.
- Check that the total amount you’re depositing is equal to the total amount displayed at the bottom of the page, including tax or GST. If it’s not, check that you’ve entered the correct amounts.
- If you want, you can save this transaction as a recurring receive money. This is ideal for repeat payments, like interest payments.
- Click Save as recurring.
- Enter the recurring transaction Schedule name.
- Choose the Frequency, such as Daily, Weekly or Monthly.
- Choose the date the recurring transaction will start.
- Select how many times you want the transaction to recur.
- Click Save.
For more information on recurring transactions, see Recurring transactions.
- When you're done, click Record, or if you need to create another receive money transaction, choose an option under Record and new:
- Click Record and create new to record the transaction and create a new one
- Click Record and duplicate to record the transaction and create a new one with the same details (which you can then edit).
To edit a receive money transaction
- From the Banking menu, choose Find transactions.
- Filter the transaction list as required.
- For the Source Journal, choose Cash Receipts.
- Enter a Date from and Date to date to find transactions within a date range.
- Enter all or part of the transaction's Description. Receive money transactions have a reference number starting with "CR".
- Click the transaction's Reference number to display its details.
- Make the required changes to the transaction. If the transaction:
- has not been reconciled or matched, you can change any details you require.
- has been reconciled or matched, you can change everything except: the account into which the deposit was received, the date, the reference number and the total amount of the transaction. You can change the amounts of individual line items, as long as the Total Amount shown at the bottom of the page remains the same.
- If you need to change any other details, you’ll need to unreconcile or unmatch the transaction before editing it.
- Click Save.
To delete a receive money transaction
- From the Banking menu, choose Find transactions.
- Filter the transaction list as required.
- For the Source Journal, choose Cash Receipts.
- Enter a From and To date to find transactions within a date range.
- Enter all or part of the transaction's Description.
Matching transactions will be displayed. Receive money transactions have a reference number starting with "CR".
- Click the transaction's Reference number to display its details.
- Click Delete at the bottom of the page. A confirmation message appears. If the transaction has been reconciled, deleting it will affect your next bank reconciliation.
- Click Delete to the confirmation message.
If the deleted receive money transaction was created from a bank feed transaction, you'll need to allocate the transaction again.
Transfer between bank accounts
![]()
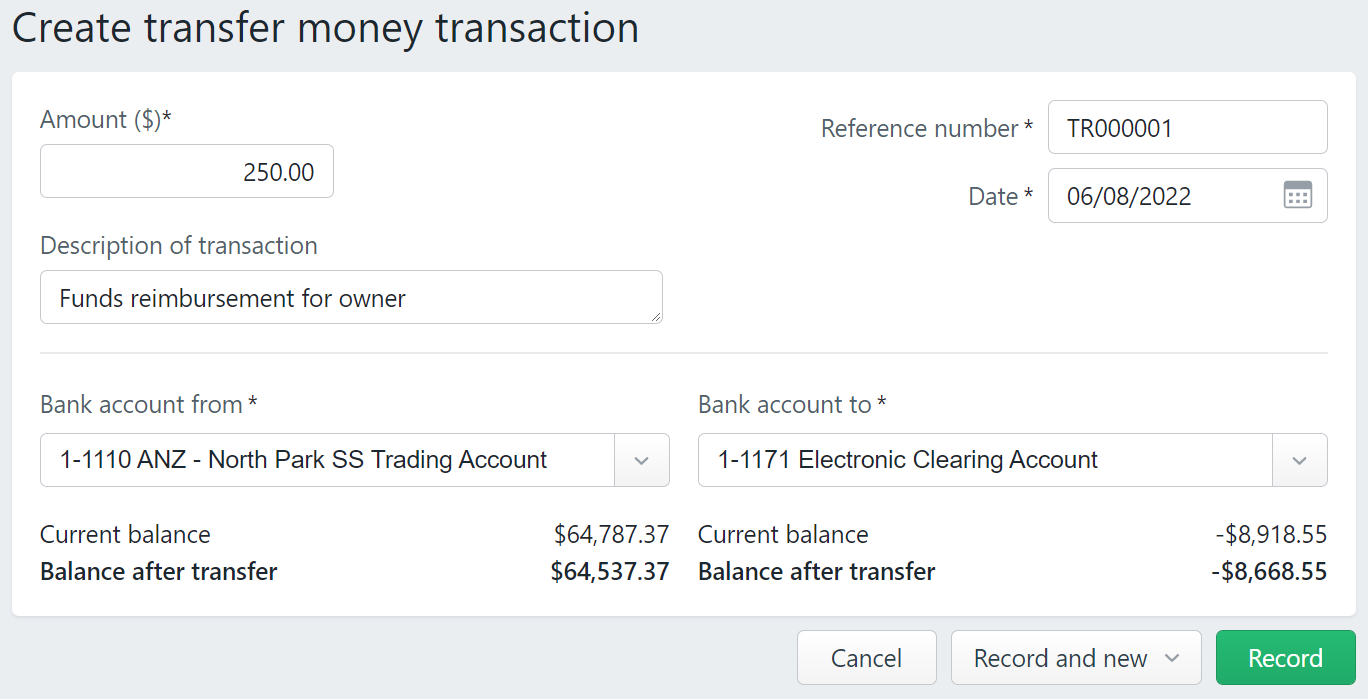
If you've transferred money from one bank account to another (for example, from your cash account to your credit card account), you can make a record of this transfer in MYOB from the Create transfer money transaction page, accessible from the Banking > Transfer money menu.
If you use bank feeds or import your bank statements, and a transaction represents a transfer, you can do that from the Bank Transactions page, which shows the transactions uploaded by bank feeds or uploading statements.
- Go to Banking menu > Bank transactions
- On the Bank transactions page, click the down arrow to expand the relevant transaction, then click Transfer money.
- Select the correct transfer in the list and click Save.
Otherwise, if you only have bank feeds on one of the accounts, or if MYOB couldn't find a matching transaction, you can manually record the transfer by clicking the Create a transfer money link.
If a bank transaction represents a transfer between two of your bank accounts (for example, you transferred money from your Cheque account to your Mastercard), you can match the two halves of the transfer together (the withdrawal transaction from one account and the deposit transaction into another).
If the transactions were recorded by your bank within a day of each other, MYOB will usually be able to identify the matching transfer transaction. Otherwise, you can manually create a transfer transaction and match both transactions to that.
If you need to transfer money between other account types (not bank or credit card), you can always record a general journal entry.
To record a transfer between accounts
- From the Banking menu, choose Transfer money. The Create transfer money transaction page appears.
- Enter the Amount of the transfer
- Remember the field has a built-in calculator.
- Remember the field has a built-in calculator.
- Enter a Description of the transfer.
- Make sure the Reference number is correct. If not, enter a new number. Remember that this field will update the default for the next time.
- Make sure the Date is correct. If not, enter a new date or click the icon next to it to select a date from the calendar.
- Choose the Bank account from. This is the account you're transferring money from. The current balance is shown for the selected account, along with the balance after the transfer.
- Choose the Bank account to. This is the account you're transferring the money to. The current balance is shown for the selected account, along with the balance after the transfer.
- Click Record to transfer the money, or if you need to create another transfer money transaction, choose an option under Record and new:
Working with transactions
- Recurring transactions: You can add default values that will appear each time you create a new transaction.
- Finding transactions: Use MYOB's search function to find exactly the transaction you need to review, adjust, or delete.
- Find and replace within transactions: See what you can do to all transactions with a simple action.
MYOB offers functionality around transactions that allows you to add efficiency to recording and monitoring the movement of money

Recurring transactions
If you have transactions that you record regularly—for example, a rent invoice—you can set them up as recurring transactions and get them to record automatically.
Why you should use recurring transactions
Recurring transactions save you a lot of repetitive manual data entry. For example, if you issue invoices for exactly the same amounts to your customers, month after month, then you can set up recurring invoices to be automatically recorded on a specific day each period, with all of the information about the invoice already filled in. This is ideal if your business offers ongoing subscriptions, leases, or service contracts.
You can create and edit recurring transactions for the following transaction types:
- invoices
- bills
- spend money
- receive money
- general journals.
Watch this video by MYOB's Help Centre to learn more about recurring transactions and how to improve efficiency by automating repetitive tasks.
Scheduling recurring transactions
Specify how often you want the transaction to be recorded, and for how long you want to schedule it. For example, you can schedule a recurring invoice for a product a customer needs to restock monthly for the next 12 months.
![]()
Or, you can just save the recurring transaction as a template to use whenever you like, without a set frequency. If a recurring transaction changes (such as when the customer pays you or the amount), you can easily edit it.
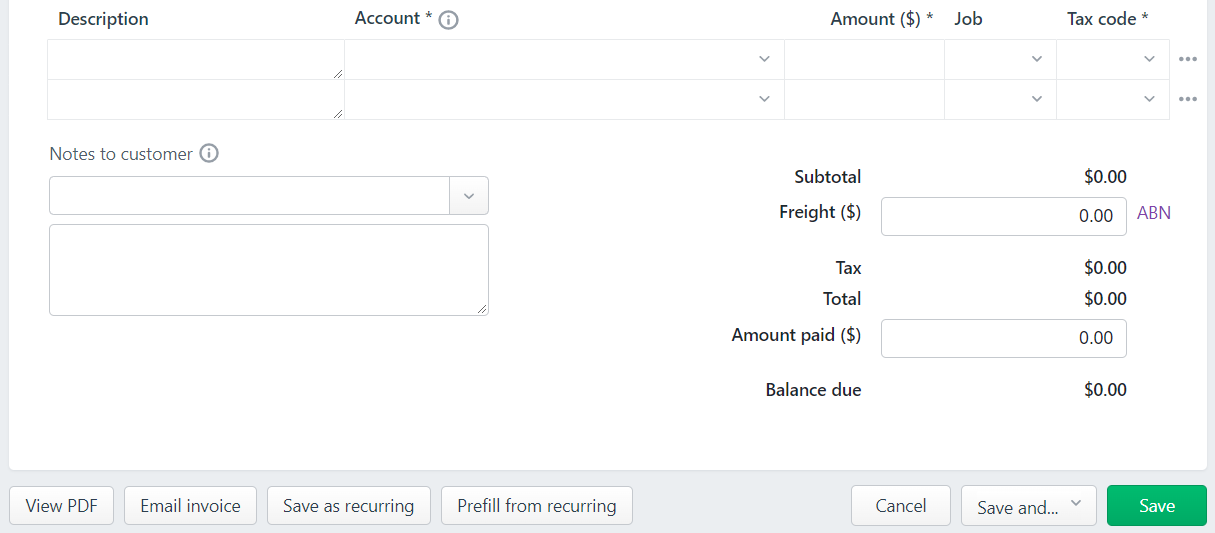
Creating a recurring transaction
![]()
- Go to Recurring transactions (available in the following menus: Sales, Purchases, Banking, or Accounting).
- Click Create recurring transaction and choose the transaction type you want to create.
- Enter the Schedule name.
- Choose the Frequency, such as Daily, Weekly or Monthly.
- If the frequency of the transaction will vary or if you want to save the recurring transaction as a template to use whenever you like, choose a Frequency of Never. You can then create a transaction whenever you need it with many of the details already entered.
- Choose the date you want recurring transactions to start from.
- Indicate how long you want the recurring transaction to continue.
- Complete the details of the transaction that will be created from the recurring transaction.
- Click Save.
Create a recurring transaction from an existing transaction
You may find that it would be convenient to duplicate an existing transaction if it becomes more frequently required. By selecting a recurring transaction outside of its frequency needs, it acts like a template for you to use anytime.
- Find the transaction you want to make a recurring transaction. For example, go to the Sales menu > Invoices or Purchases > Bills
- Select the number of the transaction you want to use as recurring to open it
- Select Save as recurring from the options at the bottom of the screen.
- Clicking Save instead will create the transaction as a one-off from the selected recurring transaction. In this way, you can use a recurring transaction anytime you wish.

- Clicking Save instead will create the transaction as a one-off from the selected recurring transaction. In this way, you can use a recurring transaction anytime you wish.
- Continue as above to create (or use) the recurring transaction.
Create a recurring transaction from an existing recurring transaction
If you have previously created a recurring transaction, you can create another recurring transaction from it. You might do this if the new recurring transaction has similar frequency, transaction details, etc.
When you create a recurring transaction from another recurring transaction, the details from the original recurring transaction are automatically filled in (you can change them if you want).
For example, if you offer the same monthly service to a number of customers, you can create a recurring invoice for one customer and then create additional recurring invoices for other customers, just changing the customer each time.
- If you haven't already done so, create the first recurring transaction, following the steps in 'Create a recurring transaction' above.
- Start to create a transaction as you normally would, for example, go to the Sales menu and click Create invoice.
- Click Prefill from recurring
- Select a recurring transaction
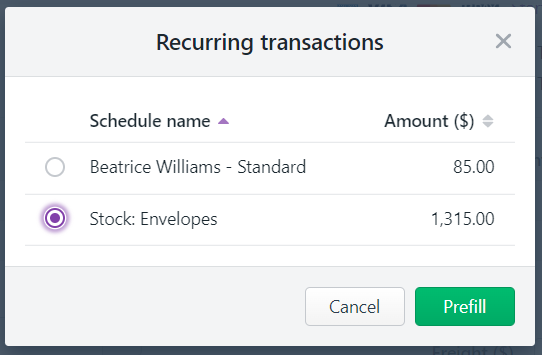
then click Prefill. The transaction is filled in with the details of the recurring transaction you've selected. - Change any details you need to, for example the Customer.
- Click Save as recurring.
View, edit or delete recurring transactions
- Go to Recurring transactions (available in: Sales, Purchases, Banking, or Accounting).
- Click the Schedule name of the recurring transaction.
- If you want to:
- delete the recurring transaction, click Delete.
- Note: Deleting a recurring transaction only removes it from your list of recurring transaction templates. Transactions recorded previously, using this recurring transaction as a template, are not affected.
- make changes to the Schedule details or invoice information, make your changes and click Save.
- delete the recurring transaction, click Delete.
Sending recurring invoices
If you want to automate sending invoices, you can create the invoice, save it as a recurring transaction and give it the appropriate frequency rate. MYOB will process the invoice as scheduled — usually between 7am and 9am and then you can manage the invoice as usual for this client, i.e., email the invoice, or email the PDF attachment.
Finding transactions
MYOB security feature: The Find transactions page is only available for users with the Administrator or Accountant/Bookkeeper roles and permissions.
There are three tabs in Find transactions:
- Debits and credits—a detailed view of transactions including their associated debits and credits and affected accounts
- Transactions—a simplified view of transactions including a description, source journal and amount
- Find and replace—use this view to replace the account or tax code in one or more transactions.
The list includes all transactions received from your bank or imported from a bank statement, as well as all transactions you’ve entered into MYOB.
fdh
How to find transactions
- From the Banking menu, choose Find transactions.
- Click the applicable tab for a simplified view (Transactions tab) or a detailed view (Debits and credits tab).
- Filter the list of transactions as required.
- Choose the Period for the transaction you're looking for. The Date to and Date from dates change accordingly. To enter custom dates, choose Custom as the Period.
- In the Source journal field, choose the appropriate journal. What is this? If you're not sure what journal to choose, then choose All.
- If you're on the Debits and credits tab, choose the Account the transaction was allocated to.
- Enter all or part of the transaction's description or amount in the Search field.
- As you choose filtering options, transactions that meet your search criteria will be displayed.
- Click a transaction's reference number to view its details or edit it.
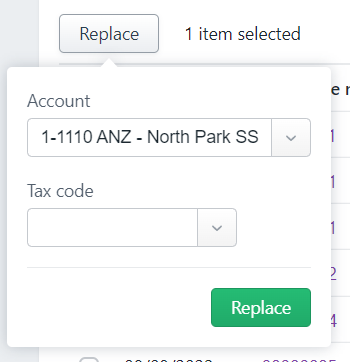
How to find and replace within transactions
Use the Find and replace tab to replace the account or tax code on one or more transactions.
- On the Find transactions page, click the Find and replace tab.
- Filter the list of transactions as required.
- Choose the Period for the transaction you're looking for. The Date from and Date to dates change accordingly. To enter custom dates, choose Custom as the Period.
- In the Source journal field, choose the appropriate journal. What is this? If you're not sure what journal to choose, then choose All.
- If you're on the Debits and credits tab, choose the Account the transaction was allocated to.
- Enter all or part of the transaction's description or amount in the Search field.
- Select the transactions you want to edit.
- Click Replace.

- From the Account and Tax code lists choose a new account or tax code.
- At the time of writing, there is a glitch that doesn't show the tax codes after clicking 'Replace' (it only shows the dropdown for Accounts). If this is the case for you, the fix is to click the Business Name menu, and then Business Settings. When you return to Banking > Find Transactions > Find and replace tab > Replace, you will see two dropdowns.
- (Note: There are times when things don't look right - the solution for this problem was found in the MYOB community - a great resource!)
- At the time of writing, there is a glitch that doesn't show the tax codes after clicking 'Replace' (it only shows the dropdown for Accounts). If this is the case for you, the fix is to click the Business Name menu, and then Business Settings. When you return to Banking > Find Transactions > Find and replace tab > Replace, you will see two dropdowns.
- Click Replace to refresh the Find transactions page with your changes.
Using Source Journals to help narrow your search

You may find it easier to find the transactions by limiting them to the source journal. The following table shows what type of information can be found in each journal.
| In this journal... | ...are these transaction types |
|---|---|
| General | depreciation of assets, year-end adjustments, income distributions |
| Sales | sales made on credit |
| Purchases | purchases made on credit |
| Payroll | employee payments |
| Cash payments | money paid out, for example, purchase receipts, cheque stubs |
| Cash receipts | money received, for example, cash register sales, receipts |
| Inventory | adjustments to the quantity or value of your inventory items |
Transaction reports
We will cover the reporting functions of MYOB later in the topic, but you may find it useful to take a look at the following two reports now:
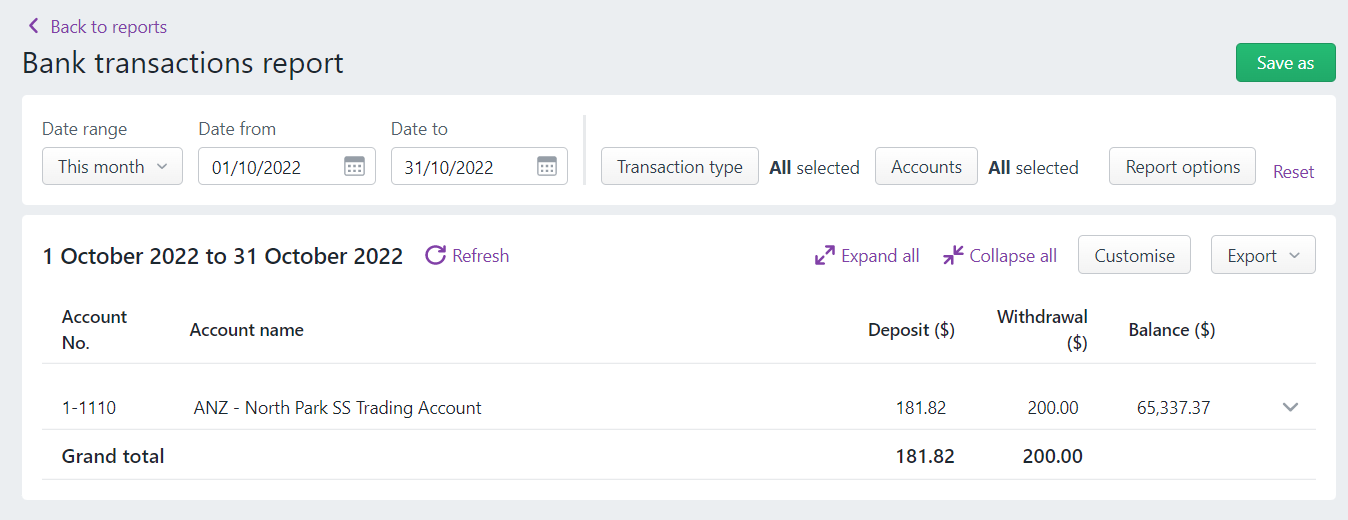
Bank transactions report
This report displays deposits and withdrawals for your selected bank or credit card accounts along with a running balance.
- Go to the Reporting menu and choose Reports.
- Click to open the Banking transactions report.
- Filter the report as required:
- Choose a Date range to report on.
- Choose the Transaction type to include in the report.
- Choose the Accounts to include in the report.
- Click Report options for additional filters.
- Click Save as and complete the prompts to create and save the report.
Coding report
This report lists transactions and whether they are allocated or unallocated within a specified date range. This is a valuable resource to help with reconciliation as it provides a list of transactions to be allocated.
- On the Reporting menu choose the Banking tab > Reports.
- Click to open the Coding report.
- Filter the report as required.
- Choose a date range.
- Choose the accounts to include in the report.
- You may select the option Include allocated transactions.
- Click Report options for additional filters.
- As with most MYOB reports, additional options to Customise and Export a PDF are available as well.
- Click Save as when you are done.
It's important to ensure your accounting software reflects your banking activity. Reconciling ensures that the bank account balances in MYOB match your bank’s records.
Manually reconcile accounts in MYOB.
Follow this procedure for banking accounts that you manually enter transactions into, that is, accounts that don’t have bank feeds, and accounts you don’t import bank statements for.
- Go to the Banking menu and choose Reconcile accounts. The Reconcile account page appears.
- In the Account field, enter the account you want to reconcile. The Last reconciled date for this account is shown.
- For the Statement date, choose the closing date that appears on your bank statement. Only unreconciled transactions dated on or before that date will appear. If you're reconciling as at the end of a week or month, and your statement has transactions dated later, choose the last day of the period you’re reconciling.
- In the Closing bank statement balance ($) field, type the closing balance that appears on the statement your bank sent you. If you're reconciling as at the end of the week or month, and your statement has transactions dated after that date, type the closing balance for the last day of the period you’re reconciling.
- For each entry on your bank statement, select the corresponding transaction on the Reconcile accounts page. The Calculated closing balance will update to show the expected closing balance of the statement based on the transactions marked as cleared in the list.
-
If a transaction on your bank statement hasn't yet been recorded in MYOB, record it now then come back and complete the reconciliation.
If you want to save what you're doing and complete reconciliation later, click Save progress (at the top right). Any transaction selections you've made in Reconcile accounts are saved when you go to other pages.
- When the Calculated closing balance equals the Closing bank statement balance, and there is no Out of balance shown, click Reconcile.
- To save your progress and pick up this task another time, click Save progress. Any transaction selections on the Reconcile accounts page are retained. So if you go to other parts of your MYOB software and return to Reconcile accounts, your selections will still be there.
- You can then print the reconciliation report by exporting the report as an Excel spreadsheet or PDF by clicking Export.
To view your Bank Account Import history:
- Go to the Banking menu and choose Bank transactions.
- Click the Import statement. The Bank statement import history page appears.
- Choose the Bank account you want to view imported statements for. A list of all the statements imported for this account appear.
- If you want to delete an imported statement, click the delete (x) icon for the statement, then click Delete at the confirmation message.
Activity: Banking quiz
Paying suppliers and employees using Electronic Payments (EPs)
You may remember that after recording a payment to a supplier or employee in MYOB, you have the option to transfer the money via electronic payments, which means you can choose to make the payment via bank transfer and then deposit the funds into their account.
Do you remember the benefits of paying via EPs? Take a moment and try and remember before scrolling down to see the answer.

Did you remember that you may choose to use EPs because:
- they are more secure - no cash or cheques to lose or monitor
- cash and cheque payments are becoming rare - cashless payment has become the expectation
- using a computerised accounting system like MYOB, and paying from that software links some of the activities involved, saves time, and is easier to monitor as it creates an audit trail.
Two ways to accomplish electronic payment:
- Pay via bank file - create a bank file (ABA) from MYOB, then upload it to the bank for processing
- Pay via direct payments - using MYOB to generate everything you need to get suppliers and employees paid quickly with less work.
Here are the differences between them:
| Bank file direct | Direct payments |
|---|---|
|
|
*Direct payments availability Only Australian businesses registered as Sole Traders and/or Private Companies with the Australian Business Registry are eligible to apply.
Setting up electronic payments
Before paying via EP, you'll need to get MYOB ready to do so. This information is provided in the previous Topic Purchasing and payments, Supplier and employee payments.
Managing the payment
Eftpos payments normally settle at midnight on the date the designated person settles the eftpos machine. Usually that is the date it will appear on your statement, but sometimes weekends and holidays can delay that.
All credit and debit card payments made on the same day will be grouped and deposited into the settlement account you nominated when you set up online invoice payments. BPAY payments will be individually deposited into that same account.
Because the payments are automatically recorded in your MYOB business, when the bank transactions come into your software (either via bank feeds or an imported bank statement), those payments can be easily matched.
Activities: Managing transactions
MYOB Help pages accessed in this topic:
- Bank statements
- Import bank and credit card statements
- Viewing your bank statement import history
- Creating rules
- Banking
- Learn about general feature changes after upgrading
- Entering bank transactions manually
- Spend money
- Receive money
- Transferring between accounts
- Transferring funds from a bank transaction
- Recurring transactions
- Finding transactions
- Reconciling your bank accounts
- Viewing your bank statement import history
- Setting up electronic payments
- Online invoice payments