About this topic
Welcome to Practice, which sets up the final stage of our immersive journey into Art Pipeline for Games! In this topic, we will shift gears and dive into a practical experience designed to consolidate and refine your rigging and animation skills.
This topic consists of three hands-on rigging and animation tasks and serves as a focused opportunity for you to put everything you’ve learnt into practice, preparing you for the ultimate challenge of this course’s assessment.
Task 1: Rig a leg using IK Setup and FK Setup

In the Rigging topic, you learnt about creating digital skeletons and structures within 3D models.
Practice using your knowledge of joints and handles to rig a leg using IK Setup and FK Setup, as outlined in this task.
- Access Maya: Open Maya on your computer.
- Create Joints for a Leg:
- Open a new scene in Maya.
- Begin by creating joints for the leg, starting from the hip and working down to the foot.
- Position the joints appropriately, ensuring they align with the leg anatomy.
- Add IK Handles:
- Create an IK handle for the leg from the hip joint to the ankle joint to.
- Adjust the IK handle's placement and orientation as needed.
- Create Controls for the IK Handle and the Root:
- Create a control object, such as a circle or square, for the IK handle.
- Position and orient the control object at the desired location, typically near the ankle or foot.
- Create a separate control object for the root of the leg to control its movement.
- Create FK Setup for the Same Set of Legs:
- Create additional joints for the FK setup.
- Create joints that match the joint structure of the leg for the FK setup.
- Position the joints to align with the leg's anatomy, like the IK setup.
- Compare Poses:
- Pose the leg using the IK setup by manipulating the IK handle and control objects.
- Take note of the pose created using the IK setup.
- Switch to the FK setup by hiding the IK handle
- Pose the leg again using the FK joints and observe the differences in the resulting pose.
- Share the Rigged Leg:
- Capture an image of your rigged leg.
- Post the image to the forum thread Task 1: Rig a leg using IK Setup and FK Setup.
- See if images of other’s rigged legs can help you identify areas of improvement in your technique.
Task 2: Create a bouncing ball animation
In the Animation topic, you learnt about keyframing, Maya’s Graph Editor, and timing and pacing. Practice using your skills around controlling the motions of an object to create a bouncing ball animation, as outlined in this task.
- Create a Sphere: Create a sphere object in Maya and adjust the size and position of the sphere as desired.
- Move the Pivot to the Bottom Edge:
- Select the sphere object.
- Ensure the pivot point is at the centre of the sphere.
- Drag the pivot point to the bottom edge of the sphere.
- Animate the Ball Jumping and Moving:
- Select the sphere object and set a keyframe for its initial position.
- Elevate the ball at the desired frame to simulate the jump, setting another keyframe.
- Lower the ball back to the ground, setting a final keyframe.
- Stretch and Squash the Ball:
- Select the ball and access Graph Editor.
- Adjust the curves in the Graph Editor to create a stretch and squash effect during the ball's movement.
- Preview the animation to confirm the desired stretch and squash effect.
Task 3: Create a 32-frame walk cycle
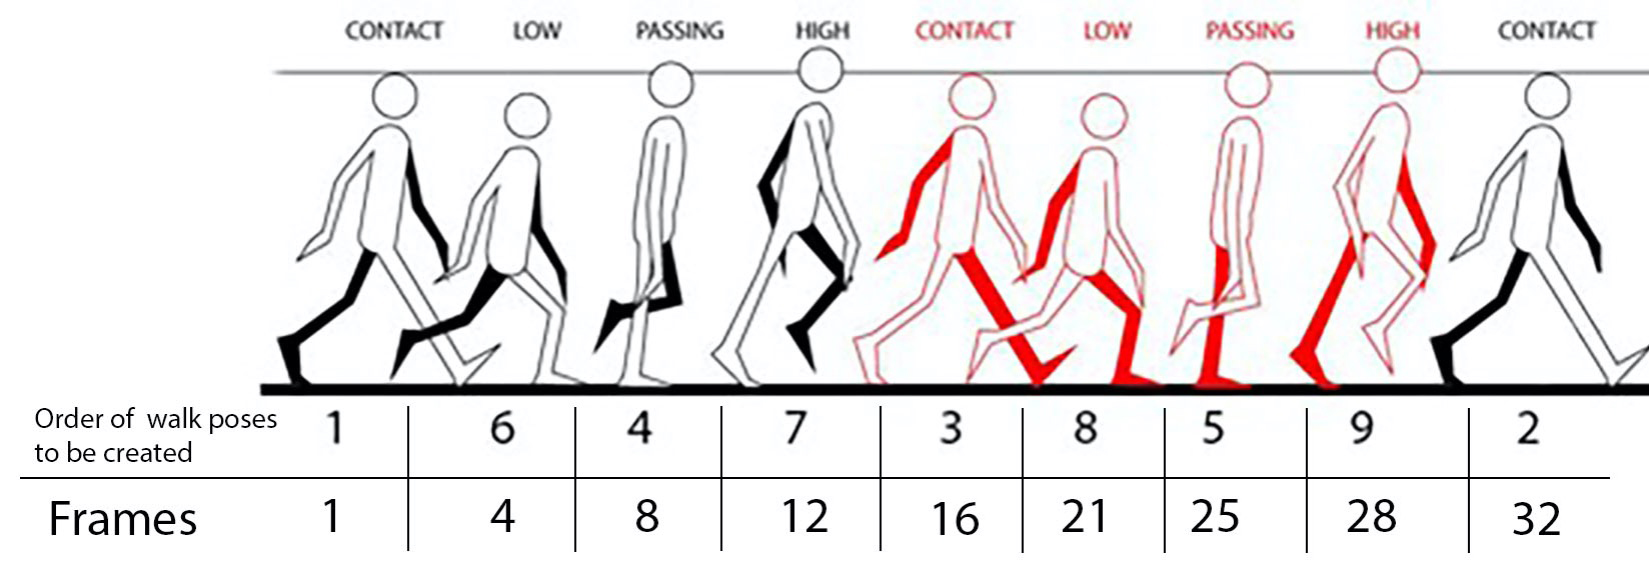
In the Animation topic, you learnt about creating dynamic animation cycles, and how to create walk cycles. Practice using your skills around creating a walking motion with a series of poses and movements, as outlined in this task.
This task is divided into two parts to make it easy to follow. Work through both Part A and Part B.
Part A
- Download the Rig File: Open the rig file in Maya to access the character model.
- Set the Timeline to 32 Frames: Adjust the timeline settings in Maya to have a total of 32 frames for the walk cycle animation.
- Create the First Walk Pose (Contact):
- Identify the first frame of the walk cycle and set the character in a contact pose, where one foot is in contact with the ground.
- Adjust the position and rotation of the character's limbs and body to reflect the contact pose.
- Key All Controls:
- Select all the relevant controls for the character's limbs and body.
- Set keyframes for the initial contact pose by keying the selected controls.
- Create the Same Pose in the Last Frame:
- Identify the last frame of the walk cycle, which should be 32.
- Replicate the contact pose from the first frame to the last frame to ensure a seamless loop.
- Create Pose in Frame 16: Create a mirror image in frame 16 of the poses created in frames 1 and 32.
Part B
- Create Poses in Frames 8 and 24:
- Divide the remaining frames evenly to create poses at frames 8 and 24.
- Adjust the character's limbs and body to create appropriate poses that reflect the different phases of a walking motion.
- Play the Animation:
- Play the animation to preview the walk cycle.
- Observe the character's movement and check for any inconsistencies or issues.
- Fine-tune the Animation in the Graph Editor: Refine the animation by adjusting the curves to smooth out transitions, control timing, and ensure a natural-looking walk cycle.
- Create a Playblast: Generate a playblast of the walk cycle animation to create a preview video.
- Share the Animation:
- Export or save the walk cycle animation file.
- Post your animation file to the forum thread Task 3: Create a walk cycle.
- Review the walk cycle animations of others to compare your own work.
Next steps
Congratulations, you’ve come to the end of this course’s final topic! We hope you've used time here to practise your skills in rigging and animation – the three tasks above have been designed to prepare you for this course’s assessment, where you'll showcase your skills in rigging and animating a biped character’s walk cycle.
We encourage you to engage fully with this topic, using it as an opportunity to refine your skills, and to aim for excellence in your study. Embrace the challenges and creative freedom provided by the tasks, and use them as a launchpad to succeed in the assessment that is coming up.
Remember that practice makes perfect. Push yourself to explore new techniques and approaches, and strive for continuous improvement. Take pride in your game art and let it inspire you to continue your creative journey beyond the confines of this course. By applying what you've learned in Art Pipeline for Games, you can achieve remarkable results for yourself and for the game community.