The following are the key steps to dry and brush a dog safely:
- Remove excess water with towels
- Move the dog to the drying and brushing area and secure it safely
- Dry the dog
- Brush the dog according to work instructions and breed requirements.

Remove excess water with a towel
No matter how hard a dog shakes in the bath, it will still be wet. Dripping water on the floor is a WHS risk. So, remove excess water from the coat while the dog is still in the bath.
First, wring the excess water out of the coat with your hands by gently squeezing the hair all over the body. This is a great way to check all the product has been rinsed from the coat. Re-rinse, if required, and hand wring the coat again.
Next, use a clean, dry chamois to start the towel-drying process. Wring out the chamois as you work to effectively remove water from the coat. Follow up with clean, dry towels to remove as much water as you can from the coat and skin. If you don’t use a chamois, you may need to use several cotton towels to dry a large or heavy-coated dog. You can also towel-wrap the dog in a dry towel to soak up a little more water before blow-drying it.
Completely hairless dogs can be towel-dried and then allowed to air dry. If the dog has long furnishings (patches of hair, typically around the feel and head), use a blow dryer to dry them. Avoid blow-drying the bare skin.
Once the dog has been towel-dried, move it to the drying and brushing area.
Move the Dog to the Drying and Brushing Area

As with moving dogs to the bathing area, it is usually safest for the dog to walk from the bath to the grooming table, rather than you carrying it.
Remove the grooming loop holding the dog to the bath and replace it with a slip lead. Let the dog out of the bath by opening the door, having it walk down a ramp or picking it up and lowering it to the ground yourself. If possible, lower the bathing system to make it easier for the dog to exit.
Make sure the dog steps out onto a non-slip surface to reduce the likelihood of falling over.
If you carry the dog to the drying and brushing area, make sure you use the same lifting and carrying techniques as described in the previous subtopic. You can carry the dog wrapped in a towel to reduce dripping water onto the floor. The towel can be used to help absorb water that is blown from the coat with an HV dryer.
Lift the dog onto the grooming table. Lower the grooming table to make it easier to get the dog on. Replace the slip lead with the grooming loop. Attach the grooming loop to the grooming arm and adjust the grooming arm position to suit you and the dog. You are now ready to dry the dog!
Safety note
Never secure the dog to the floor or let it move under the grooming table. Tables may unexpectedly collapse, move or have a fault causing them to drop suddenly, causing harm to any dog that is under them at the time.

As mentioned in Topic 2, Subtopic 2 - Selecting appropriate equipment, there are several options for drying a dog, which require different equipment and techniques. Once you have towel-dried the excess water from the coat, three of the most common methods for completely drying a dog include:
- Air drying
- Cage drying
- High velocity drying.
Air Drying
Once you have towel-dried the excess water from the coat, allowing the dog to dry on its own is called air drying. It does not require any equipment. It just takes time.
Air drying is only suitable for hairless and very short-coated or smooth-coated breeds. Dogs with longer coats take too long to completely dry, which puts them at risk of a skin condition developing. Damp hair will also tangle more easily than dry hair, making brushing more difficult.
To ensure the coats of longer-coated breeds are fully dry, to the skin, you will need to use a blow dryer.
Blow drying the dog removes all the water from its coat much more quickly than air drying. However, many dogs find the noise of the blow dryers stressful. So, continue to monitor the dog’s behaviour throughout the drying process. Adjust your low stress handling techniques according to the dog’s needs, and use affection and praise to help keep the dog calm and to create positive associations with the drying process.
Give the dog breaks, increase your use of restraint equipment and seek assistance if the dog becomes overstimulated or too difficult to handle safely on your own.
Safety note
Always watch the dog and look for signs of dehydration or heat stress when using a blow dryer. Use the lowest heat setting as practical and avoid aiming the heat and airflow at the same patch of skin for long periods. Give the dog breaks, especially for long drying sessions, and offer water.
Signs of heat stress include:
- excessive panting
- dull eyes
- pale gums
- sticky saliva
- listless behaviour.
If you have any concern for the dog’s wellbeing, stop the dryer immediately and offer water. Seek veterinary assistance if required.
Cage Drying
Cage drying is the process of attaching a dryer to or aiming a dryer at a cage or crate containing the dog. The dryer must be set to a low heat setting, the cage must have excellent ventilation, and the dog must be able to move freely within the cage to ensure the dog does not experience heat stress.
Frequently check on and assess the health and wellbeing of dogs that are in the process of cage drying.
Cage drying is suitable for smooth-coated breeds with short to medium-length hair (AfFORDable Pet Center, Inc. n.d.). Cage drying may also be an option for stressed dogs or those who are fearful of louder blow dryers.
High Velocity Drying
HV drying is great for removing loose hair from all coat types, but especially for double-coated dogs. When drying dogs with long, curly, drop, combination, silky or wavy coats, use the HV dryer to dry the coat, followed by a fluff dryer to style and ‘set the coat’ - preventing it from curling again.
When using an HV dryer, it is good practice to place a towel under the dog. Water blown from the coat will be absorbed by the towel, rather than making the grooming table wet and slippery, or being reabsorbed by a different section of the dog’s coat. The towel also acts as padding and a non-slip surface for the dog.
Happy hoodies are also very useful when using HV dryers, even for dogs that are not particularly anxious, because they reduce the noise for them.
HV Dryer Nozzles
HV dryers have several nozzle attachments. Different nozzles have different uses.
A condenser cone is a cone-shaped nozzle with a round opening. The air tends to come out of this shaped nozzle like a corkscrew. This twisting airflow can cause whip knots in long coats, so the nozzle should be held far enough away not to tangle the hair. The longer the hair, the further away from the skin you will need to hold the nozzle. The smaller the opening, the more likely you will get whip knots.
Flat nozzles are also known as water strippers or spades. The airflow out of flat nozzles is flat and tends to be cooler and quieter than a cone nozzle. Flat nozzles will help straighten coats as you dry. They are available in several widths and lengths. The specific shape to use is typically up to personal preference (Hilley 2013).
Cone nozzles are great for de-matting and removing loose undercoat hair in compact double coats and tightly curled coats. If you see tangles forming when using a cone nozzle, move the cone further away from the coat, turn down the air pressure or use a spade nozzle. Spade nozzles strip water from the coat much faster than cone nozzles. Narrow spade nozzles are great for ‘ironing’ out curly coats, while wide spade nozzles are great for drying coats that are prone to knotting and for styling drop-coats. Wide flat nozzles are much gentler than narrower ones, but it will take you longer to dry the coat.
HV Drying Techniques
When using an HV dryer, it is best to start on the neck using a condenser cone. Always start with the lowest speed setting to allow the dog time to adjust, then build up to as high an airflow as the dog will tolerate. You may need to adjust the air pressure up and down throughout the drying process, depending on the dog and the area you are drying.
As with washing the dog, always start at the neck and work your way towards the tail set. The neck is not generally a sensitive area, and most dogs will tolerate the dryer well in this area. Starting with more sensitive areas, such as the tail region, may cause the dog stress and make them less cooperative.
Work quickly, but only move to the next patch once you can’t see any water spraying out of the coat. Once you have reached the tail set, skip the dog’s head and tail, and return to the neck region.
On this lap of the dog, focus on fully drying and straightening the coat. Hold the condenser cone as close to the skin as you can without the hair tangling. Rapidly move the cone in a very small area. This agitation motion is particularly effective when drying double-coated or short-coat breeds.
Once you see the hair separate rather than clump together, you’ll know it is dry, and you can move to a new patch of the coat. Again, start with the neck and work towards the tail set. Next, dry the front legs, and then the back legs. Dry the head, ears and tail last.
Matted or tangled shed hair tends to look like webbing in the coat. Use the HV dryer to blast shed hair from the coat by aiming the airflow at the base of the ‘web’ and working it out towards the tips of the healthy hair. You can use a brush to help remove the mats and tangles if the HV dryer alone is not enough.
Once the dog is dry, remove the condenser cone and work the dog over one more time, from the neck to tail set, then the legs and finally the head, ears and tail. Hold the open hose as close to the skin as you can. This final lap of drying will set the coat.
When drying the dog’s head, remove the condenser cone and hold the ears at the base. This hold helps to keep the dog’s head still. It also closes the ear canal, reducing the noise of the dryer and the sensation of the air blowing around and into the ears (Verplank 2016).
Watch
The following section of video from How to dry your dog using a High velocity dryer, stand dryer and handheld dryer (3:34 min), demonstrates some key techniques of using an HV dryer.
Touch Test
Regardless of the techniques or equipment you use to dry a dog, you should always use the touch test to check that the dog is completely dry. Damp patches often cause canine hot spots, which are red and sore patches of skin that may ooze fluid or pus and can become easily infected.
To do a touch test, run dry hands over the whole dog and feel down to the skin. The armpits are prone to dampness and are an excellent place to check. If you discover any damp patches, simply dry that section of the dog again.

The Benefits of Brushing
Apart from keeping the coat looking good, brushing is very important for the health and wellbeing of the dog. Brushing helps to remove old, damaged and dead hair and skin cells, promoting a healthier coat and healthier skin. It also helps distribute the natural oils throughout the coat, enhancing its overall health and shine.
Regular brushing prevents the formation of matts because it removes loose hair from the coat and untangles small knots before they turn into matts. It also removes unwanted objects such as grass seeds, which can cause discomfort and infection in extreme cases.
By reducing excess hair, brushing prevents the coat from becoming overly thick and helps the dog maintain appropriate body temperatures. The massaging effect of brushing stimulates good skin circulation, and many dogs enjoy the sensation (RSPCA Australia 2022).
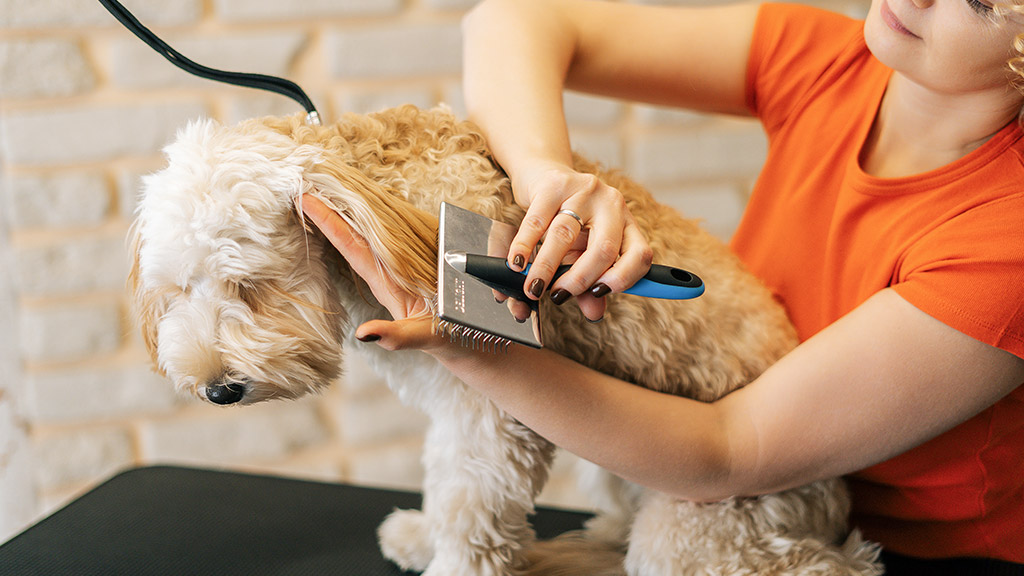
General Brushing Techniques
As with bathing, try to make the brushing process a positive experience for the dog. Using the correct brushing equipment, the right techniques and the right pressure for the dog will help it be a pleasurable experience for them. Using inappropriate brushes, pulling hard at tangles or brushing the hair the wrong way will be uncomfortable or even painful for the dog. When grooming, remember to attend to the entire body of the dog, including the belly and between the legs. Exercise caution when brushing sensitive areas such as the face, ears, toes, and any regions not covered by a thick layer of hair.
Monitor the dog’s behaviour and be respectful of its discomfort. If the dog becomes distressed, give it a break and a chance to calm down before starting to brush its coat again. If the dog is repeatedly or increasingly distressed by the brushing process, it may be best to have the owner come pick it up and complete the task on another day. It is sometimes appropriate not to complete a full brush in a single session. Better to inconvenience the client than to push the dog past its threshold of discomfort resulting in the groomer being scratched or bitten or the dog hurting itself trying to escape.
Knots and Tangles
When brushing a dog's coat, it's important to choose a suitable brush or comb and gently work in the direction of the hair's growth. Start with a soft brush or wide-toothed comb to loosen any tangles, knots, hair or debris, and then switch to a finer tooth comb or brush for more stubborn tangles.
When you come across a knot, hold the base of the tangle near the skin. Comb the knot out by starting at the top, near the tips of the hair and working your way through the knot, towards the skin. Conditioning and detangling sprays are useful to help break up tangles and mats more easily. The more easily you can detangle the coat, the more comfortable it will be for the dog and the quicker the process for you both.
If you find a dense mat, you can use a de-matting tool to break it up. These tools are very sharp, so keep a comb between the tool and the dog’s skin to prevent nicks (Nelson 2023). If the matt is too close to the skin and you can’t break it up by hand, it may be best to carefully shave it off using clippers. Take great care not to touch the skin while trimming close to the tangle or mat (RSPCA Australia 2022).

Examine the Dog’s Coat and Skin while you Brush
While you brush the dog you can assess its coat and skin condition. Pay attention to hard-to-spot areas like between the dog's toes, around the ears, under the armpits and the genital region. These areas are prone to tangles and skin issues. A thorough check can help identify potential issues early on, such as dirty build-up in ears, signs of infection, external parasites like fleas or ticks, mats, grass seeds in the coat, skin diseases such as ringworm (as shown in the following image), and any scratches or cuts, inflamed areas, lumps or bumps that may require veterinary attention.

Ringworm is actually caused by a fungal infection rather than an actual worm. However, the infection typically appears as a red and raised ring on the skin, as though a worm was just below the surface. Ringworm is highly contagious and can easily spread between dogs as well as from dogs to people.
If you suspect a dog has a ringworm infection, let all the staff know. Make sure to wear gloves when handling the dog and make sure to change your gloves and wash your hands once you have finished.
Ticks bury their heads in the skin of the dog to suck their blood. They typically look like little lumps on the skin of the dog (as seen in the following image). On closer inspection, you should be able to see its legs. Ticks are arachnids (have eight legs) and vary in size and colour. They should only be removed with the permission of the client and only if you are confident to do so. Most ticks are fairly harmless. However, several species can cause paralysis in dogs. Always notify the client if you see a tick on their dog.

Fleas, another common external parasite of dogs, are insects (have six legs) that live in the coat and feed on the dog’s blood. You may see adult fleas jumping or moving around in the hair or see tiny pale eggs glued to the hair. You may also see ‘flea dirt’ – dark red-brown or black specks in the coat.
Flea bites tend to make dogs itchy, so you may see them scratching at or nibbling on particular parts of their bodies. Flea bites also cause small welts and redness of the skin.
Mites are tiny arachnids that are typically too small to see without a microscope. They feed on the blood and skin of the dog. Almost all dogs have small numbers of Demodex mites, a type of mite that lives in or near hair follicles, particularly around the head and paws. A normal, healthy immune system keeps these mites under control.
Sarcoptes mites tend to infest the edges of the ears, elbows, wrists and hocks of dogs. Dogs have a very itchy allergic reaction to both the mites themselves, and their faeces.
Both Demodex and Sarcoptes mites cause mange in dogs – skin inflammation (hot and red skin) and hair loss. A veterinary must complete a skin scaping and example the sample under a microscope to accurately diagnose a mite infestation.
Ear mites, as the name suggests, infest the ear canals of dogs. Symptoms of an ear mite infestation include:
- “Skin irritation in and around the ears
- Scratching around the ears, head, and neck
- Head shaking
- Dark and waxy ear discharge
- An unpleasant odour from the ears” (NexGard, n.d.b)
Ear mites also require a veterinary diagnosis with a microscopic examination of a sample.
Mites are highly contagious and spread easily between dogs. They can also spread to humans. However, in most cases, dog mites only cause mild skin irritation in people.
Remember, it is not your place to diagnose any health concerns. However, always inform the client of your observations and strongly recommend that they see a veterinarian for an accurate diagnosis and treatment plan.
Examine the dog's nails to assess their length and health. If the nails start touching the ground when the dog stands or walks, they are too long and need trimming. Pay attention to the dew claws as well, as they can cause problems if excessively long, potentially injuring the pad or becoming damaged themselves. Dew claws don't naturally wear down and may need more frequent trimming than the nails on the toes. If a nail trim is not part of the work instructions for that dog, make a note of your assessment on the dog’s record. you may need to suggest to the client that they get their dog’s nails trimmed in the near future.

Lastly, take the opportunity to inspect the dog's teeth. Dental and gum disease can be common and lead to pain, discomfort and serious health issues. Addressing any dental problems early on is crucial for the dog’s wellbeing.
Signs of dental and gum disease include:
- Yellow or brown patches on teeth
- Loose or missing teeth
- Excessively bad breath
- Red, swollen or bleeding gums
- Excessive drooling, “ropey” or pink saliva (Lake Cross Veterinary, n.d.)
Again, if a teeth clean is not part of the work instructions, make a note of the condition of the dog’s teeth for future reference (RSPCA Australia 2022).
Specific Brushing Techniques
Stretch Drying
Stretch drying is a combination drying and brushing technique that involves brushing while you dry the coat. The purpose of stretch drying is to straighten the coat in preparation for styling or clipping. You can use either an HV dryer or a fluff dryer, depending on your personal preference, the type of coat, and the specific needs of the dog.
To achieve the best results:
- Start drying the coat as you normally, using whichever type of blow dryer you prefer, until the coat is mostly dry. Use a detangling brush to brush the coat in the direction of the hair growth as you dry it.
- Once the coat is mostly dry switch to a fluff dryer on a low heat and low speed setting.
- Brush the mostly dry coat with a slicker brush against the direction of the hair growth with the dryer blowing on the hair you are brushing at the time.
- Once the whole coat has been thoroughly dried and brushed with the slicker brush, turn off the dryer. Using a standard or wide-toothed comb that is most appropriate for the dog’s coat type, brush through the entire coat again in the direction of the coat. Brush through the entire coat a second time with the comb, but against the direction of hair growth to ensure the coat is lush and full. If the coat has been properly dried and detangled, the comb should run smoothly through the coat without getting caught.
The low heat helps ‘set’ the coat straight. As you dry, remember to brush each part of the coat using quick, light strokes (1-4 strokes per second). Choose a slicker brush with pins that match the length of the dog's coat.
Start by working on the shorter sections of the body coat and gradually move towards the dog's head. Then, proceed to dry and fluff the rear legs, followed by the front legs, the head, ears, and finally, the tail. It's crucial not to move on to the next section until the current one is entirely dry, free from mats, and fully straightened. If you encounter a stubborn mat during stretch drying, take note of it and address it later after you finish drying the entire dog (Verplank 2016).
For most breeds, brush against the direction of growth of the hair to straighten it. However, for drop-coated breeds, always brush in the direction of the coat to ensure a smooth finish.
Safety note
When brushing the dog's head, be gentle and use your finger or thumb to cover each eye. This protects the dog from accidental scratches, especially since slicker brushes can be quite sharp (Verplank 2016).
Watch
The following section of video from How to dry your dog using a High velocity dryer, stand dryer and hand held dryer (2:30 min), demonstrates the technique of stretch drying as well as discusses some benefits of using a stand dryer.
Line Brushing
Line brushing is a brushing technique that ensures the full thickness of a dog’s coat is free from tangles. It is a particularly effective method of brushing for dogs with double, heavy, drop or curly coats. Line brushing with a slicker is a great way to de-shed the coat while using a pin brush will give the coat a smooth finish.
To line brush a coat, separate the hair to expose a neat line of skin. You then brush all the hair along the line until all knots are gone. Then, draw a new line about a finger-width higher than your previous line and brush out the new line. Repeat until you have worked the entire coat. It is easiest to start at the dog’s belly and work your way up in small patches.
Line brushing can be very time-consuming, so it can help to have the dog lay down on a padded mat to prevent fatigue and fidgeting.
Watch
Line brushing a double-coated Shetland Sheepdog is demonstrated in the following video, Line Brushing Tutorial: Double Coated Breeds (3:55 min).
Brushing Dogs With Long or Drop Coats
When brushing long-haired dogs, choose brushes with longer bristles and combs with wide teeth. If using a slicker brush, use medium pressure and ensure you are brushing all the way down to the skin.
Line brushing can be useful for these types of coats to make sure you locate and remove all tangles. Starting at the dog’s feet, lift small sections of the hair to brush underneath it and work your way up the dog. Hold the hair sections closer to the skin from where you are brushing to prevent painful pulling on the skin (Nelson 2023).
Finish long coats with a pin brush to protect the fragile hair from breaking, and a hemp bristle coat for a smooth finish. You should be able to run a metal comb easily through the entire coat.
Use the same techniques for brushing the long furnishings on hairless dogs.
Brushing Dogs With Double or Heavy Coats
Double-coated breeds such as the Samoyed, Australian Shepherd and Siberian Huskie, have a dense layer of soft fine hair beneath a coarser layer of longer hairs. The double coats make these breeds prone to matting, necessitating regular and thorough grooming to remove the thick undercoat hair. Removing dead and loose hair through bushing, also called de-shedding, reduces matting and helps air get to the dog’s skin.
Thorough bathing and HV drying help to loosen and remove dead hair. Brushing the dog once its coat is fully dry will get rid of any remaining loose hair. Undercoat rakes, slickers, wide tooth combs and de-shedders are designed to access the heavy undercoat below the top layer of a double or thick coat. When using these grooming tools, it is crucial to employ short and gentle strokes, avoiding pulling too hard or scraping the dog's skin. Bristle brushes and grooming mitts can also be useful for finishing off grooming the outer coat.
When brushing a double- or heavy-coated dog, start with brushing through the undercoat and then gradually work through to the outer coat. For short-haired double-coated breeds such as the Labrador Retriever, Miniature Schnauzer and Corgi, start with a slicker brush to brush and remove tangles from the undercoat. When brushing long-haired double-coated breeds such as the Pomeranian, Pekingese, and Rough Collie, it is more effective to use line brushing to ensure all tangles are removed. Use an undercoat rake to brush the undercoat, followed by a wide-tooth comb to eliminate tangles. You can use a detangling spray to help break up the more stubborn knots.
As with other coat types, most of the brushing should follow the direction of hair growth. However, gently brushing the hair of the undercoat backward away from the skin, and then in the direction of hair growth can help loosen the hair further, especially if brushing in the direction of hair growth alone is insufficient to remove excess undercoat hair.
To complete the brushing process of a double-coated dog, use a bristle brush or grooming mitt to remove any loose hairs and smooth the coat in the direction of hair growth (RSPCA Australia 2022).
Brushing Dogs With Combination or Silky Coats
You will need a few different brushes to brush a dog with a combination coat. Make sure to select a brush with wires approximately the same length as the hair on the section you are brushing. Always brush in the direction of the hair growth.
Starting at the head and working towards the tail, use short strokes with a slicker brush to remove the dead undercoat hairs and tangles from the longer outer coat. Under the tail is the prime area for tangles. Remember to change to a brush with short wires to accommodate the shorter hair and use gentle strokes in this sensitive area.
Line brushing is an effective method for brushing out the longer sections of hair. Use one hand to support the hair so that you don’t pull on the skin.
Once you have worked the whole coat, use long strokes of the slicker brush to smooth out the coat. Then, end with long strokes of a pin brush or wide-toothed comb to remove any remaining loose hairs and give the coat a smooth shiny finish. Start with the head, ears and neck. Work your way along the flanks of the dog to the croup. Gently comb out the feathering on the abdomen and legs. Finally, comb out the underside of the tail and the tail itself (Zsolt 2013).

Brushing Dogs With Fluffy, Curly or Wavy Coats
Depending on the look the client has requested, it is often best to brush and fluff a curly coat as you dry it. Use the line brushing technique with a slicker brush for these coat types. Make sure to choose a brush with a pin length that matches the length of the dog’s coat. Follow the line brushing with a metal comb to locate any knots and tangles you may have missed (Nelson 2023).
The following image shows the difference in appearance of a Pomeranian before (left image) and after (right image) brushing with the correct equipment and technique.

Brushing Dogs With Short or Smooth Coats
Short-haired or smooth-coated dogs do not need a lot of brushing. Choose a bristle brush with short, soft bristles or a silicon brush and use gentle to firm pressure. If the breed is also double-coated and requires de-shedding, use a rake with short pins or a de-shedding tool. When brushing the undercoat, use short gentle strokes and don’t brush the same area more than three times. It is easy to cause brush burn and bald spots in these breeds (Nelson 2023).
Brushing Dogs With Wiry Coats
For trimmed or short-coated, wire-haired dogs, use a slicker brush or a silicon brush with gentle pressure to remove loose undercoat. Brush out long furnishings (the longer accent hairstyles on wire coats, such as the moustache, eyebrows and skirt) to remove and prevent tangles. Use an undercoat rake to help remove the dead undercoat in double-coated breeds. Finish with a metal comb.
Longer or untrimmed wire coats may require hand stripping to remove the dead hair from the topcoat and to keep the skin and coat healthy and looking great. Brush the dog gently with a Coat King stripping comb or a stripping knife in the direction of the hair growth, to prevent discomfort for the dog.
Watch
In the following video, Hand Stripping an Irish Terrier - Dog Grooming Tutorial (4:41 min), the groomer demonstrates the use of a stripping knife.
Hand stripping is a big commitment for the dog’s owner. The grooming routine must be strictly adhered to because stripping must be done within the dog’s natural hair cycle of growth. Hand stripping is easiest to do and pain-free for the dog when it is done at the end of the hair lifecycle. In other words, when the hair is ready to come out. The length of the hair life cycle varies between breeds.
If there is too long a period between hand stripping sessions, or if the dog is clipped instead of stripped, the hair can change in texture, becoming softer and harder to strip. The strict grooming schedule and the expense of hand stripping (it takes significantly longer to hand strip a dog compared to clipping it) are off-putting for many owners. As a result, hand stripping is now considered a specialised art amongst groomers and is not offered by many services.
Monitor the Dog’s Behaviour
As with bathing and drying, monitor the dog’s behaviour during the brushing process. Continually assess its arousal level and emotional state. Give the dog breaks, especially if the brushing stage is prolonged or there are serval mats that need attention. Adapt your low stress handling techniques to suit the dog in each moment, using praise, affection and possibly even food rewards to ensure a positive experience for the dog at all times.
Increase your use of restraints, as appropriate and seek help if required.
Complete the following five (5) activities to check your knowledge and understanding of the key concepts of this topic. You may repeat this activity as often as you like. Use the arrows to move between the different activities.