Power is the ability to exert force in the shortest period of time (Physiopedia, n.d.). The main difference between strength and power training is that strength training works on your ability to overcome resistance, while power training works on your ability to overcome resistance as quickly as possible. For this reason, the main difference between strength training and power training is the velocity at which exercises are performed.
Power training is a training approach that has a high level of transference to most sports, which require athletes to produce rapid movements like acceleration, jumping, and change of direction. Power training is also highly relevant for athletes who need to impart force rapidly on an object (such as striking or throwing a ball or other object) or another person in a contact sports situation.
ACSM suggests that the ability to express high rates of force development and high-power outputs are critical performance characteristics central to success in most sporting events. ACSM identifies three key variables that are of primary importance for sports requiring strength and power. These variables are:
- Maximum Strength
Strength should be considered one of the foundational elements required for the development of power based on contemporary literature where stronger athletes are reported to express higher power outputs. One explanation for this relationship relates to the fact that stronger individuals are able to generate forces significantly faster than their weaker counterparts (at the same weight). - Power Output
An increase in strength does not automatically translate immediately to an increase in power (especially in well-trained populations). Once athletes have established adequate strength levels, they need time to accommodate a transfer to increased power. They do this by incorporating specific power training approaches (i.e. plyometrics, complex and contrast training) that are used to optimise power development that transfers to athletic performance. This essentially revolves around an increase in the speed at which they complete exercises. - Maximal Rate of Force Development
Essentially, how quickly force can be produced. This is thought to be the underpinning mechanism behind the expression of power in sports. Given that the mass of an athlete doesn’t change much and the force they can produce is a gradual process, increasing the rate of force development in key movements is a key focus for athletes (Bellon et al, 2016).
To understand the main training attributes that contribute to maximal power output, it is important to understand the basic definition of power and how it is mathematically calculated. Mechanical power (measured in Watts) is often referred to as the rate at doing mechanical work is performed under a given set of conditions and is calculated by multiplying force by velocity.
Power = Force x Velocity. This means power can be improved by increasing either force (strength) or velocity, or by using a mixed-method approach. For example, a mix of heavy strength training alternated with explosive exercises.

To maximise power development, a combination of unloaded and loaded (up to 90%1RM) exercises can be used to enable athletes to work throughout the entire power continuum to maximise power output (as well as enhance programme variety). The aim of all power training is to encourage athletes to move as fast as possible but always with appropriate form and control (Physiopedia, n.d.).
When programming for power training, resistance is typically lower than for strength training and movement velocities are higher. The velocity of a given exercise will be dependent on the amount of resistance being worked against. Power training will follow strength training in a well-designed periodised programme. This usually begins with the adaptation of strength exercises by increasing the tempo of the concentric phase of a lift while maintaining a slow and steady eccentric phase. This approach will then give way to plyometric movements involving fast eccentric (loading) and concentric phases.
Different forms of power-training
Explosive power lifts
Explosive power lifts, also known as Olympic lifting, are weight training movements done at high velocities. The focus is usually on the concentric part of the lift and can be applied to most standard resistance exercises. However, a few key exercises have been developed to focus exclusively on power development. These include the hang-clean and Olympic lifts like snatch and clean and jerk. These lifts are usually done with considerable weight and have complex techniques that need to be honed before external loading is increased.
Plyometrics and loaded plyometrics
These exercises typically revolve around jumping but can also be performed on the upper body (with the hands as the contact point). Plyometric exercises utilise the stretch-shortening cycle (a concept whereby muscle and tendon tissue can store energy during the quick eccentric phase to be used in the concentric phase). Loaded plyometrics refers to the addition of load (or weight) to plyometric exercises. Maximal jump squats or split lunges with dumbbells or a power bag.
Ballistic training
Based on maximising the acceleration of an object while minimising the deceleration phase. This often involves throwing a weighted object like a medicine ball, but can also involve jumping while holding (or swinging) a weight. For example, continuous jumping while holding a trap bar or jumping while swinging a weighted club or kettlebell. The difference between loaded plyometrics and ballistic training is that ballistic training is usually repeated continuous reps, whereas loaded plyometric exercises are usually maximal single efforts.
Complex (contrast) training
This method involves alternating heavy lifts with plyometric exercises. Ideally, the exercises should move through similar ranges of motion. An example of this would be doing a set of heavy back squats (80-95% of 1RM) followed by a set of maximal vertical jumps. This method uses the post-activation potential phenomenon (PAP).
Contrast loading
This is where the same exercise is performed with different loads and velocities. Most commonly a heavy lift set is performed first (85-95% 1RM) followed by a set performed with 30-60% 1RM. The heavy lift is performed at normal tempo, with the lighter lift done as fast as possible.
Velocity based training
Uses specialist equipment like accelerometers which can be placed on equipment to provide immediate feedback on velocity (and power output) achieved during a repetition. This equipment is used to ensure velocities are maximised for every working repetition. The use of this equipment has been shown to increase lifting, leading to enhanced power output within training sessions (Keller et al, 2014).
Overriding principles of strength training
The following are the overriding principles of strength training from a resistance training perspective.
| Overriding principles | Description |
|---|---|
| Load | Wide-ranging loads depending on the approach used (from bodyweight to 90% 1RM). |
| Rest | Rest requirements can vary significantly due to various load levels, typically between 2 and 5 minutes. |
| Lower Training Volume | Power training aims for maximal effort on every repetition, resulting in generally lower programmed volume and the need for full recovery between sets. |
| Repetitions and Sets | A wide range is used, but power training typically involves lower repetition counts, high intensity, and longer rest periods, similar to strength training. |
| Order of Exercises | Compound or multi-joint exercises are prioritized, followed by specific single-leg approaches if sport-specific. The majority of exercises target multiple large muscle groups to maximize power production. |
| Tempo | Power repetitions are generally faster than other resistance training modes, focusing on moving the resistance or body as fast as possible, driven by athlete's intent for maximum power development (Ambler, 2021). |
Benefits of power training
Whether you are working with an athlete seeking to improve their sports performance or someone looking to enhance everyday activities, power training has a lot to offer. Let's learn about how it can help your clients become stronger, faster, and more agile while contributing to muscle growth and injury prevention.
Improves power
This is because power training recruits higher force-producing muscle fibres. Similar to strength training, power training targets high-threshold motor units (fast twitch fibres). These motor units produce more force, and quickly, which are the key components of a powerful contraction.
Improves the magnitude and velocity of force production by utilising sensory receptors to your advantage
When a muscle is stretched quickly, as in the eccentric phase of plyometric training, muscle spindles respond by causing contraction of the same muscle which can be harnessed in a powerful concentric contraction phase.
Improves rate coding (speed of contraction of muscle)
This refers to the speed at which the CNS can activate motor units. This can enhance reaction time and speed off the mark for athletes but also has benefits for everyday living tasks such as navigating a busy street and reacting quickly and powerfully in dangerous situations. This could be anything from reacting to a child’s actions in dangerous environments or improving your own dynamic balance, reducing your own fall risk.
Improves performance
Depending on the training approach, power training can have a positive performance effect on speed, agility, acceleration, jump distance, both vertical and horizontal, as well as a number of throwing, kicking and striking movements from throwing or hitting a ball to punching/kicking an opponent in combat sports.
Improves muscle shape, definition and size
This form of training targets fast-twitch fibres. These are the fibres primarily responsible for muscle growth and definition. Another contributing factor is that power training creates mechanical and metabolic stress in muscles which increases the levels of anabolic hormone secretion leading to increased protein synthesis.
Improves the strength and resilience of connective tissue
Specifically, tendons, ligaments, fascia and joint capsules which reduces the risk of injury from sprains and strains. This is not only through repeated stress of resisted exercises but also due to helping improve landing mechanics, during plyometrics, which has been specifically indicated in reducing knee injuries in athletes.
The potential for human strength
When placed in competition the key strength lifts of bench press, squat, and deadlift are known as “powerlifting”. These are maximal strength tests.
Power as a measure of force over time is essentially a measure of wattage. However, these kinds of measures are usually reserved for machine-based anaerobic activities like cycling, rowing, etc. Let’s start exploring the human potential for power in the following three categories.
- Olympic lifting
- Jumps
- Throws.
1. Olympic lifting
Olympic weightlifting focuses on two major lifts overhead using approved techniques. These lifts are clean and jerk and snatch. They are very technical and involve mastery of technique. Just like strength measures, there are two ways in which to measure Olympic lifts, absolute weight lifted and relative weight lifted. The following are the world records for these two lifts, both absolute and relative, for men and women between the years 2006-2021.
| Current World Records for Olympic Weightlifting | |||
|---|---|---|---|
| Lifts | Snatch | Clean and Jerk | Combined Total |
| Men’s absolute | 225kg Lasha Talakhadze – Georgia (2021) |
267kg Lasha Talakhadze – Georgia (2021) |
492kg Lasha Talakhadze – Georgia (2021) |
| Men’s relative | 139kg lifted at 56kg bodyweight (2.48 x b/w) Wu Jingbiao - China (2015) |
166kg lifted at 55kg bodyweight (3.01 x b/w) Om Yun-chol – North Korea (2019) |
294kg lifted at 55kg bodyweight (5.35 x b/w) Om Yun-chol – North Korea (2019) |
| Women’s absolute | 148kg Li Wenwen - China (2021) |
187kg Li Wenwen – China (2021) |
335kg Li Wenwen – China (2021) |
| Women’s relative | 98kg lifted at 48 kg bodyweight (2.04 x b/w) Yan Lian – China (2006) |
119kg lifted at 49kg bodyweight (2.42 x b/w) Saikhom Mirabai Chanu – India (2021) |
213kg lifted at 49kg bodyweight (4.34 x b/w) Hou Zhihui – China (2021) |
2. Jumps
This is a record of much debate! There are a lot of people who claim to have produced a vertical jump of over 50 inches (127cm) online, however, the highest recorded and verified vertical jump in a test-standardised competition was 47.1 inches (119.634cm) by American footballer Josh Imatorbhebhe in 2015.
Watch the following video of Josh Imatorbhebhe’s world-record standing vertical jump.
There are a couple of different ways to measure vertical jump. Standing vertical jump is the most common, but another world record stands for a box jump. This record is held by Christopher Spell who had his 170cm jump verified by the Guinness Book of Records in 2021.
The following video is of Christopher Spell’s standing remarkable box jump.
At the NFL combine in 2015 Center back Bryan Jones set a new world record for the broad jump of 3.73m.
Check out the following video of Bryan Jones’ world-record broad jump in action.
3. Throws
While other power-orientated records are not as routinely tested, the overhead medicine ball throw is a common test. American Decathlete Bryan Clay recorded a throw of 23.68m with a 4.5kg medicine ball at a US Army testing session in 2006. There was no video evidence of this throw, however, here is a video of NFL wide receiver Andre Johnson throwing an even heavier ball (5.5kg) 22m in 2017.
Andre Johnson's extraordinary medicine ball throw, covered an astounding distance of 72 feet. This astonishing display of strength and power will leave you in awe.

For clarity, power training will be divided into two distinct categories:
- Resisted Power Training
- Plyometric Training.
1.Resisted Power Training
This form of training is where a client performs explosive exercises against an external resistance (usually a weighted object). Common external loading tools used in this form of training include barbells, dumbbells, medicine balls, power bags, weighted vests and trap bars to name a few.
Frequency
The first step in determining how often a client should perform power training is how long it takes to recover from power training sessions. Power training has a high impact on the nervous system and research has shown that the nervous system can take between 48-72 hours to recover from such stimulus (Bosse, n.d.). This suggests that power training could conceivably be done 2-3 days a week (depending on other fatiguing training being done).
Intensity (load) and tempo (velocity)
The difficulty in prescribing power training exercises is that no definitive loading ideal has been determined from research. Research into ideal loading for power improvement has yielded a number of different results but researchers have agreed that load strategies need to differ depending on specific goals of the training phase. This indicates that rather than there being a single loading, repetition and set allocation to optimise power in an athlete, there is more of a spectrum of approaches. Resisted power training can therefore be further split into different categories (with slightly different goals). Sarabia et al (2017) and Walker (2017) suggests these categories are:
Strength orientated power-training (lower velocity)
Typically, over 70% of 1RM loading applied. This would be used in the first step of transition from strength training to power training phase of training. Obviously, heavier weight results in less lift velocity (less than 0.75 m/s)
High velocity power or strength-speed training
70%1RM loading. Thought of as the peak power training zone. This lighter weight allows contraction velocities of between 0.75 - 1 m/s).
Speed orientated power training
30%-40% of 1RM load. Very high velocity exercises (may involve leaving the ground). This light weight allows even faster velocities of between 1 –1.3 m/s)
The choice of approach will ultimately depend on the phase of training, the specific goals of the training phase and the requirements of the sport the client is involved in. As we have already discussed, the key to power training is the intent (and ability) to move a resistance as quickly as possible. A balance needs to be reached between activating enough motor units to elicit significant improvements in neuromuscular activation and choosing a weight that allows for optimal speed of contraction. If a weight is too heavy, speed of contraction is lost, if a weight is too light, motor unit activation (force) is reduced. This is known as the force-speed continuum and is represented by the force-velocity curve (more on this to come soon). It is therefore suggested that power training programmes progressively move from heavier loads to lighter loads and lower to higher contraction velocities (i.e. work on motor unit activation first, then the speed of firing).
Recent research suggests that loading should ideally be individualised for clients and based more on velocities of movement achieved at certain loads (using accelerometers). This means rather than a set load percentage of 1RM, it may be better to find the maximum weight that can be lifted in an exercise while still being able to achieve optimal contraction velocity. The recent advancements in technology have allowed trainers to be able to track velocities. Walker (2017) provides details of these ideal contraction velocities for each power training approach in the table below:
This allows a trainer to select a power training focus, and then find an ideal weight based on the maximum weight that a client can use while achieving the optimal contraction velocity. As an example, if the focus for a client was to work in the speed-strength zone, a trainer would experiment with loads between 30-40% of 1RM load to find a weight where the client can achieve a velocity close to 1.3m/s (using an accelerometer). This method allows for individual differences in clients as the focus is on velocity of the contraction, rather than a nominal percentage of 1RM, therefore this is a more individualised approach.
Volume (sets and repetitions and rest)
Due to the different approaches for power training, it is difficult to arrive a single recommendation for the number of sets, repetitions and rest duration for power training. Polson (2017) compiled the latest recommendations from three powerhouses in sport science (NASM, ACSM and NSCA) and came up with the following suggested volume parameters for power training:
| VOLUME GUIDELINES FOR POWER TRAINING | ||
|---|---|---|
| Strength orientated power training | Speed orientated power training | |
| Sets | 3-5 | 3-5 |
| Reps | 3-6 | 6-10 |
| Rest | 2-5 minutes | 2-3 minutes |
Variety
Due to time crunched athlete training and competition schedules many trainers will have their clients perform short, targeted strength and power phases of training, then move to a contrast training approach (where strength and power training approaches are alternated in the same session). This often involves super-setting a traditional strength set of an exercise, with an explosive version of the same exercise. An example of this for squats may be:
1-5 repetitions of barbell squats @ 85-100% of 1RM followed by 8-10 repetitions of jump squats with 30-40% of 1RM squat load.
2. Plyometric power training
Plyometric training involves quick, powerful movements performed in a series of reactive exercises involving an eccentric contraction followed immediately by an explosive concentric contraction. Common plyometric movements include bounds, hops and jumps. Like power training methods, plyometric movements need to be progressively trained with an initial focus on technique (both of movements and landing). Plyometric activities involve body weight loads and the harnessing of ground reaction forces (i.e. pushing off the ground).
The following guidelines for plyometric training variables come from the National Academy of Sports Medicine (NASM).
Frequency
2-3 sessions a week. Plyometric exercises are best performed in a fully rested state, so at least 48 hours is recommended between sessions. The fatigue status of an athlete plays a key role in the effectiveness of the program and an athlete’s ability to produce peak power.
Intensity
While plyometric exercises generally use bodyweight as resistance there is still an intensity progression associated with exercises. An example of this is provided by Suchomel et al (2019) using plyometric jumping exercises as an example. Not only does this indicate different levels of intensity, but it also suggests the base level of strength a client should have before attempting these exercises, e.g. before attempting depth jumps from a 30cm box a client should be able to squat at least 1.5 x their bodyweight.
Volume
This is dependent on your training experience with plyometrics. The volume of a plyometrics training session is often expressed in ground contacts (each time you land/catch). Early research indicated volumes of up to 200 contacts a session, however, more recent research suggests less than this as each repetition of a plyometric exercise should be performed at maximal intensity. The risk of too many repetitions is that the session becomes more of an endurance, rather than explosive power session. Most research agrees that repetitions for a plyometric exercise should be in the range of 3-8 repetitions for between 3 and 6 sets, with few sources suggesting up to 10-12 repetitions may be acceptable for advanced athletes. NSCA recommends the following total session contacts for different levels of experience:
| Level | Contacts Range |
|---|---|
| Novice | 80-100 contacts |
| Intermediate | 100-120 contacts |
| Advanced | 120-140 contacts |
Rest
A work:rest ratio of between 1:5 and 1:10 is recommended for recovery between sets. This means if a set of 6 box jumps takes you 20 seconds to complete, you would need between 100-200 seconds rest before starting the next set. The range for rest exists as some plyometric exercises are more taxing than others. For example, a set of bounds or hops might only require a 1:5 work:rest ratio, whereas a set of maximal box jumps might need a 1:10 ratio.
Training velocity
All plyometric exercises should be performed at 100% intensity, or maximal velocity. The focus is definitely on quality of individual repetitions, rather than volume.
Variety
There are a lot of ways to add variety into plyometric exercises, but like any form of training, the more specific it is to the demands of the sport that your client is involved in, the better. For example, a basketballer or netballer may benefit from explosive medicine ball chest throws, but this exercise would have little relevance to a sprinter. Inclusions of unilateral vs bi-lateral exercises and used of implements for throwing etc should be based on the requirements of the sport.
Considering the insights from resisted power and plyometric training, the following programming variables should be applied when working with clients of varying training experience during a power or plyometric training session:
| Training variables | Strength-orientated Approach | Strength-Speed Approach | Speed-orientated Approach | Plyometric Approach |
|---|---|---|---|---|
| Number of exercises | 4-8 exercises per session | 4-8 exercises per session | 4-8 exercises per session | 2-3 exercises |
| Load | 70-90% of 1RM | 50-70% of 1RM | 30-40% of 1RM | bodyweight |
| Repetitions | 3-6 | 3-8 | 6-10 | 3-8 Novice –80-100 total contacts Intermediate: 100-120 total contacts Advanced: 120-140 contacts. |
| Sets | 3-5 | 3-5 | 3-5 | 3-6 |
| Rest intervals | 3-5 minutes | 3-4 minutes | 2-3 minutes | 1:5 – 1:10 work-to-rest ratio |
| Velocity | 0.5-0.75 m/s | 0.75-1 m/s | 1-1.3 m/s | as fast as possible |
Take a look at the following video of the muscular power guidelines.
Applying progressive overload in power training
Power training should be a progression that follows a meaningful strength training phase. However, it is often difficult to determine when an adequate strength level has been achieved and when a shift in training emphasis to include more specialised power development strategies should occur. What is known, is that athletes with greater squat strength (e.g., 2 x body weight) express higher power outputs than their weaker counter parts in vertical and horizontal jumping activities, which indicates the more strength an athlete has, the better their potential for transference to power.
So, your client has completed a meaningful period of strength training and you are about to begin a phase of power training. The next step would be to help the athlete transition towards higher velocity power training techniques by starting with a strength-orientated approach.
Step 1: The strength-orientated approach
This can involve simply adding more velocity to common strength exercises by adjusting tempo of the lift. A common approach to this style of training is to perform a controlled eccentric phase of a repetition, pause for a 2 count, then perform an explosive concentric phase. This approach uses repetition, set and rest volumes similar to strength training but will be done at a slightly reduced weight (70-80%1RM is common).
The shift to a power training approach may also benefit from the learning of some new exercise techniques that are designed to harness power. These include lifts like the hang and power clean, the clean and jerk, and snatch. These techniques are complex and are usually learned in a progression. It is necessary to work on the technique of these lifts for some time with first a bar and then progressive loading through to the desired loading range). As a client nears the end of their strength training phase, some technique work could be done on these explosive lifts to ready the client for their use under load.
Step 2: Increase velocity
This involves reducing the load to 50-70% to allow for greater velocity of contraction. Once again, this could be adjusting the tempo of common gym lifts, or utilising the newly learned power training techniques. The key to this approach is moving the resistance as quickly as possible.
Step 3: Speed/maximal velocity
This is where the power gains you have made using strength and power training methods is transferred to speed (making it relevant to athletic performance requirements). In this progression you will see exercises chosen with specificity in mind. More unilateral exercises for running and jumping athletes, more specialised exercises utilising equipment like medicine balls for throwing sports and upper body power. The load during this phase drops even further so that maximal contraction velocities can occur. This may also be where faster eccentric loading phases start to be used to harness the stretch-shortening mechanism for more explosive concentric contractions.
Step 4: Plyometrics
This phase targets maximal explosiveness using bodyweight as the resistance.
According to the Athlete’s Authority (n.d.) anyone new to plyometrics should work through the following continuum:
- Learn how to land
Think stepping off a box and landing strongly in an athletic position (hips back, knees slightly bent). - Learn how to jump (concentric)
Think sitting on a box and rising to jump or pausing at the bottom of a squat for 2 seconds then jumping explosively. Then move into counter movement jumps (eccentric loading followed by concentric phase). - Learn how to jump and land with a change in location
Two foot first (e.g. broad jumps, lateral jumps) then single leg jumps (hurdle hops etc). - Learn to jump and land continuously
Multiple jumps, hurdle hops and bounds - Learn to rapidly absorb force and jump
Depth jumps, multiple jumps/hops for maximum distance
The Athlete Authority (n.d.) also suggests the following frequency and volume:
| Training Phase | Exposures/wk | Contacts per Exposure | Example exercises |
|---|---|---|---|
| Eccentric absorption | 3-4 | 50-70 | Tall to short landing (drop squat), Altitude landing (from box) |
| Concentric production | 3-4 | 50-70 | Squat jump, Sit to squat jump |
| Jump integration | 2-3 | 40-60 | Broad Jump, Single hurdle jump |
| Continuous jumps | 2-3 | 30-50 | Continuous hurdle jump, Mini hurdle hops |
| Shock method | 1-2 | 20-40 | Depth Jumps, Multiple hops for distance |
In summary, plyometrics should start with bi-lateral exercises with a focus on correct technique in movements (and landing), before progressing onto unilateral exercises and those involving rapid change in direction. Plyometric exercises can also be graded in terms of intensity, so exercise progression should go from lower to higher intensity. Mac (n.d.) suggests the following intensity categories for common plyometric exercises.
Please note: reference to intensity does not relate to how hard a client performs the exercise, but rather how much load the exercises put on the body. All plyometric exercises should be performed with maximal intensity.
Effective Training Strategies for Athletes with Time Constraints
Due to restricted timelines in athlete training schedules, it is common to see forms of contrast training used in sessions. This will involve combining step 1 or 2 exercises with step 3 or 4 exercises (often using a super set approach). These types of approaches allow for maintenance of strength, while speed/velocity is trained. It is also thought to target the post-activation potential phenomenon (PAP) where a heavy load contraction can precipitate a more powerful contraction immediately after (due to high activation of the nervous system).
Watch the following video, Plyometric Progression, which shows the recommended progression for starting a client off with plyometric training. It covers the progression from establishing the correct landing form through to the performance of an explosive eccentric/concentric exercise (countermovement jump).
Skills targeted by different plyometric exercises
Not only do plyometric exercises come at different intensity levels, but they also target different aspects of sporting performance. The table below shows what performance skills can be enhanced by the different exercise approaches:
| Skills Built by Plyometric Exercises | ||||||
|---|---|---|---|---|---|---|
| Skill | Jumps in place | Standing jumps | Multiple jumps | Box drills | Bounding | Depth jumps |
| Start speed | ✓ | ✓ | ✓ | ✓ | ||
| Acceleration | ✓ | ✓ | ✓ | |||
| Change of direction | ✓ | ✓ | ✓ | ✓ | ||
| Vertical jump | ✓ | ✓ | ✓ | ✓ | ✓ | |
| Horizontal jumps | ✓ | ✓ | ✓ | ✓ | ||
Contrast training
While it is not suggested that plyometric training sessions are performed on the same day you have already trained a muscle group using heavy resistance training, it appears training both modalities within the same session can be very effective (not only from a time perspective but from a performance one also). This is where contrast training comes into play. Contrast training is a method that combines both heavy lifts and explosive plyometric exercises in the same session. These can be performed one after each other, or in a super-set approach. The preferred order of exercise sees a heavy lift performed first, followed by a plyometric exercise. This approach is thought to maximise the post-activation potential phenomenon (PAP), where a heavy resistance lift can increase the force production of the next activity using the same muscle groups (via enhanced neural activation). The effect of contrast training was shown by Adams et al (1992) who compared a lower body strength and plyometric-only approach to a contrast training approach. The subjects in this experiment completed their squat, plyometric jump, and contrast (squat and jump) programmes for 6 weeks and the results showed that the contrast training group had the largest improvements in vertical jump by quite some distance. The strength-only approach improved their jump height by 3.3cm, the plyometric group by 3.81cm, and the contrast group by 10.67cm! This shows that a contrast training approach may be very beneficial to improving some explosive sporting skills, however, this type of training is advanced and should only be used by athletes with extensive experience in both modalities and a very high strength base.

The following section will look at the technique and suggested progression for a number of commonly used power training exercises. Please be aware that these techniques are somewhat complex and need repetition to be performed well. It is strongly suggested that in addition to watching and reading the material to come and practising these techniques, you seek opportunities to attend practical seminars and coaching on the performance, delivery and coaching of these techniques before introducing them to clients.
The following information covers the starting movements and initial progressions towards the key Olympic lifts.
The technical pointers and coaching tips have been taken directly from the NSCA “Basics of Strength and Conditioning Manual” written by Sands, Wurth and Hewit (2012).
Before we go through the different lifts and their variations watch the video of the front rack position, which pertains to the start or the finish of many of the lifts.
“The Clean” progression
Watch the following video called “Clean Variations” which goes through three options for a full “Power Clean”. This includes the Hang High Pull which is a great starting point, the “Hang Power Clean” which is the next progression, and the full “Power Clean” which is where the bar comes from the floor.
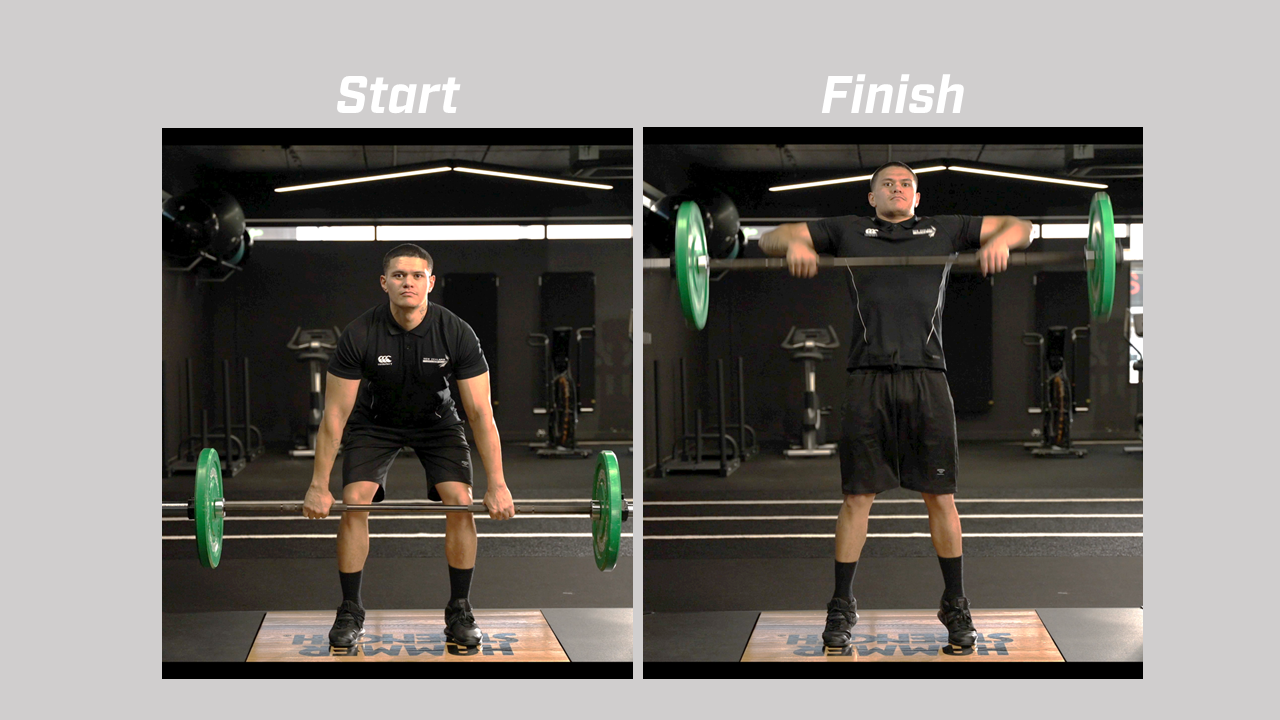
Hang high pull
Exercise Objective: Develop the ability to express explosive power in the hips and legs
Start Position
- Approach the bar resting on the floor or platform so the shins make contact
- Place feet hip-width apart with toes pointed straight ahead
- Keep back flat and shoulder blades pulled together, and squat down to grasp the bar
- Grasp the bar with a pronated grip slightly wider than shoulder-width with arms straight and elbows pointed out
- Head remains in a neutral position looking forward throughout the entire lift
- Lift bar smoothly off the floor to just above the knees
- Stand erect with shoulders, hips, and knees in alignment, and the bar held at arm’s length on the top part of the thighs.
Procedure
- Take a deep breath to fill the chest with air and engage the core
- Keep back flat and shoulder blades pulled together
- Lower the bar to the top of the knees by flexing at the hips
- In the load position, shoulders should be in front of the bar, back flat, arms extended with elbows pointed out, hips flexed, knees slightly bent (not locked out), and weight on the heels
- When the bar reaches the top of the knees, immediately extend hips, knees, and ankles to achieve triple extension and accelerate the bar upward
- Simultaneously extend onto the balls of the feet and shrug shoulders straight up
- Keep the bar close to the body with arms straight and elbows pointed out until the body is fully extended
- Pull the bar up to mid-chest height by flexing the elbows out and keeping them above the bar.
- Lower the bar in a controlled manner by keeping elbows slightly flexed, sitting into a quarter squat position, and landing the bar on the thighs.
Coaching Points
- The bar should be pulled up in a straight path, close to the body
- Avoid “throwing” the head and shoulders back to complete the lift
- Once comfortable with the movement, aim to use as much velocity as possible
- Stand erect in the start position before each repetition
- Avoid pulling with the arms before attaining complete extension of the hips.
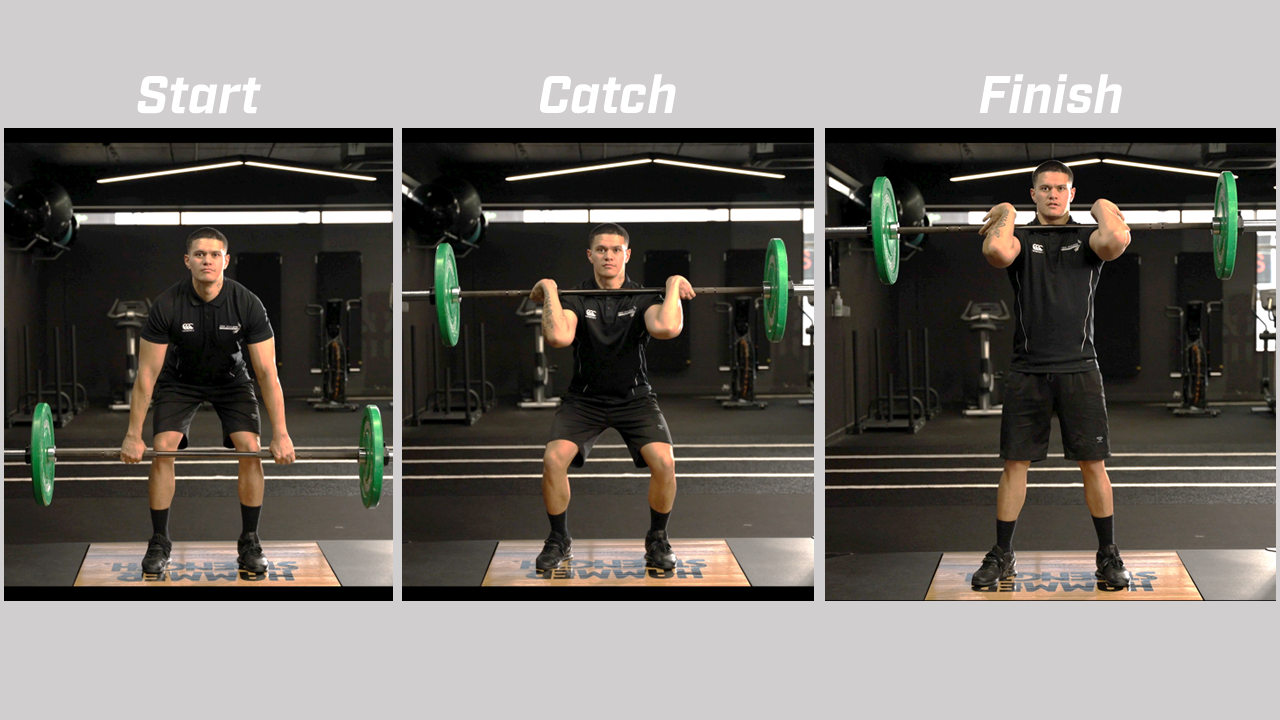
Hang power clean
Exercise objective: Develop explosive power in the hips and legs and teach the athlete to utilize the stretch-shortening cycle
Start Position
- Approach bar resting on the floor or platform so the shins make contact
- Place feet hip-width apart with toes pointed straight ahead
- Keep back flat, shoulder blades pulled together, and squat down to grasp the bar
- Grasp the bar with a pronated grip slightly wider than shoulder-width with arms straight and elbows pointed out
- Head remains in a neutral position looking forward throughout the entire lift
- Slowly extend hips and knees to elevate the bar to just above the knees
- Keep the bar close to the body and extend hips as the bar passes the knees
- Stand erect with shoulders, hips, and knees in alignment and the bar held at arm’s length touching the top part of the thigh
Procedure
- Take a deep breath to fill the chest with air and engage the core
- Keep back flat, and shoulder blades pulled together
- Lower the bar to the top of the knees by flexing at the hips
- In the load position, shoulders should be in front of the bar, back flat, arms extended with elbows pointed out, hips flexed, knees slightly bent (not locked out), and weight on the heels
- From the load position, explosively extend hips, knees, and ankles to achieve triple extension and accelerate the bar upward
- Simultaneously extend onto the balls of the feet and shrug shoulders straight up
- Keep the bar close to the body with arms extended and elbows pointed out
- Transition feet to slightly wider than hip-width, keeping them in a 30” x 36” box, and quickly pull the entire body under the bar
- Flex hips backward and sit into a quarter squat position to absorb the weight of the bar
- Quickly rotate elbows down and then up ahead of the bar to catch it on the front portion of the shoulders
- Catch the bar in the athletic position (½ squat depth).
- Stand erect with feet flat on the ground and shoulders directly over the balls of the feet
Coaching Tips
- The bar should be pulled up in a straight path, close to the body
- Use the triple extension through the ankles, knees, and hips to generate force
- Aggressively drop under the bar when it’s in the ‘floating position’
- Stand erect in the start position before each repetition
- Avoid pulling with the arms before attaining complete extension of the hips.
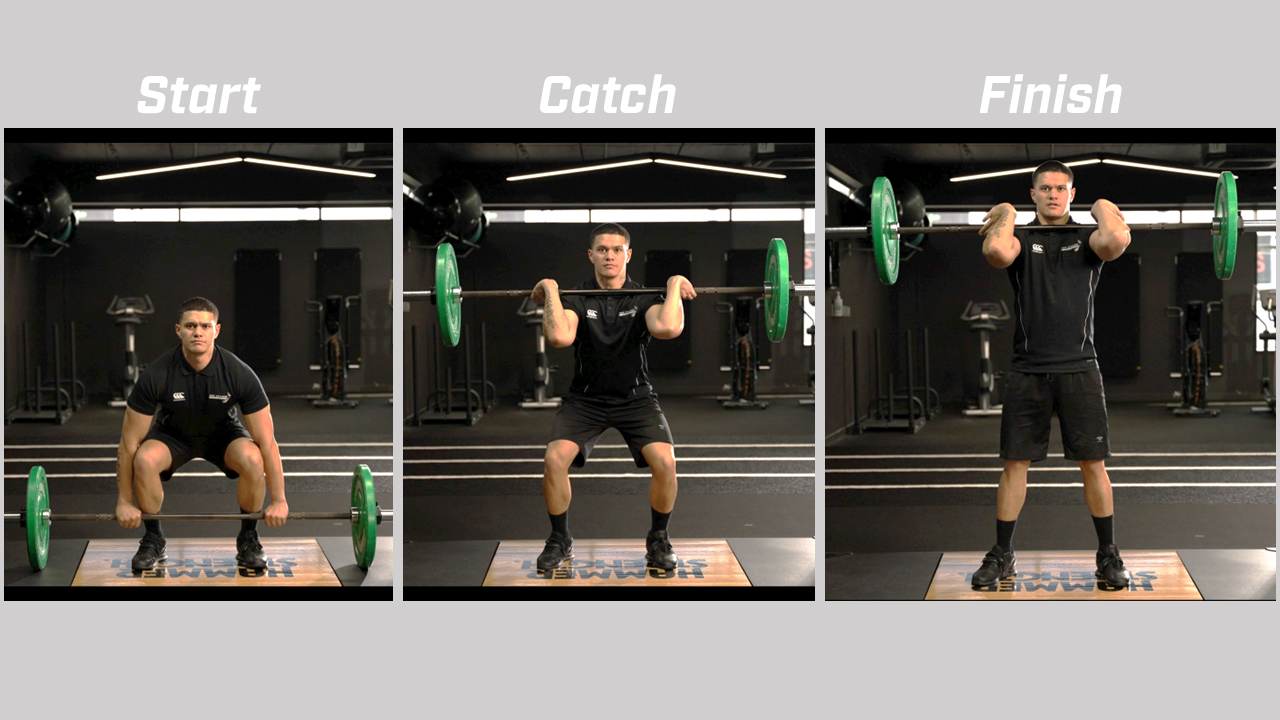
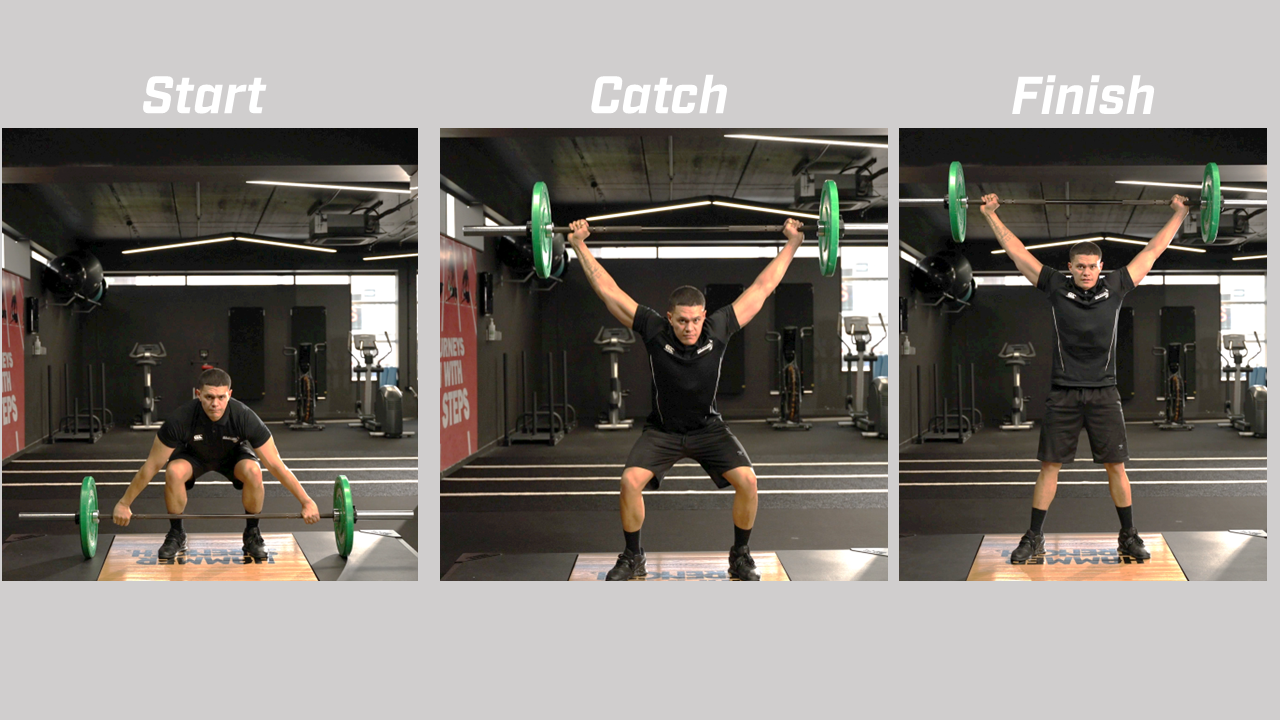
Power clean
Exercise Objective: Develop the ability to express explosive power through the whole body.
Start Position
- Approach the bar resting on the floor or platform so the shins make contact
- Place feet hip-width apart with toes pointed straight ahead
- Keep back flat and shoulder blades pulled together, and squat down to grasp the bar
- Grasp the bar with a pronated grip slightly wider than shoulder-width with arms straight and elbows pointed out
- Head remains in a neutral position looking forward throughout the entire lift
Procedure
- Take a deep breath to fill the chest with air and engage the core
- Keep back flat and shoulder blades pulled together
- Smoothly lift the bar from the floor gradually accelerating it as it passes the knees
- When the bar reaches the top of the knees, immediately extend hips, knees, and ankles to achieve triple extension and accelerate the bar upward
- Simultaneously extend onto the balls of the feet and shrug shoulders straight up
- Keep the bar close to the body with arms straight and elbows pointed out until the body is fully extended
- Pull the bar up to mid-chest height by flexing the elbows out and keeping them above the bar.
- Quickly rotate elbows down and then up ahead of the bar to catch it on the front portion of the shoulders (front rack position)
- Catch the bar in the athletic position (½ squat depth).
- Stand erect with feet flat on the ground and shoulders directly over the balls of the feet
Coaching Points
- The bar should be pulled up in a straight path, close to the body
- Avoid “throwing” the head and shoulders back to complete the lift
- Once comfortable with the movement, aim to use as much velocity as possible
- Drop under the bar as dynamically as possible, shooting the elbows through
- Stand erect in the start position before each repetition
- Avoid pulling with the arms before attaining complete extension of the hips.
Overhead press progression
Watch the following video called The “Overhead Pressing Movements” which goes through the Push Press, the Push Jerk and the Split Jerk movements.
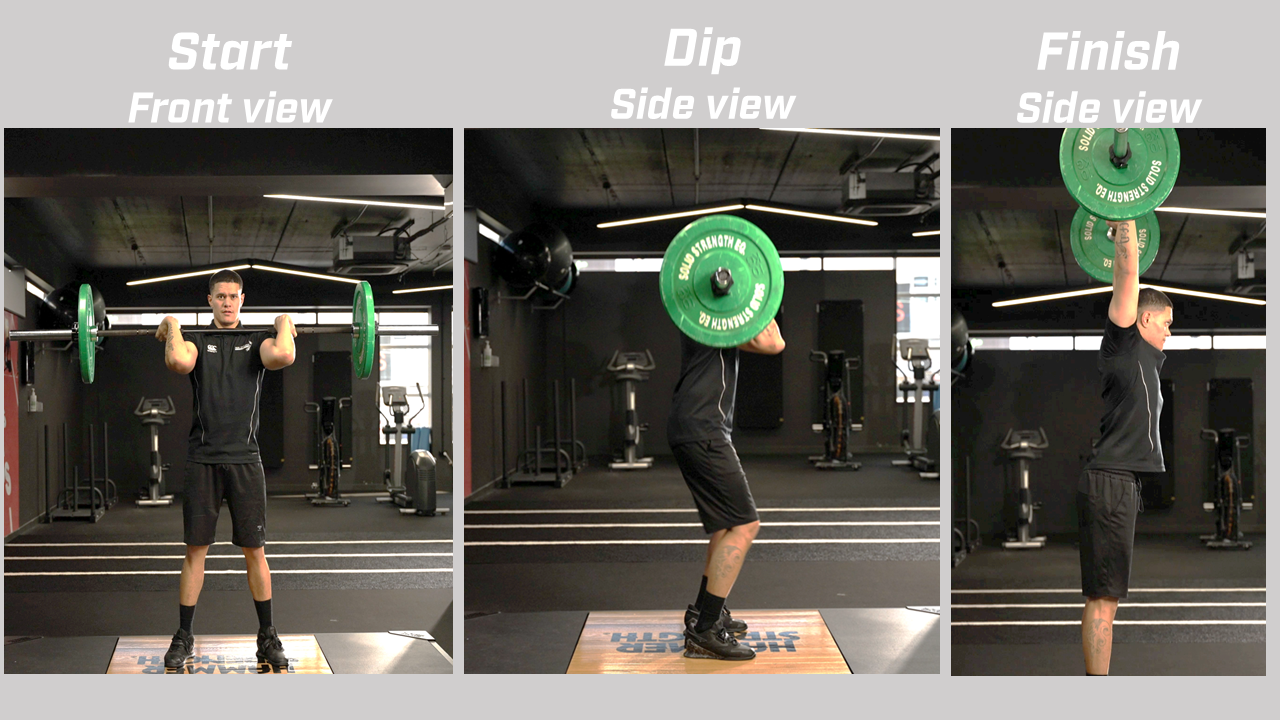
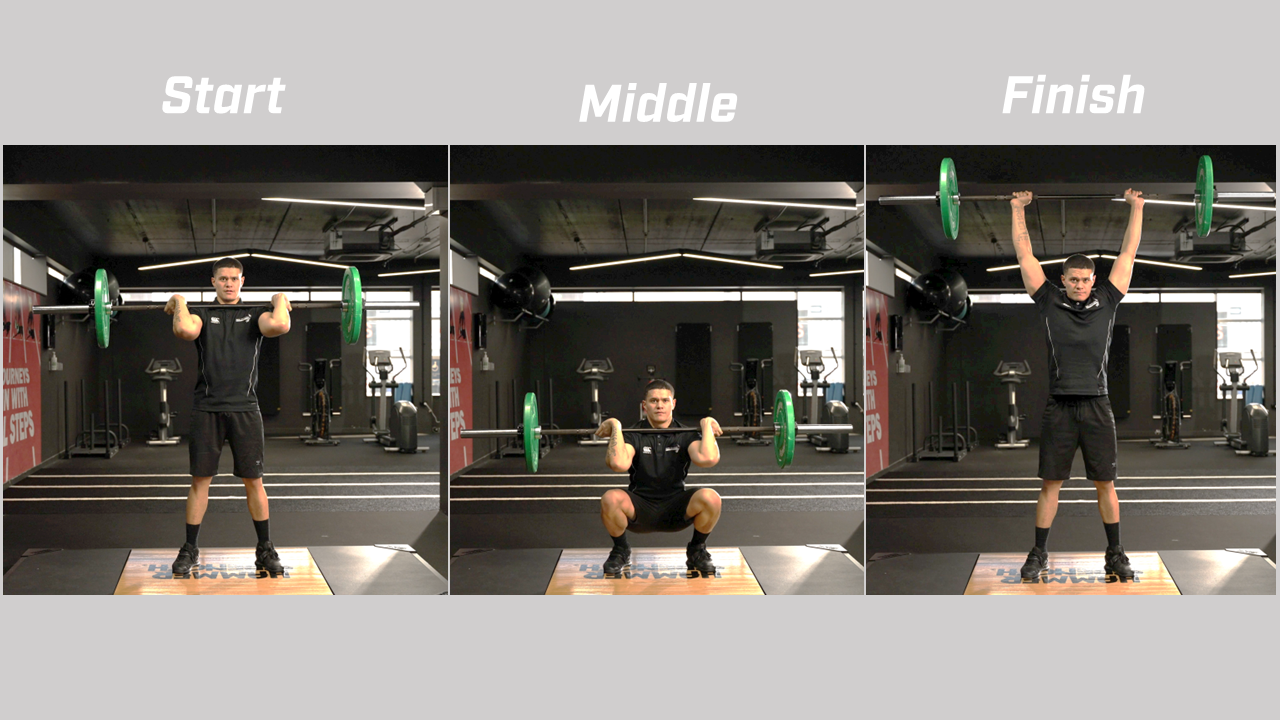
Barbell push press
Exercise Objective: To develop explosive power in the hips and legs as well as increase power in the shoulders (while stabilising overhead loads).
Start Position
- Set the bar at a height that is comfortable for lift-off
- Place hands evenly on the bar, slightly wider than shoulder-width, with a pronated grip
- Position the bar in the front rack position with elbows high and the bar over the collarbone
- Stand erect and take one or two steps back to position your body in the centre of the rack
- Place feet hip-width apart, toes pointed straight ahead, and slightly flex hips and knees with the weight centred on the feet
- Head remains in a neutral position looking forward
- Engage the core to stabilize the body and prevent arching the back
Procedure
- Start the movement in the front rack position.
- Dynamically dip into the athletic position (¼ squat) by pushing hips back, flexing knees, letting the torso come forward, and transfer the weight onto the heels
- Explosively extend hips, knees and ankles (triple extension) to accelerate the bar upward
- Drive the bar vertically by extending arms completely, pressing it overhead
- At the top of the lift, the bar should be slightly behind the ears with elbows completely extended and in line with the shoulders and hips
- Arms and legs extend at the same time
- Extend hips and knees to stand erect
- Lower the bar to the front rack position in a controlled manner
Coaching Points
- Keep the upward movement as explosive as possible
- There should be no pause at the bottom of the initial countermovement quarter squat before explosively extending the weight overhead
- Ensure you fully extend at the top of the movement (the push jerk is where you drop under the bar)
- Engage the core to prevent arching the back.
Barbell push jerk
Exercise Objective: To develop explosive power in the hips and legs as well as increase power in the shoulders (while stabilising overhead loads).
Start Position
- Set the bar at a height that is comfortable for lift-off
- Place hands evenly on the bar, slightly wider than shoulder-width, with a pronated grip
- Position the bar in the front rack position with elbows high and the bar over the collarbone
- Stand erect and take one or two steps back to position your body in the centre of the rack
- Place feet hip-width apart, toes pointed straight ahead, and slightly flex hips and knees with the weight centred on the feet
- Head remains in a neutral position looking forward
- Engage the core to stabilize the body and prevent arching the back
Procedure
- Start the movement in the front rack position.
- Dynamically dip into the athletic position (¼ squat) by pushing hips back, flexing knees, letting the torso come forward, and transfer the weight onto the heels
- Explosively extend hips, knees and ankles (triple extension) to accelerate the bar upward
- Drive the bar vertically by extending arms completely, pressing it overhead
- At the top of the lift, the bar should be slightly behind the ears with elbows completely extended and in line with the shoulders and hips
- As the bar accelerates vertically drop under the bar and catch it in the athletic position.
- Extend hips and knees to stand erect
- 8. Lower the bar to the front rack position in a controlled manner
Coaching Points
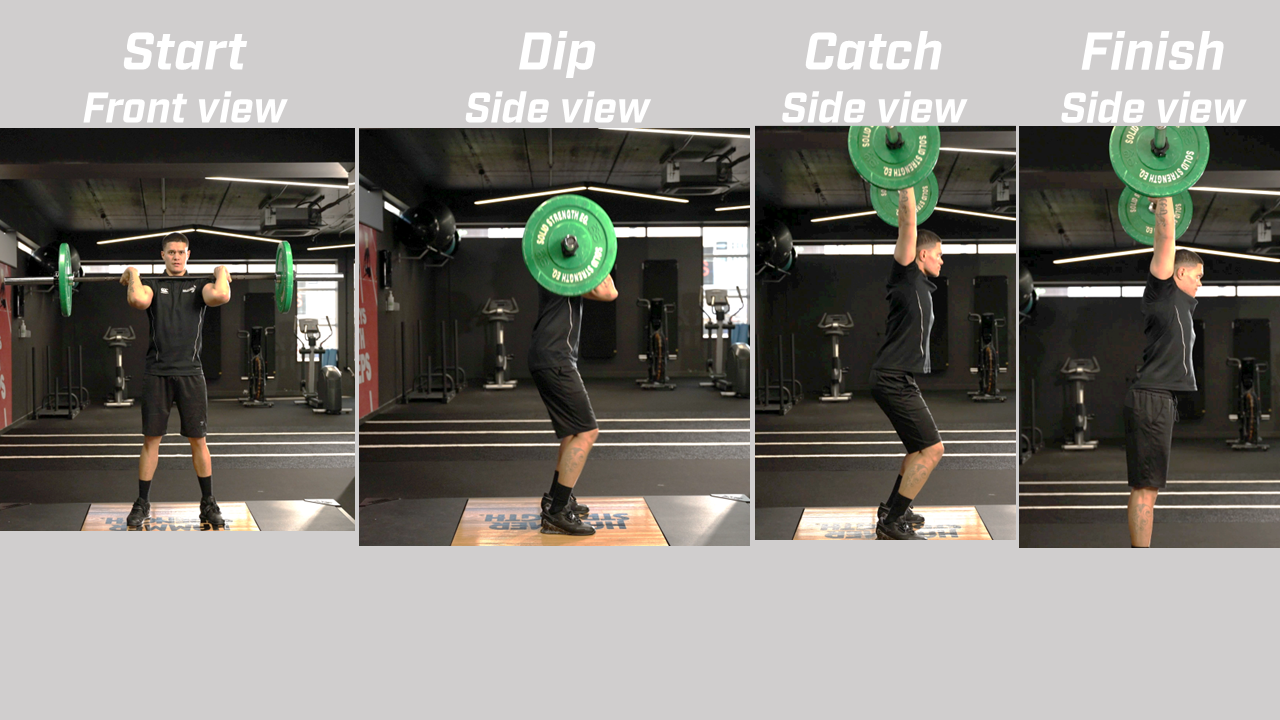
- Keep the upward movement as explosive as possible
- There should be no pause at the bottom of the initial countermovement quarter squat before explosively extending the weight overhead
- Ensure you drop under the bar and catch it with soft knees (this is what makes it different from the push press)
- Engage the core to prevent arching the back.
Barbell split jerk
Exercise Objective: To develop explosive power in the hips and legs as well as increase power in the shoulders. Also to improve balance and stability in a split stance position.
Start Position
- Set the bar at a height that is comfortable for lift-off
- Place hands evenly on the bar, slightly wider than shoulder-width, with a pronated grip
- Position the bar in the front rack position with elbows high and the bar over the collarbone
- Stand erect and take one or two steps back to position your body in the centre of the rack
- Place feet hip-width apart, toes pointed straight ahead, and slightly flex hips and knees with the weight centred on the feet
- Head remains in a neutral position looking forward
- Engage the core to stabilize the body and prevent arching the back.
Procedure
- Start the movement in the front rack position.
- Dynamically dip into the athletic position (¼ squat) by pushing hips back, flexing knees, letting the torso come forward, and transfer the weight onto the heels
- Explosively extend hips, knees and ankles (triple extension) to accelerate the bar upward
- Drive the bar vertically and extend arms overhead.
- As the bar accelerates vertically drop under the bar and catch it in a wide split position.
- Step back with the front foot first and then bring the back foot in second.
- Lower the bar to the front rack position in a controlled manner.
Coaching Points
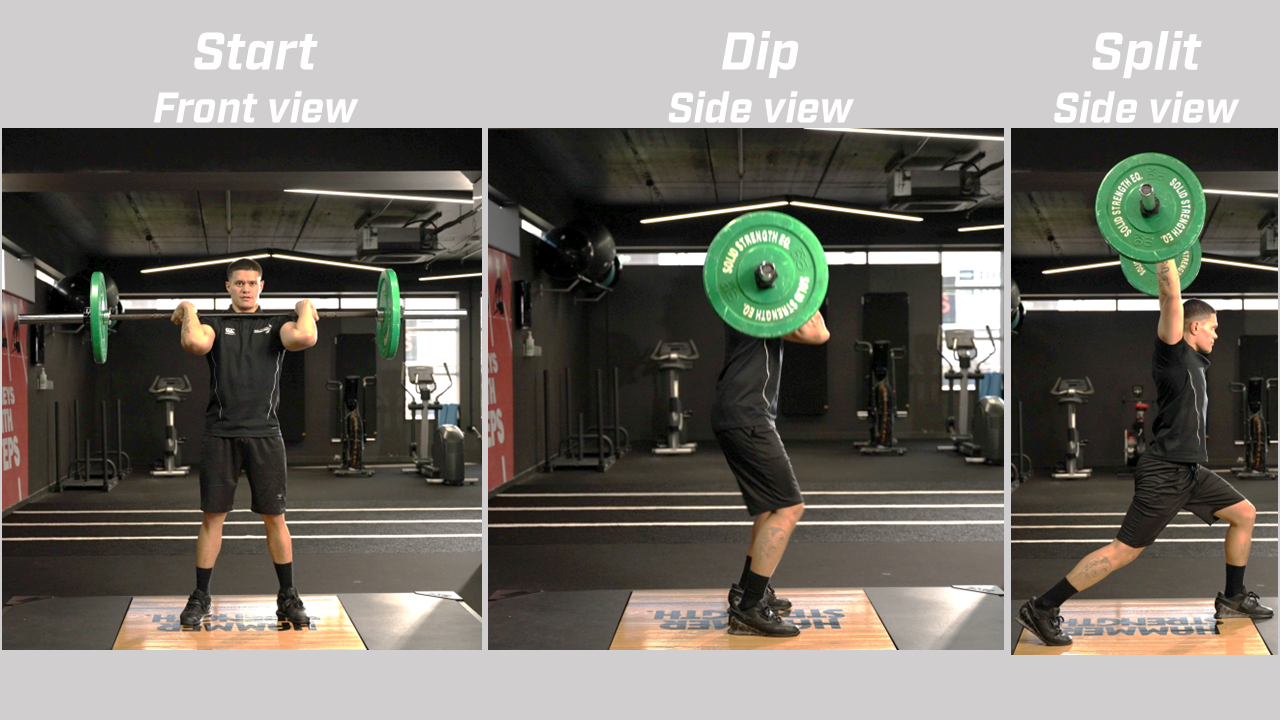
- Keep the upward movement as explosive as possible
- There should be no pause at the bottom of the initial countermovement quarter squat before explosively extending the weight overhead
- Ensure a dynamic split by dropping aggressively under the bar.
- In the split position ensure that the back leg is slightly bent and you’re on the ball of the back foot.
- The front shin should be vertical and the weight should be on the mid-front foot
- Keep the torso perpendicular to the floor.
Barbel snatch and barbell thruster
Watch the following videos on the Barbell Snatch and the Barbell Thruster. They are quite complex movements so it is suggested that you participate in some coaching of these lifts if you haven’t performed it before.
Try it out
To enable you to get a deeper understanding of these lifts, it is important to try them out for yourself.
WARNING: Due to the relatively complex nature of the lifts, it is strongly recommended that you seek additional guidance from a coach or trainer who works in the Olympic Lifting space. This additional depth of coaching is necessary before you attempt to implement these types of lifts with clients.

As previously mentioned, plyometric exercises can be graded in terms of intensity. The selection of exercises will be dependent on the client’s baseline strength and experience with plyometric training.
Mac (n.d.) groups plyometric exercises into the following categories:
- Lower body jump variants: from ankle hops to depth jumps
- Bounding and hurdling (hops): often include change of direction
- Upper-body pushes and throws (both linear and rotational): Either from the floor (like clap push-ups) or throwing an object like a medicine ball.
However, before you jump, you need to learn how to land! The first step of any programme involving clients new to plyometric exercise is learning correct landing techniques, for efficient acceptance of force.
Lower body plyometric exercises
The following is a selection of common plyometric exercises.
Box jump variations
Broad jump variations
Jump squat lunge variations
Depth jump variations
Other lower body exercises
Upper body plyometric exercises
Push up variations
Medicine ball horizontal push exercises
Other upper body power exercises
Core plyometric exercises
Power exercises for core
Now you have been introduced to a variety of power training approaches, it’s time to get your hands dirty. Remember, the best way to understand how to program plyometrics and which clients to use particular approaches with, is to try some different approaches in your own training. Why not try a couple of these plyometric exercises out for yourself and report back to the group on the forum how you found them?
Important note: Please ensure you select plyometric exercises that reflect your experience with this type of training.
Time to dive into the scientific principles related to power training. You will remember that Power is an expression of Force and Time. Power is the ability to express maximal force in the shortest period of time. According to Fitts, McDonald and Schulter (1991) the ability to produce power is affected by a number of main variables including:
Muscle fibre size and length
Contributes to overall force production. Larger muscles have the potential to produce more force. This goes deeper with the number of cross-bridges (sarcomeres) you have in parallel and the force that each cross-bridge can produce also contributing to potential for power. A well-structured strength/hypertrophy programme can enhance these factors.
Muscle architecture
Includes things like the angle of the tendon attachment and the fibre muscle-to-length ratio. These are essentially determined genetically.
The type and number of muscle fibres you have
Power training relies heavily on fast twitch fibres to produce power as slow twitch fibres cannot produce force quickly enough for explosive activity. The amount of force your muscles can produce is directly related to their potential for power. Fast twitch fibres have more cross-bridges (so higher peak force), faster contraction speeds (due to both faster motor neuron conduction and enhanced calcium utilisation by actin and myosin for faster cross-bridge formation). Not only that, Bellon et al (2016) also suggest the shortening velocity of type 1 (slow twitch) fibres is compromised because they have a limited ability to break myosin head cross-bridges with actin quickly, so can’t create as many subsequent power strokes during a contraction. Fast twitch fibres can dissociate cross-bridge connections up to nine times faster than slow twitch fibres allowing for greater numbers of power strokes during contractions. This explains why force produced by fast twitch fibres is greater than slow twitch at any velocity or resistance load as shown in these two graphs taken from PTdirect.com.
Fibre type is unable to be changed significantly (genetics), so is a limiting factor in power production in some people. However, improvements can be made regardless of genetic disposition.
The time available to produce force
The longer the time you have for the production of force, the greater the number of cross-bridges that can form. More cross-bridges = more contractile force. Higher velocity movements provide less time for cross-bridges to form and as a result reduce the amount of force produced.
Your ability to fire motor units quickly
The rate of force development. Essentially, how well your nervous system can activate motor units. This is enhanced through performing a mix of heavier lifts and more explosive exercises.
The resistance you are moving against
Lighter loads can be moved faster, heavier loads cannot be moved as quickly (each of these loading strategies have a place in power training, but for different purposes). This is manipulated in power training to target different elements of power (e.g. strength-speed, speed etc).
How do force, velocity and power relate?
Strength is all about developing maximal force. In order to generate maximal force within a muscle, you need all of the motor units to fire in a sequence. The Principle of Orderly Recruitment describes how muscle fibres are recruited in a contraction. This principle states that motor units within a given muscle are ranked by threshold. That is, the lower threshold fibres are recruited first, often slow twitch fibres, and the higher threshold fibres are recruited as they are needed as the force of a muscle action increases.
This indicates that a period of time is needed to achieve maximal motor unit activation. If the speed of contraction is fast, as it is in power training, then the total force produced will be diminished as the slow twitch fibres will not be activated in time to contribute to the contraction. This is essentially the key difference between strength and power training protocols. Strength training is concerned with maximal force production, so is performed at a moderate tempo to allow for full motor unit activation. Power training is concerned with shifting a resistance quickly and therefore requires explosive tempos that will knowingly result in less than maximal motor unit activation. Those will a greater allocation of fast twitch muscle fibres will have an advantage in power activities and a larger proportion of motor units will be able to respond to explosive muscle contraction, resulting in higher force development.
Your understanding of the relationship between force, velocity and power can be further enhanced by understanding the force-velocity curve.
The force-velocity curve
The force-velocity curve is a physical representation of the inverse relationship between force and velocity. It essentially works on the principle that maximal force production takes time and that as velocities of movement increase, total force production diminishes. Strength training works at one end of the force-velocity spectrum as the force associated with strength movements is very high. As a result, the movement velocities associated with strength training are slower, not because the strength athlete wants to move slowly, but due to the weight of the resistance. Exercises that use little resistance can be performed much quicker and are therefore found at the other end of the force-velocity curve. Bodyweight exercises like maximal sprinting or plyometrics can be done very quickly as there is little resistance to work against.
Resisted power training approaches fall somewhere in the middle of these two examples. Higher-loaded exercises like power cleans and Olympic lifts are towards the upper middle zone of the curve as they utilise heavier weights but are performed with the intent to move the weight as quickly as possible. Power training exercises using lighter loads (like weighted jump squats) are towards the lower end of the curve as the focus is on explosive speed.
Even within a given training approach, different lifts will result in different coverage across the force-velocity curve. This is obviously due to the load applied to a given lift but is also influenced by the number of muscle groups used in the exercise, the complexity of the lift and how the load is distributed or where it is placed. An example of this for power training exercises is given by Parry (2021) below. As you can see, heavier exercises like isometric mid-thigh pulls sit to the far left, whilst jump shrugs (@ 30% of 1RM) sit on the far right. Moderately heavy cleans and snatches sit to the centre-left of the curve, and the somewhat lighter power cleans and power snatches sit to the centre-right.
The ultimate objective of power training is to shift the force-velocity curve to the right resulting in a client who is able to move heavier loads at higher velocities, which translates to more explosiveness. Shifting of the force-velocity curve to the right also represents an improved rate of force development (RFD). A client with greater RFD will be more explosive as they can develop larger forces in a shorter period of time (Walker, 2016).
In summary, if we are moving fast we have increased power because we are doing things in less time, however, there is a trade-off in that as we speed up more and more we produce less force, which ultimately leads to a reduction in power. A power curve peaks at an “optimal velocity”. A sweet spot where the force produced by a movement and the velocity it is produced at are best balanced.
Optimal power or peak power
Multiple research sources indicate that this zone is most likely achieved during training performed as quickly as possible using moderate resistance loads of around 40-70% of 1RM with differences thought to be dependent on the exercise performed and the individual client characteristics (fibre type, training level etc.).
Let’s remind ourselves of the different power training approaches:
- Strength-Speed Focus
Involves exercises typically performed 80-90% of 1RM. It has more of a strength focus than speed, but movements are still performed as quickly as the resistance allows. Often includes performing Olympic lifts like the snatch and clean and jerk). These exercises do not achieve peak power as velocities are too slow (Limited by resistance). - Speed-Strength Focus
Lower force development due to more moderate loading of exercises (30-60% of 1RM common). It leans more towards speed development rather than strength. Example exercises include lightly loaded jumps like weighted jump squats and split lunges and other single-effort plyometric drills like counter-movement high box jumps. These exercises do not deliver peak power as resistance is often too low to generate enough force. - Maximal Velocity Focus
Involves much lower force production but activities are performed at maximal velocity. Exercises in this zone include fast plyometric drills such as repeated jumps, hops and bounds, sprinting and multi-directional sprint, and hop and jump drills. These exercises do not achieve peak power as force production is too low.
The peak power training zone would fit somewhere between the strength-speed and speed-strength zones. Using exercises that use loads of approximately 40-70% (depending on the exercise and client) allows the use of contraction velocities that achieve the greatest balance (sweet spot) between force development and speed of all the training zones. Example exercises in this training zone include progressions of the clean like power cleans and high pulls, weighted jump squats (using a trap bar) and bench press throws (Walker, 2016).
So, if there is a peak power training zone, why bother training with higher or lower loads? Power is a function of both force or strength and speed or velocity. Therefore, improvements can be made to explosive power by targeting both of these elements.
Lifting heavier loads leads to greater force production as more motor units are called on to help with the lift. This type of lifting causes the necessary structural changes to the muscle that lead to greater force development.
Lifting lighter loads allows for greater velocity of movement which enhances neuromuscular activation. It also targets fast twitch or higher threshold fibres and increases a muscle’s rate of force development. The exercises using moderate loads allow for a mix of both speed and force production. Working quickly against moderate loads allows you to operate the peak power-producing zone. Training quickly against resistance also allows sporting athletes to produce more explosive power when the resistance is removed and if these movements are closely aligned with the sporting movements required in the athlete’s sport, this will improve power production during the performance of the sporting skill, leading to more powerful kicks, throws and jumps.
While most sporting athletes will spend some time training in each of the power training zones during this phase of training, the time spent at each zone ultimately depends on the following factors:
- Their training age and experience.
- Their individual strengths and weaknesses.
- Their training goals.
- The sport they play and the positional requirements of that sport.
- The time of year/season they are in.
For many sporting athletes, the demands of their sport require them to be able to produce power across the force-velocity curve. An example of this would be a rugby player, who may be required to produce strength in a scrum, speed in the form of sprinting and jumping and every other type of movement in between!
By only training on one part of the force-velocity curve, e.g. maximum strength, it is likely that the athlete will only improve their performance at that section on the paradigm. For example, only training maximal strength may lead to improvements in force production, but it may also result in a reduction in muscle contractile velocity. Training programmes that combine strength and power training approaches have been repeatedly shown to improve athletic performance more than strength or speed training alone (Walker,2016). Therefore, it should come as no surprise that most strength and conditioning coaches commonly use an all-rounded approach within their programming.
The graph below shows the improvements made when only one training approach is used, e.g. strength or speed. You can see that strength training only results in an increase in force production at low velocities, but a reduction in the ability to produce high-velocity contractions. Conversely, focusing on speed training only appears to reduce total force production at lower velocities while improving velocity of contraction under light loads.
Watch the following video called, The Force-Velocity Relationship, for a summary of force and velocity.

Plyometric exercises emphasise a rapid transition from eccentric to concentric contraction. Multiple studies have shown that power output during the concentric phase of a contraction is enhanced with a rapid preceding eccentric movement compared to concentric contractions without one (Seibert et al 2021). This contraction concept is known as the stretch-shortening cycle (SSC). The stretch-shortening cycle is thought to benefit explosive concentric contractions through three main mechanisms:
- Neuromuscular pre-activation
Greater nervous system activation of muscle fibres based on the neural awakening occurring due to the stress of the eccentric stretch portion of the movement - Stretch-reflex contributions
Due to the activation of muscle protective sensory receptors that cause muscle contraction (muscle spindles) and desensitisation of other muscle/tendon receptors that inhibit contraction - The recoil of elastic stored energy
The storage and release of energy are created in the eccentric portion of the movement.
There are three key phases to plyometric exercises. Let’s discuss the following three phases and the scientific principles behind each phase.
- Phase 1: The eccentric pre-stretch phase
- Phase 2: Amortisation phase
- Phase 3: Concentric shortening phase
Phase 1: The eccentric pre-stretch phase
This phase is known by a number of names in the literature including readiness, pre-loading, pre-setting, preparatory, faciliatory, potentiation, counter force or counter movement phase, but essentially describes the first phase of a true plyometric movement that stretches the muscle fibres prior to a rapid concentric contraction. According to Davies, Riemann and Manske (2015), this eccentric stretch of fibres is thought to stretch the muscle spindle of the muscle-tendon unit and the non-contractile tissue within the muscle and tendon including:
- The series of elastic components that reside in tendons
- The parallel elastic components like muscle membranes and fascia
As you can see in the diagram below, in relation to the contractile elements of muscle in the sarcomere, the parallel elastic components wrap around and support the sarcomere in the form of the extracellular collagen matrix formed by connective tissues. The series of elastic components are found in the tendon and musculotendon unit.
The theory is that these elastic components within muscle and tendon have the ability to store energy created by the stretch that can then be used to create a more powerful concentric contraction. This stimulation of the non-contractile elastic components of the muscle is often referred to as the neurophysiological‐biomechanical response. Several researchers have demonstrated this eccentric pre‐stretch will enhance the resultant concentric muscle contraction (Davies, Riemann and Manske, 2015).
The effectiveness of the pre‐stretch phase is dependent on three stretch variables:
- The magnitude of the stretch: How much energy is generated by the stretch.
- The rate of the stretch: How quickly the stretch occurs.
- The duration of the stretch: How long the stretch occurs over.
Manipulating any of these variables will have a significant effect on the amount of energy stored during the eccentric pre‐stretch motion.
The magnitude and rate of the stretch will determine whether or not the protective muscle spindle is activated. If the stretch is enough to activate the muscle spindle, there will be an increase in motor neuron firing to contract the stretched muscle, attempting to save it from tearing. The strength of the signal sent to the spinal cord from the muscle spindle is dependent on the rate and magnitude of the stretch. The faster and more forceful the stretch, the stronger the neurological signal sent from the muscle spindle to the spinal cord, and as a result, the greater the muscle concentric contraction.
Another protective receptor that plays a role in the SSC is the Golgi-Tendon Organ (GTO). This receptor acts with a protective reflex to inhibit concentric contraction when it detects too much force going through a muscle/tendon. The GTO modulates or limits the amount of concentric contraction force a muscle produces, which is not ideal when you are trying to create explosive contractions. Luckily, these receptors can be trained to accept a greater level of force in the muscle/tendon. Regular plyometric exercise that follows a logical progression plan is thought to increase the excitability of muscle spindles while de-sensitising the GTO response leading to greater efficiency of neuromuscular performance and increasing both the speed and magnitude of powerful contractions (Davies, Riemann and Manske, 2015).
The effect of the duration of the eccentric stretch will be further discussed in Phase 2: Amortisation phase. However, it is commonly accepted that the more rapid the eccentric stretch phase of the SSC the more powerful the concentric contraction. Walker (2016) likens the SSC to a spring mechanism and suggests that the faster and harder the spring is compressed, the greater the recoil action of the spring. The speed of the eccentric stretch of the SSC is known as the “rate of loading”. Increasing the rate of loading will lead to greater recoil force and more powerful concentric contractions. An example of this is incorporating a run up into a jump which will increase the rate of loading and likely increase the jump, provided a person exhibits adequate co-ordination of movement.
Phase 2: Amortisation phase
The term amortisation was developed to describe the time from the end of the eccentric stretch phase of the SSC to the onset of the concentric contraction. This is also known as the “time to rebound”. This phase is believed to be the key to the performance of plyometrics, because the shorter the amortisation phase the more effective and powerful the plyometric movement. This is thought to be because a shorter amortisation phase appears to use the stored energy from the eccentric phase more efficiently in the transition to the concentric phase (Davies, Riemann and Manske, 2015). If the amortisation phase is delayed, the stored energy is wasted as heat, the stretch reflex is not initiated and following concentric contraction is not as effective. With this in mind, one of the primary goals of plyometric training should be to decrease the time to rebound or reduce floor contact time. Walker (2016) suggests an amortisation phase of less than 850 milliseconds is ideal for the maximal efficiency of the transferred force.
Phase 3: Concentric shortening phase
The concentric phase can also be referred to as the resultant power production performance phase. This final phase of the plyometric movement is where the stored energy from the eccentric phase and short amortisation phase is used to contract the muscle to propel the body, or an object with maximal power. This is where the contractile elements of the muscle, or sarcomeres, work in conjunction with the non-contractile elastic tissues to create an efficient and powerful contraction.
Additional factors for consideration
Take a look at the following two additional factors that need to be further considered.
Strength
An abundance of research has demonstrated that stronger athletes have a better ability to store elastic energy than less-strong individuals. Elastic energy is primarily stored in the tendon, rather than muscle, and the ability to transfer force effectively through the SSC is largely dependent on the ability to create and maintain tendon stiffness. Those with a strength training background tend to exhibit thicker and stiffer tendons. This supports the use of a strength training phase before undertaking a plyometric programme of activity. (Walker, 2016)
Transfer to sports performance
Plyometrics training increases neuromuscular coordination by training the nervous system and making movements more automatic during activity which is the training effect. This is known as reinforcing a motor pattern and creating automation of activity, which improves neural efficiency and thus neuromuscular performance. Obviously, the more aligned the plyometric exercises are with the sporting requirements of the athlete, the greater this transference is (Davies, Riemann and Manske, 2015).
The effectiveness of the SSC in improving plyometric power is reliant on a combination of factors that need to work together to produce maximal force production including pre-activation of the neuromuscular system, adaptation of the neuromuscular receptors and enhanced transfer of stored elastic energy. Plyometric exercises performed with a muscle/tendon complex that has already been targeted with a strength training programme seem to be the best recipe for enhancing plyometric performance.
Measures of power
Measures of muscular power are wide-ranging. They include measures of absolute and relative power, in Watts, using a variety of lab-based testing equipment, through to much simpler field-based tests that are used to estimate power production in a more relatable sense for coaches and athletes. Let’s focus on the most accessible forms of muscular power testing as these are the assessments you will most likely use in a performance training setting.
Common tests of muscular power can be divided into the following categories:
- Explosive lifting tests.
- Sport-specific power tests.
- Jumping and running tests.
- Throwing and hitting tests.
Explosive lifting tests
These are essentially 1RM tests of common explosive lifts. These assessments should be reserved for advanced lifters who have the required technical expertise to perform these lifts under maximal loads. Common lifts used for assessing maximal power production include the snatch, clean and jerk, and power clean.
Sport-specific power tests
These are tests that have been designed because of the unique requirements of the sport, e.g. the AFL running jump test, or those that have particular alignment with specific sporting movements like cycling and rowing. These tests usually require the use of specific and expensive testing equipment like Watt Bikes.
Tests of power should be chosen based on the relevance they hold for the client’s performance goals. Just like strength tests, power tests involve maximal effort, so trainers should think carefully about the suitability of a test before using it on a client. Trainers should ask themselves: “Do the risks of conducting the test outweigh the benefits of having the test results?”.
Common measures of muscular power
The following is a selection of the most common jumping, running and throwing assessments for muscular power. Read more for a full list of muscular power tests (along with how to set up and run them).
Jumping and running tests
Measures lower body explosive power. This test can be conducted using a variety of different equipment including:
The vertical jump test
- A measuring tape, a wall and chalk.
- A vertec device.
- A timing matt.
There are also many variations of the vertical jump test that relate to different movements in the pre-jump phase, e.g. static start, one-step two leg, one-step one leg, with a run-up, without the use of arms. The test version chosen should be the one most related to the use of jumping in the sport the athlete plays. For example, a basketball player more often jumps off one foot during a game for maximal vertical efforts e.g. to lay-up, dunk or intercept a pass, whereas a volleyball player predominantly jumps off two feet.
If general lower body power is the goal, then a standard counter-movement vertical jump test from a stationary start point is most commonly used.
Standing broad jump
Another test of maximal lower limb power. This is an easily administered test that requires only a measuring tape and an appropriate jumping and landing area. A client starts from a marked line that is aligned with a zero measure on the measuring tape, then uses a typical counter movement involving bending at the hips, knees and ankles, along with swinging the arms back, to jump as far forward as possible. The client must take off and land with 2 feet. The jump is measured from the starting line to the nearest point of contact, usually the heel. There is also a multiple jump for distance versions of this test which measure both power and co-ordination (e.g. the 2-hop and 3-hop test). To compare the power production of individual legs, these tests can also be conducted with single-leg hops.
Margaria-Kalamen power test
This test measures the power of the lower limbs in running and requires a client to run up a flight of stairs. To conduct this test, you need a stopwatch, weight scales, a tape measure and a flight of 12 steps with at least 6m of clear run-up space leading up to them. Each step needs to be of equal height and somewhere in the vicinity of 17.5cm -20cm high. You will also need cones to mark the 3rd, 6th and 9th clearly. The vertical height difference between the 3rd and 9th step also needs to be accurately measured. The client starts on a mark 6m from the first step. On a “go” command, they sprint as fast as they can up to the first step then bound up the steps by stepping on the 3rd, 6th and 9th step. The time from contact with the 3rd step to contact with the 9th step is recorded. Power, in Watts, is calculated by using a formula that includes the time taken, the vertical distance between the 3rd and 9th steps, and the client’s body weight. The accuracy of this test can be improved if timing mats or gates are used on the 3rd and 9th step instead of a stopwatch.
Throwing power tests
Now, let's dive into various throwing power tests to assess different aspects of power. Each test is designed to target specific muscle groups and movements, offering valuable insights into your client's performance. Please review the details of each of the following tests for a comprehensive understanding of their purposes and execution techniques.
Seated medicine ball chest throw
The purpose of this test is to measure the power output of the upper body muscles. It requires a wall, an open space, a 4kg medicine ball and measuring tape. The client sits with their back flat against a wall to isolate the upper body musculature. The back must stay in contact with the wall throughout the test. The client sits with legs fully extended and feet slightly apart. The ball is held in a chest pass grip with the hands on the side and slightly behind the centre of the ball. The client then throws the ball as far forward as they can by explosively pushing the ball away from them. A few attempts will be required to work out the optimal launch angle. The distance is then measured from the wall to the point at which the ball first made contact with the floor.
Forward overhead medicine ball throw
To measure upper body power in overhead movements. The equipment required to complete this test is a medicine ball, between 2 and 5kg depending on sex and age, an open space and a tape measure. The client stands on a clearly marked starting line with feet shoulder-width apart. The ball is held with the hands on the side and slightly behind the centre. The throwing action is similar to that used for a soccer/football sideline throw-in. The ball is brought back behind the head, then thrown vigorously forward as far as possible. The subject is permitted to step forward over the line after the ball is released. The measurement is from the start line to the first point of contact the ball makes with the ground.
Backward overhead medicine ball throw
This is a test of upper body and core power output. To conduct this test, you need a 3kg medicine ball for men, or a 2kg ball for women/youth, an open space and a measuring tape. The client stands with their heels on a clearly marked starting line facing away from where they will throw the ball. The starting position is with the ball in both hands, held above the head, with arms extended. Keeping the arms extended, the client swings the ball down between their legs while flexing the knees. Then in one motion, the ball is flung up and back over the head, optimally at about 45 degrees. The measure is taken from the start line to where the ball makes first contact with the ground.
Rotational power ball throw
This test is a measure of core power. To conduct it you need a 3kg medicine ball and an open area and measuring tape. The client starts by standing perpendicular to the start line, such as in a pitching or hitting stance. The ball is held in both hands with the back hand on the back of the ball and your front hand under the ball. The ball is drawn back, with only a slight bend at the elbows allowed, keeping the ball between the waist and chest. Then in one motion, the ball is flung up and forward (optimally at a 45- degree angle). Several practices may be required to get the best trajectory for maximum distance. The athlete is permitted to fall forward over the line after the ball is released. The measure is taken from the start line to where the ball makes first contact with the ground.
Programme guidelines for power and plyometric training programmes
Now that we have discussed a range of different power training approaches and tests, it is time for you to have a go at producing a session plan. Due to the complexity of power training exercises and the short time we have spent covering these, and how difficult it will be to find willing clients who are ready for this form of advanced training, the best, and safest, way for you to practice your programming skills for power and plyometric training methods is to create a session plan for a case-study subject that will be provided in your assessment document.
Before we move on to this task, let’s recap some key programming principles and look at a few examples of power and plyometric sessions.
You will remember that power training can be broken into several categories, each requiring a slightly different approach. Let’s refresh your memory of these:
| Training variables | Strength-orientated Approach | Peak Power Approach | Speed-orientated Approach | Plyometric Approach |
|---|---|---|---|---|
| Number of exercises | 4-8 exercises per session | 4-8 exercises per session | 4-8 exercises per session | 2-3 exercises |
| Load | 70-90% of 1RM | 50-70% of 1RM | 30-40% of 1RM | bodyweight |
| Repetitions | 3-6 | 3-8 | 6-10 | 3-8 Novice –80-100 total contacts Intermediate: 100-120 total contacts Advanced: 120-140 contacts. |
| Sets | 3-5 | 3-5 | 3-5 | 3-6 |
| Rest intervals | 3-5 minutes | 3-4 minutes | 2-3 minutes | 1:5 – 1:10 work-to-rest ratio |
| Velocity | 0.5-0.75 m/s | 0.75-1 m/s | 1-1.3 m/s | as fast as possible |
Here are a couple of example session plans that will help you better understand the difference between a couple of these different approaches. This is to give you an idea of the amount of volume in a power training session. The purpose of a power training session is not volume, but rather intensity and quality of movement.
Please note: Only the main workout exercises are shown without warm-up or cool-down details.
| Example Session Plan for a Lower Body Strength–Speed Approach | |||||
|---|---|---|---|---|---|
| Exercise | Reps | Load | Sets | Rest | Tempo |
| Hang Power Cleans | 6 | 75-80% of 1RM | 3 | 3-5 mins | Explosive |
| Push Press | 6 | 75-80% of 1RM | 3 | 3-5 mins | Explosive |
| Hang High Pulls | 6 | 75-80% of 1RM | 3 | 3-5 mins | Explosive |
| Romanian Deadlifts | 6 | 75-80% of 1RM | 3 | 3-5 mins | Explosive |
| Example Session Plan for a Lower Body Contrast Approach | |||||
|---|---|---|---|---|---|
| Exercise | Reps | Load | Sets | Rest | Tempo |
| Back Squat | 5 | 80-85% of 1RM | 3 | 3-5 mins | Moderate |
| Jump Squat | 5 | 20% of 1RM (squat) | 3 | 1:10 sec work-to-rest ratio | Explosive |
| Power Cleans | 6 | 75-85% of 1RM | 3 | 3-5 mins | Explosive |
| Depth Jump | 6 | Bodyweight | 3 | 1:10 sec work-to-rest ratio | Explosive |
Note: These can either be done in order, or in a super-set fashion alternating between the strength exercise and the plyometric exercise.
| Example Session Plan for a Lower Body Contrast Approach | |||||
|---|---|---|---|---|---|
| Exercise | Reps | Load | Sets | Rest | Tempo |
| Back Squat | 5 | 80-85% of 1RM | 3 | 3-5 mins | Moderate |
| Jump Squat | 5 | 20% of 1RM (squat) | 3 | 1:10 sec work-to-rest ratio | Explosive |
| Power Cleans | 6 | 75-85% of 1RM | 3 | 3-5 mins | Explosive |
| Depth Jump | 6 | Bodyweight | 3 | 1:10 sec work-to rest-ratio | Explosive |
| Example Session Plan for a Total Body Plyometric Approach | |||||
|---|---|---|---|---|---|
| Exercise | Reps | Load | Sets | Rest | Tempo |
| Countermovement Box jump (45 cm) | 5 | Bodyweight | 3 | 1:10 sec work-to-rest ratio | Explosive |
| Lateral 1 leg box push-offs | 5 | Bodyweight | 3 | 1:10 sec work-to-rest ratio | Explosive |
| Clap push-ups | 6 | Bodyweight | 3 | 1:10 sec work-to-rest ratio | Explosive |
| Countermovement overhead throw to wall | 5 | 3kg ball | 3 | 1:10 sec work-to-rest ratio | Explosive |
Here are some useful websites for extra reading on programming for power and plyometric sessions
Right, time to apply what you have learned. Head to your assessment for an assessment guide video and instructions on submitting your assessments.
The assessment guide video explains your assessment task, which requires you to use the information you have learned on this topic to help a case study client.
Assessment 1 B will require you to apply the knowledge you have learned and practised by completing the following tasks:
- Design a Power Training programme for an athlete
- Justify your selection of programme variables (e.g. modality of training, exercise selection, sets, reps, rest etc.)
- Design a progressed programme for the end of the mesocycle
- Justify the changes you implement to the progressed programme
- Select a relevant fitness test to test this fitness component.
Important note: This is an ongoing assessment!
Within this module, there is a single assessment, Assessment 1B, which spans various topics covered each week. To successfully complete this assessment by the due date, you will need to integrate knowledge from multiple topics. These topics include:
- muscular endurance
- hypertrophy training
- strength training
- power training.
As you progress through the module, you'll notice that each week's topic contributes a piece of the puzzle required for the assessment. While you advance through each topic, you will have gathered all the necessary knowledge and skills to complete Assessment 1B comprehensively.
Note: Do not leave all the training programs to the last minute, these should be worked on every week in order to complete the assessment and submit by the due date.
Let's put your newly acquired knowledge of all the training approaches to practical use. To get started, please proceed to the assessment section for Assessment 1 C, where you'll find a helpful guide video outlining your upcoming tasks for this assessment. Follow the instructions provided to complete this assessment effectively.
This assessment revolves around applying the insights gained during this module by completing the following tasks:
- Design a resistance training session for a real athlete.
- Liaise with an industry professional to gain feedback.
- Implement your session on your athlete.
Please note: This needs to be done for two different resistance training modes. Assessment 1C tasks you with choosing two of the training approaches you've learned and adapting them for a client. This assessment allows you to demonstrate your understanding of how to tailor training programs to individual needs.
IMPORTANT
Assessment 1C is an ongoing project that you'll work on until the end of this module and submit in week one of the next module (Module 3). Use the principles and techniques you've gained here to create an effective and personalised training program for your client. Good luck with your assessment!