Who says beginners can't create really cool designs?
Throughout this section, we will guide you through various tutorials and activities that will support you in developing the basic tools and techniques when using Photoshop.
We will explore the steps used to retouch and edit pictures, create appealing compositions and add effects to bring your image to life.
Beginning Photoshop
You will now have the opportunity to become familiar with the concept of Photoshop. Let us dive in and get started with the basic functions of opening files, re-setting workspaces and saving images.
You will also be guided through the navigation process along with shortcuts, including zooming in and out, moving around and viewing modes.
Each of the links below brings you to a treasure trove of learning!
- Get to know Photoshop
- Raster Vs Vector, which will provide a description of each, and its relationship to size and quality
- Text Overlay
- Highlighting
Have you spent time with all of the tutorials? If you love what you are doing and want to keep doing it on your own, you may like to explore the Adobe Photoshop User Guide! Just don't get frustrated if you try to move yourself along too quickly, and some of the tutorials are a tad too advanced for you at this point.
Once you have done the tutorials, come back here and do the following activities, which have been selected to focus on the needs of students at this level of their learning journey.
Tutorial Activities
🕔 4 - 5 hours total
Complete all of the learning activities in the following sections.
The Sharepoint folder, Photoshop Resources contain all of the activity files you will need. You can download them as you need them or download and unzip them all at one time. Save your work on the following activities so you can go back and see how you accomplished the technique at a later stage.
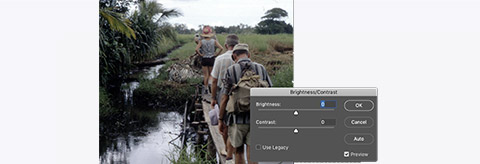
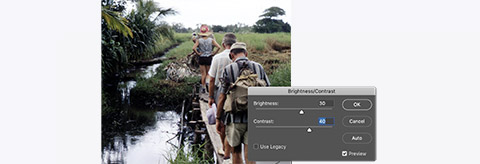
To get you started, we'll begin with basic photo editing. The activity will guide you through adjusting image brightness, contrast, and colour values.
From the Photoshop Resources, open the folder, 1 adjustments, and open each of the four images in Photoshop.
Activity - Adjustment
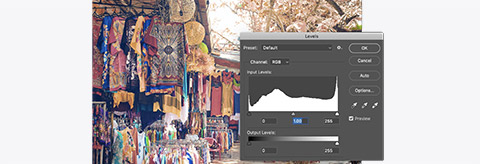
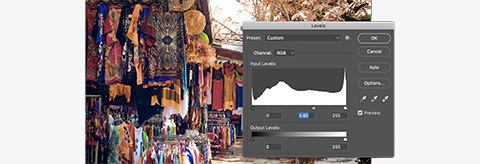
- Adjustments are available from Image/Adjustments in the menu bar. Brightness and contrast adjustments will help make your images look less washed out.
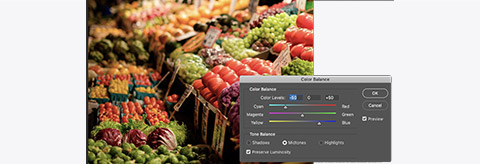
- Colour balance can help compensate for unnatural colour casts.
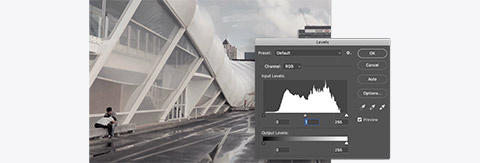
- Levels will allow you to adjust both brightness and contrast by changing the black, white and midpoints of an image.
Note: Using Adjustment from the menu bar will only affect the layer you have selected, and it is a permanent change to your image. Because of this, it is often better to use layer adjustments as they are non-destructive and can be applied to all layers below them and masked. By doing it this way, you can choose to 'show' or 'hide' the adjustment you made. - Use the layer adjustment icon at the bottom of the layer panel to select the type of adjustment.
- Use the Properties panel to make the adjustment.

- Save your work.


Having completed the list of tutorials above, you have had the opportunity to explore the basic functions of Photoshop, which included:
- navigation
- opening and saving files
- short cuts
- screen capture
- text overlay
- image adjustments.
These are important functions to support you in manoeuvring through Adobe Photoshop.
Now that you have given them a try for yourself, you are ready to explore the Photoshop tools that help you create cool designs.
In the next video, we will begin to explore the use of layers within Photoshop and how they are used to compose multiple images. When adding layers, you can organise and manage your design in order to apply elements simultaneously.
It allows you to move, edit and work with specific parts of an image on one layer without affecting content on other layers.
It is extremely useful as you are able to modify and adapt images, add text, and change colour without having it impact on your original image. This is good when you want to remove (or hide) certain aspects of a design.
'Non-destructive editing' will also be touched upon. This process allows you to make edits to a photo on a separate layer so both the edited image and the original are saved. This allows you to make changes without overwriting the original image, giving you flexibility to change your mind.
Throughout this section, we will touch on:
- Image layers
- Adjustment layers
- Smart layers
- Blending modes
- Non-destructive editing.
Click here to watch the tutorial.
Once you have become familiar with the concept of layers, you can easily apply this in Photoshop.
Follow the steps below to help you apply layers to your design.
Activity - Layers
- Start by opening the 2 Layers folder
- You will use each of the layers in this folder for the Layers activity.
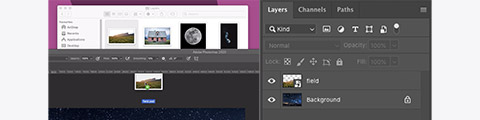
- Start the activity by opening stars.jpg in Photoshop.
- The file is a flattened jpeg image, meaning we will see only one layer in our layer palette named 'Background'.
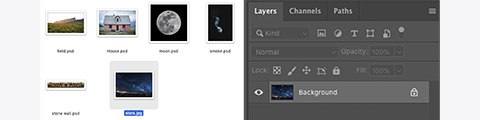
- From the same folder, drag the field.psd file into the image window and drag the image to meet the bottom of the image window — press return to set its size.
- (By default, images we drag into other images in Photoshop appear in the layers palette as 'smart layers'. We will look at these in more detail later.)
Next, we will add the house to the scene.
- (By default, images we drag into other images in Photoshop appear in the layers palette as 'smart layers'. We will look at these in more detail later.)
- From the same folder, open House.psd in Photoshop.
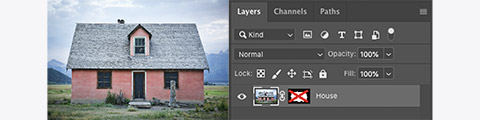
You will notice that the house currently has its original background and foreground. We only want the house.
If you look at the layers panel, you will see that a mask has already been created for this image. - Shift-click the layer mask with the red cross through it. (We will explore 'masking' in a later activity.)
- You should now see the house with a transparent background.

We are going to drag the masked house layer into the image of the stars. To do this, we need to be able to see both images.
- You should now see the house with a transparent background.
- Select Window/Arrange/2-up Vertical from the menu bar.
This will display both of your open images side-by-side.
- Using the move tool, drag the house into the image of the stars.
- You can close the house image without saving.
- Our layer panel will now include the three layers in the vertical order we see them.
- Now we'll add the moon into the image.
- Use either of the techniques we have just tried to get the moon into the scene (moon.psd).
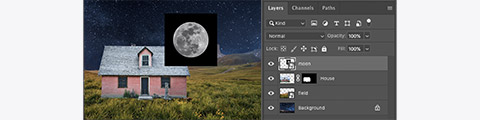
You will notice the moon currently has a black background and is sitting on top of the house.
First, we will need to move it back in the layer stack (adjusting the vertical order) to sit between the stars and the field. - Drag the moon layer icon in the layer panel so it sits in the appropriate place.

- Use the move tool to position the moon where you would like it to be.
- To get rid of the black square background, a mask would be a good option, and we will cover how to do that later on. In this case, we will be using a 'blending' mode.
- With the moon layer active, click the drop-down menu where it says Normal.
- Select a blending mode that you think works best (lighter colour).

- Select a blending mode that you think works best (lighter colour).
- Use the same technique to get the smoke into the image.
- Now, we can put our rock wall in the foreground. Remember to position it correctly in the layer stack. You should have something that looks a bit like this:
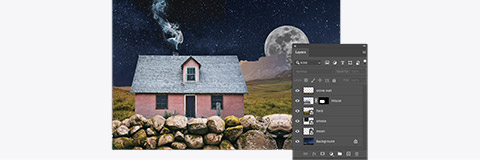
The field layer in our scene looks a little warm to be at night. We will use an adjustment layer to try and correct this. - Select colour balance from the adjustment layer button at the bottom of the layer panel.

Above the Layer panel is the Properties panel. - Use the colour balance sliders to make the scene cooler (blue tone).
- The adjustment layer will affect all layers below it in the stack, so make sure it's positioned just above the field layer to stop it from affecting the moon and sky.
- Hold the option (MAC) or ALT (Windows) and click between the adjustment layer and the field layer to apply layer clipping.

- Repeat the steps to apply another adjustment layer to make the field darker.
- Save your work.


Now that you have had the opportunity to apply layers within Photoshop let's try another activity where you will be guided to blend modes together in the following section. This is useful when you want to have images overlap with each other to form one image.
Tau kē! Understanding layers can be challenging. If you haven't grasped it yet, slow down and try the activities again. You may find it helpful to find a YouTube video that resonates better with you.
If you need support, reach out to your peers or tutor for assistance before moving on to the next activities in this topic. Either way - kai pai! Keep up the great work. Learning new tools and asking for help are skills that will continue to serve you in all careers!
Blending modes will change the way layers affect the layers below them. We can use blending modes to create interesting effects, double exposures, and apply textures.
Blending modes can, in some instances, eliminate the need to mask out a white or black background.
Activity - Blending modes
Let's get started!
The files for this activity are in the folder called 3 blending modes.
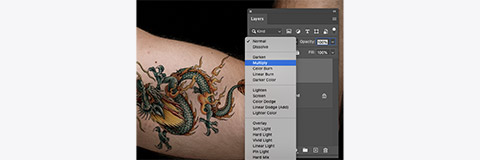
- Open the tattoo.psd file, scale and rotate the dragon graphics to position it over the arm.

- Now, change the blending mode for the layer to Multiply. This will make the white areas transparent, and the rest of the image will appear to be part of the skin.
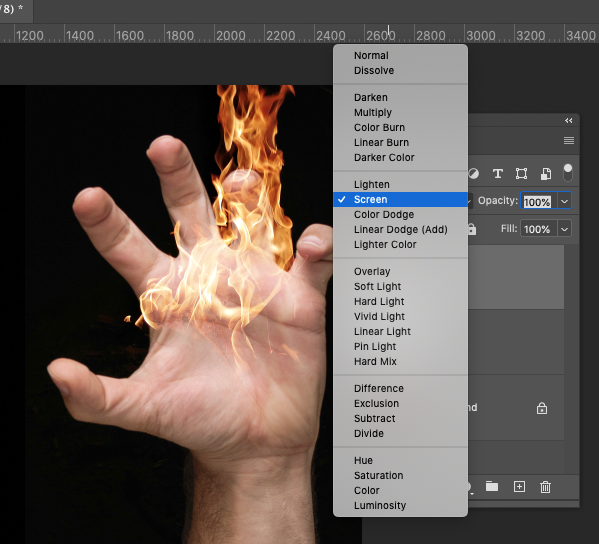
- Add the fire.jpg image to the tattoo image. Change position so the fire covers the hand.
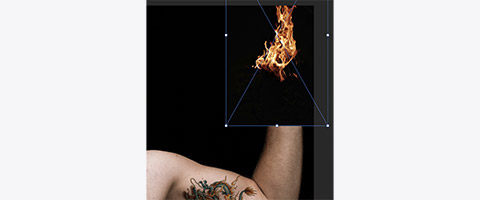
- Now, set the blending mode for the fire to Screen. Screen is the opposite of multiply.
- Next, open the blending modes.psd file and experiment with the different modes and circles provided.
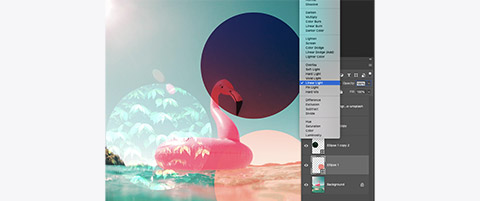
- Save your work.


The brush tool, a primary painting tool in Photoshop, works as a drawing tool to apply colour, size, patterns and shapes. It can also be used as a healing tool to remove blemishes, duplicate elements, and clone objects or images; however, this will be touched on in a later tutorial.
Within the video linked below. We will focus on the basic Photoshop brush tool techniques, which are useful for beginners to get started in developing their Photoshop skills.
Topics that will be covered include:
- What is the brush tool in Photoshop?
- Tools that use brushes
- Selecting and modifying brushes
- Loading downloaded brushes
- Creating your own brushes.
Watch the Adobe Photoshop Brush tutorial. You may like to pause the video to make notes, as you will need these instructions to help you complete the following activity.
Activity - Brushes
We often default to using the soft round brush in Photoshop; however, there are lots of interesting things we can do by creating our own brushes.
Any image or selection can be made into a brush in Photoshop.
A brush in Photoshop is essentially a greyscale representation of where the paint or ink will be applied. Black is 100% ink coverage. White is no coverage.
- Open cloud.jpg from the 4 Brushes folder.
- First, change the colour mode of the cloud image to grayscale.

- Invert the colours so the cloud is dark, and the background is light (Command + I).

- Use the levels to make the background pure white and increase the density of the black in the cloud.
Now that the image is ready to become a brush, we need to define it as one. -
Select the Define Brush preset from the edit menu. Give your brush a name and click OK.


The brush will now be accessible in the Brush and Brush Settings panels.
Selecting the brush in the Brush Settings panel will allow you to use it to stamp or stroke using the foreground colour.

To make the brush more interesting and appear more cloud-like, we start by increasing the spacing.
-
Increase the spacing to about 50%.
-
Tick and select Shape Dynamics on the left and increase the size jitter to 100%. Change control to pen pressure.
(The pen pressure setting usually applies when using a drawing tablet like a Wacom Intuos or Cintiq. We’ll be simulating this later in this tutorial.) -
Set the angle jitter to 100%.
-
Tick and select Scattering on the left and increase scattering to 30%.
-
Set count to 2. Save this new brush with all its settings by clicking the + icon in the bottom right corner of the brush settings panel.
The brush preview should look like a long cloud that is tapered at each end.

We will now use this brush to re-create this image.

- Start by creating a document 5000 x 2500px.
- Add a gradient fill layer using blues to create the sky.

- Create a new empty layer above the sky and select it.
- Use the free-form pen tool to draw your initials (try to use a single stroke).
- In the path panel, right-click the work path and select Stroke Path.

- Select Brush and Simulate Pressure before clicking OK.

If the stroke is too thick or thin, undo and adjust the size of the brush before using Stroke Path again. - Save your work.


Now it is time to combine our brush tool techniques with the use of colour.
Working with colour is something you must learn to do effectively in Photoshop, as the opportunities for transforming designs are endless.
The following tutorial will cover aspects of colour picking, background vs. foreground colour, the eye-dropper, colour swatches, and gradients. All of these elements will be explored and will support you in further developing basic Photoshop skills.
Watch Colour Management to learn more about how you can use colour within Photoshop.
Activity - Colour
Colour can be applied to an image in many different ways. One common way is using the brush tool and selecting foreground colours.
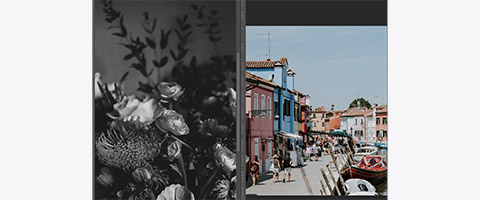
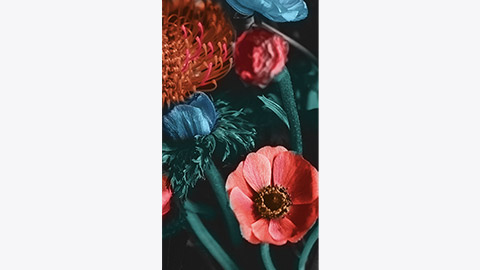
For this activity, open the files annie-spratt-KVE-mp7v-10-unsplash.jpg and annie-spratt-WBpr_yH0Frg-unsplash.jpg in the folder named 5 Color.

- Clicking the foreground colour in the toolbar will open a colour picker. (The olive green box.)
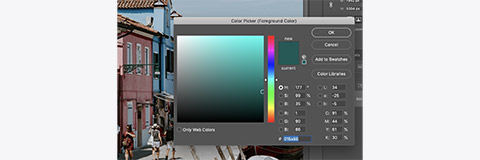
You can use the hue cube and slider to select any colour you like. - Another way to access colour is by clicking on an open image with the Eyedropper tool, which will select a colour from that point in the image. The benefit of the Eyedropper Tool is that it is a shortcut that allows you to select a foreground colour without opening the colour picker.

- There is an even further shortcut directly from the brush tool. With the brush tool selected > hold 'I' to temporarily enable the eyedropper > single-click your image to sample a colour > release 'I' to return to the brush tool.


Colours sampled from an image can be used in any other image you have opened. Let us give this a try!
- Place these two images side-by-side.
- Select the brush tool and change the blending mode to colour in the options bar.
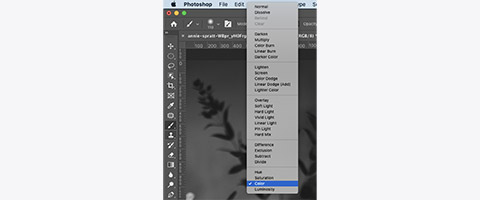
- Hold 'I' and sample a red from the image on the right.
- Paint the petals of one of the flowers.
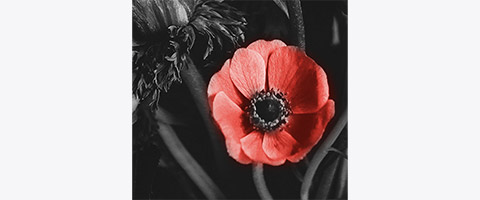
- Repeat the process to colour the rest of the image.
- Save your work.


Creating unique and interesting typography compositions or manipulating an image to include text is where Photoshop really shines.
Many of the text controls in Photoshop will be familiar across other software programs.
Click here to learn more about how you can design with text.
Let's jump right in to make a couple of different wooden signs.
Activity - Type tools
The files for this activity are in the folder 6 Type.
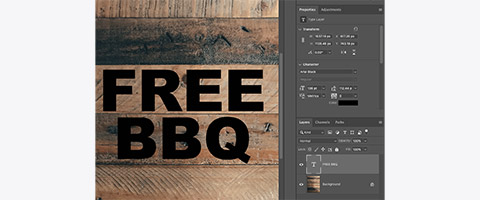
- Start by opening the Types-Image1.jpg (a wooden background).

- Select the Horizontal Type Tool from the toolbar.
- With the type tool selected, you will see the options bar, which now contains settings for typefaces, type size, and alignment.
- The default will probably be Myriad Pro, Regular, 24pt left-aligned. We will need a much bigger and bolder font to use on our sign.
- With the type tool selected, you will see the options bar, which now contains settings for typefaces, type size, and alignment.
-
Use the typeface dropdowns to select a heavy bold font and set the type size to around 90pt. (We will be changing this later to make our text fit.) Click the centre align icon.
- Do a single click somewhere in the middle of the third board. You should see some highlighted placeholder text.

- Type your name or any word that you think would look good etched into a wooden sign. We will be using 'FREE BBQ'.
- Click on the text layer or click away from the text to finish typing.
-
Within the text layer, select the properties panel, which will display settings for your text.
- Adjust the size, leading and tracking to make the text fit your boards.
- See if you can get each line to fit nicely on a board (you may need to use the move tool).
- See if you can get each line to fit nicely on a board (you may need to use the move tool).
- Change the colour of the text using the colour option in the properties panel.
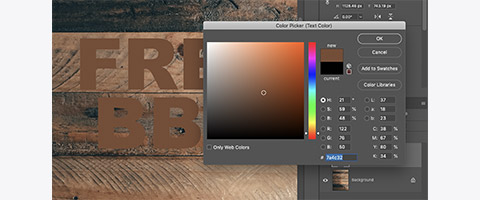
- Sample a light wood colour from the image by clicking on the image outside the colour picker. Then click OK.
- Change the blending mode for the text layer to Multiple to make the text appear to be branded onto the wood.
- If you think the text looks too dark, just use the text colour option again and pick a lighter colour.
- This helps make the text feel like a part of the image rather than slapped on top.
- We can make it look even better by using layer styles.
- If you think the text looks too dark, just use the text colour option again and pick a lighter colour.
-
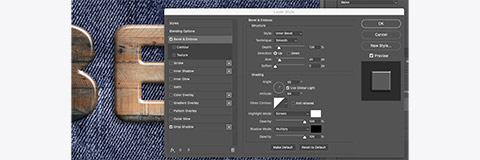
Double-click on the text layer slightly to the right of the layer's name to open the Layers Styles window.
- Select Bevel and Emboss to activate it.
- Set the style to Inner Bevel, set the direction to down, adjust the highlight opacity to 0% and the shadow opacity to 100%.
- The effect should make the text appear to have depth, like it has been pressed into the wood. You should experiment with other layer-style settings to see if you can create some other effects.
- Set the style to Inner Bevel, set the direction to down, adjust the highlight opacity to 0% and the shadow opacity to 100%.
- Save your work.


Now, let's try something using similar techniques.
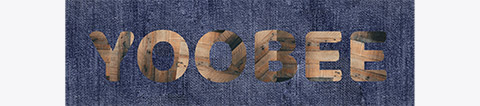
Open the other file in this folder, Type-Image2.jpg (a blue textured background).
- Start by making a text layer with your name in a bold font that nicely fits the page.

- Next, bring in the wood texture file and position it to cover the first letter.

- Copy the layer so that each letter is covered by its own layer.

- Resize and rotate each wood layer so there is a bit more variation between each letter.
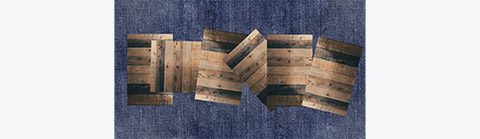
- Select all the wood layers and press command + E. This will merge all the selected layers into one layer.

- Now, option/ALT-click between the wood layer and text layer to apply layer clipping. Your text should look new, like it is made of wood.
-
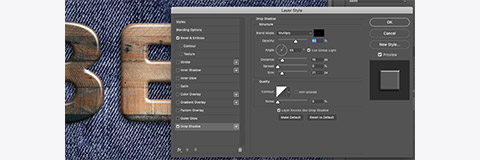
- Now, use layer styles on the text layer to add some depth. Use the settings shown below. The angle and attitude are important here.
- Adding a drop shadow will help lift the text off the background.
 Using this technique, you can put anything inside your text. Keep exploring to see what other designs you can come up with.
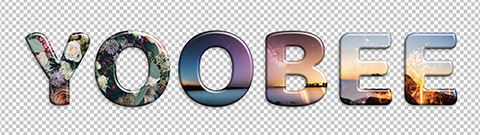
- As usual, save your work.


Tip
Photoshop has a great many ways to work with type, but it is not recommended for laying out text in a brochure or magazine. Because it's a raster image editing program, you run the risk of having your type look soft or pixelated. Adobe InDesign is a better tool to lay out text in a brochure or magazine. We'll cover this program in Course 3, Design/Web.
Selections basics
You have now had the opportunity to learn about and become familiar with the basic functions of Photoshop.
We will now dive in to explore the selection tools used to create, transform and modify your images into a work of art.
Selection tools are designed to select images, or the desired part of an image, so you can work on them without affecting the unselected areas.
We will specifically focus on the selection tools below:
- Selection tools - lasso and marquee
- Selection tools - object and quick selection, magic wand
- Saving and loading selections
- Colour range
- Focus area.
Take the tutorial, Make selections, to learn how to create a selection, work with popular selection tools, and fine-tune the edges of a selection in Adobe Photoshop.
Once you have viewed the tutorial, follow along with the activity below to explore different selection methods.
Activity - Selection basics
Start by downloading the assets from the folder called 7 Selections in the Sharepont folder Photoshop Resources.
Selections give us a way to define areas to work on. We can use selections to copy elements, apply filters, restrict brush strokes and create masks.
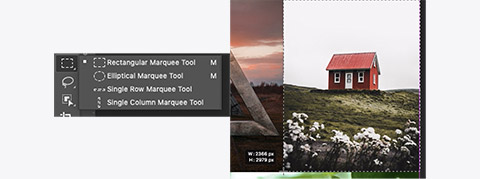
The most common selection methods are lasso and marquee. Marquee selection can be rectangular or elliptical.
- With the rectangular marquee tool selected, click and drag from the top right corner of the house image to the bottom left and release the mouse button. Selections are indicated on-screen by the marching ants.
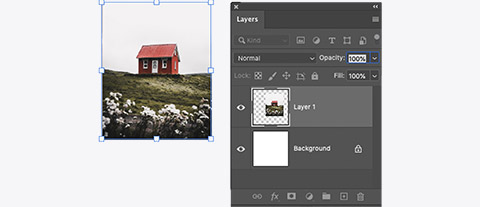
- Copy the image and paste it into a new document. Only the selected area will be copied.
- Using the elliptical marquee, select the round window on the left. Hold the space bar while creating the selection to position it correctly.
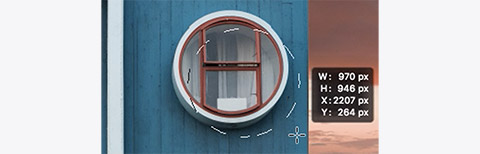
- Copy and paste the window into the new document.
- The regular lasso tool can be hard to use for accurate selections. Try using it on the leaf. You’ll find it difficult to stay on the edge.
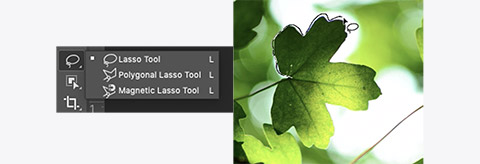
- Try again, but this time with the magnetic lasso. Do a single click anywhere on the edge of the leaf, then slowly trace the edge until you are back where you started.
- Do another single click to finish.
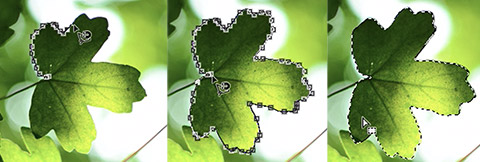
- The regular lasso tool can be hard to use for accurate selections. Try using it on the leaf. You’ll find it difficult to stay on the edge.
- Copy and paste the leaf into the new document. The polygonal lasso tool works by making straight lines between single clicks.
- With the polygonal lasso tool selected, do a single click at the top of the triangle.
- Move the cursor to the bottom right corner.
- Click again, and repeat until you are back at the start point.
- Click the start point to finish.
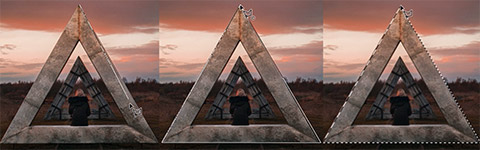
- Copy and paste the triangle into the new image.
- Sometimes, the marquee or lasso tools won’t be appropriate to use.
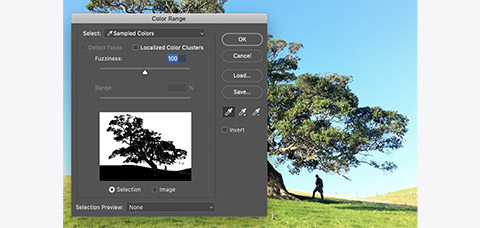
- The tree image below has far too many details to select by hand.
- In the menu bar, go to Select/Colour Range.
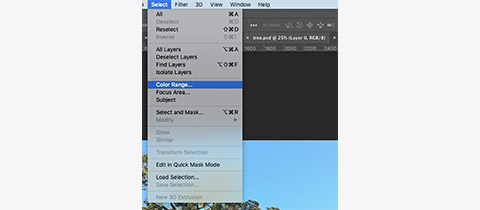
- In the menu bar, go to Select/Colour Range.
- With the eyedropper, select a blue colour from near the top of the image.

- Hold Shift and select a blue from the middle left of the image.
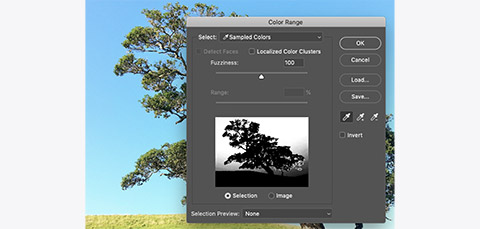
- Hold Shift and click just under the branches on the right.
- Adjust the fuzziness to 100 and click OK.
- We have just made a very accurate selection of the sky by sampling different shades of blue.
- We can invert the selection so the tree and ground are selected.
- Go to Select/Inverse from the menu bar.
- With the selection active and the tree layer selected, click the mask button at the bottom of the Layers panel.
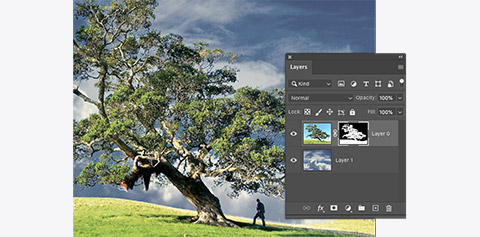
- Save your work.


Healing and cloning tools
Previously, you were shown a video explaining the brush selections and how they work within Photoshop. Let's extend your brush selection skills and dive a little deeper to explore how to use those selections to clone, heal, remove blemishes, duplicate images and clone between layers.
Whether you want to remove blemishes on the skin or paint over large areas of an object during manipulation, you can achieve this with healing and cloning tools. They are also used to blend, make corrections, remove objects and duplicate aspects of an image.
These are techniques you can use to improve your design further.
Watch How to remove small imperfections from a photo, an Adobe tutorial, to see a step-by-step video that will guide you in achieving these techniques throughout your design.
Activity - Cloning
Download the activity files from the Photoshop Resources in the folder named 8 Clone and Heal Tools to get started.
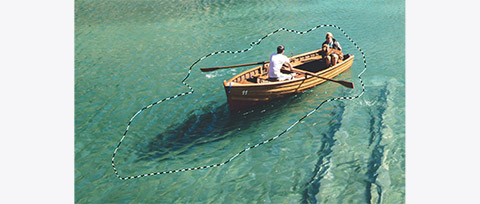
The clone tool is used to paint out elements of an image by replacing them with elements from somewhere else in the image. It can be used to hide blemishes on the skin, paint out objects in the sky, and, in this activity, remove boats from the water.
Let us paint out the small boat in the middle of the photo.

The clone tool requires you first to define a source. This will be the point used to copy from.
Otherwise, we will receive this message.

- With the clone tool selected, hold option (Mac) or Alt (Windows) and click somewhere about two boat lengths to the left of the boat, at about the same distance away.
- Now hover the cursor over the front of the boat. You should see the boat begin to be obscured by water from the source point.
- Increase or decrease the brush size so that it is about half the height of the boat, and start painting the boat away.
The effect may look a little obvious up close, but if you zoom out, it will appear much better. Try cloning some of the lighter areas back to make it less obvious. - Try using the clone stamp to remove the bright spots in this image. Remember to select a source that is as close to what should be there as possible.
- Save your work.

Activity - Healing
The heal tools are also used to remove elements from an image; however, instead of copying from a source, they calculate from a source or from an area surrounding the element to be removed.

- Using the Healing Brush Tool, option/ALT-click to the right of the boat slightly further back in the centre.
- Paint over the boat image. Notice how it is not being replaced with an exact copy of the source. You may want to revert this image and try the first boat using the healing brush.
- Save your work.
Activity - Patch Tool
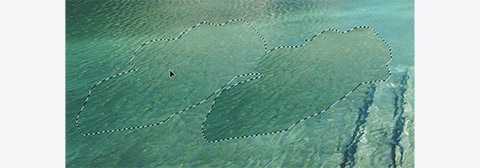
The big boat in the middle of the scene would be difficult to remove using the previous tools as there are shadows and a boat ramp that could interfere with our sources.
For this one, we will use the Patch Tool.

- Using the Patch Tool, draw a selection roughly around the boat and its shadow.
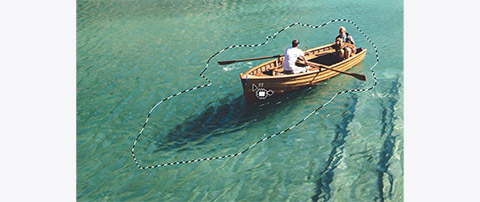
- Click and drag the selection to the left and release when the boat is covered.
- Try removing all the boats using the tool discussed.
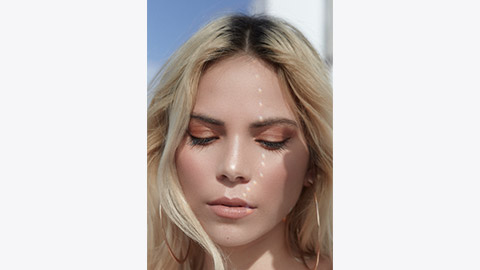
You have now had the opportunity to follow step-by-step instructions on how to remove and heal objects within an image.
- Using the following image, try removing the nose ring and necklace.
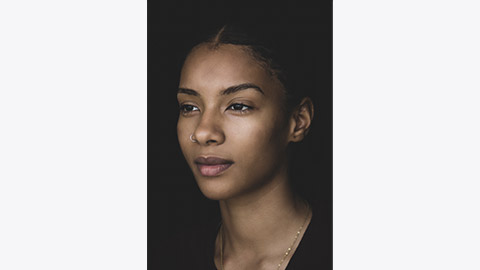
- Save your work.


Layer masking may sound a little daunting, but we have broken it down into multiple tutorials to explain the crucial steps.
Layer masking allows us to edit and show things from different layers at the same time. It provides you with the flexibility to adjust layers without touching the original image.
The amazing thing about layer masking is that you can make specific parts of an image transparent, allowing you to fade from one image into another.
You will find a series of tutorials below that will help you wrap your head around how you can achieve this look within your design.
- Click here to see how layer masking works.
- Click here to see how you can use layer masks to make composites of multiple images.
- Click here to see how you can use layer masks with selections to remove objects.
- Click here to see how you can refine layer masks.
- Save your work.
Remember to go at your own pace, pausing the videos when you need to and then trying out your new skills in the software on your computer.
Once you are confident, you are ready to attempt the following activity.
Activity - Layer masking
Download the activity files from the Photoshop Resources in the folders named 9 Masking Images and 9 Masking Tools.

A mask in Photoshop is a greyscale representation of what is visible and invisible on a layer. They sit next to the layer they relate to and are often chain-linked to the image, so they will move with the image.
White indicates areas that are visible. Black indicates areas that are hidden.
Areas of the masks that are grey will be semi-transparent depending on the density of the grey.
- Shift-clicking a layer mask will toggle the layer mask on or off. You can edit a layer mask using the same tools you might use to edit an image layer.
- Select the layer mask by clicking in the layer panel. You can tell if it is selected by the white corners around it.
- Use a brush tool with black as the foreground colour to paint the mask so that the house no longer has a white border.

To make a mask, we often start with a selection.
- Make a selection of the centre leaf.
- Click the mask button at the bottom of the layers panel. A mask revealing the selected area will be applied to the layer.

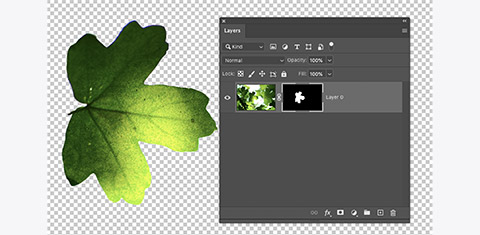
- Save your work.


Combine objects
Masks also allow us to combine objects together in interesting ways.
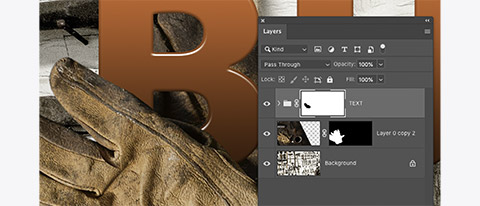
- Move the gloves from the tools.psd file into the text and tools.psd file. Place them under the 'B' in BUILD so that the top glove can just be seen through the lower part of the B.
We are going to make the top glove appear as if it sits on top of the B. - Using a brush tool, paint on the mask for the TEXT group to hide the portion of the 'B' that should be under the glove.
You may accidentally mask more than necessary. You can paint the 'B' back in by switching the paint colour to white.
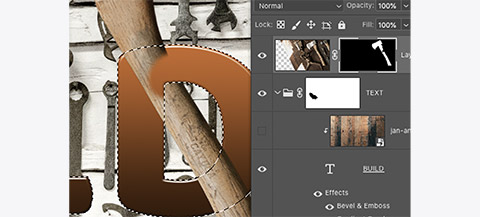
- Place the axe so its handle crosses diagonally through the middle of the 'D' and is above the TEXT group.
- We will make it appear as if the handle is going through the 'D' by hiding the section of the handle that covers the 'D' at the top.
- To make this easier we can make a selection of the BUILD text first.
- Expand the text group and command-click the 'T' icon for the text layer.
- Select the axe layer's mask. Paint in black to hide the section of the handle that should go behind the 'D'. The active selection means the brush can only paint where the text is, avoiding the need to move carefully with the brush.
- Do the same with the hammer and another letter.
- Select mask and use a couple more tools in the image.
- Activate the wood texture layer to complete the image.
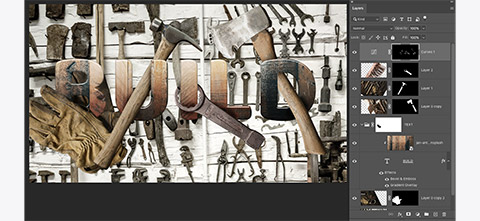
- As an additional challenge, try using a mask adjustment layer to add some shadows to help with the appearance of depth.
- Save your work.


Forum post — Novice and Newbie activities - Fun with Photoshop
These activities are designed to teach you how to use the tools, so the focus is on the doing and not the output. However, if you want to share your work and enjoy looking at the fruits of other people's labours, please head to the correct forum and upload jpegs of your work. Describe any of your thoughts and reflections about completing these activities.
Tino kino te pai. Great work to finish all of these tutorials and learning activities!