In this topic we will delve deeper into your digital devices and explore how you engage with them while navigating the Online campus.
There are a variety of devices available to access and interact with technology, each device caters to different needs and preferences, and has different characteristics.
Let’s look at the ones that are most popular in the world today:
| Desktop computers | Stationary (usually on a desk) devices that consist of a computer tower, monitor, keyboard, and mouse. |
| Laptop computers | Portable computers that combine the display, keyboard, touchpad in a single device. |
| Tablets | Tablets are portable touchscreen devices that bridge the gap between smartphones and laptops (for example: iPads). Tablets are great for on-the-go tasks. The primary way to use these are through touch interaction. |
| Smartphones | Smartphones are everywhere! These pocket-sized devices combine the functions of a phone, camera, multimedia player, and computer in one! Like tablets, the primary way to use a smartphone is through touch interaction. |
Online learning at NZMA can take place on either a desktop computer (a stationary computer, with separate keyboard and mouse) or a laptop computer. Students can also use a tablet (for example an iPad) or a smartphone to read over the programme content if you are not near your computer or laptop.
Please note: Desktop computers and laptops are preferable to use when you are completing assessments as tablets may not have the necessary software, file management can be more limited and typing is not as comfortable, unless you have an external keyboard.
All of these devices have operating system software (OS for short), that allows the user to run applications and interact with their computer.
Let’s look at the most commonly used:
- Windows: developed by Microsoft, if you have a computer that is not an Apple brand, you most likely will be using Windows as your operating system for this device.
- macOS: this is Apple's operating system and is designed to run exclusively on Apple computers.
- Android: developed by Microsoft, if you have a smartphone or tablet that is not an Apple brand, you most likely will be using this operating system on these devices.
- iOS: this is Apple’s operating system used exclusively for Apple's line of iPhones and iPads.
DID YOU KNOW?
A non-Apple computer is commonly referred to as a ‘PC’, which stands for Personal Computer. The term PC is often used to describe computers that run on the Windows operating system.
An Apple computer is commonly referred to simply as a 'Mac' or Mac computer. Mac is short for Macintosh, which is the brand name used by Apple for its line of personal computers.
Keeping your operating system up to date
Periodically the companies that make the operating systems will update them for a variety of reasons. It is important to keep your operating systems up to date, as this will help maintain the security, performance, and functionality of your device. Regular updates mean that you are benefiting from the latest improvements and protections available.
Different 'types' of devices have different methods to action an update of their operating systems, follow the instructions for your device below:
Windows (for PC's)
| Step 1 | Click on the ‘Start’ button and select ‘Settings’ (the gear/cog icon). |
| Step 2 | Go to ‘Update & Security’ and click on ‘Windows Update’ in the left sidebar. |
| Step 3 | Click on ‘Check for updates’ and follow the prompts to install any available updates. |
macOS (for Mac's)
| Step 1 | Click on the Apple icon in the top-left corner of the screen for the drop down menu. |
| Step 2 | Select ‘System Preferences,’ then choose ‘Software Update.’ |
| Step 3 | If updates are available, click ‘Update Now’ to install them. |
iOS (for iPhone's and iPad's)
| Step 1 | Go to ‘Settings’ on your device. |
| Step 2 | Scroll down and select ‘General.’ |
| Step 3 |
Choose ‘Software Update’ to check for and install any available updates. |
Android (for smartphones that are not iPhones and tablets that are not iPads)
| Step 1 | Open the ‘Settings’ app on your device |
| Step 2 | Scroll down and select ‘System’ or ‘About phone’ (the name might vary). |
| Step 3 |
Look for ‘Software Update’ or ‘Software Information’ to check for and install updates |

All digital devices are very complex tools, we look at the key basic components of these devices below in this diagram. If you want more information about each component, click the name in the 'accordion' information below to reveal more details.
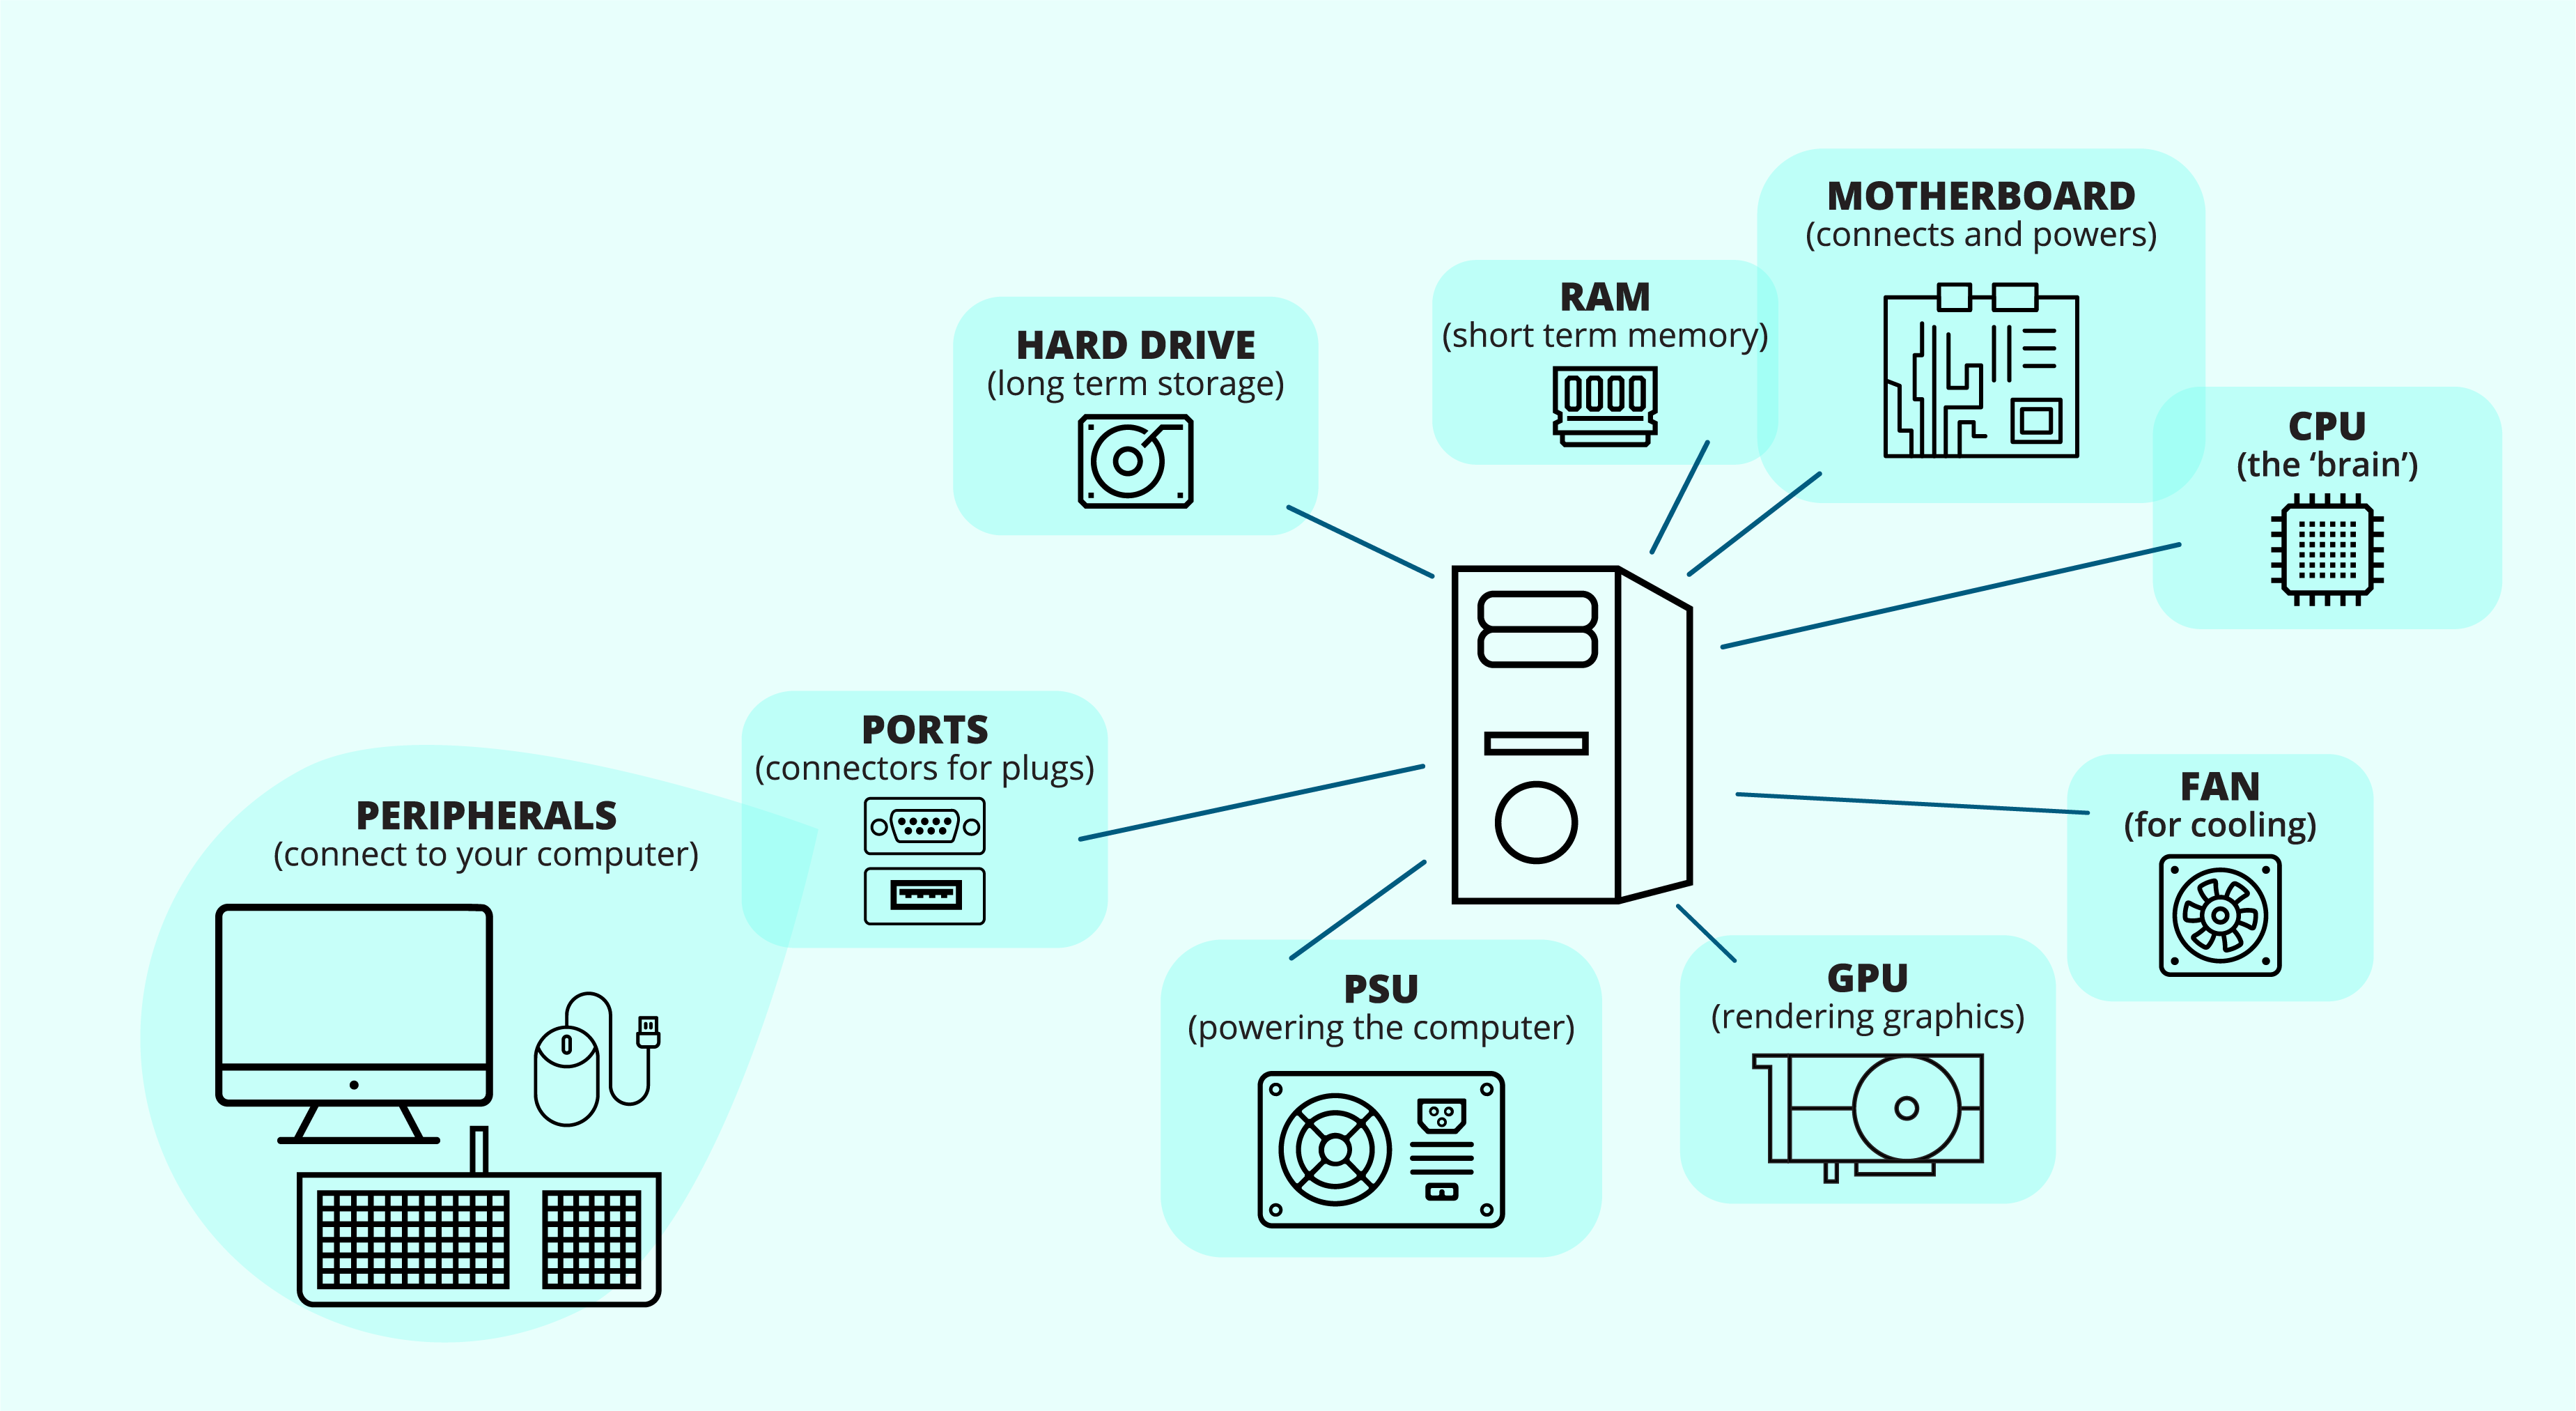
This can be referred to as the ‘brain’ of the computer, the CPU executes all instructions, performs calculations, and manages data. It's responsible for the overall processing of all tasks.
Random Access Memory (RAM) is a type of short term memory for the computer for things it is using at that moment, like any programmes you have open and the tasks you are currently working on.
The more RAM a computer has, the better it can handle multiple tasks at once at a quick pace. If you don’t have enough RAM your computer will work very slowly or even crash.
Long term storage in your computer. Your storage will hold your operating system, any applications you have, saved documents, and media files. Most storage is either Hard Disk Drives (HDD) or Solid-State Drives (SSD).
HDD are older and more traditional storage devices. They consist of spinning disks that store data magnetically. They are cheaper but are generally slower than SSDs.
SSDs are a newer type of storage that uses memory chips to store and retrieve information. Your computer can find files on an SSD much faster because there's no need to wait for a spinning disk. They are also more reliable and quieter than HDDs.
The motherboard is the main circuit board that connects and provides power to all the other components. It houses the CPU, RAM, and provides connectors for peripherals like hard drives, graphics cards, and more.
The PSU provides power to the various components in your computer. It converts the electrical power from your outlet into a form that the computer can use.
Also known as a graphics card, the GPU is responsible for rendering images and videos. It's particularly important for tasks like gaming, video editing, and graphic design.
To prevent components from overheating, computers have cooling systems that typically include fans, heat sinks, and sometimes liquid cooling systems.
These are connectors on the computer where you can plug in various devices like USB drives, monitors, keyboards, and mice.
The case houses and protects all the components. It provides the physical structure of the computer and includes necessary openings for airflow and ports.
These are additional devices that you can connect to your computer, such as monitors, keyboards, mice, printers, external hard drives, and more.
The software that manages the computer's hardware and provides a user interface for you to interact with. Common examples include Windows and macOS.
Software is inside our computers and devices
Software is what makes it possible for us to browse the internet, play games, send emails, edit documents, watch videos, and perform countless other tasks on our digital devices. It's what brings technology to life and makes it useful in our daily lives.
Software developers use programming languages to write the code that makes software work. These languages provide a way for humans to communicate with computers and create the desired functionality.
The most important piece of software in your computer is your operating system. Your computer software might also be anti-virus programmes and various applications.
More about Apps
Apps (short for applications) are a type of software and are like tools in your toolbox. Each app is like a different tool that you can use for a specific job.
For example: Microsoft Word is an app that allows you to create documents and you might have a camera app that lets you take photos.
The list of available apps is endless and makes your computer experience useful and fun for you.

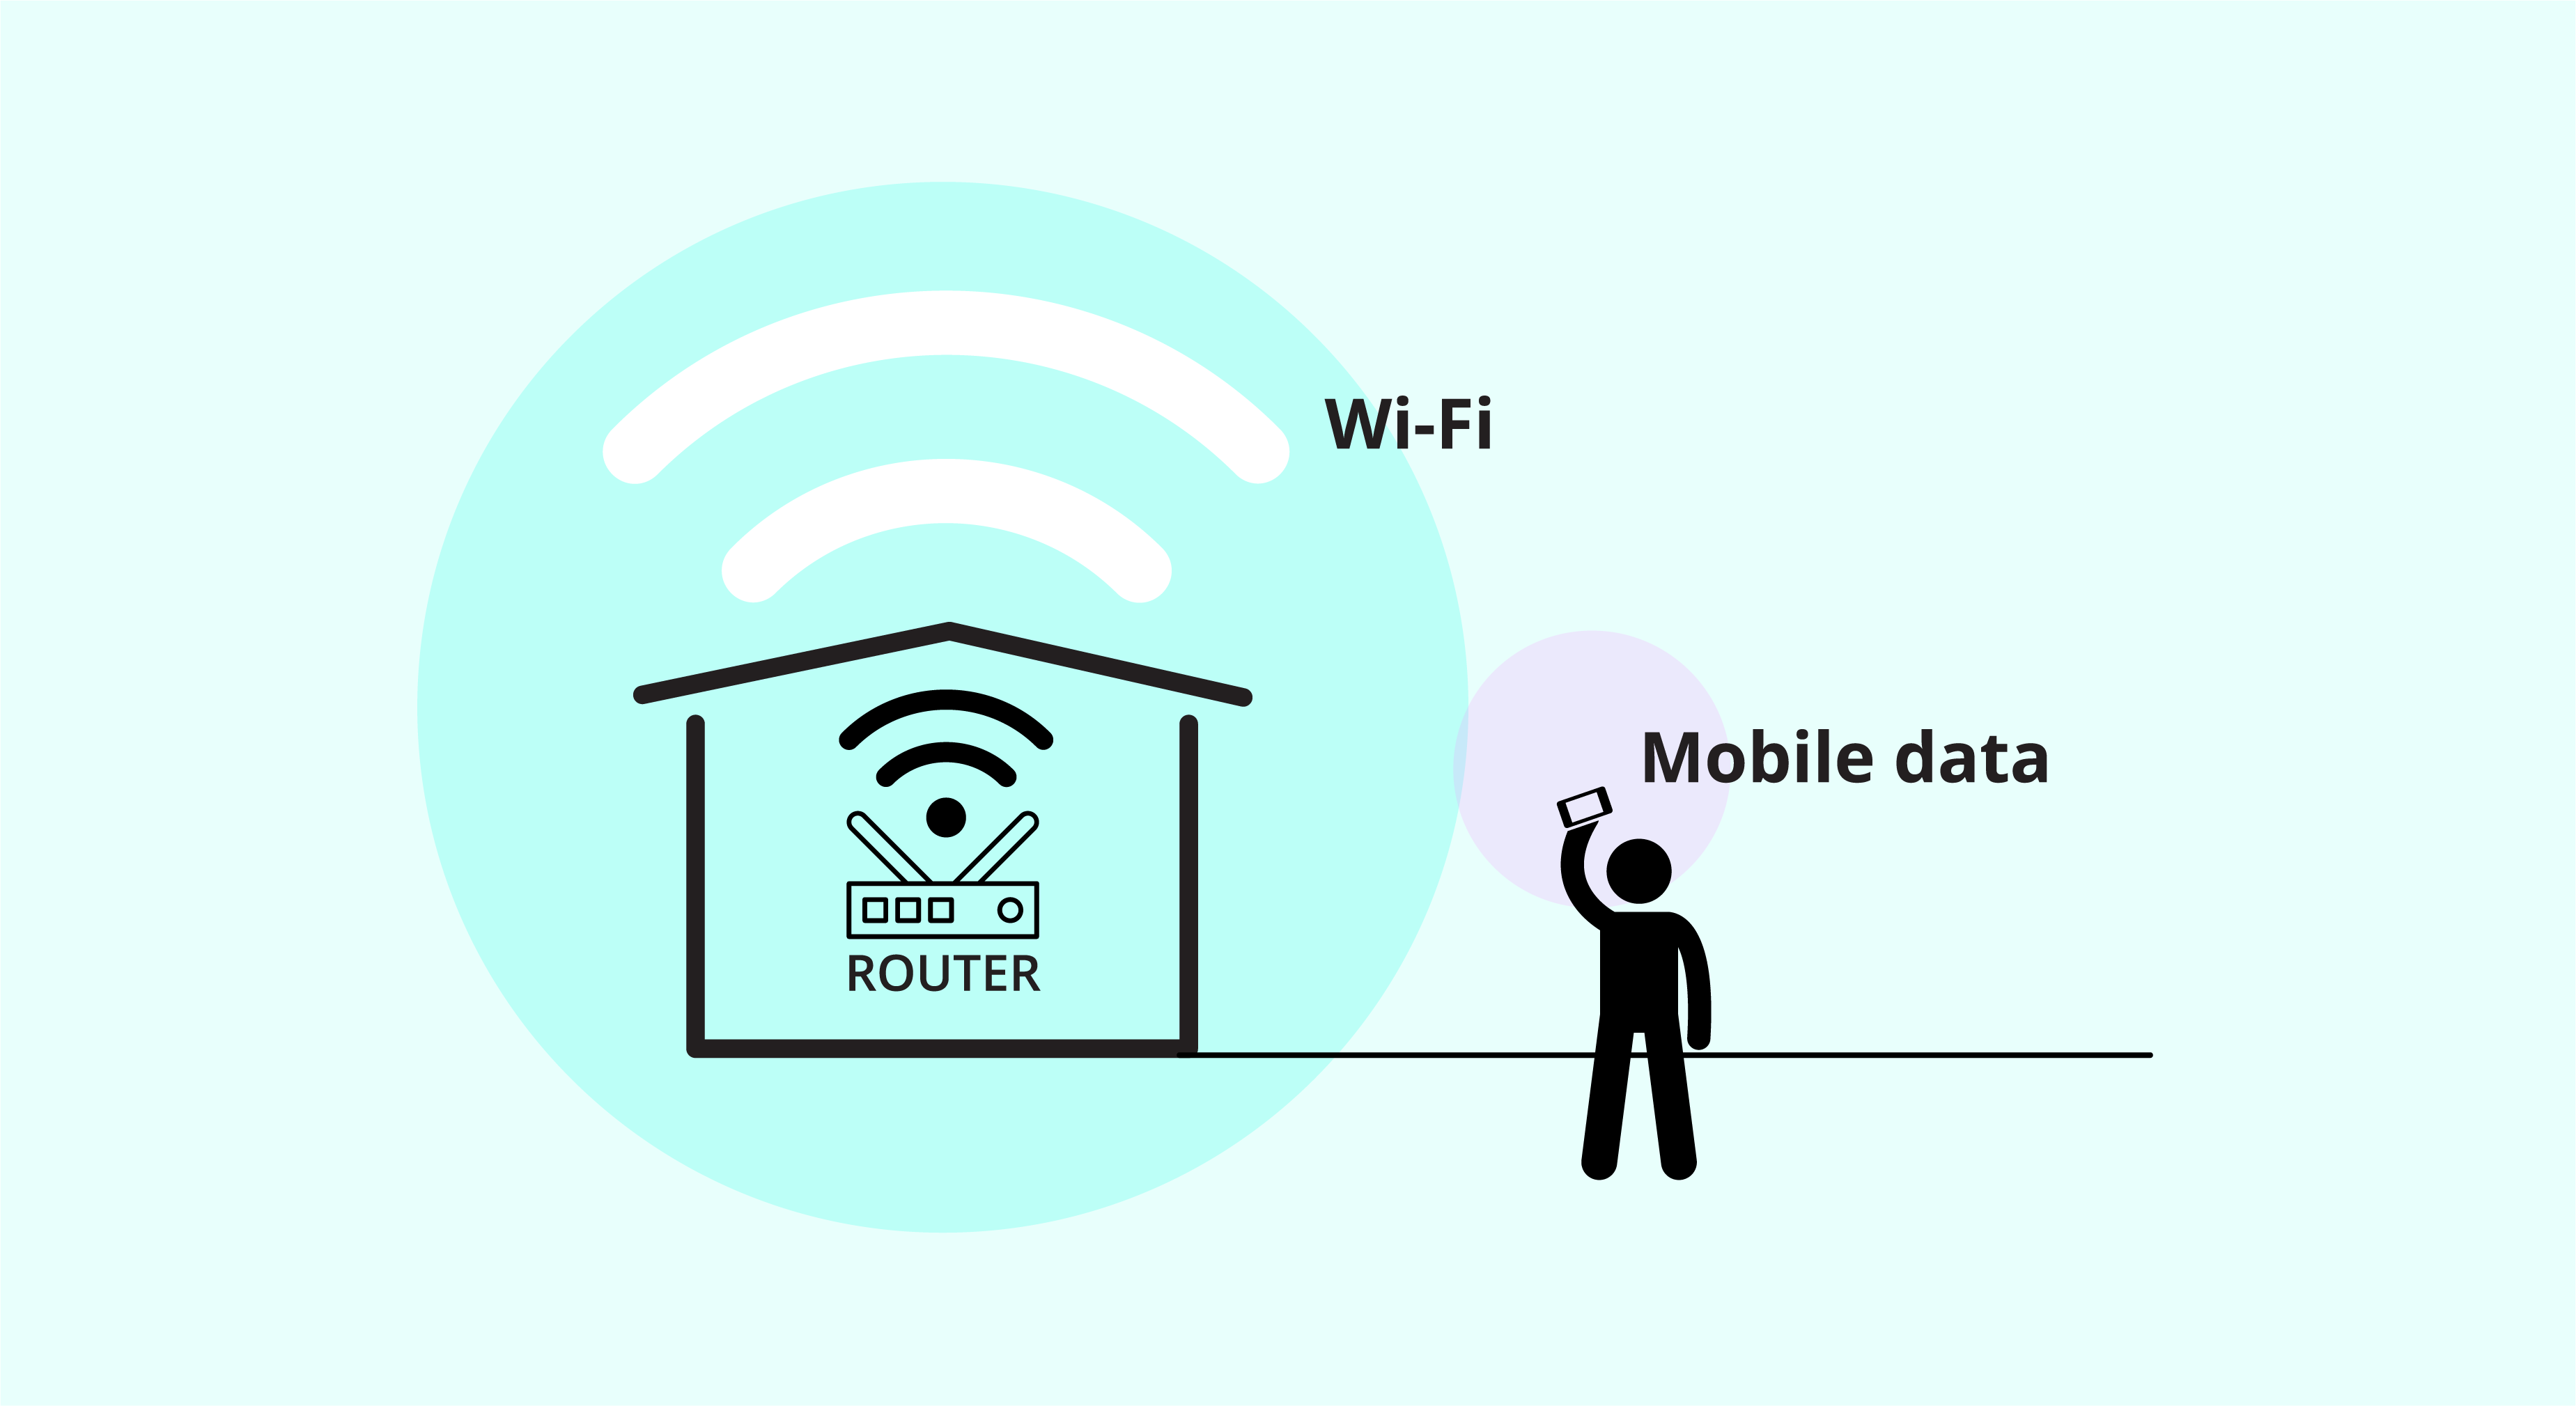
When you are studying online with us, you need to be connected to Wi-Fi so you can access all the learning material.
DID YOU KNOW?
Wi-Fi is a registered trademark of the Wi-Fi Alliance, formerly known as the Wireless Ethernet Compatibility Alliance. If you can remember dial-up internet, you will appreciate how easy it is to connect to Wi-Fi now days. ;)
How does Wi-Fi work?
You will most likely have Wi-Fi at your home (or where ever you are studying) and your device will 'catch' the signal and connect to the internet once you have input the specific password.
- To access the Wi-Fi around you, your device needs to be 'introduced' to the Wi-Fi signal first and you need to input a password.
- Once your computer has been ‘introduced’ to the Wi-Fi, it will remember and automatically connect each time. Sometimes your computer can’t connect to your Wi-Fi, in these instances, if you are sure your password is correct, a simple re-start of your computer often resolves the issue. Double check your computers operating system is up to date, as this could cause connectivity issues. (See above for info on keeping your operating system up to date.)
Different types of devices have different methods to connect to the internet, follow the instructions for your device below.
How to connect to the internet with Wi-Fi, if you are on a PC (Windows operating system):

| Step 1 |
In the bottom right corner of your screen, look for the Wi-Fi icon, which looks like a series of bars or waves. |
| Step 2 |
Click on this icon to see available Wi-Fi networks and your current connection status. You can click on a network to connect to it or view its properties. |
| Settings: | You can also access more detailed Wi-Fi information through the Windows 'Settings': |
| Step 1 |
Open the ‘Settings’ app by clicking the Windows icon in the lower-left corner and selecting the gear-shaped ‘Settings’ icon. |
| Step 2 |
In the Settings window, go to: ‘Network & Internet.’ Here, you'll find options to view your current network connection, manage known networks, and troubleshoot Wi-Fi problems. |
Connecting to the internet, if you are on a macOS (Apple Mac):
| Step 1 | In the upper-right corner of your screen, you'll see the Wi-Fi icon, which looks like a series of bars or waves. |
| Step 2 | Click on this icon to see available Wi-Fi networks and your current connection status. You can click on a network to connect to it or view its properties. |
| System Preferences: | For more detailed Wi-Fi information on a Mac, go to the Apple menu in the upper-left corner and select ‘System Preferences': |
| Step 1 | Click on ‘Network.’ |
| Step 2 | In the Network preferences, you can select ‘Wi-Fi’ on the left to view and manage your wireless network connections. You can also click ‘Advanced’ to access more Wi-Fi settings and view a list of known networks. |
Please note: Wi-Fi information can vary slightly depending on your computer's make and model.
Mobile Data
If you are not near any available Wi-Fi (Wi-Fi is limited to being available within a few hundred meters of the router). This means that if you are not at your home, your computer will not be able to ‘see’ the Wi-Fi and you might want to use mobile data.
Smart phones, laptops and some tablets will have mobile data to connect them to the internet when you are out and about (and not near any Wi-Fi).
Just keep in mind that using mobile data can use up a part of your phone plan, so it's a good idea to use it when you need it and switch back to Wi-Fi when you're back home.
DID YOU KNOW?
A router is a device in your home or office that manages internet data traffic between your computer devices and the internet, it ensures security through features like firewalls, and provides wireless connectivity for devices through Wi-Fi.
So now you have your computer device, your operating system is up to date and you have a Wi-Fi connection to access your online learning, you now ready to use a web browser to access the internet for your online learning — as you are doing so, reading this :).
A web browser is like your window to the internet. It allows you to search and see any number of websites. We recommend Google Chrome (Chrome for short) as the best web browser for our online learning platform.
Different types of devices have different methods to download Chrome, follow the instructions for your device below:
Downloading Chrome, if you are on a PC (Windows operating system):
| Step 1 | Open your existing web browser (e.g., Internet Explorer, Microsoft Edge). |
| Step 2 | In the address bar, type ‘chrome.com’ or ‘google.com/chrome’ and press Enter. |
| Step 3 | On the Google Chrome website, click the ‘Download Chrome’ button |
| Step 4 | You might see a message confirming that you want to download the installer. Click ‘Accept and Install’ or a similar button. |
| The installer will be downloaded to your computer. | |
| Step 5 | Once the download is complete, locate the installer file and double-click it. It will most likely be in your Downloads folder if you haven’t specified a place for it to be downloaded to. |
| The ‘Downloads’ folder is usually located within your personal user folder. You can often find it by going to ‘This PC’ or ‘My Computer’ and then looking for the ‘Downloads’ folder. | |
| Step 6 | Follow the on-screen instructions to install Google Chrome. You may be prompted to choose options like setting Chrome as your default browser and importing any existing bookmarks. |
Downloading Chrome, if you are on a macOS (Apple Mac):
| Step 1 | Open your existing web browser (e.g., Safari). |
| Step 2 | In the address bar, type ‘chrome.com’ or ‘google.com/chrome’ and press Enter. |
| Step 3 | On the Google Chrome website, click the ‘Download Chrome’ button. |
| Step 4 | You might see a message confirming that you want to download the installer. Click ‘Accept and Install’ or a similar button. |
| Step 5 | The installer will be downloaded to your Mac. Once the download is complete, open the installer file. |
| Step 6 | Drag the Google Chrome icon to the ‘Applications’ folder to install it. |
| Step 7 | Open Google Chrome from your Applications folder or by searching for it using Spotlight (search). To use Spotlight: press Command + Space and start typing ‘Chrome’. |
Always ensure you are downloading software from the official source to avoid downloading potentially harmful files from unofficial websites.
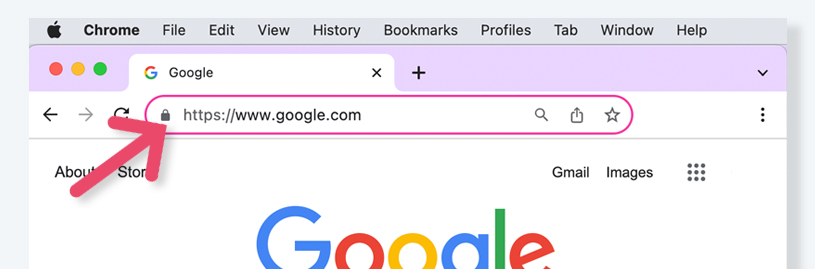
When we want to go to a particular webpage (like the one you are on now!), you must use it’s unique web address. This is just like how a physical address tells you where a building or shop etc is located — a web address or URL (short for Uniform Resource Locator) tells your web browser (we recommend Chrome) where to find a specific webpage or resource on the internet.
This is the information that is typed into the browser/address bar (type and press 'enter') or appears in the browser/address bar if you have clicked a hyperlink.
What is https?
The 'https' part of a web address stands HyperText Transfer Protocol Secure, which is a standard application-level protocol used for exchanging files on the World Wide Web.
What is that padlock icon?
You will notice a 'padlock' icon when a web address is displayed. This usually signals a secure connection to that website.
However it is important to note that Google is updating this padlock icon to a different icon currently. This is due to Google's research showing it misleads users into a false sense of security, as the padlock is showing that only the connect is safe, not the website.
DID YOU KNOW?
Hyperlinks are clickable text or elements on a webpage, email, documentation etc, that you can click and it will automatically take you to the webpage.

If you don’t know the web address of what you are looking for on the internet, you can put a word or phrase into a search engine.
The most common search engine is Google (so commonly used it has become a verb for searching for something in the internet—’I’ll just google it!’)
Once you are in Chrome, getting to Google is easy, you can just type in google.com into the address bar and press enter. Or you can also simply type your search query directly into the address bar and press 'Enter', Chrome will automatically use Google as the search engine and display the results of your search.
DID YOU KNOW?
You can bookmark any web address that you will want to return again. It’s a quick access to these web pages, without needing to type in the web address each time.
Creating a bookmark in Google Chrome is a handy way to save websites you frequently visit for quick access.
| Step 1 | Open Chrome |
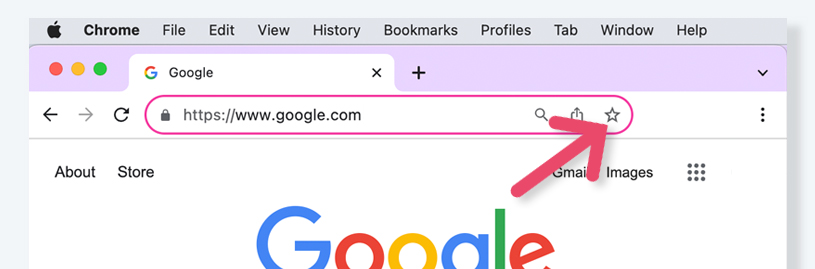
| Step 2 | Go to the website that you want to bookmark Navigate to the website you want to bookmark by typing its URL (web address) in the address bar and pressing 'Enter'. |
| Step 3 |
Click the star icon |
| Step 4 | 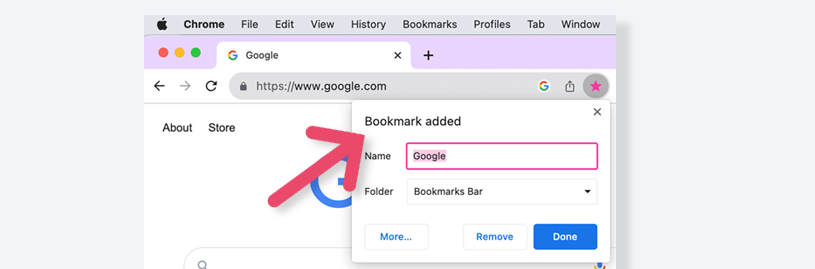 Select where to save the bookmark You can also change the name of the bookmark here. Select from the dropdown menu to save it in the Bookmarks Bar or another folder. |
| Step 5 | Save the bookmark Click the ‘Done’ button to save the bookmark. |
Your bookmark is now saved!
If you saved it to the Bookmarks Bar, you'll see it appear there (the Bookmarks Bar is just under where you type your web addresses in the browser).
If you saved it to a folder, you can access it by clicking the three vertical dots (menu icon) at the top-right corner of the browser, then selecting ‘Bookmarks’ and finding the folder you chose.
To access your bookmark, simply click on it in the Bookmarks Bar or open the bookmarks menu and click on the bookmark's name. This way, you can quickly return to your favourite websites without typing the full web address every time.
If you're experiencing issues like slow web loading, privacy concerns, or website errors, clearing your cache and cookies can be a useful troubleshooting step.
What is your cache?
Cache (pronounced ‘cash’) is a part of your computer’s memory and is used to store frequently accessed or recently used data for quick retrieval.
The cache stores a copy of frequently used data, such as app files, web page elements or recently used documents, in a form that can be quickly accessed. When the same data is needed again, the computer checks the cache first.
If the data is present in the cache, it can be read much more quickly than fetching it from the slower storage. Web browsers store copies of web page elements (images, text etc) in a cache to load web pages faster on subsequent visits.
Regularly clearing your web browser's cache can help improve browser performance and privacy.
Caches significantly enhance system performance, as they reduce the time it takes to access frequently used data. However, they must be managed effectively to ensure that outdated or irrelevant data isn't retained for too long. In some cases, clearing the cache can help resolve issues related to outdated or corrupted cached data.
However, when you revisit websites, after you have cleared the cache, this means that your browser will now need to download all assets (images, scripts, stylesheets) again, which can result in slightly longer page load times.
What are cookies?
Cookies are small pieces of data that websites store on your computer when you visit them. These data files serve various purposes, such as improving your browsing experience, remembering your preferences, and providing personalised content. Cookies are an integral part of web browsing and play a significant role in how websites function.
Here are some key points to understand about cookies:
- Tracking and identification
Cookies can be used to identify your computer or device when you return to a website. They are often used for tasks like remembering login credentials or items in your shopping cart. - Privacy concerns
Cookies have raised privacy concerns as they can be used to collect data about your browsing habits. However, many websites use cookies responsibly to enhance user experience without compromising privacy. - Cookie settings
Most web browsers allow you to control how cookies are used. You can choose to accept, block, or delete cookies.
There are some important things to note before you clear your cookies:
- Clearing cookies removes stored login credentials, which means you'll need to re-enter usernames and passwords for websites you regularly visit.
- Cookies are often used to store your preferences on websites, such as language settings or customised layouts. Clearing cookies resets these preferences to default settings.
- Many websites use cookies to provide personalised content, recommendations, and targeted advertising. Clearing cookies can disrupt these features, and you may see less relevant content.
- After clearing cookies, you'll need to re-authenticate (log in) on websites where you were previously logged in automatically. This can be time-consuming.
- If you were shopping online or filling out a lengthy form, clearing cookies can remove items from your shopping cart or reset form data, potentially causing you to start over.
How to clear the cache and cookies on your computer, in Google Chrome (PC and Mac):
| Step 1 | Open Chrome Click on the Google Chrome icon to open the browser. |
| Step 2 | Access Settings In the top-right corner, you'll see three vertical dots (menu icon). Click on it to open the menu. |
| Step 3 | Go to Settings From the menu, click on ‘Settings.’ |
| Step 4 | Clear Browsing Data Scroll down to find ‘Privacy and security.’ Click on ‘Clear browsing data.’ |
| Step 5 | Choose Data to Clear Select ‘Cookies and other site data’ and ‘Cached images and files.’ There are other options here, so read them carefully if you chose to select them. |
| Step 6 | Clear Data Click on the ‘Clear data’ button. Confirm if prompted. |
Clearing your web browser’s history, on your computer in Google Chrome (PC and Mac):
| Step 1 | Open Chrome Click on the Google Chrome icon to open the browser. |
| Step 2 | Access Settings In the top-right corner, you'll see three vertical dots (menu icon). Click on it to open the menu. |
| Step 3 | Select 'History' In the drop-down menu that appears after clicking the three dots, hover over 'History'. |
| In the 'History' submenu, click on 'History' again | |
| Step 4 |
Choose Time Range On the right side, you can select a time range to clear. You can choose from options like Last hour, Last 24 hours,"Last 7 days, or All time. |
| Step 5 | Select Data to Clear Below the time range options, you'll see a list of types of browsing data you can clear, such as browsing history, cookies, cached images and files, and more. Check the boxes next to the types of data you want to remove. |
| Step 6 | Clear Data Once you've selected the time range and data types, click the 'Clear Data' button. Chrome will confirm your choice. |
| Step 7 | Confirmation A confirmation dialog will appear, asking if you are sure you want to clear the selected data. Confirm by clicking 'Clear'. Chrome will then proceed to clear your browsing history and other selected data. Be aware that this action is irreversible, and the cleared data cannot be recovered. After the process is complete, your browsing history for the specified time range will be removed. |
Clearing your browser's history is often associated with clearing cookies. Clearing your bower’s history means that you'll lose your record of the websites you have visited.
This action should not delete your saved bookmarks. Browser history and bookmarks are two separate features in web browsers, and clearing one does not affect the other, but be sure to read all the prompts from your actions when you are doing this, as some browsers may combine the two features.