As our NZMA Trades campus students master the tools of their respective trades, let's now turn our attention to the tools you'll be utilising for your online studies with us.
All our Online students have free access to the Microsoft 365 suite of software such as: Microsoft Word, Excel, PowerPoint, Outlook and OneDrive, while they are studying with us.
These are accessible by signing in here: microsoft.com/en-nz

- Sign in using your student email and the password you have set up to access the Online Campus.
- You can download the Microsoft programmes onto your devices or use the web version of all these applications. Word is an important app to download, as most our online programmes use this for their assessments.
- Follow the instructions on this website to download and install the apps on your computer.
- Be sure to download Word, as you will need it for completing assessments.
Outlook

Occasionally you will receive emails from the Online Campus team, these emails will go to your nominated contact email address.
However, some important emails will go to your student email address in Outlook, please check this inbox regularly through Outlook.
Download Outlook and sign into your student email by using the same sign in as you use to access the Online Campus.
Word

‘Word’ is short for Microsoft Word, which is a very widely used word processing software application.
Word allows us to create, edit, format, and save documents, making it a versatile tool for completing your assessments and more.
Word has a user-friendly interface, a wide range of formatting and styling options, spell-check and grammar-check capabilities, the ability to insert images and other media and support for saving documents in various file formats, including .docx (the Word default), .pdf, and .txt.
Did you know?
Microsoft has information and support for Word users.
CLICK to access these resources: support.microsoft
GO TO: Section 5.1.5 for handy links to Word tutorials.
PowerPoint

PowerPoint is another widely used Microsoft 365 app. It can be used to create and deliver dynamic presentations.
PowerPoint has a user-friendly interface with slide templates and design options, the ability to add text, images, charts, graphs, videos, and animations to slides, tools for creating slide transitions and custom animations, and support for speaker notes and presenter view during presentations.
Did you know?
Microsoft has information and support for PowerPoint users.
CLICK to access these resources: support.microsoft
GO TO: Section 5.1.5 for handy links to PowerPoint tutorials.

Live Sessions are a feature of the Online Campus that allows you to attend video meetings with your tutor and other students via Zoom.
Your tutor will schedule Live Sessions regularly for your programme. These sessions might include information about assessments, Q and A sessions, a guest speaker, or specific topic information. The Live Sessions calendar is found in the content menu of your programme of learning, under Live Sessions.
To be an active learner, it is important to attend these sessions and make the most of the time with your tutor and peers. However, if you cannot attend, don’t worry, each Live Session is recorded and when the recording is available it will be in the content menu under Live Session Recordings.
GO TO: Section 4.4 (Stay Connected in the Learning Success Hub) for more information about Live Sessions, including how to register and join a Live Session.
Live Session video etiquette rules
| Be punctual | Join the Live Session on time to avoid disruption. |
| Stay engaged | Pay attention to the presentation and participate actively by asking questions or providing comments when appropriate. |
| Use kind and respectful language | Keep your comments and questions respectful and constructive, even if you disagree with the presenter or other audience members. |
| Avoid interruptions | Mute your microphone when you're not speaking to prevent background noise. |
| Be patient | If there are technical difficulties, be patient and wait for the presenter or host to resolve them. |
Adding backgrounds to your video in a Live Session
If you want to blur or add a background to your video to screen your actual background, follow these steps below:
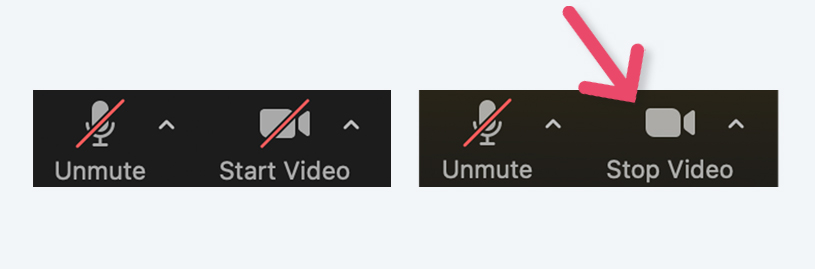
| Step 1 |
Start video
|
| Step 2 |
Access background settings
|
| Step 3 | If you want to blur your background for privacy In the this pop up menu, click on 'Blur My Background' and Zoom will automatically apply a blur effect to your background. |
| Step 4 | If you want to adding a virtual background
|
| Step 5 | Adjust settings You can also adjust the settings for your virtual background, such as the opacity or the ability to 'Mirror' the background. These settings can be useful if you want to fine-tune your virtual background appearance. |

When your computer or app isn’t working how you think it should, sometimes it is hard to know what to do. Below are some simple tips that might help solve the issue.
GO TO: Section 5.1.4 for more IT tips.
Restart! Switch it off and on
- Restart the program or app
Close the problematic program or app and reopen it. This simple step can resolve many minor issues. - Restart your computer or device
If the program or app continues to misbehave, try restarting your computer or device. Restarting can clear temporary glitches and free up system resources.
Update!
-
Check for updates
Ensure that the program or app is up to date. Outdated software can lead to compatibility issues and performance problems. Most programs and apps have an option to check for updates within their settings or menus. -
Check for operating system updates
Sometimes, issues can be resolved by updating your computer's operating system.
GO TO: Section 6.2.2 for more information on how to update your operating system.
Tidy up
- Clear your cache and cookies
Some apps, especially web browsers, can benefit from clearing cached data and temporary files. This can help improve performance and resolve display issues.
GO TO: Section 6.2.10 for more information on how to clear your cache and cookies.
- Free up disk space (storage)
If your computer's storage is nearly full, it can slow down program performance. Delete unnecessary files or move them to an external storage device.
What's the message?
- Check for error messages
(for example: 404 page not found) Pay attention to any error messages that appear. These messages can provide clues about what's causing the problem. If you don't understand the error message, you can search for it online for more information.
Get help
- Seek help
If you're unable to resolve the issue on your own, don't hesitate to seek help from a tech-savvy friend, family member or an IT professional. You can also contact customer support for the program or app you're having trouble with.
GO TO: Section 5.1.4 for more IT handy contacts.