In this topic, you will gain valuable information into effectively working with documents on your computer, empowering you with the skills and confidence to successfully complete your online assessments
Starting off
When starting to work with documents on your computer, the first step is typically to open a word processing program such as Microsoft Word. Once the software is launched, you can create a new document or open an existing one. Then you can begin by typing or importing content, and as you work, it's essential to save your document regularly to ensure your progress is preserved.
We look below at some of the basic tasks you will need, as you start to work on your assessment documents.
-
Making a new document
To create a new document: click on ‘File’ in the top menu and choose ‘New’ or ‘New Document.’ This will create a new blank document for you to start working on. -
Saving the document
The first time you click ‘Save’ of a new document (and remember to do this as soon as you create it), a pop up window will appear asking for where you would like to save it. (you can also name the document in this pop up window).
GO TO: Section 6.5.2 for more information on saving your files. -
Naming the document
Give your document a clear and descriptive name so you can find it easily again in the future.
GO TO: Section 6.6.2 for more information on best practice file and folder naming. -
Most importantly
Save regularly: save, save, save! Don’t forget to frequently save your document, if your computer crashes and you have not saved it: you will lose all work you have completed from the previous save.
GO TO: Section 6.5.2 for more information on saving your files.
Tip
Remember to save regularly! If this is a consistent habit, you will never lose work if you computer crashes.

When you work on a computer, whether you're writing a document, creating artwork, or doing anything else, it's important to save your work regularly so that you don't lose it. Think of saving like putting your work in a safe place so you can come back to it later.
Finding the Save option
- Most programs have a menu at the top of the screen. It might be called ‘File’ or have the program's name.
- Click on that menu.
- Once in that menu item, you'll see options like ‘Save’ or ‘Save As.’ If you're saving the file for the first time, click ‘Save As.’ If you've saved it before and want to keep the same name, just click ‘Save.’
What is the difference between ‘Save’ and ‘Save As’?
In software applications, like Microsoft Word, ‘Save’ and ‘Save As’ are two different commands that serve two distinct purposes.
| Save |
The ‘Save’ command is used to save your current document or file. When you choose ‘Save,’ you are updating the existing file with any changes you have made since the last save. If the file is new and has not been previously saved, using ‘Save’ for the first time will prompt a pop up window, allowing you to choose a location and provide a name for the file. |
|
When to use this? Use ‘Save’ when you want to update the current file with your changes. It's a way to preserve your work in the same file without creating a new copy. |
|
| Save As |
The ‘Save As’ command is used to save a copy of the current document or file with a different name, location, or file format. This will allow you to create a duplicate or a new version of the file while keeping the original intact. You can also change the file format (e.g., from .docx to .pdf) or save it in a different folder. |
|
When to use this? Use ‘Save As’ when you want to:
|
Choosing where to save your files
Saving files on a computer is like organising things in your house. Imagine your computer is like a big digital house with different rooms (folders) to keep your belongings. When you create or get files like documents, photos, or videos, you need to put them in the right room (folder) so you can find them easily later.
Some areas in your computer that you might save your files are:
- Documents
For letters, stories, and important papers, you might want a ‘Documents’ folder. This is a good place for things you need to read or edit later. - Pictures
If you take photos with your phone or camera, you might have a ‘Photos’ folder for them. This way, you can find your pictures quickly when you want to see them. - Music and Videos
If you download songs or videos, you can make a ‘Music’ or ‘Videos’ folder. This keeps all your entertainment files together. - Downloads
Sometimes, when you get things (download) from the internet, they go to a ‘Downloads’ folder temporarily. You can move them to the right folder later.
Tip
- Try to keep similar things together, just like you group things that belong in the same room in your house.
- You can even make new folders on your computer to organise things better and you can make folders within folders for even greater organising. Just remember to label everything clearly for easy access later.
- Just like you know where to find things at home, saving files in the right place on your computer helps you find and use them easily later.
On most devices, there is a designated area where people commonly save documents. This area is known as the ‘Documents’ folder, and it's a default location provided by the operating system to help users organise and store their files.
Here's how it works:
The ‘Documents’ folder is usually found within the user's personal folder, which is named after the user's account name on the computer. This personal folder is often located in the ‘Users’ directory on the main drive (usually labelled ‘C:’ in a PC).
The ‘Documents’ folder is designed to be a central place where you can store various types of documents, such as text files, spreadsheets, presentations, and more. It's like a digital filing cabinet for your electronic files.
Inside the ‘Documents’ folder, you can create subfolders to further organise your files. For example, you might create subfolders like ‘Work,’ ‘Personal,’ ‘Projects,’ or anything else that helps you categorise your documents.
It's easily accessible:
The ‘Documents’ folder is easily accessible from various programs when you want to save or open files. Many programs have a shortcut to the ‘Documents’ folder within their ‘Save’ or ‘Open’ dialogs.
Other standard folders:
In addition to the ‘Documents’ folder, the operating system often provides other standard folders like ‘Pictures,’ ‘Music,’ and ‘Videos’ for organising multimedia content.
These folders serve a similar purpose to the ‘Documents’ folder but are specialised for specific types of files so you can keep all files of a similar type together.
Remember, while the default ‘Documents’ folder is a convenient place to save files, you can create additional folders or use external drives to organise your files based on your preferences and needs. The key is to find an organisational method that works best for you and helps you easily locate your files when you need them.

No one likes a messy desk!
Think of your computer's desktop like a real desk in your home. When you have too many things on your physical desk, it becomes messy, and it's hard to find what you need. The same can happen on your computer's desktop when you save too many files there.
Why you shouldn’t save files to your computer desktop:
- So visually cluttered!
Just like a cluttered physical desk doesn't look organised, a cluttered computer desktop can make it hard to find the things you need. - Difficult to find files
When you have lots of files on your desktop, it's easy to lose track of where something is. It's like having too many things piled up on your real desk, making it hard to find a specific paper or item. - It can make your computer run slower
Having many files on the desktop can slow down your computer a bit because it has to load all those icons and files every time you start your computer. - Accidental deletion
If you accidentally click on the wrong thing, you might delete a file without realising it. Just like knocking something off your real desk by mistake.
There are much better places to save your files
- Documents folder
Remember we talked about the ‘Documents’ folder? It's like a virtual filing cabinet. It's a great place to keep your important files because you can organise them into different folders. - Create your own folders
Just like you'd use folders to organise your papers on your physical desk, you can create folders inside the ‘Documents’ folder on your computer. This makes it easy to find things. - External Drives or Cloud storage
If you have many files, you can also use external drives (like USB drives) or Cloud storage. It's like having a storage box for things you don't need every day.
Tip
It's okay to keep a few important things on your desktop, like shortcuts to programs you use a lot. But try to keep it clean and not overcrowded.
Remember: just like you organise your things at home to find them easily, organising your computer files in the right places makes it easier to use your computer and find what you need.

When we work on a document on our computers, there are some actions that you might often repeat. Each action has a keyboard 'shortcut', you will see the PC and Mac version of the shortcut for each action in the table below (Here's how you use the keyboard shortcuts: for example with 'Command + c', you would click the 'Command' button on your keyboard, and whilst still holding it down, also click the 'c' button.)
Copy and Paste
When you want to create a duplicate (copy) of something (like text, an image, or a file) and keep the original where it is, you use the ‘copy and paste’ method.
| Step 1 |
Select the content you want to duplicate To do this, click and drag your mouse cursor over the text, or double click to highlight the text. If it is an image, click it with your cursor. |
| Step 2 |
Choose Copy Once you have selected the item/s, right-click on the selection and choose ‘Copy’ from the menu that will appear. You can also go to the main menu (usually under 'Edit') chose 'Copy' or use the keyboard shortcuts. |
|
Keyboard Shortcut for Copy: PC: Ctrl + c Mac: Command + c |
|
| Step 3 |
Paste Move your cursor to the place where you want to insert the duplicate content. Right-click in that spot and choose ‘Paste’ from the menu that will appear. You can also go to the main menu (usually under 'Edit') and choose 'Paste' or use the keyboard shortcuts. The copied content will be inserted at that location, while the original remains in its original place. |
|
Keyboard Shortcut for Paste: PC: Ctrl + v Mac: Command + v |
Cut and Paste
When you want to move something (cut it) from one location to another, you use the ‘cut and paste’ method. This involves removing the content from its original place and placing it somewhere else.
| Step 1 |
Select the content you want to move To do this, click and drag your mouse cursor over the text, or double click to highlight the text. If it is an image, click it with your cursor. If you're working with images or files, right-click on the item and choose ‘Cut’. Then either from the main menu (usually under 'Edit') chose 'Cut' or use the keyboard shortcuts. |
|
Choose Cut Once you have selected the item/s, right-click on the selection and choose ‘Cut’ from the menu that will appear. You can also go to the main menu (usually under 'Edit') chose 'Cut' or use the keyboard shortcuts. |
|
|
Keyboard Shortcut for Cut: PC: Ctrl + x Mac: Command + x |
|
| Step 2 |
Move your cursor to the place where you want to move the content. Right-click in that spot and choose ‘Paste’ from the menu, or simply click in the spot you want to paste and use the keyboard shortcuts. The content you cut will be moved from its original location to the new one. |
|
Keyboard Shortcut for Paste: PC: Ctrl + v Mac: Command + v |
Undo
If you make a mistake or change your mind after copying or cutting something (or any action within your document), don't worry—you can use the ‘Undo’ option that can help you revert the changes.
Undo on a PC:
On a Windows PC, you can typically use the ‘Ctrl + z’ keyboard shortcut to undo your last action in many applications. This keyboard shortcut works in various software, including word processors, web browsers, and more.
Alternatively, you can often find the ‘Undo’ option in the Edit menu at the top of the program's window.
Undo on a Mac:
On a Mac, the keyboard shortcut to undo is usually ‘Command + z.’
Like on a PC, you can also look for the ‘Undo’ option in the Edit menu of the application you're using.
In both cases, using the ‘Undo’ command can help you reverse your most recent action, whether it's typing, formatting, deleting, or any other action you performed. It's a handy way to correct mistakes or changes you didn't intend to make.
Remember that not all programs and applications might use the same keyboard shortcuts or menus, so if you're unsure, you can often find the ‘Undo’ option in the program's main menu under the ‘Edit’ section. If you're ever in doubt, you can consult the program's help documentation or do a quick online search for specific instructions related to the application you're using.
When you work on a computer, there are many different file formats you may come across. You can see what the file format of a document is when you look at the name of a file, the file format abbreviation appears after the document name and a full stop.
For example: a Word document is titled like this: ‘Document Name.docx’. So this is a docx file format.
Different file formats exist because different tasks and applications have varying requirements for how data is structured, stored, and presented. Each file format is designed to provide specific features, optimisations, and compatibility, making it suitable for its intended purpose.
We will look at a few of the more common file formats below:
This is the default file format for Word documents in recent versions of Microsoft Word (2007 and later). It is widely used and is compatible with most word processing software.
PDF (Portable Document Format) files are widely used for sharing documents because they maintain formatting and can be viewed on almost any device using PDF reader software. Word allows you to save documents as PDFs. See more about PDFs in the next section.
Rich Text Format is a text file format that can be opened in Word and other word processing software. It's often used for basic text documents that don't require advanced formatting.
These are plain text files contain unformatted text and are compatible with virtually any text editor or word processing program, including Word. They are often used for basic notes and documents.
HTML (Hypertext Markup Language) files are used for web documents. Word allows you to save documents as HTML files, which can be viewed in web browsers.
JPEG (Joint Photographic Experts Group) (pronounced ‘jay-peg’) is a widely used format for photographs and images with a wide range of colours. It is a widely compatible format that works well with most devices, software, and online platforms.
JPEGs use lossy compression to reduce file size while maintaining decent image quality – lossy compression is a data compression technique used in digital media, such as images, audio, and video, to reduce file sizes by selectively discarding some of the data that the human senses are less sensitive to. (Called lossy because some data is 'lost'.)
PNG (Portable Network Graphics) is a lossless image format, meaning it retains high-quality images without loss of detail. It supports transparency and is often used for images with sharp edges, like logos and graphics with text. PNGs are common for web design.
HEIC (High-Efficiency Image File Format) is a relatively new image format developed by Apple. It offers high-quality compression and is used on iOS devices for photos and images.
MP4 (MPEG-4) is the most widely used video file format on smartphones. It provides a good balance between video quality and file size. Many phones, both Android and iOS devices, save videos in the MP4 format by default. This format is great to save any video files you have created, for upload to our online journals.
MOV (QuickTime) is the video file format developed by Apple and is commonly used by iPhones and iPads. It is a high-quality video.
Understanding PDF’s is important in our Online Campus, as this is the file format that generally is requested for when you upload your assessments for grading.
What is a PDF?
A PDF (Portable Document Format) is like a digital paper. It's a special type of file that lets you share and view documents exactly as they were meant to look, no matter what kind of computer or device you're using. Which makes them very popular and why we like them handed in as assessments.
- PDFs keep things the same
Imagine you write a letter or make a nice drawing on your computer. When you want to show it to someone, you can save it as a PDF. This means that when they open the PDF on their computer, tablet, or phone, it will look just like how you made it. The fonts, colours, pictures—everything will stay the same. - They are easy to share
PDFs are great for sharing because they work on many different devices. You can email a PDF, put it on a USB drive, or even print it. When someone else opens your PDF, they'll see exactly what you wanted to show them. - PDFs are Read-Only
A PDF is a Read-Only document. It means that people can look at it, read it, and see all the things you put in it, but they can't easily change anything by mistake. So if you send an important document as a PDF, others can see it without accidentally changing stuff. - They are easy to open
To open a PDF, you just need a program called a PDF reader. Many computers already have one installed. When you double-click a PDF, it should open in the PDF reader, and you can start reading or looking at whatever is inside. - PDF vs. Word Documents
Sometimes people use programs like Microsoft Word to write documents or PowerPoint to create presentations. But if you send someone a Word or PowerPoint document, they might see it differently if they don't have the same program (or they can edit them and make changes). Saving or exporting Word documents as PDFs help solve this problem because they keep everything looking the same no matter what program you use to open them and 'lock' them so they can't be easily edited by someone else.
PDFs are easy to create, however different types of devices have different methods to create PDFs, follow the instructions for your device below:
Making a PDF, if you are on a PC (Windows operating system):
| Step 1 | Click the 'File' tab | |
| Step 2 | Click 'Save As' or use the keyboard shortcut | 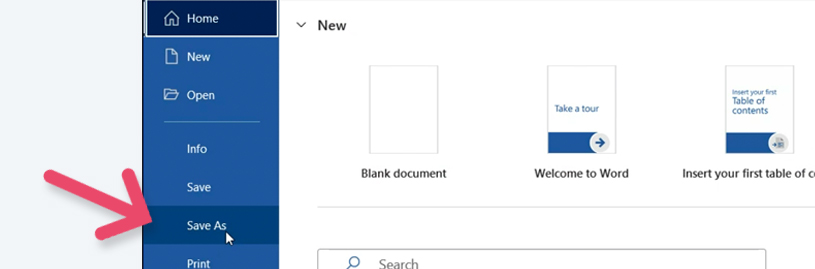 |
| Step 4 | In the 'Save As' type list, click PDF (.pdf) | 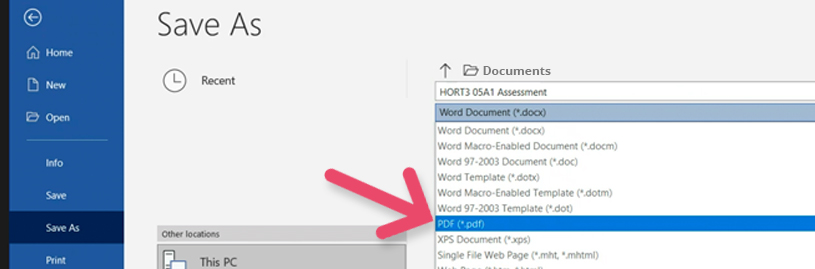 |
| Step 6 | Click 'Save' |
Making a PDF, if you are on a macOS (Apple Mac):
| Step 1 | Click the 'File' tab | |
| Step 2 | Click 'Save As' or use the keyboard shortcut | 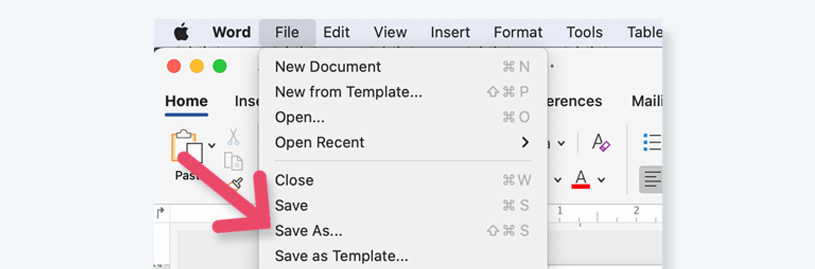 |
| Step 3 | Click 'File Format' towards the bottom of the window | 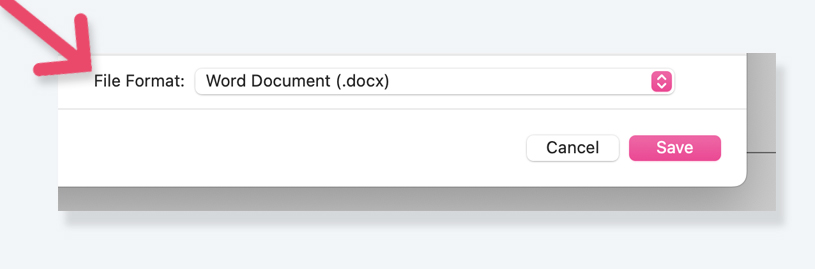 |
| Step 4 | Select 'PDF' from the list of available file formats | 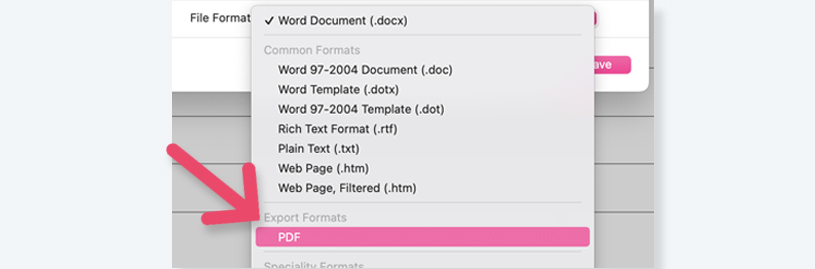 |
| Step 5 | Give your file a name, if it doesn't already have one, then click 'Save'. |

Nowadays, most people use their mobile phone to take photos and this is especially true when it comes to capturing images for your assessments.
To get the photographs from your phone to your computer, there are a few methods:
|
Email them! The easiest method for a small number of photographs is to email them to yourself. |
|
| For a larger number of photographs, you can use a USB cable. |
|
|
Using Wi-Fi (Wireless), this is also useful for a larger number of photographs.
|
|
Most of the assessments in the Online Campus are completed in a supplied Word template, so it is important that you download Microsoft Word and spend some time learning the basics, if you are new to it.
GO TO: Section 6.4.1 for more information on how to access Word (in Microsoft 365).
GO TO: Module 7 (Common Queries) for some fun practice assessments you can download.
Assessments in Word
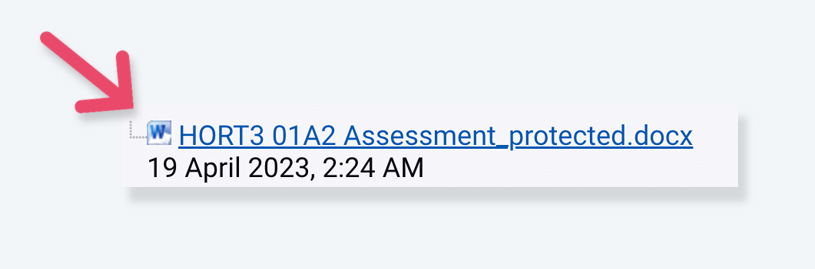
Many of the online assessments will be in Microsoft Word (MS Word) format. They generally will be an editable template: this means there will be fields that you can type in and areas of the document that you cannot edit.
The file in your assessments area of your programme of learning, will look like this:
Getting ready to start filing in your assessment template:
| Step 1 |
Gather information If you are still unsure, your online tutor can answer any questions and most assessments have a Live Session to discuss an assessment prior to the time to start it, either join that or watch the recording afterwards. |
| Step 2 |
Download the assessment documents GO TO: Section 6.6.1 for more information on how to download assessments in the Online campus. GO TO: Section 6.4.1 for instructions on installing and opening Word. |
| Step 3 |
Working on the assessment template |
| Step 4 |
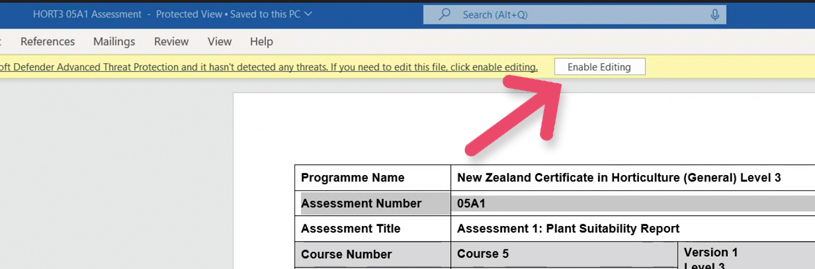
Ensure you Save As/Save this file as soon as you open it. GO TO: Section 6.2.2 for instructions on Saving and Naming your files. |
| Step 5 | Start filling in the assessment by typing in the editable fields. You will be able to click in the first editable area and type in your name and other details as required for this assessment |
Tip
Name your assessments retaining the original name of the assessment and then add your name at the start.i.e. Jane Smith_HORT3 01A2 Assessment
Inserting an image to the assessment template:
| Step 1 |
Choose the right image format |
| Step 2 |
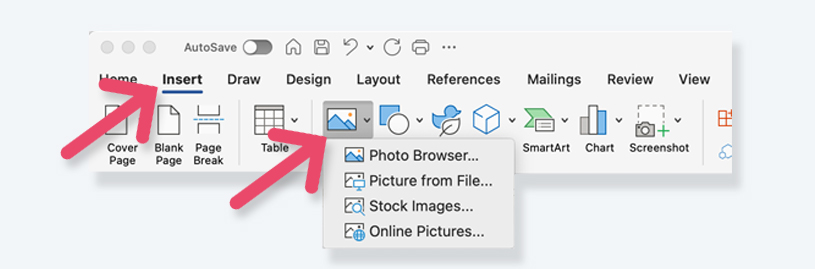
Inserting images |
| Step 3 |
Click on the ‘Insert’ tab in the Word toolbar. |
| Step 4 |
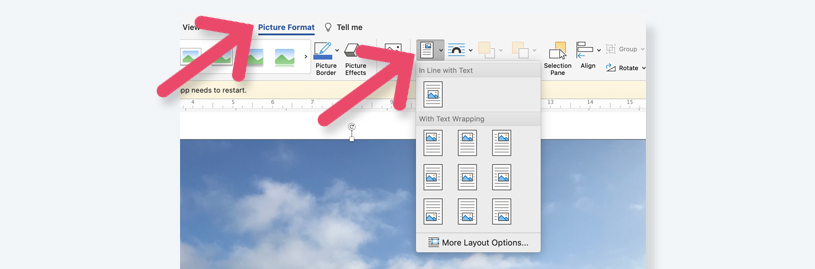
Image placement |
| Step 5 |
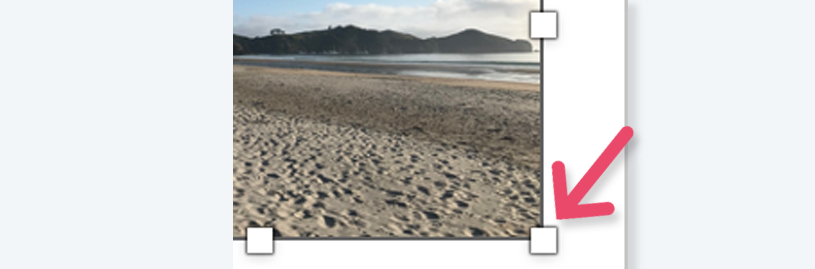
Scaling your image
|
| Tip | You can move the image by clicking and dragging it to the desired location within your document. |
| Save! | After resizing, remember to save your document by clicking ‘File’ then ‘Save’, or use the keyboard shortcuts. |
All done?
After completing your edits, it's a good practice to review and proofread the document for accuracy and completeness. Re-check all your answers.
Save the document again after making any final changes or additions.
Save As a PDF
Remember to save the Word assessment file as a PDF for uploading into the Online platform.
GO TO: Section 6.5.7 for instructions on how to Save As a PDF.
GO TO: Section 4.2.2 for more information on how to upload your assessments once they are complete.
Some assessments ask you to create a presentation. These may be a poster, a digital presentation or a video presentation. There are a number of tools/programmes that you could use to create a presentation, we will look at the most popular below.
Using PowerPoint to create a presentation

You will have access to PowerPoint through Microsoft 365.
GO TO: Section 6.4.1 for more information on how to access and download Microsoft 365.
PowerPoint has a user-friendly interface with slide templates and design options, the ability to add text, images, charts, graphs, videos, and animations to slides, tools for creating slide transitions and custom animations, and support for speaker notes and presenter view during presentations.
Did you know?
Microsoft has information and support for PowerPoint users.
CLICK HERE to access these resources: support.microsoft
GO TO: Section 5.1.5 for handy links to PowerPoint tutorials
The key features and functions of PowerPoint are:
-
Slideshow creation
PowerPoint allows users to create visually engaging slideshows, which are composed of individual slides. Each slide can contain text, images, graphics, charts, and multimedia elements. - Slide design
Users can choose from a variety of pre-designed templates and themes or create custom slide designs. Slide layouts and formatting options are available to enhance visual appeal. - Multimedia integration
PowerPoint supports the incorporation of multimedia elements such as images, videos, audio clips, and animations into presentations. These elements can make presentations more engaging. - Animation and transitions
Users can apply animations and transitions to individual objects or entire slides, adding visual effects and interactivity to the presentation. - Slide master and templates
PowerPoint provides a Slide Master feature that allows for consistent formatting and branding across all slides. Users can also create custom templates for future presentations. - Collaboration
PowerPoint offers collaborative features that enable multiple users to work on a presentation simultaneously, making it easier to create and edit content as a team. - Presenter tools
Presenter View provides tools and notes for speakers during a presentation, while the Slide Show mode offers features like annotations, laser pointers, and a timer. - Charts and graphs
PowerPoint includes tools for creating charts and graphs directly within the program, making it easy to present data and statistics effectively. - Recording the presentation
You can make a recording of your presentation by selecting the 'Record' button in the top menu.
PowerPoint is widely used in business, education, and other fields for creating professional presentations, lectures, reports, and training materials. It's a versatile tool for conveying information in a visually compelling and structured manner.
Saving your PowerPoint presentation
Once you have completed your PowerPoint presentation, it is important to save a copy, in the correct file format, for uploading to the Online platform.
| If you are handing in a presentation/slide show |
Save As a PDF Remember to name it with the assessment name and your name i.e. Jane Smith_ECE L4 01A2 presentation |
| If you have created a recording/video of your presentation |
Video formats (MP4, WMV) CLICK to access information and guides to export a presentation as a video file. |
Using 'Canva' to create a presentation
CLICK to access canva.com/free

If you want to create a poster or visual document for your assessment, Canva is a popular and user-friendly online graphic design platform that allows users to create a wide range of visual content.
The key features and functions of Canva are:
- Canva offers a free plan that provides access to a wide range of design tools, templates, and resources. Students can sign up for a free Canva account using their email address or social media profiles.
- Design templates
Access to thousands of templates for various purposes, including presentations, posters, social media graphics, and more. - Customisation
The ability to customise templates by adding text, images, icons, and other elements. - Basic elements
Use of basic design elements, such as shapes, lines, and free stock photos and illustrations. - Collaboration
Collaborate with classmates or team members on design projects. - Exporting as a PDF
Download completed designs in PDF for uploading the Online platform.
Make a video recording of yourself

You can create a video recording of yourself in a number of easy ways:
| Using your phone | Most smartphones come with a built-in camera app that allows you to record videos. Simply open the camera app, switch to video mode, and press the record button. |
| Selfie Camera | Use your phone's front-facing or selfie camera to record yourself while seeing your image on the screen. This is great for vlogs, video diaries, or recording yourself singing. |
| Tripod or Stand | Invest in a smartphone tripod or stand to keep your phone steady while recording. This ensures a stable shot and allows you to be hands-free. |
| Using a Laptop or Computer | Built-in Webcam: most laptops and computers have built-in webcams that can be used to record videos. You can use camera software or third-party video recording apps. |
| Video Conferencing Apps | Video conferencing platforms like Zoom, Skype, or Microsoft Teams allow you to record video meetings. You can create a meeting and join it by yourself to record a video message. |
Recording Tips:
- Ensure good lighting
Position yourself facing a source of natural light or use additional lamps to illuminate your face evenly. - Pay attention to your audio quality
Record in a quiet environment to avoid background noise, and speak clearly. - Eliminate the wobbles
Use a stable surface or tripod to prevent shaky footage. - Run a practice
Test your setup before recording to make sure everything is working as expected. - Be prepared
Practice and rehearse what you want to say or do in your recording to minimise retakes. - Practice again
Remember, the key to successful self-recording is practice. The more you do it, the more comfortable you'll become in front of the camera, and the better your recordings will be.
Remember to download your completed video as an MP4 for uploading to the Online platform.