Speed, agility, and quickness training (SAQ) involves a range of different high-tempo training approaches designed to help in the development of the neuromuscular system to perform movement tasks at speed, thus improving motor skills, body function, and ultimately performance.
SAQ training is used by conditioning trainers and coaches to develop the rate of force production, and the response to stimuli and improve the velocity of movement in athletes. SAQ training comes under the components of the fitness “skills” category and, thus is considered an additive training mode to the core training components like strength, endurance and power (Walankar and Shetty, 2020).
This topic will cover the three qualities of SAQ. It is important to note that there will be some obvious cross-over in covering these qualities. You will gain an in-depth knowledge of the purpose of:
- each training approach
- how to apply the training variables associated with each
- a wide range of session and assessment tools to apply to your programming for SAQ development.
You will also learn about the trainable and non-trainable elements associated with SAQ performance including the role of genetics.
Developing endurance, strength, and power are considered prerequisites for developing speed. If an athlete hasn’t developed some endurance, they will not be able to complete meaningful speed training volume. If strength and power are limited, then an athlete will lack the required muscle force production to propel their body weight quickly. See the following training blocks that lead up to the speed development block.

A good conditioning programme has to be designed on the basis of specific physiological demands associated with each sport. Programmes are designed to improve performance skills and prepare the body for the rigours of exercise to reduce the risk of injury. Once a level of base conditioning (endurance and strength) is achieved, improvements in sports performance are targeted through programmes focusing on skills such as speed, agility, specific power, balance, and reaction time (Walankar and Shetty, 2020).
Let’s discuss speed, agility, and quickness as separate entities. While most sports would benefit from improving all three of these skills, some sports require a focus on one or two over others. An example of this is 100m sprinting which needs excellent quickness in the form of reaction time off the line, and maximal straight-line speed, but has little use for agility.
Let’s start by taking a brief look at what each aspect of SAQ is.
Speed

Speed is the ability (and the skill) needed to achieve high movement velocity. Speed is the time rate at which an object is moving along a path. It is a scalar value which means (in science terms) it has no direction associated with it. The term that is used to encompass both speed and direction of travel is velocity. These terms are often used interchangeably in training circles. Speed is calculated by dividing the distance an object travels by the time it took the object to travel the distance. Speed is most often expressed as metres per second or kilometres per hour. For example, if a 100m runner completes his race in 10 seconds, then his speed would be 10m/sec. Multiple that number by 3.6 and you have your km/hr value (in this case 36km/hour).
Agility

Agility is the ability to change direction quickly and efficiently. Miller (n.d.) defines agility as the ability to accelerate, decelerate, stabilise, and quickly change directions with proper posture. Unlike speed, agility includes both acceleration and deceleration. Sheppard (2005) describes agility in relation to sport as “a rapid whole-body movement with change of velocity or direction in response to a stimulus” which indicates that agility is somewhat dependent on speed and quickness also.
Quickness

Miller (n.d.) defines quickness as the ability to react and change body position with a maximum rate of force production. The key to quickness is the ability to react to a stimulus. This could be a sprinter or swimmer’s ability to react to a starting gun (reaction time), or a football goalkeeper’s ability to react to a penalty shot. Hale (2004) suggests training for quickness is not the same as training for absolute speed. This is because quickness relies heavily on immediate movement reactions and can therefore be thought of as the first phase of speed.
While all SAQ qualities are important for optimal performance in most sports, the approaches used to develop each of them require a little thought. For example, an athlete might have great straight-line speed, but slow reaction times and poor agility. Another athlete might have excellent quickness, but poor speed over extended distances. Through a series of well-chosen performance tests, a trainer can isolate areas that need work in athletes and then choose targeted training approaches to improve these qualities.
Speed vs. agility: Training distinctions
Gamble (2013) reports that there is an increasing body of data to suggest that dedicated training (for each quality) is required to elicit optimal improvements and that speed training alone will not be reflected in improved change of direction performance or improved agility performance in sport.
Gamble (2013) suggests that only a limited statistical relationship exists between a players’ straight-line sprinting performance and their ability to change of direction at speed (agility). Little and Williams (2005) studied the relationship between acceleration, maximum speed and change of direction in professional soccer players and found little relationship existed, suggesting that speed and agility are distinct abilities that are relatively independent of each other. Further to these findings, correlations between measures of these abilities decreased even more when any sports skill component (like dribbling a ball) was incorporated into the agility test (Young et al, 2001). Young et al (2001) also reported that 6-weeks of straight-line speed training had no effect on agility performance and conversely, 6-weeks of agility training had no effect on straight-line speed. These findings re-enforce the idea that agility and speed must be developed via specific training approaches.
The following short video shows evidence of the difference between straight-line speed and agility. In this simple experiment, Christiano Ronaldo competes against a national 100m sprint champion in a straight-line vs weaving (change of direction drill). This video not only re-enforces the findings made by Gamble (2013), but also introduces some interesting biomechanical differences in the way sprint athletes vs. sports athletes move.
Benefits of SAQ training
The benefits of SAQ training are more performance than health-related. SAQ drills are primarily designed to develop an athlete’s overall athletic ability to perform tasks with speed and efficiency. According to Hernandez (2022) areas of improvement include:
- Acceleration.
- Top end speed.
- Deceleration.
- Reaction time.
- Evasion abilities.
- Coordination.
- Quickness.
- Focus.
While SAQ training improves neuromuscular performance, it also prepares the body tissues for explosive movements required in sports, and as such lowers the risk of injury during these movements. On a physical level, the athlete is more prepared to react quickly, gracefully and with agility to a given movement requirement.
Speed is considered a skill, because it is dependent on other bio-motor qualities like strength, power, flexibility, anaerobic power and capacity. Genetics also plays an important role in an athlete’s ability to attain high speeds (i.e. muscle fibre type and length, body composition and anthropometrics), however, everyone has the potential to get faster with speed training. MacLennan (2021) suggests few team sport athletes ever reach their true speed potential because as a motor skill it takes time and patience as well as a sound training plan to achieve meaningful increases in speed.
Speed is considered an integral performance skill in most sports as it is often the deciding factor in securing possession in ball sports, losing (or keeping up with) opponents and creating better scoring opportunities for better win/loss ratios.
Factors contributing to speed development
Developing speed capabilities necessarily comprises a variety of elements. For example, strength qualities are needed for an athlete to overcome their own inertia (such as during initial acceleration). Speed-strength and stretch-shortening cycle abilities (as discussed in power and plyometric training) are required every time the foot strikes the ground to propel the body forward. In addition to this, speed is highly dependent on an athlete’s neuromuscular coordination and technique. In order for speed training to translate to sports performance, all of these components must be trained in a way that is specific to the form of locomotion and velocities that feature in the sport (Gamble, 2013).
It was a long-held belief that speed capabilities were not very trainable, as speed was essentially a direct capability based on genetics. More recently, there has been a shift in opinion with coaches, trainers, and researchers all acknowledging that while genetic aspects do exert a major influence on speed, there is a growing acceptance that an athlete’s speed capabilities can be developed with appropriate training interventions (Gamble, 2013).
Let’s look at the genetic predispositions to running fast. Potential for and Limits of Speed Development (n.d.) suggests that the principle genetic limits to speed performance are:
| The type and distribution of muscle fibres | Those athletes with the highest top-end speed exhibit a preponderance of fast-twitch muscle fibres (especially fast-twitch type II or type IIx fibres) as compared to those returning more moderate speed performance. These fast-twitch muscle fibres have a higher force-producing capacity and a higher speed of contraction, which means the higher the percentage of fast-twitch fibres an athlete has, the greater their potential for speed. |
|---|---|
| The ability to activate muscle fibres | While the proportion of fibre types you have is essentially set at birth, training can affect their characteristics and how they are activated (for good or bad). For example, prolonged endurance training can lead to type II muscle fibres taking on slow twitch fibre characteristics. Untrained populations are only able to recruit a limited proportion of fast twitch fibres. Training with both high loads and speed is required to develop the capacity to recruit a higher proportion of type IIx fibres. Therefore, speed development programmes must incorporate resistance training that uses high loads and explosive movement. |
| An athlete’s body type and structure | Lever lengths (limbs) can greatly influence an athlete’s ability to move at speed. The length of levers is determined by both bone length and the point at which muscles insert into bones. The shape of muscles and length of the attachments (I.e. tendons) can also play a role in speed generation, along with the size of specific force generating muscles. All of these factors are determined by genetics. |
It would appear that particular ethnicities are also more pre-disposed to achieving top end speeds due to their genetic make-up. There is no question that those of West African descent have dominated the world stage in pure running speed over decades (e.g. 100m and 200m sprinting). Entine (2020) suggests this is due to anthropometric and biomechanical advantages such as:
- Relatively less subcutaneous fat on arms and legs and proportionately more lean body and muscle mass, broader shoulders, larger quadriceps, and bigger, more developed musculature in general;
- Denser, shallower chests;
- Higher centre of gravity, generally shorter sitting height and narrower hips.
- Longer Achilles tendons with smaller, higher calves. Thicker, stronger and more powerful glutes and hip flexors (which are key force producers in sprinting).
- Faster patellar tendon reflex;
- Greater body density, which is likely due to higher bone mineral density and heavier bone mass at all stages in life, including infancy.
- Modestly, but significantly, higher levels of plasma testosterone (3-19 percent), which is anabolic, theoretically contributing to greater muscle mass, lower fat, and the ability to perform at a higher level of intensity with quicker recovery;
- A higher percentage of fast-twitch muscles and more anaerobic enzymes, which can translate into more explosive energy.
It must be remembered that genetic predisposition does not equal speed. Entine (2020) provided the following quote from Lindsay Carter, a physical anthropologist at San Diego University who has studied thousands of Olympic level athletes over the years:
"From a biomechanical perspective, the answer is 'yes,' race and ethnicity do matter. All of the large-scale studies show it, and the data goes back more than a hundred years.....but there are far too many variables to make blanket statements about the deterministic quality of genetics. Nature provides an average advantage, yes. But that says nothing about any individual competitor”.
Although genetic limits provide a theoretical ceiling for speed capacity, the focus of a speed development program is improvement of existing capacity and especially how it relates to sport performance. The key point here is that every athlete can become faster, but that how fast they can get may be somewhat determined by factors out of their control.
Other Factors
Ok, so we have determined that there are a number of factors that contribute to speed potential that fall outside of an athlete (or trainer’s) control. Let’s put these aside and focus on some other factors that can be improved:
The National Strength and Conditioning Association (2017) suggests there are two key factors that can be improved to develop running speed. These are:
- Stride Cadence - the number of strides taken per second
- Stride Length - the distance travelled by each stride
The product of these two factors gives a mathematically accurate description of speed and a logical thought process would suggest that if an athlete were able to increase one of these (while the other remained constant), running speed will increase. Therefore, the focus of training modalities to increase speed generally focus on improving stride cadence, optimising stride length, or improving both.
What can we learn by looking at elite sprinters?
When comparing the stride frequency and stride length of elite vs novice sprinters it is easy to see the differences. The following graph shows that elite sprinters typically take longer strides than novice sprinters with an average stride length of approximately 2-2.2m per stride achieved by around the 40m mark of a 100m sprint. Novice sprinter's stride lengths were up to 25cm shorter on average and peaked around the 30m mark of a 100m sprint.

In terms of stride frequency (cadence), elite sprinters also peaked at around 4.5 steps per second reducing to 4.25 steps per second towards the end of the 100m race. In comparison, novice sprinters averaged around 4.25 steps per second at the start of the race, dropping to around 4 steps per minute by the end of the race.

You can see the affect these differences in stride frequency and length had on total running velocities on the following graph. The elite sprinters held maximal velocities of around 9m/sec compared to 7m/sec for novices.

Training Speed Abilities (n.d.) supports these findings and suggests the key differences that can be seen between elite and novice sprinters include:
- Elite sprinters achieve greater stride length and are capable of increasing it up to 45 m from a static start, whereas novices achieve their maximum stride length at around the 25m mark.
- Elite sprinters achieve greater stride frequency (nearly 5 strides per second) and are capable of increasing it up to 25m from a static start, whereas novices achieve their maximum stride frequency at 10 to 15m into a race.
- Elite sprinters produce greater initial forces and velocities at the start and reach maximal velocities of up to 12 m/s after 5 to 6 seconds (45-55 m), whereas novices reach their top speed at 20 to 30 m.
These findings support the approach of targeting stride frequency and stride length. One of these factors is definitely easier to target than the other. The idea of taking quicker steps is easier to understand as a function of speed, than attempting to adjust the length of a runner’s stride. Too much focus on artificially lengthening an athlete’s stride (distance of each step) can lead to an athlete placing their foot ahead of their centre of mass. This places an athlete in a compromised position for generating force and ultimately slows running speed. Instead of focusing on increasing an athlete’s stride length, the focus should be on ensuring an athlete’s stride length is the most effective length for force production (NSCA, 2017).
Stride length
According to NSCA (2017), an effective stride length is one that is generated by applying a force into the ground (pushing off the ground) and propelling the athlete forward rather than reaching forward with the legs (in an attempt to pull the athlete forward). Gamble (2013) expands on this theory by suggesting optimal stride length is one that maximises propulsion and minimises braking forces and that if an athlete’s foot is placed too far in front of the centre of mass, excessive braking forces are generated.
During high-speed running, the optimal position for a foot strike is just in front of the centre of mass in order to maximise the effective interval of ground contact. It is also critical that the foot is moving in a rearwards direction at foot strike to maximise propulsion and minimise braking force. This is impossible to achieve when the athlete is over-reaching their strides as contact is often made with the heel of the foot instead of the midfoot or forefoot which reduces braking and impact forces and allows for improved elastic storage and return of elastic energy (Gamble 2013).
The following video explains the information above with some great visual images to help your understanding.
The optimal stride length for sprinting is highly individual as it is largely linked to limb length. However, there is a common calculation used by sprint coaches that is simple enough to apply. First, you need to calculate your average stride length. This is best done by videoing yourself sprinting over a nominal distance. Knowing that you are unlikely to achieve peak speed until at least 20-30m of running. One way of doing this is to capture a video of yourself sprinting over at least 70m. If you count the number of strides you take between the 30m and 70m mark. Divide the distance covered (40m) by the number of steps you took, and you have your average stride length. For example, if you take 20 steps between the 30m and 70m mark your equation would look like this:
40m / 20 steps = 2m per stride.
Now that you have your average stride length, you can use the following measurement and associated calculation to compare your actual stride length against your optimal stride length.
Calculating optimal stride length for sprinting
Determining an optimal stride length appears to be associated with the leg length of an individual athlete. This is established by measuring what is called “trochanter length”. Trochanter length is identified by measuring the distance between the greater trochanter of the femur and the base of the barefoot or floor (Bernstein, n.d.; Track Star USA).
Trochanter length can be used to determine optimal stride length by calculating a minimum to maximum stride length range and how it relates to proper individual mechanics. Optimal stride length should range from a minimum of 2.35 x trochanter length to a maximum of 2.50 x trochanter length. (Bernstein, n.d.)
Youth male athletes and female athletes should typically exhibit a stride length close to the minimum edge of the range, whilst elite athletes will experience a stride length closer to the maximum edge of the range (and even as high as trochanter length x 2.7 (Track Star USA)).
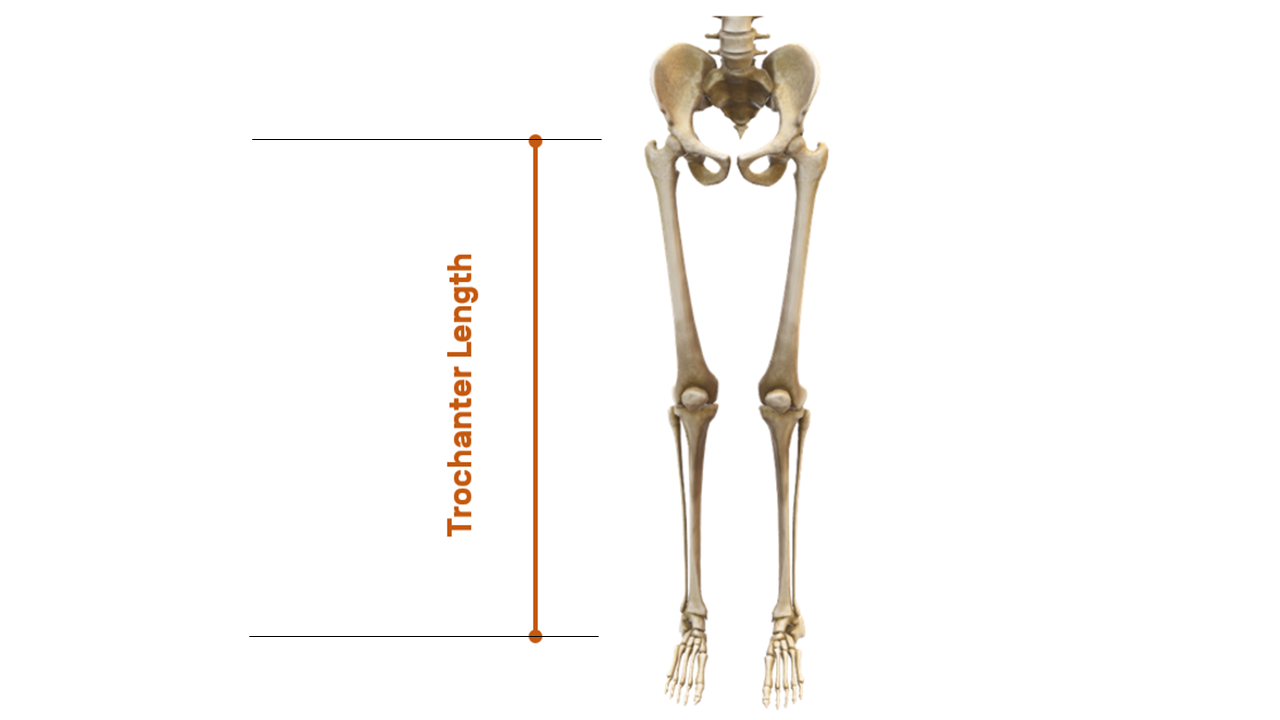
Steps to measure the trochanter length as supplied by Glaeser (2013):
- Athlete stands erect on the floor in bare feet.
- Palpate the hip by firmly pushing the tissue to locate the top of the greater trochanter.
- Measure from the floor to the top of the greater trochanter in centimetres.
- Measure both sides and average the two measurements.
- Record the length for each athlete
Example
John’s measurement from greater trochanter to floor is 77cm.
Optimal stride length = 77cm x 2.5 = 192.5cm
There are two things that should be done once this figure is calculated:
- Compare the figure to John’s average stride length calculated by videoing John sprinting
- Video John sprinting from a lateral perspective to see where his foot strike is in relation to his centre of mass (COM).
If you establish that John’s average stride length is less than what was calculated and there is no evidence that John is over-reaching with his strides (I.e. foot is out in front of his COM) then John could be encouraged to increase his stride length.
Increasing stride length
It is a common assumption that to increase stride length, an athlete would have to reach further with their lead leg during the time it is in the air. This is not the case. Stride length is largely a function of the impulse and velocity generated at toe-off (NSCA, 2017). Impulse is the force created over the time it is applied. Larger impulses are created when a high force is applied over a short time period (think a golf club hitting a golf ball). A runner’s mass doesn’t change during a sprint, which means the only way they can increase the impulse of a foot strike is to apply it more quickly.
Another factor that does not change during a sprint is the velocity of the athlete’s centre of gravity. This is a key factor in dictating stride length. Like impulse, forward movement of the COM is generated during the time the athlete’s foot is in contact with the ground (the stance phase). Therefore, efforts to enhance stride length by technical means during the flight phase (when the leg is off the ground) show limited effect and athletes should instead focus on generating impulse and velocity during the time the athlete is in contact with the ground (NSCA, 2017).
This theory is backed up by Weyand et al (2000) who found that faster sprinters applied more force during ground contact than slower sprinters. These sprinters also applied this greater force over shorter contact times. This not only resulted in longer strides, but also the ability to generate higher stride frequency. Interestingly, the time it took for both faster and slower sprinters to reposition their legs in the flight phase was very similar. This indicates that a more rapid repositioning of the legs in flight contributes little to overall speed.
In summary, stride length is not generated during the swing phase of a running stride (leg of the ground), increased stride length should come naturally through creating larger impulses during foot contact. This will naturally propel an athlete forward (along with their COM) leading to a longer stride (while still under their COM).
During his world record-setting 100m sprint Usain Bolt only took 41 steps. This means his average stride length was 2.44m. He achieved this by creating an exceptional impulse at foot strike, not by reaching further forward with his lead leg.
Stride frequency
Stride frequency (or cadence) is also a function of contact time (the time spent on the ground with each stride) and flight time (the time spent in the air on each stride). Put simply, stride frequency can be split into two parts:
- How long your foot spends on the ground
- How quickly you can cycle your leg through the air for another ground contact
While both of these factors play a part in speed, interestingly research has shown that the time your feet spend on the ground may be more important than the speed at which they move through the air.
Research has shown little variation in flight time between sprinters of different abilities. Therefore, the greatest variations in cadence appear to be the result of differences in ground contact time (Weyand et al. 2000). These authors concluded that efforts to improve stride cadence should focus on shortening ground contact times rather than focusing on cycling the legs faster.
The time that the foot is in contact with the ground during sprinting is known as the “stance phase”. The time when the foot is cycling through the air for another foot strike is called the “flight phase”.
The stance phase is the time between initial foot contact and subsequent “toe off” of the same leg. The flight phase is the period between toe-off and the next foot contact (on the same leg). NSCA (2017) describes what happens during the stance and flight phases:
- In early stance where the foot makes initial contact, the athlete’s body absorbs the landing force which can be between 2.5 and 5 times their body weight (depending on the speed and distance of the sprint). The leg muscles need to absorb this force. They do this through eccentric contraction. The key to doing this efficiently is having enough muscle strength and tendon stiffness (gained through resistance and plyometric training) to effectively repel this force. If the muscle strength is sufficient and the tendon stiff enough, the athlete can develop elastic energy in this phase (which is beneficial in later stages). If the muscle strength and tendon stiffness are not ideal, then significant braking forces will occur at this point.
- During the mid-stance (of foot contact) the athlete switches from eccentric absorption of force to concentric production of force. If elastic energy was stored in the initial stages of foot strike, this can be used to contribute to greater total force production. The importance of this elastic energy storage was described by Cavagna & Kineko (1977) who found that concentric muscle contraction was responsible for around 53% of power produced in sprinting (enough to run at around 5m/s) and that the remaining increases in power output were the result of storage and release of elastic energy.
- In late stance, the body accelerates forward as a result of the concentric forces generated. Ensuring foot strike is positioned just ahead of the COM at initial contact means the production of concentric force will be in a down and backward direction, propelling the runner forward and slightly up.
- An athlete cannot increase their velocity during the flight phase. The importance of this phase is to cycle the leg efficiently in preparation for the next foot strike. An inability to cycle the leg in flight effectively leads to sub-optimal ground contact limiting the impulse an athlete can create.
- Because athletes can only propel themselves forward during the stance phase, this phase should be the main focus of any speed enhancement programme.
Summary of research
It is apparent that sprint speed is a function of stride length and frequency, and it is important to get the balance right between these two factors for optimal speed. Focusing on increasing stride length by “reaching” further forward with the lead leg will likely increase breaking forces and slow you down. Instead, stride length should be increased naturally by increasing impulse at foot contact (and ensuring you have adequate muscle strength and tendon stiffness to generate elastic force).
There are a couple of other factors to consider that can lead to negative interactions between step length and step frequency. Hunter, Marshall and McNair (2004) conducted a study that examined the interaction of step length and step rate during sprinting and concluded that the key factors that could contribute to a negative interaction between stride length and frequency were:
- Leg length: Long limbs in taller athletes leads to longer strides more time spent in the air and longer contact with the ground (thus reducing step frequency). This is likely to be due to a combination of greater inertia associated with longer legs and because longer ground contact led to higher vertical take-off velocities meaning concentric force pushed up rather than forward thus decreasing velocity.
- Vertical velocity of take-off: The steeper the angle of vertical take-off, the longer the stride and the less frequent the stride rate. These authors suggested that the better sprinters in the subject group had a higher degree of horizontal rather than vertical take-off angles. Those with higher horizontal take-off velocities exhibited both faster stride frequency and long step lengths, compared to those with higher vertical velocities who exhibited long strides but lower frequency.
So, what can we take from all this research to apply in practice.
- It would appear that the focus of most speed programmes should be on increasing impulse at foot strike which should lead to naturally longer stride lengths.
- It is important to convert this higher impulse created in foot strike to a balance between horizontal and vertical velocity at push-off.
- The ability to create higher horizontal push-off force appears to relate to technique – specifically the position of the initial foot strike relative to COM, the part of the foot that makes contact with the ground (i.e. mid and fore-foot), and the direction that the foot pushes in (i.e. more back than down).
Technique
We have now established that a key factor in developing speed is to maximise force application at foot strike, but how is this achieved? Outperform (n.d.) suggests there are three ways to maximise force application in sprinting:
- Proper sprinting form
- Proper sprinting mechanics
- Proper sprinting rhythm
In short, fast sprinting is developed through technique.
Here are a few tips for maximising sprint technique to achieve higher horizontal velocities. Note, these relate mainly to track sprinting but obviously have relevance to running fast in general. These guidelines come from Outperform (n.d.)
Upper body posture
When accelerating, the body must lean forward (around 45 degrees) to exert backward force on the ground to propel the athlete forward. Once initial speed is achieved, sprinting posture should be tall with the head, neck and shoulders directly over the hips. Anything more than a very slight lean forward will negatively impact on force production. Breaking at the waist or leaning too far forward will drastically reduce your ability to apply force down (and back).
See the following images if an acceleration posture and sprinting posture.
Arm drive is essential for stability (countering the movement of the legs). There are a few theories around arm use (bent versus extended) but what is agreed on is that to increase speed arm movement should be towards the target (rather than across the body). This great little video explains the importance of arm action in fast running.
Lower body mechanics
Remember, the goal of sprinting fast is to maximise the impulse applied to the ground, in the right direction (back and down). In order to do this, the pelvis must remain neutral (not tilted forward or back). Keeping the pelvis neutral will create a stretch of the hip flexors of the back leg during the stride allowing for an elastic return of the thigh to the front of the body for the next stride. To sprint fast you need to have the foot land directly under your centre of mass. Over-reaching with the lead leg is a speed killer. Instead, the focus should be on pushing down on the ground while maintaining a neutral pelvis.
Leg movement positions
Many coaches will talk about two key leg movements involved in sprinting to maximise foot strike impulse. These are the “Hard Z” and the “Active Strike”. The following video explains this two-phase movement process.
Ground contact
To maximise the force created by the leg movements (after the acceleration phase) don’t run on your toes! If you try and run on your toes your ankle will collapse once the foot hits the ground increasing ground-contact time and resulting in lost speed. Instead, the foot should be somewhat dorsiflexed as this will create another stretch-reflex where the stored energy can act like a spring once contact occurs. The ideal point of contact is the forefoot (widest part of the foot)
Speed/Acceleration
So far, our learning has focused almost exclusively on achieving maximal top-end speed. There are actually three key components to speed that have different degrees of relevance to athletes from different sports. These are:
- Acceleration: Moving from static start to top speed as quickly as possible.
- Maximal Velocity: Achieving your maximal speed
- Sprint endurance: Being able to hold top-speed
For track sprinters, all three of these aspects require attention as they encompass critical areas of performance for the discipline of track sprinting. Sports athletes however may have varying degrees of use for each of these sprint phases.
For example, almost every sports athlete will benefit from maximising their acceleration off the mark. This will enable them to get to the ball first, get themselves open to receive the ball or lose a defender. In many sports, athletes will never reach maximal speed as the distance of the sprints they perform doesn’t allow them to (e.g. basketball, tennis etc). For these athletes, reaction time and acceleration are key, but maximal speed and sprint endurance have little relevance.
Acceleration obviously uses a different technique to top-end sprinting. During the acceleration phase of sprinting, the body position adopted is vastly different from that during top-end sprinting. Your body angle during acceleration needs to have everything going forward. Your shins need to be going forward, not vertical. Your torso should be in a straight line with the leg that is driving into the ground creating an angle of around 45 degrees with the ground.
You will spend more time on the ground in this phase as you need to generate as much force as possible to overcome your body’s inertia and get it moving forward. While the strides taken in acceleration are shorter than at top speed, the intention should still be to create long powerful strides (Bucholz and Zweifel, n.d.). MacLennan (2021) says this is particularly true of the first 2-5 strides. Think full extension of arms and legs and long lines. The separation between movements of the arms and legs during this phase is an indication that full force is being put into each stride. The longer arm extension also helps prolong ground contact which is important to generate required force during acceleration (MacLennan, 2021).
The position of the initial contact during a foot strike in acceleration is to the rear of the athlete’s COM in order to maximise forward propulsion (Gamble, 2013). The motion of the legs during acceleration should be like pistons, using glutes and quadriceps to drive the legs straight into the ground before repositioning ahead of the body (using direct linear lines). This is different to maximal velocity sprinting where the movement of the legs is more “cyclic“and involves more hamstring use (MacLennan, 2021). The forward angle of your body during acceleration means you can create more horizontal forces. Acceleration occurs within the first 30m of sprinting and most of this within the first 8-10 strides.
The following table adapted from Mackenzie (2001) shows the percentage of maximum speed most people achieve in the early phases of a sprint. It shows that maximal speed is reached between 40 and 50m. If you are working on acceleration, the key is what percentage of your maximum speed you can achieve within a certain distance. If you are working on developing top-end speed, you need to run a distance that allows you to achieve over 90% of maximal speed (i.e. over 30m and ideally up to 60m), however, if acceleration is the goal, runs can be performed over a variety of shorter distances.
| Meters | 10m | 20m | 30m | 40m | 50-60m |
|---|---|---|---|---|---|
| % of max | 45% | 84% | 93% | 97% | 100% |
According to NSCA (2017) during the 100m final in the Beijing Olympics, Usain Bolt achieved 73% of his maximum speed after 10m, 85% at 20m, 93% at 30m, and 96% at 40m. He attained his maximum speed of 60m. This means he would leave most people quickly behind out of the blocks! While the 20-60m percentages align well with the above figures, remember he is moving at a much faster velocity than most.
The majority of literature agrees that both acceleration and top-end speed are somewhat independent and as such can be targeted with different drills. This approach is favoured because muscle force production differs between the acceleration phase and top end sprint phase. Cavagna et al (1977) concluded that the acceleration component is mainly dependent on raw strength of the muscles (concentric contractions), whereas once you’re above 50% of top-end speed you are utilizing the stretch-shortening cycle of the muscle and tendon units to “spring” you along. This means speed work over different distances is required to target these two critical aspects of speed. Shorter distances (10-30m) are effective for initial acceleration training, while distances of up to 60m are required to target top speed. Speed endurance training would see training distances extended even more.
The key information related to the acceleration technique and the reasons behind each point discussed are detailed in the following video.
The following is a great video summarises the key qualities of good sprinting that any athlete who wants to be fast should be aware of:
Expression of speed in sport
The sprinting technique of team sports players appears to differ from that of track athletes (Young et al. 1995). It is also suggested that the acceleration phase for team sports athletes may be shorter so that they acquire top speed within a shorter distance in relation to track sprinters (Gamble, 2013). This is a reflection of the fact that these abilities involve different patterns of muscle recruitment and motor firing. In the context of some team sports, acceleration and short-distance speed may be of more relevance than top speed attained over longer distances. The distances covered at high-velocity locomotion are typically short and this generally coincides with direct involvement in attacking or defensive play. Team sports played on a restricted playing area (basketball, volleyball) and some playing positions within other field team sports will rarely engage in high-velocity locomotion over distances sufficient to attain maximum speed (Gamble, 2013). Hence, training for maximum speed would appear to be a secondary priority for these players given that they will rarely express these capabilities on the field of play (Young et al. 2001). However, for field sport athletes like football, rugby, AFL and hockey, athletes are required to sprint the full length of the field on occasion to get back on defence after a turnover, chase down an opposition player, or following a break in the line (to score), which indicates a form of longer sprint training is required to improve this quality.
Another consideration around speed in sporting athletes is that players have to perform high speed movements both with and without sporting equipment which will also alter the way they run. This means a portion of speed training should be performed with the equipment they have to carry (i.e. balls, racquets, hockey sticks, cricket bats etc) to ensure relevance to their sport. This is most often achieved by working on general speed first (using sprinting drills), then more specific drills incorporating sprinting distances and equipment from the sport.
Common approaches for speed training
Speed training should follow a dedicated period of resistance training focusing on strength, power and plyometric exercises designed to strengthen muscles, maximise recruitment of powerful type 2 fibres and increase stiffness of lower limb muscles and tendons for enhancement of the stretch-reflex mechanism.
Given that speed can be broken into different phases (acceleration, maximal velocity and speed endurance), it makes sense that training approaches are organised to target these different qualities.
Regardless of the drill used, if the purpose of the drill is to improve acceleration, the following elements should be emphasised (particularly over the first few strides of the drill):
- Rearward arm drive combined with opposite high knee drive
- A body lean angle of around 45 degrees from the vertical for static starts and 30-40 degrees for rolling starts
- Full extension of the hip, knee and ankle so there is a straight line from rear foot to the top of the head at toe-off (no breaking at the waist). This is known as the “power line”.
Running drills that focus on acceleration should be performed over distances ranging from 5m-30m.
Common methods used to improve acceleration
Wall leg drives
Works on the power line leg drive movement critical to acceleration. Ensure all aspects of the movement are linear (straight-line). Both aspects of the movement are to be performed as quickly as possible (I.e. leg drive up and driving the same leg down into the ground). See the following videos of a single-leg example and a double-leg progression.
Wall leg drive- single
Wall leg drive- double
Push-up start
This drill emphasises the lean forward and drive aspects of acceleration from a static start. Athletes must be coached to ensure all movements are linear (straight forward and back). Emphasis should be placed on trying to fully extend arms and legs in a straight line for the first 5 steps.
Push up start - speed training - acceleration drill
Falling start sprints
This drill helps familiarise athletes with the desired degree of forward body lean that should be employed during acceleration. It helps athletes achieve the acceleration “power line” without having to think about it.
Falling start: Increase your speed
Assisted falling starts
Slightly more advanced. From a trainer’s perspective you can physically put the athlete into the body angle you want them at. It is also useful when an athlete doesn’t trust themselves to fall without breaking earlier than they should.
Assisted falling start: Increase your speed
Sporting athletes need to be able to accelerate from a range of different starting positions (and off both feet). The following four drills involve different starting body positions:
Three-point crouch starts
A variation to fall starting. This starting position helps develop co-ordination of arm action and leg drive from flexed start position. This can be more specific for some sports where players have to get off their line quickly (e.g., Rugby players in a defensive line, or hockey defenders rushing out during a penalty corner)
How to 3 point running starts
Deep knee bend starts
The athlete adopts a more aggressive forward lean position and emphasises the positive shin angle by starting with a deeper bend in the knee. More of a strength-orientated movement as the concentric muscle contraction is more difficult to achieve from a flexed position. This drill will help an athlete build lower body sprinting strength by putting them in a disadvantaged position.
Deep knee bend start: Increase your speed
False (plyo) step starts
More of a sports drill than a sprinting drill. It is designed to help players develop a better sprint body position and a more explosive first step out of a standing start position. This drill involves a player taking a step back in order to create a forward lean and power position for the first step forward leading to greater impulse (with the leg well behind the COM) and more horizontal power in the first step (note: this would not be a drill used by sprinters who start out of blocks and need to produce their first step power from the front leg).
Staggered/Split stance starts
Involves placing one foot slightly in front of the other. Athletes should switch feet to become proficient at starting explosively off both legs.
Staggered starts
Med ball start sprint
Helps with a more explosive first step. Medicine balls should be kept light for this drill (2-3kg).
Medicine ball acceleration start: Increase your speed
Jog to sprint
This drill recognises that not all sprints in sports are initiated from a static start position. In this drill, an athlete begins by jogging, then initiates a sprint. The focus should be on adopting a power position at the moment the sprint begins (i.e. increased lean forward (30-40 degrees to vertical) and utilising leg and arm piston movements by driving the lead knee through and long extension of the opposite arm.
Jog to sprint: Increase your speed
Acceleration from different positions
The final phase of acceleration training for sport is to add specificity to match the demands of the sport. This often involves accelerating from different body positions. The starting body position chosen should reflect the positions a player finds themselves in during a game. In a sport like rugby, this could be getting off the floor after making a tackle to spring again, in basketball it could be accelerating after landing from a jump, in touch rugby it could be accelerating from a short backward running effort. Practising these disadvantage starting positions, forces an athlete to develop co-ordination strategies that allow them to get up to speed quickly. Here are a couple of example drills to illustrate this approach:
Supine lateral acceleration
Supine lateral start
Prone backward start
Prone backward start
Strengthening drills for acceleration using resistance
Sled push (March)
Not a speed drill per see, but a strengthening drill that mimics the “piston” like movements of the legs in the initial acceleration phase and is a great way to work on achieving the power position and is a great way for athletes to embed the feeling of good positioning and co-ordination of leg movements before higher tempo drills are performed.
Sled push (sprint)
Once the athlete has mastered the mechanics and positioning of the sled march, they can add explosive power to the drill with the sled push (sprint). Weight can be added as an athlete’s power improves, but the focus of this resisted acceleration drill is the quick piston-type movements of the legs in a forward lean position. All movements during the drill should be linear (straight forward and back).
Low position sled push (March and sprint progressions)
A progression used to over-load the hip, knee and ankle complex to strengthen the key sprinting muscles and encourage stiffness in connective tissue while exaggerating the piston movement of the legs in acceleration with very advanced shin angles achieved through lower body position and larger steps.
Low Sled March – Push: Increase your Speed
Low-position sled sprint
Sled pulls
Sled pulls over short distances have also been linked to improved acceleration. Zafeiridis et al (2005) looked at weighted sled pull training and its effect on sprint acceleration, and they concluded that training with a weighted sled would help improve the athlete's acceleration phase. This was true over both 20m and 50m efforts. Lockie et al (2003) investigated the effects of various loadings and concluded that when using a sled, a light weight of approximately 10-15% of body weight should be used so that the dynamics of the acceleration technique are not negatively affected.
How to perform sled pulls
Bungee resisted sprints
This approach is effective over short sprint distances (dictated by the length of the bungee). The bungy can be anchored to the floor or wall or can be anchored to a trainer or training partner outdoors.
![[ADD IMAGE'S ALT TEXT]](/sites/default/files/bungee-sprints-1024x576.jpg)
Partner resistance using speed harness or resistance bands
You can purchase harnesses that are typically worn like a backpack, or around the waist that have an extended cord out the back that a trainer or training partner can apply resistance through.
Alternatively, the use of a regular resistance band from the gym would suffice.
When strong resistance is applied an athlete can lean into the sprint more (simulating acceleration power lines). If lighter resistance is applied an athlete can achieve upright maximal velocity posture. Here is an example of resistance bands used to work on acceleration:
An additional benefit of using a resistance harness is that it can be released after a period of resisted running to achieve an “overspeed” effect.
Use of sprint resistance machines
These specially designed machines can offer constant or variable resistance over the course of a sprint. This means they can be set higher for the acceleration phase and lower for the maximal sprint phase (or vice versa depending on the goal of the session). These devices also allow greater running distances than more traditional bungee approaches. They can also be used to tow the athlete for an overspeed training approach. Obviously, these devices come with significant costs associated with them. Here is an example of one of these devices being used for resisted sprinting.
Resisted sprinting devices
Resisted sprint training guidelines for acceleration
| Distances to use | Resistance load to use | Notes |
|---|---|---|
| 5-30m | 15-50% of bodyweight (depending on training level) OR 20-50% decrement in usual time |
Emphasis on aggressive forward body lean, attacking the ground in a backward manner and rapid limb switching (piston movements) |
Maximal speed common approaches
Maximal speed approaches can be broken into four different categories. These include:
- Technique drills
Which work on proper recruitment of musculature, speed of neuromuscular firing and correct body positioning. - Resisted sprinting drills
While most resistance drills target acceleration, those that allow for longer running distances can also improve maximum sprint velocity also. The resistance modes that allow longer running distances are resistance harnesses with longer attachments, parachutes, and sleds or resisted sprinting devices. - Repeated sprinting drills
Essentially sprints over different distances, often performed from a rolling, or flying start to take away the acceleration requirement (energy use) allowing athletes to achieve the same velocity as after maximum acceleration but using less energy. - Overspeed (assistance) sprinting drills
This approach is primarily used as a means of improving stride frequency without significantly affecting movement mechanics. The idea is to increase sprinting velocity by around 10% by reducing the time and energy required to accelerate. It utilises down-hill or down-wind sprints, tensioned bungy cords and other forms of towing that make the athlete move at speeds slightly faster than they can achieve in normal conditions.
Maximal speed running drills are typically performed over distances between 30m and 60m. The most common approaches for improving maximal sprint speed (once techniques are embedded) are repeated sprint drills and overspeed training.
Technique Drills
Improving sprinting mechanics can take time (that many S & C coaches don’t have the luxury of). It also takes a level of knowledge that will require further upskilling outside the scope of this course. However, it is useful for all trainers involved with athletes looking to improve their speed to have an awareness of how to improve sprint mechanics. There are a multitude of sprint technique drills available online. This is merely a small selection of some of the most commonly used.
The following video takes you through a series of drills used by sprint coaches that explain the biomechanical advantages to be had by refining sprint techniques.
The remaining drills are those that could easily be implemented as part of an extended conditioning warm-up (before a speed session) to start to embed some of the key sprint mechanics in your athletes. These have been organised from least to most complex. Let’s take a look.
Big Arms
To emphasise the role of arms in sprint mechanics and increase stride length
Running Butt Kicks
Pedal the bicycle
Works on the cyclic leg motion that should be used while running at top speed. The focus is on quick leg turnover.
No arms to sprint
This is another drill that is designed to remind athletes of the importance of arm drive in sprint speed.
The Switch (or “A” switches)
Fly in mini-hurdle run
This sprint drill helps to embed the cyclic nature of maximum velocity sprinting. It allows the mechanics developed in the technical skills to be applied in a sprint. The hurdles encourage the high knee drive, full flexion of the trailing knee and correct foot placement required for fast sprinting. The idea of this drill is to build co-ordination of these elements resulting in a smooth and fast transition across the hurdles. See the following example.
Resisted Running Drills
Resistance running drills are a great progression from less specific power/plyometric gym-based training to speed-strength field-based training. The beauty of these exercises is that they work on strengthening sprinting muscles while using actual running mechanics. There is still significant debate over the amount of resistance to use in these drills. Most of the literature supports a resistance that reduces normal sprinting velocity by around 10-30%, however, some of the very best Jamaican sprinters apply much heavier resistance than this. The resistance used should be based on the athlete’s training level and their ability to maintain normal sprint mechanics during the exercise. Bidlow (2022) suggests higher resistance loads are better for improving initial acceleration, while lighter loads are better for improving later acceleration and maximal velocity. Resisted sprinting is typically used in the later preparatory phases of a training calendar (rather than in competition phase).
Common ways of adding resistance to sprinting include the use of:
Incline sprints
The best grade of incline appears to be around 10-20 degrees. It is best done outdoors as if done on treadmills the treadmill determines the velocity.
Resistance harnesses
These are easy to use in team training situations. Resistance is supplied by a partner or trainer. These have relevance to both acceleration and maximum speed training depending on the level of resistance supplied. Harnesses can also be released following a period of resisted sprinting to allow an overspeed effect. Here is a specialised harness that allows for this (however a trainer could simply release the harness too).
Parachutes
These work by increasing air resistance and are a useful tool when training by yourself. Different-sized chutes are used to effect more or less resistance. These parachutes simply attach around the waist and allow an athlete to adopt a proper maximum velocity running posture. Note: in order for this method to work effectively, you should always sprint into the wind.
Sled pulling
As discussed under acceleration, however using less resistance (around 10-15% of body weight) with sprints completed over longer distances (i.e. 50-60m).
Resisted sprint training guidelines for maximal velocity
| Distances to use | Resistance load to use | Notes |
|---|---|---|
| 30-60m | 15-25% of body weight (depending on training level) OR 10-15% decrement in usual time |
Emphasis on upright running posture, horizontal (back) ground strike and full recovery between reps |
Repeated maximal sprints
Simply put, this involves sprinting as fast as you can over relevant distances involved in the sport you play. The most common approaches are 30-60m sprints from a variety of starting positions. These can be static starts if you wish to incorporate acceleration, or more often rolling (flying) starts to reduce the acceleration effort required and focus on achieving top speed. Rolling starts begin with a slower jog into the sprint start point which quickly transitions into a maximal sprint effort. Rolling starts more often simulate the requirements of sport. An example of this is when the ball is moved along the backline in rugby. Initially, the players run at a moderate pace until they receive the ball and are required to sprint at full pace. Another example is in basketball where a player is running forward, then sprints to execute a fast break.
Assisted (over-speed) training
These drills are designed to improve stride frequency by increasing the sprint velocity to above-usual levels. They achieve this by either allowing an athlete to run faster than usual (e.g. in down-hill sprints), or by pulling the athlete along (with the use of bungees or specialised devices). These techniques are most often used with intermediate to advanced athletes.
Warning: These drills come with an element of risk and so should be treated with caution with those athletes who are yet to master sprint mechanics. For this reason, it is suggested that these drills only act to increase the usual sprint velocity by no more than 10%. Exceeding approximately 10% of an athlete’s maximal velocity may lead to large disruptions in technique and cause the athlete to overstride in an attempt to brake and protect themselves (Hicks, 2017).
Research into assisted sprint methods is fairly sparse, although what has been completed reports promising outcomes. The mechanism behind the improvements is somewhat less clear. While resisted running methods clearly target the concentric contraction of sprint muscles against resistance, assisted running methods are suggested to lead to speed improvements by allowing athletes to run at supra-maximal velocities. The benefits of this approach appear to be decreased ground contact times and increased stride length along with positive neuromuscular changes (enhanced recruitment of fast twitch motor units) and increased muscle and tendon stiffness leading to greater stretch-reflex responses (Hicks, 2017). Enhanced stiffness is thought to be derived from greater eccentric muscle action that over-speed training elicits as athletes are forced to accept greater foot strike forces than they normally would (Hicks, 2017).
The difficulty in applying overspeed training is getting the level of assistance right for the athlete. While a definitive guideline has still not been produced for this, Hicks (2017) completed a review of the literature on this training method and reported that:
- Downhill running should be limited to gradients of 1-1.5 degrees from flat to avoid unnaturally long stride lengths and associated excessive braking forces. Some researchers believe down-wind sprints on flat surfaces are more effective.
- Towing forces that elicit a maximal velocity of no more than 106-110% of maximal unassisted velocities appear best for maximising the running velocity without compromising the sprinting technique.
- Assisted sprint training should only be used for maximal sprint velocity training (not acceleration training).
- Contrast training (i.e. a mix of resisted, normal and assisted sprint training within the same session) appears useful to enhance motor patterns and maximal speed. Assisted and resisted training methods appear best used towards the end of the general preparation phase for sprinters and are generally avoided in competition as they carry a slightly higher risk of hamstring injury when compared with unassisted sprinting.
Examples of assisted sprinting approaches
Downhill sprints
The easiest form of assisted sprinting to perform. The hard part is finding a steady decline of 50-60m that is no more than 1.5 degrees.
Bungee overspeed training
Useful over shorter distances (20-30m). It involves a partner creating tension on the bungee and essentially pulling you along at a rate faster than you would normally sprint. Safety notes: Timing is everything! If the athlete leaves their run too long they can “slingshot” off the line. The key is to allow the athlete to adopt an upright maximal sprint posture. to avoid this, cones can be placed to let an athlete know when to begin their sprint (i.e. when their training partner reaches the cone, they should start). Here is an example of this technique in action where the trainer is using a whistle to let his athletes know when to start their sprint.
Use of towing devices
These devices essentially pull the athlete towards them through a winch mechanism. They can be set to pull at different rates. The advantage of these devices is that they can be used for longer distance-assisted sprints. The downside is the cost of acquiring one.
Speed endurance training
Speed endurance training is typically only beneficial for athletes involved in extended sprinting pursuits like 400m runners. It involves longer sprints where the purpose is to hold maximal velocity for extended periods. It has limited relevance to sports athletes who rarely perform sprints of extended distances (beyond 60m). In the context of most sports athletes, speed endurance would be applied in repeated sprints of 40-60m (with or without resistance).
For sports athletes, speed endurance is often worked alongside anaerobic capacity and typically structured in an interval training approach because in the context of sport, these high-intensity efforts often involve a change in direction and are broken up by periods of low-intensity work. Here are some common examples of speed endurance training for field-based athletes.
- Shuttle runs
Out and back sprints increasing in length – 10m and back, 20m and back, 30m and back etc. - Pyramids
e.g. sprint 10m/walk 40m, sprint 20/walk 30, sprint 30/walk 20, sprint 40/walk 10, sprint 50, then work back to the start again by shortening sprints. Rest for 90 seconds after 1 full set. - Cruise and sprint
Gradual acceleration for 60m then an all-out sprint for 40m. Repeat x 3 then rest for 2 minutes and repeat. - Hollow Sprint
Set out 5 cones at 30m intervals. Jog one, sprint one until the last cone, turn and repeat x 3. Rest for 2 minutes at the end of sets.
Resisted Sprint training guidelines for speed endurance
| Distances to use | Resistance load to use | Notes |
|---|---|---|
| 40-60m | 10-30% of bodyweight OR 10-30% decrement in usual time |
Emphasis on upright running posture, horizontal (back) ground strike and full recovery between reps |
Applying the FITT principles to speed training
| Type | Speed training can be used with any form of cardiovascular training, but not all approaches can be used with different cardio modes. For example, while overspeed training can be used with running and cycling, it is difficult to implement with rowing! Variations of speed training including resisted, normal and assisted methods can be used (often within the same session). |
|---|---|
| Frequency | This will ultimately depend on the phase of training and the demands of the sport. General recommendations suggest between 2 and 3 sessions a week of speed/agility training, ideally separated by at least 24-48 hours. While the total work (volume) performed in speed sessions is relatively low, it is very intense training and therefore requires significant recovery. Ideally, speed training is done when the body is in a fresh (recovered) state, so should be scheduled with other training in mind. |
| Intensity | Aside from technique drills that can be done at sub-maximal intensities, the main workout activities of a speed session are performed at near-maximal intensity. This means that speed sessions involve short bursts of maximal activity broken up by long periods of rest. The focus of a speed session is quality of effort (over quantity – volume). |
| Time (duration) | This will ultimately depend on the focus of the session. Acceleration repeat sprints will be completed over the distance between 5 and 30m so will only take a few seconds. Maximal velocity repeat sprints are typically done over 20-60m, so will take around no longer than 7-8 seconds. Speed endurance work is still typically done in efforts of no more than 100m. Even though the duration of total sessions can be quite short. This is because once fatigue occurs you can no longer make speed gains. |
Speed training programming variables
The following information was compiled by @YLMSportScience using data obtained from a literature review completed by Haugen et al (2019). It gives a comprehensive guide to the programming variables that should be applied when designing speed training programmes with different training focuses:
| Training method | Distance (m) | Intensity (%) | Recoveries (min) | Total session volume (m) | Initiation | Time to next HIS (hours) |
Footwear and surface |
|---|---|---|---|---|---|---|---|
| Acceleration | 10–50 | > 98 | 2–7 | 100–300 | Block/3-point/crouched | 48 | Spikes on track |
| Maximal velocity | 10–30a | > 98 | 4–15 | 50–150a | 20–40-m flying start | 48–72 | Spikes on track |
| Sprint-specific endurance | 80–150 | > 95 | 8–30 | 300–900 | Standing start | 48–72 | Spikes on track |
| Speed endurance | 60–80 | 90–95 | 2–4 (8–15) | 600–2000 | Standing start | 48–72 | Spikes on track |
| Resisted sprints | 10–30 | 80–95b | 3-6 | 50–200 | 3-point/crouched | 48 | Optional |
| Assisted sprints | 10–30a | ≤ 105 | 5–15 | ≤ 100a | 20–40-m flying start | 48 | Spikes on track |
| Tempo | 100–300 | 60–70 | 1-3 | 1000–2000 | Standing start | 24 | Trainers on grass |
*Intensity is expressed in per cent of maximal velocity. HIS=High-intensive session
**The session should be ended when a drop-off in performance and/or technical deterioration is observed
***Flying start distance excluded
****The perceived effort is maximal, so the velocity decline is caused by resistance.
Designing a speed training session
The recommended general approach for designing a speed training session involves the following sequence:
- Warm-up: A meaningful warm-up (e.g. RAMP) that will ready the body for explosive sprint work
- Technical drills: To switch on the neuromuscular system and emphasise certain technical elements you wish to work on with the athlete
- Speed training: The main workout. Usually no more than 3 exercises as quality tends to diminish with additional activities. Near maximal intensity in all efforts. This means volume needs to stay fairly low. This often means a few maximal reps of each exercise. Any more than this and fatigue will start to diminish output. This is why many trainers opt for contrast training sessions where speed is worked on first, then resistance training modalities to make the most of the time they have with their athletes.
- Strength/Power training: If you are targeting both of these modalities in the same session it is best to do speed work first (as any fatigue from strength/power training will impact more on maximal speed than vice versa).
See the following example of a speed session targeting acceleration and maximum velocity. Take a look at the volume of exercise included in a session. This session comes from Designing a Speed Training Session (2017).
| Session stages | Exercises | Reps | Recovery |
|---|---|---|---|
| Warm-up | RAMP warm up – 10 minutes. Ends with repeated rolling sprints at intensities from 60-90% max. | ||
| Technical Drills | Wall leg drives “A” switches |
||
| Speed Training |
Flying (rolling sprints) - 20m jog + 20m Max sprint Sled pulls – 10m (30% bodyweight) |
3-4 3-4 |
1:10 work to rest 1:10 work to rest |
| Strength/Power |
Depth jumps DB explosive split squat (5kg DB) |
2 sets of 5 2 sets of 6 |
3 minutes rest 3 minutes rest |
Applying progressive overload to speed training
As you have probably guessed by now, applying progressive overload to speed training is not about increasing training volume. Instead, it is about applying different training approaches and distances to ensure progression. An athlete new to this form of training, or just starting a training block including speed will likely start with shorter distances on flat surfaces. Depending on the training goal, distances could then increase, or resistance could be added to create progression. As acceleration and maximal speed can be targeted separately, individual sessions may have different focuses, for example, a session focusing on acceleration might employ resistance methods and sport-specific starting point drills, whereas a maximal velocity session might include longer sprints and overspeed training. As athlete condition improves a small amount of volume might be added to sessions in the form of an additional rep or two, or an additional exercise (while remaining within suggested guidelines to avoid fatigue issues).
While multiple linear sprints are required across most games of sport, sports also require athletes to be fast in a variety of directions. Many of the movements required in a game of sport are non-linear, requiring athletes to move laterally at speed, run angles and even move backward at pace. This is where agility training comes in.
Speed fitness test
There are a multitude of tests that can be used to assess linear speed. The most obvious of these involves assessing a distance over time approach. Sprint of speed tests can be performed over varying distances depending on the factors being tested and the relevance to the athlete’s sport. The aim of all speed tests is to cover the set distance in the quickest time possible.
Normative data exists for a range of speed tests over different distances for those who want to know where they sit for their age and sex, however, most speed testing involves simple test/re-test comparisons between the same athlete (before and after a block of speed-focused training).
As with all other fitness testing, it is imperative that the test conditions are standardised for reliable pre and post-training block comparisons. Key considerations revolve around pre-test preparation (rest, training load and nutrition), warm-up protocols, the testing surface (grass, track concrete etc) and the method of timing.
Speed tests are best conducted using timing gates for accuracy.
![[ADD IMAGE'S ALT TEXT]](/sites/default/files/Speed%20Tests.jpg)
These devices generally work by transmitting an infra-red beam of light that when broken starts and stops an electronic timer. While the use of stopwatches is common in field sports, improvements in speed over sprint distances are often measured in milliseconds and using a stopwatch relies on the consistency and reaction time of the user (which could negate small improvements, or lead to unrealistic improvements).
Obviously, timing lights come with a considerable cost, so the reality is that many trainers and coaches will rely on timing with stopwatches. Accuracy of timing with stopwatches can be improved with the use of a “starter”. A starter is an additional person who is stationed at the start position for the test. This allows the timer to stand at the endpoint of the sprint test distance. Athletes should be instructed to start a sprint test in their own time (not in reaction to a signal). The starter should stand with their arm raised and drop their arm the moment the lead foot of the athlete crosses the start line. This indicates when the timer should start the stopwatch. The timer then stops the clock when the athlete crosses the end line.
Agility is widely considered the ability to change direction quickly and efficiently, but there are many elements to agility that make it hard to comprehensively define in one sentence. Like speed, agility encompasses acceleration and linear qualities, but unlike speed, I also involve deceleration and rapid changes in direction. Those who are the most “agile” can perform these changes of direction while maintaining high speed.
While the terms “agility” and “change of direction speed” are often used interchangeably, recent literature has actually separated these terms into two distinct categories:
- Agility: True sporting agility involves reactive abilities in unpredictable environments. For example, in a game of tennis, a player has to react to the plays of their opposition move quickly in a variety of directions to successfully counter opposition moves.
- Change of direction speed: The pure ability of an athlete to move quickly through a pre-planned change of direction activities, e.g. many sports drills have pre-planned directional change incorporated in them and are repeated over and over.
This also indicates that most traditional agility tests (e.g. the “T” test) are not actually measuring true sporting agility and should therefore be considered a change of direction tests.
While speed is a critical factor in agility, agility requires a series of cognitive functions over and above speed including:
- Visual processing
- Timing
- Reaction Time (to stimuli where the movement required cannot be planned in advance)
- Perception
- Anticipation
This is why agility is considered a “skill” that has high trainability beyond simply speed of movement. Agility is considered a vital skill for most sports. In invasion/territorial sports like football, rugby, hockey and basketball (where the objective is to invade the opposition area and score points), agility is beneficial for avoiding tackles, retaining possession and ultimately create scoring opportunities.
Agility must be trained independently of linear speed as recent research has determined that linear sprint training has little to no influence on sprinting involving directional change (Sheppard and Young, 2006). This was even more true when the inclusion of a sports-related skill was introduced (like dribbling a basketball or football).
The ability to sprint repeatedly and change direction while sprinting is a key determinant of sports performance in field and court sports. Changes of direction in sport are most commonly in response to a stimulus (e.g. another player’s movement, movement of play, or the ball).
The complex nature of agility is shown well in this diagram by Young et al (2002). It shows that true agility is made up of multiple components, but that these can be split into two major sub-sets.
- The mental processing of stimuli based on both what you see and what you know (i.e. the responses you are able to call on from the training you have done).
- The physical performance of the agile movement which encompasses everything from the condition of your body in terms of coordination, strength, power, balance and technique.

This information tells us that agility training needs to encompass both the mental processing and physical aspects of agility to truly improve an athlete's agility for sports performance. It is also clear to see from this, that many agility drills employed in physical conditioning sessions target the physical components of agility without the requirement for perceptual and decision-making. This means most athletes are working on change of direction, rather than true agility. Quality trainers and coaches understand the importance of including both aspects of agility in their programmes and therefore include drills that allow for both to be developed.
So what is a better definition of agility? This one by Young and Young (2006) sums it up quite nicely.
A rapid, whole-body movement with change of velocity or direction in response to a stimulus in an open (unplanned) environment
Right, so we now understand the difference between agility and change of direction. Let’s find out how to train it.
Benefits of agility training
There are obvious performance benefits to be gained from agility training like the ability to evade, lose (or stop) opposition players, be in the right place at the right time to receive/strike the ball or navigate a tight space at speed (e.g. dance down the touchline to score in the corner, dribble through a defensive line etc). There are a number of other benefits that are afforded by agility training also, including:
| Injury prevention | Many injuries occur when our body falls out of alignment and posture during dynamic movement at speed (e.g. tearing a knee ligament due to a misstep). Agility training improves flexibility, balance and control. Practising agility drills allows the body to learn how to maintain correct body alignment and posture during rapid changes of direction. Sensory receptors and the neuromuscular system are able to practice working together to choose safe and efficient ways of adjusting to rapid directional change and the support tissue (like ligaments) strengthens to support joints through these dynamic shifts. The brain learns how to better sequence muscle contraction to ensure the joints are protected against lateral and shear forces. |
|---|---|
| Increased cognitive function | Agility and change of direction drills train more than just your muscles and joints, they also hone your ability to process information quickly and react using a range of different movement approaches. Pre-planned change of direction drills enhance movement patterns, foot speed patterns, memory and coordination, while stimulus-response tasks force the brain to react to different stimuli and practice making rapid athletic decisions and movement execution. Over time, these “movement options” become second nature and allow athletes to make agile decisions during sports performance. |
| Improved co-ordination and balance | Agility drills encourage our body to improve balance during dynamic movement. When we regularly practice hand-eye coordination, fast stops and starts, and agility speed drills, it trains our body to work as a cohesive unit. When our body is working in sync, our movements become more fluid, resulting in smooth, coordinated transitions. |
| Sport specificity | Agility training has the highest transference of any movement-related training tool to sport. Agility drills can most closely mimic the movement requirements in sports and can also easily include the use of sporting equipment. This is why agility training fits nicely in the specific preparation training phase as athletes begin to train specifically for the requirements of their sport. |
Movements that differentiate agility from speed
The key difference between speed and agility training is the inclusion of lateral movements. Lateral movements are a characteristic aspect of movement during team sports performance. In particular, evasive manoeuvres that occur in competitive play are most often initiated with a lateral step (Gamble, 2013). Similarly, the “side-step” action used to evade defenders involves the abduction of the hip and placement of the foot to create medial-lateral ground reaction forces to create lateral propulsion. Because most strength and power conditioning exercises for the lower limbs are performed in the sagittal plane, they correlate poorly with change of direction measures. The only resistance training approaches that seem to correlate well to rapid change of direction are unilateral strength and plyometric exercises that involve the frontal plane (i.e. involves side-to-side movement). This means an exercise like lateral box jumps, would have more transference to agility than a vertical jump.
It also appears that eccentric and stretch-reflex-inducing exercises have more relevance to agility than methods targeting concentric muscle contraction. This is thought to be because change of direction movements are associated with longer foot contact time than sprinting and that unilateral tasks that focus on eccentric acceptance of weight including those that produce lateral propulsion and reversing direction (deceleration) have the greatest transference to agility improvement. This suggests that when trying to improve an athlete’s agility, resistance training should focus mainly on unilateral movements incorporating lateral force acceptance and deceleration. An example of such tasks would be multi-directional hopping tasks, lateral jumps and hops, and unilateral drop jumps (Gamble, 2013)
One other key difference between agility movements and pure speed relates to body position. While speed training transitions from a lean forward acceleration position to an upright sprinting position with long strides, mid-foot striking, and a high COM, agility training consists of multiple accelerations and decelerations (in order to change direction), so strides are often shorter and COM is held lower to facilitate tighter and more balanced turns and transitions.

The importance of postural control and stability
In order to be agile, you need to be able to perform rapid change of direction efficiently. An athlete’s ability to control their COM is critical to this. The ability of an athlete to control lumbopelvic and trunk posture is crucial to maintaining proper lower limb mechanics and efficient transfer of force to generate a change of direction movement. Agility involves “whole body” changes in direction. If the legs are creating force in one direction, but the torso is still moving in another direction, then balance is lost along with the efficiency of movement. This is why unilateral exercises are vital in resistance training preparatory phases to encourage strengthing of the muscles that ensure pelvic and torso stability during rapid directional change. A strong core is also critical to ensure the kinetic chain functions optimally to transfer force from the ground through to the torso and ensure all body parts move in the same direction. Change of direction drills allow athletes to practice the required postural adjustments under planned conditions, but many agility requirements in sports are unplanned (I.e. in response to an external cue), so tasks that require an athlete to make postural adjustments under reactive conditions should be incorporated into training.
Applying the FITT principles and progressive overload to agility training
From a programming perspective, agility training can be viewed as very similar to speed training. It is essentially performed at very high intensities over short durations and is a form of training best done when athletes are fresh. The associated mental processing requirements of agility training can also make it challenging in terms of focus, which means agility drills are best performed before fatigue-inducing tasks that might have an effect on coordination or mental sharpness.
| Type | Agility training has the ability to be very sports-specific. The more the drills mimic the movements and directional changes associated with the sport, the better. As in all training approaches, agility and change of direction drills could start with more generic approaches in general preparation (to work on co-ordination, foot placement and rapidity of movement) then the focus can shift to more specific agility tasks related to the sport (often using simulated opposition and relevant sporting equipment). |
|---|---|
| Frequency | As with speed training, agility training is recommended to be limited to 2-3 times a week with adequate recovery time between sessions. However, agility training is rarely targeted exclusively in conditioning sessions, so elements of agility training could be inserted into most sports training as conditioning games and drills. |
| Time (duration) | Movement durations for agility-based drills should reflect game movement requirements. Agility movements are rapid in nature, so should be performed over short durations with high intensity. Once agility skills are enhanced, agility can be further enhanced through the execution of agility skills within decision-making game simulation drills and tasks. These might have longer durations to simulate game day requirements. |
| Intensity | When building agility initially, the intensity of drills might be pulled back a little to focus on foot placement and efficiency of agility movement patterns. Once these have been developed, intensity can be ramped up to add speed to the movement. The final phase of agility training (in a sports context) should reflect the game-day intensity requirements of the sport. Like speed training, agility training is more about quality and intensity of movement than volume of movement, so agility sessions should be kept short, sharp and relevant to the sport. |
To optimise agility/change of direction training, agility should follow a dedicated period of strength and power training (and likely a period of linear speed training too). The general progression of agility or change of direction training approach should then move through the following phases (from the bottom up):

Common approaches to agility/change of direction training
Agility training can be split into 3 clear categories for application.
- Generic approaches
These are pre-planned coordination and change of direction tasks that would be used in preparatory phases to enhance coordination and neuromuscular connection. These often revolve around ladder and cone drills and are not specific to any one sport. These would be classed as change-of-direction drills as they do not encompass the processing and decision-making of true agility drills. - Unplanned approaches
Still generic enough to be applied to athletes from any sport, these drills involve reaction to stimulus, processing and decision making and working out the best movement pattern to achieve the purpose as efficiently as possible. These drills would be classed as agility/change of direction drills. - Sports Specific approaches
These drills involve the specific directional change and decision-making required for successful performance in a given sport. They allow athletes to take the skills they have practised in earlier agility training, and apply them in-game simulation activities (often using opposition and game simulation). There are thousands of sport-specific drills that fit into this category. This would be classed as true agility drills.
Examples of generic approaches to change of direction training
There are thousands of generic agility drills available online. In this section, you will be introduced to some of the more common generic approaches. The first few examples cover agility work that could be performed in a gym environment in the general conditioning phase of training for most sports. They are designed to prepare the body structures and nervous system for the field or court-based agility drills to come.
Line drills
These great drills require no equipment. They are designed to improve body control during multi-directional movements and rapid change of direction. It is best to start with bilateral movements and then progress to single-leg variants of the drills. A basic progression of these drills is provided in image form by NSCA (2017).
Click through the slide of images that include the variants of these drills. Note that the numbers identify the steps and feet placement.
- Forward to back.
- Lateral hops
- Scissors.
- Lateral forward/Back hop.
- Angle hops.
Once these are mastered, athletes can progress onto more difficult line drills like the following:
Ladder drills
Agility ladders can be used to improve neuromuscular connection for quickness and agility. The focus of all ladder work should be to reduce foot contact time, improve accuracy of foot placement and improve the cadence of foot strikes. By introducing a range of directional movements an athlete can develop co-ordination of rapid movement in a variety of directions, which can then be used to make more efficient movement pattern choices in a sporting setting. Ladder drills can also mix foot speed with plyometric and sprint work (by sprinting once you leave the ladder).
Ladder drills are all pre-planned, meaning they work on speed and change of direction only (without the requirement for visual processing and decision making). Here some examples of common ladder drills that progress in terms of complexity. They are all generic co-ordination drills that teach your neuromuscular system to co-ordinate rapid movements in a variety of different directions.
A range of agility and speed work training equipment is starting to become available to target these generic forms of agility work. Examples of these include:
Dot drill mats
A mat with dots that can be used to perform activities similar to line drills.
Watch them in action in the following video.
Hexagonal agility rings
Which offer a little more variation than standard speed ladders
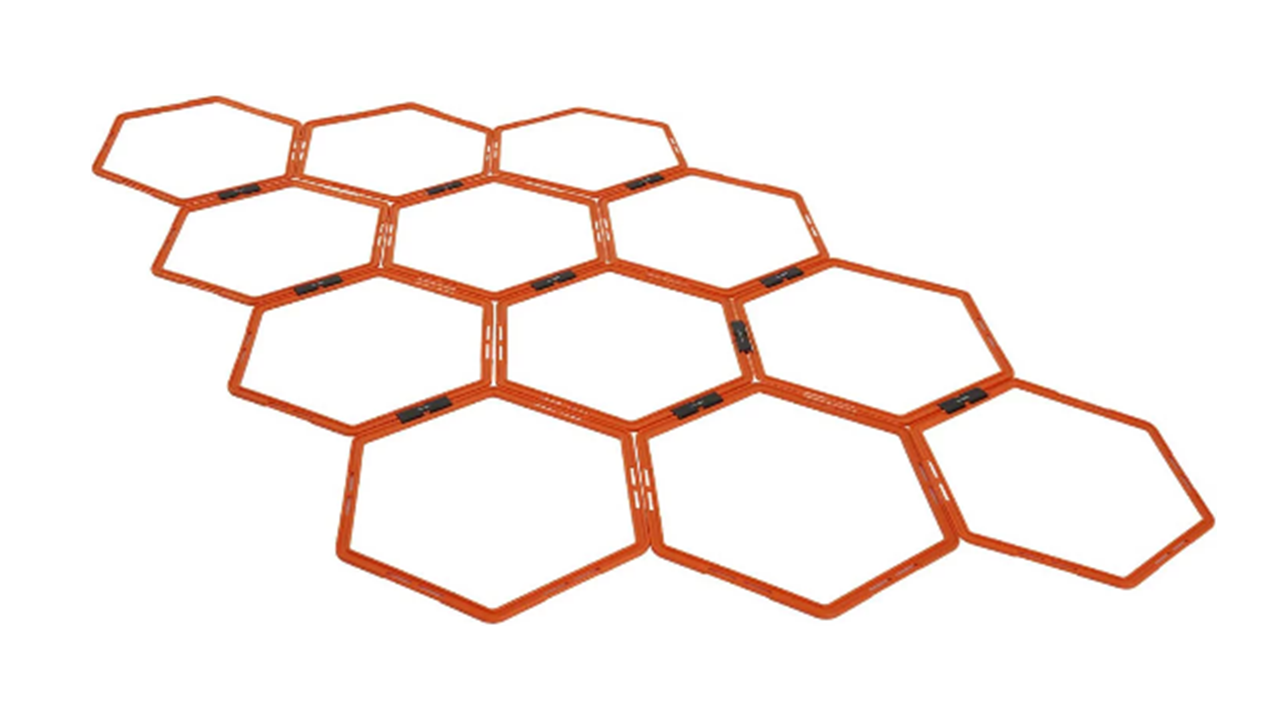
Agility square trainers
Allow you to do similar activities as ladders and dots.
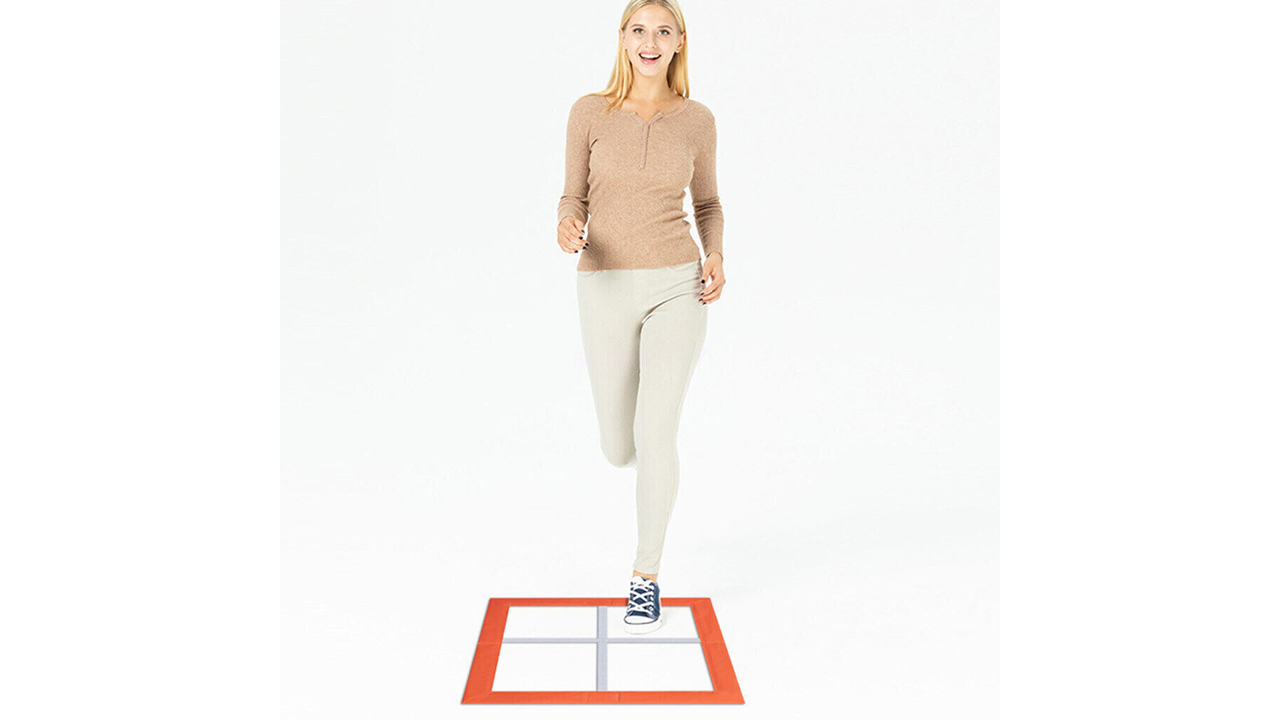
Training volume for these types of activities is based on the number of single-foot contacts made with the ground in a session. The following table from the NSCA (2017) shows the suggested volume of foot contact per session for athletes of different experience levels. It is important that agility sessions stick to these volumes to avoid the session turning into an aerobic one.
| Level | Low-intensity drills | Moderate-intensity drills | High-intensity drills |
|---|---|---|---|
| Beginner | 80 | 60 | 40 |
| Intermediate | 100 | 80 | 60 |
| Advanced | 140 | 120 | 100 |
Image source: https://www.nsca.com/education/articles/kinetic-select/intensity-and-volume-by-drill-type/
Rest periods between sets should not be less than 2 minutes (unless the work period is very short). Rest periods of shorter than 2 minutes limit the total amount of quality work that athletes can perform.
Pre-requisite knowledge for change of direction drills
Once an athlete has shown an improvement in tolerance, coordination, quickness and accuracy with these drills they are ready to perform larger scale agility movements. These are often easiest to conduct with the use of cones or agility poles.
Before we move onto the remaining drills we need to learn a little more about the mechanics of deceleration to change direction. In order to change direction quickly and efficiently an athlete must be coached on how to decelerate and change direction. This coaching could include transitioning from back peddling to forward sprinting (or vice versa), or decelerating to change direction or turn.
These tips for decelerating and turning efficiently come from O’Donnellan (2020):
When approaching a turn that requires deceleration and a change of direction it is important to shorten your strides and sink down with your hips back and COM low. You should feel a stretch in your hamstrings as they work eccentrically to slow you. Adopting this position allows you to stay balanced during the turn and allows you to apply more force into the ground for a quicker stop. A common error in agility drills is an athlete approaching a turn too upright (with hips and COM high).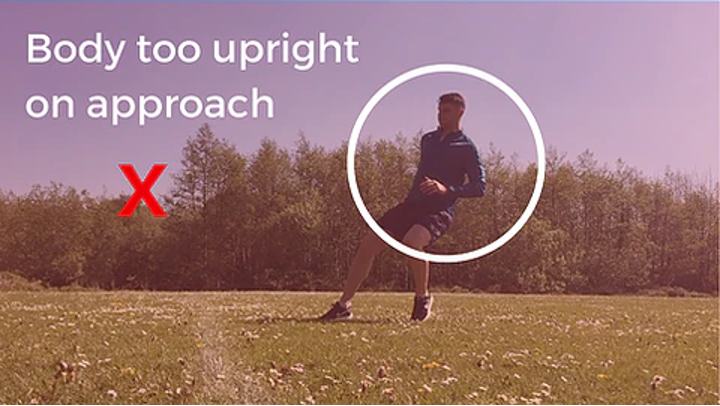
An upright stance heading into a change of direction often results in an athlete failing to plant their push off foot firmly on the ground (i.e just plants their toes). This leads to less ground reaction force and a poor rebound effect. Instead, an athlete should attempt to “thump” this plant foot into the ground with the foot flat. This will enhance ground reaction force and improve stability leading to a more forceful push off.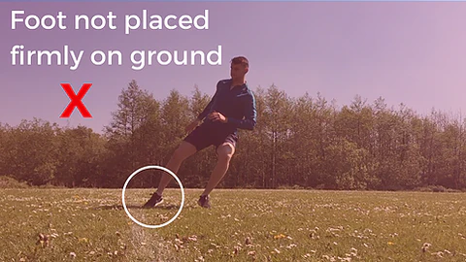
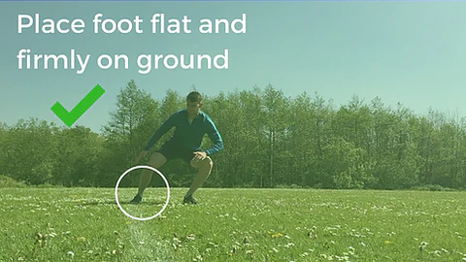
Now to execute the turn. A lot of athletes use the trailing leg (not the plant foot) to accelerate out of the turn. This works when the angle you are turning is very sharp and you need to open your hips to face the new direction of travel (i.e. turns of over 90 degrees), but in general, initial acceleration should come from the plant foot (this is why a stable flat foot plant is required). This should see your plant foot brought through to be the main driving force in initial acceleration.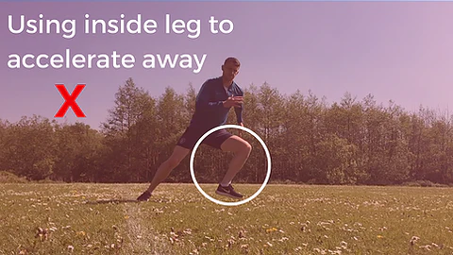
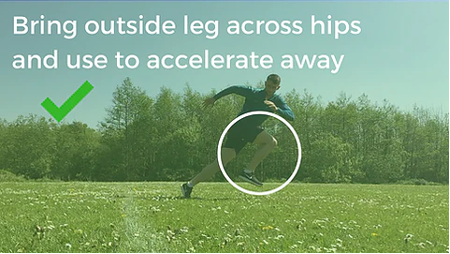
The quick-step technique
This is used to transition from backward to forward running. Some sports require quick transitions from back peddling to forward sprinting. The following video talks you through the quick-step method for achieving this transition efficiently.
Examples of Change of Direction Training Using Cone Drills
There are many and varied cone drills that can be used with athletes (some more generic, some more aligned with specific sports). These cone drills require athletes to accelerate and decelerate multiple time (to mimic the requirements of sports).
These types of drills can be broken into different categories:
- Forward running drills
- Forward/back running drills
- Mixed lateral and forward running drills
See the following examples of drill types.
Note: Those drills shown in video format have been taken from a site that focuses on American Football but are essentially generic drills that could be used to increase agility in a range of sporting athletes.
Examples of a forward-running agility drills
There are a multitude of these drills that can be used to keep training interesting. These can range from simple weaving runs, through to complex set ups requiring athletes to think and remember. The distances and turn angles can be made relevant to the sport of the athlete. For example, it would be expected that football players would cover more distance than tennis players, and that tennis player agility drills would have tighter turns. Common examples include:
The pro-agility shuttle (5-10-5)
3 cone: “L” drill
Cone alley vs. 2 - speed & agility drill
Examples of forward/backward running agility drills
These are useful in sports where players are required to back pedal (e.g. basketball, tennis, touch rugby etc.). They involve short bursts of forward running followed by back peddling and often use angled runs rather than just straight forward and back.
Cone alley (zig zag) drill
Agility “m” drill
Back track drill
Examples of multi-directional drills – including lateral movements
These drills are useful for sports where a transition from forward or backward running to side shuttling is required, for example, a back line in rugby realigning after individual opposition attacks, or a basketballer moving to stay in front of a dribbing attacker.
Cone alley vs. 3 - football speed training
Run shuffle run drill
These are just a snippet of the vast number of drills that are available online. Alternatively, you can come up with your own that better matches the requirements of the sport that your athlete participates in. Existing drills can also be adapted to encompass different ways of moving (I.e., forwards, backwards, sideways).
Examples of Unplanned Change of Direction/agility Training
All of the agility training examples so far have been planned or “known pattern” drills. This means the movements and directions are known and planned in advance. Unplanned change of direction/agility drills offers an athlete multiple choices of directional change that are determined by a form of outside stimulus. This could be a coach issuing verbal or visual cues, or more sophisticated light systems. These drills require an athlete to notice stimuli, process this information, react quickly and execute an efficient movement to achieve a goal. The complexity of the drill will depend on how many directional options are included. For example, a simple left and right option is easier to anticipate than drills including left, right, forward, backward, or diagonal options.
Verbal or visual cues can be used to determine movement sequences, however, visual cues are generally better as most athletes are required to react with agility to visual cues like the bounce of the ball or opponent. Here are some examples of unplanned changes in direction drills.
Reactive box drill
Gates drill
A series of reactive agility drills
This series of drills comes from a football training session, but there is no use of the ball by the athlete, so this could be adapted for any sport.
Use of light systems
Recently, technology that is specifically designed for reactive agility tasks has been developed. These can be set to random sequences to keep athletes guessing. They also have the added advantage of being able to store data (like timing gates) so that progress can be monitored for improvements.
Examples of sport-specific change of direction agility training
There are a number of ways to make agility drills more specific to an athlete's sport. Usually, this involves incorporating the sports equipment or simulating gameplay situations from the sport. Here are a couple of examples from a few different sports.
Three essential reactive agility drills for football/Soccer players
SKLZ Basketball Court Markers: Reactive Training Drill
Use of opponents for reactive agility
There are other forms of equipment that allow reactive agility to work in more of a game-realistic setting. They are particularly useful for evasion sport athletes like rugby and touch rugby players, or sports where you have to stay connected to your opponent. These include tag games within a set area or the use of evasion belts or reaction balls.
Evasion belt activities
Training volume for running-based agility training drills
This table from the NSCA (2017) gives the training session volume recommendations for running-based agility drills. The durations indicated refer to total running times within the agility session. For example, if you are dealing with a beginner, they should do a maximum of 2 minutes of high-intensity agility work within the main body of the workout. So, if a particular drill takes 10 seconds to complete, they could do 6 sets of this drill with (30 seconds rest between each). This would amount to 1 minute of active work, which would leave them room to do another drill with 60 seconds of work time still available. It is important to stick to these volume guides as agility work is all about maximal effort and quality of movement. Too much volume will lead to fatigue and a reduction of high-intensity movement.
| Experience | Work volume per training session | Rest between drills* |
|---|---|---|
| Beginner | 2 minutes | 30 seconds |
| Intermediate | 3 minutes | 30-40 seconds |
| Advanced | 4 minutes | 30-50 seconds |
Table adapted from: https://www.nsca.com/education/articles/kinetic-select/intensity-and-volume-by-drill-type/
Note: as the number of drills increases, rest time should also increase as the cumulative effect of fatigue leads to the breakdown of technique and quickness. It is important for trainers to stick to these suggested volumes and rest periods, so that intensity and quality is maintained.
Designing an agility/change of direction training session
The design of agility sessions closely resembles a speed session. They should be preceded by a quality warm-up. In a general training session for sport, speed and agility are often targeted within the same session.
See the following example of an SAQ session targeting multi-directional speed and change of direction. Look at the volume of exercise included in a session. This session comes from Designing a Speed Training Session (2017). Note: this session is a contrast session with some explosive plyometric exercises following the agility work.
| Session stages | Exercises | Reps | Recovery |
|---|---|---|---|
| Warm-up | RAMP warm up – 10 minutes. Ensure both linear and lateral movements are incorporated. | ||
| Technical Drills | Single-leg lateral jump and stick (e.g. resembles ski jump) | ||
| Change of direction |
“T” or “M” sprint drill Reactive Box Drill |
6 reps 4 x 15-second reps |
90 seconds rest between each rep. 2 minutes rest between each rep |
| Strength/Power |
Rotational med ball throws Single-leg Lateral box push-offs |
3 sets of 6 2 sets of 5 each leg |
3 minutes rest 3 minutes rest |
Change of Direction Tests
There are a multitude of tests that assess different change of direction abilities. In fact, almost any drill can be used as an assessment tool. When selecting a fitness test for a change of direction, there are a couple of considerations to make.
- What type of change of direction are you wanting to assess? This will largely depend on the sport that an athlete plays, and the change of direction requirements associated with their position. Do they need to be able to turn 180 degrees on a dime? Do they need to be able to weave in and out to avoid defenders? Do they need to be able to get to different parts of the court quickly for defensive purposes (e.g defensive sliding in basketball, or V-cut in netball)?
- Are you assessing the athlete to gauge improvement, or as a means of selection? Many elite sports use fitness assessments like change of direction as part of the selection process (e.g. American sports often have assessment days called “combines”. In these situations, they will use standardised tests where the results can be compared against normative data. If the aim of testing is simply to see if improvement occurred across a training period, then any relevant agility drill is fine to use.
- Do you want to include sporting equipment in the test to make it more sport-specific? There are many change of direction tests that can be adapted to incorporate a ball or piece of equipment athletes would usually carry. Common examples of this are dribbling a basketball or soccer ball, running with a hockey or lacrosse stick, or carrying a rugby ball.
Once you have decided on what it is you would like to test, you can either make up your own change of direction assessment task or use one of the wide range of tests that exist online. The test protocols for change of direction testing are the same as for speed testing, although the warm-up should incorporate a combination of linear and lateral movements.
The use of timing gates to measure the time to complete is the most accurate method of assessment. One set of gates is placed at the start of the test and one at the end (if it finishes in a different place). Alternatively, a stopwatch can be used by employing the same procedure explained in speed testing. Because change of direction tests are somewhat complex, athletes should be given a clear explanation and demonstration of the task. They should then be given the opportunity to try out the test before they are assessed.
For consistency, clear instruction should be given around the movement of athletes around or to cones during a test. For example, does the test require them to completely pass around a cone, put their foot past a cone, or touch a cone?
Finally, all change of direction tests involving turning should be performed in both directions to assess an athlete's ability to turn one way vs the other.
Common change of direction tests
Here are some of the most common change of direction tests used in athlete development. These tests are all standardised and have associated normative data to compare against.
The “T” Test
Probably the most widely used change of direction test in the world. This test can be adapted in a number of ways but its original design incorporated forward, backward and lateral movements.
All you need to run this test is a flat, non-slip environment, measuring tape, four cones and a stopwatch or timing gates. See the following image that illustrates the four cones that are set out:

The athlete starts at cone A. The test can either begin with a command by the timer (which incorporates reaction time) or in the athlete’s own time. The athlete sprints forward to cone B, then shuffles sideways to touch cone C, then shuffles sideways to touch cone D, before shuffling back to touch cone B and then back peddling to cone A. The athlete then repeats the test but moves the opposite way after reaching cone B for the first time. The score is the total time to complete the course.
This test has been adapted in a number of ways over the years to suit the demands of different sports. The most common adaptation includes athletes running forward for the whole test and having to turn outside of each cone.

The Illinois test
This test assesses running agility using various turns and movements. To run this test, you need a flat non-slip surface, a measuring tape, 8 cones and a stopwatch or set of timing gates.
The cones are set out using the layout in the following image.
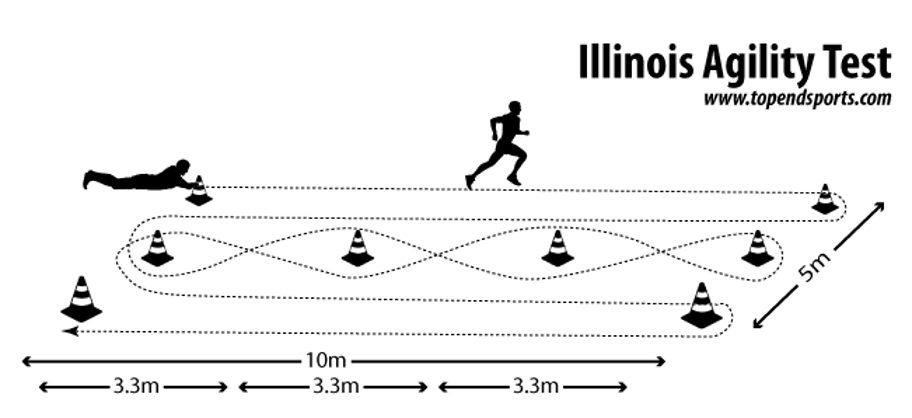
In the original test, participants start by lying on their stomach with their head and hands placed on the start line. This test is started with a command from the timer. On ‘Go” the athlete gets to their feet and sprints 10m turns around the first cone, then sprints back 10m, turns again and weaves between cones placed 3m apart (first one way, then the other). They then sprint out to another cone 10m away, turn around this cone and sprint back 10m to finish the course. The athlete should then be assessed starting from the other side of the course. The score is the total time to complete the course.
The 5-0-5 test
This simple test assesses the ability of an athlete to accelerate, stop, turn 180 degrees and accelerate again over a short distance. All you need to run this test is a flat non-slip surface, 3 cones, a measuring tape and a stopwatch or set of timing gates.
The cones (and timing gates) are set out with a start cone, a second cone (or timing gates) 10m away and a third cone 5m after that. See the following example.
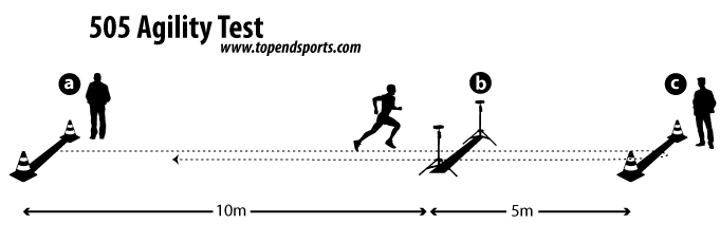
The athlete begins by running out to the 10m mark (point B) building up some speed. When the athlete hits point B they sprint to point C putting one foot past the cone (it can help to place a strip of tape here as a line), turns 180 degrees and accelerates back though point B. The test score is the time from when the athlete crosses point B for the first time, until the time they cross point B for the 2nd time. This is why the timing gates are situated at point B. If using a stopwatch, the timer should stand in line with point B.
A wide range of change of direction tests along with how to set up and run them (and normative data if it exists) on the Topendsports website:
Topendsports: Direction tests
Quickness has been identified as ‘‘a multi-planar or multi-directional skill that combines acceleration, explosiveness, and reactiveness’’ (Moreno, 1995). This definition suggests that quickness consists of cognitive and physical reactive abilities and explosive acceleration. Sounds pretty close to a definition of agility, right?
That is because quickness is a component of both speed and agility. If we are to separate these terms completely, speed is how quickly you move, agility is how fast (and efficiently) you can change direction, and quickness is how fast you can physically react to stimulus. This means quickness is a vital component of sport as the ability to react to a stimulus faster than your opponent can be the difference between winning and losing.
While quickness is a part of speed and agility, it is not the same thing and therefore should be trained in its own right. Because quickness is based on an athlete’s ability to react to stimuli, the key to success in developing quickness is training the nervous system to recognise, process and respond quickly to stimuli.
Neural training
Proper neural training to develop quickness must encompass the following:
- The recognition of stimuli – requires focus and anticipation
- The processing of information – relies on previous experience (can be trained)
- The instantaneous recruitment of a maximal number (and the right type) of motor units
- Increasing the firing rates of motor units – through training the muscles involved in movements to respond explosively (hint: this can involve other modes of training like power training and plyometrics)
- Increasing neuromuscular coordination – practicing movement responses so the brain can synergistically use multiple muscle groups in performing movements.
To achieve improvements through neural training approaches requires multiple rehearsals of movements resulting in stored memories in the brain called engrams. Practice is the essential factor is the storage of these motor programmes. Like all forms of training, it is vital that the focus should be on quality of movement (correct technique) first before volume and speed of movement is increased (Mackenzie, 2004).
Reaction time
Put simply, reaction time is the time between when a stimulus is noticed and the (physical) reaction to that stimulus. In a sporting context there is one more element we could add to that definition and that is that that the physical reaction needs to be appropriate and well executed. For example, the difference between being able to make contact with a cricket ball travelling 150km/hr and being able to smash it for six is significant in terms of performance.
Reaction time consists of three parts:
1. Sensory transmission of input
In sport, this usually includes the noticing of stimuli through visual, auditory or touch means. This stage simply reflects how quickly the transmission of sensory signals reaches the brain. This element of reaction time requires attention and focus and in a visual context also involves knowing what to look for. For example, exposure to hours of practice allows athletes to hone their sensory skills that of non-athletes. Much of this learning is sub-conscious rather than conscious. An example of this can be seen in the following video, where technology is used to see how Christiano Ronaldo's attentional focus has developed over years of training to pick up visual cues of the opposition to allow him to react more effectively to evade defenders.
2. Central Processing
This takes 80% of the time required to react. This is the time taken from when the sensory information is received by the processing parts of the brain (e.g. the visual cortex for vision, the auditory cortex for sound etc). During this processing time, the brain identifies the stimulus, compares it to previous experiences and learning and chooses an appropriate response. This process is shortened in known sporting situations, where the person can anticipate the likely movement of the stimulus and is able to narrow down the possible responses. This reduction in processing time is typically achieved through practice and exposure to the stimulus over time. If the brain is prompted to receive information ahead of the stimulus occurring, this can shorten processing time. For example, a sprinter about to start a race is expecting the gun and can therefore attune their focus and pre-warn the brain to expect this incoming stimulus.
Techniques can also be used to increase the predictability of the stimulus you are required to react to. For example, a defender forcing their opponent to move a certain way can limit the number of options available to the attacker and therefore make it easier for athletes to predict the likely movement outcome they must respond to. An example of this is when a defender in basketball changes their stance to force an attacker to their left.
3. Motor execution time
The final part of reaction time is the time it takes from the processing area of your brain to relay impulses to the muscles to create an action. The speed of this part of the reaction is dependent on the complexity of the required response. For example, simple hand reaction movements can be completed extremely quickly, whereas full-body responses take more time. This is because the brain must access stored motor programmes that then send impulses down the required motor neuron pathways to execute movements. The more complex the movement required, the more difficult it is to sequence muscle contraction for a quick and accurate response. The only way to enhance this process is through repeated practice. Practising skills in a closed environment (for example pre-planned agility drills) is a great way to reinforce motor patterns, but in order for reaction time to improve, these skills need to be practised in unplanned situations, e.g. reactive agility drills). The more (and varied) practice is performed, the more honed the neuromuscular system becomes and the quicker (and more accurate) the response.
Because there are three components to reaction time, drills can be developed that target each part of the reaction time sequence. This means not all drills need to be directly related to the sport (at least not initially). There are many reaction time tasks that can be used to target general focus and processing time, which can then be built on to incorporate increasingly complex movement responses.
Drills targeting visual and auditory sensory input and processing speed
These drills work by removing the complexity of movement response from the task. If the movement task required is kept simple, the emphasis can be placed on recognising the stimuli and increasing sensory input and processing speed. Simple drills that will be beneficial for those athletes requiring fast hand-eye reactions include:
Pen touch
This simple drill can be done anywhere. The athlete places one hand palm up. The trainer holds a pen with the tip just above the athlete’s hand (palm up). The trainer quickly taps the athlete’s hand with the pen and the athlete attempts to grab the pen before it is removed. This task can be used to hone visual reaction time (with the athlete watching the pen), or auditory reaction time (the athlete closes their eyes and listens for a verbal command from the trainer, e.g. “now”. This simple task also allows for the athlete to work on their anticipation skills.
To advance the complexity of the drill a second pen can be introduced (I.e. one on each hand) where the trainer chooses to touch only one hand with a pen. This increases the options available to the athlete, further tests stimulus processing, and brings in more of a movement execution element. To start with an athlete will often close both hands in response to a touch, but over time will be able to respond more accurately with independent hands.
Ruler drop

This other simple drill involves dropping a ruler between a person's thumb and finger and then attempting to grab it as quickly as possible. The ruler should start with 0cm at the bottom. The reaction score is the number of centimetres read on the ruler at the point at which the ruler is caught. This task can also be progressed to a ruler in each hand and can also be used to target visual or auditory reaction time (e.g. by closing the eyes and listening for verbal commands.
Ball drop (sequence)
This is a simple hand-eye reaction time task using coloured balls. At the simplest level, the task begins with a ball held in each hand (palm down). The athlete must place their own hands over the hands holding the balls. The trainer then drops a ball, and the athlete must attempt to react quickly enough to catch it (or hit it in mid-air).
This drill can be progressed in a number of ways including:
- Introducing a third or 4th ball (need another person for this).
- Turning around the spinning and attempting to catch on a verbal command.
- Tossing balls of different colours and calling a colour for the athlete to catch.
Once sensory input and processing reaction time have improved using simple movement tasks, an athlete is ready to move onto drills that require more complex movement outputs.
Drills to target motor execution
Of course, these drills also continue to work on sensory input and processing speed, but by adding more of a full body response and agility/coordination requirement. Once again, the use of balls is a great way to work on this. Here are a couple of examples of simple reaction time full body movement tasks using tennis balls.
Ball bounce drills
Tennis reaction drills: Speed bands
Tennis ball reaction start: Increase your speed
While the drills above target mainly lower body reactions compared with hand-eye coordination, there are also a number of drills that can be used to target simple movements using the feet (e.g., for footballers). In fact, the beauty of reaction time drills is that they can be adapted to suit any sport and can be done with or without sporting equipment (e.g, basketballs, footballs, hockey balls and sticks etc.).
Progressions for reaction time tasks should be programmed from simple movement reactions, through to multiple movement possibilities and finally game scenario tasks (usually involving reacting to an opponent).
The following is an example of a group of athletes progressing through a series of reaction time drills as an example. Note the effort and enthusiasm of the athletes for these drills.
Compilation fun team reaction games and drills
Like speed and agility training, reaction time drills are best completed when athletes are fresh and are great to put at the start of a conditioning workout after a quality warm-up, before any endurance-based or fatiguing work is completed.
Let's put your newly acquired knowledge of all the training approaches to practical use. To get started, please proceed to the assessment section for Assessment 2 C, where you'll find a helpful guide video outlining your upcoming tasks for this assessment. Follow the instructions provided to complete this assessment effectively.
This assessment revolves around applying the insights gained during this module by completing the following tasks:
- Design 2 cardiovascular training sessions for a real athlete.
- Liaise with an industry professional to gain feedback.
- Implement your session on your athlete and include photographic/video evidence.
IMPORTANT
Assessment 2C is an ongoing project that you'll work on until the end of this module and submit in week one of the next module (Module 5). Use the principles and techniques you've gained here to create an effective and personalised training program for your client. Good luck with your assessment!