Premiere Pro is one of the most commonly used tools for editing professional-quality videos.
Adobe describes it this way:
Premiere Pro is designed for a video editor's post-production workflow. It's equipped with a suite of powerful editing tools for content creators and filmmakers to organize and edit video files as well as to enhance and fine-tune audio and image quality.
If you want to jump right in and get started, head over to the user guide and direct your own learning. As you come across activities in the course that require specific techniques, we'll refer you back to this section to learn them, but you are welcome to take as deep a dive into learning this tool as you wish.
Before starting the Film course, be sure you have taken all of the tutorials in this section. You may need or want to brush up on them when using a new technique in an activity.
We point all of our learning to Adobe directly to ensure you are always getting the latest instructions directly from the source. We'll teach you what you can do with the software in our film course, but how to use the software will remain in this tutorial section.
Tutorial Activities
🕔 2-3 hours total
Complete all of the learning activities in the following sections. Get started by downloading the tutorial files: Film Video Resources.zip. (You'll upload these into your project in Step 5 below.)
When you start a new project in Adobe Premiere, making an effective project folder structure is essential.
Keep all your relevant files collected together so that no media links are missing if the project is opened on another computer. We suggest the following folder structure to get you started, but once you are off and running, you may find a different way to organise your assets — just make sure you stay organised.
|
Step 1. When starting a new project, the first thing to do is create a new folder to act as the "Root' folder. Step 2. Name your root folder descriptively for each different project you work on. (For example: Environmental Project). |
||
Step 3. Inside the root folder, make some subfolders to store your media assets.
|
 |
|
Setting up a folder structure for each project is the start of creating good habits that keep you organised — saving time and hassle during production.
When you open Adobe Premiere and start a new project, make sure to:
|
 |
|
| Note: You will notice that an Auto-Save folder gets created as well. | 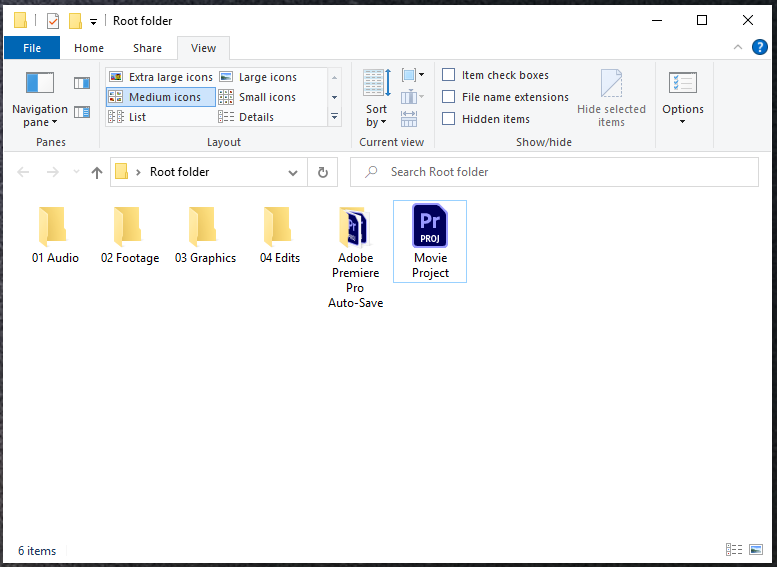 |
|
| Step 4. Populate the subfolders with the assets you have gathered and import each folder into your Premiere project. |  |
Premiere includes some default workspaces for:
- Assembly
- Editing – This is the default workspace and includes the following panels:

- Project: Where we import and organise the file we’ll use in our project. This includes videos and still images, music and audio, and the sequences we create.
- Timeline: Where we put our media to assemble, create and edit a sequence.
- Program: Where our timeline will be displayed.
- Source: Where we can view clips before they go in the timeline.
- Colour
- Effects
- Audio
- Graphics

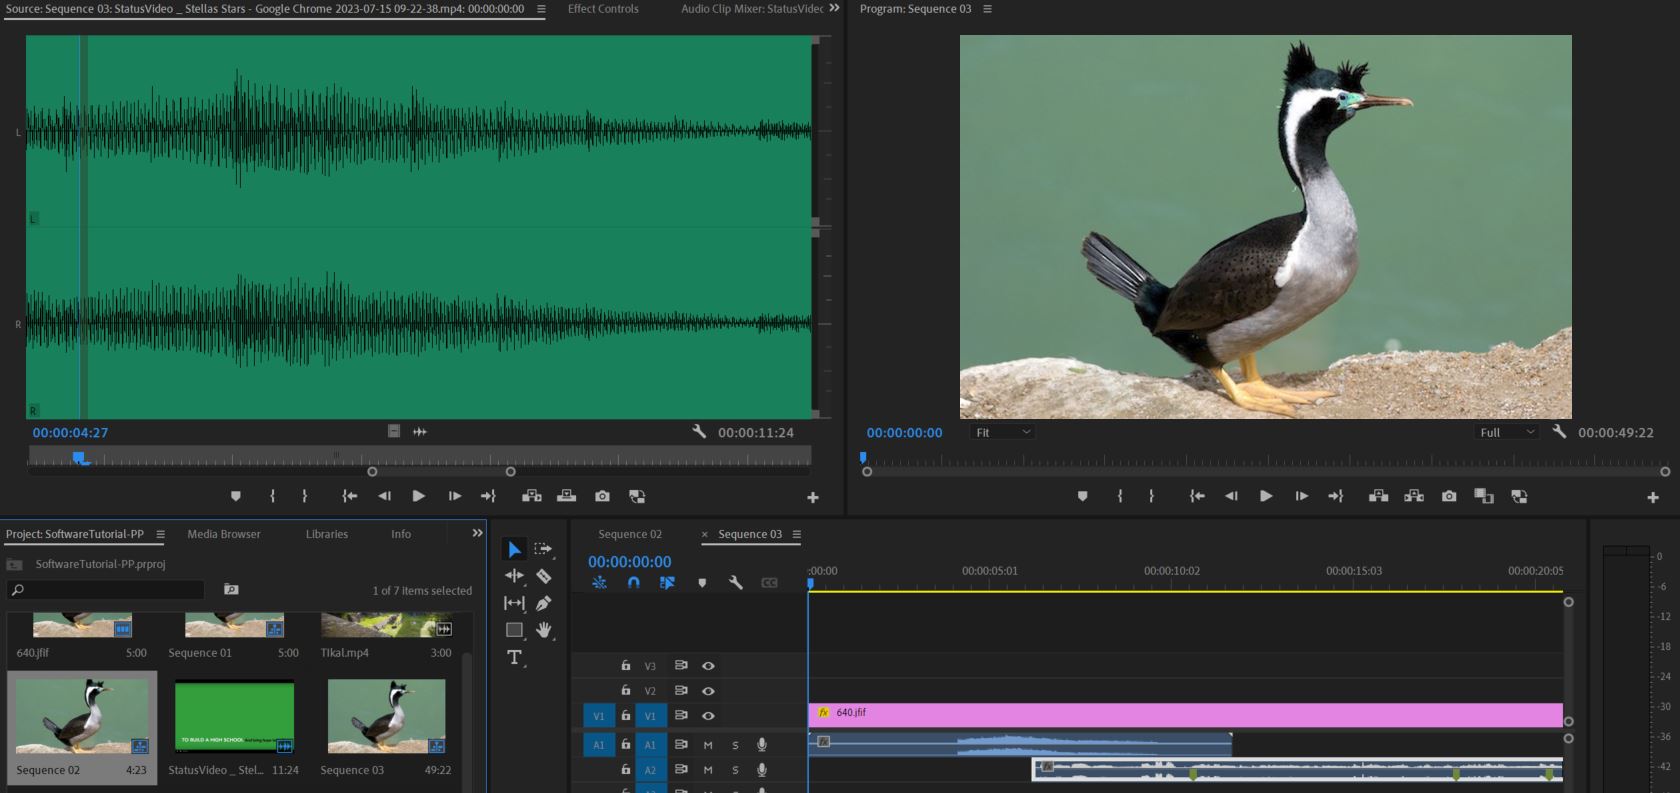
Step 5. Double-click in the centre of the Project panel to select and import the media you downloaded at the start of this section. Your project panel will now include the file you just imported.

Step 6. Double-click a file in the Project panel to display it in the Source panel.

Step 7. Use the player controls to preview the clip.

As a filmmaker, it’s important to make decisions about which parts of the clip to include in your timeline.
To select a portion of a clip
- Move the play head to a point in the clip where you would like it to begin, and click the Mark In button.
- Move the play head to a point in the clip where you would like it to end (around 10 seconds), and click the Mark Out button.
- Now click and drag from the middle of the source panel and drop onto the timeline.
This will create a new sequence and add the clip to it. The sequence will be created using the setting from the clip you dragged.
- The new sequence will be added to the project panel and named after the first clip is added.
- You can drag media from the source panel or the project panel into the timeline.
- Dragging a clip into the program window will allow you to choose how the clip is placed in the timeline.

Learn these functions so you don't accidentally overwrite your sequences in the timeline when you bring new clips in!
- Insert will split the clip at the playhead in the timeline and place the dragged clip between the split clips.
- Overwrite will place the dragged clip at the playhead and overwrite any clips after it in the timeline.
- Replace will override only the clip where the playhead is.
- Overlay will place the clip at the play head on a video layer above the clip already in the timeline.
- Insert Before or After will place the clip either before or after the clip the playhead is over.
Repeat the process to add additional clips to your timeline and play your timeline using the player controls in the Program panel.
File types
You may already have some experience with different file formats for video. If you’ve downloaded movies online or copied videos you’ve captured on your phone or camera, you may have noticed more than a few different file extensions.
The file type is commonly differentiated by its file extension and is often described as the 'container' or 'wrapper' for the video. It describes how the elements of the videos are stored and read by our computers and devices.
Browse Adobe's great list of common video formats to see if you recognise any extensions.
MP4
MP4 (MPEG-4 Part 14) is the most common type of video file format. Apple’s preferred format, MP4, can play on most other devices as well. It uses the MPEG-4 encoding algorithm to store video and audio files and text, but it offers lower definition than some others. MP4 works well for videos posted on YouTube, Facebook, Twitter and Instagram.
MOV
MOV (QuickTime Film) stores high-quality video, audio and effects, but these files tend to be quite large. Developed for QuickTime Player by Apple, MOV files use MPEG-4 encoding to play in QuickTime for Windows. MOV is supported by Facebook and YouTube, and it works well for television viewing.
AVI
AVI (Audio Video Interleave) works with nearly every web browser on Windows, Mac and Linux machines. Developed by Microsoft, AVI offers the highest quality but also large file sizes. It is supported by YouTube and works well for television viewing.
MPEG-2
If you want to burn your video to a DVD, MPEG-2 with an H.262 codec is the way to go.
Codecs
'Codec' stands for Compression-Decompression - which is exactly what it does. A codec can be a software or hardware solution that compresses a video for storage and decompresses it for playback. Each codec has its own advantages and disadvantages. Some codecs offer small file sizes but low image quality, while others might have high image quality but larger file sizes. Having both a small file size and high image quality may mean less compatibility.
Two popular codecs are:
- H.264 (AVC): This is currently the most popular format. It’s used in a lot of devices like cameras and phones for recording and also in streaming platforms like Netflix. H.264 hardware is often part of devices such as televisions, iPhones and computers.
- H.265 (HEVC): This is the next generation of H.26x codec. It stands for High-Efficiency Video Coding, and as the name suggests, it offers better compression while maintaining high image quality. By default, modern iPhones and iPads use this codec as capturing 4k footage can create very large files, especially at high frame rates.
Frame Rates
Frame rate, or FPS (frames per second), is the number of individual frames used every second to capture and display motion.
In the Film History topic, we look at early 1900s films like 'Arrival of a Train at La Ciotat' (The Lumière Brothers, 1895) and 'A Trip to the Moon' (Georges Méliès, 1902). These early examples were often shot at very low frame rates: 12-18fps. This is why the motion often appears choppy.
24fps is considered the standard recording frame rate for film and television. It allows for smooth movement and a cinematic look to the motion. The number 24 came about in the 1920s in response to the need for the film industry to have a standard that could be used to synchronise both the movie and the recorded audio.
25fps in NZ, or 30fps in the US, is common for live television like a news broadcast or sporting event. It’s also popular for soap operas. 30fps is the default recording frame rate for many phones and apps.

Slow-motion
60, 120, and 240fps are very high frame rates, and these are often used to create slow-motion effects. By playing back footage shot at 60fps at 30fps, you effectively double the time the motion takes to happen without making it appear choppy.
Some filmmakers have chosen to use high frame rates in their movies. Peter Jackson chose to use 48fps for the 'Hobbit' movies in an effort to render a sharper, more 'realistic' image. It’s worth looking at some of the criticisms of this decision.
Ang Lee’s 'Gemini Man' was shot at 120fps — that’s very fast!

Time-lapse
Capturing frames at much longer intervals (seconds, minutes, hours) and playing them back at a regular frame rate can enable us to see movement that would otherwise be imperceptible (like plants growing and clouds moving). Time-lapse can be a useful way to show the passing of time.
While watching this video, think about how the music affects your mood. Imagine what the feeling would have been if the background music had a fast beat to it or if it was heavy metal. Would you 'see' this through a different lens?
Resolution
When we’re discussing resolution for film and video, we’re usually talking about the output resolution or the resolution we’re capturing. In both cases, it’s about the number of pixels.

One way to understand this is to think about buying a television. Other than the price, the two main considerations when purchasing a T.V. are its size and its resolution (or the number of pixels it can display). A few years ago, most large-screen televisions were advertised with a resolution of 1080p (also known as full HD). This means that there were 1080 pixels going vertically down the screen. Because televisions come in a standard shape of 16:9, it also means that there are 1920 pixels going horizontally across the screen.
1080p also became a popular recording size for both professional and consumer equipment, with video cameras, digital SLR cameras and smartphones all supporting the size for recording.
Recently, 4K (Ultra HD or UHD) has become the new standard for large televisions, especially for screens 50” and above. A 4K screen has the equivalent number of pixels as four 1080p screens.
As the pixel density increases, more detail can be captured by a camera or displayed on a screen. A lot of modern cameras and phones now have the ability to record in 4K, with some now supporting 8K.
We introduced you to making smaller clips from one large clip. This is a deeper dive into that feature.
When you bring large files into Premiere Pro, you can break them into manageable chunks called Sub-clips. Watch one or both of these videos to learn the process of making them:
Here is another helpful video:
Premiere Pro can accept most audio formats: MP3, M4a, and WAV will all work well.
Audio files can be added to the Project panel using the same process used to bring in video files. Once in the Project Panel, audio clips can be added to the timeline by dragging and dropping them into Audio Track 1 or 2. Audio tracks can also be cut and edited in the same way, using the same tools as video tracks.
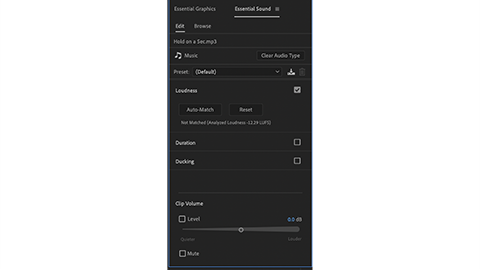
| We can access more audio settings by opening the Essential Sound panel from Window in the menu bar. | 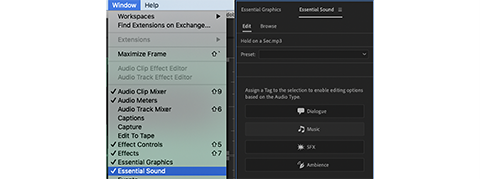 |
|
Tag the type of audio selected to adjust its properties. Use the Clip Volume slider to make the audio louder or quieter. This can also be used for audio that is part of your video clips. |
 |
Editing the volume to mix audio layers
When you bring audio into your project, it won't always play back at the same volume, but you can manage that by editing the volume of specific sections of audio.
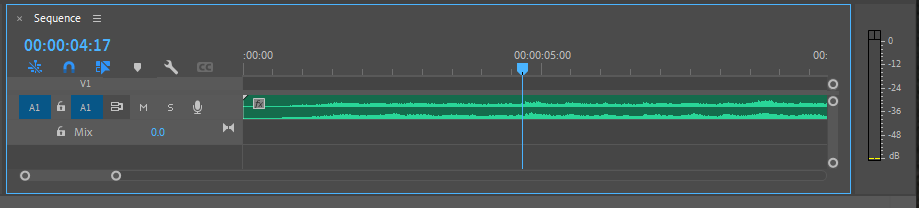
- In the timeline, you will see each audio track stacked like the video layers.
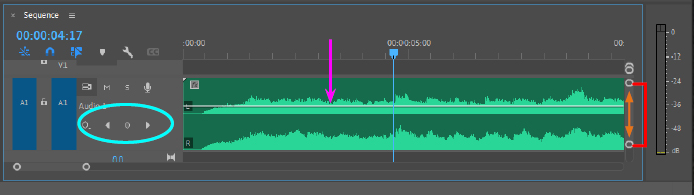
- If you squeeze the circles [red bracket] closer together, you will see more detail on the audio track. The keyframe editor [blue circle] and the clip volume [pink arrow] become visible.
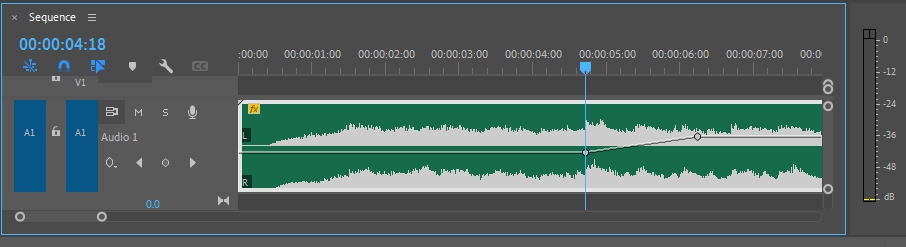
- If you click the "Add Keyframe" button, a keyframe will be added to the play head. By adding multiple keyframes and moving them up or down, you can change the volume level between keyframes. Use this method to mix various audio tracks to get a good balance between music and dialogue.
Transitions are how we move from one clip to another. Watch the following video for a few insights before we begin.
Standard cut
This is the most basic transition, and it requires no extra effort in Premiere. It’s just the end of one clip meeting the beginning of the next.
Jumpcut
Jump cutting can be used to speed up a scene or show time passing more quickly. We use the razor tool to make cuts in the clip and remove pieces that make the scene drag on. You often see just cuts in YouTube videos.


- Start by dragging a clip into the timeline.
- Use the Program panel player controls or drag the playhead to a point where an action has just finished.
- Select the Razor tool from the central Tool panel and click on the video track where the playhead is. This will make a cut in the clip.
- Move the playhead to the beginning of a new action point and make another cut.
- Right-click the clip between the two cuts and select Ripple Delete. Ripple delete removes the clip and shifts the clips that follow down.
- Repeat until the clip is finished.
Jump cuts can also be used to edit out dialogue mistakes. Watch the video below for more tips.
Transition effects
Transition effects can be applied between clips and cuts to change how the transition will happen. There are many different types of 'Wipe and Dissolve' that can be applied.
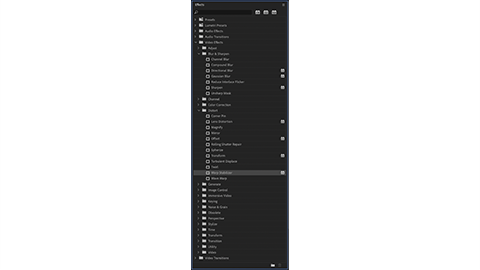
You can find a list of transition effects by clicking the Effects tab in the Project panel and expanding the Video Transitions folder.
To add a transition effect:

- Drag a transition effect from the project panel between two video clips in the timeline.
- Open the Effect Controls tab in the Source panel to control the duration.

Masking transition
Watch this tutorial to expand your learning around masking for transition effects.
We can add text and titles to our movie using the text tool in the central Toolbar.
- With the text tool selected, click on your movie in the Program panel. A graphic element will be added to the timeline at the playhead. By default, the element will be five seconds long.
- Type what you would like the title to say.
- Open the Essential Graphics panel from Window in the menu bar.
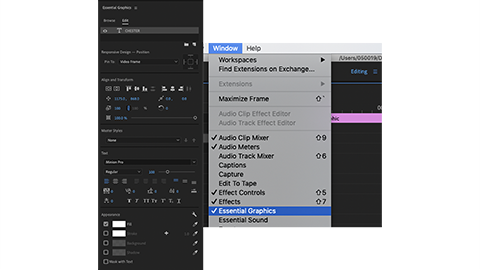

We can use the Essential Graphics panel to adjust the typeface, size, alignment and colour of our title. We can also use the selection tool to position it.
The duration of the title can be adjusted by dragging the ends of the clip in the timeline.
The Essential Graphics panel has a range of pre-made titles with animation that can be dragged onto your timeline and edited.
Colour grading is the process of correcting, enhancing or changing the colouring of your captured video. Most footage you capture will need to be graded to correct its white balance, improve its contrast and make it consistent with the rest of your footage and the look of the movie.
Colour grading is actually a 2-step process. Before we can start playing with the tone and colour of our movie, we need to work on the basics of correcting white balance, exposure, and contrast so they are consistent between clips.
Colour correcting
-
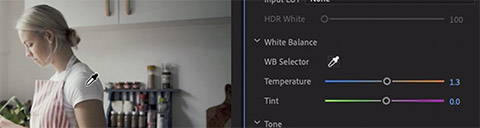
Start by selecting the Color Workspace by clicking Color in the top bar. In the Color Workspace, the Lumetri Color panel will appear on the right-hand side of the screen, and clips will be selected if the playhead is over them. Many of the settings in the Basic Correction section will be familiar across other software.
- With the White Balance Eyedropper selected, click on an area of the image in the Program panel that you know should be white.
- Move the play head to the next clip.
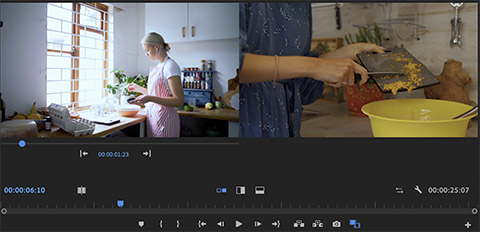
- Turn on Comparison View by clicking the
 icon in the Program Panel player controls. This will show two frames from two different points in the movie side-by-side. We can use this view to correct the second clip to match the first.
 - Another way to get consistency is to use the colour-matching features.
- Set the Reference viewer to a frame in the first clip and the Current view to the second clip.
- Select Color Wheels & Match from the Lumetri Color panel.
- Click Apply Match. Premiere will analyse the Reference frame and use the colour wheels to match the clips.
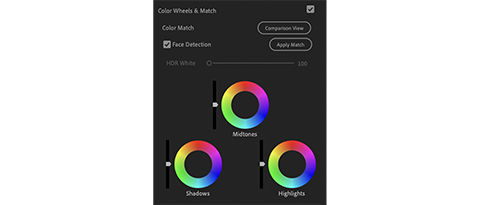
- Repeat across the rest of the clips. You may find that Color Match doesn’t give you the result you expected or wanted. In those cases, undo the colour match and use the basic corrections or play with the colour wheels to make improvements.


Creative colour
Once your footage looks consistent, you can get creative with the look of your movie.
The Creative section of the Lumetri Color panel has a lot of interesting colour effects that can be applied.

Or you can use the sliders and colour wheels in the Creative section to create your own.

'Effects' are a great way to enhance your movie. Premiere has lots of interesting built-in effects. We'll start by watching this tutorial:
After watching the video, work through this activity.
- Open the Effects Workspace by clicking Effects in the top bar. The Effects panel will appear on the right. Find effects by searching for them in the Search Bar or by expanding the folders.
- Locate the Gaussian Blur effect, then drag it onto a clip in your timeline.
- With the clip selected, open the Effects Controls panel in the Source panel. The Effects Controls panel will now include a Gaussian Blur at the bottom of the Video section.
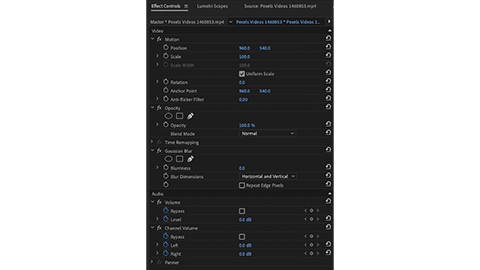
- Click and drag the Blurriness value to the right to increase the effect. This same process can be used to apply other effects. Each clip can have multiple effects applied to it.


This technique is used to marry two images into one. The applications of this are endless. You can swap in a different background, foreground, prop, animal, car...whatever you can dream up!
Green Screen technique
Techsmith.comHere’s how it works: you record your subject in front of a green backdrop, then use special editing software to replace every pixel of that specific green color with another image or video. This substitution process allows the software to seamlessly put a different background behind your subject.
For example, imagine you or your subject standing in front of a weather map. Viewers can’t see the green screen, because the map ‘replaces’ it. Despite being filmed in a studio, it appears the subject is in front of an actual changing map, allowing for immersive and dynamic visual content.
Getting started with compositing
Take this Adobe tutorial, Make a composite.
Did you do all the activities? You'll be doing this yourself, so you may want to bookmark the tutorial in case you want to return to it for reference.
Here is another step-by-step tutorial from Premium Beat with a moody undertone where you will make this!

If you still want to discover more about compositing, watch and participate in this video:
Spill
There will be times when you need to use this technique on your composite design, so this video addresses spill:
Removing green screen
-
Create a timeline with a background video on Video Track One and your green screen footage on Video Track Two.
-
Drag the Ultra Key effect from Keying in the Effects panel onto the green screen footage.
-
In the Effect Controls panel, use the eyedropper to select green in the Program panel.

-
Adjust the Tolerance and Pedestal values to refine the mask.


When you finish your project, you are ready to export the document, which means you will be saving the document in a different format from the one you built it in.
Exporting is a three-step process:
- rendering
- encoding
- saving
The following video tutorial will teach you how to export your work:
For activities in this class, please export as an MP4.
Rendering
As noted above, the first process that occurs behind the scenes when exporting is rendering.
The rendering process transforms your spliced videos, sound effects, and frames into a viewable file inside Adobe Premiere Pro. You can separate the process of rendering from exporting if your video isn't playing smoothly while you are developing. The drawback is that you won't be able to change certain aspects of the rendered portion of your movie unless you reverse it with a right-click.
This video provides more information about rendering.