Animators widely accept that hundreds of principles apply in animation, from how you should approach drawing to how a character walks or runs.
The 12 fundamental principles of animation – developed in the early days of Disney feature animation – are the main principles you should apply to all your animation, including your drawings and 3D work. These 12 principles are not rigid or inflexible, but since animation's early days, animators have found them to work.
If you want your animation to have more fluidity and believability, you’re encouraged to apply these 12 principles throughout the stages of animation production.
Explore
Think and ink
This topic is designed to spark your curiosity about how to use the 12 fundamental principles of animation to create engaging characters and stories.
If you’d like to explore a fascinating inside story of how two long-term Disney animators (Frank Thomas and Ollie Johnston) shaped the art of animation with these principles, the following recommended reading - especially Chapter 3 - is for you:
- The illusion of life: Disney animation. Thomas & Johnston. ISBN: 978-0-7868-6070-8
Subtopics that you can explore
In this Fundamental Principles of Animation topic, you’ll explore four key subtopics, each focussing on three specific principles. These subtopics are:
- Principles 1-3 (Squash and Stretch; Anticipation; Staging)
- Principles 4-6 (Straight Ahead Action and Pose to Pose; Follow Through and Overlapping Action; Slow in and Slow out)
- Principles 7-9 (Arcs; Secondary Action; Timing and Spacing)
- Principles 10-12 (Exaggeration; Solid Drawing; Appeal)
Learning tasks that will help you develop and practise animation skills
Practice
Build your knowledge
There’s just one learning task in this topic – an opportunity to test your knowledge at the end of the topic. This knowledge check is designed to help you self-evaluate your progress through the fundamental principles of animation and identify areas that you might need to review to help with your assessments.
| # | Learning Task Name | Duration (Hours) | |
|---|---|---|---|
| 1 | Check your knowledge | 0.5 |  |
The first three fundamental principles of animation set the stage for your exploration, offering insights into guidelines that help you create movement, realism, and impact within animated sequences. Step into:
- Squash and Stretch
- Anticipation
- Staging.
Maximise your searching – use your Find function!

Take advantage of the Find function on your PC (Ctrl + F) or Mac (Command + F) device to quickly locate the three fundamental principles in this subtopic.
1. Squash and Stretch
Squash and stretch is arguably the most important of the fundamental principles of animation. An animation scene that doesn’t include squash and stretch but only rigid, immovable shapes looks lifeless, stiff, and dull.
All forms of character animation use squash and stretch, from a bouncing ball or a character walking or running, to the most serious acting scenes.
How can you use squash and stretch to indicate weight?
You can use squash and stretch to indicate how heavy a character or object is.
How can you use squash and stretch to indicate matter?
You can use squash and stretch to indicate the type of matter that makes up a character or object.
A ball with:
- lots of squash and stretch could consist of elastic rubber
- hardly any squash and stretch could be plastic
- no squash and stretch could be stone or iron.
How can you use squash and stretch to indicate solidness and flexibility?
A character will have both solid and flexible features – the head is a good example.
![[ADD IMAGE'S ALT TEXT]](/sites/default/files/Areas%20Of%20The%20Head.jpg)
2. Anticipation
An 'antic' or anticipation is the pose that sets up an action before it happens, usually with a slight movement in the opposite direction to the main action.
A dancer does not just leap off the floor. A backwards motion (i.e. the anticipation) occurs before the forward action is executed. Almost all real actions have major or minor anticipation, such as a baseball pitcher’s wind-up or a golfer’s backswing.
How does anticipation function in animation?
![[ADD IMAGE'S ALT TEXT]](/sites/default/files/Anticipation_0.jpg)
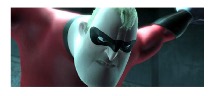
In animation, this movement prepares the audience for an action the character is about to perform, such as starting to run, jumping, or changing expression.
![[ADD IMAGE'S ALT TEXT]](/sites/default/files/Anticipation%202_0.jpg)
How can anticipation be used for comedic effect?
You can achieve a comic effect by not using anticipation after a series of gags that have used anticipation; the pose or action that does not have the antic will have more snap and impact—making the pose or action appear to stand out to the audience.
Anticipation in feature animation is usually less broad and more subtle than in television animation unless a scene requires it to develop a character’s personality, e.g., the Genie in Disney’s Aladdin.
3. Staging
Staging relates to how a show is shot, considering angles, framing, scene length, colours, and lighting.
As you’ve discovered in this course, a pose or action communicates to the audience a character's attitude, mood, and reaction as it relates to the story and its continuity.
The story is also helped by the effective use of staging, taking into account camera angles and long, medium, or close-up shots. Staging directs the audience’s attention to your story or idea – and each sequence, scene, and frame must relate to the story, as a film has a limited amount of time.
How is staging linked to clarity?
Staging is all about clarity – for the audience, and for your animation:
- Audiences can get confused with too many actions at once. Use one clearly stated action to get the idea across unless you’re animating a scene depicting clutter and confusion.
- Background and animation should work together as a pictorial unit in a scene. Take care with the background design and layout (i.e. limit excess detail) so it doesn’t obscure or compete with the animation in the front.
Tip
Staging = Clarity
In this Staging section, you’ll discover what to do when composing your shots, and what not to do. These guidelines cover shot composition, shot sizes, and shot angles.
There many be times when it’s acceptable to break the rules – just be wary of anything that looks awkward! If you’re not sure, or if you’re doubting yourself, just remember that staging is all about clarity.
How do you stage a shot?
Select + to view four composition techniques to use when staging your shots.
A crucial part of staging in animation is how you position the characters, scenery, and props within the picture frame:
- Each shot should have only one principal idea or topic – a centre of interest – to which the viewer's eyes are attracted.
- Keeping your shot compositions simple is crucial in establishing a clear centre of interest.
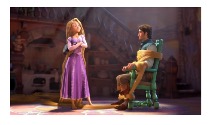
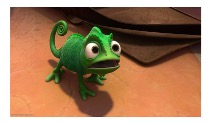
In the three images below, you can see that, despite several characters or objects on the screen at once, your eyes are drawn to a particular part of the image because the overall arrangement of the characters and objects is simple and clear.
![[ADD IMAGE'S ALT TEXT]](/sites/default/files/Centre%20Of%20Interest%201.jpg)
![[ADD IMAGE'S ALT TEXT]](/sites/default/files/Centre%20Of%20Interest%202.jpg)
![[ADD IMAGE'S ALT TEXT]](/sites/default/files/Centre%20Of%20Interest%203.jpg)
The rule of thirds is a compositional rule of thumb in visual arts such as painting, photography and design.
The rule states that an image can be divided into nine equal sections by two equally spaced horizontal lines and two equally spaced vertical lines.
Important compositional elements are then placed along these lines or at their intersections.
![[ADD IMAGE'S ALT TEXT]](/sites/default/files/Animation%20Frames.jpg)
Explore
Rule of thirds, twice
You might remember the rule of thirds from the Art and Animation Basics topic you completed in the Foundations module. The rule is a key concept related to composition, where a well-composed animated story enhances the clarity of the action, guides the viewer’s eye, and conveys the desired mood.
As you delve deeper into the Diploma of Animation Level 5, feel free to revisit previous sections that sparked your interest. A quick return to earlier information can provide valuable insights, reinforce your understanding, and unveil new connections as you progress.
Keep your learning journey dynamic by exploring the wealth of knowledge you've encountered along the way, and follow the breadcrumbs!
- Foundations > 1.4 Art and Animation Basics > 1.4.4 Composition > Exploring composition
When framing your shots, you need to imagine an imaginary camera filming your characters in an imaginary set.
The shot size refers to how far the camera is from the main characters or objects. The camera is close up if the characters are large in the frame. The camera is far away if the characters are small in the frame.
Explore the Shot Size Reference table below to identify shot sizes, their intended use, and examples from animated films.
Table 1: Shot Size Reference
| Shot size | What the shot is used for | Example of the shot |
|---|---|---|
| Long shot or Wide shot |
|
 |
| Full shot or Medium shot |
|
 |
| Close up |
|
 |
You can tilt your imaginary camera to produce different angles. Explore the Shot Angle Reference table below to identify shot angles, their intended use, and examples from animated films.
Table 2: Shot Angle Reference
| Shot angle | What the shot is used for | Example of the shot |
|---|---|---|
| Eye-level shot |
|
 |
| High-angle shot |
|
 |
| Low-angle shot |
|
 |
| Dutch tilt |
|
 |
What are the do’s and don’ts when composing shots?
As mentioned earlier in this section, there may be times when it’s acceptable for you to break animation rules and principles, including staging. Before you do so, first learn to use the rules correctly. Practise them thoroughly. Then, break them successfully.
Select + to view the do’s and don’ts when composing your shots.
Don’t
Don’t compose your shots like the two examples below. Why? Because they’re boring and look more like a model sheet than a film! Even cinemagoers who are not highly critical expect more sophistication than these shots demonstrate.

Do
When in doubt, follow the rule of thirds and position the character on a three-quarter view:
Some directors successfully break this rule – Stanley Kubrick and Wes Anderson are notable examples – but pulling this off is difficult.
Do
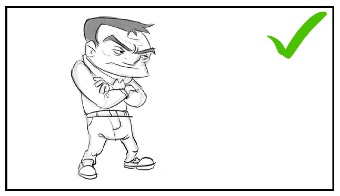
Take care in using negative space around a character. This shot’s framing is balanced and appealing, even if the character looks at something off-screen:
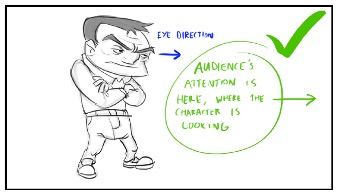
Don’t
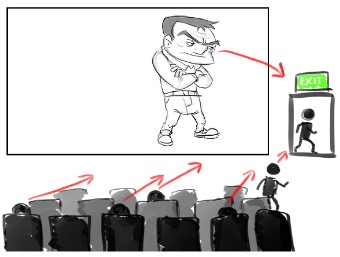
As you can see in the example below, this can easily go wrong.
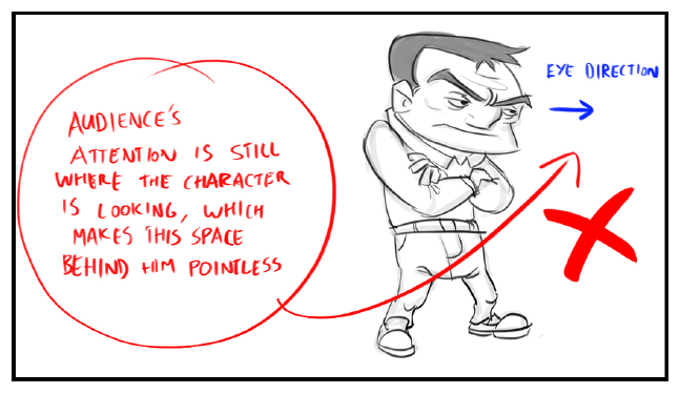
Don’t position the character on the wrong part of the screen as you’ll leave part of the image redundant. It will feel awkward to the viewer because it’s a natural reaction to look where the character is looking. You don’t want to direct the audience away from your film:
Don’t
Bad framing often happens because of bad tangents, when two lines meet each other in a way the audience finds awkward or unappealing.
Don’t compose a shot like the example below, where the character’s groin is framed right on the edge of the screen:
It draws unwanted attention to this part of the character, making the audience feel uncomfortable.
![[ADD IMAGE'S ALT TEXT]](/sites/default/files/Don't%204.jpg)
Do
Instead, frame the character in the shot a little bit higher up:

Do
Leave ‘breathing space’ at the top and bottom of the character:

Don’t
Don’t cut off the top of the character’s head or have them stand with their feet on the bottom of the screen:
The same applies to close-ups as well:
Explore the next three fundamental principles of animation and gain insights into guidelines that help you structure and infuse your animation with realism and fluidity. Find out about:
- Straight Ahead Action and Pose to Pose
- Follow Through and Overlapping Action
- Slow in and Slow out.
Maximise your searching – use your Find function!
Take advantage of the Find function on your PC (Ctrl + F) or Mac (Command + F) device to quickly locate the three fundamental principles in this subtopic.
4. Straight Ahead Action and Pose to Pose
- Straight ahead action starts at one point and finishes at another in a single continuous movement.
- Pose to pose is a variety of actions in one scene requiring clearly outlined key frames to mark:
- the action’s extreme points and
- how a character gets from one pose to another.
How you execute in-betweens with these two approaches to animation can alter the whole rhythm and timing of the action.
How does straight ahead action work?
Straight ahead action is a primitive way of animating.
You start with one drawing. You then draw the next frame – and the next frame – in sequence, one after the other.
![[ADD IMAGE'S ALT TEXT]](/sites/default/files/The%20kineograph.jpg)
Pros and cons of straight ahead action
Using straight ahead action has its advantages and disadvantages:
| Advantages | Disadvantages |
|---|---|
Using straight ahead action:
|
Using straight ahead action makes it difficult to maintain proportions, models, and sizes and to control timing and spacing. |
The problem with animating purely with straight ahead action is that it is hard to maintain control. You might develop more creative ideas due to its spontaneity, but the resulting shapes and forms can be inconsistent. As the table above mentions, it's also difficult to control the timing and spacing when using this approach.
It's for these reasons that animators invented the pose to pose approach.
How does pose to pose work?
You draw two key drawings to mark the beginning and end of each movement.
Then, you add drawings in-between these two key positions to produce smooth animation.
Pros and cons of pose to pose
Using pose to pose also has its advantages and disadvantages:
| Advantages | Disadvantages |
|---|---|
Using pose to pose:
|
Using pose to pose:
|
From the two tables above, you’ve discovered that both pose to pose and straight ahead action have their advantages and disadvantages –you should aim to combine the advantages of both methods when you animate.
5. Follow Through and Overlapping Action
What is follow through?
Follow through is when the main action on the body of a character stops, and all other parts not under the direct control of the character (e.g. floppy appendages, clothing, hair) continue to catch up to the main mass of the character.
So, nothing stops all at once and certainly not all at the same time.
![[ADD IMAGE'S ALT TEXT]](/sites/default/files/Follow%20Through.jpg)
What is overlapping action?
Overlapping action is when the character changes direction while their floppy appendages, clothing, or hair continue in the same direction.
These character parts will then change direction to follow the main action a few frames later.
How is overlapping action used?
When a character – like Disney’s Goofy – is running and suddenly swerves around a corner, his ears and floppy parts of his clothes continue in the original direction until a few frames later: his ears and clothes then drag around to follow the main direction of action again.
Feature animation displays this type of action much more subtly. For example, when a character starts to dance, her dress does not move with her immediately but catches up a few frames later. You can handle long hair and animal tails in the same manner.
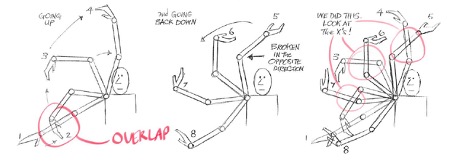
Getting the timing right…with an X
As you may have guessed, timing becomes critical to the naturalness of overlapping action.
Richard Williams uses the term 'X ' in his book The Animator's Survival Kit to represent overlapping action. The idea is that when different parts of a character move independently, they create shapes resembling the letter 'X' during certain points in the animation.
By identifying the Xs, you can ensure that different parts of a character have their own timing, increasing the visual appeal of the animation.
Enhancing the flow…with an 8
Williams also introduced the idea of how overlapping action can create another visual pattern, resembling a Figure 8.
A Figure 8 occurs when different parts of a character move in a way that forms loops or curves, contributing to the overall appeal of the animation.
![[ADD IMAGE'S ALT TEXT]](/sites/default/files/Overlapping.png)
6. Slow in and Slow out
How do slow ins and slow outs contribute to realism
As an action starts, you usually have:
- more drawings near the starting pose
- fewer drawings in the middle, and
- more drawings near the last pose.
Fewer drawings make the action faster. More drawings make the action slower. So, slow ins and slow outs soften the action, making the action more lifelike.
These two techniques are part of the broader concept of ‘ease’.
What is ease and what does it do?
Ease refers to the way in which your animation speeds up or slows down over time.
Using ease creates an effect of acceleration and deceleration. Just like a car, your animation needs to:
- speed up gradually
- reach its desired speed, then
- slow down gradually before it stops.
![[ADD IMAGE'S ALT TEXT]](/sites/default/files/Acceleration.jpg)
What is a basic spacing formula for smooth and appealing animation?
In computer animation, a slow in is usually called an ‘ease in’. Likewise, a slow out is called an ‘ease out’.
So, in computer animation, the terms are different – but the concept is the same and as important. If you ignore spacing in animation using any medium, it appears robotic and stiff.
For most things in the world, whether they are alive or mechanical, they tend to move with spacing like this:
![[ADD IMAGE'S ALT TEXT]](/sites/default/files/Basic%20Spacing%20Formula.jpg)
In other words:
- there are a lot of in-betweens at the beginning and end of the movement, so the spacing is very tight at these points
- in the middle of the movement, the spacing is further apart.
This spacing makes the movement snappy but also smooth and appealing.
Tip
Exceptions to the formula!
Most movements you animate should follow the basic formula outlines above to some degree. Of course, there are many exceptions, but this is the general rule.
For example, with a gag action, you may omit some slow out or slow in for shock appeal or a surprise element, giving you more snap to the scene.
Dive into the next trio of fundamental principles, where the focus shifts to advanced concepts related to natural motion, action, and time and space, enriching your animation with depth and sophistication. Explore:
- Arcs
- Secondary Action
- Timing and Spacing.
Maximise your searching – use your Find function!
Take advantage of the Find function on your PC (Ctrl + F) or Mac (Command + F) device to quickly locate the three fundamental principles in this subtopic.
7. Arcs
Arcs describe natural movement. All actions create circular movements because they usually pivot around a central point.
What is the significance of arcs in animation?
In animation, the central point that action pivots around is usually the joint of a character.
Arcs also describe a line of action through a character. All actions, with a few exceptions (such as the animation of a mechanical device), follow an arc or a slightly circular path. This behaviour is especially true of human figures and the actions of animals.
Arcs give animation a more natural action and better flow. You can think of natural movements in terms of a pendulum swinging - all arm movements, head turns, and even eye movements are executed on arcs.
How can you achieve natural movement using arcs in the digital space?
Arcs is usually one of the first principles animators learn to use, usually through the bouncing ball exercise.
![[ADD IMAGE'S ALT TEXT]](/sites/default/files/Arcs_0.jpg)
Reflection
Bounce that ball
You spent time learning about arcs during the Art and Animation Basics topic in the Foundations module, using software to animate a ball bouncing across your screen and extending your use of animation principles, including arcs.
Do you remember any insights you gained from creating the left-to-right ball bounce using arcs? How did it help you with other animations you practised where arcs were critical, like hand gestures? Were you able to refine the overall quality of these animations by modifying arcs?
What about arcs and key frames?
Usually, new animators quickly get used to the idea of in-betweening on arcs. However, they often overlook key frames when handling arcs.
Sometimes, you'll have a complex series of keys, like a character walking and talking at the same time. The movement might be very complex, but all the keys will flow along a simple arc.
![[ADD IMAGE'S ALT TEXT]](/sites/default/files/Key%20Frames.jpg)
8. Secondary Action
Secondary action is just that. It's another action that takes place at the same time as the main (i.e. primary) action. A secondary action may be as simple as turning the head from side to side during a walk sequence.
The secondary action:
- enriches the primary action
- adds more dimension to the character animation
- supplements or reinforces the primary action.
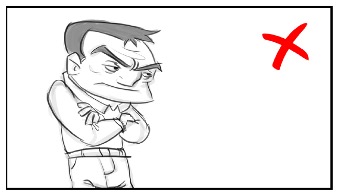
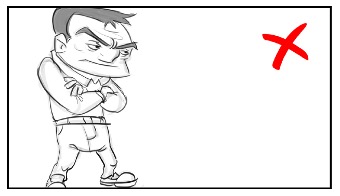
Case Study
Angry Guy
A character angrily walks toward another character, swinging his arms and bouncing his head.
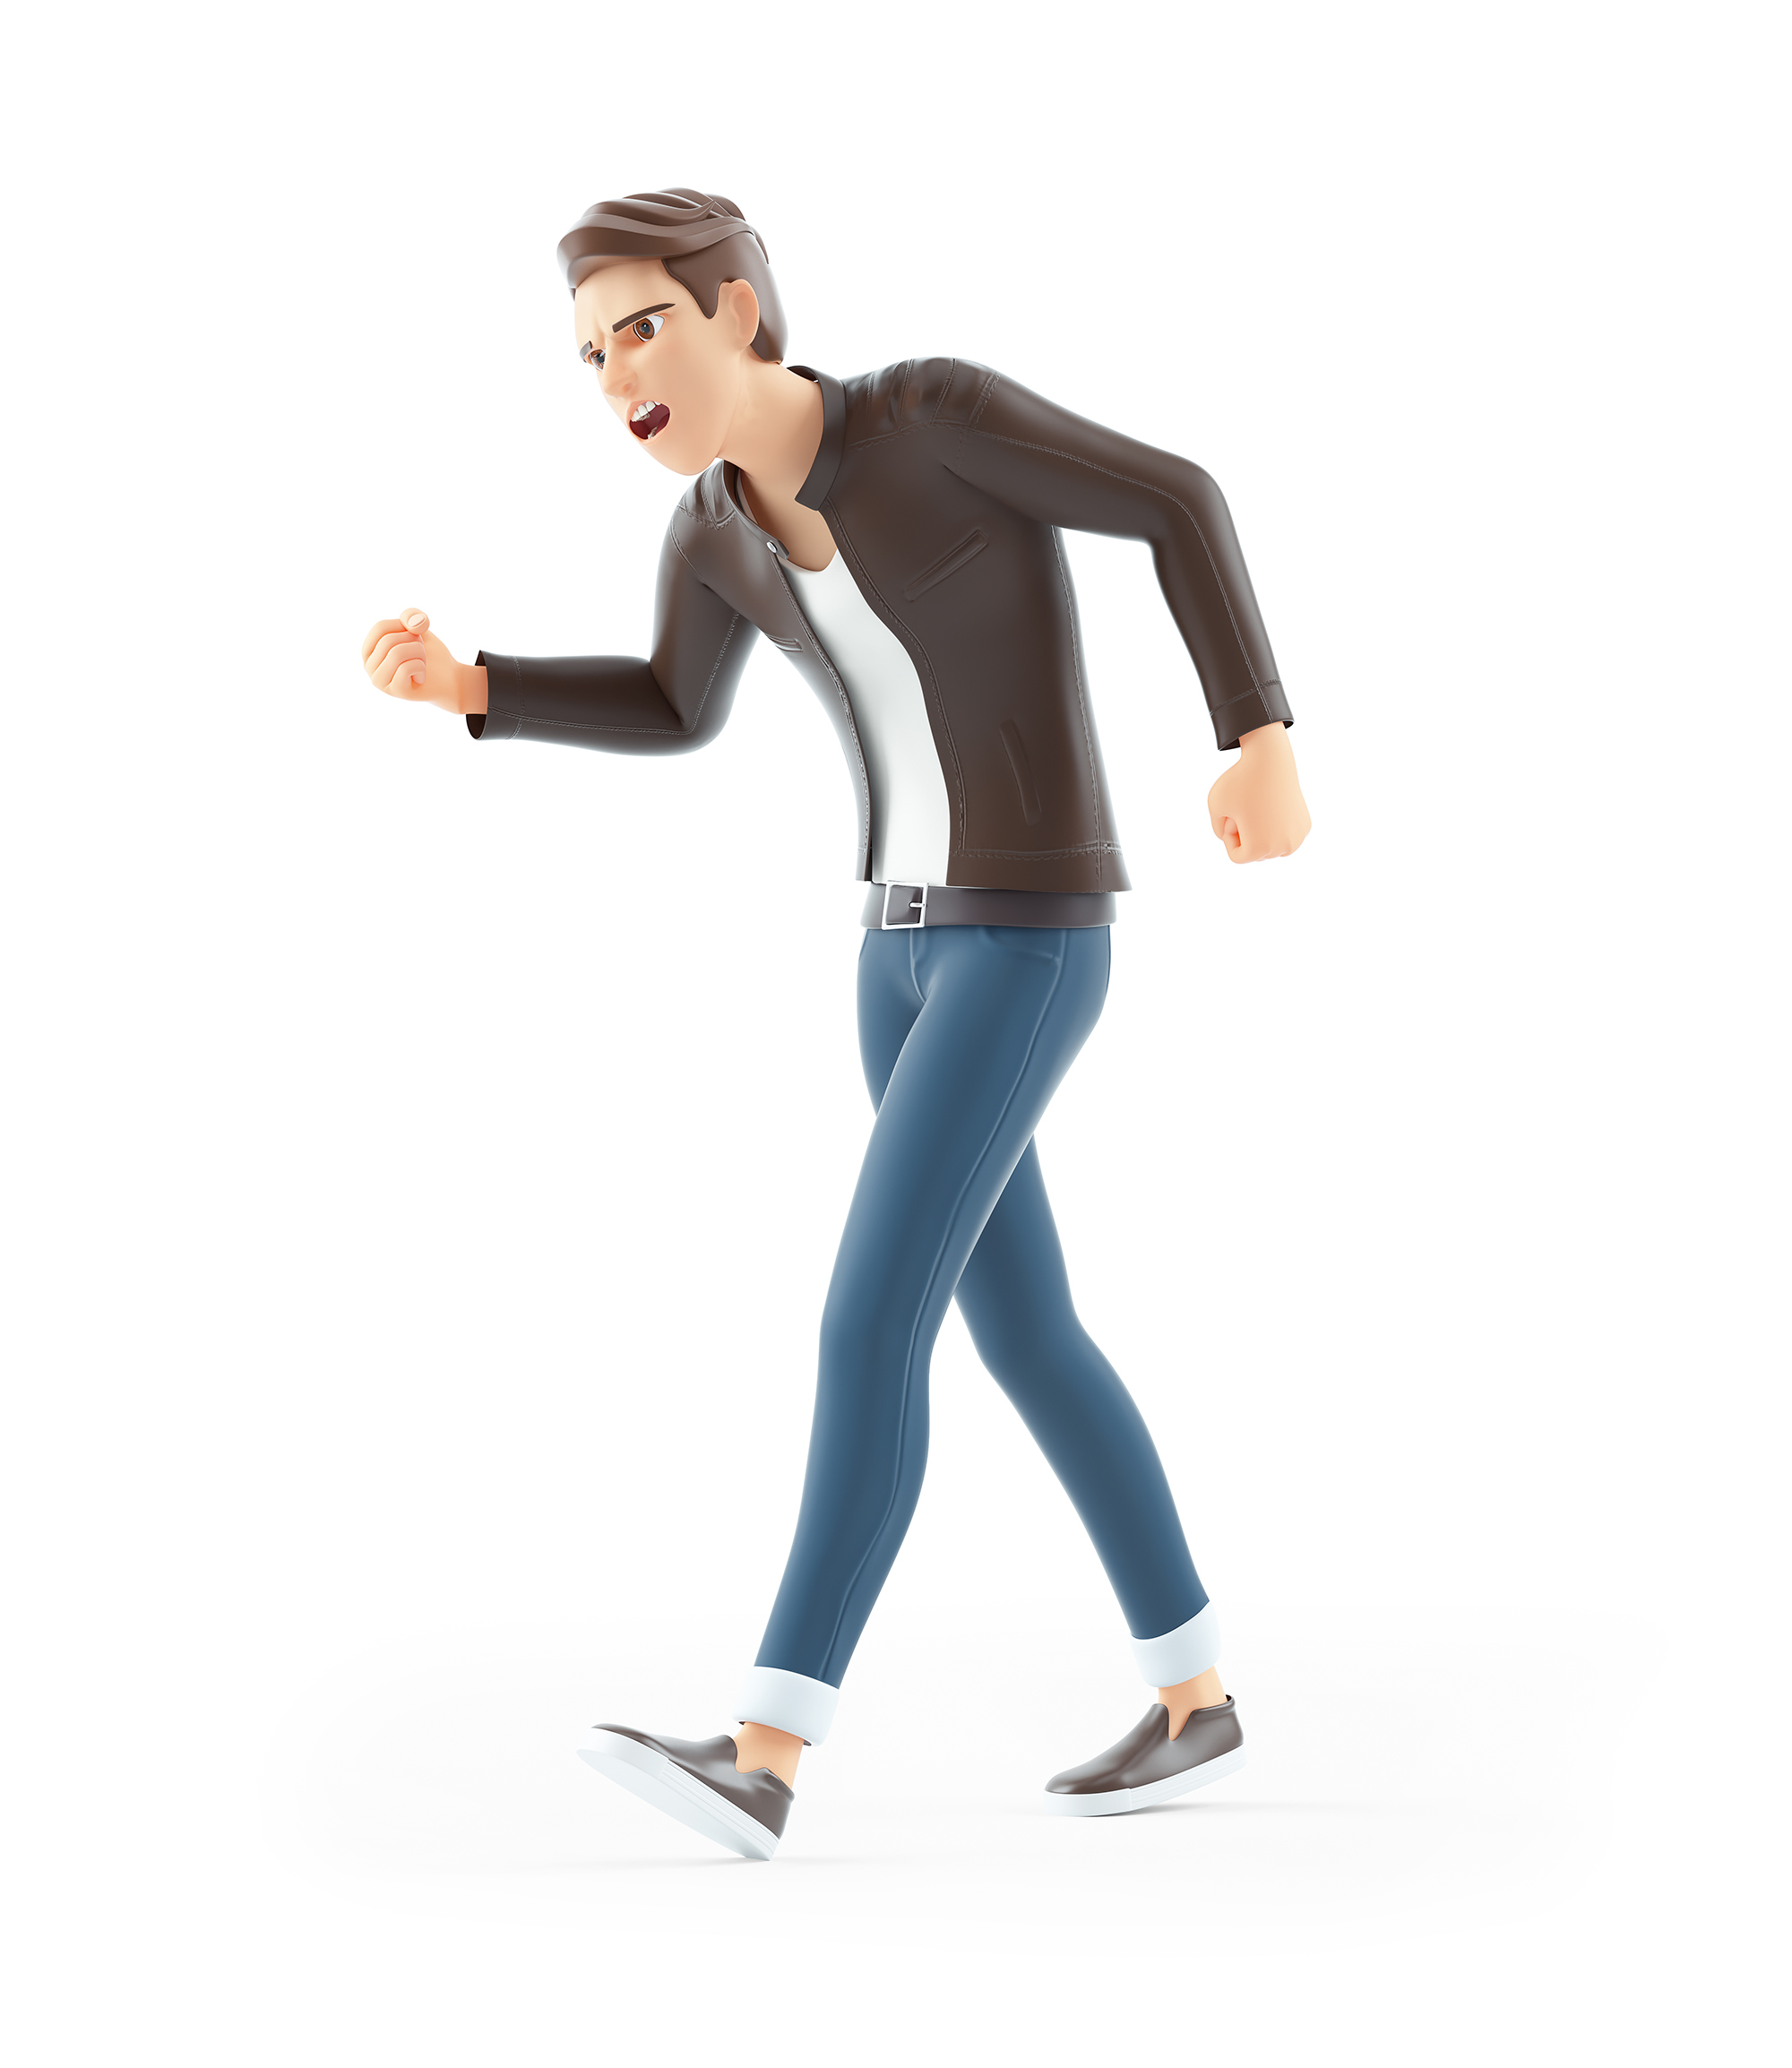
- The walk is forceful, aggressive, and forward-leaning. The leg action is just short of a stomping walk.
- There are a few strong gestures of the arms, working with the walk.
- There’s possibly dialogue at the same time, with tilts and turns of the head to accentuate his walk (but not so much as to distract from the walk action).
So, what’s the secondary action in this case?
Identify the primary action first. That would be the angry walk!
Then, identify the secondary action. The arm swings, head bounce, and other body actions are all part of the secondary action, working together to support one another.
What’s the action type?
9. Timing and Spacing
Timing
Timing is how long it takes for a character to perform an action. You can break down any action into sections that are slow, fast, or as pauses.
Good timing is essential for creating believable animation and giving a sense of realistic physics and emotional performance.
Tip
Experience takes time
Timing is about how you get characters to interact naturally. You’ll gradually get a feel for good timing through experience and experimentation.
Comedians who rely on timing to get the most from their gags learn it through experience. You, too, will get timing right through practice, using the trial-and-error method to refine your techniques.
Getting a second opinion from a more experienced animator is also an excellent way to gain valuable knowledge to develop your own aesthetic taste of timing.
What factors influence timing in animation?
Select + to view three factors to consider when aiming for good timing.
Timing has much to do with deciding how many drawings you use to portray an action. At a basic level:
- More drawings between poses slow and smooth the action.
- Fewer drawings between poses make the action faster and crisper.
A variety of slow and fast timing within a scene adds texture and interest to the movement.
Another technical aspect of timing is that most animation is done on either:
- Twos (a drawing photographed on two frames of film) or
- Ones (a drawing photographed on each frame of film).
Twos (2’s) are used most of the time. Ones (1’s) are used during camera moves such as trucks and pans and, occasionally, for subtle and quick dialogue animation.
Timing exists in the acting of a character when establishing mood and emotion or when reacting to another character or a situation.
Studying the movement of actors and performers on stage and in film is useful when animating human or animal characters. Examining film footage frame-by-frame can also help you understand the timing of animation.
Tip
Act out the action and time it
"How fast should an action take?"
It's a common question. The answer is usually something like “Try it and see what looks good...” which is not particularly helpful to the animator asking the question!
The best thing to do if you are unsure of how long something should take is to act the action yourself and time how long it takes. Suppose you use this as a starting point. In that case, you can adjust your animation to make it faster or slower in the areas where your observation tells you that time needs to be added or removed.
Timing guidelines you can use
You can use some basic timing guidelines to determine how long some actions may take.
How can timing describe physics?
Similar to the bowling ball versus balloon example above, if a character picks up a box, the weight of this box can be determined by the speed at which the character picks up the box.
If the character picks it up slowly, it will help make it look heavy, while fast timing will help give the impression that it is light.
There are, of course, many other elements to this movement that will help to show weight. However, timing is an essential element of the illusion of weight.
How can timing describe an emotional performance?
Once again, timing is not the only thing that will affect a character's emotional state. Elements such as the facial expression and the pose will also play a role.
But what if the character’s face can’t be seen? What if the character is just a block or a blob without limbs to pose? Then, timing will help to determine the mood of any character regardless of their form.
How do pauses make timing more effective?
Timing is about more than just speed. It's also about pauses.
Pauses are often overlooked but are just as important as the speed an action takes. You must consider timing carefully so that the audience can clearly understand everything important in a piece of animation.
Select each of the three hotspots below to identify the timing and pauses in the action.
Suppose a character moves continuously from one pose to another without pauses. In that case, it will be very difficult for the audience to see and understand the important parts of the movement.
Spacing
If timing is the time an action or sequence of events takes to complete, spacing is how you set and control the speed at which an object, character or part of a character moves from one pose or position to another.
You can make an object or character appear to move fast, slow, accelerate, decelerate or change direction by changing the spacing or 'gap' between your drawings. You can also create a feeling of timing, weight, or even high impact by carefully adjusting the spacing between your drawings.
The more your drawings or frames overlap, the smoother your action will look to the audience.Thomas & Johnston (1995), The Illusion of Life: Disney Animation.
How does good spacing prevent unstable effects?
The ability to change speed means that for most actions, your drawings of frames should not be spaced so far apart as to chatter or appear to strobe when viewing the played-back animation.
Suppose you start to see a chattering or strobing effect. In that case, it indicates that you don’t have enough drawings or overlap in the spacing of your animation.
To fix this, add more drawings or frames in-between your action so that there is more overlap or less of a gap in the spacing between your drawings or frames.
The closer together your drawings or frames are, the slower the movement; the further apart they are, the faster the movement.Thomas & Johnston (1995), The Illusion of Life: Disney Animation.
In the following image, a ball is moving from A to B in 8 frames, moving at a constant speed. The first ball will go faster than the second because it must travel double the distance in the same number of frames.


How does acceleration and deceleration influence spacing
A character or object will not just suddenly start moving at a constant speed. There will be a period of acceleration in which the character or object builds up to a certain rate of speed and, then again, a period where the character or object will decelerate over time rather than coming to a sudden crashing halt. These periods of acceleration and deceleration also apply when an object or character changes direction.
In terms of spacing, this means that the space or gap between your drawings or frames will increase or decrease over time to accelerate or decelerate the speed of your animation.
Most normal actions can be thought of in terms of acceleration and deceleration.Thomas & Johnston (1995), The Illusion of Life: Disney Animation.
Timing charts
Animators originally developed timing charts for hand-drawn animation to:
- indicate the specific number of key poses, breakdowns, and in-betweens
- indicate the order in which an animator should draw the drawings between two keys
- set the timing and spacing of the drawings between the two keys.
How do ‘even’ timing charts work?
The most basic timing chart you will come across is an even, with only one drawing indicated between the two key drawings.
How do ‘ease’ timing charts work?
Another type of timing chart is an ease, which uses the same approach of creating the breakdown position in the middle between the two keys, as does an even.
But, in an ease, the in-betweens get progressively closer to a key, depending on if you are easing in or out.
How do other timing charts work?
Other timing charts you may encounter are thirds and favouring.
Explore
Feeling spaced?
You might recall learning about core elements of hand-drawn animation – including ‘even’ timing charts – from the Foundations module when you worked through Traditional 2D Animation Basics.
- Foundations > 1.4 Art and Animation Basics > 1.4.1 Traditional 2D Animation Basics > Hand-drawn animation – the basics
Feel free to revisit that section to refresh your memory on how movement is impacted by the choice of timing and spacing, as well as various types of timing charts used in animation.
Frame rates
Frame rates are the number of frames that you see per minute. You must follow set standards of frame rates (FPS, i.e. frames per second), depending on how the animation will be viewed or broadcast.
| Frames per second (FPS) | Standard |
|---|---|
| 24 FPS | The standard for cinematic features. |
| 25 FPS | The broadcast standard for PAL-based TV systems (United Kingdom, Europe, New Zealand, Australia). |
| 30 FPS | The broadcast standard for NTSC-based TV systems (North America) |
Faster frame rates are becoming more common in broadcast media and feature films. Examples include The Hobbit trilogy and Avatar: The Way of Water, all filmed and screened using 48 FPS.
You’ll complete most of your animation using the standard frame rates of 24 FPS or 25 FPS.
Animating using ones or twos
What is animating on ones?
Animating on ones – sometimes referred to as animating on 'singles' – means that a new image or drawing is shown onscreen for every animation frame.
Animating on ones helps to create smoother animation and is standard practice in feature animation.
It's also required when animating anything moving quickly onscreen or when a camera moment is happening.
What is animating on twos?
Animating on twos – sometimes referred to as animating on 'doubles' – means that each drawing or image of animation is onscreen for two frames.
Animating on twos is common in animation for television.
Occasionally, animation on 'threes', 'fours', or even 'eights' is also used. However, be aware that animation will start to look choppy the longer each drawing is held onscreen.
Uncover the final three fundamental principles of animation which help you propel your creations beyond just movement into captivating and appealing sequences. Discover the essence of:
- Exaggeration
- Solid Drawing
- Appeal.
Maximise your searching – use your Find function!
Take advantage of the Find function on your PC (Ctrl + F) or Mac (Command + F) device to quickly locate the three fundamental principles in this subtopic.
10. Exaggeration
Exaggeration is the enhancement of a physical attribute or movement. It’s a caricature of facial features, expressions, poses, attitudes, and actions.
What exaggeration does not refer to is extreme distortion of a drawing or extremely broad, violent action all the time.
Tip
Push it!
Using of a strong line of action and a clear silhouette contributes to the exaggeration of the character's pose, making it more visually appealing and impactful.
Likewise, by highlighting key moments in an action, you can exaggerate the impact (for example, of a hit or bounce), making these moments more noticeable and dynamic.
Action traced from live-action films can be accurate but stiff and mechanical. In feature animation, a character must move more broadly to look natural.
The same applies to facial expressions, but the action should not be as broad as in a short cartoon style.
Exaggeration in a walk, an eye movement, or even a head turn will give your animation more appeal. Use good taste and common sense to keep your characters from becoming too theatrical and excessively animated.
11. Solid Drawing
Solid drawing conveys a sense of three-dimensionality through line work, colour, and shading.
How does solid drawing connect to basic drawing principles?
Solid drawing is a measure of how well you apply the basic principles of drawing.
Explore
Quick refresher!
You may recall basic drawing principles from the Foundations module when you worked through Observation Drawing.
These basic principles of drawing are:
- Construction
- Anatomy
- Silhouette
- Line of action
- Gesture
- Weight
- Balance
- Light and Shadow
- Foundations > 1.2 Observation Drawing
Mastering the basic principles of drawing and using them effectively in your sketches will:
- enhance the overall form and appeal of the image
- give a feeling of weight and solidity in the pose or performance
- give your volumes solidity over time
- help to create the illusion of the third dimension (3D).
These basic drawing principles apply to animation as to academic drawing or fine art. With solid drawing, you draw in the classical sense, i.e. using pencil sketches and drawings to reproduce life around you.
You then transform these drawings with colour and movement, giving the characters the illusion of life in 3D (movement in space) and 4D (movement in time).
How does construction support solid drawing?
The basic drawing principle of construction - building your images from the inside out - is essential for solid drawing, in which you draw the basic shapes and then add layers of detail on top to build your characters.
Consider the human form, which is difficult to draw at the best of times!
If you simplify the shapes that together make up the human form, drawing a character throwing a ball or performing a complex sequence of acrobatics is easier.
![[ADD IMAGE'S ALT TEXT]](/sites/default/files/Simplified%20Human%20Skeleton.jpg)
Blocky construction
You can further simplify the construction process by using blocky construction, which makes moving volumes around in three dimensions simpler because of the visible edges of the forms.
There are advantages to using blocky construction in your drawings. Simple blocky shapes:
- are easier to draw
- give a better understanding of height, width, and length as their edges are easier to see
- make perspective easier to deal with
- are easier to maintain volumes over time
- help to retain visual information and details.
![[ADD IMAGE'S ALT TEXT]](/sites/default/files/Blockier%20Shape.jpg)
12. Appeal
Appeal is the process of giving personality to the characters you draw.
Just like a live performer has charisma, an animated character has appeal. And you know you are on the right track if you can convey a character's personality without an audio soundtrack.
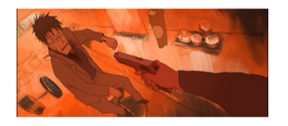
Swipe through these sketches of three Disney characters. Which one has the most appeal to you?
Appealing animation does not mean just being cute and cuddly. All characters - whether heroic, villainous, comic, or cute - must have appeal.
Appeal, as you will use it, includes:
- An easy-to-read design
- Clear drawing
- Personality development that captures and involves the audience’s interest.
Early cartoons were a series of gags strung together on a main theme. Over the years, the artists learned that to produce a feature, they needed story continuity, character development, and a higher quality of artwork throughout the entire production.
Like all forms of storytelling, a feature must appeal to both the mind and the eye of your viewer.
In this topic, you’ve learnt about the 12 fundamental principles of animation. You’ve gained deeper insight into guidelines that help you:
- create movement and impact in animated sequences
- structure and infuse your animation with realism and fluidity
- enrich your animation with depth and sophistication
- make your animation more captivating and appealing.
Empower your animation journey by thinking about how you can apply these fundamental principles, using them to transform your creations and ensure a captivating experience for your audience.
Check what you know about fundamental principles
Use the quiz below to test your knowledge of the fundamental principles of animation to help ensure you’re on the right track, and identify areas where you may need to revisit specific principles.
Practice
Task 1: Check your knowledge - Fundamental Principles of Animation
Get ready to put your knowledge of animation's fundamental principles to the test! This quiz is designed to help reinforce your understanding and is not part of the formal assessment process. Treat it as a valuable tool to track your progress and identify areas for improvement.
What steps should you take to complete this task?
15-30 minutes
Set aside 15-30 minutes to complete this knowledge check.
- This quiz has 20 questions. Read each question carefully. Make sure you understand what is being asked before attempting an answer.
- If a question stumps you, make an educated guess based on your knowledge. Don't let difficult questions discourage you.
- Stay confident and do your best. Remember, it's a learning opportunity, and not a formal assessment!
- Once you've reviewed your answer and are satisfied, click the ‘Check button’ to see if you chose the correct answer. You can also retry questions and show solutions.
What should you do after completing this task?
Now that you've tested your knowledge of the fundamental principles of animation, it's time to apply what you've learned in your real-life animation projects. Use these principles as your guide to create dynamic, compelling animations that captivate your audience.
Remember, the true value of knowledge lies in its application. So, keep animating, experimenting, and refining your skills in your coursework. Your journey to becoming a skilled animator is not just about knowing the principles but about applying them creatively and effectively. Keep pushing yourself, and enjoy bringing your ideas to life through animation!
Reflect on what you’ve learnt, practised, and achieved
As you wrap up this topic, take a moment to reflect on what you've learnt by completing this topic’s quiz.
Consider how the 12 fundamental principles can help shape your technical skills into the future and offer you a pathway to infuse your unique creativity into each frame, enriching your animation journey - keep going!
| # | Learning Task Name | Duration (Hours) | |
|---|---|---|---|
| 1 | Check your knowledge | 0.5 | |