Learning to create effects animation is a great way to start applying animation principles and concepts. Basic effects animation does not require an understanding of human and animal anatomy and it's free of the restrictive movements of a human character.
Effects animation allows you to explore movement more freely and to focus on:
- moving forms and shapes along paths
- speeding up and slowing down
- applying changing and variable forces, such as wind and atmospheric pressure.
When learning to design effects frames, you can focus on appealing shape design more freely using abstract shapes instead of specific anatomy. So, get ready for a creative journey in this topic, where you’ll shape the movement of the four core elements of earth, wind, fire, and water.
Explore
Booming explosions, gusting winds, raging fires!
This exciting topic allows you to practice a series of design and animation learning tasks where you can use animation principles and concepts to create compelling effects.
The following book is recommended reading if you want to take a deep dive into the world of special effects animation with animated effects expert Joseph Gilland, who explains the techniques, philosophy, and approach behind hand-drawn animated effects and how to use these with your digital projects:
- Elemental Magic: The Art of Special Effects Animation. Gilland. ISBN: 978-0-2408-1163-5
Subtopics that you can explore
In this topic, each of the six key subtopics offers a unique blend of insights and techniques to grow and enhance your effects design and animation skills. These subtopics are:
- Effects Reference
- Earth
- Air
- Fire
- Water
- Other Special Effects
![[ADD IMAGE'S ALT TEXT]](/sites/default/files/effects_1.jpg)
Learning tasks that will help you develop and practise animation skills
Practice
Use your skills and build your knowledge
Dive into this topic’s learning tasks confidently – they're your portals to mastering effects animation magic. Completing the learning tasks will build your design and animation skills, equipping you to craft a diverse range of remarkable effects.
Look out for this PRACTICE box throughout this topic to identify learning tasks and resources, letting you know exactly what to do. The information below outlines what learning tasks to expect in Effects Animation and how much time you should allocate to each one.
| # | Learning Task Name | Duration (Hours) | |
|---|---|---|---|
| 1 | Create thumbnails, drawings and notations | 2 |  |
| 2 | Animate a dust cloud | 8 | |
| 3 | Animate a smoke plume | 6 | |
| 4 | Animate a campfire | 8 | |
| 5 | Animate a small splash effect with no depth | 6 | |
| 6 | Animate a small splash effect with depth | 8 | |
| 7 | Animate a pop sequence | 4 | |
| 8 | Animate a trail sequence | 8 | |
| 9 | Design a series of arc key shapes and colour treatments | 1 | |
| 10 | Animate an electrical sequence | 6 | |
Feedback and support is woven through the learning tasks as you complete them. Reach out if you have any questions about what to do!
Using reference when designing and animating effects can be very helpful – whether observing everyday occurrences or studying online resources, reference offers you creative inspiration and guidance.
This short subtopic helps you interpret and collect reference materials, setting the foundation to translate your observations into well-designed and animated effects.
Finding effects reference
You can find potential examples of effects reference everywhere around you, from the steam coming from your coffee, running taps, splashing bathwater, or rain drops.
Inspiring animators
One of the best ways to get inspired about animating effects is to look at other animators' work.
Take a look at the work of the following excellent FX (effects) artists:
- Chris Graf
- Website: https://www.chrisgrafx.com/
- Adam Phillips
- Website: https://bitey.com/
- Slava Lightsoul
- Joseph Gilland
- Book: Elemental Magic: The Art of Special Effects Animation. ISBN: 978-0-2408-1163-5
Online resources
There are a vast number of effects reference you can look at and observe online. YouTube and Pinterest are just two examples.
YouTube
YouTube has many effect reference videos you can watch.
Watch this short video from Stylus Rumble, which shows their collection of splash and water feature references (0:20m).
Watch this second short video from Stylus Rumble, which shows their collection of dust references (0.19m).
For more reference examples, sign up to Pinterest and search for effects animation.
There are many varying effects styles, and you can create your own Pinterest boards and collect the effects that inspire you!
Practice
Task 1: Create thumbnails, drawings, and notations
Take the plunge into effects animation by creating a page of thumbnails, design drawings, and notations based on your observation of effects reference. You'll develop a keen eye for effects that inspire you and set the foundation for your journey into effects design and animation.
What tools or resources do you need for this task?
Make sure you have access to:
- Sketchbook
- Pencil
- Optional: Adobe Photoshop
What steps should you take to complete this task?
1-2 Hours

Set aside 1-2 hours to complete steps 2-6 below.
- Revisit the Effects Reference subtopic to reinforce what you know if you need to.
- Collect various effects reference materials from your surroundings. Explore online resources for additional inspiration.
- Generate a page of thumbnails capturing the essence of the observed effects. Focus on quick, small-scale sketches.
- Choose a few thumbnails that resonate with you the most. Develop these into more detailed design drawings. Keep to one page.
- Add notations to your drawings. Describe the observed effects, forces at play, or any unique features.
- Save your work to JPEG if using Adobe Photoshop, or use your phone to take a clear and well-lit photo if using your sketchbook.
What should you do after completing this task?
- Take a moment to review your page of thumbnails, design drawings, and notations. Reflect on your choices and how well they capture the essence of the effects reference you have observed.
- Share your page:
- Select your forum thread in Forum: Effects Animation.
- Select Reply to your first Forum post.
- Enter the words ‘Task 1: FX design' in your new post.
- Select the Post your response button, then select Edit in your reply when it shows up.
- Upload your JPEG or photo using the Attachment field.
- Select Save changes to share your coursework to your forum thread.
- Get feedback on this and other learning tasks at the next Live Session – check the Live Session calendar for dates and times.
Now that you've honed your skills in observing effects reference, it’s time to learn how to create visual effects that mimic natural phenomena through effects design and animation, starting with the element of Earth.
A fun way to get into effects animation is animating dust kicking up when an object hits the ground or something zooms by the camera.
You’ll get the chance to practise designing and animating a dust cloud in this subtopic, while exploring planning and design approaches essential for creating realistic dust effects.
Factors to consider
When animating dust, you need to consider the following factors:
- dust movement, weight, and impact
- timing
- dissipation.
![[ADD IMAGE'S ALT TEXT]](/sites/default/files/Earth%20Dust.png)
Movement, weight, and impact
Direction of movement of dust
When animating dust, the main consideration is the direction in which dust and debris will be moving.
Usually, this will be determined by an outside force, for example, an object hitting the ground, which pushes the air out of the way as it hits the ground. This sudden rush of air will kick up the dust around the point of impact.
Weight of dust
Dust has a small amount of weight, so it will try to hug the ground and, depending on the amount of dust and energy in the impact, will not kick up into the air too much.
Impact influence on dust
If the impact is uniform, the dust will move outwards in a uniform ring around the impact zone.
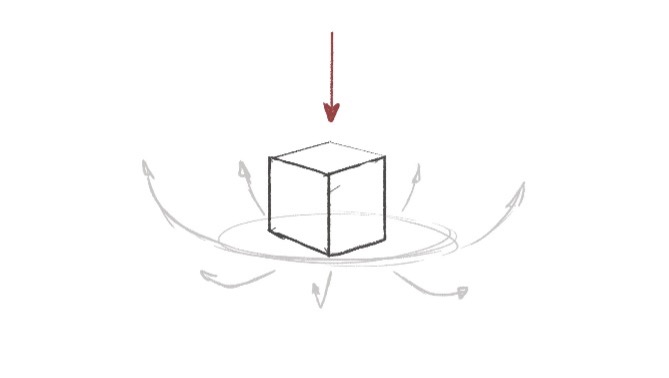
![[ADD IMAGE'S ALT TEXT]](/sites/default/files/Uniform%20Impact%202.jpg)
If the impact happens at an angle, then the resulting dust cloud will be affected by that angle, kick up non-uniformly, and move in a direction influenced by the initial impact.
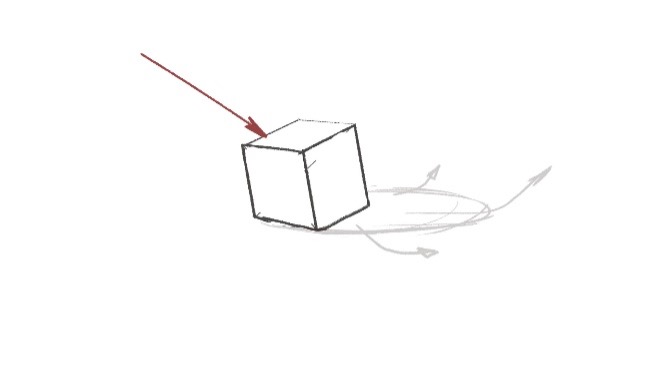
![[ADD IMAGE'S ALT TEXT]](/sites/default/files/Angle%20Impact%202.jpg)
Timing
The impact will determine the timing of the dust cloud. The sudden rush of air squeezed out from between the ground and the object on impact will cause the dust to appear quickly. Then, as the dust moves away from the impact zone and mixes with the air around the immediate area, it will slow down and dissipate.
Dissipation
When getting dust to dissipate, try to break up the shapes incrementally so that the smaller shapes break up first; the larger shapes will take longer. Offsetting the timing will add interest and appeal to the animation's timing.
Swipe through the four images below to view the incremental stages of dust shapes breaking up.
Design
You can use different design approaches when animating dust, for example:
- Single tone design
- Two tone design
Single tone design
Tip
Clips and demos
This topic includes two types of multimedia content for you to watch:
- Short clips that provide you with visual, playable examples of various animation effects.
- Longer demonstration videos that describe and explain animation processes and techniques. These videos support you when completing learning tasks.
Enjoy the short animation clips – remember that one of the best ways to get inspired about effects is to look at other animators’ work!
Observe the techniques shown in the demonstration videos. Pause the videos to practise or experiment with steps or tools. If a video presents challenges, pause it to attempt the tasks or find the solution.
In this clip (11 seconds), the dust design has been drawn as a single-tone shape, with all the focus given to:
- the form of the shape
- the path and movement of the dust animation.
When you animate a dust cloud using only a single tone, think about the shapes you are trying to describe. You can add interest by using asymmetry and variation within the shapes.
Two tone design
In this clip (1 second), two tones are used to add interest and variation to the dust.
The second tone describes a shape's highlights or shadows. It also describes the highlights of the volumes within the shape, adding more definition and a three-dimensional look to the overall effect.
Suppose you decide to design a two-tone dust effect. When drawing the shapes, you must think about the direction of light and the forms you are trying to describe visually.
You draw:
- highlights on the edges of the forms facing the light source
- shadows on the edges facing away from the light source.
Animating a dust cloud
Watch Geoff design, plan, and animate a dust cloud in five videos, located in the playlist below. Use the hamburger icon in the top right of the playlist to access the video menu.
These videos help you complete Task 2: Animate a dust cloud below.
Practice
Task 2: Animate a dust cloud
Get your hands dirty with your first effects animation challenge by designing and animating a dust cloud. Make it kick up in the air as if an inanimate object is hitting the ground, pushing the air out of its way.
What tools or resources do you need for this task?
Make sure you have access to:
- Pencil and paper to plan your effect
- Toon Boom
- Drawing pen and tablet.
What steps should you take to complete this task?
6-8 Hours
Set aside 6-8 hours to complete steps 2-6 below.
- Revisit the Earth subtopic to reinforce what you know if you need to.
- Watch Geoff’s five videos, carefully observing his planning and design techniques to animate a dust cloud in Toon Boom.
- Plan your dust cloud animation, considering key factors like dust movement and weight, impact influence, and dissipation.
- Configure the scene in Toon Boom, ensuring a frame rate of 24/25fps and a resolution of 1920 x 1080, and start designing the dust cloud.
- Design your dust cloud animation in Toom Boom.
- Set the timing of the dust cloud, considering its sudden appearance during the initial rush of air and the subsequent slowing down and dissipation as dust mixes with the surrounding air.
- Implement your chosen design approach within Toon Boom, whether single-tone or two-tone. Focus on shaping the dust animation, incorporating asymmetry for a single-tone design, and emphasizing light direction for a two-tone design.
- Refine your animation and export it as an MP4.
What should you do after completing this task?
- Review your animated dust cloud. How effectively you captured the nuances of dust movement, timing, and dissipation? Identify successful elements and areas for improvement.
- Share your dust cloud effect to forum:
- Select your forum thread in Forum: Effects Animation.
- Select Reply to your first Forum post.
- Enter the words ‘Task 2: Dust cloud' in your new post.
- Select the Post your response button, then select Edit in your reply when it shows up.
- Upload your MP4 using the Attachment field.
- Select Save changes to share your coursework to your forum thread.
- Get feedback on this and other learning tasks at the next Live Session – check the Live Session calendar for dates and times.
Build on your practice with animation dust effects and extend your skills into crafting various atmospheric effects in the next subtopic, Air, and keep your animation journey fresh!
Air and wind effects are among the trickier effects to animate.
Learn the nuances of airflow and wave-like motion in the context of wind and smoke, then design and animate your own smoke plume in this subtopic!
Factors to consider
When animating air, you need to consider the following factors:
- influence of airflow
- wave-like motion
- timing.
![[ADD IMAGE'S ALT TEXT]](/sites/default/files/Air.png)
Influence of airflow
Usually, it is the influence of airflow movement that you will be animating, not the air itself.
![[ADD IMAGE'S ALT TEXT]](/sites/default/files/Airflow%20Movement.jpg)
Occasionally, air and wind are depicted as a more graphical series of rougher-looking lines, which can be a fun and straightforward way to get the idea of airflow and wind across to the audience.
Play this clip (3 seconds) to see this in action.
Wave-like motion
Wind and smoke regularly show a wave-like motion in their movement and shapes.
Wind
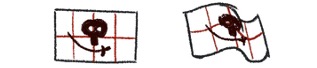
The movement and energy of the wind is clearly visible in a flag fluttering in the breeze.
The wind creates a wave-like motion of flowing, overlapping action as the energy travels through the flexible – but fixed – medium of the flag.
Diagram 1 below shows how, ripples form on the flag's surface and then move along its surface. From above, you can see how the wind hits the flag and then travels along its surface.

Suppose you need to add a design to the flag. In that case, the best method to keep the design fixed on the surface is to:
- Divide the flag into sections.
- Use the divisions to help you place details on the surface.
Smoke plumes regularly show the wave principle in their shapes and how they move as the smoke twists and winds up and away from their source.
When you animate smoke, think about the peaks of the shapes and try to keep them moving at a constant speed in an upward direction.
Play this clip (4 seconds) to see this in action.
Timing
When you animate wind and smoke effects, keep the timing as consistent as possible:
- Wind can move at different rates depending on your shot's requirements, but it should usually be a consistent speed.
- Smoke plumes tend to move slowly and languidly, so the spacing between your drawings should not be too great.
Important
Keep the flow, check the direction!
Smoke rises in hot air, so keeping the smoke moving upwards will be important.
It's extremely easy to make a mistake with your in-betweens and accidentally in-between the smoke moving in the wrong direction. Check your scene regularly by playing back your animation and looking out for any movement in the wrong direction.
Animating a smoke plume
Watch Geoff design, plan, and animate a smoke plume in four videos, located in the playlist below. Use the hamburger icon in the top right of the playlist to access the video menu.
These videos help you complete Task 3: Animate a smoke plume below.
Practice
Task 3: Animate a smoke plume
Time to practise your second effects animation challenge - designing and animating a smoke plume. Remember to keep the smoke moving in the right direction!
What tools or resources do you need for this task?
Make sure you have access to:
- Pencil and paper to plan your effect
- Toon Boom
- Drawing pen and tablet
- Files: Smoke.
What steps should you take to complete this task?
4-6 Hours
Set aside 4-6 hours to complete steps 2-8 below. Remember to save your work as you go when using Toon Boom.
- Revisit the Air subtopic to reinforce what you know if you need to.
- Watch Geoff’s four videos, carefully observing his planning and design techniques to animate a smoke plume in Toon Boom.
- Plan your smoke plume animation, considering key factors like the influence of airflow and the wave principle.
- Access and download the Toon Boom project files in Files: Smoke and locate the XSTAGE file inside the project file.
- Design your smoke plume animation in Toon Boom.
- Set the timing of the smoke plume, considering how it moves slowly, languidly. Keep the spacing between your drawings even and not too great.
- Keep the smoke moving upwards - check your scene regularly by playing back your animation and looking out for any movement in the wrong direction.
- Refine your animation and export it as an MP4.
What should you do after completing this task?
- How did you apply key factors in your planning? Did you face any challenges around using consistent timing?
- Share your smoke plume effect to forum:
- Select your forum thread in Forum: Effects Animation.
- Select Reply to your first Forum post.
- Enter the words ‘Task 3: Smoke plume' in your new post.
- Select the Post your response button, then select Edit in your reply when it shows up.
- Upload your MP4 using the Attachment field.
- Select Save changes to share your coursework to your forum thread.
- Get feedback on this and other learning tasks at the next Live Session – check the Live Session calendar for dates and times.
Transition from smoke to flames as you explore Fire. Explore the nuances of fire effects, leveraging your Toon Boom skills. Embrace the challenge and your creativity will stay bright!
Animating fire can be a great challenge!
Learn how to visually represent fire – from candles to fireballs – to help you plan, design, and animate a campfire.
Factors to consider
When animating fire, you need to consider the following factors:
- size and conditions
- flame movement
- timing.
Each of these factors impacts how you go about animating a fire effectively.
![[ADD IMAGE'S ALT TEXT]](/sites/default/files/Fire.png)
Size and conditions
When animating fire, ask yourself the following questions:
- What is the size of the fire?
- What are the conditions surrounding the fire?
- Is it windy or calm?
Flame movement
Fire is an exothermic reaction, so you need to think about how heat and hot air affect how flames move:
- As the fire gets larger and hotter, it will draw in cold air at the base of the fire.
- The cold air heats up and then rises as hot air, drawing the flames and any sparks generated.
Because the hot air rises, fire and flames will always travel upward, like the smoke in the previous subtopic. Remember this when drawing any in-betweens, and keep volumes moving upwards with the flow of hot air.
Timing
Fire and flames can vary in their timing and spacing. Generally, the larger the fire, the more erratic and chaotic the fire will behave.
As such, you can get away with more variation in the shapes and size of the flames as the fire animates.
Flames
Small flames
Small flames - like the flame of a candle or a match - are the simplest forms of fire that someone might ask you to animate.
Gentle small flames
Small flames can move gently and predictably. Add side-to-side and up-and-down movements to a flame for a gentle effect, as shown in Diagram 2.
![[ADD IMAGE'S ALT TEXT]](/sites/default/files/Diagram%202.jpg)
Play this clip (2 seconds) to see this in action.
Turbulent small flames
Small flames can also move more haphazardly if there is even a very small amount of turbulence in the air surrounding the flame. Apply a circular path to a flame’s tip for a turbulent effect, as shown in Diagram 3.
![[ADD IMAGE'S ALT TEXT]](/sites/default/files/Diagram%203.jpg)
Play this clip (3 seconds) to see this in action.
Larger flames
Larger flames and fires are more challenging to animate.
The best way to begin animating a fire is to draw flame-like shapes. Look at some reference material of flames and fire and try to identify the common shapes within the flames.
![[ADD IMAGE'S ALT TEXT]](/sites/default/files/Flames.jpg)
Extra detail
A small flame – like a candle – is almost the silhouette of a larger flame with variations in its colours around the edges. But as a fire gets larger – like a burning torch – you need to include extra detail within the flames to sell the larger scale of the fire.
Extra movement
The movement of a larger fire changes, too. Swipe through the three images below to see a description of this movement.
Another approach to animating larger flames is to create a series of rising shapes. You then use these rising shapes to create the undulating shapes of the flames, whipping backwards and forwards as each side of the flame gets hotter and cooler.
Play this clip (1 second) to see this in action.
Even larger flames
Fireballs
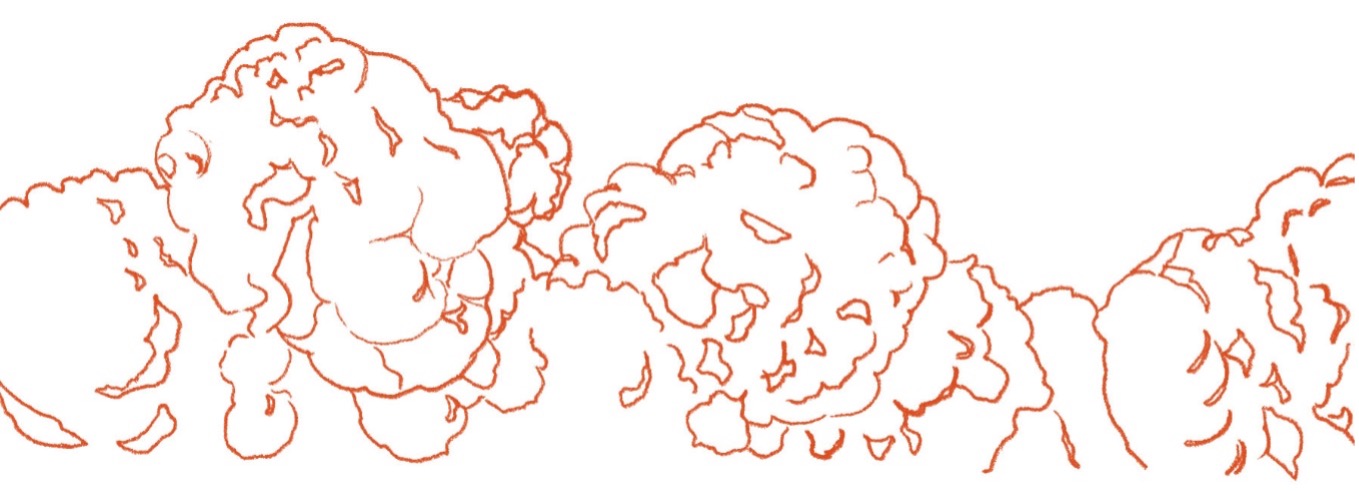
Detail in an even larger flame, like an explosive fireball, is even more extreme.
Play this clip (7 seconds) to see a fireball reference.
If you analyse the image, you will start seeing some simpler shapes in the overall form of the fire. There are cauliflower-like shapes in the volumes with some smaller surface details.
The details and colour variation show that the flames are hottest in the very bright areas and darker where the flames are cooler in temperature.
![[ADD IMAGE'S ALT TEXT]](/sites/default/files/Cauliflower-Like%20Shapes.jpg)
Tip
Use your reference
Remember, the best way to begin animating a fire is to draw flame-like shapes. Look at your reference material (like the fireball image above) and identify the common shapes within the flames to start drawing.
Campfires
The clip below of an animated campfire is a very stylised version of flames with its blocky, almost oval shape. Still, when it moves, there is no mistaking a campfire!
Play the clip (1 second) to see it in action.
Design
Select + to view four design components you can use when animating fire.
The shapes of your flames should be fluid as S curves are often built into fire shapes.

The colours you use to depict your fire can also vary.
Usually, fire has a cooler, less intense value on the outer edges. As you get closer to the hotter centre of the flames, the colours should gradually become whiter in value.

Fire also gives off light (see below), so adding one or two glow effects to the animated element will help sell the fire effect. Having an orange glow with another yellow glow applied on top looks suitably fiery.
Fire generates light, so consider adding some animated lighting to the area around the fire.
In the animated campfire clip, some animated highlights pick out the detail on the logs in the fireplace. The detail was drawn, and then animation was applied to the detail's opacity so that it appears to flicker
Play the clip to see it again in action.
Another extra detail you can add to fire and flame animation is sparks that flow upwards with the column of hot air.
As a rule, if you add sparks to your animation, they will only appear briefly before each spark disappears as it cools down and eventually dies.
Animating a campfire
Watch Geoff design, plan, and animate a campfire in two videos, located in the playlist below. Use the hamburger icon in the top right of the playlist to access the video menu.
These videos help you complete Task 4: Animate a campfire below.
Practice
Task 4: Animate a campfire
Take on your third effects challenge and create a small campfire, capturing the cosy essence with flickering flames and movements. Pay attention to the flames’ sizes and shapes, bringing the warmth of a crackling campfire to life.
What tools or resources do you need for this task?
Make sure you have access to:
- Pencil and paper to plan your effect
- Toon Boom
- Drawing pen and tablet
- Files: Fire.
What steps should you take to complete this task?
6-8 Hours
Set aside 6-8 hours to complete steps 2-8 below. Remember to save your work as you go when using Toon Boom.
- Revisit the Fire subtopic to reinforce what you know if you need to.
- Watch Geoff’s two videos, carefully observing his planning and design techniques to animate a small campfire in Toon Boom.
- Plan your small campfire animation, considering key factors like flame shapes and the fire’s colour, light, and sparks.
- Access and download the Toon Boom project files in Files: Fire and locate the XSTAGE file inside the project file.
- Design your small campfire animation in Toon Boom.
- Set the timing of the campfire – remember that the larger the fire is, the more erratic it behaves, so the shape and size of the small campfire’s flames can vary compared to a candle’s flame.
- Keep the flames travelling upwards - check your scene regularly by playing back your animation and looking out for any movement in the wrong direction.
- Refine your animation and export it as an MP4.
What should you do after completing this task?
- How did your experience with the dust cloud and smoke plume challenges contribute to your campfire animation? How did exploring flame shapes and movement enhance your design process?
- Share your campfire effect to forum:
- Select your forum thread in Forum: Effects Animation.
- Select Reply to your first Forum post.
- Enter the words ‘Task 4: Campfire' in your new post.
- Select the Post your response button, then select Edit in your reply when it shows up.
- Upload your MP4 using the Attachment field.
- Select Save changes to share your coursework to your forum thread.
- Get feedback on this and other learning tasks at the next Live Session – check the Live Session calendar for dates and times.
Now, apply your newfound insights to the next subtopic, Water, where you'll explore a fluid world of effects and refine your animation skills in portraying water-based behaviour.
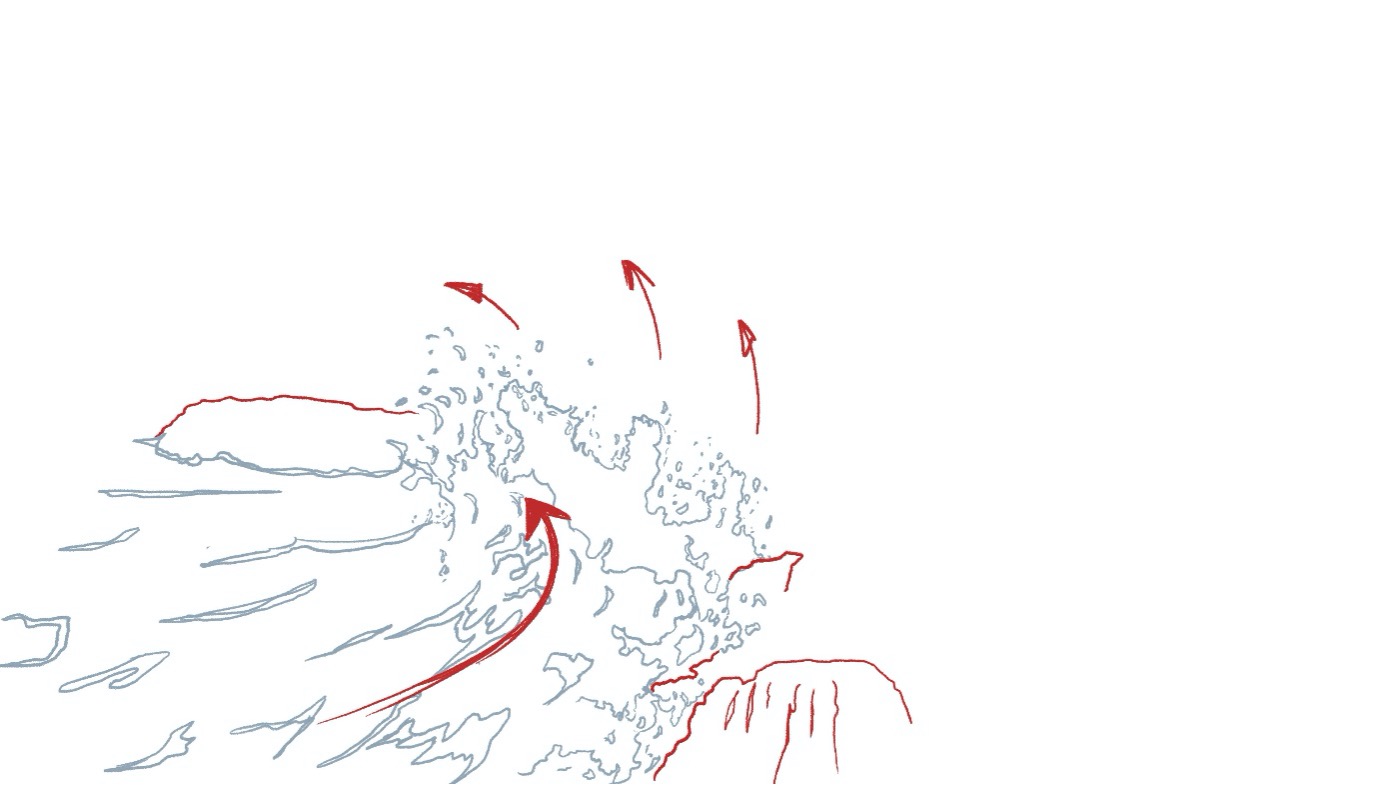
Water and splashes can be among the more challenging effects to animate.
Explore the different ways water behaves – such as small or deep splashes – so you can simulate its movement by designing convincing water effects animation.
Factors to consider
When animating water, you need to consider the following factors:
- fluid dynamics
- surface tension
- gravity.
![[ADD IMAGE'S ALT TEXT]](/sites/default/files/Water.png)
Fluid dynamics
Water as a liquid will always flow and try to find the lowest possible resting place. When it rests, water will try to level itself out unless an outside force is applied to keep the liquid water moving and flowing.
Surface tension
Water will also tend to clump and stick together due to a force called surface tension, which attracts and holds water molecules together.
Surface tension is a universal force attracting in all directions at once, so any water not in contact with a surface will always try to assume a spherical shape.
Contrary to popular opinion, the assumed ‘teardrop’ shape of raindrops is incorrect. Rain or falling water will always try to assume a sphere shape.
Gravity
With a dripping tap, the water behaves like it is sticking to the underside surface of the tap until there is too much weight of water present. This is due to surface tension.
Gravity will then tear a drop of water from the clump, and it will fall. Timing and spacing will be especially important to simulate gravity in your animation.
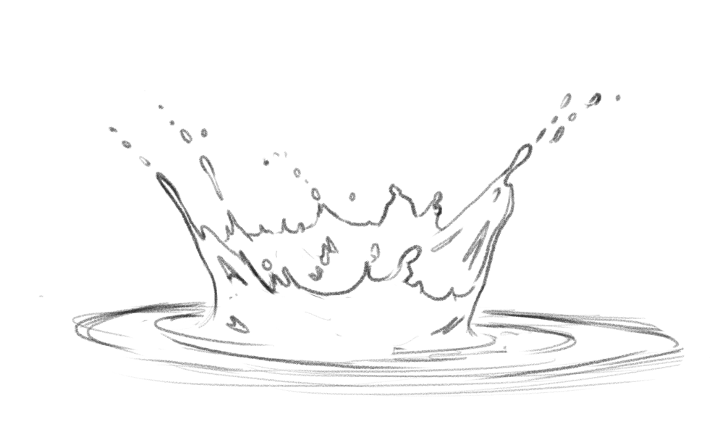
Small splashes
In small-scale splashes, the surface tension of the water has a greater influence over the overall shape of the water. It will tend to want to clump together and form a sheet or blobby clumps.
Play the clip below (10 seconds) and note the clumped-together shapes and overall blobby nature of the water splashes.
Key stages of a splash
A splash can be described in four key stages.
| Stage | Description |
|---|---|
| 1. Strike | An object striking the water breaks the surface. The surface tension is temporarily broken and dragged down by the fast-sinking object. |
| 2. Initial splash | The water moves as a cohesive sheet of water. This stage is where the energy of the splash is at its greatest. |
| 3. Transition | As the energy dissipates from the initial splash, gravity starts to act on the movement. The sheet slows down, becoming curvier in appearance. The sheet is also starting to pull apart, and holes are forming in the design. |
| 4. Dissipation | The water sheet starts to fall, speeding up as gravity takes hold of the water droplets. The sheet will continue to break up into individual droplets of water. During this stage, a secondary column of water can form as the break in the water's surface reestablishes after the object that caused the splash struck the water's surface. |
Design
To make things easier initially, think about the splash in 2D space, using only simple shapes and no detail. Using this approach, you can:
- Think about the movement of the water in the vertical and horizontal directions.
- Remove the added complexity of depth (for the moment).
Play this clip (1 second) to see an outcome of this approach.
Key positions
Now, select + to view four key positons that help you animate a small splash. Each step is aligned to the four splash stages explained above.
Start by designing the main key position of the splash during the 2. Initial splash stage.
This water sheet has the most energy, so it should convey some of that energetic movement in its design.
Try to keep the design of the water sheet a little straighter to help visually convey some of the energy of the splash.
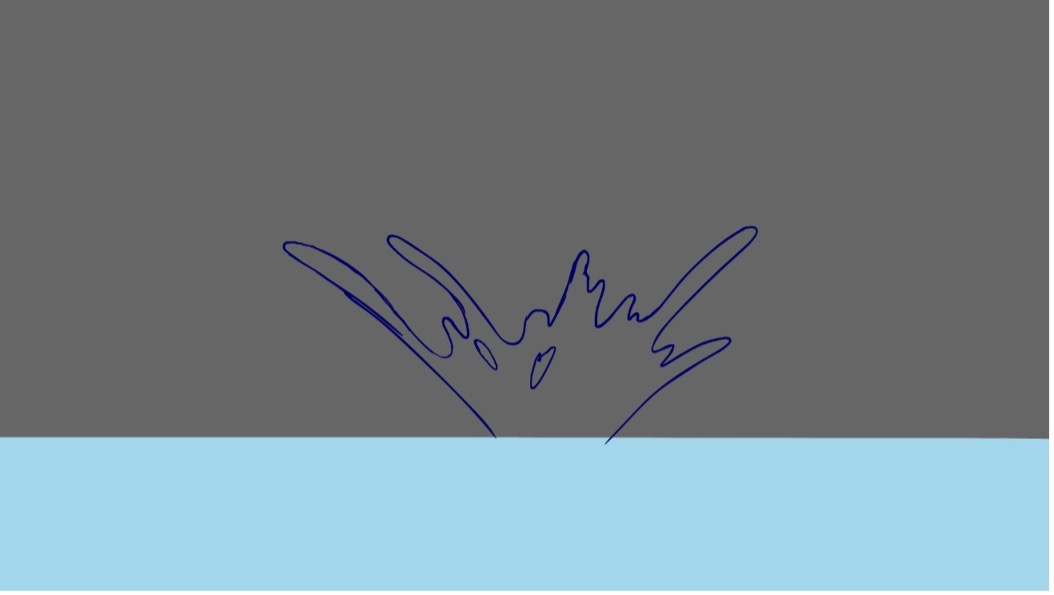
After you have the main key drawing of the splash locked down, go ahead and add more key positions that will form the extremes of the movement of the splash.
You need a key drawing for the moment of the object hitting the surface during the 1. Strike stage.
You also need a key drawing for the apex of the splash's movement, where the initial energy of the splash is lost and the sheet starts to break up during the 3. Transition stage.
![]()
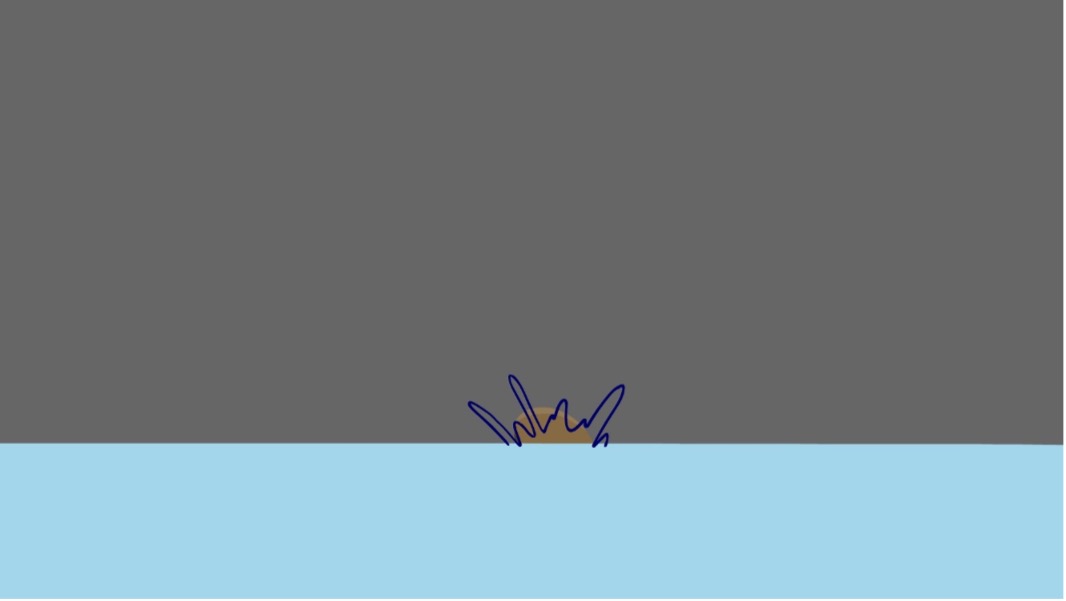
Last, you will need a key drawing for the 4. Dissipation stage of the splash.
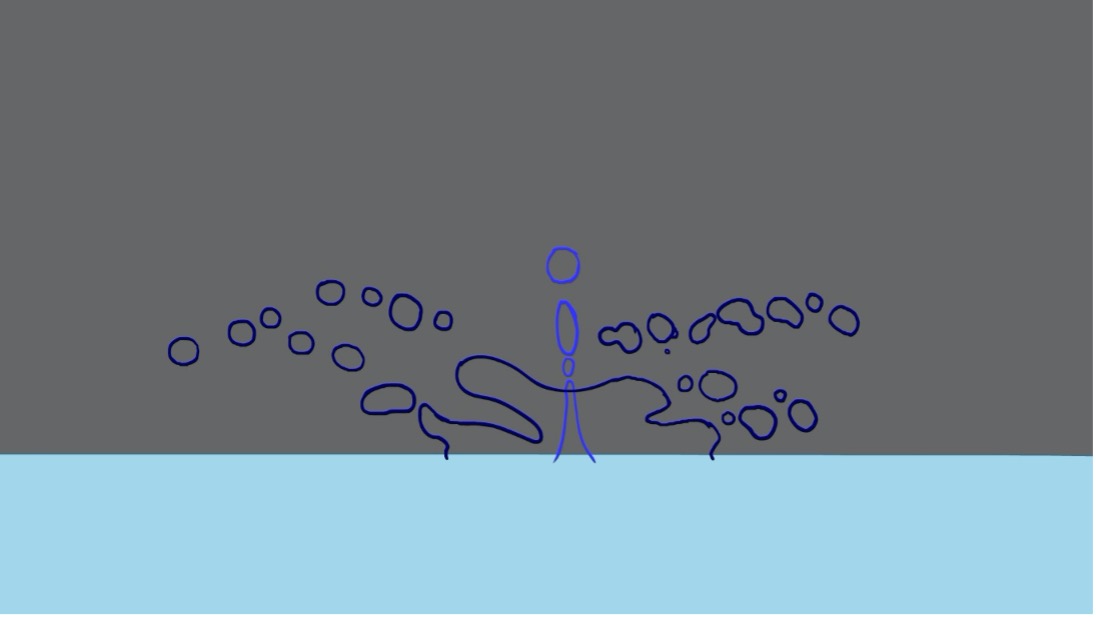
Secondary column
Splashes will generate a secondary column of water. The column shoots up through the centre of the initial splash as the surface of the water reforms after the object has passed through.
You may find it easier to animate the secondary column of water on a separate level from the main splash, to control the secondary column’s timing and appearance more easily and independently from the main splash.
In the Dissipation key position above, the secondary column has been drawn in a different colour for clarity. You will again need key positions for the:
- first appearance of the column
- apex or highest position
- dissipation
- lowest position of the dissipation just before it disappears.
![[ADD IMAGE'S ALT TEXT]](/sites/default/files/Key%20Positions.jpg)
Timing
Lastly, add any in-betweens that may be required to smooth out the splash.
Remember to have easing around the apexes of the moving parts of the splash. That means easing into and out of the apexes so that the droplets and secondary column appear to:
- slow down as they reach the apex
- then, speed up again as they leave the apex.
Doing this will give the splash animation the illusion of gravity and weight.
Animating a small splash effect with no depth
Watch Geoff animate a small splash effect (with no depth) using the above process in this video, which will help you complete Task 5: Animate a small splash effect with no depth below.
Practice
Task 5: Animate a small splash effect with no depth
Dive into the first of two water effects challenges! Bring to life the dynamic nature of a small splash (with no depth), focussing on simplicity and smoothness through fluid motion.
What tools or resources do you need for this task?
Make sure you have access to:
- Pencil and paper to plan your effect
- Toon Boom
- Drawing pen and tablet
- Files: Flat splash.
What steps should you take to complete this task?
4-6 Hours
Set aside 4-6 hours to complete steps 2-8 below. Remember to save your work as you go when using Toon Boom.
- Revisit the Small splashes section in this subtopic to reinforce what you know if you need to.
- Watch Geoff’s video, carefully observing his planning and design techniques to animate a small splash (with no depth) in Toon Boom.
- Plan your small splash, considering the key stages of a splash. Closely watch this clip again and use it as your reference: Clip: SmallSplashes
- Access and download the Toon Boom project files in Files: Flat splash and locate the XSTAGE file inside the project file.
- Design your small splash animation in Toon Boom. Your animation should be, at most, four seconds long.
- Insert easing around the apexes of the moving parts of the splash, easing into and out of the apexes so that the droplets and secondary column appear to slow down as they reach the apex, then speed up again as they leave the apex.
- Keep the water blobby and clumped together - check your scene regularly by playing back your animation and see whether it is consistent with fluid dynamics, accounting for factors like gravity and surface tension.
- Refine your animation and export it as an MP4.
What should you do after completing this task?
- How did you address the four key stages of a splash in your effect? Did you have any issues with designing your key positions and adding in-betweens?
- Share your small splash effect to forum:
- Select your forum thread in Forum: Effects Animation.
- Select Reply to your first Forum post.
- Enter the words ‘Task 5: Flat splash' in your new post.
- Select the Post your response button, then select Edit in your reply when it shows up.
- Upload your MP4 using the Attachment field.
- Select Save changes to share your coursework to your forum thread.
- Get feedback on this and other learning tasks at the next Live Session – check the Live Session calendar for dates and times.
Now that you've practised animating a simple splash effect, get ready to step into the next section – Adding depth – where you’ll learn how to make your water effects more realistic with a 3D perspective.
Adding depth
You now know the mechanics and stages of a splash!
Next, you need to consider adding depth – so start thinking of a splash in 3D.
![[ADD IMAGE'S ALT TEXT]](/sites/default/files/Adding%20Depth.jpg)
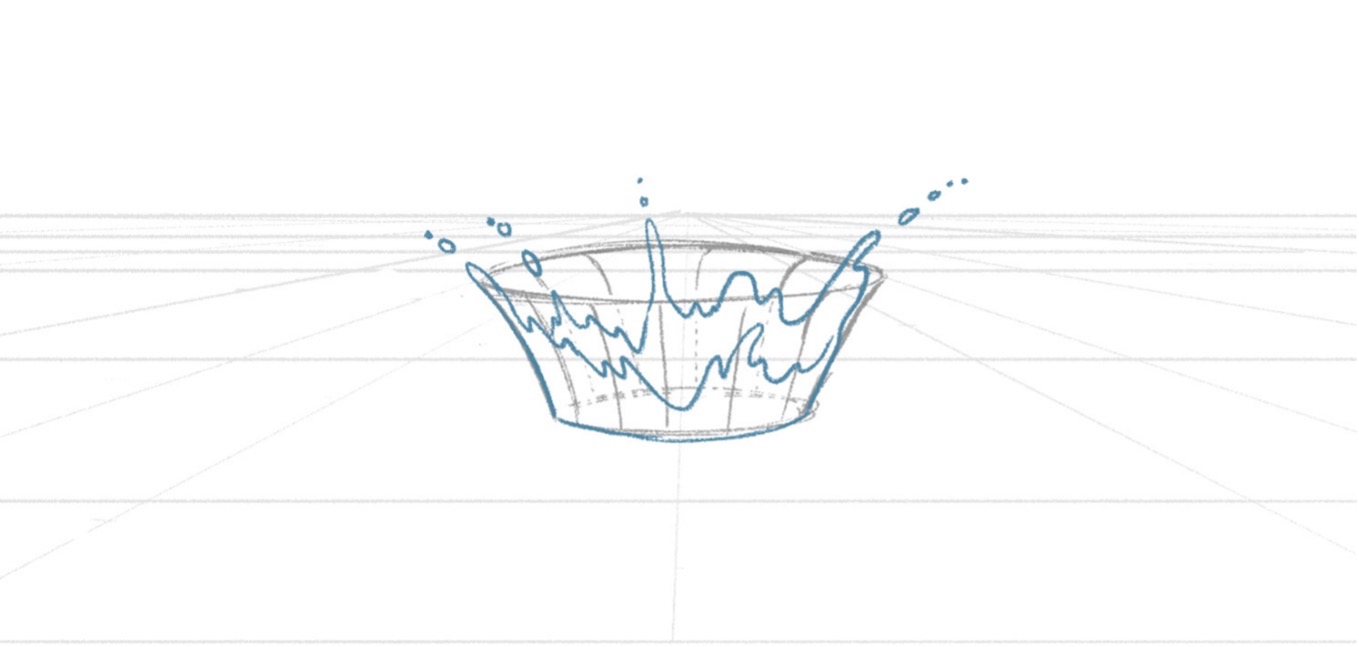
Select + to view two simple stages of designing the key position of a 3D splash.
First, simplify things and think of the 3D shape of the splash as a simple bowl shape.

You can then use the bowl shape to build the 3D version of your splash.
When designing your splash, try to keep the design asymmetrical, which will help to add appeal and visual interest to the overall design.
Key stages
Now that you have a key position to build from, add the remaining key positions by following the steps in the previous section Small splashes > Design.
Select + to view the four key stages of a splash, if you need a refresher. Which stage do you focus on next?
| Stage | Description |
|---|---|
| 1. Strike | An object striking the water breaks the surface. The surface tension is temporarily broken and dragged down by the fast-sinking object. |
| 2. Initial splash | The water moves as a cohesive sheet of water. This stage is where the energy of the splash is at its greatest. |
| 3. Transition | As the energy dissipates from the initial splash, gravity starts to act on the movement. The sheet slows down, becoming curvier in appearance. The sheet is also starting to pull apart, and holes are forming in the design. |
| 4. Dissipation | The water sheet starts to fall, speeding up as gravity takes hold of the water droplets. The sheet will continue to break up into individual droplets of water. During this stage, a secondary column of water can form as the break in the water's surface reestablishes after the object that caused the splash struck the water's surface. |
Play this clip (1 second) to see an outcome of this 3D approach.
Ripples
You also need to animate some ripples when you have small water splashes.
These include ripples:
- that expand outwards from the location of the initial splash
- for any droplets ejected from the water's surface by the initial and secondary splashes.
Watch this GIF to see ripples in action.

Explore
A ripple in space-time
You worked with ripples when you animated a rain shower in the Foundations module when you focussed on 2D Digital Animation.
Follow the breadcrumbs below if you want to revisit that challenge.
- Foundations > 1.4 Art and Animation Basics > 1.4.2 2D Digital Animation > How do you animate a rain shower?
The following information is a summary of ripple animation design and timing.
Design
The ripple's design in the previous clip is quite simple: two concentric rings with the space between them filled with a solid colour value.
When designing the breakup portion of the animation, break up the ripple into asymmetrical and different-sized sections, which is more appealing than having all the sections the same size and spaced the same distance apart.
Timing
To animate a stylised ripple, you need to animate an expanding circle that:
- starts fast, then
- eases into the final position, while
- breaking up into smaller parts before disappearing entirely.
Watch the GIF again to see ripples in action.
The following image describes the animation sequence’s ten frames:
![[ADD IMAGE'S ALT TEXT]](/sites/default/files/Frames_1.jpg)
- The ripple starts small and almost unbroken.
- As the ripple expands outwards, it slows down.
- It breaks up into smaller, separated parts, with the larger ripple sections taking the longest to break up and disappear (which creates some nice overlapping timing that adds interest to the sequence).
Animating a small splash effect with depth
Watch Geoff animate a small splash effect (with depth) in three videos, located in the playlist below. Use the hamburger icon in the top right of the playlist to access the video menu.
These videos help you complete Task 6: Animate a small splash effect with depth below.
Practice
Task 6: Animate a small splash effect with depth
It’s time to dive even deeper into creating water effects by designing and animating another small splash, this time with the third dimension of depth. And ripples!
What tools or resources do you need for this task?
Make sure you have access to:
- Pencil and paper to plan your effect
- Toon Boom
- Drawing pen and tablet
- Files: Dimensional splash.
What steps should you take to complete this task?
8 Hours
Set aside eight hours to complete steps 2-8 below. Remember to save your work as you go when using Toon Boom.
- Revisit the Adding depth section in this subtopic to reinforce what you know if you need to.
- Watch Geoff’s three videos, carefully observing his planning and design techniques to animate a small splash (with depth) in Toon Boom.
- Plan your second small splash using the bowl approach and again considering the key stages of a splash. Closely watch this clip again and use it as your reference: Clip: SmallSplashes
- Access and download the Toon Boom project files in Files: Dimensional splash and locate the XSTAGE file inside the project file.
- Design your small splash animation in Toon Boom. Your animation should be, at most, four seconds long.
- Include ripples in your design and animation. Animate two expanding circles that start fast, then ease into the final position while breaking up into smaller parts before disappearing entirely.
- Remember to keep the water blobby and to check your scene regularly to see whether it is consistent with fluid dynamics.
- Refine your animation and export it as an MP4.
What should you do after completing this task?
- How did shifting to a 3D perspective influence your approach to planning key positions for the splash? What design and timing choices did you make for the ripple effect?
- Share your small splash effect to forum:
- Select your forum thread in Forum: Effects Animation.
- Select Reply to your first Forum post.
- Enter the words ‘Task 6: 3D splash' in your new post.
- Select the Post your response button, then select Edit in your reply when it shows up.
- Upload your MP4 using the Attachment field.
- Select Save changes to share your coursework to your forum thread.
- Get feedback on this and other learning tasks at the next Live Session – check the Live Session calendar for dates and times.
Now, make one final dive into water effects by discovering layering effects and how to design larger, high-energy splashes.
Layering effects
You can create more complex animated effects by layering several elements together.
Watch the GIF below – it’s a good example of breaking up a large, relatively complicated effect and making it much more achievable.

There are seven different animated cycles included in the waterfall. Each one has no more than five or six animation frames, but the whole, when viewed together, is extremely convincing.
Watch the GIF below to see the different animated cycles.
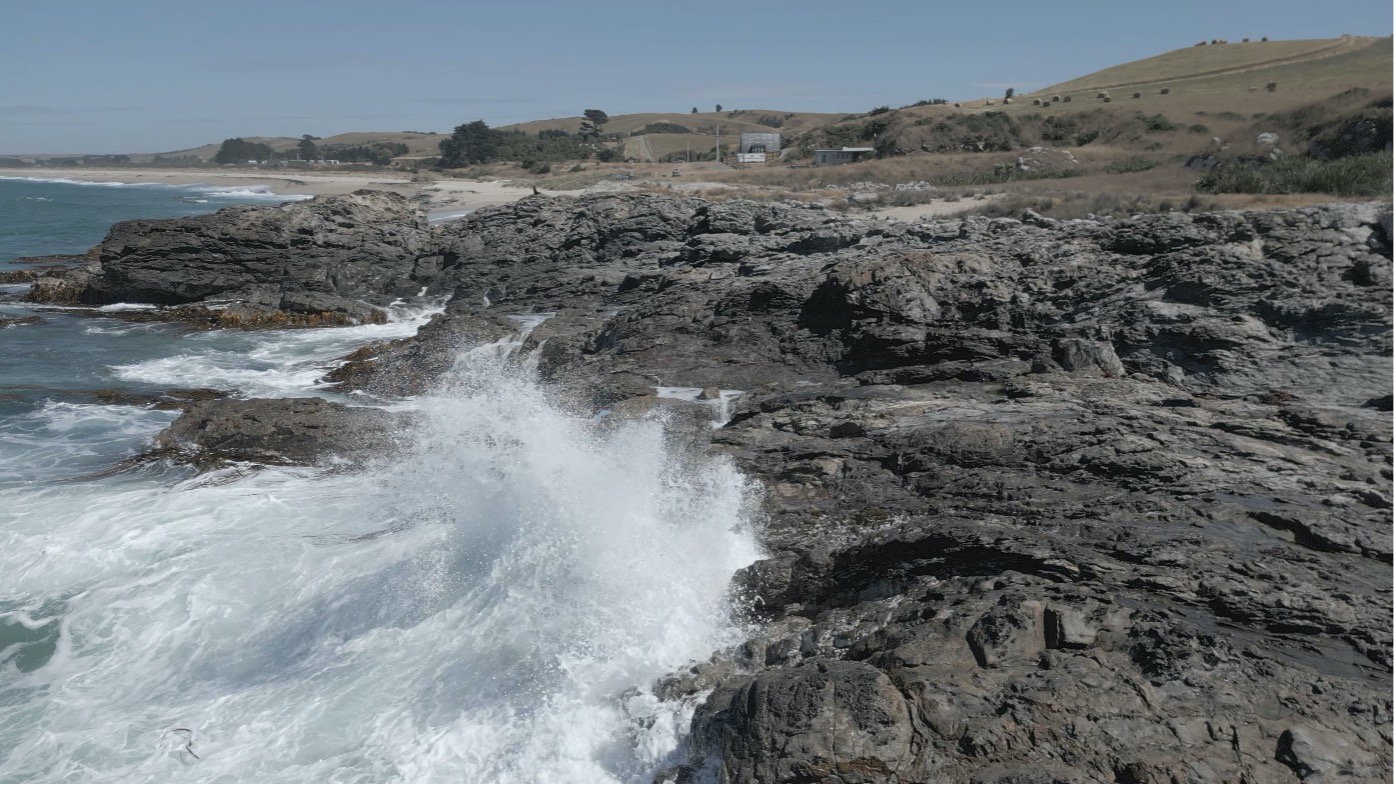
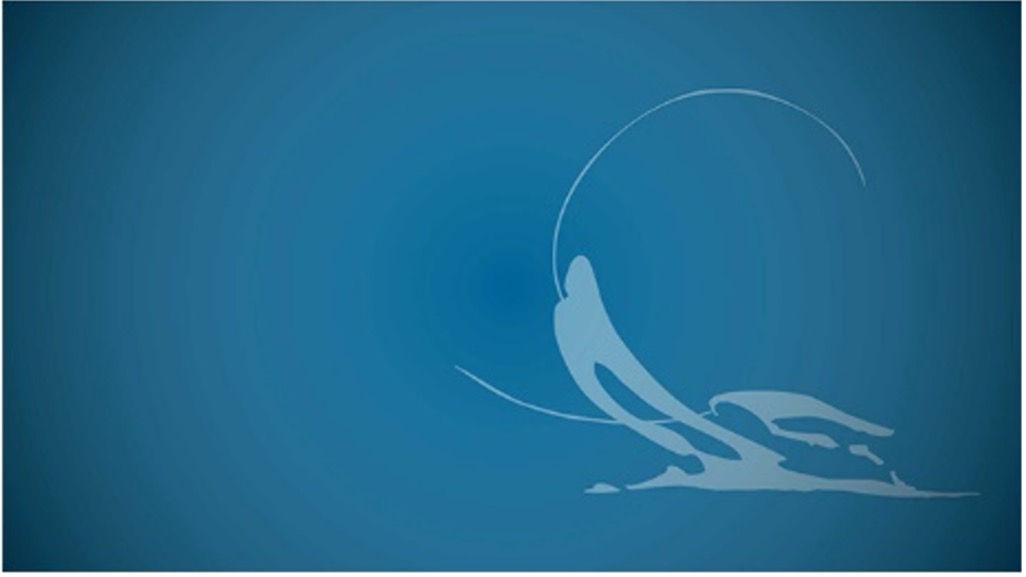
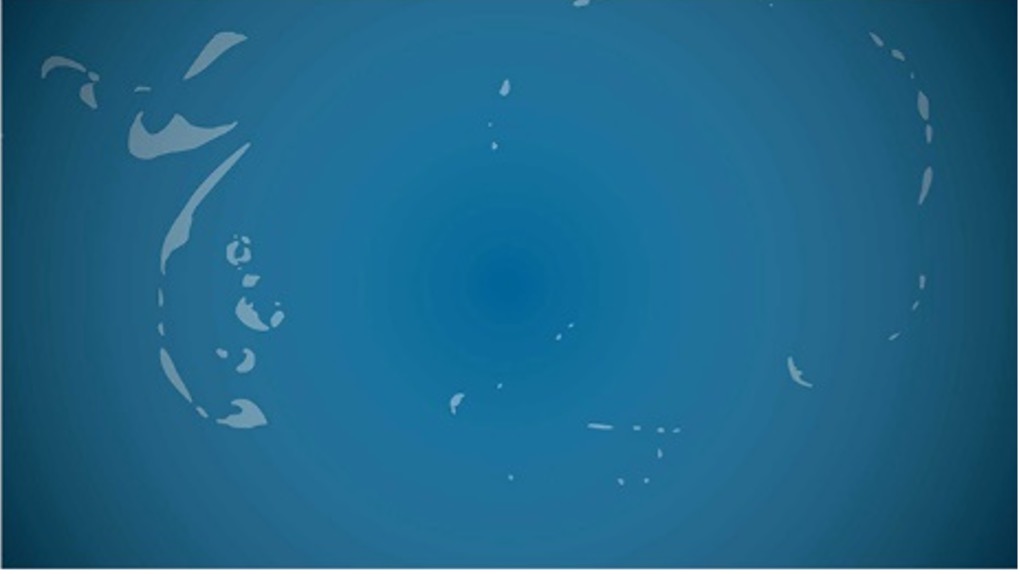
Large and high-energy splashes
In large-scale and high-energy splashes, the energy of the water's momentum is high enough to easily overcome the surface tension of the water. It will break up the water into many more tiny parts, giving it a foamy, highly vaporised, and frothy effect.
Play this clip (7 seconds) of a wave crashing against rocks. Animating this would be a hugely challenging task!
Design
You need to greatly simplify the design to animate the complex wave featured in the above clip.
Play this next clip (3 seconds) for an example of another large-scale wave crashing on the rocks. This footage will become your starting point for the simple design approach outlined below.
Select + to view three simple design steps for a large-scale wave effect using the clip above.
Copy the sourced image or video of the desired effect.
For example, take a screenshot of the wave reference.
Lower the opacity of the screenshot reference layer. In this example, the level of detail is reduced by at least 60%.
Then, on a fresh layer, draw over the reference image, simplifying the overall shapes of the wave.
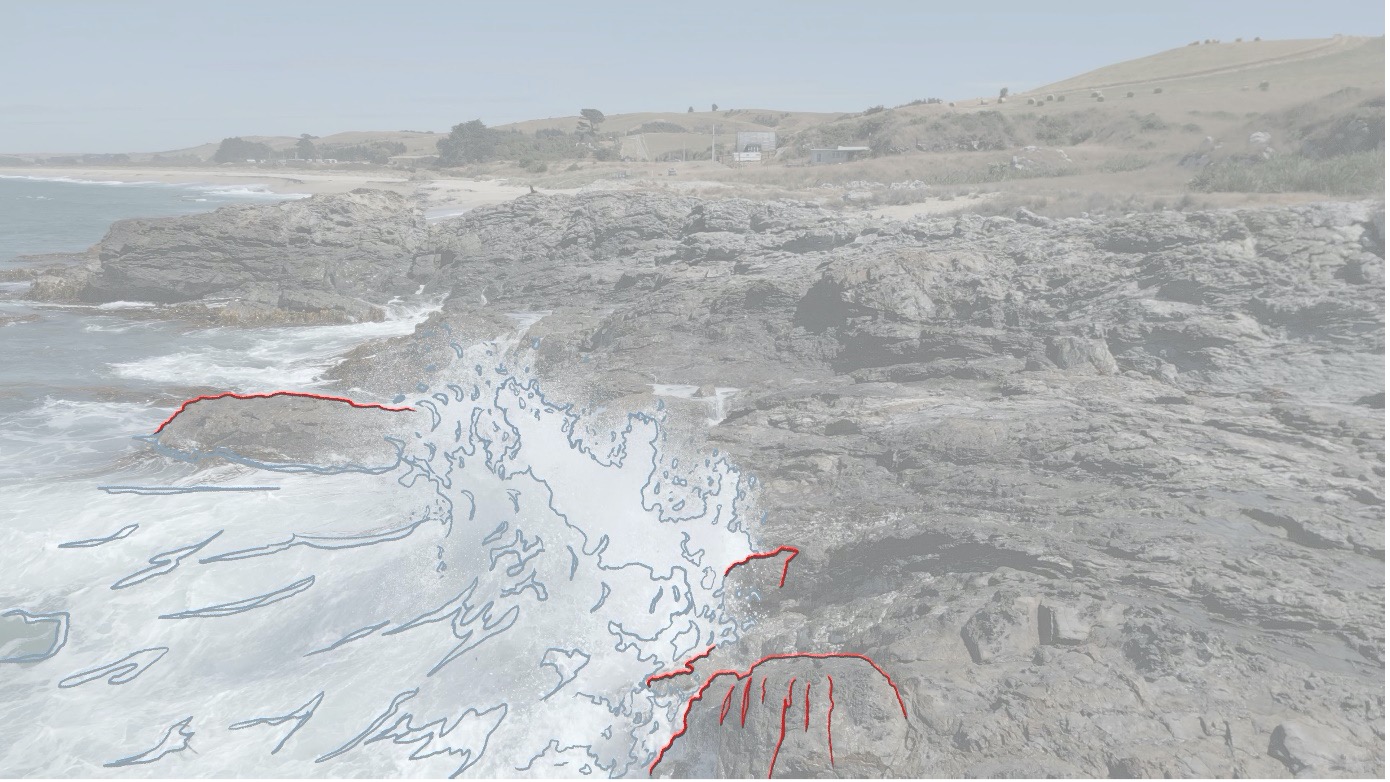
Remove the reference image.
You now have a great starting point to build your animation!
Explore the visual flair of animation through special effects like pops, trails, lightning, and electrical arcing. These effects inject dynamism into your frames, creating a visually engaging experience.
Pop effect
The pop effect is a fun and quick animation sequence.
It is useful for adding detail and nuance to a shot which needs an impact or a bit of extra business going on around another larger effect.
Timing
The pop is a short effect, usually only a few frames long – this image shows a sequence of 15 frames:
![[ADD IMAGE'S ALT TEXT]](/sites/default/files/Pop%20Effect.jpg)
The pop should appear and disappear quickly, leaving only a brief impression of it having been on-screen.
Play this clip (1 second) to see the pop in action.
Once you have your pop animated, you can get a lot of value from the sequence by simply duplicating the animated element, scattering it around the shot, and varying the start frame of each instance of the sequence.
Play this clip (2 seconds) to see an example of a duplicated pop.
Design
The design of a pop is where you can have fun and get inspired by nature's patterns, which you can then apply to the effect during the pop's breakup section.
In the first clip above, the breakup is like segments inside an orange or pomegranate. With some small adjustments to the design of the breakup portion, you can apply the pop to:
- ripples on a pond surface after a raindrop
- dusty hits from bullets striking a wall
- small firework explosions.
With imagination, the options are almost limitless!
Animating a pop sequence
Practice
Task 7: Animate a pop sequence
Build your special effects skills by designing and animating a quick and playful pop effect!
What tools or resources do you need for this task?
Make sure you have access to:
- Pencil and paper to plan your effect
- Toon Boom
- Drawing pen and tablet.
What steps should you take to complete this task?
2-4 Hours
Set aside 2-4 hours to complete steps 2-5 below. Remember to save your work as you go when using Toon Boom.
- Revisit the Pop effect section in this subtopic to reinforce what you know if you need to.
- Plan your pop sequence – use nature’s patterns to inspire you.
- Configure the scene in Toon Boom, ensuring a frame rate of 24/25fps and a resolution of 1920 x 1080.
- Design and animate your pop effect in Toom Boom.
- Refine your animation and export it as an MP4.
What should you do after completing this task?
- Reflect on the challenge of animating your pop effect with its short duration. How did you approach timing to ensure the pop appeared and disappeared quickly, leaving a brief yet impactful impression?
- Share your pop effect to forum:
- Select your forum thread in Forum: Effects Animation.
- Select Reply to your first Forum post.
- Enter the words ‘Task 7: Pop' in your new post.
- Select the Post your response button, then select Edit in your reply when it shows up.
- Upload your MP4 using the Attachment field.
- Select Save changes to share your coursework to your forum thread.
- Get feedback on this and other learning tasks at the next Live Session – check the Live Session calendar for dates and times.
When you’re ready, move to the next section and learn how to design and animate a trail sequence – an ideal special effect for emphasising swift movements of characters and objects!
Trail effect
You can use the trail effect when characters or objects suddenly zip by the camera or suddenly go from a standing start to off-screen, in the style of Road Runner or Wile E. Coyote.
Play this clip to see a trail in action.
Key stages of a trail effect
Select + to view four stages of the trail effect from the clip above.
This image shows the effect forming. It grows/builds from nothing. As shapes are introduced, they will move along a designed path. The entire effect lasts two seconds.
This image shows the effect’s path. It will be the ‘lasting’ picture of the effect, the image that burns into your mind, even once it has gone.

This image shows the effect starting to break up. The shapes will break up according to their size (e.g. larger shapes will take longer to vanish altogether) and position along the path (e.g. the first shapes introduced along the path will dissipate earlier).

This shows the middle stages of the effect breaking apart and dissipating. The first shapes introduced earlier along the path are almost gone. The most recent shapes along the path are still mid-way through their break up and will continue dissipating until they are gone (over 30 frames).
Design
Now that you’ve got familiar with the key stages of a trail effect, how can these stages drive a trail’s design?
Effect’s path
You should start creating this effect by designing a strong image of the path that the effect will take. Spend time on the design and try to develop a single interesting and appealing frame.
As mentioned. the effect's ‘path’ will be the effect’s lasting picture, the image that burns into your mind, even once it's gone.
Effect forms
Once you have your path key frame done, you can then create the animation around it. You need to think about how the effect is going to form.
- Does the path form as a character or object zips by?
- Is it from something starting within the frame (like the clip above)?
In the example above, the effect builds as if the character or object has sucked some of the ground dust or vapour off the surface from where it starts.
Effect starts to break up, then dissipates
You can handle the effect's dissipation much like the dissipation of smoke or mist, where the path breaks up slowly according to its size.
Larger parts break up into smaller and smaller parts and take longer to disappear than the smallest parts. The key thing to remember is that only some of the effect disappears at the same time.
Try to ensure that the dissipation is varied over the whole path.
Timing
The trail's formation happens very quickly. The dissipation should take longer and disappear at a slower rate.
This contrast in the fast and slow timing of the effect will add even more appeal to the shot.
Animating a trail sequence
Watch Geoff animate a smoke trail sequence in three videos, located in the playlist below. Use the hamburger icon in the top right of the playlist to access the video menu.
These videos help you complete Task 7: Animate a trail sequence below.
Practice
Task 8: Animate a trail sequence
Boost your growing special effects experience, and design and animate a trail effect that zips around the screen!
What tools or resources do you need for this task?
Make sure you have access to:
- Pencil and paper to plan your effect
- Toon Boom
- Drawing pen and tablet.
What steps should you take to complete this task?
6-8 Hours
Set aside 6-8 hours to complete steps 2-7 below. Remember to save your work as you go when using Toon Boom.
- Revisit the Trail effect section in this subtopic to reinforce what you know if you need to.
- Watch Geoff’s three videos, carefully observing his planning and design techniques to animate a trail sequence in Toon Boom.
- Plan your trail sequence, considering the key stages of a trail effect.
- Configure the scene in Toon Boom, ensuring a frame rate of 24/25fps and a resolution of 1920 x 1080.
- Design and animate your trail sequence in Toom Boom.
- Check the timing of the trail, considering its sudden formation, longer dissipation, and slow disappearance.
- Refine your animation and export it as an MP4.
What should you do after completing this task?
- Consider the impact of your trail sequence. How did your design of the trail's path enhance its visual appeal, and what creative decisions did you make in forming and dissipating the effect?
- Share your trail effect to forum:
- Select your forum thread in Forum: Effects Animation.
- Select Reply to your first Forum post.
- Enter the words ‘Task 8: Trail' in your new post.
- Select the Post your response button, then select Edit in your reply when it shows up.
- Upload your MP4 using the Attachment field.
- Select Save changes to share your coursework to your forum thread.
- Get feedback on this and other learning tasks at the next Live Session – check the Live Session calendar for dates and times.
Now, launch yourself into this subtopic’s final section on special effects and hold tight as you enter the exciting, dynamic world of lightning and electrical arcing!
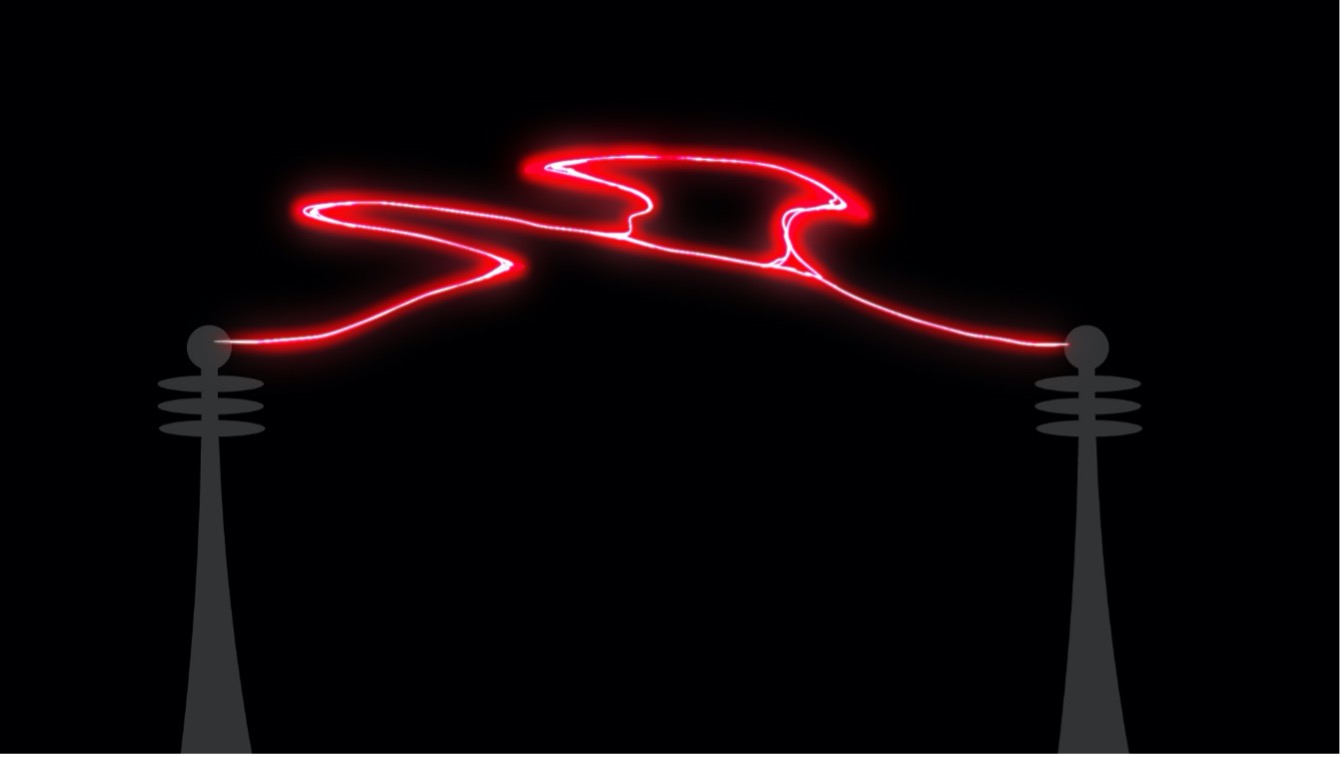
Lightning and electrical arcing
Lighting is another extremely rewarding effect to animate. As with the trail effect, the ‘lasting picture’ design of your main key position for the electrical effect is the effect's most important part.
Play this video (54 seconds, on loop) to see a lightning effect in action – it’s positively brimming with fantastic electrical effects for your viewing pleasure!
Reference: Elec_2D 2 from Matthieu Petit on Vimeo.
Design
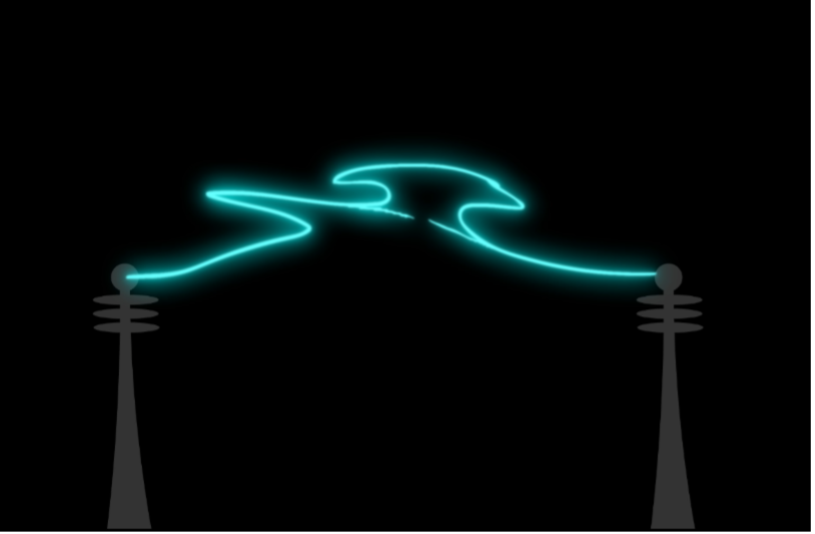
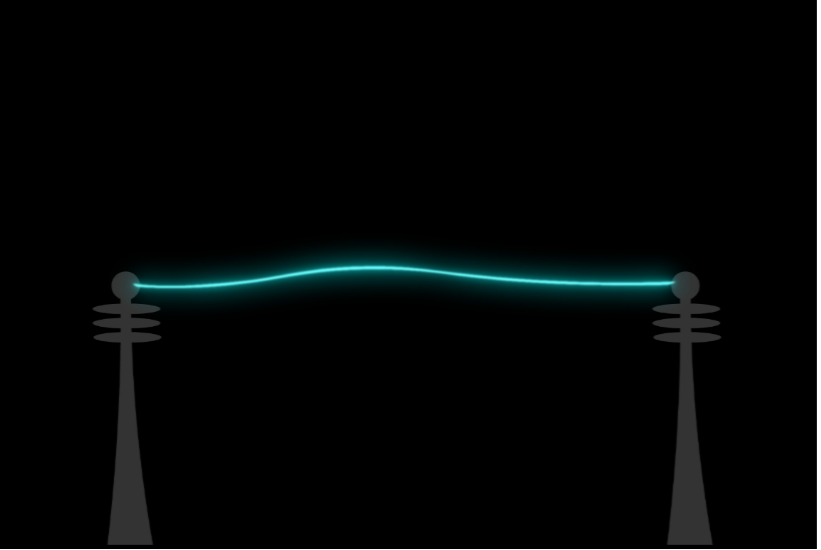
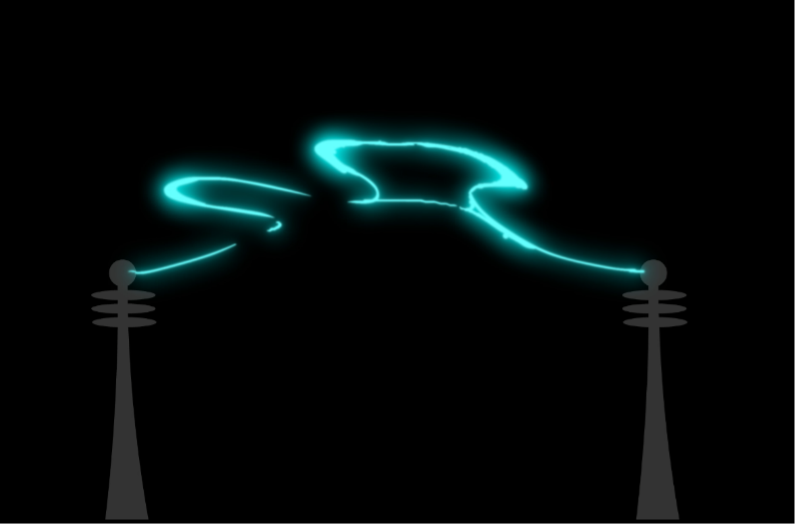
Any electrical effect you design should be as asymmetrical as possible. When creating the key design, try to think about the massive amounts of energy the arc is channelling! Select + to view five steps to design an arc between two points, a simple way to start.
Sketch some ideas for the electrical arc or lightning bolt that you would like to animate. Create as many different arcs as you like, trying each time to produce new and interesting arc paths.
Swipe through these three images for inspiration.
Try to incorporate:
- asymmetry
- varying line weighting
- contrast between sharp curves and straight sections
- S curves.
Are there any opportunities to include some forking in the design where the arc takes multiple routes to get from one side to the other?
Try different effect colours:

To help sell the electrical effect, you can add more detail to the design by adding a fine line of a lighter colour or pure white down the centre of the arc.
This detail helps to simulate the extremely hot and energetic centre of the arc.

Add a glow in an appropriate colour to the effect.
For this image, two glows were applied using Adobe After Effects:
- The first glow accentuates and makes the interior arc colour more intense.
- The second glow is applied behind the arc and creates a halo effect around the design.
Once you have decided on a sufficiently interesting arc design, you can start to make it move!
Practice
Task 9: Design a series of arc key shapes and colour treatments
Feel the power and apply your special effects skills to a series of arc shapes and colour treatments. This design-focused learning task prepares you for animating an electrical sequence later in this subtopic, adding a vibrant spark to your animation repertoire.
What tools or resources do you need for this task?
Make sure you have access to:
- Pencil and paper to plan your effect
- Toon Boom
- Drawing pen and tablet.
What steps should you take to complete this task?
1 Hour
Set aside one hour to complete steps 1-6 below. Remember to save your work as you go when using Toon Boom.
- Sketch various concepts for the electrical arcs you intend to animate. Experiment with different arc paths to create visually engaging designs.
- Using Toon Boom, incorporate design elements such as asymmetry, line weighting, shape contrasts, S curves, and forking.
- Try out different effect colours to enhance the visual impact of your electrical arc.
- Add finer details to your design, such as a light-coloured or pure white line down the centre of the arc.
- Introduce glows in appropriate colours to elevate the effect.
- Check your design and export it as a JPEG.
What should you do after completing this task?
- How did design elements such as line dynamics and colour variation contribute to your electrical arcs' appeal and energy? What challenges do you anticipate when translating these static designs into dynamic lightning animation?
- Share your design to forum:
- Select your forum thread in Forum: Effects Animation.
- Select Reply to your first Forum post.
- Enter the words ‘Task 9: Arc design' in your new post.
- Select the Post your response button, then select Edit in your reply when it shows up.
- Upload your JPEG using the Attachment field.
- Select Save changes to share your coursework to your forum thread.
- Get feedback on this and other learning tasks at the next Live Session – check the Live Session calendar for dates and times.
Ready to infuse life into your series of electrical arcs? Buzz into the next section of this subtopic, where you'll learn how to set precise timing for your arc sequence and animate your dynamic, spectacular, special effect.
Timing
An electrical arc will appear and dissipate extremely quickly, and each arc or strike will usually only last for approximately 10 -20 frames.
You should animate all electrical effects on ones, i.e., one drawing per frame.
Select + to analyse one of the smaller arc animation sequences from the clip you played at the start of this subtopic.
This sequence is a total of 8 frames before it disappears from the screen.
The arc – a straight line – establishes itself straight away in frame 1 with no build-up.
![[ADD IMAGE'S ALT TEXT]](/sites/default/files/Frame%201.jpg)
Frame 2 is an in-between from frame 1 to frame 3.
A 'Gap' has been left in the spacing between the positions of frame 1 and frame 3 so that the arc's design strongly favours the main key shape in frame 3.
The Gap will add impact to the energetic movement of the arc.
![[ADD IMAGE'S ALT TEXT]](/sites/default/files/Frame%202.jpg)
Frame 3 is the main key shape of the arc effect.
The arc has been drawn with:
- a nice horizontal S-curve design with some splitting and forking along its length.
- variation to its thickness, which makes for a more appealing design.
![[ADD IMAGE'S ALT TEXT]](/sites/default/files/Frame%203.jpg)
In frame 4, the key shape starts to break up.
The drawing continues to move in the direction established by the first three frames and continues to favour the design of the arc’s main key shape.
![[ADD IMAGE'S ALT TEXT]](/sites/default/files/Frame%204.jpg)
Swipe through these final frames (i.e. frames 5-8) of the sequence to see how the arc shape continues to break up and move in the direction established in frames 1-3.
Note: Frames 7 and 8 appear almost identical.
Animating an arc
Play this clip (2 seconds) to see an arc animation in action.
Use a formula and create your own
Now, have a go at creating your own arc animation! Select + to follow a four-step formula.
Draw your main key position. You can use one of your drawings from Task 8: Design a series of arc key shapes and colour treatments or create a new drawing.
Here's an example of the main key position from the above clip:
Draw one or two frames preceding the main shape key to start forming the main arc position.
Remember that the formation drawings should leave a spacing gap between the formation stage and the main key arc stage for some impact.
After the main arc position, push the arc further in the direction established by the formation frames. Start to break up the arc shape.
Continue to break up the effect over the next two to three frames. Be sure to continue the movement established by your first three frames.

Tip
Mix up the formula and create another shot!
Want to add more contrast and interest to your timing, preventing your first shot from looking stale? Have a go at creating another arc animation following steps 1-2 in the above formula. Then, follow these three different steps:
- Instead of breaking up the arc at step 3, keep the arc unbroken and create a new arc key position with a spacing gap between the first and second key shapes. The animation will appear to jump between the shapes.
- Remember to add in-betweens that favour the new key shape to help cushion the sudden moment.
- Then, break up the new key shape over the next few frames or continue the animation by adding another key shape.
Large arcs or lightning strikes
Play the following two clips to compare an animated lightning strike.
This clip (1 second) does not have a white card and a black card added to the animation.
This next clip (1 second) has a white card and a black card added to the animation.
Which clip appeals to you the most?
With large arcs or lightning strikes, and to simulate the flash of the blast, consider adding a white card and a black card on successive frames after the strike.
The screenshot below shows that the FX animation continues after the flash. This sequence ensures that you do not lose two of your animated frames.
![[ADD IMAGE'S ALT TEXT]](/sites/default/files/Frames.png)
Animating an electrical sequence
Watch Geoff design and animate an electrical sequence in this video, which will help you complete Task 10: Animate an electrical sequence below.
Practice
Task 10: Animate an electrical sequence
Embark on the electrifying culmination of your special effects animation journey. In this topic’s final learning task, you'll breathe life into your designed electrical arc sequence. Navigate timing and effects animation techniques to create a stunning portrayal of raw energy and power!
What tools or resources do you need for this task?
Make sure you have access to:
- Your design for arc shapes and colour treatments
- Toon Boom
- Drawing pen and tablet.
What steps should you take to complete this task?
4-6 Hours
Set aside 4-6 hours to complete steps 2-8 below. Remember to save your work as you go when using Toon Boom.
- Revisit the Timing and Animating an arc sections above to reinforce what you know if you need to.
- Refer to the design that you completed in Task 9: Design a series of arc key shapes and colour treatments and use this design to guide your animation.
- Watch Geoff’s video, carefully observing how he designs and animates an electrical arc sequence in Toon Boom.
- Configure the scene in Toon Boom, ensuring a frame rate of 24/25fps and a resolution of 1920 x 1080.
- Set the timing of the electrical arcs, considering how these will appear and dissipate extremely quickly, with each arc only lasting for approximately 10 -20 frames. Animate all electrical effects on ones.
- Use the suggested four-step animation formula in the Animating an arc section above to create your electrical arc sequence.
- Consider inserting white and black cards to simulate lightning strikes.
- Refine your animation and export it as an MP4.
What should you do after completing this task?
- How did your approach to timing contribute to the realistic appearance of the electrical arcs, considering their brief and rapid nature? How did the overall effectiveness of your animated sequence benefit from the specific design choices you made earlier?
- Share your electrical arc effect to forum:
- Select your forum thread in Forum: Effects Animation.
- Select Reply to your first Forum post.
- Enter the words ‘Task 10: Arc FX' in your new post.
- Select the Post your response button, then select Edit in your reply when it shows up.
- Upload your MP4 using the Attachment field.
- Select Save changes to share your coursework to your forum thread.
- Get feedback on this and other learning tasks at the next Live Session – check the Live Session calendar for dates and times.
Congratulations on completing the final learning task of this Effects Animation topic. You've honed your skills in design, timing, and animation, and now it's time to apply these techniques to create a captivating effects sequence.
As you move forward, continue experimenting with different elements, push your creativity, and explore new possibilities to bring your animated sequences to life. Your journey in mastering effects animation has just begun!
In this Effects Animation topic, you’ve explored how effects animation allows for a focus on abstract shapes and freer movement. You’ve:
- built your skills in collecting reference materials to help translate your observations into animated effects
- considered factors to depict various physical processes such as airflow, wave-like motion, flame movement, and surface tension
- used planning and design approaches to animate realistic effects, such as dust clouds, smoke plumes, campfires, and water splashes
- crafted special effects by creating sequences for pops, trails, and lightning.
As you continue your journey in animation, remember to harness the skills and techniques you’ve gained in this topic to elevate your future projects with captivating, realistic animated sequences.
Reflect on what you’ve learnt, practised, and achieved
As you wrap up this topic, take a moment to reflect on what you've learnt, practised, and achieved by completing the various learning tasks in this topic.
You've dived deep into animating different effects. Consider how your emerging skills are now valuable tools in your creative arsenal. Harness these techniques to infuse life and dynamism into each frame, guiding your animation towards impactful, visually stunning creations. Keep pushing the boundaries of what's possible!
| # | Learning Task Name | Duration (Hours) | |
|---|---|---|---|
| 1 | Create thumbnails, drawings and notations | 2 | |
| 2 | Animate a dust cloud | 8 | |
| 3 | Animate a smoke plume | 6 | |
| 4 | Animate a campfire | 8 | |
| 5 | Animate a small splash effect with no depth | 6 | |
| 6 | Animate a small splash effect with depth | 8 | |
| 7 | Animate a pop sequence | 4 | |
| 8 | Animate a trail sequence | 8 | |
| 9 | Design a series of arc key shapes and colour treatments | 1 | |
| 10 | Animate an electrical sequence | 6 | |