Character animation is the heart and soul of storytelling in animation, bringing life and personality to the characters that drive stories. Mastering character animation relies on your growing knowledge of anatomy, emotion, and movement to create compelling performances.
In this topic, explore the techniques and principles that breathe life into animated characters. From manipulating character rigs to understanding the nuances of body mechanics, this topic equips you with the skills needed to animate characters that resonate with audiences.
You'll learn how to plan character animations and use Maya to bring them to life. From shot setup to blocking out key poses to polishing you'll discover the iterative process of crafting dynamic character performances.
Subtopics that you can explore
In this Character Animation topic, you’ll explore six key subtopics, each offering valuable insights and techniques to elevate your animation game. These subtopics are:
- Character Rigs
- Animation Workflow
- Maya: Shot Setup and Animation Basics
- Body Mechanics
- Acting-Based Mechanics
- Acting With Dialogue
![[ADD IMAGE'S ALT TEXT]](/sites/default/files/Characters_0.jpg)
Learning tasks that will help you develop and practise animation skills
Practice
Use your skills and build your knowledge
Dive into this topic’s learning tasks confidently – they're your stepping stones to getting to grips with animation techniques and principles. Completing the learning tasks will build your character animation skills and bring your characters to vibrant life.
Look out for this PRACTICE box throughout this topic to identify learning tasks and resources, letting you know exactly what to do. The information below outlines what learning tasks to expect in Character Animation and how much time you should allocate to each one.
| # | Learning Task Name | Duration (Hours) | |
|---|---|---|---|
| 1 | Manipulate a character rig | 1 |  |
| 2 | Create 3 poses | 3 | |
| 3 | Plan and animate a ball toss | 8 | |
| 4 | Plan and animate a walk cycle | 8 | |
| 5 | Plan and animate a stand from a seated position | 10 | |
| 6 | Plan and animate a walk through a doorway | 12 | |
| 7 | Plan and animate a fence vault | 12 | |
| 8 | Plan and animate a run cycle | 8 | |
| 9 | Plan and animate a blast then fall backwards | 12 | |
| 10 | Plan and animate lifting a heavy object | 12 | |
| 11 | Plan and animate a sigh | 12 | |
| 12 | Plan and animate a dialogue scene | 16 | |
Feedback and support is woven through the learning tasks as you complete them. Reach out if you have any questions about what to do!
Step into the sandpit of character rigs, where you'll learn to use rig controls, explore various rig setups, and refine your skills in manipulating rigs to breathe life into your animation.
Explore
Bonnie 2
As you dive into this Character Animation topic, remember to unleash the potential of your character rig, Bonnie 2.
Your facilitator would have provided information about purchasing and downloading this character rig earlier in the course, so check with them if you’re unsure of what to do.
Why explore Bonnie 2?
- Learn hands-on: Put theory into practice by applying animation principles to Bonnie 2's movements in this topic’s learning tasks.
- Workflow familiarity: Get comfortable with rig controls and workflow skills essential for character animation.
- Unleash creativity: Bonnie 2 is more than just a rig – she's your canvas. Play, experiment, and bring your imaginative ideas to life!
Rig controls
When you first reference a character into your scene, it will appear in its default pose, usually a T pose or relaxed T pose like the character rigs below.
![[ADD IMAGE'S ALT TEXT]](/sites/default/files/Rig%20Controls.jpg)
Most basic character rigs generally have a similar-looking set of animation controls. Still, prepare to spend some time exploring each control, its range and channel options, and generally becoming familiar with the capabilities of each new rig you use.
![[ADD IMAGE'S ALT TEXT]](/sites/default/files/Character%20Rig.jpg)
Important
Turn off all selection modes except animation controls and curves!
By turning off all other selection modes, you won't accidentally select and move anything other than the animation controls (curves.)
The blue selection mode buttons are shown in Screenshot 1 above. These appear at the top, just below the drop-down menus. Curves are the third button from the left (represented by what looks like a backward S).
Switching control visibility
You can switch the visibility of controls on and off within the Show menu.
You can also add the controls to a layer and switch visibility on and off at the Display tab at the bottom of the channels window under Layers (see Screenshot 2 below).
![[ADD IMAGE'S ALT TEXT]](/sites/default/files/Screenshot%202_0.jpg)
Using Move and Rotate controls
Select + to view three examples of rig control.
Generally, you adjust controls by moving/translating (W) or rotating (E).
The Move control is represented by three small red, green, and blue arrows oriented along each X, Y, and Z axis. See Screenshot 3 below.
![[ADD IMAGE'S ALT TEXT]](/sites/default/files/Move%20Control.jpg)
The Rotate control is represented by three small rings/circles oriented along each X, Y, and Z axis. See Screenshot 4 below.
![[ADD IMAGE'S ALT TEXT]](/sites/default/files/Rotate%20Control.jpg)
Some controls are generally only used for rotations and would look unconventional, even silly (see Screenshot 5 below), if you moved them using their move/translate control.
![[ADD IMAGE'S ALT TEXT]](/sites/default/files/Unconventional%20Control.jpg)
Reference Editor and rig loading
Using the Reference Editor
When you prepare a project file for animation, always use the Reference Editor to load rigs into your scene.
This action prevents accidental changes from being made to the character rig, which may lead to the rig breaking and becoming unusable.
You can find the Reference Editor in File > Reference Editor.
![[ADD IMAGE'S ALT TEXT]](/sites/default/files/Reference%20Editor.jpg)
Loading a rig
You can then load a character rig into your shot by clicking on the Create Reference button and navigating to the character's location in your file
Tip
You can easily break rigs – not a good thing!
Always treat a rig as you would like to be treated – if you spun your neck around 360 degrees, you’d be dead!
Rig exploration
Each time you use a new rig, take time to explore it.
Once you’re familiar with the basic controls and what they do, try posing the character in different ways to see what it can achieve.
Always remember to tumble around the Viewport when posing characters to look at each pose from different angles. What looks good from one angle does not always look good when viewed from a different angle!
Manipulating a character rig
Watch Geoff create character references, manipulate and pose a character rig, and create a playblast across four videos, located in the playlist below.
These videos help you complete Task 1 below.
Practice
Task 1: Manipulate a character rig
Gain proficiency in manipulating the Bonnie 2 character rig within Maya to precisely control her movements into a relaxed standing pose.
What tools or resources do you need for this task?
Make sure you have access to:
- Autodesk Maya
- Bonnie 2 character rig.
What steps should you take to complete this task?
1 Hour

Set aside one hour to complete steps 2-6 below. Remember to save your work as you go when using Autodesk Maya.
- Revisit the information in this Character Rigs subtopic to help you work through this learning task at any point.
- Watch Geoff’s four videos, observing how he creates character references, manipulates and poses the Bonnie 2 rig, and creates a playblast of his animation.
- Load the Bonnie 2 rig into your scene via the Reference Editor.
- Familiarise yourself with the Bonnie 2 rig controls to understand their functions and ranges.
- Experiment with posing Bonnie 2 in various positions to achieve a relaxed standing pose.
- Evaluate the pose for accuracy and realism using different camera angles to ensure balance, asymmetry (which is a good thing!), and a clear line of action.
What should you do after completing this task?
Spend a couple of minutes thinking about any difficulties you encountered posing Bonnie 2 into the relaxed standing position. What discoveries did you make during this exploration process that will influence how you pose characters in the future?
Now that you've practised manipulating a character rig, find out about planning and poses in the next subtopic, Animation Workflow, where you'll create three essential character poses using Bonnie 2.
Discover the fundamentals of animation workflow, from storyboards and layouts to posing characters, as you practise creating three essential poses.
Planning materials
When starting a new shot, a character animator is given a series of planning materials to help inform their work, guide a given shot, and ensure they can complete the scene within the project's requirements.
Planning materials include:
- storyboards
- animatics
- layouts and previsualisations.
Whether you're working in 2D or 3D production, these planning materials also give you a very good idea of the timing and sequence of events and actions in each shot.
Storyboards
A storyboard is a series of drawings that show a sequence of shots.
![[ADD IMAGE'S ALT TEXT]](/sites/default/files/Storyboard.jpg)
The storyboard drawings are often rough, with notations that detail the shot or scene's action, camera movement, and dialogue.
![[ADD IMAGE'S ALT TEXT]](/sites/default/files/Storyboard%20Shot.jpg)
Once storyboards are completed and approved, they are often used to make the next type of planning material – the animatic.
Animatics
The animatic is a preliminary version of the final film, created using rough storyboard drawings with some added detail and basic movement.
The animatic gives a particularly good idea of the flow of the film's production from a pacing and story viewpoint. It helps inform the director and story team if the film is clear and flows well for the audience.
Watch this short video from Didier Animations, which shows an animatic for the ending credits from Despicable Me 2 (2:35m).
The animatic often goes through several revision stages, where the team work out problems with the story before moving on to the next stage.
Layout and previsualisation
Artists use the storyboards and animatic as a guide to creating layout and previsualisation versions for each shot or scene in a production.
In 2D productions, the layout drawings show where the action happens in each scene and detail precisely any camera movement and action that happens in the scene.
Background creation
The layout backgrounds are drawn at their final size and sent to the background department to be painted.
In the example below, the background has been drawn at full size over several pieces of paper:
![[ADD IMAGE'S ALT TEXT]](/sites/default/files/Background%20Example.jpg)
The full-size background is then used to plot where the camera is positioned.
Camera movement
In the background example above, you can see that the camera:
- Starts at position A, focussing on the balcony
- Moves down the building to and across the street, moving through positions B and C
- Finishes at position D.
Character positions
The character positions and posing can then be worked out using the background and camera position information.
The layout materials for a shot can include several distinct positions that the character or characters need to hit to advance the story in the shot. In the background example above:
- A character starts on the balcony looking down on the street below,
- Several other characters are in the shot at various positions in the background.
- The background is revealed as the camera pans across the scene.
Shot blocking
In 3D production, each shot is blocked out using low-resolution proxy versions of the assets required to make up the shot.
Camera position and movement are finalised and then locked down, and the characters are given basic movement and posing based on the storyboards.
Want to see 3D planning materials in action? Watch this short video from 3D Animation Internships, which shows a layout and previsualisation reel for Despicable Me 2 (1:53m).
Here’s another short video from 3D Animation Internships, which shows a layout a reel for Monsters University (4:08m).
Explore
Here be dragons
Swipe through the four images below – storyboard, rough layout, final layout, and lighting. How do aspects of the information you’ve read above relate to each image?
If you feel like it, quickly leap backwards to the Art and Animation Basics topic and re-discover the animation pipeline from this new perspective. How has your understanding of pre-production and production stages evolved?
Remember to keep your learning journey dynamic by exploring and re-exploring the huge reservoir of knowledge you're gaining along the way, and to follow the breadcrumbs!
1. Foundations > 1.4 Art and Animation Basics > 1.4.1 Traditional 2D Animation Basics > Animation pipeline
Poses
After reviewing the planning materials, the animator must create rough poses for the character(s) and start animating the shot.
The animator starts with the blocking poses for the shot.
Using reference
Look at reference material to start your initial pose ideas. You can find numerous reference materials online.
You can also take a photo or video of you acting out the required pose or performing the required action from the angle specified in the storyboards or layout material.
Analyse the reference
Once you have your reference materials, review the image or video and pay attention to the angles and shapes (including the negative shapes) created by the hips, shoulders, spine, torso, and limbs.
Observe the changes in these areas over time if you are examining video reference. For example:
- Does the angle of the hips or shoulders change at all?
- Where is the weight of the pose?
Identify key areas in reference
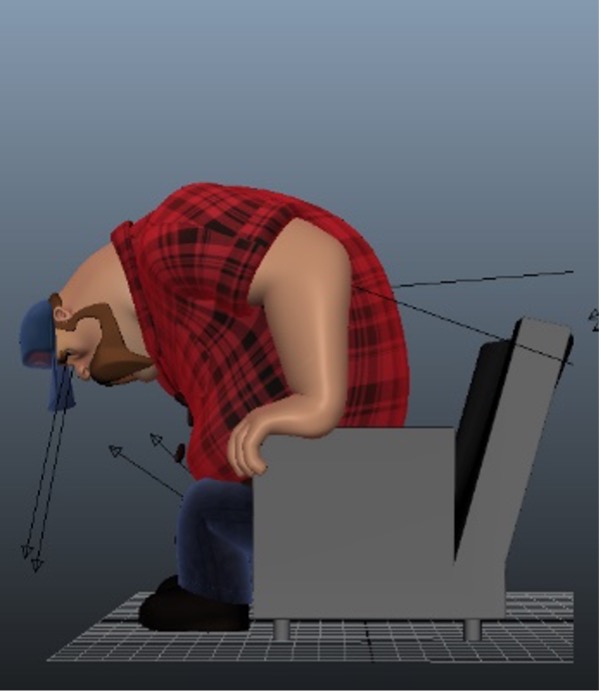
In the reference image below, three areas can be identified:
- The line of action describes a nice fluid S-curve that runs down through the head, torso, pelvis, and into the weight-bearing leg.
- The angle of the hips and shoulders is like a horizontal V.
- The weight of the pose feels balanced and well-grounded, with the centre of the head and torso nicely over the feet.
![[ADD IMAGE'S ALT TEXT]](/sites/default/files/Angles%201.jpg)
Enhance poses from reference
It is never a good idea to use reference as is. Instead, try to enhance the reference and push it further. In the above example, to create a more dynamic-looking pose, the:
- S-curve is accentuated in the line of action
- V shape (that the hips and shoulders describe) is increased.
While pushing the pose this way, the pose does not feel off balance or lose the sense of connection with the weight transferring onto the ground.
Accentuate the silhouette
Another area you want to accentuate or make clearer is the silhouette. Doing a good job at this will help your poses and animation read better at a glance.
![[ADD IMAGE'S ALT TEXT]](/sites/default/files/Silhouette.jpg)
Posing
Using what you have learned from your reference, the first task as a character animator that you must complete is to manipulate the rigid default position of the freshly imported character rig into the pose or poses required for a given shot.
While doing this, you must also inject as much life and vitality into the character as possible!
When posing characters, you'll find that the principles you have applied and the skills you have practised during the previous Foundations module are equally relevant and transferrable to:
- your character's pose design
- the manipulation process of posing your character.
Posing workflow
When posing your character, it is good practice to start posing it from the root control and then move up through the character control hierarchy.
Follow this five-step workflow when posing your character:
- Start with the main positioning and scale control (the root control).
- Move on to the controls for the hips, spine, and shoulders.
- Progress to the head controls, ignoring facial features for now. Focus on achieving the body pose.
- Adjust the controls for the arms and legs.
- Conclude by working on the controls for wrists, hands, fingers, and feet.
Tip
Precision in motion
When manipulating the controls, try to move the controls using only one axis at a time. Do not use the universal control where you can simultaneously move or rotate a control in the X, Y, and Z axes.
Using one axis at a time will help avoid gimble lock errors where a character appears to go haywire when moving from one pose to another.
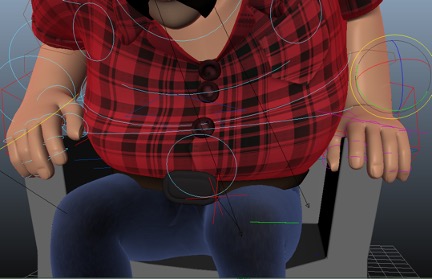
Facial expressions
Start working on the character's facial expressions using the facial controls – but only once you have the body posed and looking grounded and balanced, with a clear silhouette.
Many animators will only pose the expression to a basic extent during the blocking stage of animation, preferring to work on the character's facial animation in later animation stages.
![[ADD IMAGE'S ALT TEXT]](/sites/default/files/Facial%20Expressions_0.jpg)
The same principles apply to facial expressions as to the main pose of the character. Try to make the expression as clear as possible so you can tell what the expression is at a glance.
Look in a mirror and make the expression for yourself. Take note of the areas of your face that are moving when making an expression:
- Where are squash and stretch in the fleshy parts of your expression?
- How do your eyebrows move in relation to each other?
Practice
Task 2: Create three poses
Develop your pose creation and rig manipulation skills by creating three poses—sitting, walking, and throwing a ball—using Bonnie 2 in Maya, fostering your versatility in character animation.
What tools or resources do you need for this task?
Make sure you have access to:
- Autodesk Maya
- Bonnie 2 character rig.
What steps should you take to complete this task?
2-3 Hours
Set aside 2-3 hours to complete steps 2-10 below. Remember to save your work as you go when using Autodesk Maya.
- Revisit this Animation Workflow subtopic to help you work through this learning task at any point.
- Look for reference materials online or take reference photos or videos to help create your initial pose ideas. Analyse the reference materials, paying attention to angles, shapes, and weight distribution in the poses.
- Aim to enhance and push the poses further for more dynamism. Accentuate the key elements such as the line of action, silhouette, and weight distribution to create more impactful poses.
- Import the Bonnie 2 character rig into Maya and begin posing the character according to the three poses i.e. sitting, walking, and throwing a ball.
- Create a cube primitive in Maya to serve as a prop for the sitting pose. Position and scale the cube appropriately to simulate a surface for the character to sit on.
- Use the rig controls to manipulate the body parts, starting from the root control and moving up the hierarchy.
- Follow a structured workflow when posing Bonnie 2, starting with main positioning and scale control and progressing through the body parts systematically.
- Begin working on the Bonnie 2’s facial expressions using facial controls once the body poses are established and balanced. Experiment with various facial expressions, making them clear and easily recognisable.
- Review each pose and refine them further based on the following criteria:
- Is there a clear line of action?
- Is there a feeling of weight?
- Is the character balanced?
- Is the silhouette clear?
- Can the pose be pushed further?
- Take screenshots of each pose from multiple angles once you’re happy with the three poses.
What should you do after completing this task?
- Consider the impact of subtle adjustments on the poses. How did minor tweaks influence the clarity of the silhouettes, the perception of weight, and the overall visual appeal of the poses? Were you able to push the poses even further?
- Share your three poses to forum:
- Select your forum thread in Forum: Character Animation.
- Select Reply to your first Forum post.
- Enter the words ‘Task 2: Poses’ in your new post.
- Select the Post your response button, then select Edit in your reply when it shows up.
- Upload your screenshots using the Attachment field.
- Select Save changes to share your coursework to your forum thread.
- Get feedback on this and other learning tasks at the next Live Session – check the Live Session calendar for dates and times.
Now that you have created three dynamic poses using Bonnie 2 in Maya, it's time to dive deeper into character animation. Explore the next two subtopics – Maya: Shot Setup and Animation Basics and Body Mechanics – where you’ll learn essential techniques to make your characters spring to life with energetic and fluid motion

This subtopic guides you in optimising your animation workflow for seamless and effective character animation in Maya. It describes the initial shot setup and subsequent animation processes you go through each time you add a new scene for your shots.
Maximise your searching – use your Find function!

Take advantage of the Find function on your PC (Ctrl + F) or Mac (Command + F) device to quickly locate this topic’s main sections.
Use the following key words:
- Shot camera
- Workspace setup
- Basic render settings
- Adding key frames
- Graph Editor
- Plugins
Important
Get ready to make Bonnie 2 move!
This Maya: Shot Setup and Animation Basics subtopic prepares you for animating lifelike character movements with Maya. Although it doesn't have specific learning tasks, consider it your toolkit introduction to some key setup tasks and processes for animating with Maya.
Mastering shot setup, animation basics, and understanding Maya's essential features here will set the stage for the next subtopic – Body Mechanics.
Why it matters:
- Navigate smoothly into Body Mechanics armed with the technical information you can refer to here.
- Learn how to use Maya to set up shot cameras, customize workspaces, tweak render settings, and add key frames efficiently.
- Use this subtopic as your go-to guide during Body Mechanics learning tasks.
Bonnie 2 is waiting to come to life and throw a ball, run fast, walk through a doorway, lift a weight, and vault a fence!
Shot camera
A well-established shot setup in Maya is the foundation for a coherent and visually compelling character animation, helping you align it with the storyboard and layout. It’s important to lock your shot to allow you to concentrate on perfecting character poses and movements from a set camera angle.
Use the following information to set up and lock a shot camera.
Shot camera setup
To set up a shot camera:
- Create a new camera in your scene (Create > Cameras > Camera).
- Rename the camera 'ShotCam'.
You can then frame up the character as the storyboard and layout require.
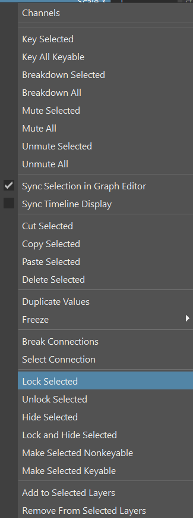
Camera locking
Once you're happy with the composition of your shot, lock the camera so it does not accidentally move:
- Select the translate fields in the channel box by right-clicking your mouse:
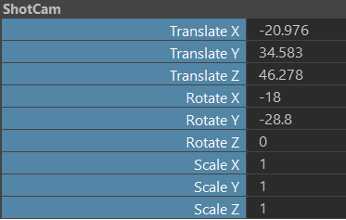
- Select Lock Selected from the options:
Animation workspace setup
Setting up an animation workspace in Maya enhances your workflow by:
- providing specialised views,
- optimising your screen space
- ensuring consistency.
Your workspace contributes to a smoother animation process and helps you focus on refining character poses and movements.
Use the following information to optimise your animation workspace and manage the viewport.
Optimised workspace
When working on an animation shot, it’s advisable to include the Perspective Camera view in your workspace and a locked Shot camera.
1. Using Perspective Camera view
Use the Perspective Camera view to move around the character.
Use it to also select and manipulate:
- various controls
- the camera (i.e., ShotCam) that generates the final animation and any playblasts.
2. Default and custom workspaces
Maya has a default animation workspace. It includes the
- Outliner
- Perspective Camera
- Graph Editor.
Choose from the default workspaces and save your own layouts using the workspace dropdown menu in the top right-hand corner of the screen:

Viewport management
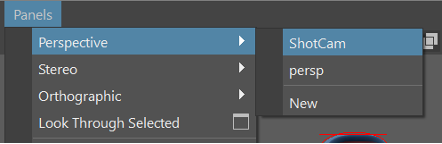
1. Changing camera view
To change the camera view in the viewport, middle-mouse click and drag the desired camera from the Outliner panel to the viewport.
Alternatively, select the desired camera from Panels > Perspective.
2. Creating multiple views
To have more than one camera display in your workspace setup, create copies of the viewport by going to Panels > Tear off Copy... from the menu in the main viewport.
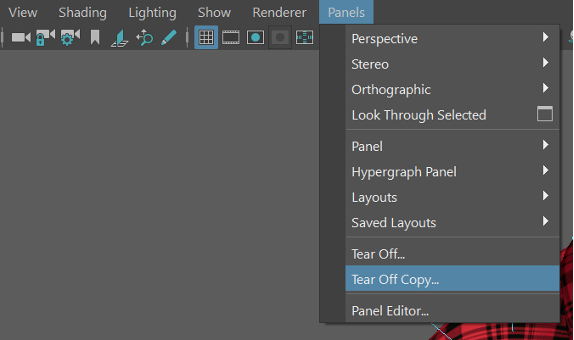
This creates a new floating viewport that can be move around your screen or shifted to another screen in a multiscreen setup.
Note: The torn-off copy will be a copy of whichever camera you have displayed in the main viewport.
3. Switching camera views
Middle-mouse click and drag the camera you want to display from the Outliner panel to the torn-off copy.
Change the main viewport display back to the Perspective camera; you will make most of your character pose adjustments in this view.
4. Displaying resolution gate
It is advisable to have the shot camera view display the edges of the frames render area so you can see exactly what the rendered shot will look like.
In the torn-off copy viewport, select the resolution gate button ![]() to show the edges of the frame render area. The button to the right of the resolution gate button turns the greyed-out area around the resolution gate on and off.
to show the edges of the frame render area. The button to the right of the resolution gate button turns the greyed-out area around the resolution gate on and off.
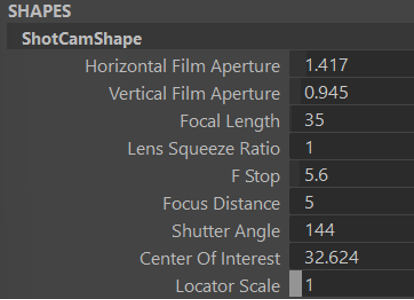
5. Adjusting ShotCam settings
Adjust the shape settings of the ShotCam, especially the camera's focal length, which simulates lens focal length just like in a real camera lens.
A low focal length provides a wider angle, allowing you to see more of the scene within the camera view. A high focal length will zoom in on the scene, allowing a more focused viewpoint.
The default focal length is 35mm, but you can customise it based on your scene requirements.
6. Saving workspace layout
Once satisfied with the layout, save it in the workspace dropdown menu at the top right of the screen.
- Go to Workspace > Save Current Workspace As...
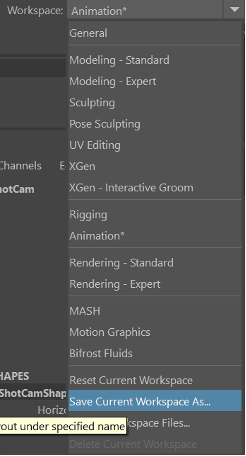
- Give it a meaningful name (e.g., '2ViewportAnimation') for easy identification and future use.
Basic render settings
Before starting to animate your scene, it’s a good idea to set up your basic render settings. By carefully configuring basic render settings in Maya, you can:
- achieve the desired visual results
- streamline the rendering process
- ensure compatibility with downstream production tasks.
Your render settings contribute to the overall success of your character animation by providing a clear and high-quality representation of the animated sequence.
Use the following information to adjust the frame size, select your render settings, and select your image size.
Frame size adjustment
At this stage, the main setting to change is the frame size. This affects the size and shape of the camera view used to animate the shots.
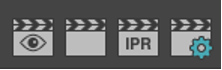
To change the render settings for the scene, select the Render Settings button at the top of the screen. It resembles a film clapper board with a cog in front of it:
Render engine selection
The Render Settings window will open, providing access to different settings and rendering options.
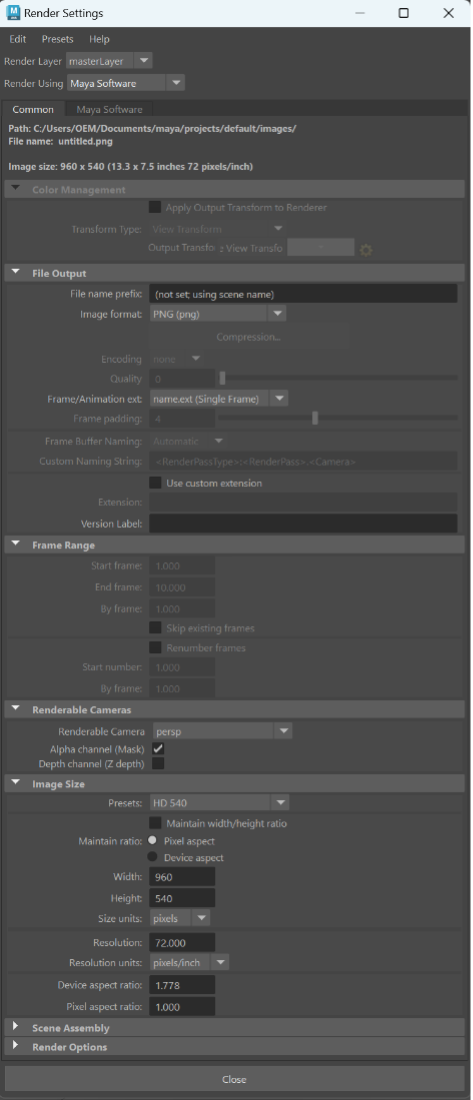
Choose which render engine to use for your scene – select Maya Software from the dropdown list, next to the Render Using option near the top of the window.
File output
Select + to view information and screenshots for file ouput.
1. Choose a file name
Choose a file name prefix for renders. This is the name that Maya assigns to any renders.
If left blank, Maya automatically adds the current scene name.
2. Image format selection
Choose an Image format from the dropdown list.
PNG is recommended for its versatility, supporting transparency in potential render layers.

3. Frame/Animation naming
Choose a Frame/Animation extension from the dropdown list. This determines the naming convention that Maya will use for render files.
Options clearly show formatting and compatibility with single-frame or multiple-frame renders.
The frame padding option becomes available after selecting an option for multiple-frame renders.

4. Multiple-frame render option
Select a multiple-frame render option, identifiable by the presence of a '#' in the format.

5. Frame padding configuration
Set the frame padding to determine the number of digits Maya uses before the frame number.
The current option is 4, so render files will be named 'name_0001.ext' and then up through the number of frames in your shot.
This is helpful as it forces your computer to order the frames sequentially when viewing them in your computer's file browsing system.
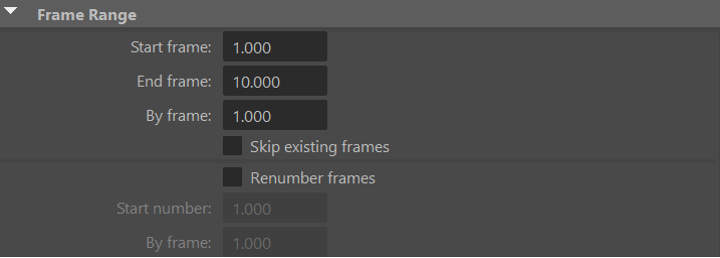
Frame range
Select + to view information and screenshots for frame range.
1. Set frame range
If you've chosen a multiple-frame render option, set the range of frames you want to render, based on how long your shot is.
The default range is:
- Start frame: 1.
- End frame: 10.
2. Adjust frame skipping (optional)
The By frame option allows you to skip frames during rendering.
- If set to 1, Maya renders every frame in sequence.
- If set to 2, Maya renders every other frame, starting with frame 1, then frame 3, and so on.
Renderable cameras
1. Choose renderable cameras
Use the Renderable cameras option to select the camera you want to render.
The dropdown menu lists all cameras currently in the scene.
2. Additional options
If needed, select the checkbox options to include the data for the Alpha channel or Depth channel included in render image files.

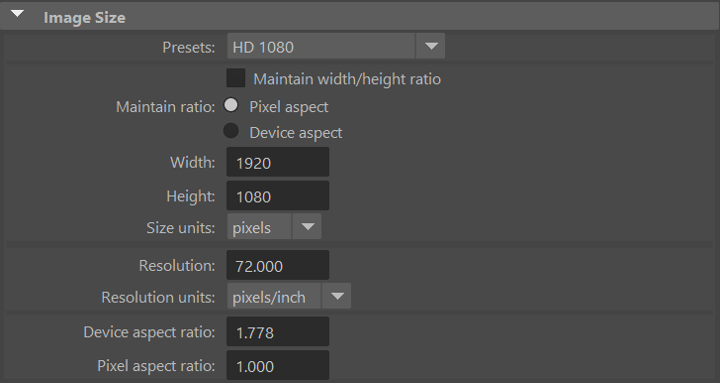
Image size
1. Select image size
Choose the image size and shape that suits your shot. Explore the range of preset options available in the Presets dropdown menu.
2. Use Diploma in Animation recommended preset
Select the preset named HD 1080.
Adding key frames
As you know by now, creating key frames empowers you to express creativity and bring your characters to life. Key frames are fundamental to character animation, controlling what a character’s pose looks like and how the character moves from pose to pose during the animation.
Maya provide you with the necessary tools for precise control of key frames within the animation sequence.
Use the following information to create key frames and use Maya keyboard shortcuts.
Key frame creation
1. Enable Select Curve Objects mode
Key frames in Maya should only be applied to the control handles of a character or object when animating the character or object.
Ensure only the control handles are selected by enabling the Select Curve Objects mode. All other selection modes should be disabled:

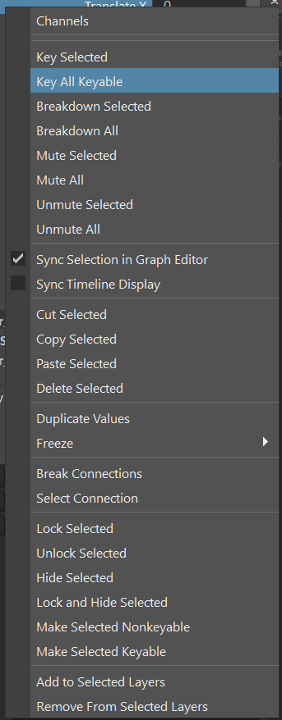
2. Create key frames
With all the control handle curves selected, right-mouse click in the channel box.
Select Key All Keyable from the menu. This creates a key frame on all the keyable attributes for each control handle you currently have selected.
3. Confirmation of successful key frame creation
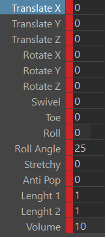
Look for a red line appearing on the timeline.
Check for a red box next to the input values in the channel box, indicating associated keys.

Tip: While it's possible to key specific attributes and controls, for simplicity, it's advisable to key all controls and attributes on the same frame for each key pose. Otherwise, your animation shot will start to get complicated to control.
Keyboard functions
Keyboard shortcuts
Maya’s keyboard shortcuts for animation are:
| Shortcut description | Key stroke |
|---|---|
| Set a key (All Attributes) | S |
| Play | Alt + V |
| Stop | Esc |
| Forward 1 Key frame | . |
| Backward 1 Key frame | , |
| Forward 1 Frame | Alt + . |
| Backward 1 Frame | Alt + , |
| Set Move Translation Key | Shift + W |
| Set Rotation Key | Shift + E |
| Set Scale Translation Key | Shift + R |
Auto key function
Find the Auto Key button at the bottom right side of the screen next to the timeline. When Auto Key is enables, the button will turn red:
![]()
If the button appears blue, it means Auto Key is currently turned off.
Graph Editor
The Graph Editor in Maya is a powerful tool, giving you control over animation curves, timing, and movement.
It enhances your ability to create expressive, lifelike character animations with precision and control over how your animation moves from one key frame to another.
Use the following information to learn about curve types, how to control curves, and how to configure your playback settings.
Curve types
A curve shape is the line that links two or more key frames. There are three main types of curve shape:
- Spline
- Linear
- Stepped.
Spline curves

Spline curves automatically interpolate between key frames, providing default ease in and out between the key frames.
Spline curves may also include overshooting, where the movement moves past a key position before settling back, to smooth the movement between keys.
Note: Most of the time, this overshooting is undesirable in your animation.
Linear curves

Linear curves create a flat curve between the key frames, which creates a constant speed with no ease in or out of a key frame.
Stepped curves

Stepped curves create a plateau effect where the curve stays flat from one Key position until it gets to the next key, where the curve suddenly steps up to the next key position.
When viewed in the Viewport, your animation will appear to jump from one key to the next without interpolation or in-between positions to smooth the movement.
Stepped curves are great to view the movement of the keys without having the automatic interpolation between keys:
- distracting your focus
- giving you a false sense of how smooth your key frame movement is.
Choosing curve types when starting out
A new animator should focus on getting the keys of a movement right without worrying about the interpolation between the keys from getting in the way.
So, when starting out as an animator, it’s advisable to animate using stepped curves.
Only switch to one of the other curve types once the keys for your action work well enough on their own without the need for interpolation to make the animation look smooth.
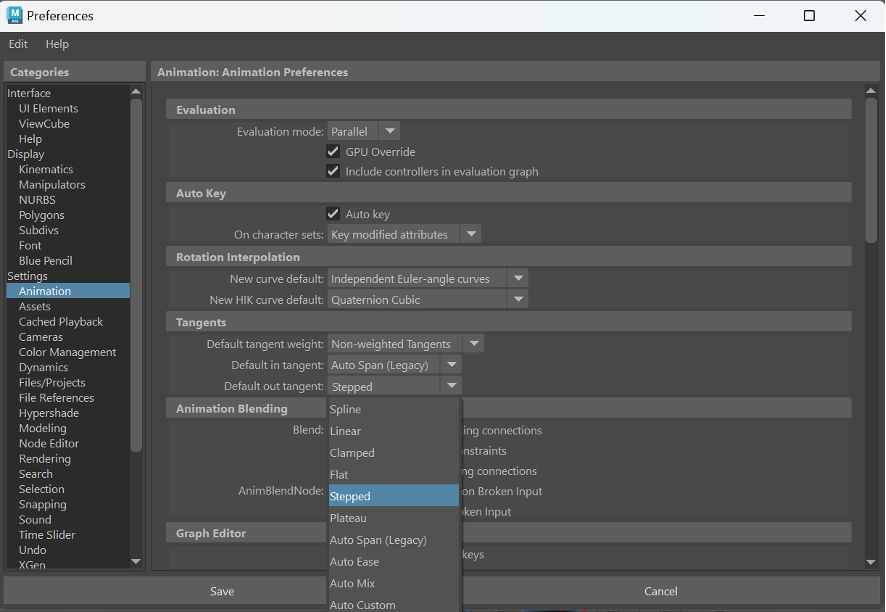
Curve control and preferences
Maya can automatically apply a curve of your choice to all keys as you create them.
- Open Maya and navigate to Windows > Settings and Preferences > Preferences.
- In the Preferences window, select Animation from the left-hand list.
- Under the Tangents options, choose Stepped from the dropdown menu for Default out tangent.
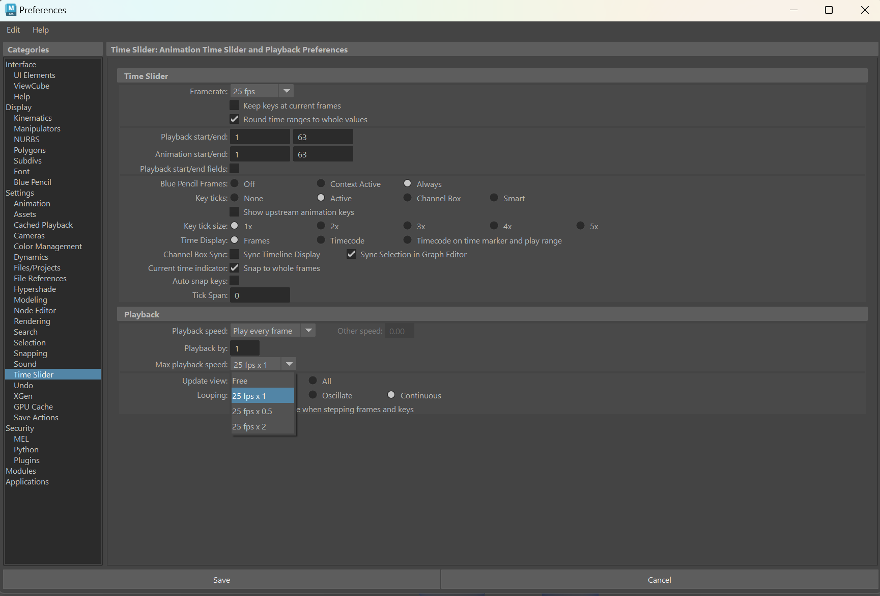
Playback configuration
You will want to change the default playback settings so that you see an accurate representation of your animation's timing.
By default, Maya will play the animation back as fast as it can, depending on your system's specifications. If you have a high-spec system, the animation playback may look extremely fast; if you have a slower system, it may look slow and sluggish.
So, you need to change the default playback settings so that Maya plays the timeline at your set frame rate. Ideally, you want to see every animation frame with no dropped frames.
Adjust default playback settings and set frame rate
- Set the frame rate to 25 fps in the Preferences window under the Time Slider category.
- Within the playback section, adjust the maximum playback speed to 25 fps x 1. This setting ensures real-time playback at 25 frames per second. Optionally, choose x 0.5 for half speed or x 2 for double speed.
- Save the changes by selecting Save to apply your playback setting changes and close the Preferences window.
Helpful animation plugins
The learning tasks in the next subtopic – Body Mechanics – mention additional plugin tools or scripts:
- ZV Parent Master
- Arc Tracker
- Pose to Shelf.
These plugins are optional to your workflow but can be helpful.
Select + to view information about the three plugins.
ZV Parent Master is a tool that creates key frame constraints between objects.
It’s available from Autodesk App Store or ZV Parent Master 1.3 (its creator’s website).
Watch this video from ZV Parent Master to see the tool in action (4:32m).
Arc Tracker is a tool that tracks selected objects and creates a motion trail so you can easily see the arcs of a path of motion.
It’s available from Highend3D.
Watch this short video from Arc Tracker to see the tool in action (0:51m). ArcTracker (youtube.com)
Pose to Shelf is a tool that allows you to save any pose you create for a character on a shelf in Maya. Once you have saved a pose, you can apply this pose to the character with just a single click.
It’s available from Highend3D.
Advantages
Pose to Shelf is great for creating a generic, relaxed pose as a starting point for posing when you first reference a character into your scene. Pose to Shelf can also be very useful when creating lip-sync for a character.
Disadvantages
Poses saved with Pose to Shelf do not translate between characters. If you have several characters that you regularly animate with, you need to create saved poses for each character separately.
Caution
Only use Pose to Shelf as a starting point
Be careful about using Pose to Shelf in your animation workflow. Creating a library of poses and relying on those poses to create an animation will make it appear stale and generic.
Poses saved by Pose to Shelf should always be used only as a starting point for your scene, not as a shortcut to complete animation faster.
Explore body mechanics in animation, where you'll apply your knowledge of character rigs and animation workflow and use your Maya skills to create various dynamic shots. Increase your experience with human movement, from subtle gestures to powerful actions, and bring Bonnie 2 to life!
Reflection
Looking ahead
As you progress through Body Mechanics, consider how you'll apply what you've learnt so far when you complete the subtopic's eight learning tasks. Think about the following:
- How will planning help you visualise the key positions and timing of your character's actions, and how will you incorporate thumbnailing into your workflow approach?
- What insights have you gained about timing and spacing, and how can you apply these insights to improve your animations as you progress?
- How is your understanding of character movement and posing evolving as you work through this subtopic, and how will you leverage this understanding in the following learning tasks?
- How can workflow principles enhance your ability to create dynamic and believable character actions, and how will you continue to refine and expand upon this workflow in future animation projects?
Considering these questions as you progress will solidify your understanding of body mechanics in animation and prepare you to incorporate these valuable lessons into your future work. Feel free to jot down the reflective questions above in a notebook as a helpful reminder to stop and think.
Maximise your searching– use your Find function!
Take advantage of the Find function on your PC (Ctrl + F) or Mac (Command + F) device to quickly locate this topic’s main sections.
| Key words for shots | Key words for workflow |
|---|---|
|
|
1. Ball toss
Ball toss: Shot setup
Follow these steps to establish a well-framed shot featuring your character:
- Reference in the character into your scene.
- Create a shot camera for the scene.
- Frame your shot composition as medium shot of the character from the waist up, ensuring headroom above the character.
- Shift the character to either the left or right of the frame based on their facing direction.
- Allow ample space for the ball toss action within the frame.
- Once satisfied with your composition and camera position, lock the camera attributes to prevent further movement.
Ball toss: Animation planning – thumbnails
Now that you’ve completed the shot setup, it might be tempting to go ahead and start creating poses for the character. Before you do this, it's important to have a plan to help guide you through blocking out your first shot.
Start planning out your animation on a sheet of paper or on a new digital canvas, starting with the main starting pose.
Think about the action's main positions. What are the main key positions of the action? What do these main positions require?
![[ADD IMAGE'S ALT TEXT]](/sites/default/files/Arm%20Positions.jpg)
Keys both control your animation and set out the extreme parameters of a movement.
Select + to find out which keys you’ll need to plan for.
- Starting pose: Start with the character at rest in a relaxed position.
- Anticipation: The character will move slightly forward, and the arm will pivot down in anticipation of the toss
- Initiate toss: The arm starts to move up at the beginning of the toss; the wrist counter rotates, dragging behind the arm movement. The body will start to move backwards slightly.
- Low point of toss: The body continues to move backwards from the hips. The hand and ball will continue to rotate up. The ball is about to leave the hand and is at the lowest point of the toss.
- Top of toss: The ball is now at the top of the apex of the toss. The character is also at the furthest back and watching the ball, ready to catch on the downward fall of the ball. The arm is starting to move downwards to catch the ball.
- Contact position: The contact position is where the ball falls back down and first contacts the catching hand. The character's body rotates forward and back towards the natural resting position.
- Recoil: The catching hand moves with the ball, absorbing and controlling the falling momentum of the ball, the body continues to rotate forward, settling the movement of the body.
- Settling: There may be one or two more keys to help slow down and control the settlement of the movement of the arm and body and bring the character to rest.
Ball toss: Starting pose
Create the starting pose for the character.
Explore
Pose design
The ball toss animation is built around the starting pose.
Ensure your starting pose follows the principles of good pose design you discovered earlier in this topic.
2. Key Animation > 2.5 Character Animation > 2.5.2 Animation Workflow > Poses
Play this clip to get an idea of a ball toss animation. Focus on the pose design.
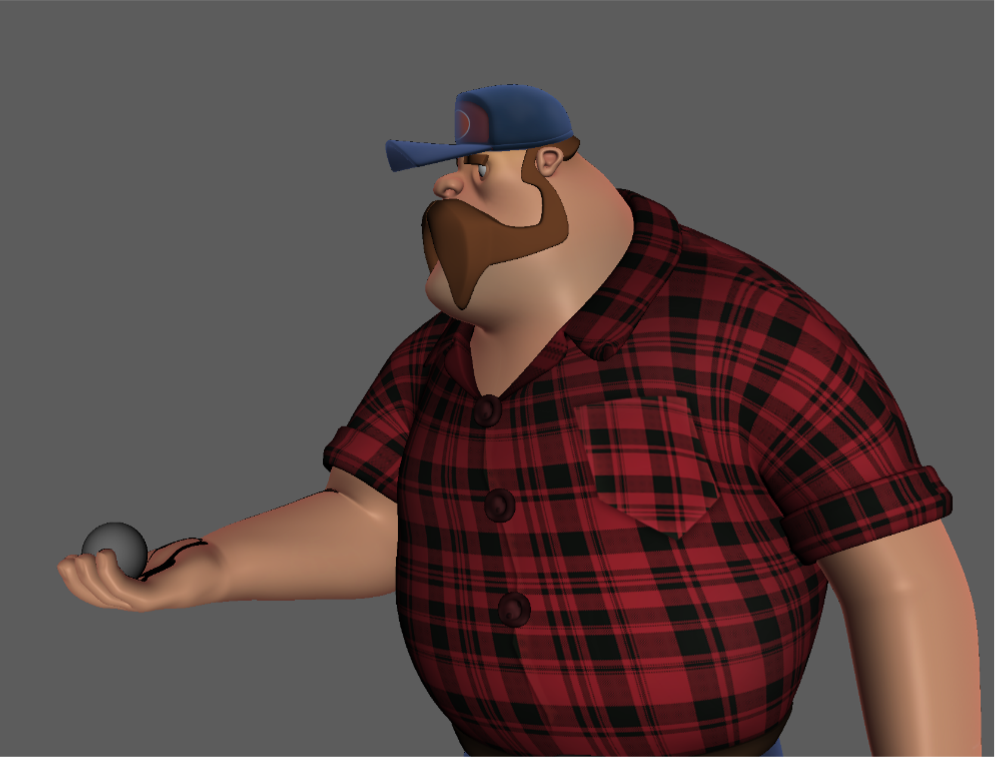
Use a polygon sphere to represent the ball, ensuring it is sized appropriately to fit nicely in the character's palm.
Ball toss: Workflow basics
Tossing and catching a ball requires carefully animating two different things - the character and the ball - as they interact:
- They must appear connected naturally and convincingly during their interaction, i.e. when the character touches and holds the ball.
- When the ball is tossed into the air, it will gain its own momentum and often require different timing than your character (until the ball is caught again).
You can manage this type of animated interaction in three different ways:
- Key-frame animation control: Control all key-frame animation to synchronize the movement of the two objects. Although not actually connected, they give the illusion of being so.
- Use of constraints: Apply a constraint in Maya to attach the ball to the hand. This constraint may be keyed to switch ON or OFF at the points where the ball must attach and detach.
- Dual ball technique: Use two balls:
- One ball is permanently attached to the hand, with its visibility keyed ON and OFF so that it’s visible when the hand holds the ball.
- Another detached ball has its visibility keyed ON and OFF at the exact same frames to come into view as the other ball becomes invisible.
Using a Parent Constraint to attach the ball to the hand
Select + to find out how to use a Parent Constraint to attach the ball to the hand.
Follow these steps to set up a Parent Constraint:
- Select driver: Select the driver of the constraint, i.e.. the wrist control of the character to make the hand move the ball.
- Shift-select driven object: Select the driven object, which is the ball to be moved by the hand.
- Apply parent constraint: Go to Animation menu set, navigate to Constraint > Parent
- Reset settings: Ensure default Parent Constraint settings by selecting Edit > Reset Settings, then click Add to close the window.
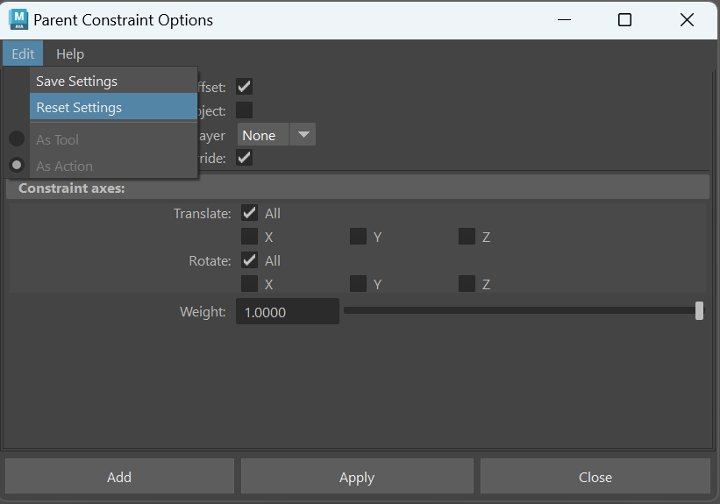
The ball should now be constrained to the character's hand so that when you move the wrist control the ball should move with the hand.
You need to switch the constraint on and off to animate the ball without the hand control affecting its movement.
To do this, you need to animate the constraint's weighting, which can be found in the channel box when the ball polygon object is selected. Follow these steps:
- Access channel box: Select the ball and find the ‘Blend Parent 1’ channel attribute in the channel box.
- Turn off constraint: Set the ‘Blend Parent 1’ attribute to 0 to turn off the constraint.
- Turn on constraint: Set the ‘Blend Parent 1’ attribute to 1 to turn on the constraint.
You need to key the blend parent attribute to animate the ball leaving the character’s hand.
Key the blend parent attribute so that it has a value of 1 up until the frame that you would like the ball to leave the hand of the character. Then, on the next frame, key the blend parent attribute to 0.
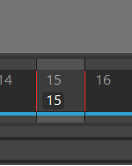
- Key blend parent attribute on frame 15: Key the ‘Blend Parent’ attribute at 1.
- Key blend parent attribute on frame 16: Key the ‘Blend Parent’ attribute at 0 to turn off the constraint.
This allows the ball to be animated independently from the hand animation.
To turn the attribute back on when the ball falls back into the character’s hand, follow the same procedure but in reverse:
- Key blend parent attribute on frame 30: Key the ‘Blend Parent’ attribute at 0 to turn off the constraint.
- Key blend parent attribute on frame 31: Key the ‘Blend Parent’ attribute at 1 to turn the constraint back on.
Ball toss: Blocking
Block as much of your action as possible into the main key positions using your planning thumbnails to help create your poses.
For the moment:
- Don’t worry too much about the timing of the poses on your timeline, as you can easily move them around to get your timing working better later.
- Focus on getting nice, strong poses that move smoothly from one pose to the next as per your initial planning poses.
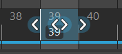
Tip: Use the <> keys to tab through your keyed movement.
Using Maya’s ghosting options to check for problems
To help you check your animation for problems, you can create a ghosting effect that shows you the positions of an object on the frames surrounding the current timeline positions.
Select + to find out how to use ghosting.
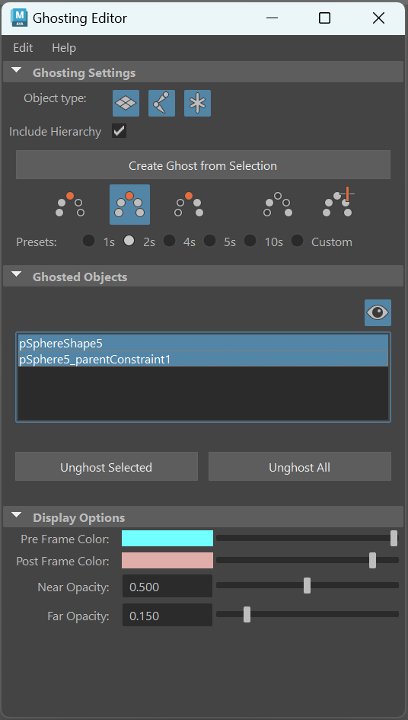
Follow these steps to enable and adjust ghosting:
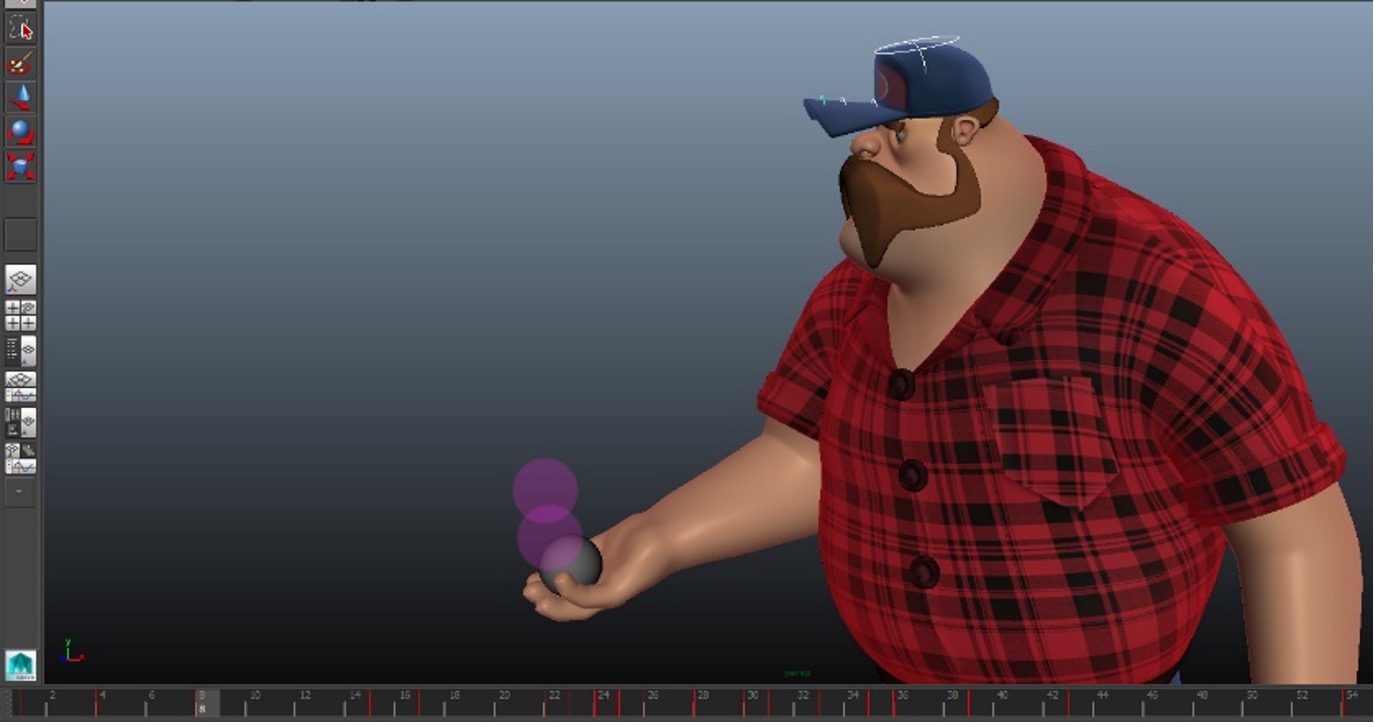
- Select object: Choose the object you want to ghost.
- Enable ghosting: Navigate to Visualize > Ghost Selected in the Animation menu set.
- Adjust ghosting options: Use the Ghosting Editor to modify options such as displaying previous or next frames, changing the number of frames displayed, and more.
Follow these steps to remove ghosting:
- Remove ghosting (single object): Go to Visualize > Unghost Selected to remove ghosting from the selected object.
- Remove ghosting (all objects): Alternatively, use Visualize > Unghost All to remove ghosting from multiple objects at once.
The Ghosting Editor can also be used for this purpose.
Continue your blocking
Select + to find out how to continue blocking your shot.
Make any adjustments necessary to create smooth arcs or adjust the spacing between your key positions.
Consider adjusting the timing of your animation on the timeline at this point, such as adding or removing time from a movement to make parts of your action faster or slower. Follow these steps:
- Select all controls: Ensure all character and ball controls are selected. This step will ensure that you are moving all the animation keys across all the controls and that you do not end up with offset keys, which can easily get confusing.
- Select keys: Shift + left mouse click and drag to timeline to select keys you want to move. This will highlight an area of the timeline. You can either select:
- One key:
- A range of keys:

- One key:
- Move keys: Use the centre arrows to move the selected keys left or right on the timeline. The outer arrows can squash or stretch the selected range of keys.
Next, add breakdowns to your work to:
- help smooth out the movement
- further define and improve the arcs
- manage any drag
- add secondary movement, etc.
A small downward movement before the toss helps pre-empt the action and gives it weight. Adjusting the timing and spacing of this anticipation action can change the weight of the ball (or the strength of the character).
When the ball first leaves the hand, the spacing will indicate the necessary energy required to toss the ball.
The initial spacing (after the first frame leaves the hand) should be the largest distance.
Changing this 'gap' will affect the feeling of energy and weight in your animation; you should always experiment to find the appropriate distance, or gap.
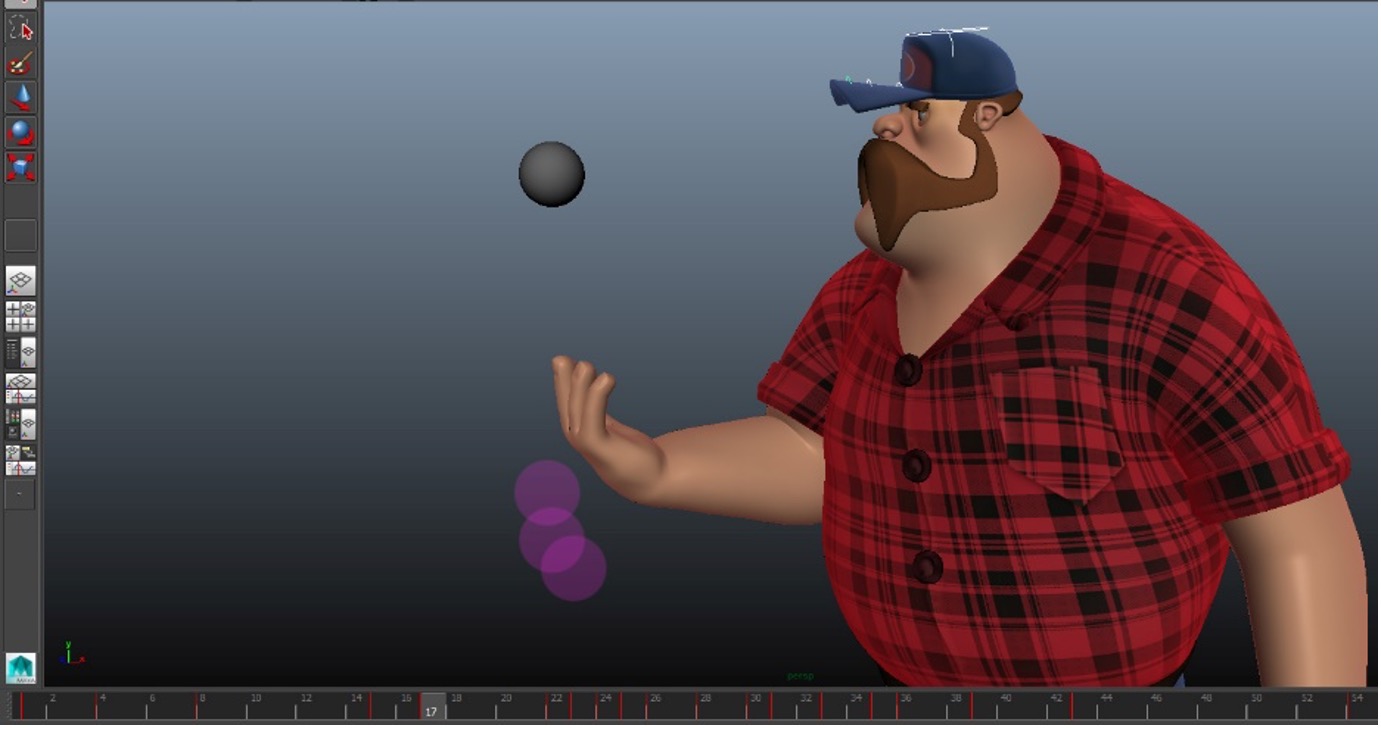
You can export your animation for review by exporting a playblast of your shot, which saves the animation as a playable video file.
The playblast is not a final rendered version of the shot but a screen capture of your viewport. A playblast is a much faster and more convenient way for you, a colleague, or an animation supervisor to review and provide feedback on your animation.
Follow these steps to export a playblast of your shot:
- Activate desired view: Ensure that the view you want to playblast is active. Maya plays the active view when you use the playback controls.
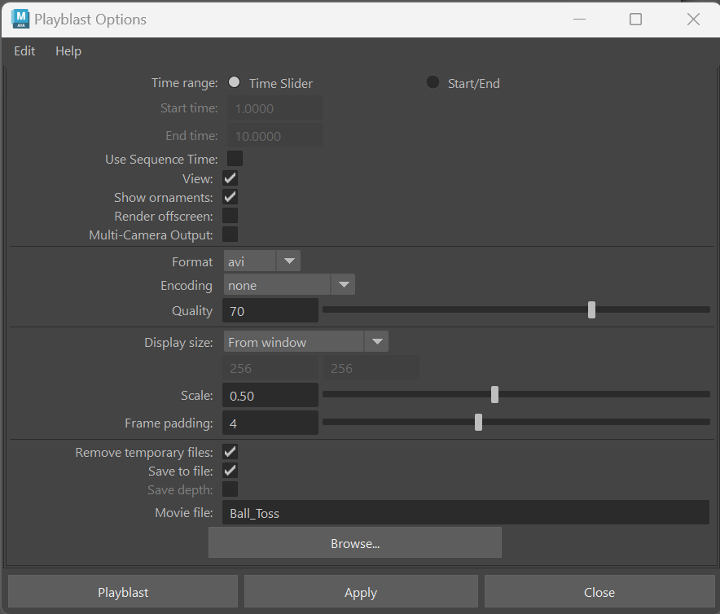
- Access playblast options: In the Animation menu set, go to Playback > Playblast.
- Configure playblast settings: In the Playblast options window, set the time range, format, encoding, quality, and display size according to your preferences.
- Save to file: Check the Save to File option and give a meaningful name to your file.
- Initiate playblast: Click the Playblast button to create the video file.
- Locate saved playblast: The playblast will be saved in the 'Movies' folder within your Maya project file system.
Ball toss: Splining
- Ensure all keys and breakdowns are functioning effectively.
- Commence work on the curves in the Graph Editor.
- Check for irregular curves, overshoots, and other anomalies.
In the initial tossing action, your curves should not have any slow-out if you want to show the correct energy.
Similarly, when the ball falls, you should avoid any slow-in. A slow-out or slow-in used in the wrong place will make your ball appear to drift or 'float'.
Tip: At a glance, you can often see curves that are not working because they are not smooth. Most often, curves should be slow in (arc), slow out(arc), slow in/slow out (S curve), or even (straight).
Ball toss: Polish
- Re-check all curves.
- Perform a final sweep for bumps and mistakes.
- Enhance small details, such as keyed movements on secondary features like the fingers during the ball release and catch. Squash surfaces into each other to add weight.
Important
Recap!
Before you move onto this subtopic’s first learning task, play this clip for a brief recap on the blocking, splining, and polish stages of the ball toss animation workflow.
Planning and animating a ball toss
Watch Geoff plan and animate a ball toss across a series of short videos located in the two playlists below:
- Ball toss: Planning and Blocking - 12 videos
- Ball toss: Splining and Polishing - 10 videos
These videos help you complete Task 3 below and prepare you to practise the subsequent learning tasks in this subtopic.
Practice
Task 3: Plan and animate a ball toss
Take your first step into body mechanics within animation by making Bonnie 2 toss a ball and focus on how her hand, arm, body – and the ball - move and respond.
What tools or resources do you need for this task?
Make sure you have access to:
- Autodesk Maya
- Bonnie 2 character rig.
What steps should you take to complete this task?
6-8 Hours
Set aside 6-8 hours to complete steps 1-9 below. Remember to save your work as you go when using Autodesk Maya.
- Use the workflow guidance in the 1. Ball toss section to help you work through this learning task. You’ll also find helpful information in the previous Maya: Shot Setup and Animation Basics subtopic.
- Watch Geoff’s two playlists, carefully observing his planning and Maya animation techniques.
- Shot setup: Ensure your scene setup is 24/25fps at 1920 x 1080 in Maya. Establish a well-framed shot featuring Bonnie 2.
- Planning:
- Sketch thumbnails to plan out the main positions of the action i.e. key poses.
- Save your thumbnails as a screenshot (i.e. JPGs). Upload your screenshot to the forum to get feedback.
- Starting pose: Once you get feedback, create the starting pose to begin animating.
- Blocking: Block out all key poses and major movements of the animation to establish the timing and overall motion.
- Tip 1: Use the ghosting feature in Maya to check for any animation problems and continue adjusting your blocking to ensure smooth arcs and proper timing.
- Tip 2: Remember to create a playblast and seek feedback at each stage of animation.
- Splining: Ensure all keys and breakdowns are functioning effectively. Commence work on the curves in the Graph Editor. Check for irregular curves, overshoots, and other anomalies.
- Polish: Focusing on improving the overall quality and realism by re-checking all curves, performing a final sweep for bumps/mistakes and creating or enhancing small details in the animation (finger flares, saccades etc).
- Save and export your animation as a playblast (MP4).
What should you do after completing this task?
- Share your thumbnails and animation to forum as separate forum posts:
- Select your forum thread in Forum: Character Animation.
- Select Reply to your first Forum post.
- Enter the words ‘Task 3: Ball toss’ in your new post.
- Select the Post your response button, then select Edit in your reply when it shows up.
- Upload your screenshots and MP4 using the Attachment field in separate posts.
- Select Save changes to share your coursework to your forum thread.
- Get feedback on this and other learning tasks at the next Live Session – check the Live Session calendar for dates and times.
Now that Bonnie 2’s has thrown her ball, progress to the next section, where you'll delve into the intricacies of walk cycles, laying the foundation for more complex animations.
2. Walk cycle
Animation cycles
An animation cycle is a repeatable series of frames you can play in an endless loop. Repeatable character actions like running and riding a bike are great candidates for animating as cycles.
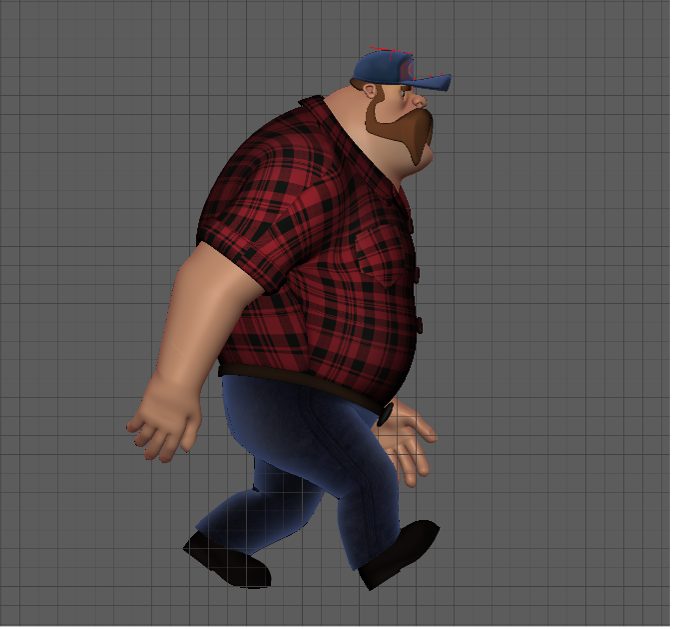
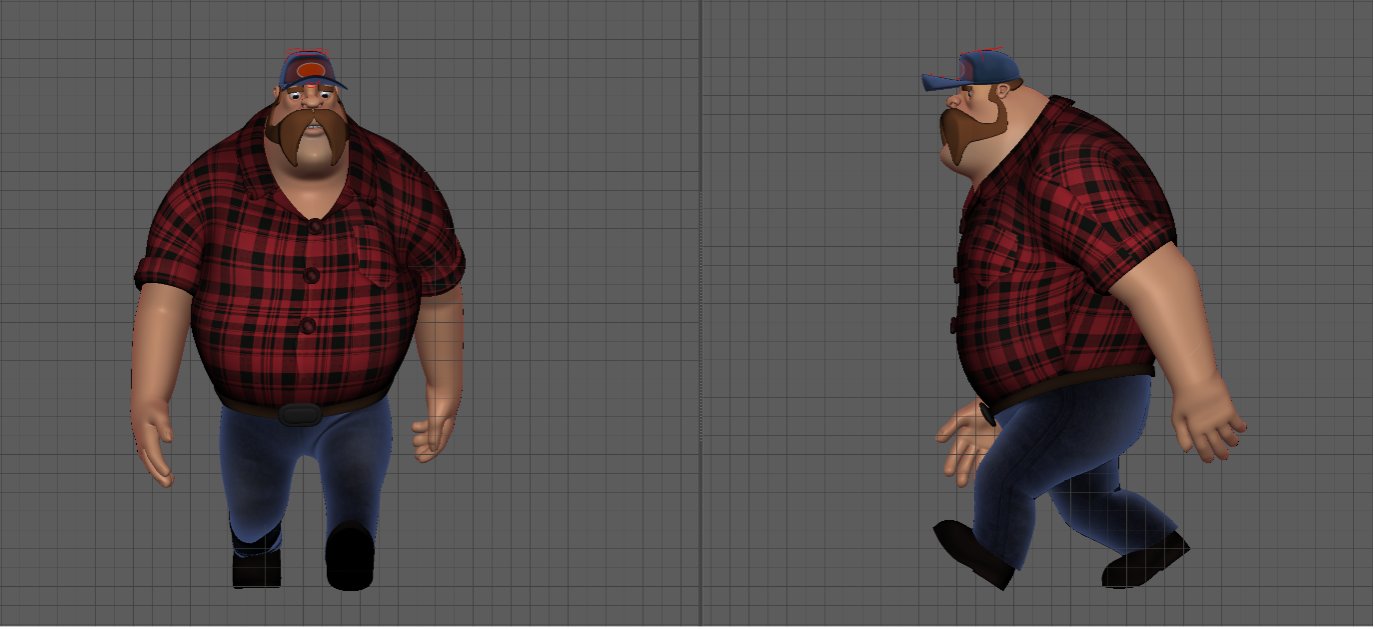
Play these two clips to see the front and side views of a repeatable character action you’ll be animating – the basic walk cycle.
Animated cycles give you a lot of value from a few frames because you can loop the frames any number of times.
Important
Consistency
Suppose you animate a character in a walking or running cycle with inconsistent spacing of their feet?
In that case, the character will appear to slide along the ground, ruining the illusion that that character is walking over a static surface.
So, when animating a cycle, keep the speed and spacing of the cycle consistent from frame to frame, especially where the character is contacting the ground.
Repeating cycles
Another type of animation cycle is a repeating cycle, where the frames are repeated in reverse order to return to the cycle's first frame before the cycle begins again.
An example of a repeating cycle is the movement of a pendulum on a clock.
Walk cycle: Shot setup
Follow these steps to establish a well-framed shot featuring your character:
- Reference in the character into your scene.
- Create a shot camera for the scene.
- When working on a walk or run cycle:
- Start by working from the side and front orthographic views.
- Move into the shot or perspective camera view when refining your animation.
- Use the front and side views with background reference grids for planning your animation poses.
- Use the background reference grids to ensure consistent spacing of the feet and accurate head and waist heights for both right and left steps.
- Once satisfied with your composition and camera position, lock the camera attributes to prevent further movement.
Walk cycle: Animation planning - thumbnails
Start planning out your animation on a sheet of paper or on a new digital canvas, starting with the main starting pose.
Think about the action's main positions. What are the main key positions of the action? What do these main positions require?
Walk cycle: Main positions
![[ADD IMAGE'S ALT TEXT]](/sites/default/files/Main%20Positions.jpg)
Select + to read about the four main positions of a basic walk cycle.
![[ADD IMAGE'S ALT TEXT]](/sites/default/files/Contact.jpg)
The Contact position establishes the stride length.
- The front foot heel contacts the ground. The rear foot heel is lifting off the ground.
- The arms move opposite to feet, e.g., when the left foot is forward, the left arm is swinging back.
- Put the character's weight over the feet and try to show the weight spread evenly above the grounded feet.
Note: The level of the head during this Contact position is not the lowest position for a walk cycle, but it is lower than the Passing position. The head level also reflects the waist level.
![[ADD IMAGE'S ALT TEXT]](/sites/default/files/Extreme%20Down.jpg)
The Extreme Down position shows:
- The character's weight being taken on the front leg.
- Their rear leg is still grounded but is about to lift off.
Note: The level of the head during the Extreme Down position is the lowest position for a walk cycle. The head level also reflects the waist level.
![[ADD IMAGE'S ALT TEXT]](/sites/default/files/Passing.jpg)
During the Passing position the character’s:
- rear leg swings through on an arc.
- arms also swing through on arcs.
Note: The head level during Passing is not the highest position for a walk cycle but is higher than the Contact and Extreme Down positions. The head level also reflects the waist level.
![[ADD IMAGE'S ALT TEXT]](/sites/default/files/Extreme%20Up.jpg)
During the Extreme Up position the rear leg moves past the passing position toward the ground.
Note :The level of the head during this position is the highest position for a walk cycle. The head level also reflects the waist level.
The next main position is the Contact position.
Walk cycle: Blocking
Block as much of your action as possible into the four main key positions:
- Contact
- Extreme Down
- Passing
- Extreme Up.
Using these four positions will:
- Set a good foundation for your animation – if these positions work well, the rest of your work becomes much easier.
- Make it much easier for a director to give feedback and for you to complete any necessary changes.
Blocking tips
- Keep your animation workflow consistent.
- Set keys for all character controls and all attributes in each main position's key frame.
- Work only with stepped tangents to begin with so that you can focus on the movement of the keys alone. Again, if your keys work well together, your work will be much easier later.
Adding breakdowns
Next, add breakdowns to your work to:
- help smooth out the movement
- further define and improve the arcs
- manage any drag, etc.
Tip: Use the <> keys to tab through your keyed movement. Don’t scrub through every frame in the timeline. This ensures that what is working is a part of your keys, and your animation does not require in-between frames to make sense visually.
Walk cycle: Splining
- Ensure all keys and breakdowns are functioning effectively.
- Commence work on the curves in the Graph Editor.
- Check for irregular curves, overshoots, and other anomalies.
Tip: At a glance, you can often see curves that are not working because they are not smooth. Most often, curves should be slow in (arc), slow out(arc), slow in/slow out (S curve), or even (straight).
Extra tip: In a cycle, make sure that all curves work smoothly from the last frame of the cycle to the first frame.
Walk cycle: Polish
- Re-check all curves.
- Perform a final sweep for bumps and mistakes.
- Enhance small details, such as:
- Keyed movements on secondary features like a hat or a belly wobble
- Adjustments to existing keys or curves to fix small pops, add extra little bounces, or squash surfaces into each other to add weight.
Planning and animating a walk cycle
Watch Geoff plan and animate a walk cycle in six videos, located in the playlist below.
These videos help you complete Task 4 below.
Practice
Task 4: Plan and animate a walk cycle
Plan and animate the first animation cycle in this subtopic by making Bonnie 2 walk, focusing on weight distribution, movement, and balance. You can make her run later!
What tools or resources do you need for this task?
Make sure you have access to:
- Autodesk Maya
- Bonnie 2 character rig.
What steps should you take to complete this task?
6-8 Hours
Set aside 6-8 hours to complete steps 1-9 below. Remember to save your work as you go when using Autodesk Maya.
- Use the workflow guidance in the 2. Walk cycle section to help you work through this learning task. You’ll also find helpful information in the previous Maya: Shot Setup and Animation Basics subtopic.
- Watch Geoff’s six videos, carefully observing his planning and Maya animation techniques.
- Shot setup: Ensure your scene setup is 24/25fps at 1920 x 1080 in Maya. Establish a well-framed shot featuring Bonnie 2.
- Planning:
- Sketch thumbnails to plan out the main positions of the action i.e. key poses.
- Save your thumbnails as a screenshot (i.e. JPGs). Upload your screenshot to the forum to get feedback.
- Starting pose: Once you get feedback, create the starting pose to begin animating.
- Blocking: Block out all key poses and major movements of the animation to establish the timing and overall motion.
- Tip 1: Focus on incorporating the four main positions: Contact, Extreme Down, Passing, and Extreme Up. Remember to set keys for all character controls and attributes in each key frame to maintain consistency and clarity in your animation and make it easier to adjust later.
- Tip 2: Remember to create a playblast and seek feedback at each stage of animation.
- Splining: Ensure all keys and breakdowns are functioning effectively. Commence work on the curves in the Graph Editor. Check for irregular curves, overshoots, and other anomalies.
- Polish: Focusing on improving the overall quality and realism by re-checking all curves, performing a final sweep for bumps/mistakes and creating or enhancing small details in the animation (finger flares, saccades etc).
- Save and export your animation as a playblast (MP4).
What should you do after completing this task?
- Share your thumbnails and animation to forum as separate forum posts:
- Select your forum thread in Forum: Character Animation.
- Select Reply to your first Forum post.
- Enter the words ‘Task 4: Walk' in your new post.
- Select the Post your response button, then select Edit in your reply when it shows up.
- Upload your screenshots and MP4 using the Attachment field in separate posts.
- Select Save changes to share your coursework to your forum thread.
- Get feedback on this and other learning tasks at the next Live Session – check the Live Session calendar for dates and times.
Having experimented with the walk cycle, advance to the next body mechanics section and expand your skills by animating Bonnie 2's transition from seated to standing, expanding your repertoire of character animation.
3. Stand from seated
Stand from seated: Shot setup
Follow these steps to establish a well-framed shot featuring your character:
- Reference in the character and environment (i.e. chair) into your scene.
- Create a shot camera for the scene.
- Compose the shot to fully capture the character with adequate headroom.
- Create a slight three-quarter front angle of the character with the camera at approximately eye level.
- Depending on the character's facing direction, ensure a spacious area in front of them.
- Set up the shot to accommodate the stand-up action within this space.
- Once satisfied with your composition and camera position, lock the camera attributes to prevent further movement.
Stand from seated: Animation planning - thumbnails
Start planning out your animation on a sheet of paper or on a new digital canvas, starting with the main starting pose.
Think about the action's main positions. What do these main positions require? What is the overall attitude of the scene?
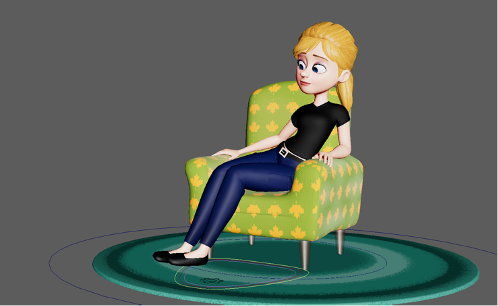
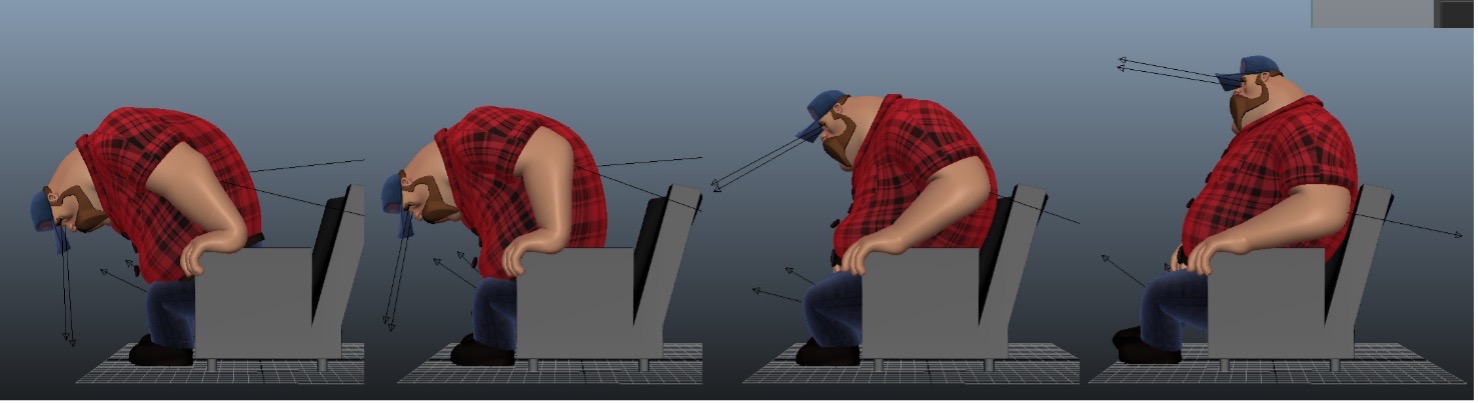
Stand from seated: Starting pose
Take time to create a comfortable seated pose for the character. When posing characters in a seated position, there is a tendency to have them sitting too stiff and unnaturally, so try to relax the character into the chair.
Your starting pose can also convey a little of the character’s attitude. Ask yourself:
- Are they tired after a long day at work?
- Are they watching something exciting on TV?
The answers to these questions will inform your initial posing and approach to your animation.
Take time to also consider and plan how your character will begin to move. This planning will help you better understand where to position your character's feet and hands, so as to avoid too many unnecessary movements to reposition the feet and hands once the character begins to move.
Stand from seated: Workflow basics

Use these steps as a basic workflow guide when animating a character standing from a seated position:
- Starting pose: Craft a solid and natural initial pose for the character.
- Main positions: Determine the final pose, focusing on hand and foot placement.
- Blocking:
- Block out the key positions.
- Refine poses to convey weight transfer.
- Manage poses involving IK-FK switching.
- Splining: Introduce breakdowns and enhance curves using the Graph Editor.
- Polishing:
- Review curves, timing, and spacing.
- Fine-tune hand placements, fingers during contacts, and overall weight and balance.
Stand from seated: Blocking
When blocking the main key positions, try to:
- Put the characters' weight over the feet.
- Ensure that the character does not appear off-balance or look like some unknown force or energy is hoisting them up.
- Make them appear to be in a grounded position and capable of pushing themselves up off the chair.
Getting your blocking poses correct will:
- Set a good foundation for your animation – if these positions work well, the rest of your work becomes much easier.
- Make it much easier for a director to give feedback and for you to complete any necessary changes.
Blocking tips
Plan first where the character’s feet will begin in the scene and where they will end up after they stand up. How many steps will they take? How big are the steps?
Take your time and resist the urge to rush your blocking. In this type of scene, blocking all your poses first without looking at the interpolation frames is easier.
Adding breakdowns
Next, add breakdowns to your work to:
- help smooth out the movement
- further define and improve the arcs
- manage any drag, etc.
Tip: Use the <> keys to tab through your keyed movement. Don’t scrub through every frame in the timeline. This ensures that what is working is a part of your keys, and your animation does not require in-between frames to make sense visually.
IK-FK Switching
Follow these steps to switch between hand controls:
- Evaluate initial hand position: Depending on the starting pose, decide whether to use IK or FK for the hands.
- No need to switch from IK to FK: If the hands are already in IK and positioned for the push-off, no initial switch is required.
- Example: Left hand in IK: The left hand shown below can start in IK, ready for the push-off without switching.
- Example: Left hand in IK: The left hand shown below can start in IK, ready for the push-off without switching.
- Consider variation for interest: Optionally, introduce variety by starting one hand in FK to enhance overall movement.
- Transition from FK to IK: As the hands move onto the chair arm, transition from FK to IK for the desired effect.
- Match IK hand to last FK position: Reposition the IK hand close to the last FK position for continuity.
- Ensure smooth transition: Work on spacing and poses to maintain a smooth switch without pops or interruptions.
- Examine and tweak entire movement: Review and refine the entire animation, ensuring a cohesive and smooth appearance.
Contact points
When blocking, take some time to pose the hands during the contact points. Don't be too fussy about avoiding minor geometry pass-throughs, but aim to position the hands to feel 'connected.'
If you don't position the hands well during the blocking, you may need to adjust them a lot later in your animation as you struggle to reposition the body by even a small amount without the hands shifting too far away from the chair.
Swipe through the two images below, labelled ‘FK’ and ‘IK’. They show the basic blocked positions of the hand before and after the IK-FK switch.
- The IK hand is keyed to FK over a single frame.
- The FK hand will need to be posed to match the last position of the IK hand.
Stand from seated: Splining
- Ensure all keys and breakdowns are functioning effectively.
- Commence work on the curves in the Graph Editor.
- Check for irregular curves, overshoots, and other anomalies.
Tip: At a glance, you can often see curves that are not working because they are not smooth. Most often, curves should be slow in (arc), slow out(arc), slow in/slow out (S curve), or even (straight).
In this type of animation, it pays to keep checking that your animation is working from various angles. For example, sometimes what appears to look right from the side will look off balance from the front or back.
Stand from seated: Polish
- Re-check all curves.
- Perform a final sweep for bumps and mistakes.
- Enhance small details, such as:
- Small finger flexes when the hands grip the arms of the chair.
- Adjustments to existing keys or curves to fix small pops, add extra little bounces, or squash surfaces into each other to add weight.
- Adding expressions changes and blinks, especially when the character is stationary, i.e., at the start and end of the scene.
Planning and animating a stand from seated position
Watch Geoff plan and animate a stand from seated position in seven videos, located in the playlist below.
These videos help you complete Task 5 below.
Practice
Task 5: Plan and animate a stand from seated position
Refine your understanding of how you can portray weight shifting and redistributing by animating Bonnie 2 pushing herself off a chair and standing.
What tools or resources do you need for this task?
Make sure you have access to:
- Autodesk Maya
- Bonnie 2 character rig
- Files: Soft chair
What steps should you take to complete this task?
8-10 Hours
Set aside 8-10 hours to complete steps 1-10 below. Remember to save your work as you go when using Autodesk Maya.
- Use the workflow guidance in the 3. Stand from seated section to help you work through this learning task. You’ll also find helpful information in the previous Maya: Shot Setup and Animation Basics subtopic.
- Watch Geoff’s seven videos, carefully observing his planning and Maya animation techniques.
- Access and download the Maya scene files in Files: Soft Chair.
- Shot setup: Ensure your scene setup is 24/25fps at 1920 x 1080 in Maya. Establish a well-framed shot featuring Bonnie 2.
- Planning:
- Sketch thumbnails to plan out the main positions of the action i.e. key poses.
- Save your thumbnails as a screenshot (i.e. JPGs). Upload your screenshot to the forum to get feedback.
- Starting pose: Once you get feedback, create the starting pose to begin animating.
- Blocking: Block out all key poses and major movements of the animation to establish the timing and overall motion.
- Tip 1: Position the character's weight over their feet, ensuring they appear grounded and capable of pushing themselves off the chair without appearing off-balance. Take your time planning the character's foot placement and resist the urge to rush the blocking process.
- Tip 2: Remember to create a playblast and seek feedback at each stage of animation.
- Splining: Ensure all keys and breakdowns are functioning effectively. Commence work on the curves in the Graph Editor. Check for irregular curves, overshoots, and other anomalies.
- Polish: Focusing on improving the overall quality and realism by re-checking all curves, performing a final sweep for bumps/mistakes and creating or enhancing small details in the animation (finger flares, saccades etc).
- Save and export your animation as a playblast (MP4).
What should you do after completing this task?
- Share your thumbnails and animation to forum as separate forum posts:
- Select your forum thread in Forum: Character Animation.
- Select Reply to your first Forum post.
- Enter the words ‘Task 5: Stand’ in your new post.
- Select the Post your response button, then select Edit in your reply when it shows up.
- Upload your screenshots and MP4 using the Attachment field in separate posts.
- Select Save changes to share your coursework to your forum thread.
- Get feedback on this and other learning tasks at the next Live Session – check the Live Session calendar for dates and times.
Now that Bonnie 2 is standing back up, move to the following section, where you'll tackle the challenge of making her walk through a doorway, testing your spatial awareness and scene realism.
4. Walk through doorway
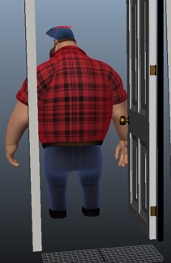
Walk through doorway: Shot setup
Follow these steps to establish a well-framed shot featuring your character:
- Reference in the character and environment into your scene.
- Create a shot camera for the scene.
- Compose the shot to fully capture the character, door, and door frame.
- Set up the shot to accommodate the walk-through action within this space.
- Once satisfied with your composition and camera position, lock the camera attributes to prevent further movement.
Walk through doorway: Animation planning - thumbnails
You must carefully plan this scene around the door and door handle:
- Assess character’s dimensions: Assess the character's reach and proportions to ensure a smooth action, avoiding issues like unreachable door handles or not fitting through the door comfortably.
- Explore poses: Begin with thumbnail poses, considering the character's silhouette during the door-opening action. Ask yourself:
- Which hand will the character use?
- Is this the best choice to keep the action visible to the audience?
- Where should the character start and finish?
- Capture reference footage: Act out the action for yourself, capturing reference footage from a similar angle to your animation.
- Observe movements: Take note of your movements as you open a door:
- Identify the anticipation.
- Simplify complex movements for clarity in the animation.
Walk through doorway: Starting pose
Using your thumbnail planning as a starting point, pose the character already at the door with their hand on the handle in preparation to open the door. Then, once you have this pose, work backwards and forwards, fleshing out the movement.
For the moment:
- Don’t worry too much about the timing of the poses on your timeline, as you can easily move them around to get your timing working better later.
- Focus on getting nice, strong poses that move smoothly from one pose to the next as per your initial planning poses.
Walk through doorway: Workflow basics
This scene requires careful working of the body and hand positions to appear natural during the door's opening.
Ideally, the character should look balanced throughout the scene and not too stretched to maintain hold of the door handle as they move through the doorway.
Careful consideration of the placement of the feet, stride length, and the position of each step will be integral in achieving a natural-looking movement in your animation.
Walk through doorway: Blocking
When blocking the main key positions, try to:
- Put the characters' weight over the feet.
- Ensure that the character does not stretch too much to either reach or hold the door handle.
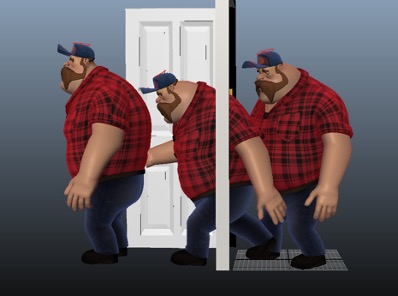
Getting your blocking poses correct will:
- Set a good foundation for your animation – if these positions work well, the rest of your work becomes much easier.
- Make it much easier for a director to give feedback and for you to complete any necessary changes.
Blocking tips
Plan first where the character’s feet will begin in the scene and where they will end up after passing through. How many steps will they take? How big are the steps?
Adding breakdowns
Next, add breakdowns to your work to:
- help smooth out the movement
- further define and improve the arcs
- manage any drag, etc.
Tip: Don’t scrub through every frame in the timeline. This ensures that what is working is a part of your keys, and your animation does not require in-between frames to make sense visually.
Back and forth
You need to work back and forth by:
- placing the body and feet
- adjusting the hand positions
- moving the door
- adjusting the body
- going back to the hands, and so on.
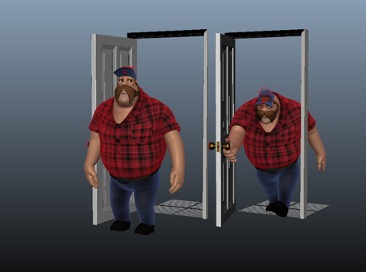
Take your time and resist the urge to rush your blocking. In this type of scene, blocking all your poses first without looking at the interpolation frames is easier.
Tip: Use the <> keys to tab through your keyed movement.
Walk through doorway: Splining
- Ensure all keys and breakdowns are functioning effectively.
- Commence work on the curves in the Graph Editor.
- Check for irregular curves, overshoots, and other anomalies.
Tip: At a glance, you can often see curves that are not working because they are not smooth. Most often, curves should be slow in (arc), slow out(arc), slow in/slow out (S curve), or even (straight).
In this type of animation, it pays to keep checking that your animation is working from various angles. For example, sometimes what appears to look right from the side will look off balance from the front or back.
If the character is large, carefully move their body through the doorframe. Moreover, repeatedly checking your blocking poses from various angles will help avoid major geometry pass-throughs.
![[ADD IMAGE'S ALT TEXT]](/sites/default/files/Splining.jpg)
Walk through doorway: Polish
- Re-check all curves.
- Perform a final sweep for bumps and mistakes.
- Enhance small details, such as details of the fingers as the character grips the door handle.
Polishing tips
Select + to view four tips that help you ensure that your walk-through doorway animation is lifelike and polished.
It's not enough in this type of animation that the door handle and hand move together - the wrist, hand, and fingers must appear to be responding to the position of the handle in the hand.
Often, animation falls short by neglecting the specific areas of interaction between characters and objects. Parenting the object to attach the handle/hand is a critical consideration for achieving a natural appearance and avoiding stiffness.
During the blocking phase, focus on ensuring the attachment of the hand to the door handle. Postpone detailed adjustments until later stages to streamline the workflow and avoid unnecessary time spent on constant refinements.
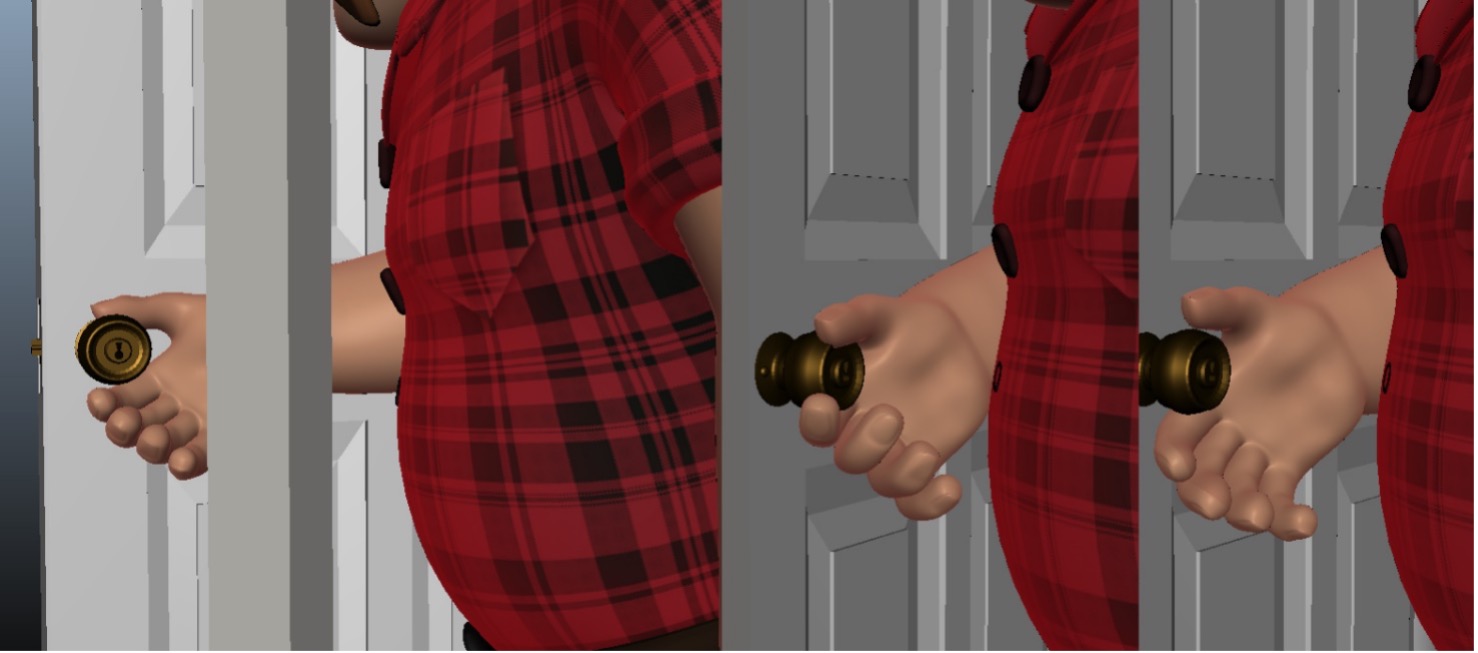
Check that your character maintains eye contact with the handle or holds a deliberate eye direction throughout the scene. This enhances character expressiveness, making them appear more alive and thinking – which is better than a blank state or a wandering eye direction.
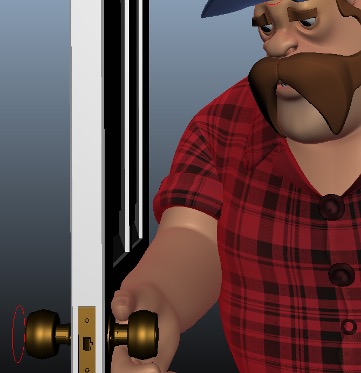
Planning and animating a walk through a doorway
Watch Geoff plan and animate another walk, this time through a doorway. This video will help you complete Task 6 below.
Practice
Task 6: Plan and animate a walk through a doorway
Hone your character animation skills by making Bonnie 2 walk through a doorway, concentrating on spatial awareness, proportions, and posing to achieve realistic movement in confined spaces.
What tools or resources do you need for this task?
Make sure you have access to:
- Autodesk Maya
- Bonnie 2 character rig
- Files: Doorway.
What steps should you take to complete this task?
10-12 Hours
Set aside 10-12 hours to complete steps 1-10 below. Remember to save your work as you go when using Autodesk Maya.
- Use the workflow guidance in the 4. Walk through doorway section to help you work through this learning task. You’ll also find helpful information in the previous Maya: Shot Setup and Animation Basics subtopic.
- Watch Geoff’s video, carefully observing his planning and Maya animation techniques.
- Access and download the Maya scene files in Files: Doorway.
- Shot setup: Ensure your scene setup is 24/25fps at 1920 x 1080 in Maya. Establish a well-framed shot featuring Bonnie 2.
- Planning:
- Sketch thumbnails to plan out the main positions of the action i.e. key poses.
- Save your thumbnails as a screenshot (i.e. JPGs). Upload your screenshot to the forum to get feedback.
- Starting pose: Once you get feedback, create the starting pose to begin animating.
- Blocking: Block out all key poses and major movements of the animation to establish the timing and overall motion.
- Tip 1: Position the character's weight over their feet and ensure they don’t stretch excessively to reach or hold the door handle. Plan the foot placement carefully to determine the number of steps they will take and the size of each step. Try to plan your placement of the character to reduce the number of steps or moves the character must make to move through the doorway.
- Tip 2: Remember to create a playblast and seek feedback at each stage of animation.
- Splining: Ensure all keys and breakdowns are functioning effectively. Commence work on the curves in the Graph Editor. Check for irregular curves, overshoots, and other anomalies.
- Polish: Focusing on improving the overall quality and realism by re-checking all curves, performing a final sweep for bumps/mistakes and creating or enhancing small details in the animation (finger flares, saccades etc).
- Save and export your animation as a playblast (MP4).
What should you do after completing this task?
- Share your thumbnails and animation to forum as separate forum posts:
- Select your forum thread in Forum: Character Animation.
- Select Reply to your first Forum post.
- Enter the words ‘Task 6: Doorway’ in your new post.
- Select the Post your response button, then select Edit in your reply when it shows up.
- Upload your screenshots and MP4 using the Attachment field in separate posts.
- Select Save changes to share your coursework to your forum thread.
- Get feedback on this and other learning tasks at the next Live Session – check the Live Session calendar for dates and times.
Transition to the next section after animating Bonnie 2's walk through a doorway, where you'll face the exciting challenge of making her vault high over a fence, honing your skills in physical momentum and coordination.
5. Fence vault
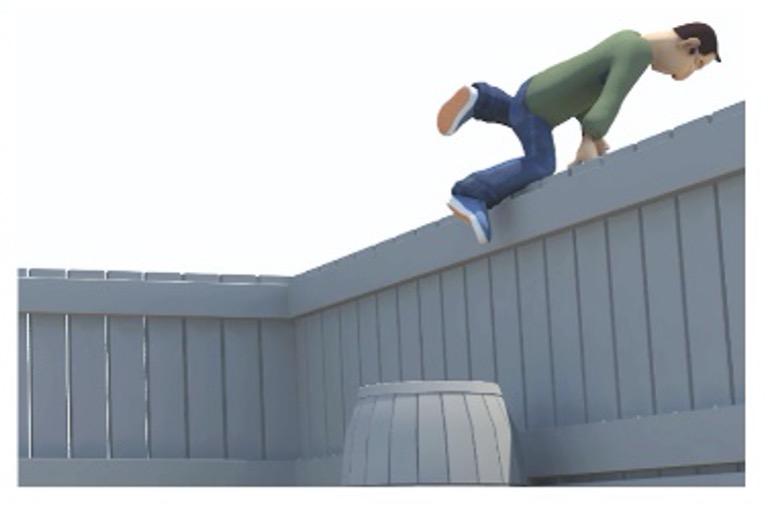
Reflection
Keep moving
You've reach the midpoint of this Body Mechanics subtopic! Stop and think about how you can apply your insights to the remaining learning tasks. Consider how:
- Planning and thumbnailing is enhancing your visualisation of character action.
- Insights you’ve gained about timing, spacing, and weight distribution can improve your next animations.
- Your understanding of character movement and posing keeps evolving.
- Continually refining your workflow approach can create increasingly dynamic character actions.
Reflecting on these points will reinforce your understanding of body mechanics and prepare you for future animation projects. Keep up the great work!
Fence vault: Shot setup
Follow these steps to establish a well-framed shot featuring your character:
- Reference in the character and environment into your scene.
- Create a shot camera for the scene.
- Position the character and fence rails within a three-quarter composition, slightly to one side of the fence, in a long shot frame.
- Set your camera position at roughly eye level with the character.
- Once satisfied with your composition and camera position, lock the camera attributes to prevent further movement.
Fence vault: Animation planning - thumbnails
Follow these steps to plan your fence vault animation:
- Shoot reference footage:
- Film a fence vault from an angle and composition similar to your shot setup.
- Capture multiple variations of the action to chose the best performance.
- Plan key positions using reference:
- Review the reference footage to understand weight and timing.
- Use notes and thumbnail sketches to plan key positions, focusing on paths/arcs, silhouettes, and poses.
- Experiment with different variations before finalising the action.
- Consider IK-FK integration and transitions:
- Determine how IK and FK will be used during the shot.
- Plan transitions between IK and FK if required.
Fence vault: Starting pose
Choosing which pose you will start with is up to you as an animator:
- Maybe start with the main vaulting pose with the character gripping the fence halfway through the action, then work backwards and forwards from there?
- Or could it be better to start with the vault's first position, where the character grips the fence?
- Or the landing position after the vault?
This initial blocking sets the tone and establishes the parameters of the animation sequence, so it is well worth spending as much time as needed to establish a good framework for your animation.
Fence vault: Workflow basics
Decide whether your character's arms will start on either:
- IK to hold on to the fence easily or
- FK and then switch when the character grips the fence.
Ensure to also key elbow and knee pole vector controls (for elbow and knee direction).
Fence vault: Blocking
Blocking key poses
- Block in key poses, making sure the character is well-positioned to reach the fence.
- Use your reference video to help with the posing and timing of the action.
- Think about where the weight is, the flow of the movement, the arcs of the main body, and the hands and feet positions.
- Look at the drag on the arms and hands.
![[ADD IMAGE'S ALT TEXT]](/sites/default/files/Fence%20Vault%202_0.jpg)
Workflow maintenance
- Regularly save your shot to avoid lost work in a program crash.
- Check basic posing and timing, adjust poses, and shift keys on the timeline to adjust timing.
Playback and version control
- Playblast often to ensure you view your animation at full speed rather than just what the computer preview speed can handle in Maya.
- Save your scene as a new version before making major changes to the animation. This way, if your changes do not work as expected, returning to an earlier version of your shot is easier without starting over.
Fence vault: Splining
- Ensure all keys and breakdowns are functioning effectively.
- Commence work on the curves in the Graph Editor.
- Check for irregular curves, overshoots, and other anomalies.
Tip: At a glance, you can often see curves that are not working because they are not smooth. Most often, curves should be slow in (arc), slow out(arc), slow in/slow out (S curve), or even (straight).
In this type of animation, it pays to keep checking that your animation is working from various angles. For example, sometimes what appears to look right from the side will look off balance from the front or back.
Fence vault: Polish
- Re-check all curves.
- Perform a final sweep for bumps and mistakes.
Tip
Check your arcs
The previous topic – Maya: Shot Set and Animation Basics – recommended the Arc Tracker plugin. It tracks selected objects and creates a motion trail so you can easily see the arcs of a path of motion.
Consider using Arc Tracker to check arcs on main body parts when you polish your fence vault animation. You select the control you want to track, select Add Objects, then Create/Recreate Trail.
Bonus tip: Start with the torso, then move out to the limbs. Smooth out any kinks and pops, and tighten timing on any floaty animation.
Planning and animating a fence vault
Watch Geoff plan and animate a fence vault in this video, which will help you complete Task 7 below.
Practice
Task 7: Plan and animate a fence vault
Ever vaulted a fence? It takes momentum, balance, and coordination. Have a go at portraying these aspects of body mechanics by animating Bonnie 2 crossing this major hurdle!
What tools or resources do you need for this task?
Make sure you have access to:
- Autodesk Maya
- Bonnie 2 character rig
- Files: Fence vault.
What steps should you take to complete this task?
10-12 Hours
Set aside 10-12 hours to complete steps 1-10 below. Remember to save your work as you go when using Autodesk Maya.
- Use the workflow guidance in the 5. Fence vault section to help you work through this learning task. You’ll also find helpful information in the previous Maya: Shot Setup and Animation Basics subtopic.
- Watch Geoff’s video, carefully observing his planning and Maya animation techniques.
- Access and download the Maya scene files in Files: Fence vault.
- Shot setup: Ensure your scene setup is 24/25fps at 1920 x 1080 in Maya. Establish a well-framed shot featuring Bonnie 2.
- Planning:
- Sketch thumbnails to plan out the main positions of the action i.e. key poses.
- Save your thumbnails as a screenshot (i.e. JPGs). Upload your screenshot to the forum to get feedback.
- Starting pose: Once you get feedback, create the starting pose to begin animating.
- Blocking: Block out all key poses and major movements of the animation to establish the timing and overall motion.
- Tip 1: Use reference videos to guide the posing and timing. Consider the drag on the arms and hands for added realism. Save your work regularly and playblast your animation frequently to review it at full speed.
- Tip 2: Remember to create a playblast and seek feedback at each stage of animation.
- Splining: Ensure all keys and breakdowns are functioning effectively. Commence work on the curves in the Graph Editor. Check for irregular curves, overshoots, and other anomalies.
- Polish: Focusing on improving the overall quality and realism by re-checking all curves, performing a final sweep for bumps/mistakes and creating or enhancing small details in the animation (finger flares, saccades etc).
- Save and export your animation as a playblast (MP4).
What should you do after completing this task?
- Share your thumbnails and animation to forum as separate forum posts:
- Select your forum thread in Forum: Character Animation.
- Select Reply to your first Forum post.
- Enter the words ‘Task 7: Fence vault’ in your new post.
- Select the Post your response button, then select Edit in your reply when it shows up.
- Upload your screenshots and MP4 using the Attachment field in separate posts.
- Select Save changes to share your coursework to your forum thread.
- Get feedback on this and other learning tasks at the next Live Session – check the Live Session calendar for dates and times.
Having portrayed Bonnie 2's fence vault, progress to the next section and elevate your animation prowess by making her run, capturing this movement’s heightened pace and energy.
6. Run cycle
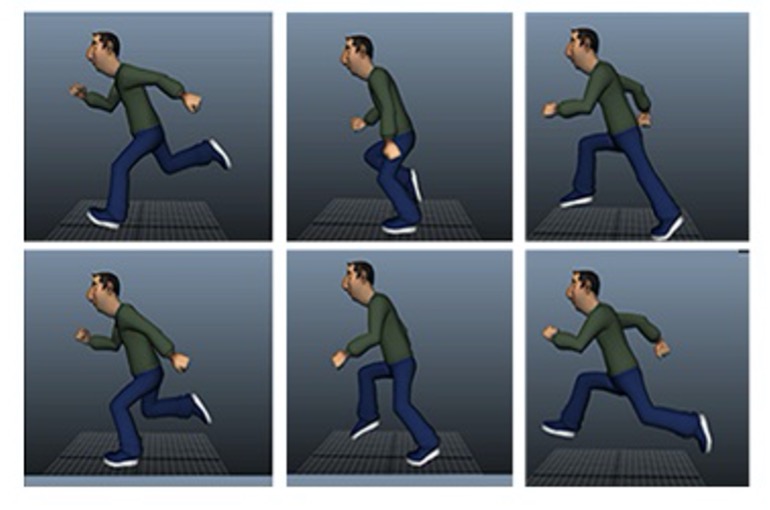
Run cycle: Shot setup
Follow these steps to establish a well-framed shot featuring your character:
- Reference in the character into your scene.
- Create a shot camera for the scene.
- When working on a walk or run cycle:
- Start by working from the side and front orthographic views.
- Move into the shot or perspective camera view when refining your animation.
- Use the front and side views with background reference grids for planning your animation poses.
- Use the background reference grids to ensure consistent spacing of the feet and accurate head and waist heights for both right and left steps.
Run cycle: Animation planning - thumbnails
Planning a run cycle will resemble the process you followed when you planned the walk cycle. The main difference with the run cycle is that there will be at least one frame (or more) where both the character’s feet are off the ground.
Think about the character’s body position. Should the character be upright? Should they lean forward? Or maybe lean backwards? How much arm movement will they be using?
Sometimes, it's better to reduce the amount of arm movement so that the running action - with less rapid limb movement - is clearer for the audience. The leg movement should be the main focus of the run action.
Run cycle: Starting position
Your first pose will establish the run's attitude, so take your time when posing the character.
Check the character's line of action, balance, and weight to get the best possible starting point for your animation to build around.
Run cycle: Main positions
The four main positions for the run cycle resemble those of a basic walk cycle. These main positions will be repeated for the opposite leg before the cycle starts again on frame 1.
Select + to read about the four main positions of a run cycle.
The Contact position establishes the stride length.
- The front foot heel contacts the ground. The rear foot heel is lifting off the ground.
- The arms move opposite to feet, e.g., when the left foot is forward, the left arm is swinging back.
- Put the character's weight over the feet and try to show the weight spread evenly above the grounded feet.
Note: The level of the head during this Contact position is not the lowest position for a walk cycle, but it is lower than the Passing position. The head level also reflects the waist level.
The Extreme Down position shows:
- The character's weight being taken on the front leg.
- Their rear leg is still grounded but is about to lift off.
Note: The level of the head during the Extreme Down position is the lowest position for a walk cycle. The head level also reflects the waist level.
During the Passing position the character’s:
- rear leg swings through on an arc.
- arms also swing through on arcs.
Note: The head level during Passing is not the highest position for a walk cycle but is higher than the Contact and Extreme Down positions. The head level also reflects the waist level.
During the Extreme Up position the rear leg moves past the passing position toward the ground.
Note :The level of the head during this position is the highest position for a walk cycle. The head level also reflects the waist level.
The next main position is the Contact position.
Run cycle: Blocking
Block the main poses first:
- Contact
- Extreme Down
- Passing (both feet off the ground)
- Extreme Up.
Repeat for the opposite run step.
Blocking tips
You need to work back and forth, checking the keys are the same from one side of the body to the other.
Take your time and resist the urge to rush your blocking. In this type of scene, blocking all your poses first without looking at the interpolation frames is easier.
Adding breakdowns
Add breakdowns to your work to:
- help smooth out the movement
- further define and improve the arcs
- manage any drag, etc.
Run cycle: Splining
- Ensure all keys and breakdowns are functioning effectively.
- Commence work on the curves in the Graph Editor.
- Check for irregular curves, overshoots, and other anomalies.
Playblast often to ensure you view your animation at full speed rather than just what the computer preview speed can handle in Maya.
Save your scene as a new version before making major changes to the animation. This way, if your changes do not work as expected, returning to an earlier version of your shot is easier without starting over.
Tip: At a glance, you can often see curves that are not working because they are not smooth. Most often, curves should be slow in (arc), slow out(arc), slow in/slow out (S curve), or even (straight).
Run cycle: Polish
- Re-check all curves.
- Perform a final sweep for bumps and mistakes.
Explore
Animate multiple variations of your run cycle!
Once you finish polishing your first run cycle, experiment with timings, exaggeration, and styles to infuse more vitality into the run.
Seek inspiration from references and have a go at emulating the running styles of your favourite characters for added creativity!
Planning and animating a run cycle
Watch Geoff plan and animate a run cycle in this video, which will help you complete Task 8 below.
Practice
Task 8: Plan and animate a run cycle
Strengthen your character animation expertise and adapt your knowledge of a walk cycle by making Bonnie 2 run in this second animation cycle. What adjustments will you make to reflect the faster pace?
What tools or resources do you need for this task?
Make sure you have access to:
- Autodesk Maya
- Bonnie 2 character rig.
What steps should you take to complete this task?
6-8 Hours
Set aside 6-8 hours to complete steps 1-9 below. Remember to save your work as you go when using Autodesk Maya.
- Use the workflow guidance in the 6. Run cycle section to help you work through this learning task. You’ll also find helpful information in the previous Maya: Shot Setup and Animation Basics subtopic.
- Watch Geoff’s video, carefully observing his planning and Maya animation techniques.
- Shot setup: Ensure your scene setup is 24/25fps at 1920 x 1080 in Maya. Establish a well-framed shot featuring Bonnie 2.
- Planning:
- Sketch thumbnails to plan out the main positions of the action i.e. key poses.
- Save your thumbnails as a screenshot (i.e. JPGs). Upload your screenshot to the forum to get feedback.
- Starting pose: Once you get feedback, create the starting pose to begin animating.
- Blocking: Block out all key poses and major movements of the animation to establish the timing and overall motion.
- Tip 1: Ensure consistency by checking that the key poses mirror each other symmetrically on both sides of the body. Avoid rushing and focus on blocking all poses before adjusting the timing of the action.
- Tip 2: Remember to create a playblast and seek feedback at each stage of animation.
- Splining: Ensure all keys and breakdowns are functioning effectively. Commence work on the curves in the Graph Editor. Check for irregular curves, overshoots, and other anomalies.
- Polish: Focusing on improving the overall quality and realism by re-checking all curves, performing a final sweep for bumps/mistakes and creating or enhancing small details in the animation (finger flares, saccades etc).
- Save and export your animation as a playblast (MP4).
What should you do after completing this task?
- Share your thumbnails and animation to forum as separate forum posts:
- Select your forum thread in Forum: Character Animation.
- Select Reply to your first Forum post.
- Enter the words ‘Task 8: Run’ in your new post.
- Select the Post your response button, then select Edit in your reply when it shows up.
- Upload your screenshots and MP4 using the Attachment field in separate posts.
- Select Save changes to share your coursework to your forum thread.
- Get feedback on this and other learning tasks at the next Live Session – check the Live Session calendar for dates and times.
How are you feeling? Continue your journey by moving on to the next section, where you'll tackle the dynamic animation of a blast impact and Bonnie 2’s subsequent fall backwards, pushing the boundaries of your character animation skills.
7. Blast then fall backwards
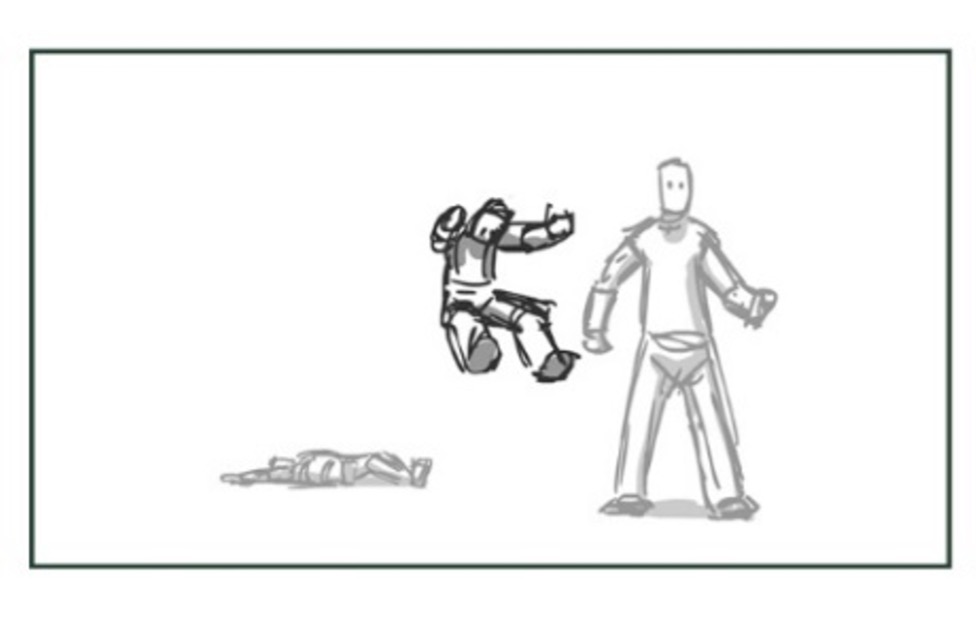
Blast then fall backwards: Shot setup
Follow these steps to establish a well-framed shot featuring your character:
- Reference in the character into your scene.
- Create a shot camera for the scene.
- Create a ground plane for the character to stand on. Ensure the ground plane is sized appropriately for the action.
- Frame the shot composition as a long shot with the character framed in a full body shot.
- Set your camera position at eye level with the character.
- Once satisfied with your composition and camera position, lock the camera attributes to prevent further movement.
Blast then fall backwards: Animation planning - thumbnails
You've probably seen a shot in a movie shot where a character realises what’s about to happen a split-second before they're blasted off their feet by the blast of a shotgun or explosion.
This shot - 'Blast then fall backwards' - can get that same slight character reaction the moment before the blast throws them back. You can infuse your shot with:
- a realistic sense of weight and force as the character falls
- an impactful secondary action and settling after the character impacts the ground before coming to a complete rest.
Break down the shot into four stages to plan your animation. Select the four cards to identify these stages.
When thumbnailing, try to create at least one strong pose for each of the four stages and then build the rest of the posing around these main positions.
![[ADD IMAGE'S ALT TEXT]](/sites/default/files/Realisation.jpg)
Blast then fall backwards Starting pose
Choosing which pose you will start with is up to you as an animator. Pick the pose that speaks to you and work backwards and forwards from there.
This initial blocking sets the tone and establishes the parameters of the animation sequence, so it is well worth spending as much time as needed to establish a solid framework for your animation.
Blast then fall backwards Blocking
Blocking key poses
- Block in key poses; the hit of the blast happens at frame 15.
- Use your planning and thumbnails to help with character posing and spacing.
Animation considerations
- Think about where the weight of the character is, the flow of the movement, arcs of the main body, hands and feet.
- Look at the drag on the arms, head and legs.
- Delay keys on limbs and head at the end; they will settle slightly after the body.
Playback and version control
Playblast to check your progress, check basic posing and timing, adjust poses, and shift keys to change timing.
Save your scene as a new version before making major changes to the animation. This way, if your changes do not work as expected, returning to an earlier version of your shot is easier without starting over.
Playblast often to ensure you view your animation at full speed rather than just what the computer preview speed can handle in Maya.
Adding expressions
When the main action of the body looks good, add a change of expression near the beginning of the shot as the character realises they are about to get blasted.
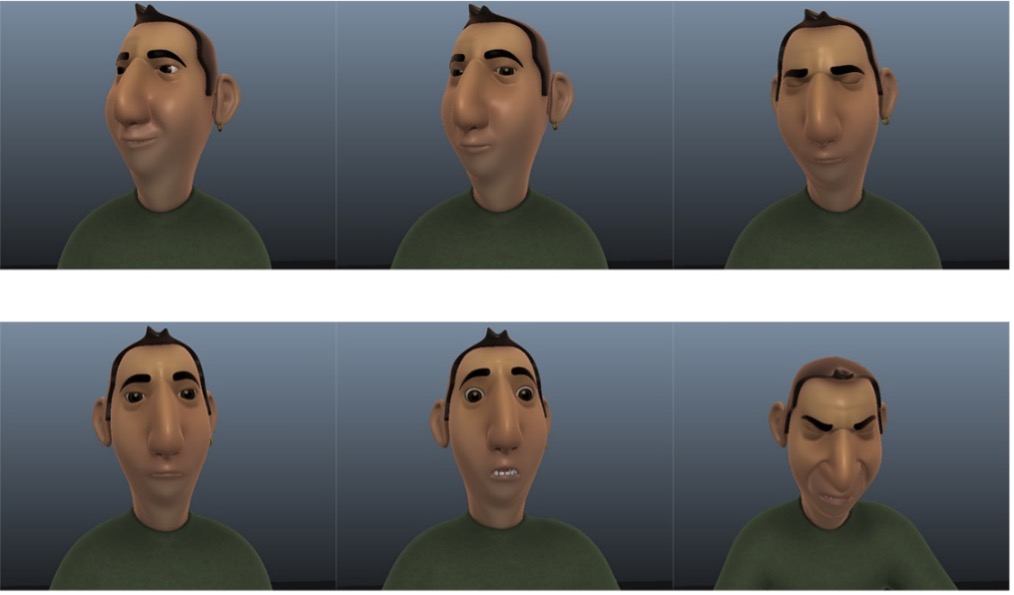
Blast then fall backwards Splining
- Ensure all keys and breakdowns are functioning effectively.
- Commence work on the curves in the Graph Editor.
- Check for irregular curves, overshoots, and other anomalies.
Tip: At a glance, you can often see curves that are not working because they are not smooth. Most often, curves should be slow in (arc), slow out(arc), slow in/slow out (S curve), or even (straight).
In this type of animation, it pays to keep checking that your animation is working from various angles. For example, sometimes what appears to look right from the side will look off balance from the front or back.
Blast then fall backwards Polish
- Re-check all curves. Start with the torso, then move out to the limbs.
- Perform a final sweep for bumps and mistakes. Smooth out any kinks and pops, and add finger detail.
Planning and animating a blast then fall backwards shot
Watch Geoff plan and animate a blast then fall backwards shot in this video, which will help you complete Task 9 below.
Practice
Task 9: Plan and animate a blast then fall backwards shot
Challenge your character animation abilities and master the portrayal of weight and force by animating Bonnie 2 experiencing a blast impact and falling backwards. Dramatic!
What tools or resources do you need for this task?
Make sure you have access to:
- Autodesk Maya
- Bonnie 2 character rig.
What steps should you take to complete this task?
10-12 Hours
Set aside 10-12 hours to complete steps 1-9 below. Remember to save your work as you go when using Autodesk Maya.
- Use the workflow guidance in the 7. Blast then fall backwards section to help you work through this learning task. You’ll also find helpful information in the previous Maya: Shot Setup and Animation Basics subtopic.
- Watch Geoff’s video, carefully observing his planning and Maya animation techniques.
- Shot setup: Ensure your scene setup is 24/25fps at 1920 x 1080 in Maya. Establish a well-framed shot featuring Bonnie 2.
- Planning:
- Sketch thumbnails to plan out the main positions of the action i.e. key poses.
- Save your thumbnails as a screenshot (i.e. JPGs). Upload your screenshot to the forum to get feedback.
- Starting pose: Once you get feedback, create the starting pose to begin animating.
- Blocking: Block out all key poses and major movements of the animation to establish the timing and overall motion.
- Tip 1: Incorporate a change of expression early in the shot to depict the character's realisation of being blasted. Delay keys on the limbs and head towards the end, allowing them to settle after the main body action.
- Tip 2: Remember to create a playblast and seek feedback at each stage of animation.
- Splining: Ensure all keys and breakdowns are functioning effectively. Commence work on the curves in the Graph Editor. Check for irregular curves, overshoots, and other anomalies.
- Polish: Focusing on improving the overall quality and realism by re-checking all curves, performing a final sweep for bumps/mistakes and creating or enhancing small details in the animation (finger flares, saccades etc).
- Save and export your animation as a playblast (MP4).
What should you do after completing this task?
- Share your thumbnails and animation to forum as separate forum posts:
- Select your forum thread in Forum: Character Animation.
- Select Reply to your first Forum post.
- Enter the words ‘Task 9: Blast’ in your new post.
- Select the Post your response button, then select Edit in your reply when it shows up.
- Upload your screenshots and MP4 using the Attachment field in separate posts.
- Select Save changes to share your coursework to your forum thread.
- Get feedback on this and other learning tasks at the next Live Session – check the Live Session calendar for dates and times.
Transition to the next section after completing Bonnie 2's blast animation, where you'll embark on the final task of making her lift a heavy atlas ball, refining your abilities to portray weight, strain, and kinetic energy in animation.
8. Lifting a heavy object
Weight transferral
Animating a convincing scene in which a character lifts a heavy object (like an atlas ball) is a difficult thing to do. But thinking about weight transferral – as the character pits their energy and strength against gravity – is useful when practising this type of animation.
![[ADD IMAGE'S ALT TEXT]](/sites/default/files/Animating.jpg)
Lifting a heavy object: Shot setup
Follow these steps to establish a well-framed shot featuring your character:
- Reference in the character and environment into your scene.
- Create a shot camera for the scene.
- Frame the shot composition as a long shot with the character framed in a full body shot.
- Set your camera position at roughly eye level with the character.
- Once satisfied with your composition and camera position, lock the camera attributes to prevent further movement.
Lifting heavy object: Animation planning - thumbnails
The posing of the character can indicate to the audience how heavy an object is. Think about your character's posing and how you can best use the spine’s curvature and the strain on the limbs to show the audience the weight of the atlas ball.
Swipe the two sets of sketches below to get an idea of how posing can indicate weight.
Spine curvature and limb strain
Think of the spine as a fishing pole with a heavy fish on the end of it.
In an attempt to pull the weight, the pole pivots from the base, and the weight pulls down on the pole's upper end; as this happens, the pole (i.e. spine) curves and flexes.
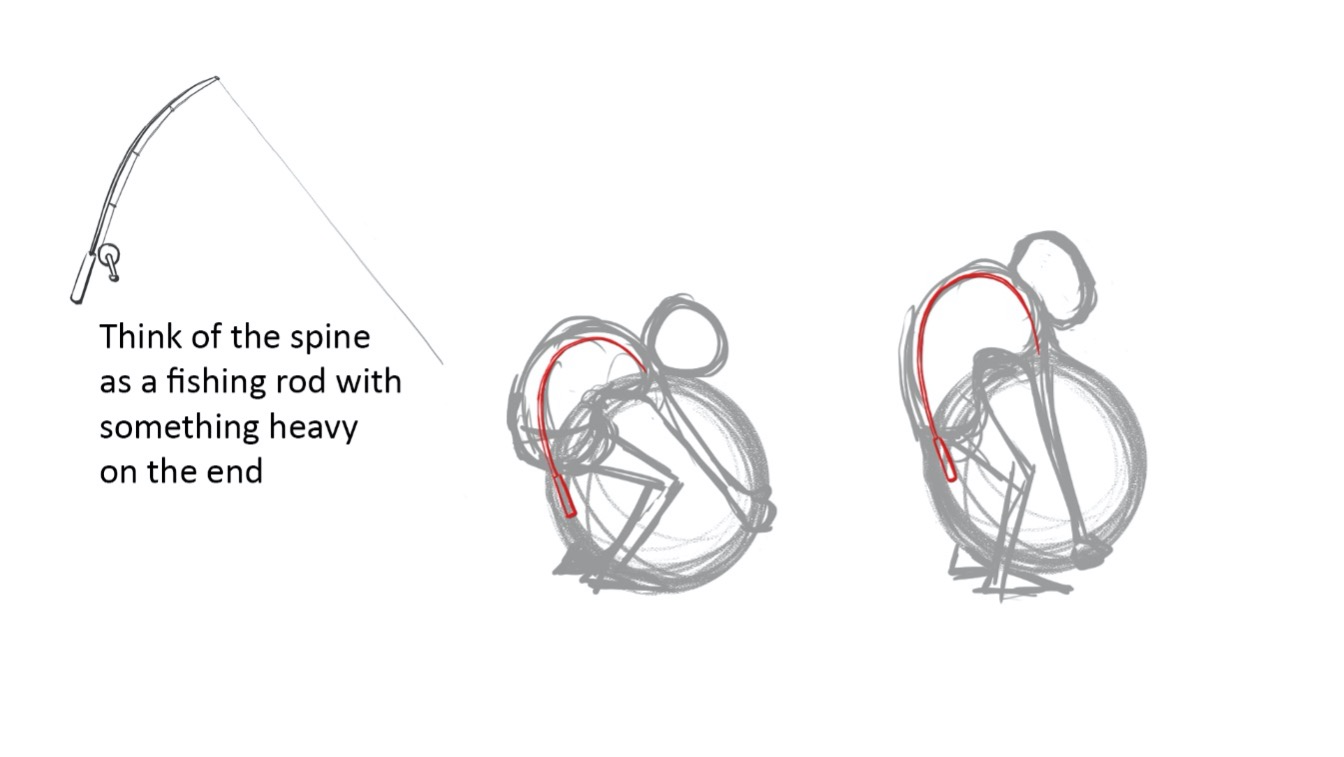
The arms will always be straight if they take the ball's weight. You may even want to stretch the arms slightly, which is easier when drawing your poses but may not be possible with a character rig.
If the arms bend, then the illusion of weight will be lost.
Ball grip
The ball itself will want to fall back to the ground at any opportunity, so it will try to rotate towards the ground from the point at which the character is holding it.
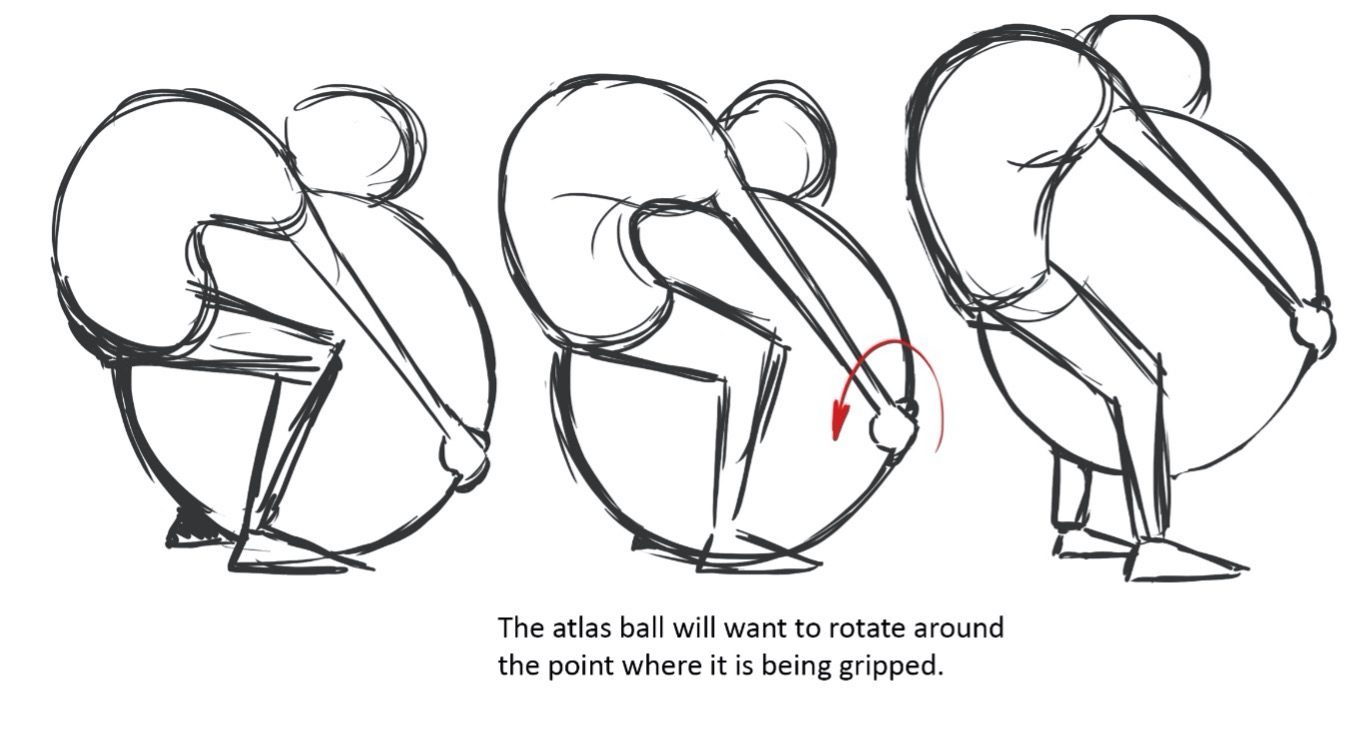
Where the character grips the ball will also say something about how heavy the object is.
Tip
Lines of action
It can be useful to begin your thumbnails by observing a line of action or ‘rhythm’ line in each pose. Good poses with a strong line of action can make every difference in your animation.
Lifting heavy object: Starting pose
Choosing which pose you will start with is up to you as an animator.
This initial blocking sets the tone and establishes the parameters of the animation sequence, so it is well worth spending as much time as needed to establish a solid framework for your animation.
Lifting heavy object: Blocking
With a heavy weight, body energy must begin much sooner than the ball begins to move.
- The body energy will begin moving noticeably before the ball (the shape of the back, the straightening of the arms, the extension in the neck).
- The ball does not move with the body's energy. It stays still, actually dropping slightly during the moment of weight transfer. It takes longer before the body energy begins to move/lift the ball.
![[ADD IMAGE'S ALT TEXT]](/sites/default/files/Gravity.jpg)
Useful tool: ZV Parent Master
This shot requires the character to maintain a grip/point of contact with the ball in enough areas to appear to be holding it. The shot should avoid sliding hands or grip points.
You can use various methods – such as manually applying parent constraints, as well as frame-by-frame adjustments – to help manage these aspects of the animation, A useful tool to help you animate objects in mutual contact is the ZV Parent Master script.
Tip
Help your workflow
The previous topic – Maya: Shot Set and Animation Basics – recommended ZV Parent Master. It’s a very helpful script that creates key frame constraints between objects It’s available from Autodesk App Store or ZV Parent Master 1.3 (its creator’s website).
When using tools and scripts, always let these three basic rules guide you:
- If it looks good, it doesn’t matter how you did it!
- If it works for you, use it!
- If it doesn’t work for you, then don’t use it!
Select + to read more about ZV Parent Master (ZV).
ZV is a simple button that allows you to key a constraint, for example, between an object and a hand. This means you can snap/lock the hand onto a desired object such as a ball, using keys on your timeline to control whether the two objects are locked together or unlocked. When the object needs to be picked up or gripped, ZV can lock it to the object, and the lock can be released when the object is let go or placed down.
Although this type of tool is common, there is no fixed workflow that you must learn. As you develop your approach to animation workflow, you need to experiment with ZV to see how and when it works. Dedicate an hour or two to playing with the script and seeing how it works and what it does.
ZV may work wonderfully in some situations but create problems in others:
- Because you essentially lock pivot points together, the animation may only sometimes look right when you 'connect' two things together. When you grip or hold something, the exact point of contact between you and the object may be constantly changing. So having two objects appear connected at a non-moving point only sometimes looks right.
- So, you may be able to use ZV for parts of your animation but still require keying each frame in other parts to make the interaction believable.
Lifting heavy object: Splining
- Ensure all keys and breakdowns are functioning effectively.
- Commence work on the curves in the Graph Editor.
- Check for irregular curves, overshoots, and other anomalies.
Tip: At a glance, you can often see curves that are not working because they are not smooth. Most often, curves should be slow in (arc), slow out(arc), slow in/slow out (S curve), or even (straight).
In this type of animation, it pays to keep checking that your animation is working from various angles. For example, sometimes what appears to look right from the side will look off balance from the front or back.
Lifting heavy object: Polish
- Re-check all curves.
- Perform a final sweep for bumps and mistakes.
- Enhance small details, such as the details of the hands and fingers as they grip the ball.
Planning and animating lifting a heavy object
Watch Geoff plan and animate lifting a heavy object in this video, which will help you complete Task 10 below.
Practice
Task 10: Plan and animate lifting a heavy object
How heavy? Refine your skills further by animating Bonnie 2 lifting an atlas ball, emphasising weight transfer, physical strain, and body energy to create a convincing and impactful movement.
What tools or resources do you need for this task?
Make sure you have access to:
- Autodesk Maya
- Bonnie 2 character rig
- Files: Heavy object.
What steps should you take to complete this task?
10-12 Hours
Set aside 10-12 hours to complete steps 1-10 below. Remember to save your work as you go when using Autodesk Maya.
- Use the workflow guidance in the 8. Heavy object section to help you work through this learning task. You’ll also find helpful information in the previous Maya: Shot Setup and Animation Basics subtopic.
- Watch Geoff’s video, carefully observing his planning and Maya animation techniques.
- 3. Access and download the Maya scene files in Files: Heavy object.
- Shot setup: Ensure your scene setup is 24/25fps at 1920 x 1080 in Maya. Establish a well-framed shot featuring Bonnie 2.
- Planning:
- Sketch thumbnails to plan out the main positions of the action i.e. key poses.
- Save your thumbnails as a screenshot (i.e. JPGs). Upload your screenshot to the forum to get feedback.
- Starting pose: Once you get feedback, create the starting pose to begin animating.
- Blocking: Block out all key poses and major movements of the animation to establish the timing and overall motion.
- Tip 1: Ensure the body's energy begins the movement before the ball starts to lift, with indicators such as changes in the back's shape, arm straightening, and neck extension. Allow a brief timing delay in the ball’s response to convey the weight effectively.
- Tip 2: Remember to create a playblast and seek feedback at each stage of animation.
- Splining: Ensure all keys and breakdowns are functioning effectively. Commence work on the curves in the Graph Editor. Check for irregular curves, overshoots, and other anomalies.
- Polish: Focusing on improving the overall quality and realism by re-checking all curves, performing a final sweep for bumps/mistakes and creating or enhancing small details in the animation (finger flares, saccades etc).
- Save and export your animation as a playblast (MP4).
What should you do after completing this task?
- Share your thumbnails and animation to forum as separate forum posts:
- Select your forum thread in Forum: Character Animation.
- Select Reply to your first Forum post.
- Enter the words ‘Task 10: Heavy’ in your new post.
- Select the Post your response button, then select Edit in your reply when it shows up.
- Upload your screenshots and MP4 using the Attachment field in separate posts.
- Select Save changes to share your coursework to your forum thread.
- Get feedback on this and other learning tasks at the next Live Session – check the Live Session calendar for dates and times.
Congratulations on mastering Bonnie 2's challenging movements! Celebrate your momentum through Body Mechanics and venture into the next subtopic, Acting-Based Mechanics.
You'll explore a whole new dimension of character animation, infusing characters with personality, emotion, and depth and further expanding your animation experience and creative capabilities.
Learn how to integrate a character’s emotions, expressions, and thought processes with animation techniques, focusing on applying acting-based mechanics to help you animate Bonnie 2 sighing.
Basic mechanics of a sigh
A sigh animation can be challenging as it demands more subtle movements, which, if not handled with care and attention, can look disjointed. So, what are the basics mechanics of a sigh?
Select + to read about a sigh’s three main poses.
The anticipation of the character moving slightly forward and down with the shoulders drooping slightly.
The up position, where the character's:
- movement is back and up
- shoulders come back and up
- chest inflates while they inhale, ready for the sigh action.
Note: This up position pose may vary depending on how exaggerated the sigh is, as performed by the actor who recorded the sound.
The sigh action where the character's:
- movement is forward and down
- shoulders come down again
- chest deflates while they expel their breath, which creates the sound of a sigh.
Note: This sigh action pose is the part that will be synced up with the sound in your voice-over track.
Acting choices for a sigh
Important acting choices when animating a sighing scene includes how to create a feeling that the character is thinking for themselves.
A character will not just suddenly sigh out of nowhere. There must be a lead-up to the action and visible signs that an internal monologue is going on in the moments just before the character sighs.
Lead-up to the sigh
In the lead-up to the sigh, you need to create time for the character to think.
Swipe the two key frames below to see key frames 1 and 2 a sigh shot, in which the character thinks.
But what can the character do while thinking?
- You can't just hold the character in a static pose; otherwise, the character will look dead and uninteresting.
- Conversely, you can’t make the character can't move around too much because that wouldn't work well with the overall mood and feeling around the sigh action.
So what can you do?
Build a backstory
The movement in the moments before that sign will entirely depend on the story elements of the scene you are animating.
If you don't have any information about what has happened to the character to make them sigh, you must make up something to help inform your acting choices.
You need to listen to the audio of the sigh and decide what kind of sigh it is. Is it:
- an angry sigh or a sad sigh?
- a sigh of utter exasperation because a child asks the same question for the 100th time?
- a sigh of a character thinking about:
- events in the past?
- everything they must do to prepare for an event in the future?
Swipe the five key frames below to see key frames 3-7 of the sigh shot, in which the character then sadly sighs.
Decide on a short backstory similar to these possibilities and use it as a starting point to help you build a short sequence leading into the sigh action.
Actions and movements for expressing thought
If used with restraint and subtlety, you can use actions and movements to help you show a character thinking.
Head turns and head movement
In the context of a sigh, a slight, partial head turn works well. An up/down head movement means the character can look at or focus their attention on something, for example:
- their hands
- a part of the environment on or off-screen,
- another character on or off-screen.
Example: A character expressing thought
- Swipe through this example (two images) of a typical head turn with a start position and an end position for the action.
- Swipe again (three images) to identify the anticipation pose for the head turn. It’s built into the movement – the head comes down to establish an arcing movement with the eyes closed in a blink.
To make the anticipation pose more appealing, it should slightly favour one side or the other of the head turn; in this case, the position slightly favours the start position. - Swipe again (four images) to view the addition of an accent into a head turn by creating another key favouring the end position. The character will move into this accent position quickly during the turn, hitting on the accent and settling into the final position as the character eases into the final key
- Swipe again (four images). Any head movement should incorporate arcs, whether a broad movement like this example or a more subtle movement.
Moving holds
A moving hold is where you create two almost identical poses so that a small amount of interpolation happens between the two poses. This interpolation helps to keep the character alive while appearing almost static.
When you move into the Splining phase of animation, the slight difference between the poses creates the interpolation you need to keep the character alive.
To create a moving hold, follow these two steps:
- Create a key pose where you want your hold to be.
- Duplicate the pose and slightly push that pose a little further to create a slight movement or change between the two.
The good thing about this creation method is you’ve built the moving hold into your animation's initial Blocking phase – so it's much clearer from the very early stages of your animation what you intend for the timing of your scene, both for you while animating and anyone that you show your animation to.
Blinks
Adding blinks can be a simple but very effective method to keep a character alive during the still sections of an animation.
Blink timing
Different types of meaning can be given by simply adjusting the timing used to open and close the eye.
- A fast or ‘alert’ blink will perhaps only need one breakdown between open and close.
- A slow ‘sleepy’ blink will require many more in-between frames.
![[ADD IMAGE'S ALT TEXT]](/sites/default/files/Eye%20Closing.jpg)
![[ADD IMAGE'S ALT TEXT]](/sites/default/files/Eye%20Blinking%202.jpg)
A standard blink has one in-between either side of the breakdown.
Swipe the two images below to compare the blink timing chart with the eye closing key drawings and in-betweens.
Eye saccades
Saccades are quick darting eye movements that move around the character's current eyeline or eye direction.
In the following clip, you can see a graphic version of an eye with:
- eye direction changes, then
- a series of saccades to imply that the eye is scrutinising something closely, then
- another change of eye direction and another series of saccades.
Look at the clip’s timeline below:
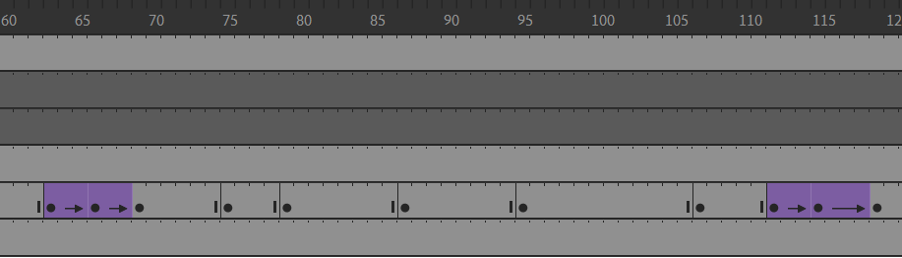
- The eye direction changes are made over six or seven frames with easing and a central key to establish an arc.
- The saccade movements are made from one frame to the next without interpolation between the eye positions.
- The saccade movements are held for four frames at the shortest to 12 frames at the longest.
When creating your saccades, experiment with the movement between each saccade and the number of frames you hold the movement for. The composition of your shot and the size of the character's eyes in the frame will determine how well the saccades will read to the audience.
Tip
Optimise your eye animation
If there is a large amount of character movement, don't animate saccades, as you won't be able to see them.
Saccades work best if you can clearly see the subtle eye movements, so save them for scenes where you can see the character's eyes and when there is not too much character movement happening.
Cohesive expressions
When creating expressions, remember two key points:
- The face is quite fleshy, and a few areas will squash and deform.
- If one part of the face moves, then it will also affect the other parts of the face around it.
Eyebrows
Think of eyebrows as if they connect to each other with an elastic string. If one eyebrow moves up, it will pull on the other eyebrow, appearing to flow from one into another.
![[ADD IMAGE'S ALT TEXT]](/sites/default/files/Eyebrows.jpg)
Cheeks and mouth
The cheeks will move in response to any movement of the mouth.
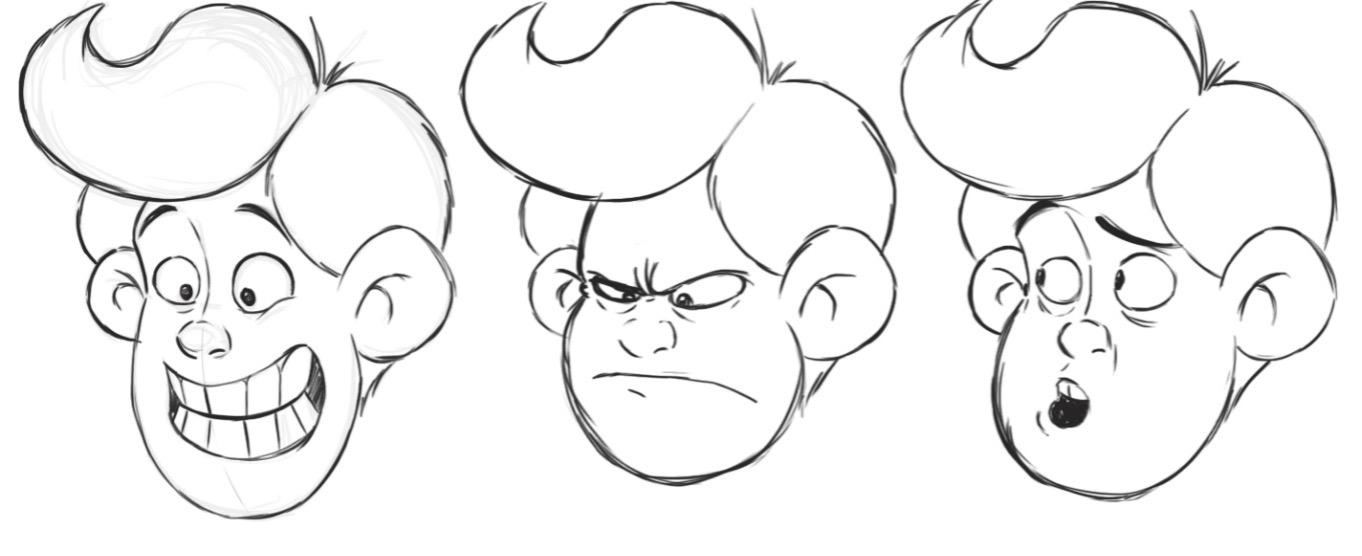
Example 1: A smile
To make a character smile, you move the corners of the mouth up. But just moving the corners of the mouth is not quite enough; the cheeks must also move up in response as the mouth movement squashes them.
Example 2: A sneer
You need to consider which part of a mouth moves to form an expression or mouth shape for dialogue.
In a sneer, for example, the mouth on either side of the nose moves up towards the eyes, which will, in turn, squash the cheeks more in that area and less on the outer edges.
Eyes
The eyes will be affected by the character's eyebrows and cheeks.
Think of the eyes as being stuck in the middle between two opposing forces. If one or the other moves, then the eye shape will be squashed or stretched in response.
For example, if the brow or cheek moves away from the eye, then the eye will widen and stretch in response to the movement.
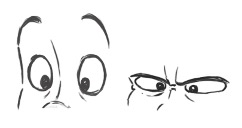
Animation workflow for a sigh
Select + to view each of the seven workflow steps for planning and animating a sigh.
- Reference in the character and environment.
- Create a shot camera in your scene.
- Frame your shot composition as a mid-shot with the character framed from the waist or chest up, ensuring headroom above the character.
- Set your camera position at roughly eye level with the character.
- Once satisfied with your composition and camera position, lock all camera attributes to prevent further movement.
- Plan out your animation in thumbnail form.
- Decide on the character's inner monologue.
- Devise a subtle action to depict the character thinking before the sigh.
- Explore different poses for the character based on their overall attitude.
- Begin posing the main acting section of the shot.
- Block in movement around the character's inner monologue.
- Keep the acting minimal to maintain consistency between the acting and the action.
- Plan and establish the main attitude of the character.
- Consider whether the character is sad or tired.
- Use the character's attitude to guide how you pose them in the scene.
- Begin blocking in the main acting poses for the lead-up to the sigh action.
- Keep the acting minimal, focusing on one or two poses to maintain consistency.
- Allocate sufficient time on the timeline for the character to think.
- Block in the main sigh poses, starting with anticipation, followed by the up pose and the sigh pose.
- Conclude by allowing the character to settle after the sigh action.
- Ensure all keys and breakdowns are functioning effectively.
- Commence work on the curves in the Graph Editor.
- Check for irregular curves, overshoots, and other anomalies.
Tip: At a glance, you can often see curves that are not working because they are not smooth. Most often, curves should be slow in (arc), slow out(arc), slow in/slow out (S curve), or even (straight).
In this type of animation, it pays to keep checking that your animation is working from various angles. For example, sometimes what appears to look right from the side will look off balance from the front or back.
- Re-check all curves.
- Perform a final sweep for bumps and mistakes.
- Enhance small details, focussing on facial expressions, eye saccades, etc.
Planning and animating a sigh
Watch Geoff plan and animate a sigh in eight videos, located in the playlist below.
These videos helps you complete Task 11 below.
Practice
Task 11: Plan and animate a sigh
Develop your skills in conveying character emotions and thought processes by planning and animating a sigh, breathing life into Bonnie 2 and evoking a sense of expressive, subtle realism through your animation.
What tools or resources do you need for this task?
Make sure you have access to:
- Autodesk Maya
- Bonnie 2 character rig
- Files: Sigh.
What steps should you take to complete this task?
10-12 Hours
Set aside 10-12 hours to complete steps 1-10 below. Remember to save your work as you go when using Autodesk Maya.
- Use the workflow guidance in this Acting-Based Mechanics subtopic to help you work through this learning task at any point. You’ll also find helpful information in the earlier Maya: Shot Setup and Animation Basics subtopic.
- Watch Geoff’s eight videos, carefully observing his planning and Maya animation techniques.
- Access and download the audio track: Files: Sigh.
- Optional: You can also record and use your own audio.
- Shot setup: Ensure your scene setup is 24/25fps at 1920 x 1080 in Maya. Establish a well-framed shot featuring Bonnie 2.
- Planning:
- Decide on the character’s inner monologue and devise a subtle action to depict their thoughts before the sigh.
- Sketch thumbnails to plan out different poses based on the character’s overall attitude and head movements.
- Save your thumbnails as a screenshot (i.e. JPGs). Upload your screenshot to the forum to get feedback.
- Starting pose: Once you get feedback, create the starting pose to begin animating.
- Blocking: Block out all key poses and major movements of the animation to establish the timing and overall motion.
- Tip 1: Keep the acting minimal. Start with anticipation, followed by the up pose and the sigh position and conclude by allowing the character to settle after the sigh action. Create a wave movement in the head and neck during the sigh action.
- Tip 2: Remember to create a playblast and seek feedback at each stage of animation.
- Splining: Ensure all keys and breakdowns are functioning effectively. Commence work on the curves in the Graph Editor. Check for irregular curves, overshoots, and other anomalies.
- Polish: Focusing on improving the overall quality and realism by re-checking all curves, performing a final sweep for bumps/mistakes and creating or enhancing small details in the animation (finger flares, saccades etc).
- Save and export your animation as a playblast (MP4).
What should you do after completing this task?
- Ask yourself:
- How did you ensure that the main poses conveyed the gradual buildup and release of tension associated with a sigh?
- How did you use techniques such as head turns, moving holds, blinks, and eye saccades to convey the character's internal dialogue and mood?
- Share your thumbnails and animation to forum as separate forum posts:
- Select your forum thread in Forum: Character Animation.
- Select Reply to your first Forum post.
- Enter the words ‘Task 11: Sigh’ in your new post.
- Select the Post your response button, then select Edit in your reply when it shows up.
- Upload your screenshots and MP4 using the Attachment field in separate posts.
- Select Save changes to share your coursework to your forum thread.
- Get feedback on this and other learning tasks at the next Live Session – check the Live Session calendar for dates and times.
Great work on sharpening your skills at integrating emotions and expressions into your animation! In the next and final Character Animation subtopic, you’ll explore how to synchronise Bonnie 2’s movements and facial expressions with spoken dialogue, enabling richer storytelling and more compelling narratives.
Explore the intricacies of lip sync animation and how to integrate dialogue with character expressions and poses, culminating in animating a dialogue scene.
Lip sync animation
As a character animator, you'll often animate character acting sequences that include characters talking with each other in dialogue or in solo monologue performances.
The principles developed for acting and lip sync animation used in hand-drawn cartoons are identical to those used in 3D animation, so applying those principles will prepare you to animate character acting and lip sync in any animation medium.
Key differences with lip sync animation
Essentially, lip sync for 3D animation is the same as that for standard character animation, with one essential difference: in 3D animation, lip sync must be synchronised to a specific timing, as pre-determined by the voice track.
So, as an animator you need to deliver character acting performances while also synchronising the action with mouth movements.
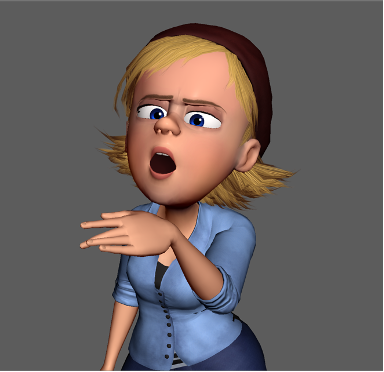
Planning the character acting performance
You also need to plan the character acting performance precisely to the last frame to match the timing of the voice recording due to a fixed and non-flexible scene duration.
Voice
During a character animation that involves voice performance, you plan your character performance around the voice track. This process begins by identifying the accents in the voice track and designing poses to suit the character and situation.
Tip
Uncover accents
When listening to a voice track, you can recognise certain parts of the delivery as more emphatic. These are often the areas where the character's voice is louder, and you hear more emotion in the delivery.
In animation, these peaks in the voice performance are referred to as accents (or ‘hits’).
With a voice track, you need to note the frame number and position for each accent. But how do you identify which words have an accent?
- You can often identify accents by the amplified peaks or spikes in the wave format on a digital voice track:
- Listen to the differences in the tone, cadence, and inflexion of the voice performance. After listening to a voice recording a few times, you can identify the words that will be ‘accented’ in your animation. Specifically, accents are most often long vowels of a word, for example, the ‘a’ sound in ‘cake’.
Poses
The poses must accentuate the voice acting and be believable – it's important to synchronise the movement so the accents are ‘felt’ during the performance.
You approach this by:
- using animation principles
- anticipating each accent
- using clear arcs to move between poses
- effectively cushioning your movements.
You can also use varied spacing, squash and stretch, overlapping action, and drag to enhance the animation.
Planning steps
A basic lip sync workflow includes three essential planning steps:
- Identify the accents
- Plan strong poses
- Plan how poses move into each other
Follow these five steps when you start to plan your lip sync animation scene.
- Listen to your voice recording.
- Say the words aloud multiple times.
- If available, check the WAV format for peaks or spikes
- Identify accents in the voice performance.
- Write down the words, underlining the accented vowels.
2. Plan strong poses
When working in an animation studio, you often base your character animation on:
- poses already described in a storyboard, or
- more detailed poses provided by the animation director.
If you’re working on your own animation scene and have the freedom to plan any actions you choose, plan simple poses that clearly show the character's gestures and expressions.
Facial expressions do not need to be detailed, but body, pose, and gesture should convey a clear attitude. Strong gestural poses are the key to a good character performance, so develop these thoroughly before animating.
Tip
Pose yourself some questions
As you gain experience as an animator, you’ll become more confident in your choice of poses, as well as action and timing.
There are many things to consider, but ask yourself these starter questions when drawing your poses for a lip sync animation:
- What is your character's attitude during each part of the performance?
- What emotion does the character feel?
- How does your body react when you experience that emotion?
- Is there a shift from one emotion to another during the scene?
- How will the character move from one pose to the next?
- Are their actions fast or slow, smooth or erratic?
- Are there too many actions or poses in your initial idea?
3. Plan how poses move into each other
Once you’ve drawn your best attitude poses, plan how one pose moves into the next.
Often, you'll begin planning around the clearest storytelling poses and actions (usually the biggest accents in the dialogue). So, you could plan in and out of a pose in the middle of your acting scene rather than starting with your first pose and always working forward.
Other times, you may just plan from the start of a scene to its finish.
Mouth shapes and phrasing
Look in the mirror. Slowly mouth different sounds and letters of the alphabet. Observe your mouth and the shapes it makes.

Some mouth shapes are useful for understanding how the mouth can describe different sounds – or phonemes – in a character’s performance.
Important
What’s a phoneme?
Within animation, the word ‘phoneme’ refers to each basic sound the mouth can make, represented by specific mouth shapes.
Mouth charts
In any animated production, a mouth chart is developed for each main character, which includes an image of each of the basic phonemes.
Hand-drawn animation: Traditional mouth charts
Hand-drawn animation studios circulated a generic mouth chart for main characters in a cartoon animation, which provided animators with the basic mouth shape for each phoneme.
Swipe the nine images below to view the basic mouth shapes.
Stylised consistency: Generic mouth charts
These are not the only mouth shapes you can use. Still, they commonly comprise the generic mouth chart - used for hand-drawn animated TV productions and a development of the hand-drawn animation pipeline.
Usually, a generic mouth chart is produced for each main character, and animators use these to plan mouth shapes for each frame, keeping the design and model of the character consistent during lip sync.
In this way, the generic mouth chart ensures the stylised look of an animated production, as all animators will be sure to draw the same shapes as those created by the character designers.
Also, using the generic mouth chart, animators can plan and indicate all mouth shapes for a scene on their exposure sheet without needing to complete all their drawings - the assistant animators and clean-up artists follow the mouth shapes indicated on the exposure sheet to complete the drawings.
Emotion and design variations in mouth shapes
Emotion
Basic mouth shapes look different depending on the character's emotions.
Swipe the nine images below to view the basic mouth shapes for a sad expression. The shapes look different from the happier expressions shown above, even though the phonemes are the same
Design
Mouth shapes also vary based on a character’s design features and face shape.
Below is an example showing generic mouths designed for a specific character with a distinctive squared, angular mouth.
Despite the unusual mouth design, the design of each phoneme must still read clearly and relate to the other mouth shapes correctly.

Explore
What about character rigs?
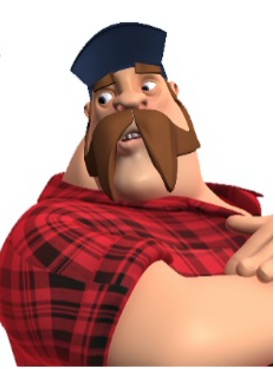
3D character rigs often include pre-made mouth shapes for various phonemes or emotions.
Using mouth controls and blend shapes, rigs can achieve a wide variety of requirements for lip sync, including subtle and unusual shapes to describe the nuances of expressive character performance.
Simplifying mouth movements with phrasing
When animating lip sync in an acting scene, it’s important not to describe every letter or sound with a different mouth shape. If you used a different mouth shape for each sound, the animation will be too jerky and erratic.
Instead, look for ways to describe groups of sounds by simplifying mouth movements. One way is to simplify smaller lip shapes by making them ‘blurred’ or blended into broader jaw movements as the mouth transitions from open to closed.
Example: “Everybody knows!”
For example, read out loud the line: “Everybody knows!”. If you count the syllables, you’ll find the line has five to six syllables.
Select the five cards below to see the ten shapes you need to use if you were to animate all the different sounds.
As you can see, the mouth opens five times.
But you can simplify it to just three main movements if you observe the basic, broad shapes made with the mouth as it opens and closes:
This time, the mouth opens three times.
In this way, the “Everybody knows!” phrase will be more appealing and simplified. It stops the phrase from distracting the audience due to any excessive mouth movement.
Principles of character acting
Select + to view each of the five principles to follow when animating a character acting and dialogue scene.
You should apply these principles for any type of character acting animation, including hand-drawn, 3D and digital 2D - they provide a simple workflow and a solid platform from which your creative ideas can grow.
- Begin by planning your storytelling poses for each accent in the voice recording.
- Create strong gestures and attitudes in your poses. Although not essential, it is preferable to sketch your poses so you can see your ideas forming. Experiment with different poses and search for the strongest character performance.
- The initial poses are planned for the accents. For each accent of your dialogue, you should design a strong gesture pose, a moving or motion pose, and an action.
- Example: Your character may gesture with their hand but also lean forward with their body and head as they gesture. In this way, you can convey and emphasise the voice accent with an equivalent body accent.
- These poses will occur exactly during the frame of the voice accent. The mouth will also hit its broadest shapes to convey the vowels during the accents. Generally, your character will pop into each accent.
- An anticipation pose must occur immediately before each accent in preparation for the broad movement during the accents. The anticipation will create a stronger accent by providing a greater contrast between poses.
- Plan anticipation poses for each of the accents in the voice recording. Create strong gestures and attitudes in your poses, use opposing actions for movements requiring stronger contrast, and use squash and stretch to emphasise the accented movements.
- During an anticipation pose, a character squashes slightly, closes their eyes and draws into a tighter mouth shape in preparation for the pop into the accent. This pop generally occurs simultaneously in the body gesture and the mouth lip sync, and in animation terms, is referred to as the gap.
- The gap between anticipation and accent is the core of the animation movement. Around the gap, you base your arcs as your character moves from anticipating, through its accents, cushioning into each new position.
- The size of the gap can vary in both spacing and timing. So, you can move your anticipation pose and accent pose further apart in space (spacing) for a broader action or closer together for a softer movement. Or you can adjust the distance in time between your anticipation pose and your action pose
- Moving the poses closer together in time results in a quicker movement, creating a stronger, more emphatic hit or pop during the accent. This is because there will be fewer frames for smoothing between the keys and fewer in-betweens or interpolations. Moving the accent further in time from the anticipation allows more frames for smoothing between the two, creating a slower movement.
- For example, visualise a character waking from a daydream by saying “What?” in the following way:
- The character would start posed slumped in a blank stare, close their eyes momentarily, their head moving down a little and pursing their lips (anticipation, WH), before straightening in their body and looking up, their eyes popping open as they hit the vowel accent of WHAT? (accent).
- The character would then move slightly slower than if they were abruptly startled out of their daydream, and the gap would be slightly longer and the spacing softer or less broad.
- Try to visualise your animation moving through the gap you create between your antic and accent, and adjust the spacing and/or timing to achieve the effect you are aiming for. With only one frame between antic and accent, you may favour either the antic pose or the accent rather than position a standard breakdown. Which pose needs to be ‘felt’ for longer?
- Cushion each hit along an arc established by the position of the anticipation and the accent poses. The impact of the accent will determine the amount of cushioning required, i.e., with broader spacing or shorter timing between antic and accent, you would typically use more cushioning to soften the movement sufficiently.
- You can also soften the overall impact of each accent by using more frames to slow into your anticipation pose. It is important to plan smooth arcs between all your poses. Action should move along arcs, S curves and figure 8’s.
- In longer acting scenes with several accents, where a character moves into several different poses, you should design smooth and appealing arcs that flow from one accent to the next rather than poses that fight each other. Look over your storytelling and accent poses early in your planning to see how they move from one pose to the next. Adjust positions and pose choices to achieve smooth-flowing and appealing arcs throughout your scene.
- The resting or cushion pose from one accent can move naturally along the same arc into the anticipation pose for the next accent. Your lips sync should also move along smooth arcs, S curves and figure 8’s.
- Try looking in a mirror, move your mouth into different shapes and observe the arcs of movement. Appealing and smooth lip sync animation will move along clear arcs that move with or compliment the body's acting accents.
- It is important to use various poses that contrast tension and relaxation, curves and straights, and broad and subtle, realistic and exaggerated movements.
- Both broad and smooth spacing should be used. Timing can be varied between short and sharp, and soft and slow. This variety will add believability, texture, and character to your animation, and applies to your lip sync, body movements, and facial expression.
- Use texture but always adhere to the basic principles that provide the framework to build a successful character animation performance.
Explore
Explore the animation community!
To practice applying these five principles and workflow, consider joining the 11 Second Club where creativity thrives!
You can participate in their monthly character animation competition and witness the magic unfold. Top entries chosen by the community receive valuable critiques from leading animators worldwide.
Embrace the opportunity to enhance your skills and connect with the vibrant animation community!
Importing audio into Maya
To import audio into your scene on Maya, select any of the four options below:
- Right-mouse click the volume icon in the Playback Options and select Import Audio. A file browser lets you select the name of the sound file(s) to import. If an audio offset is embedded with the file, it will appear in the File Type Specific Options. You can also specify an offset in this field as well.
- Select Audio > Import Audio... from the Animation menu set (F4).
- Select File > Import from the main menu bar. A file browser lets you select the name of the sound file(s) to import. If an audio offset is embedded with the file, it will appear in the File Type Specific Options. You can also specify an offset in this field as well.
- Drag the file(s) from a file browser into one of the Maya viewports or onto the Time Slider. The audio waveform fills the Time Slider. Right-mouse click the waveform on the Time Slider and select Sounds from the Animation controls menu.

Select + to view five additional guidelines for audio import and configuration in Maya.
Specify an offset for the audio file in the Attribute Editor by:
- Right-mouse click the waveform
- Select Sounds >
from the Animation Controls menu. Specify the starting frame for audio playback in the Offset field.
If audio is not audible during playback but is heard when scrubbing the timeline, adjust settings:
- Go to Windows > Settings and Preferences.
- Select the Animation Section:
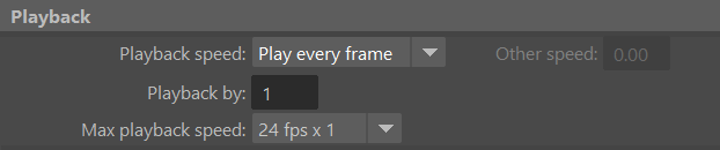
- Change playback from ‘Play every Frame’ to ‘24 fps x 1’.
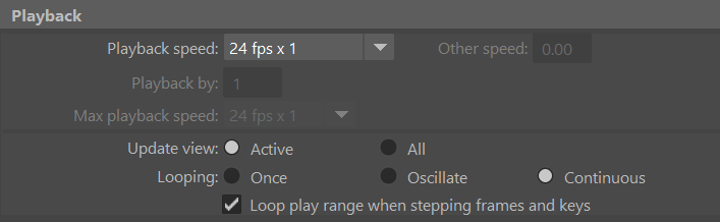
You should now be able to hear your audio file when playing back your animation.
Convert .wav files created on a Mac to a Windows-compatible format before importing them into Maya.
Maya supports various audio file formats on different operating systems:
| Operating system | Audio file format |
|---|---|
| Linux | .aiff, .wav, .bwav |
| Windows | .aiff, .wav, .bwav |
| Mac OS | .aiff, .wav, .bwav, .mp3 |
- You cannot import a sound file whose filename begins with a number.
- If you created the sound file on a different machine. ensure that all codecs used to create the file are installed on the importing machine.
- On Mac OS X, .mp3 files can only be dragged and dropped onto the Time Slider; they cannot be imported using File > Import.
Animation workflow for a dialogue scene
Select + to view each of the six workflow steps for planning and animating a dialogue scene.
- Reference in the character and create a shot camera in your scene.
- Import the audio file.
- Frame the shot composition based on the acting and dialogue.
- Position the camera at eye level with the character.
- Initially leave the shot camera unlocked until you have a clear idea of the action and acting in your shot
- Lock camera attributes after blocking planning and starting pose.
- Listen to the provided audio track multiple times, identifying main accent points.
- Plan accents in thumbnail form, considering posing around each accent. Ask yourself these questions:
- Where will the anticipations be? What will they look like?
- How are you going to move from one accent to the next?
- What might the rough timing be?
- Are you going to add a gap to create more impact?
- Where are the cushions and settle poses?
- Explore posing ideas for the character based on the audio track. Ask yourself these questions:
- Are your acting choices too cliché?
- Is this the clearest action? Can you simplify your idea?
- Pose the main accent of the dialogue, syncing it with the dialogue track on the timeline.
- Establish the character's main attitude. Are they sad, angry, tired, or apathetic?
- Consider how the character's attitude influences your planning and posing choices.
- Begin blocking in your accent poses, syncing them with the dialogue track on the timeline.
- Avoid excessive acting to ensure clarity for the audience.
- Incorporate moments of minimal movement, allowing the character to think and to create breathing spaces for both the character and the audience.
- Ensure all keys and breakdowns are functioning effectively.
- Commence work on the curves in the Graph Editor.
- Check for irregular curves, overshoots, and other anomalies.
Tip: At a glance, you can often see curves that are not working because they are not smooth. Most often, curves should be slow in (arc), slow out(arc), slow in/slow out (S curve), or even (straight).
In this type of animation, it pays to keep checking that your animation is working from various angles. For example, sometimes what appears to look right from the side will look off balance from the front or back.
- Re-check all curves.
- Perform a final sweep for bumps and mistakes.
- Enhance small details, focussing on facial expressions, eye saccades, small movements of the hands and fingers, etc.
Planning and animating a dialogue scene
Watch Geoff plan and animate a dialogue scene in seven videos, located in the playlist below.
These videos helps you complete Task 12 below.
Practice
Task 12: Plan and animate a dialogue scene
The final Character Animation learning task! Here's your chance to practise integrating dialogue with expressive movements to create a compelling and believable dialogue scene that communicates Bonnie 2’s emotions.
What tools or resources do you need for this task?
Make sure you have access to:
- Autodesk Maya
- Bonnie 2 character rig
- Files: Youvebeenacting.
What steps should you take to complete this task?
12-16 Hours
Set aside 12-16 hours to complete steps 1-10 below. Remember to save your work as you go when using Autodesk Maya.
- Revisit the information in this Acting With Dialogue subtopic to help you work through this learning task at any point. You’ll also find helpful information in the earlier Maya: Shot Setup and Animation Basics subtopic.
- Watch Geoff’s seven videos, carefully observing his planning and Maya animation techniques.
- Access and download the audio track: Files: Youvebeenacting.
- Shot setup: Ensure your scene setup is 24/25fps at 1920 x 1080 in Maya. Establish a well-framed shot featuring Bonnie 2.
- Planning:
- Listen to the audio track and identify the main accent points in the dialogue .
- Sketch thumbnails to plan out the accents, considering the posing around each accent. Explore posing ideas and mouth shapes for the character based on the audio track.
- Save your thumbnails as a screenshot (i.e. JPGs). Upload your screenshot to the forum to get feedback.
- Starting pose: Once you get feedback, pose the main accent of the dialogue, syncing it with the dialogue track on the timeline.
- Blocking: Block in accent poses, syncing it with the dialogue track on the timeline.
- Tip 1: Avoid excessive acting to ensure clarity for the audience. Incorporate moments of minimal movement, allowing the character to think and to create breathing spaces for both the character and the audience.
- Tip 2: Remember to create a playblast and seek feedback at each stage of animation.
- Splining: Ensure all keys and breakdowns are functioning effectively. Commence work on the curves in the Graph Editor. Check for irregular curves, overshoots, and other anomalies.
- Polish: Focusing on improving the overall quality and realism by re-checking all curves, performing a final sweep for bumps/mistakes and creating or enhancing small details in the animation (finger flares, saccades etc).
- Save and export your animation as a playblast (MP4).
What should you do after completing this task?
- Ask yourself:
- Did your experimention with posing and mouth shapes contribute to your understanding of animating lip sync and conveying emotion through dialogue?
- How did you apply the five principles of character acting to Bonnie 2’s performance in the dialogue scene?
- Share your thumbnails and animation to forum as separate forum posts:
- Select your forum thread in Forum: Character Animation.
- Select Reply to your first Forum post.
- Enter the words ‘Task 12: Dialogue’ in your new post.
- Select the Post your response button, then select Edit in your reply when it shows up.
- Upload your screenshots and MP4 using the Attachment field in separate posts.
- Select Save changes to share your coursework to your forum thread.
- Get feedback on this and other learning tasks at the next Live Session – check the Live Session calendar for dates and times.
Hopefully, you’ve enjoyed flattening out your Character Animation learning curve by integrating dialogue with expressive movements and creating a compelling character performance with Bonnie 2.
You've honed your skills in planning strong poses, controlling timing, and synchronising actions with dialogue, laying a solid foundation for future and more complex character animation. Great work!
In this Character Animation topic, you’ve equipped yourself with new skills that will help you infuse your characters with dynamic and expressive movement. You’ve:
- manipulated character rigs, exploring various setups to bring your characters to life on screen
- created essential poses by using animation workflow elements, from planning to posing characters
- optimised your animation workflow in Maya, learning the ins and outs of shot setup and animation processes
- applied your knowledge of body mechanics to capture the essence of human movement by creating various action and gesture shots
- integrated acting-based mechanics and dialogue to convey emotion and thought, culminating in nuanced and complex character animation.
Remember, nothing beats experience gained through practice, experimentation, and trial and error. Embrace challenges, learn from your mistakes, and keep refining your skills. With each animation, your characters will become even more captivating and expressive. Keep pushing your boundaries, and never stop learning!
Reflect on what you’ve learnt, practised, and achieved
As you wrap up this topic, take a moment to reflect on what you've learnt, practised, and achieved by completing the various learning tasks in this topic.
Consider how you've grown as an animator and the challenges you've overcome. Think about how you'll apply your emerging character animation skills and insights to your coursework and future projects. And remember to celebrate your progress!
| # | Learning Task Name | Duration (Hours) | |
|---|---|---|---|
| 1 | Manipulate a character rig | 1 | |
| 2 | Create 3 poses | 3 | |
| 3 | Plan and animate a ball toss | 8 | |
| 4 | Plan and animate a walk cycle | 8 | |
| 5 | Plan and animate a stand from a seated position | 10 | |
| 6 | Plan and animate a walk through a doorway | 12 | |
| 7 | Plan and animate a fence vault | 12 | |
| 8 | Plan and animate a run cycle | 8 | |
| 9 | Plan and animate a blast then fall backwards | 12 | |
| 10 | Plan and animate lifting a heavy object | 12 | |
| 11 | Plan and animate a sigh | 12 | |
| 12 | Plan and animate a dialogue scene | 16 | |