Introduction
In this topic we’ll:
- describe the information you need to include in your site analysis plan
- use online tools to identify the sun’s path in relation to our site
- walk through the steps involved in drawing up the site analysis plan for a garden.
By the end of this topic you’ll be able to:
- Draw a site analysis plan for a garden, which shows both site and environmental information.
The first task is to trace key elements of the base plan. We don’t need to trace everything, but equally, we don’t want to leave so bare that we can’t interpret the site without overlaying it onto the base plan.
Trace the following:
- All site boundaries.
- All site buildings. Use a thick pen (0.5 or 0.8) and just draw the outside wall, leaving gaps for windows and doors – you don’t need to add the graphic symbols on this drawing.
- Fences that are 1.8m high or taller. We’ll need to consider their shadows when designing the new garden.
- Trees and shrubs. Trace the trunk and the spread. A single circle for the tree spread will do for this drawing.
- Trace the outline of plant masses / garden beds. Don’t worry about using the graphic symbol for planting mass.
By the time we’ve added annotations and other site information we’ll be able to interpret the drawing even when separated from the base plan.
Next, we’ll add in the environmental information: those things that are not on the site itself. We do this first so that annotations about the site itself don’t get in the way of these bigger notes.
Because environmental information usually relates to a big part of our site, if not all of it, these notes can take up a lot of space. Start with the biggest one first. This is almost always the sun path.
Indicating the sun’s path
First we need to find the sun’s path for our location, during both summer and winter. Go to https://sun-direction.com/country/new-zealand/ and:
- Find the closest city to you to see the sun path map.
- Set the date at the top of the page to the summer solstice (21 December).
- Look at the map and take note of the position of the sunrise (the yellow line coming off the cross heading approximately east) and the sunset (the orange line heading approximately west.
- Set the date at the top of the page to the winter solstice (21 June).
- Look at the map again and take note of the position of the sunrise and sunset.
The winter solstice is the shortest day and the day that the shadows are at their longest. The summer solstice is the longest day and has the shortest shadows. 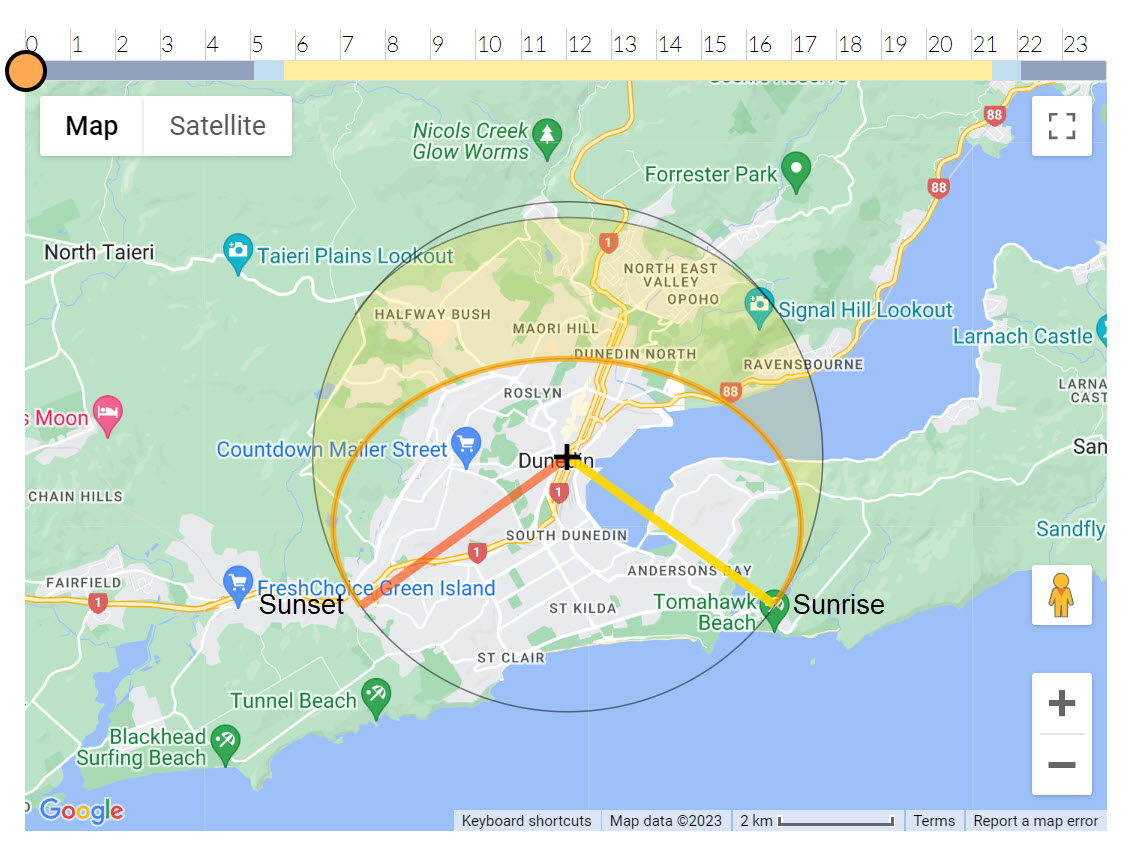 The sun’s path on the summer solstice in Ōtepoti Dunedin.
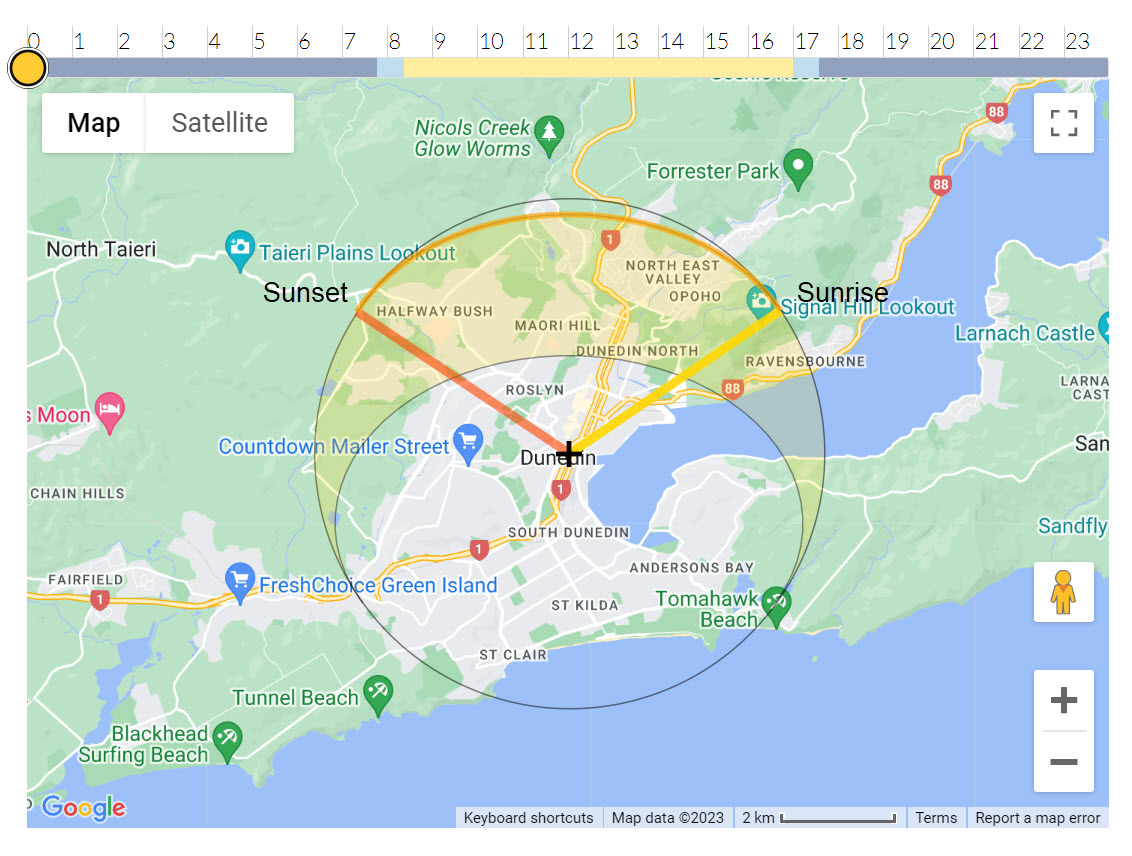 The sun’s path on the winter solstice in Ōtepoti Dunedin. Note the sunrise and sunset positions are close to 60 degrees different when compared to the summer solstice.
There are two main ways of showing this on our plan. The one you choose will depend on how much space you have on the page, and your own preference.
The first option is to create an arc around the site that shows the sun’s path in summer and in winter. Place this as close to the edge of the page as possible.
The other option is to create a small drawing of the site on the page and place the arc around this.
Showing the direction to off-site features
Next add arcs to show the directions to off-site features, both desirable and undesirable ones. Things like:
- the direction of the prevailing wind
- views you want to bring into the garden
- views you want to block out
- the direction that loud noises come from, such as a nearby motorway or industrial complex.
After adding the environmental information we add information specific to the site. We use the same type of annotations and leader lines that we used for the base plan. On this plan it’s not essential that they are neatly lined up, but the writing still needs to be readable.
Adding annotations
Add the following information:
- tree and shrub names and heights
- the composition of plant masses / garden beds, such as “Assorted ground covers” or “Ornamental grasses, mosses and rocks”
- the location of soil tests the test result for each, for example “Soil test: clay”
- for windows that the bottom is much higher or lower than normal, indicate this height like “Height to bottom of window: 300mm”
- the location of all overhead or approximate location of underground services.
Adding approximate movements
We also need to add the typical movements of people, animals, and vehicles. This is usually best done using colouring pencils. Pick a colour for people, another colour for vehicles, and a different colour for animals, if appropriate.
Think about how people move around the site. Where they move from and to when doing different activities. For example, how would the client go about taking out the recycling bin?
- Which door would they go out?
- Where are the bins kept?
- What’s the most efficient way to get it to the curb?
What about going to work in the vege garden? Or taking out the compost? Hanging up the washing? Mowing the lawns – where is the mower kept and how do they get it to the lawn?
Do the same for vehicles, also considering how they turn around, for instance when backing out of the garage.
If the client has pets, think about their needs too.
Add a small key or legend to show what each colour means.
Adding a title block
The very last thing to do is add the title block. At a minimum, a site analysis drawing should include the following information:
the name of the drawing
- the site address
- your name
- the date drawn
- the scale
- orientation (direction of north).
The easiest option is to edit the title block provided earlier, print it and stick it on in the bottom right corner.
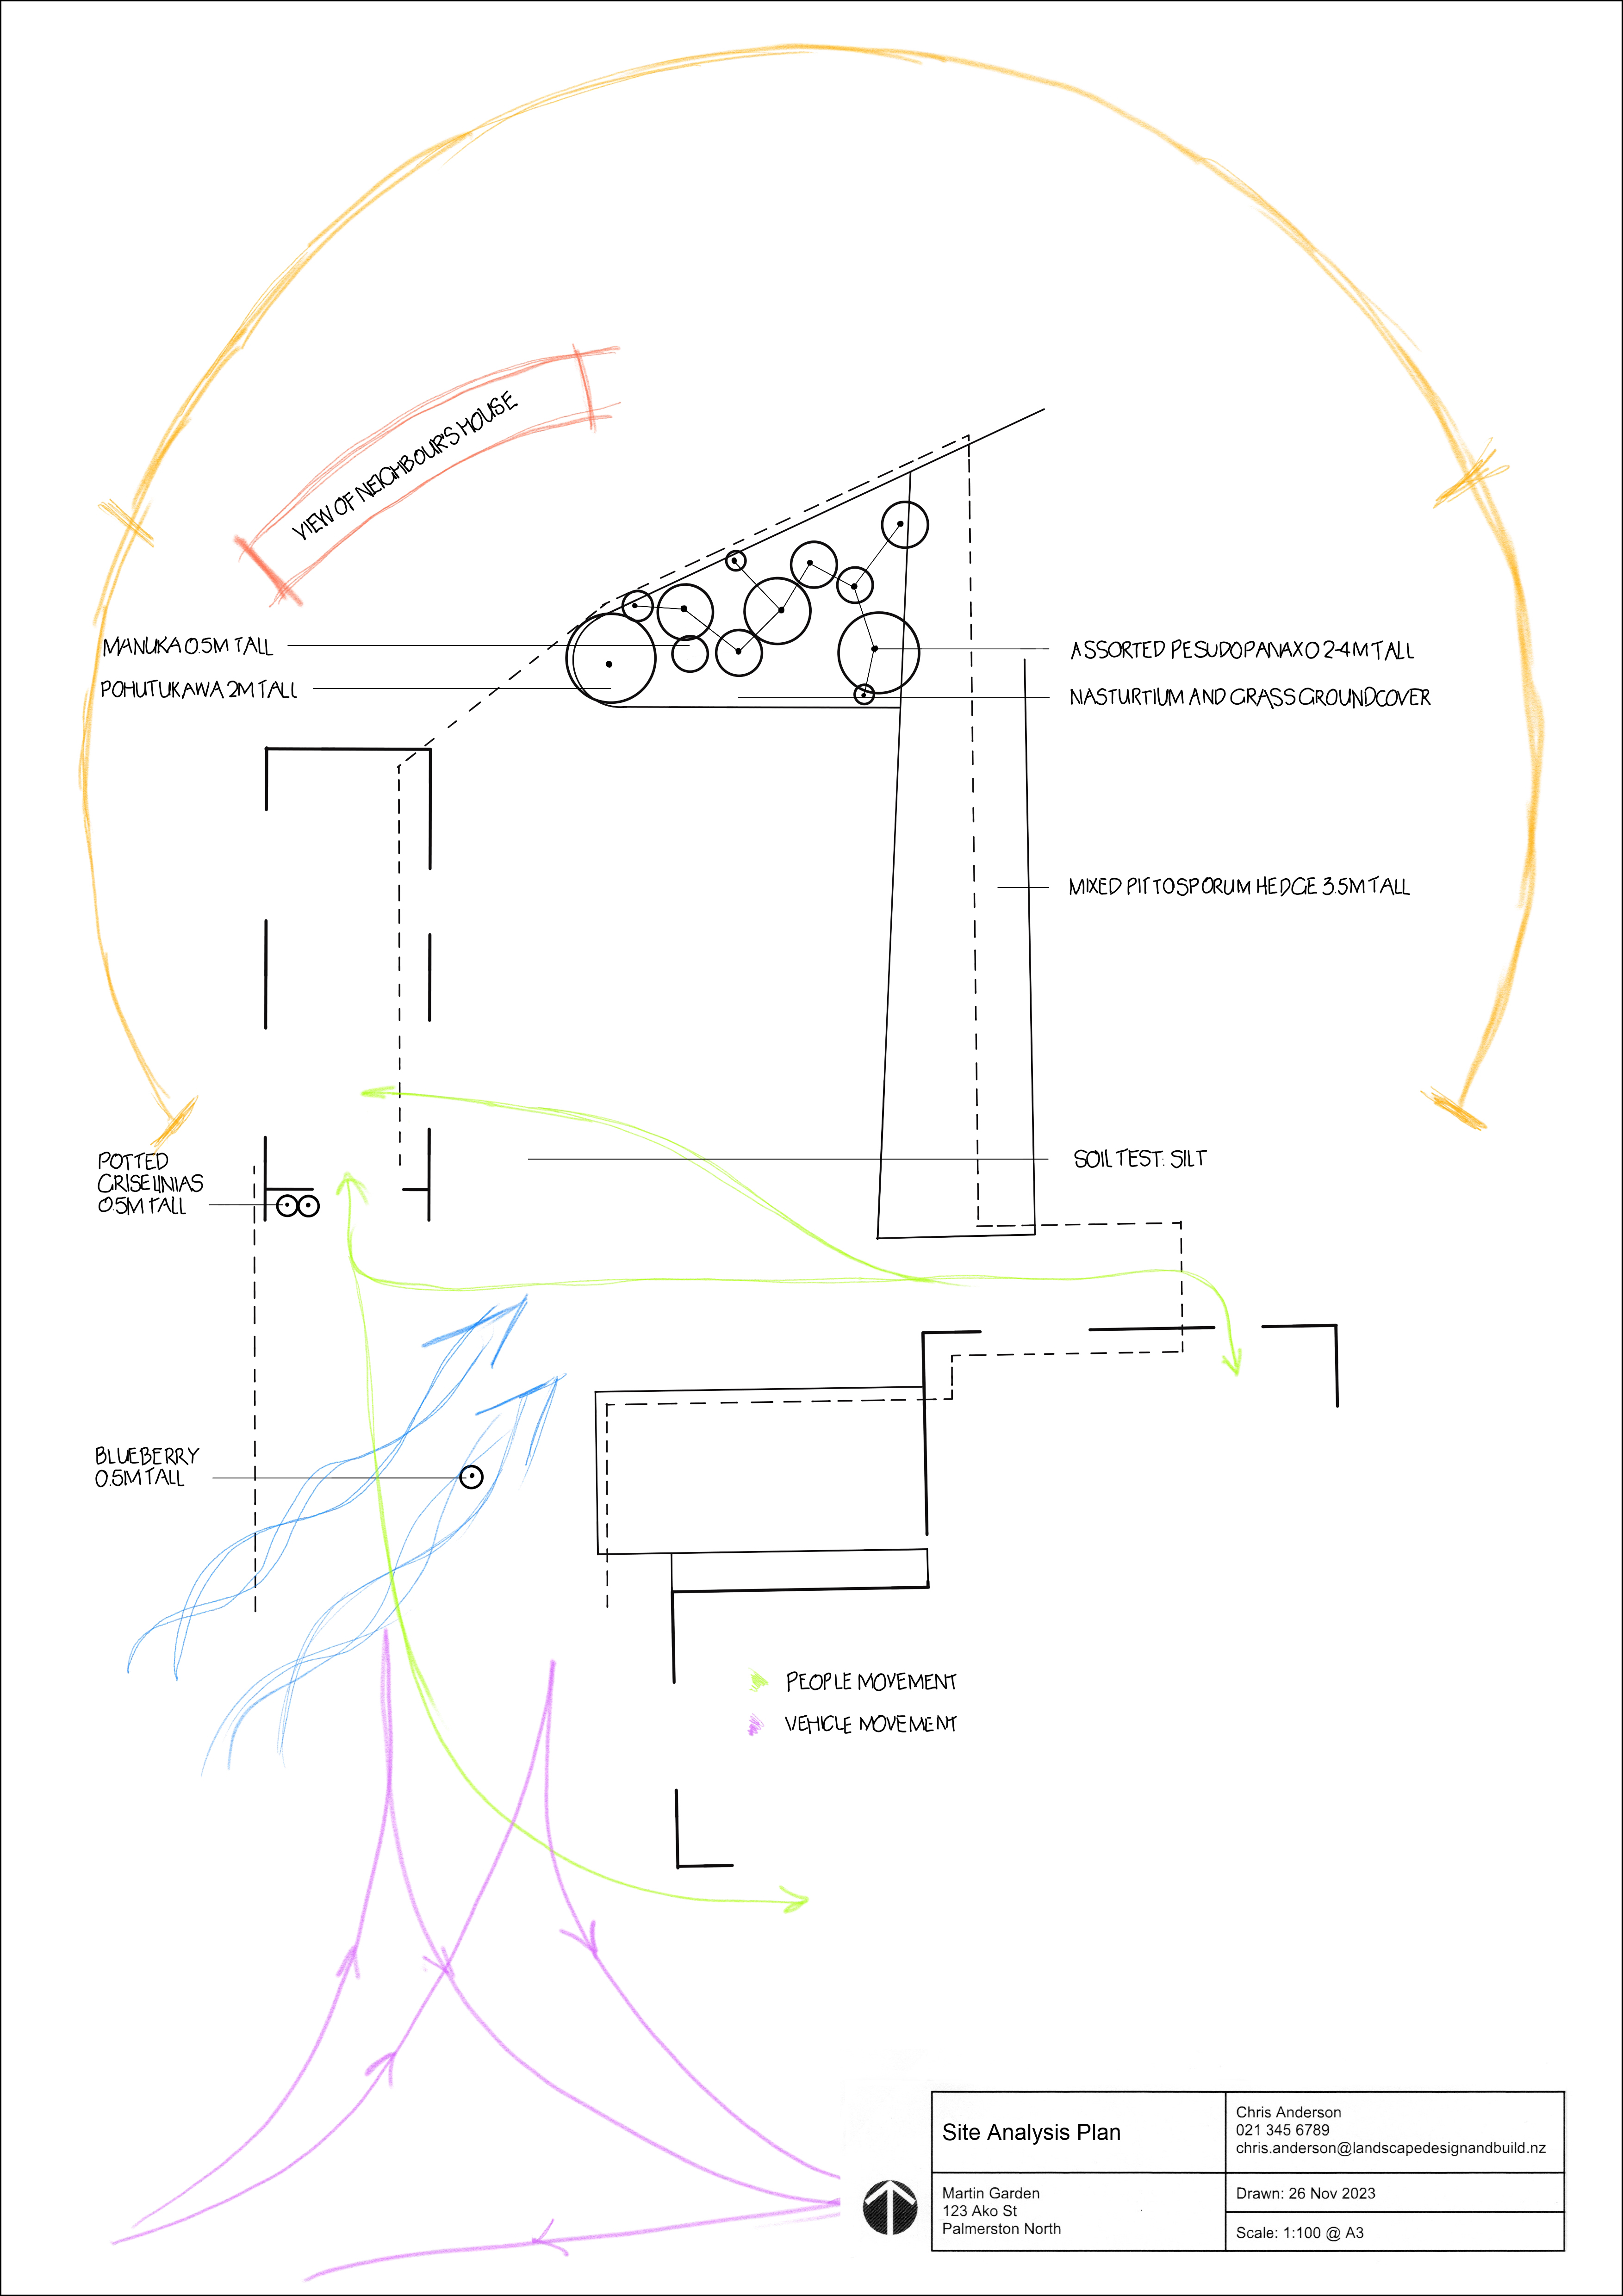
Site analysis plan for the Martin Garden.
Once you’ve finished both your base plan and site analysis plan, you should be ready for Assessment LDB02A2. Go and read the instructions carefully and make sure you’ve done everything you need to, then upload and submit your work for marking.
And once you've done that, you will be ready to move on to Module 3: Garden Design 1. Ka rawe!