In this topic, we’ll work through the stages of the ideation process, which include:
- planning for the passage of time
- arranging garden rooms according to their primary function
- drawing inspiration from others
- using grids to give a skeleton framework
- adding ground surfaces and gardens
- checking that the design adheres to the principle of balance.
By the end of this topic, you’ll be able to ideate garden design concepts.
The first thing to do in the ideation stage is to review the client’s needs. Reread the client brief and go back over your interview notes. Highlight the key parts of the client brief – the things you’ve said you’ll include in the design, such as outdoor dining for eight, or protection from the wind.
Do the same with the interview notes, by highlighting any other points that didn’t make it into the client brief but seem like they should be designed for.
Keep these documents nearby and refer to them throughout the design process. Also bring out your site analysis plan and keep this nearby.
Next, take your base plan and secure it on your drawing board. Place a sheet of tracing paper on top and secure it.
Planning for the future
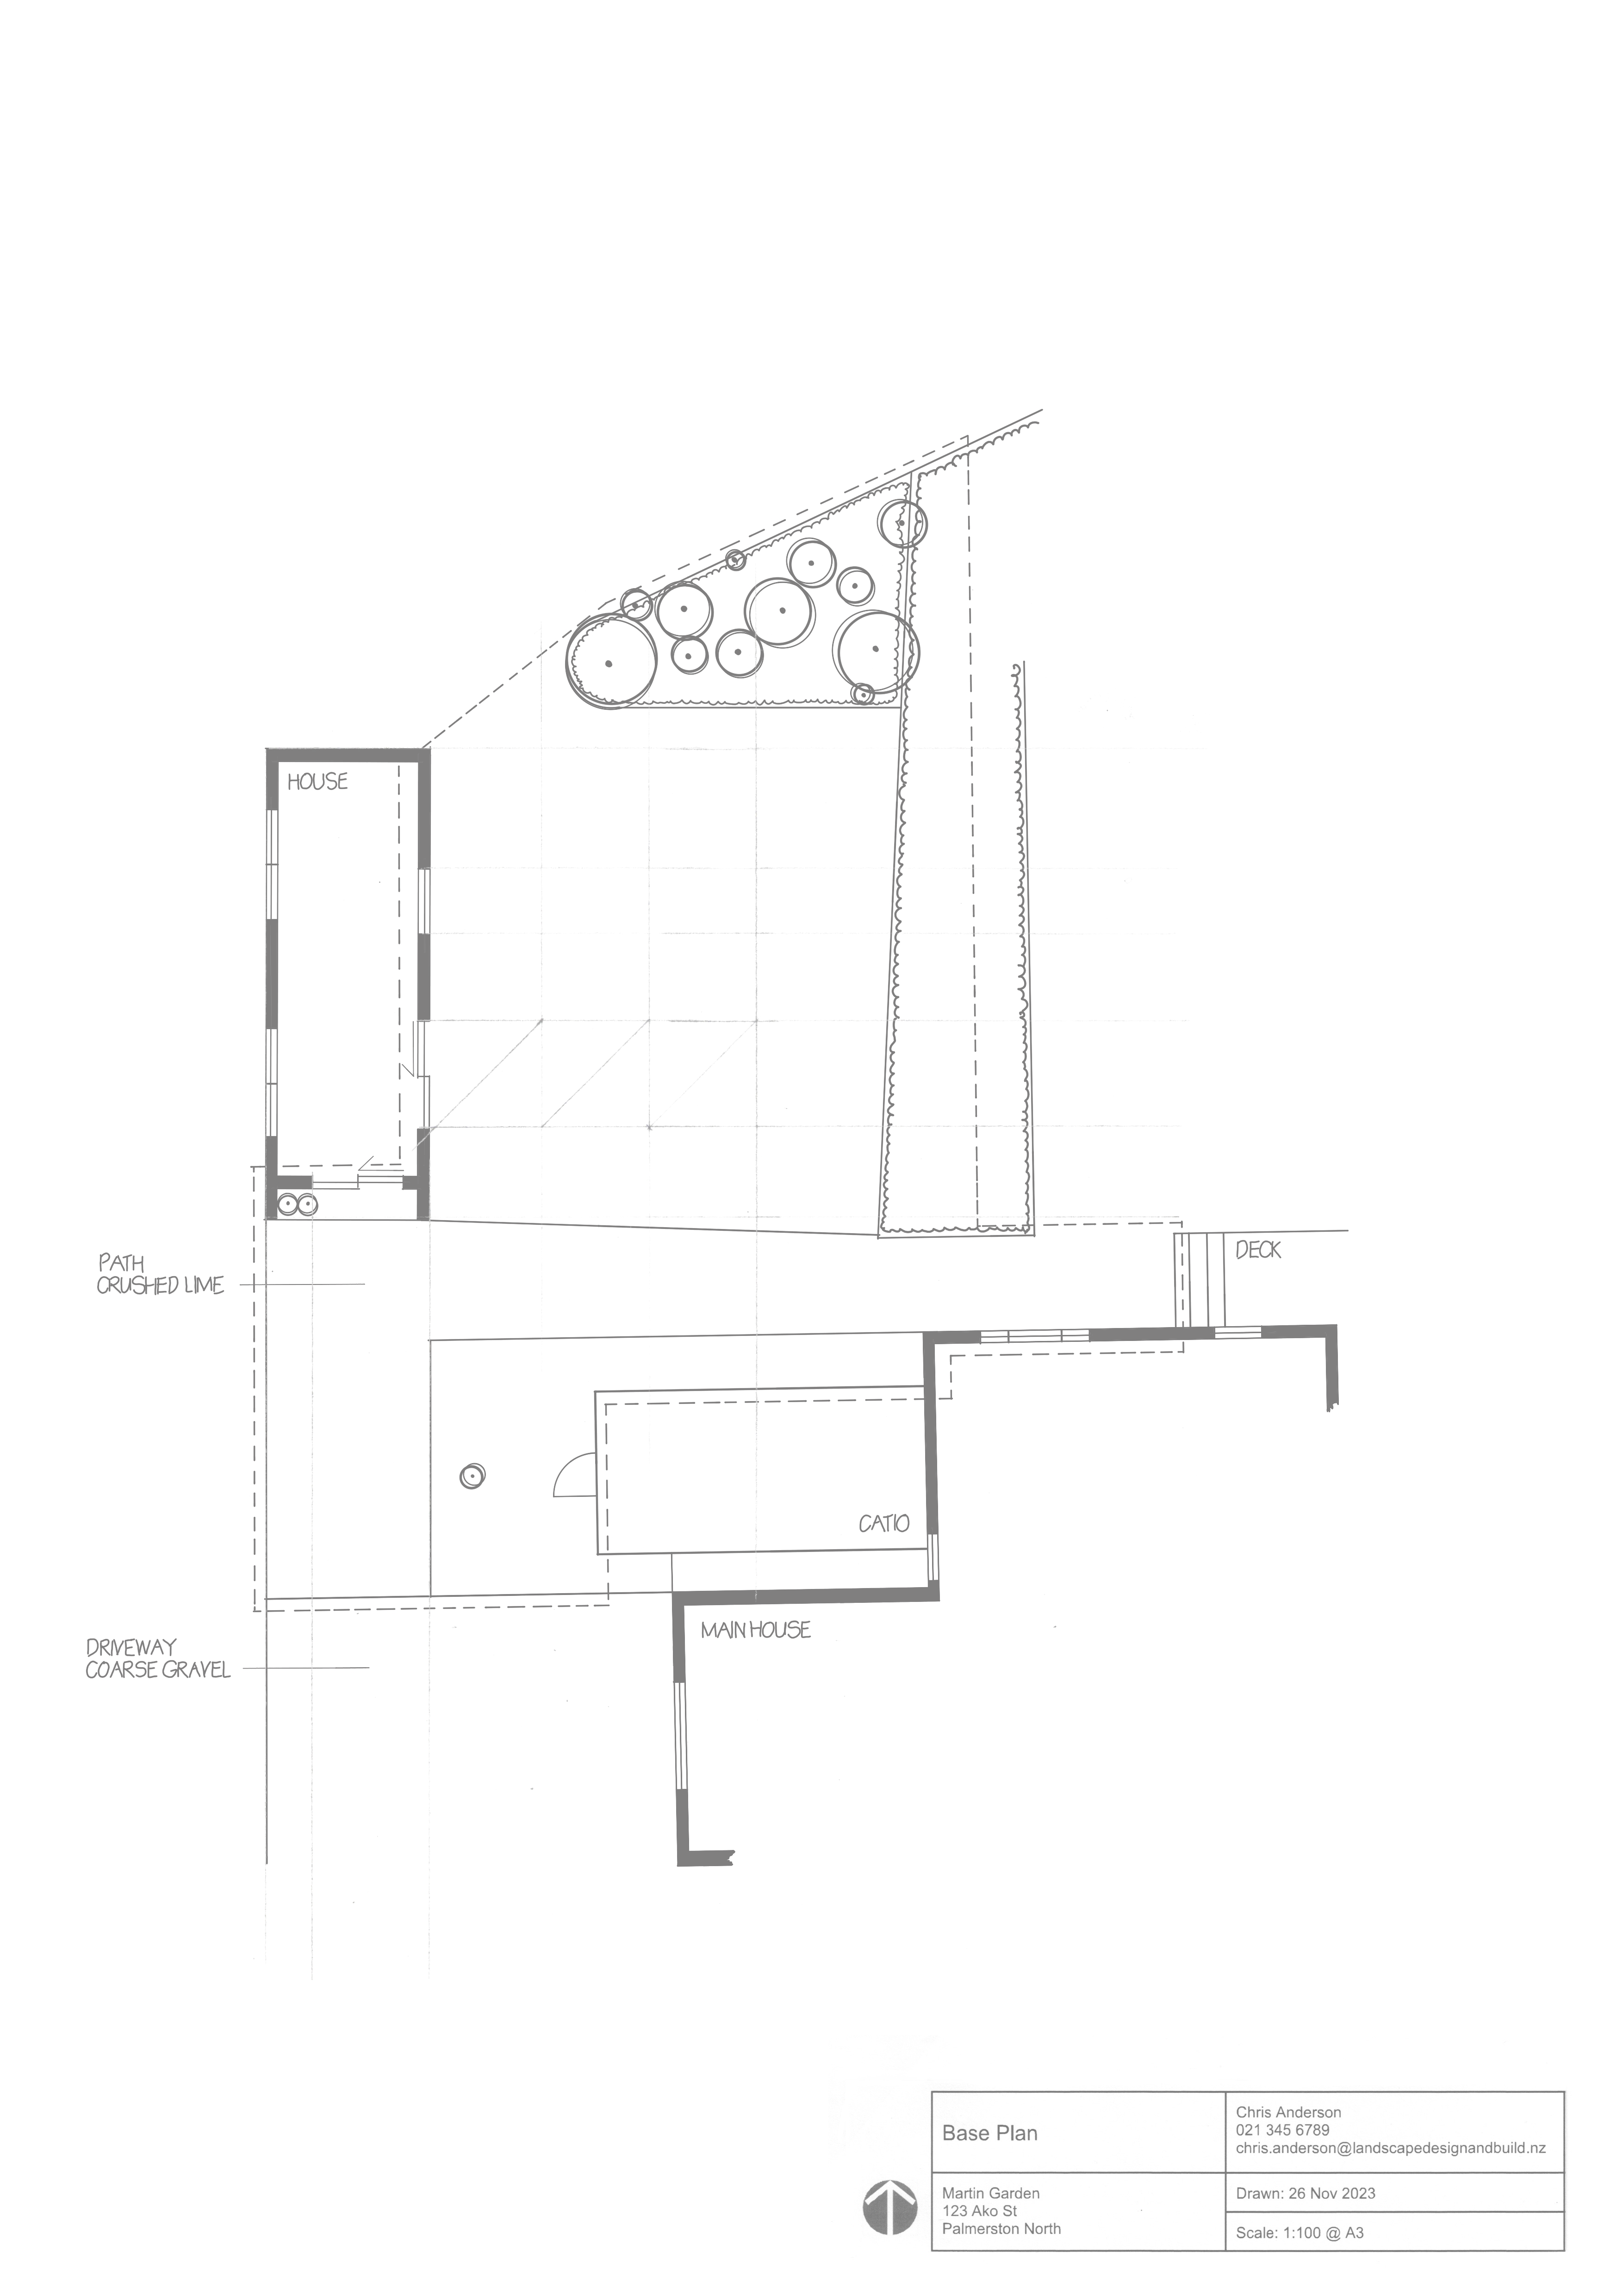
If there are any trees on the site that have not reached maturity, you need to draw them in at the size they will be in 10 years. This can be hard to estimate, but to give you some idea, check the following website databases:
Southern Woods and Leafland are two plant nurseries based in Aotearoa that have excellent websites.
Shoot Gardening also has an extensive plant database but now limits the number of plants you can view in a month without signing up for a paid account.
For plants that take 10 years or less to reach maturity, use the maximum spread listed and multiply by 0.8 which will give you a reasonable guess of the average spread.
For plants that take more than 10 years to reach maturity, divide 10 by the minimum age to maturity then multiply this number by the maximum spread. For example, the Shoot Gardening website says that Betula pendula (silver birch) grows to maturity in 20-50 years and reaches a maximum spread of 12m. So 10 years / 20 years = 0.5 x 12m spread gives an approximate spread at 10 years of 6m.
Draw the future size of the trees in the correct locations on the tracing paper, either using a drawing compass or a circle template. Remember that the spread of a tree is the diameter of the canopy. Circle templates will usually have the diameters written on them.
If you are using a compass, you’ll need to take the diameter and halve it to give you the radius. Then, when you draw the circle, it will be the right size. Make the circles nice and dark, either using a dark pencil or a pen, so they remain visible when you add more layers of tracing paper.
Planning for now
Add another layer of tracing paper, then using your site analysis plan shade in the morning and late afternoon shadows as they would be in spring or autumn. We use spring and autumn because the shadows will be longer than for summer.
We assume that the garden will not be used as much over winter. If you are designing specifically for winter use, use winter shadows.
Remember that you can use the Sun Direction website that was introduced earlier in the programme too.
Make sure your shadows include the future size of the trees, as can be seen in the following example.
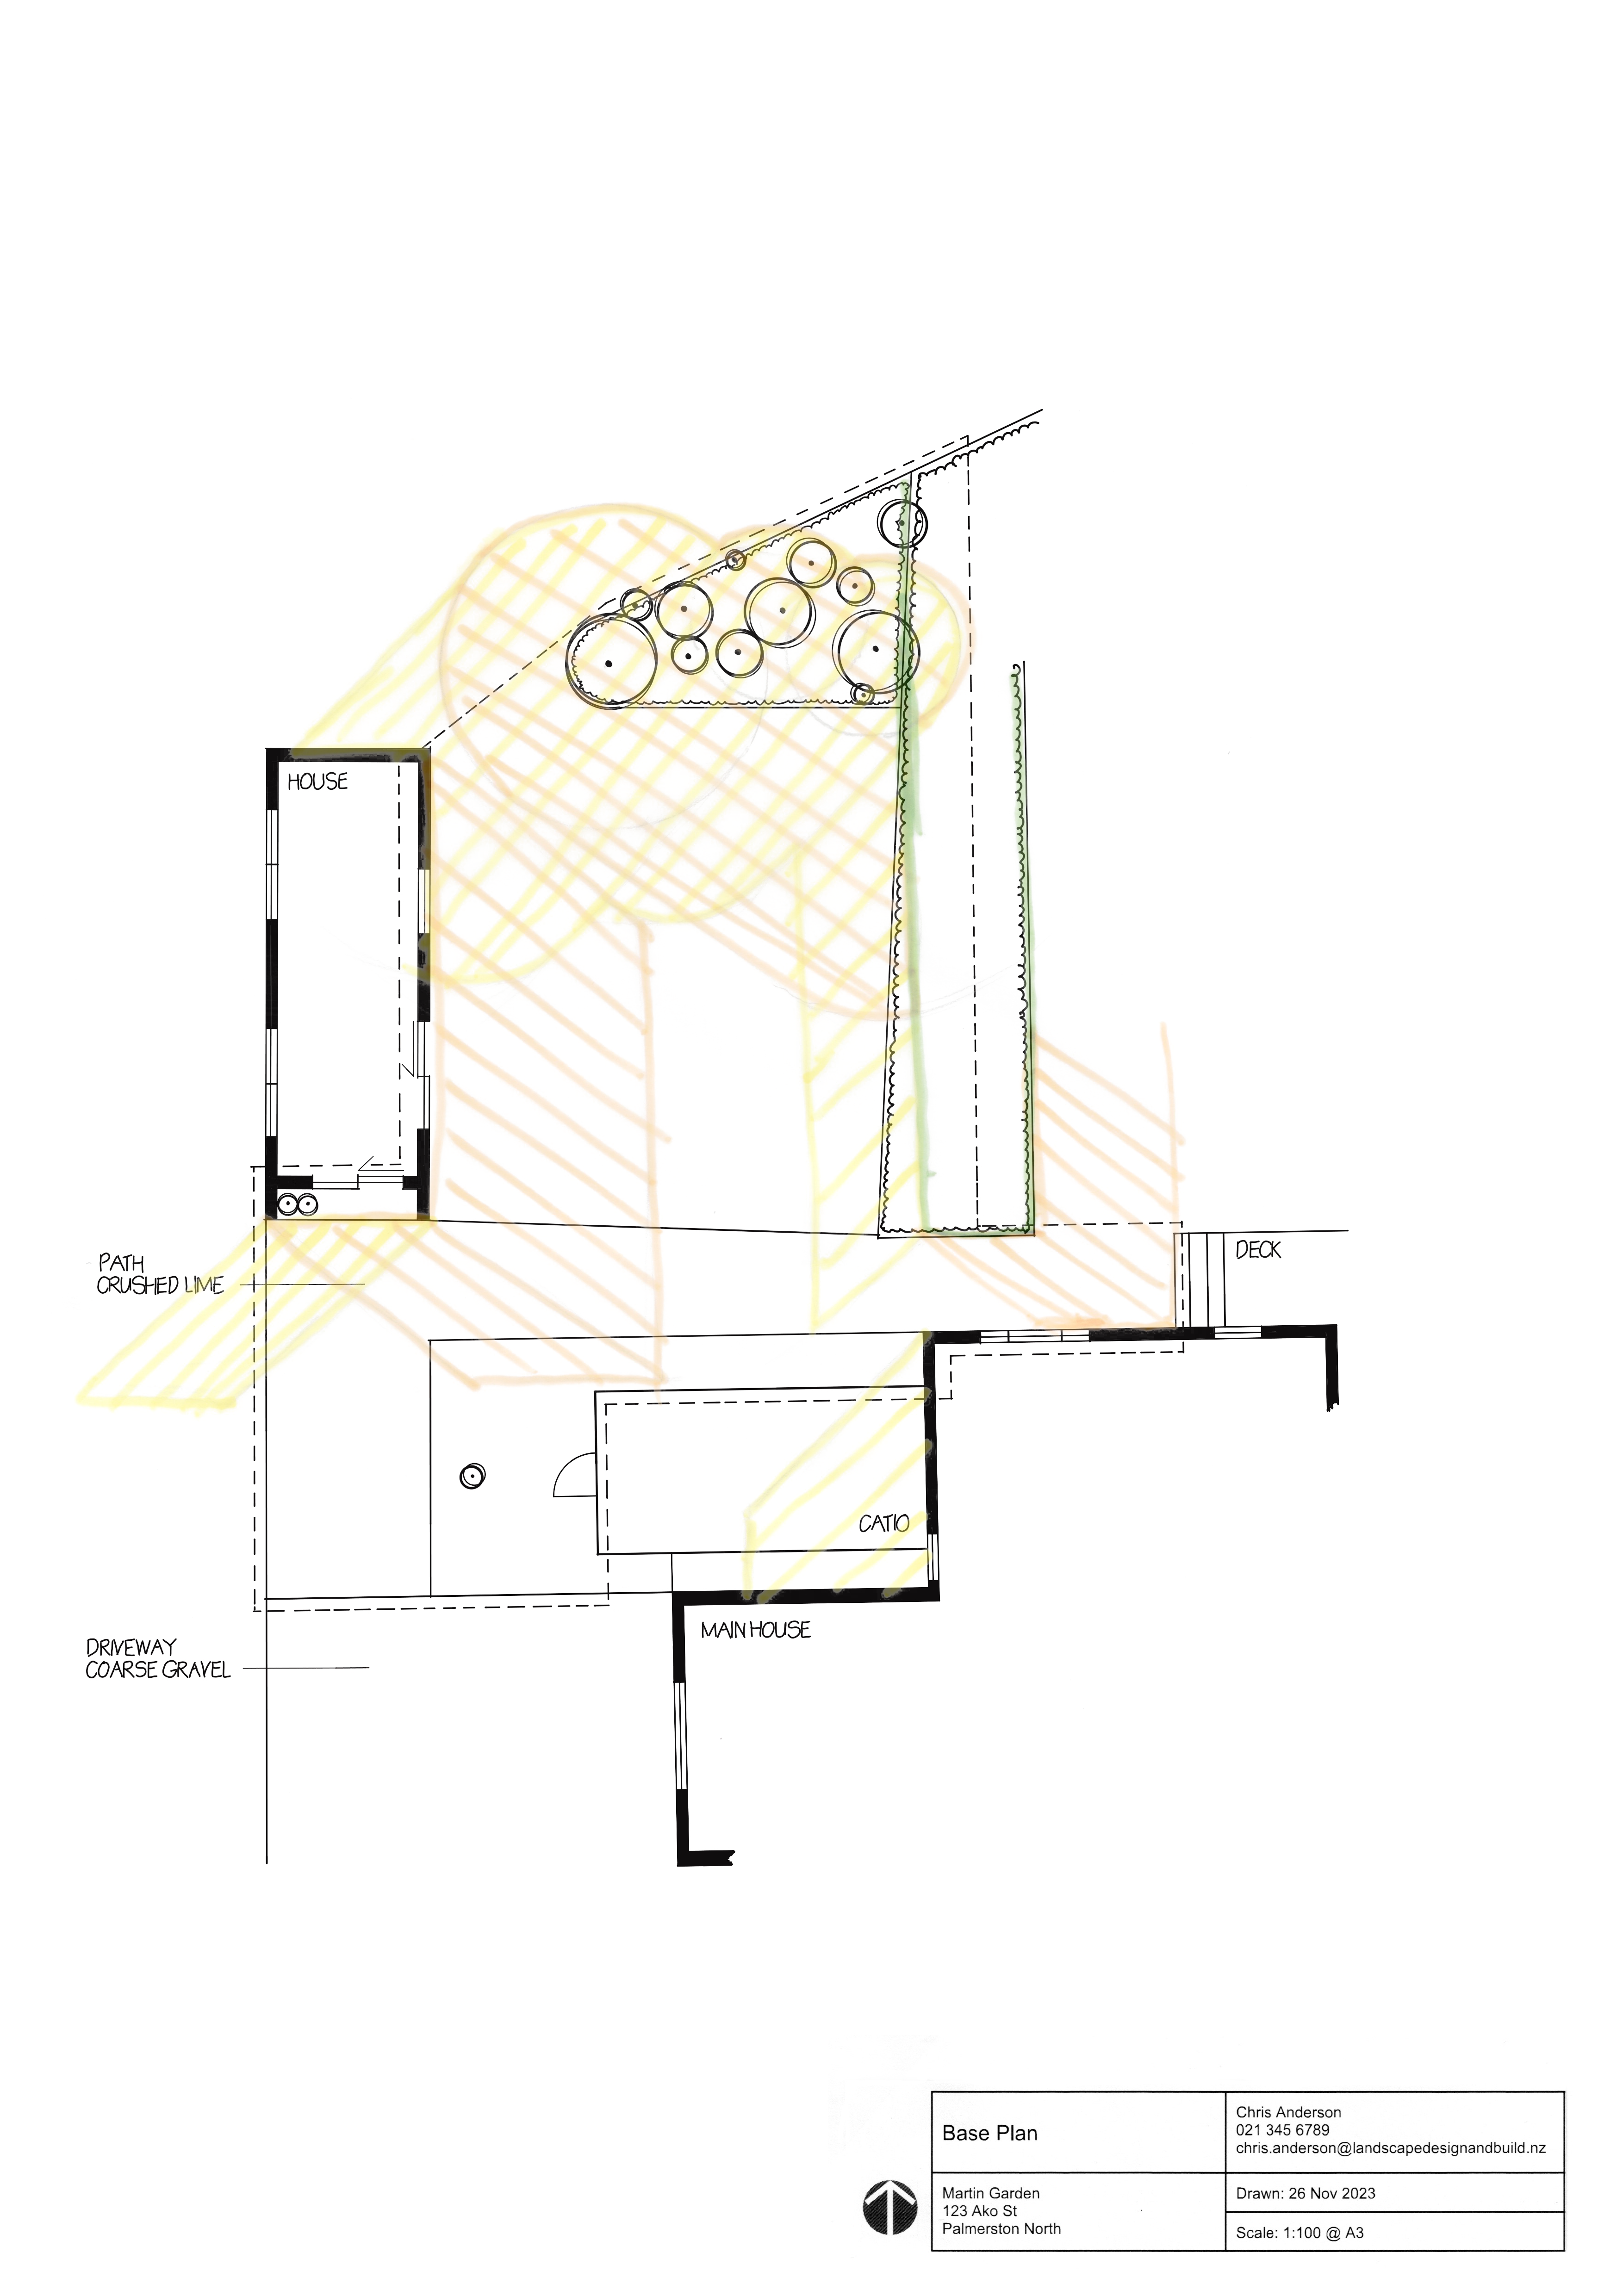
This overlay shows the mid-morning (yellow) and afternoon (orange) shadows in the Martin Garden. The green shows that the designer intends to trim the hedge back to this point.
Now you can remove the tracing layer that had the tree outlines on it and re-secure the layer with the shadows.
Add another layer of tracing paper, but you may only want to secure it in two corners. During this part of the process we are going to try out a number of ways that we could arrange the garden rooms, so you’ll be removing sheets of paper and adding new ones frequently.
You might find it useful to add two or three fine pen marks at the location of key points that are showing through from the base plan, such as corners of the house or site boundaries. This will help you line up the tracing paper again in the future.
You’ll recall from earlier in the programme that one of our key landscape design tikanga (rules of thumb) is that ‘form follows function.’ Each garden room should be designed for a particular function, such as outdoor entertaining or a kids play area. The purpose of the space needs to steer the design. What it looks like (its form) then follows on from this.
Bubble diagrams
Using pencils, coloured pencils or felt tip pens, draw bubbles on the paper that represent the functions of different garden rooms. As you do this, think about:
- How big does each space need to be?
- Think back to the section about scale and balance and use your cut-outs as tools to help you answer this question.
- The bubble you draw can be bigger than the space needs to be, because at a later stage you can add in plants and other positive space, but it can’t be smaller.
- How do the site conditions affect the possible arrangements?
- In particular, think about which spaces will be used at different times of day and relate this to the shadow layer.
- Additionally, if other site conditions, like wind, or muddy lawn areas are a problem you may want to incorporate this in your thinking.
- Where should each space go in relation to the house?
- The further from the house, the less the space will be used. Outdoor spaces that the client will use often should be placed close to the doors of the house. For instance, a space for a washing line should be near the laundry door. A patio for entertaining should be close to the lounge and ideally the kitchen.
- Your bubbles should take up the whole space of the garden, or at least it should be obvious what the remaining spaces are – this is usually access or circulation.
- Some common functional spaces are:
- active play (or lawn)
- secluded relaxation
- entertaining
- outdoor dining
- productive gardens (or vege garden and/or orchard)
- utility – space for things like rubbish, recycling, and compost bins, a washing line, a garden shed and so on
- circulation – note that people will move, or circulate, through other spaces, so only use this where you think there is a specific need to have this as a designated space.
Don’t dwell on this for too long. The important thing is to come up with a range of different arrangements you can review later. When the whole site is covered in bubbles, take that layer off and put a new piece of tracing paper on and repeat the process.
Remind yourself that the idea is to make the arrangements different.
Circulation paths
Once you have a handful of different functional diagrams (“bubble diagrams”), take some time to look at each one and decide if there is merit in taking it further. For the ones that you think work best, one at a time:
- put the layer back on the base plan
- add another layer of tracing paper
- draw arrows to show how you want people and vehicles to move around the garden.
The following four images show different arrangements, most with circulation arrows added. Select the arrows at the bottom right of the activity to view it in fullscreen.
This is where we start getting our creative juices flowing!
Identifying emerging themes
To create a sense of unity in our design we want to identify a theme to work with.
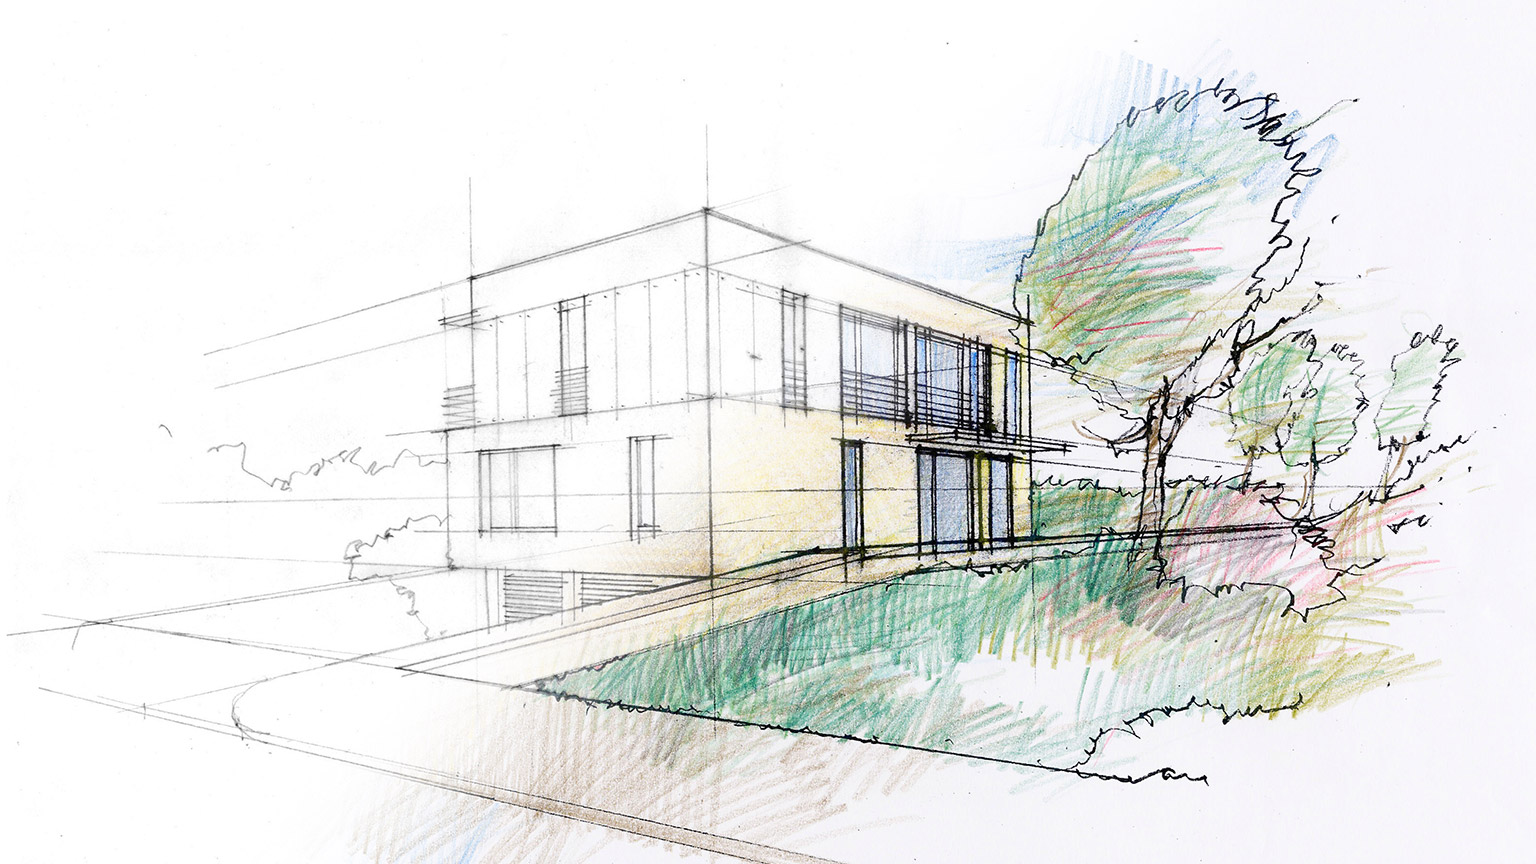
For the Martin Garden, the theme is about extending Genevieve's house by creating additional rooms in the garden to give her more space. Two themes spring to mind:
- The rectilinear design of the house, with its horizontal long run steel cladding and chunky joinery could lend itself to a modern abstract art themed design, similar to the work of Piet Mondrian.
- The diamond shaped detailing on the front of the house could be replicated in the landscape by implementing an angular design.
Developing a mood board
As mentioned early in the programme, design thinking relies heavily on creating experience we want our clients to enjoy. In other words, what are the distinctive functional spaces and how should each space feel?
A good way to do this is to create a mood board.
You can do this in a number of different ways, such as:
- Cutting out photos from old magazines and glueing them to a sheet of paper.
- Saving photos you find on the internet and adding them to a PowerPoint slide or Google Slides presentation.
- Using an online content curation tool, like Pinterest.
If you’ve used Pinterest before you’ll probably know how quick it can be to create a board full of images. If you’re new to Pinterest, or haven’t used it for a particular purpose, like landscape design, you’ll find some useful tips in this video by Howfinity (11:13): How to Use Pinterest - Complete Beginner's Guide
A few points to keep in mind when using Pinterest for landscape design:
- Make your boards secret, especially if using your client’s name as the board title, e.g. “Martin Garden.”
- When finding ideas, estimate and consider the cost of the projects you’re looking at. It’s easy to find amazing, elaborate landscape designs on Pinterest but these may cost hundreds of thousands of dollars to construct.
- Focus on ideas for each of the garden rooms and ideas that may help unify the site as a whole.
- Consider materials that link to the architecture of the site. For instance, if the house on the site you’re designing is a timber weatherboard villa, search for fence designs that complement the house, rather than looking for extremely modern fence designs.
- You can add private notes to the images you save by clicking on the “Note to self” button. Add comments about what particular parts of the image you like.
- Periodically, look at your board as a whole and remove the images you don’t like anymore.
Use this mood board as a starting point to help get a feeling for the types of spaces you want to create. You might decide to create sections within your board for different garden rooms.
Here are the search terms we used to create a mood board for the Martin Garden:
- small modern garden design
- cosy outdoor dining
- raised garden beds
- abstract rectilinear garden design
- mid-height garden fencing
- low garden fencing
- modernist art.
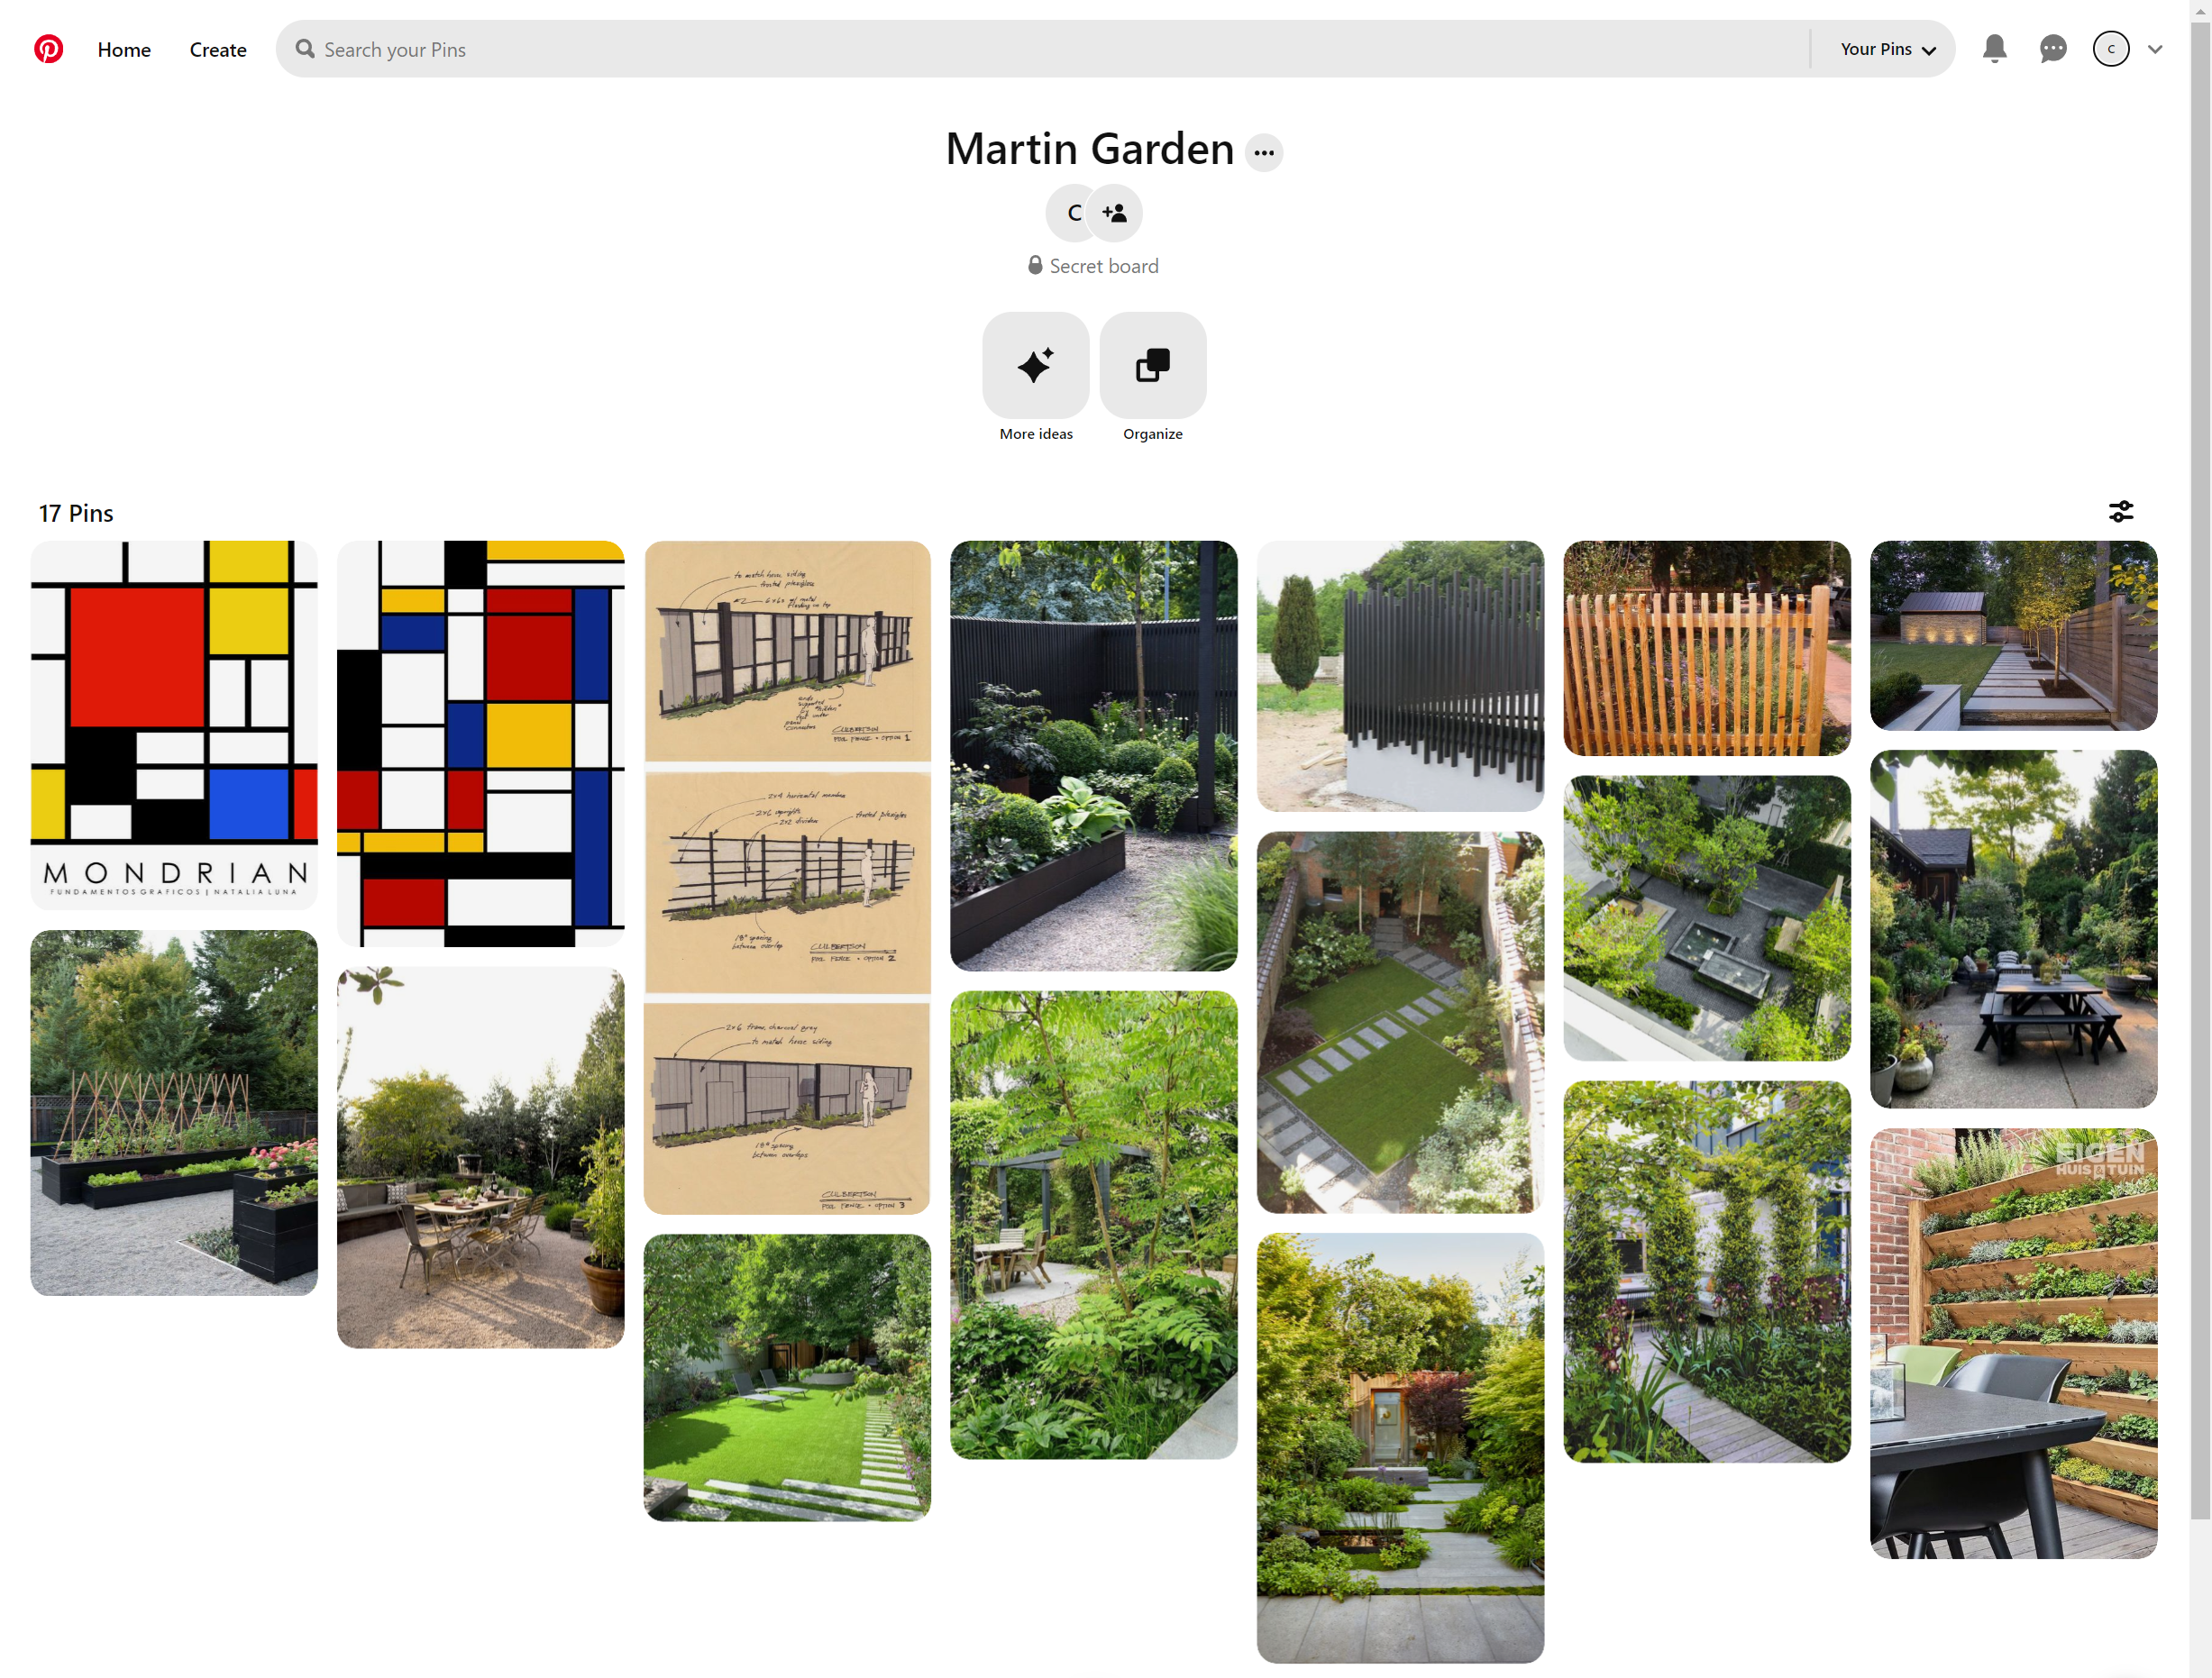
Martin Garden mood board created on Pinterest.
So how do we take these inspiring design ideas and bring them into our site?
One common way is to create a grid of lines that will serve as guides to help us create spaces that are in proportion with, and link to, the site buildings.
The two main approaches are:
- regular grids
- ad-hoc grids.
Regular grids
Regular grids are guidelines that are spaced equally across the site. The spacing between the guidelines should be based on the scale of part of the house, for instance the width of a major door or window, or the spacing between posts of the veranda.
Grids are commonly rectilinear to the house (perpendicular and parallel to it) but can also be run at an angle, as shown in the images below. View the activity fullscreen.
Ad-hoc grids
The other approach is to form an ad-hoc, or as needed, grid based on features of the house. To create guidelines perpendicular to the ones projecting off the house, you can lightly pencil in 45 degree diagonal lines. Where these cross parallel lines draw a perpendicular line, and these will have the same spacing as the parallel grid.
An ad-hoc grid with vertical spacing that is the same as the width of the sliding door (as shown by the diagonal lines).
You may decide to:
- draw your grid lines on a sheet of tracing paper and then do your design work over top of it (as shown earlier with the diagonal regular grid), or
- lightly draw these grid lines as construction lines on the sheet that you’re working on.
Now use the grid and your cut-out shapes (for scale) to create the shapes for the ‘open centre’ of each garden room – the ground surface.
Note that the grids are guides only. However, where the edge of a shape falls close to a grid line you should make it line up unless there is a good reason not to. The same is true for circular and organic shapes; make their edges touch the grid lines where possible.
Once you’ve done this for all spaces, use the circulation diagram you created earlier to determine where the rooms will join each other. Add suitable paths to allow people to move between the spaces. In cases where the movement from one space to another is a primary route, in that it will be used often, make it wide. Where it is a secondary path, which is infrequently used, make it smaller.
After this, the spaces you have left over can be filled in with planting mass (gardens).

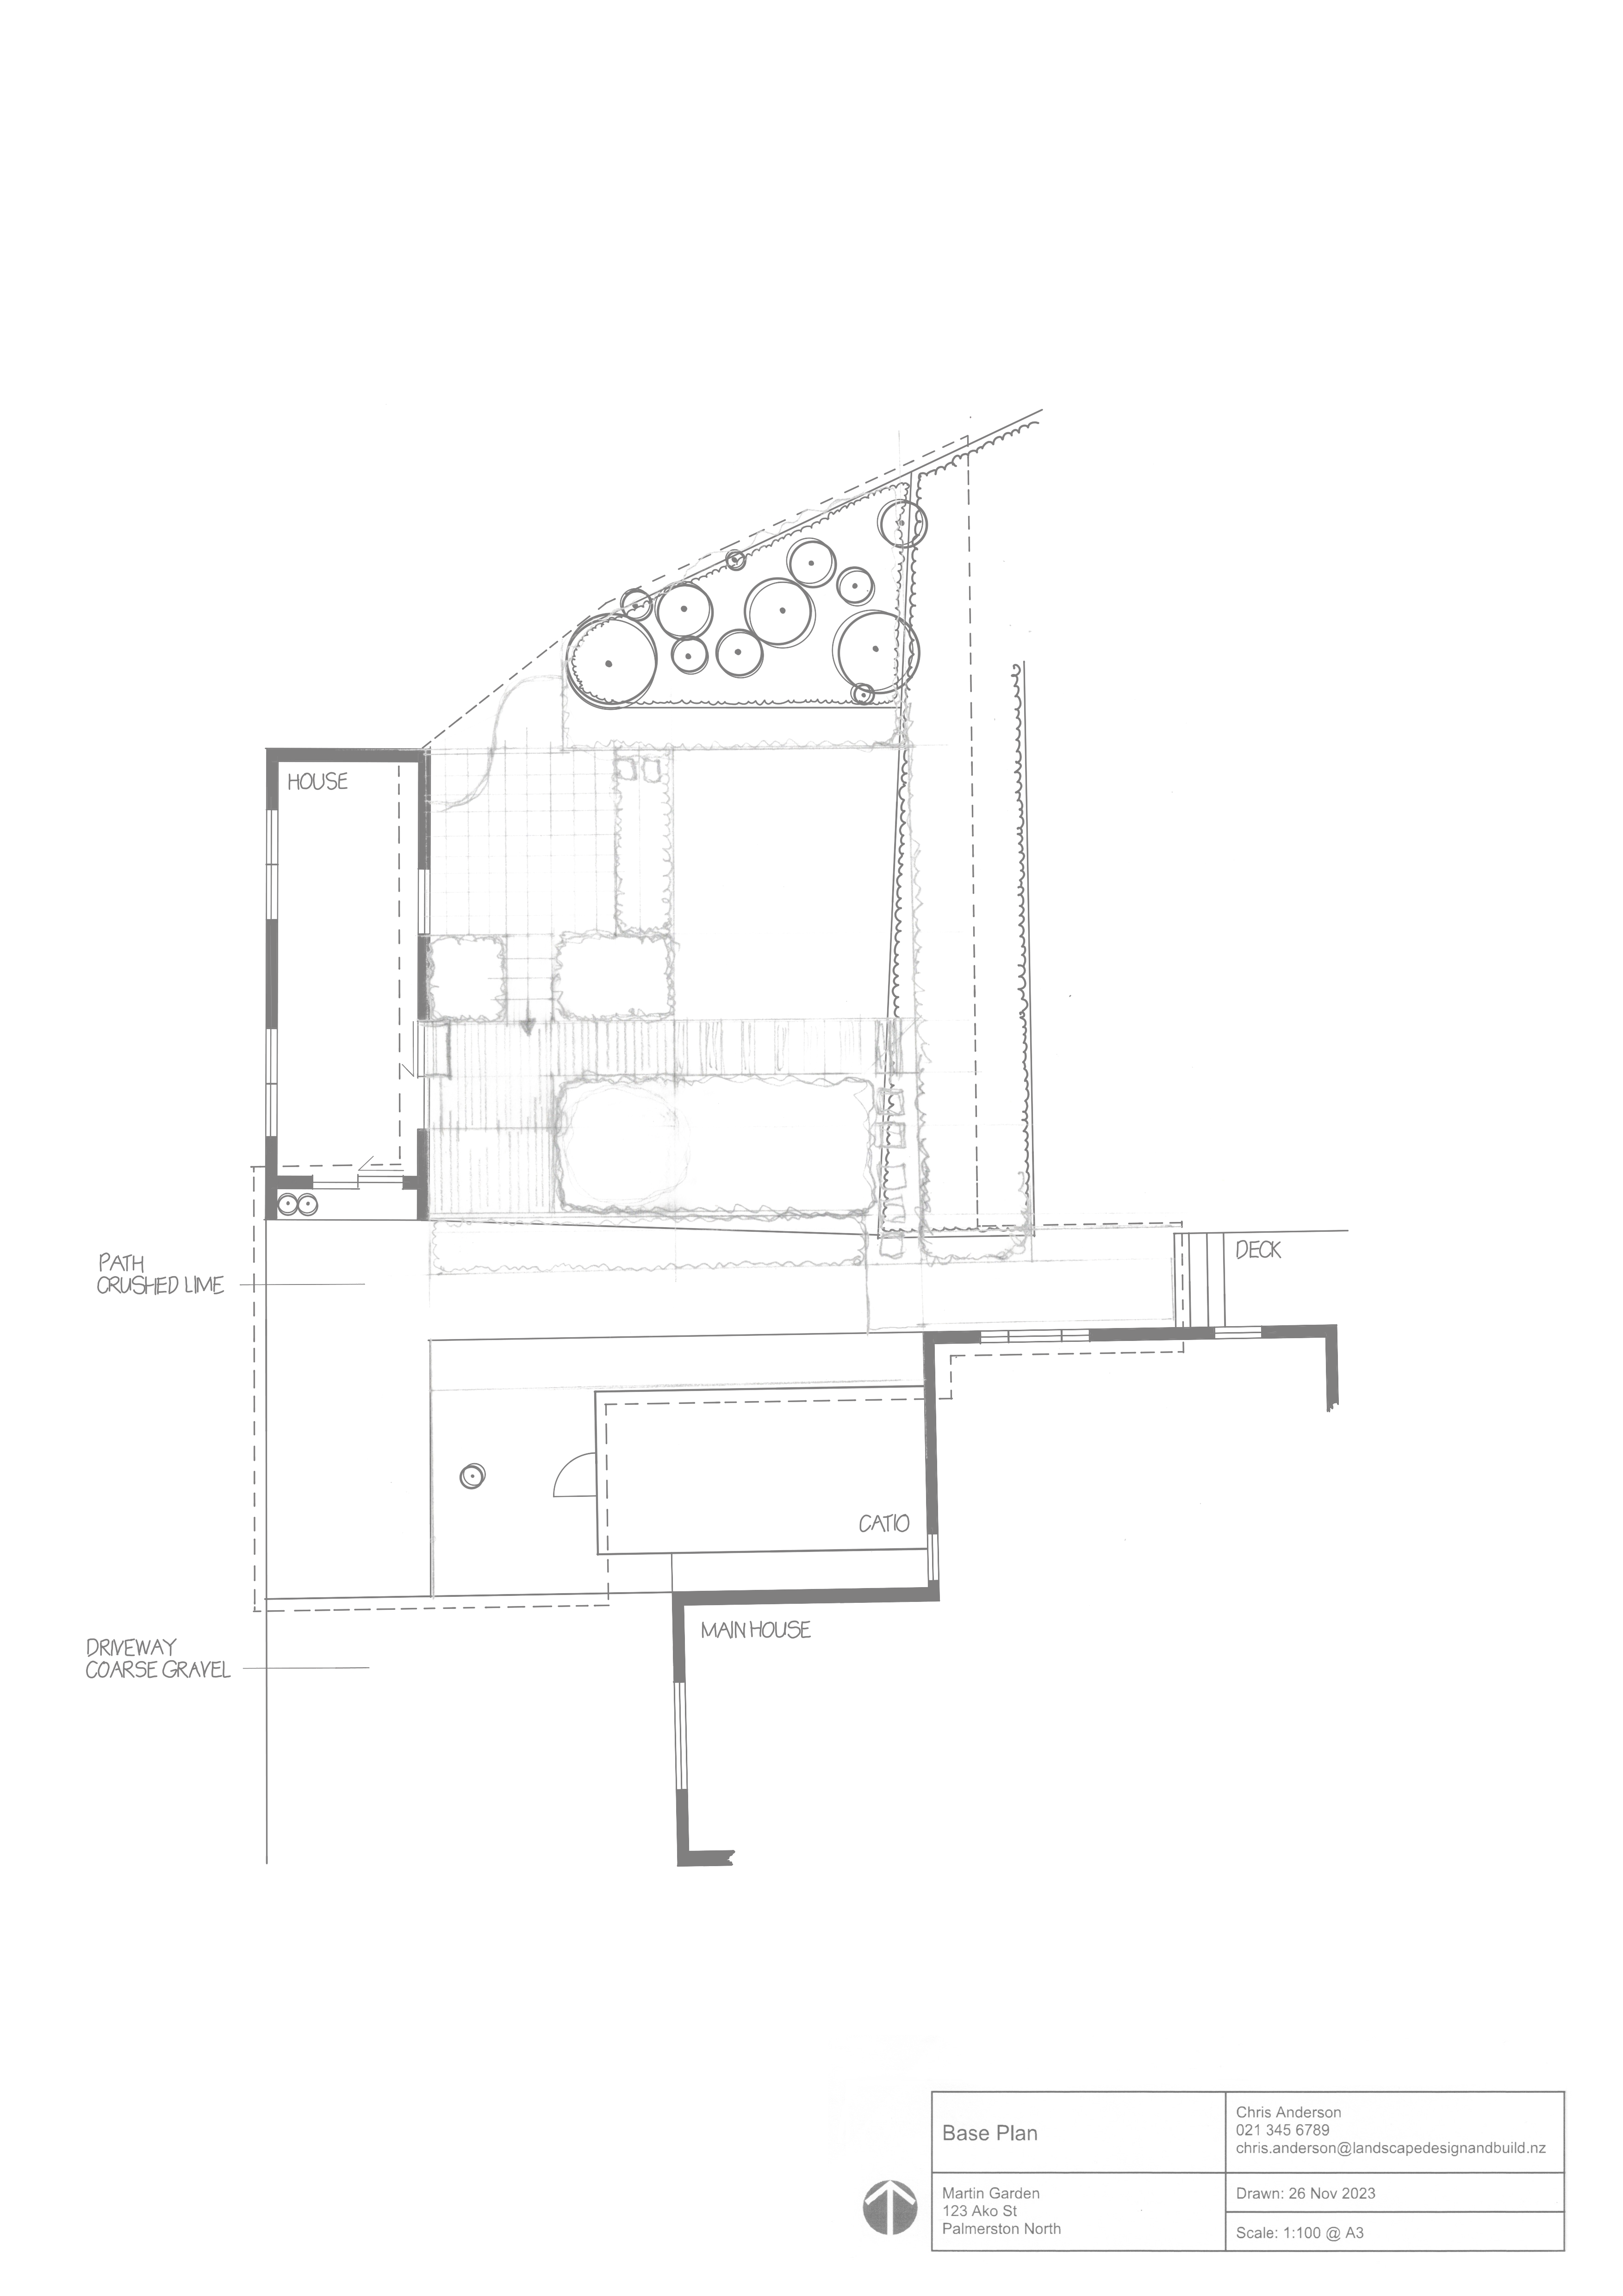
Partially complete rectilinear concept design for the Martin Garden showing open centres for the main garden rooms, connecting paths, and gardens.
One useful trick is to check the balance of the design early in the concept development process.
A simple way to do this is to trace over the concept on a separate sheet of tracing pager and hatch the positive spaces. This will give you a rough sense of how much space is positive and how much is negative. Because different objects have different visual weights, this is only a rough approach, but it can quickly highlight imbalance.
 |
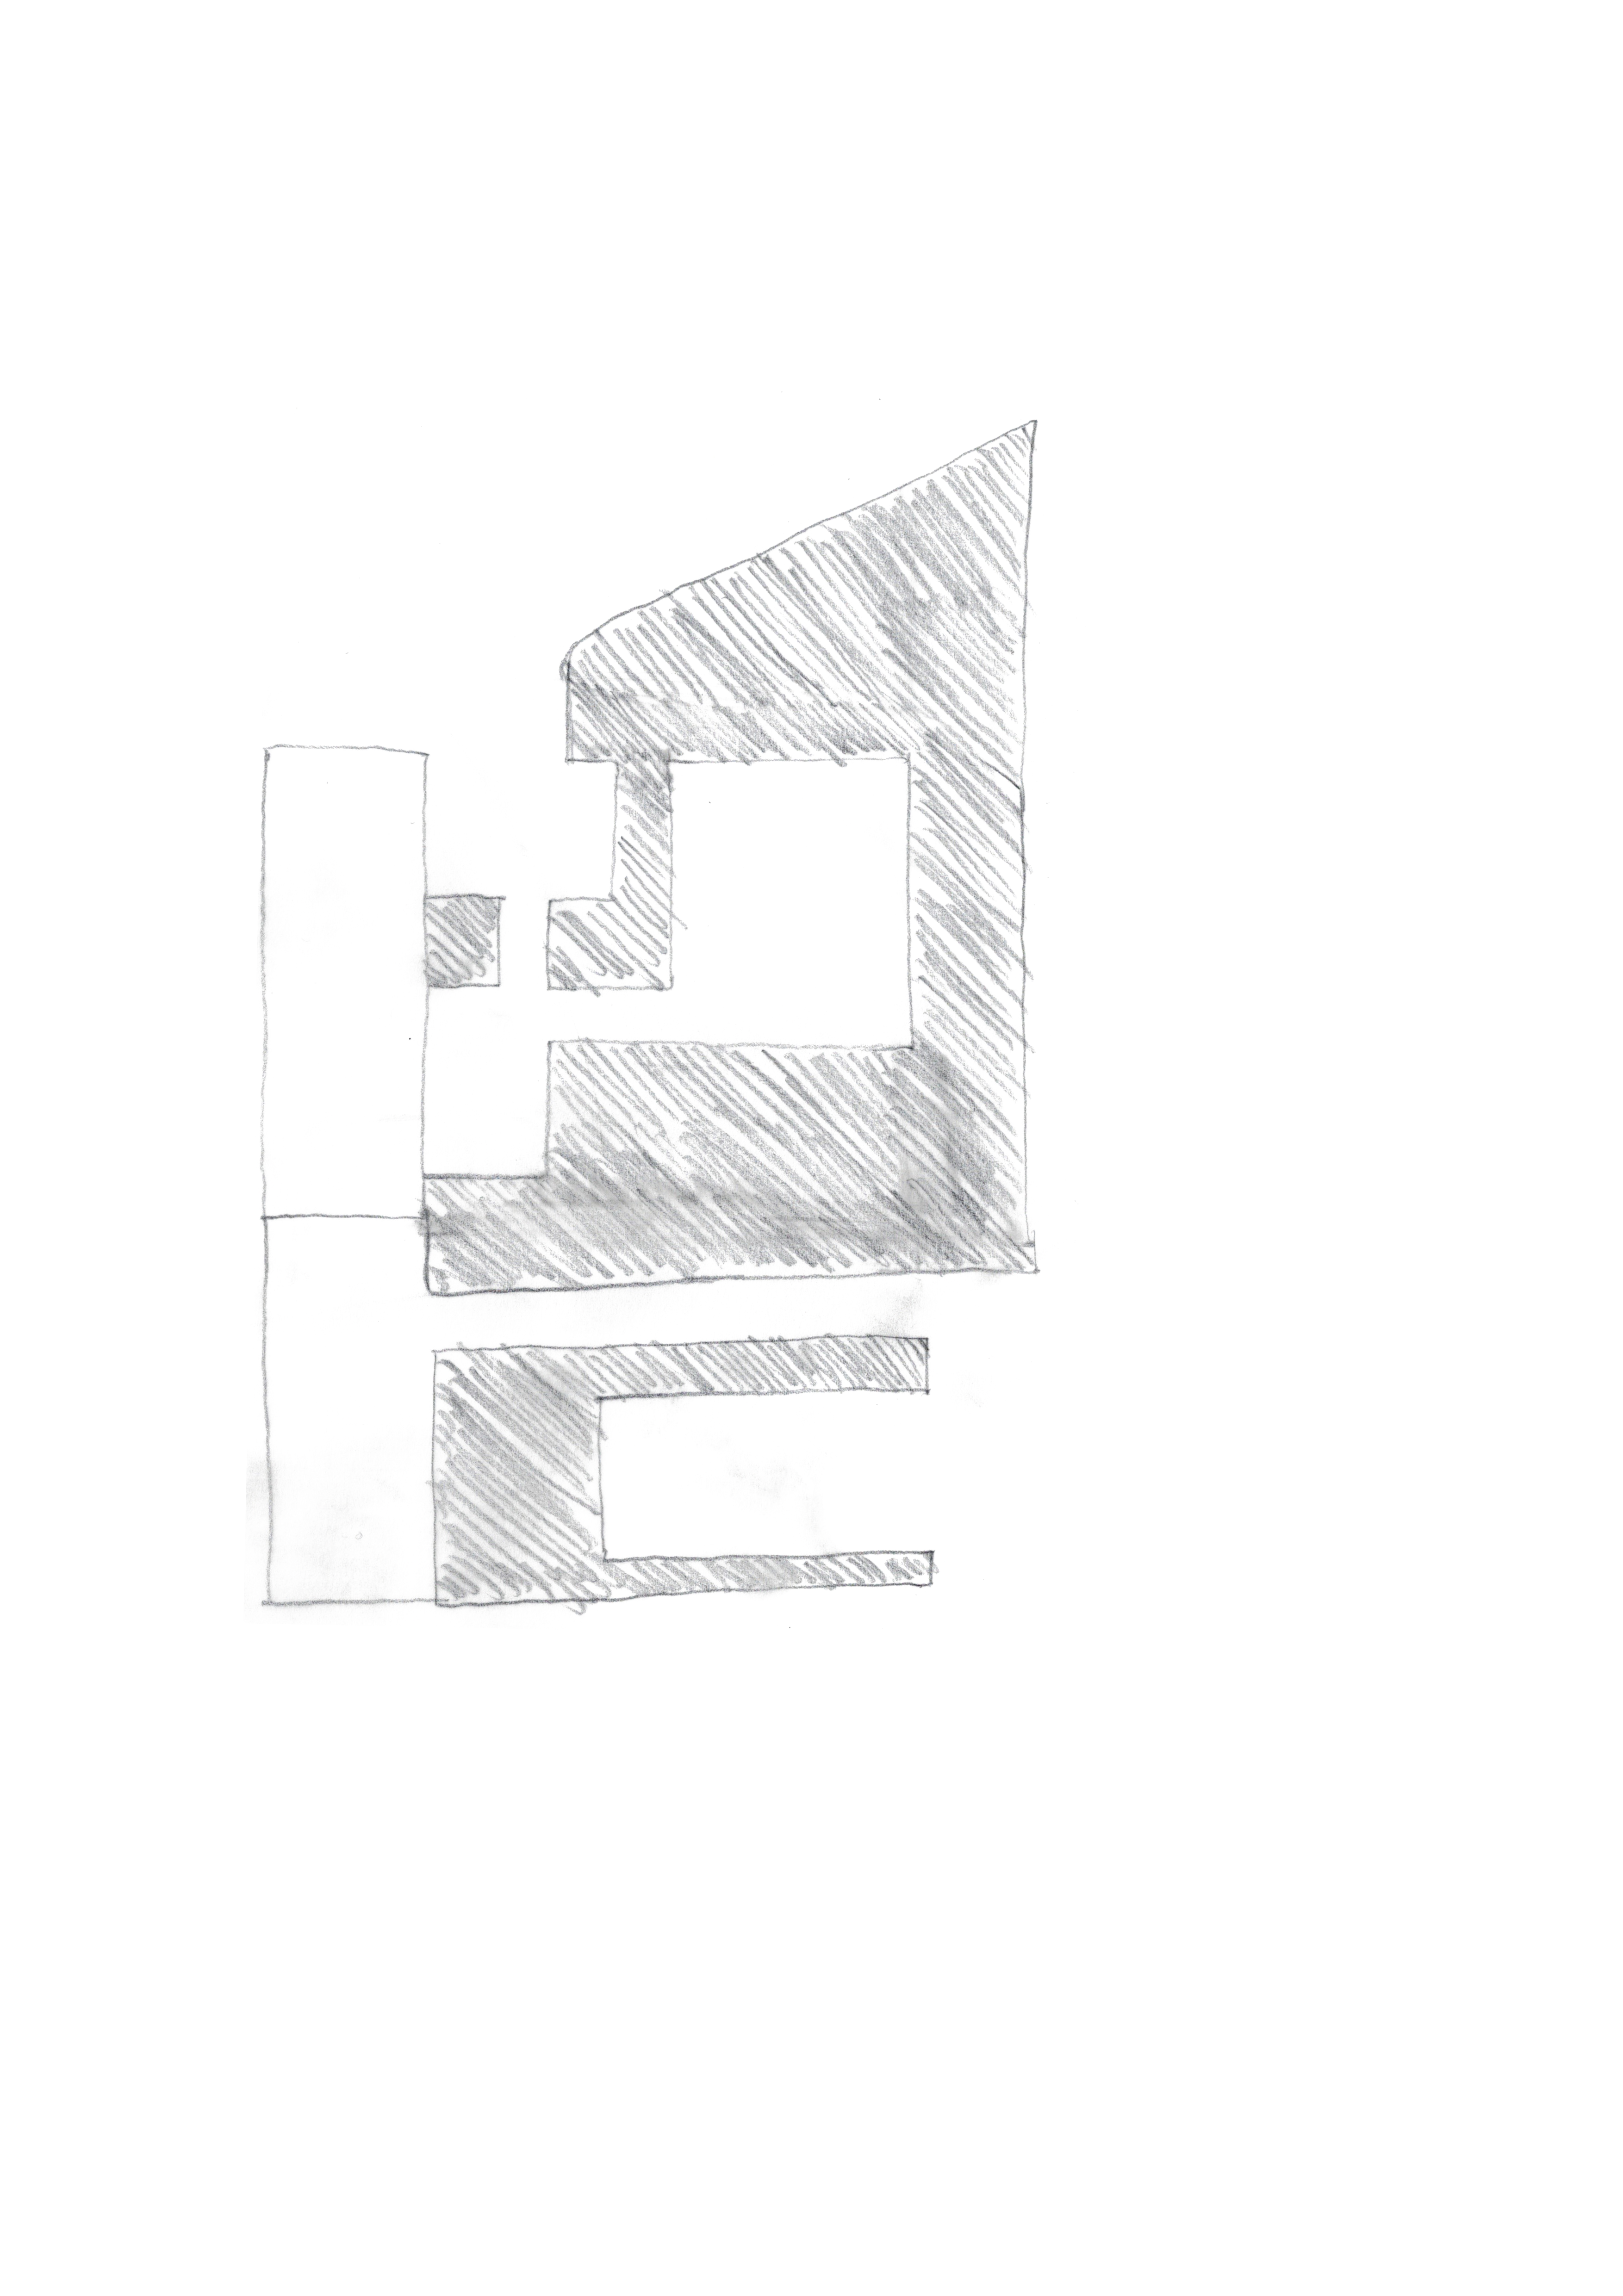 |
| First rectilinear design for the Martin Garden. | Checking the balance of the first design. Note that there is significantly more positive space (shaded areas) than negative space. |
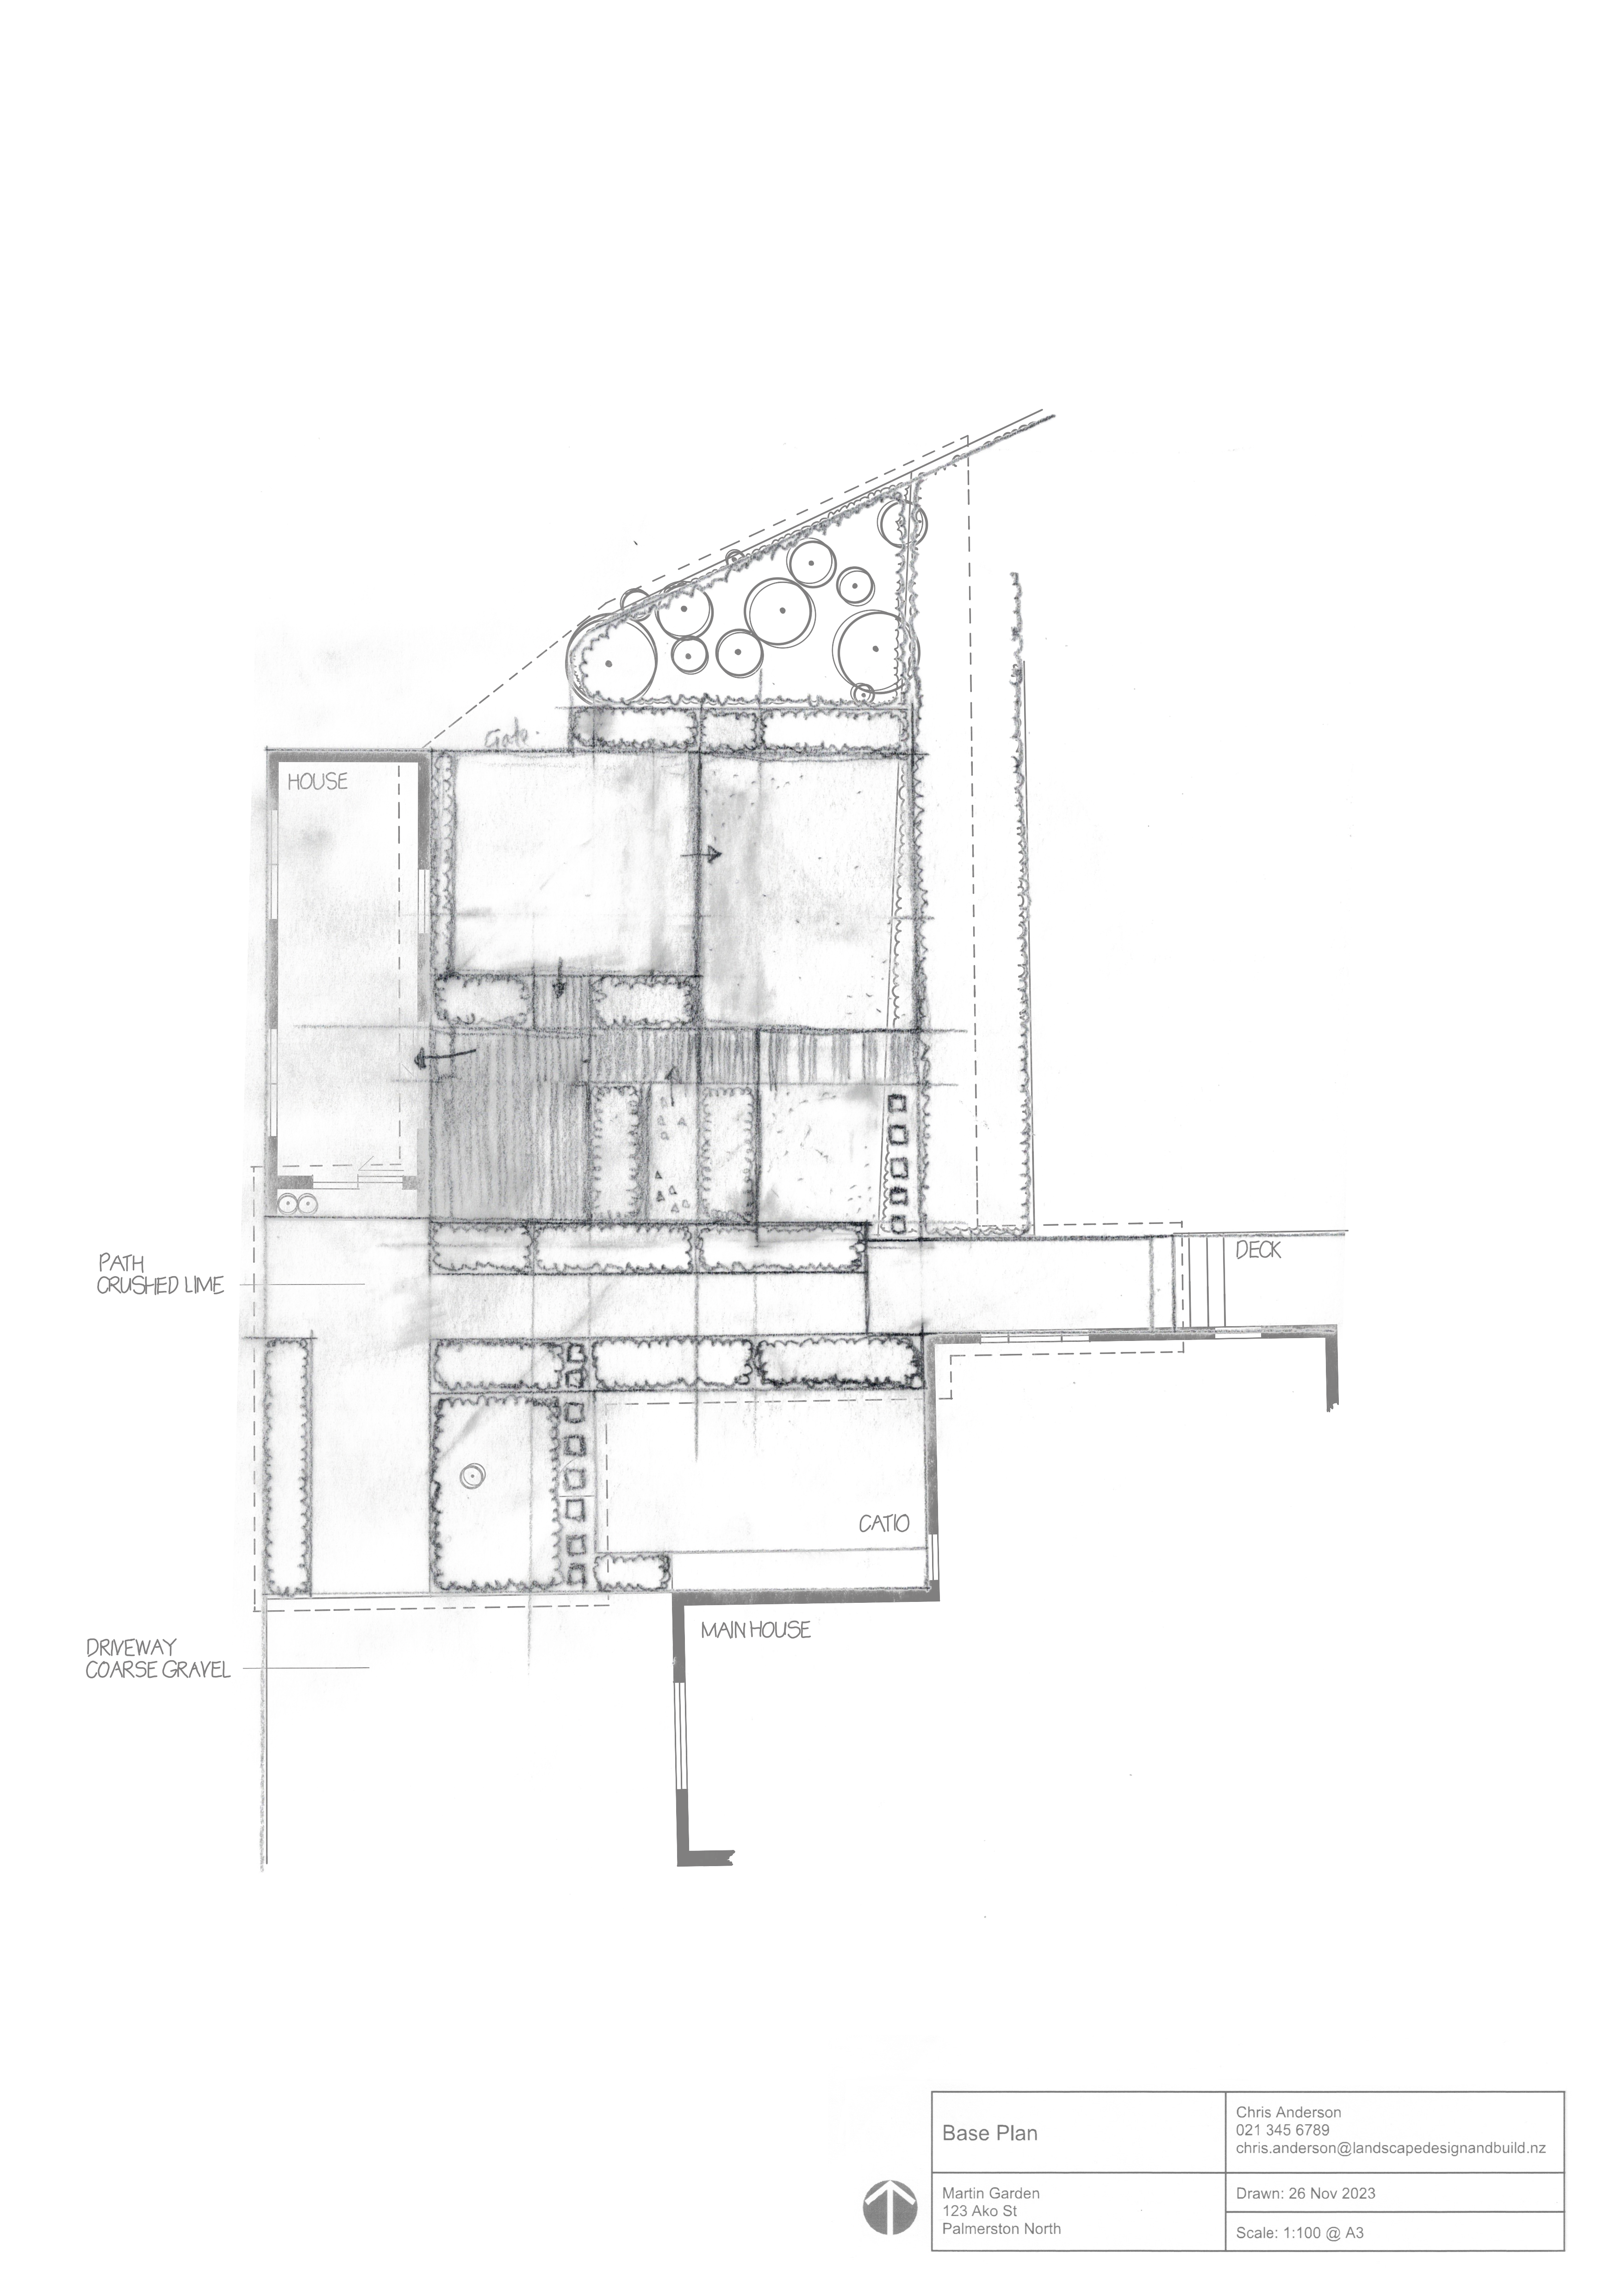 |
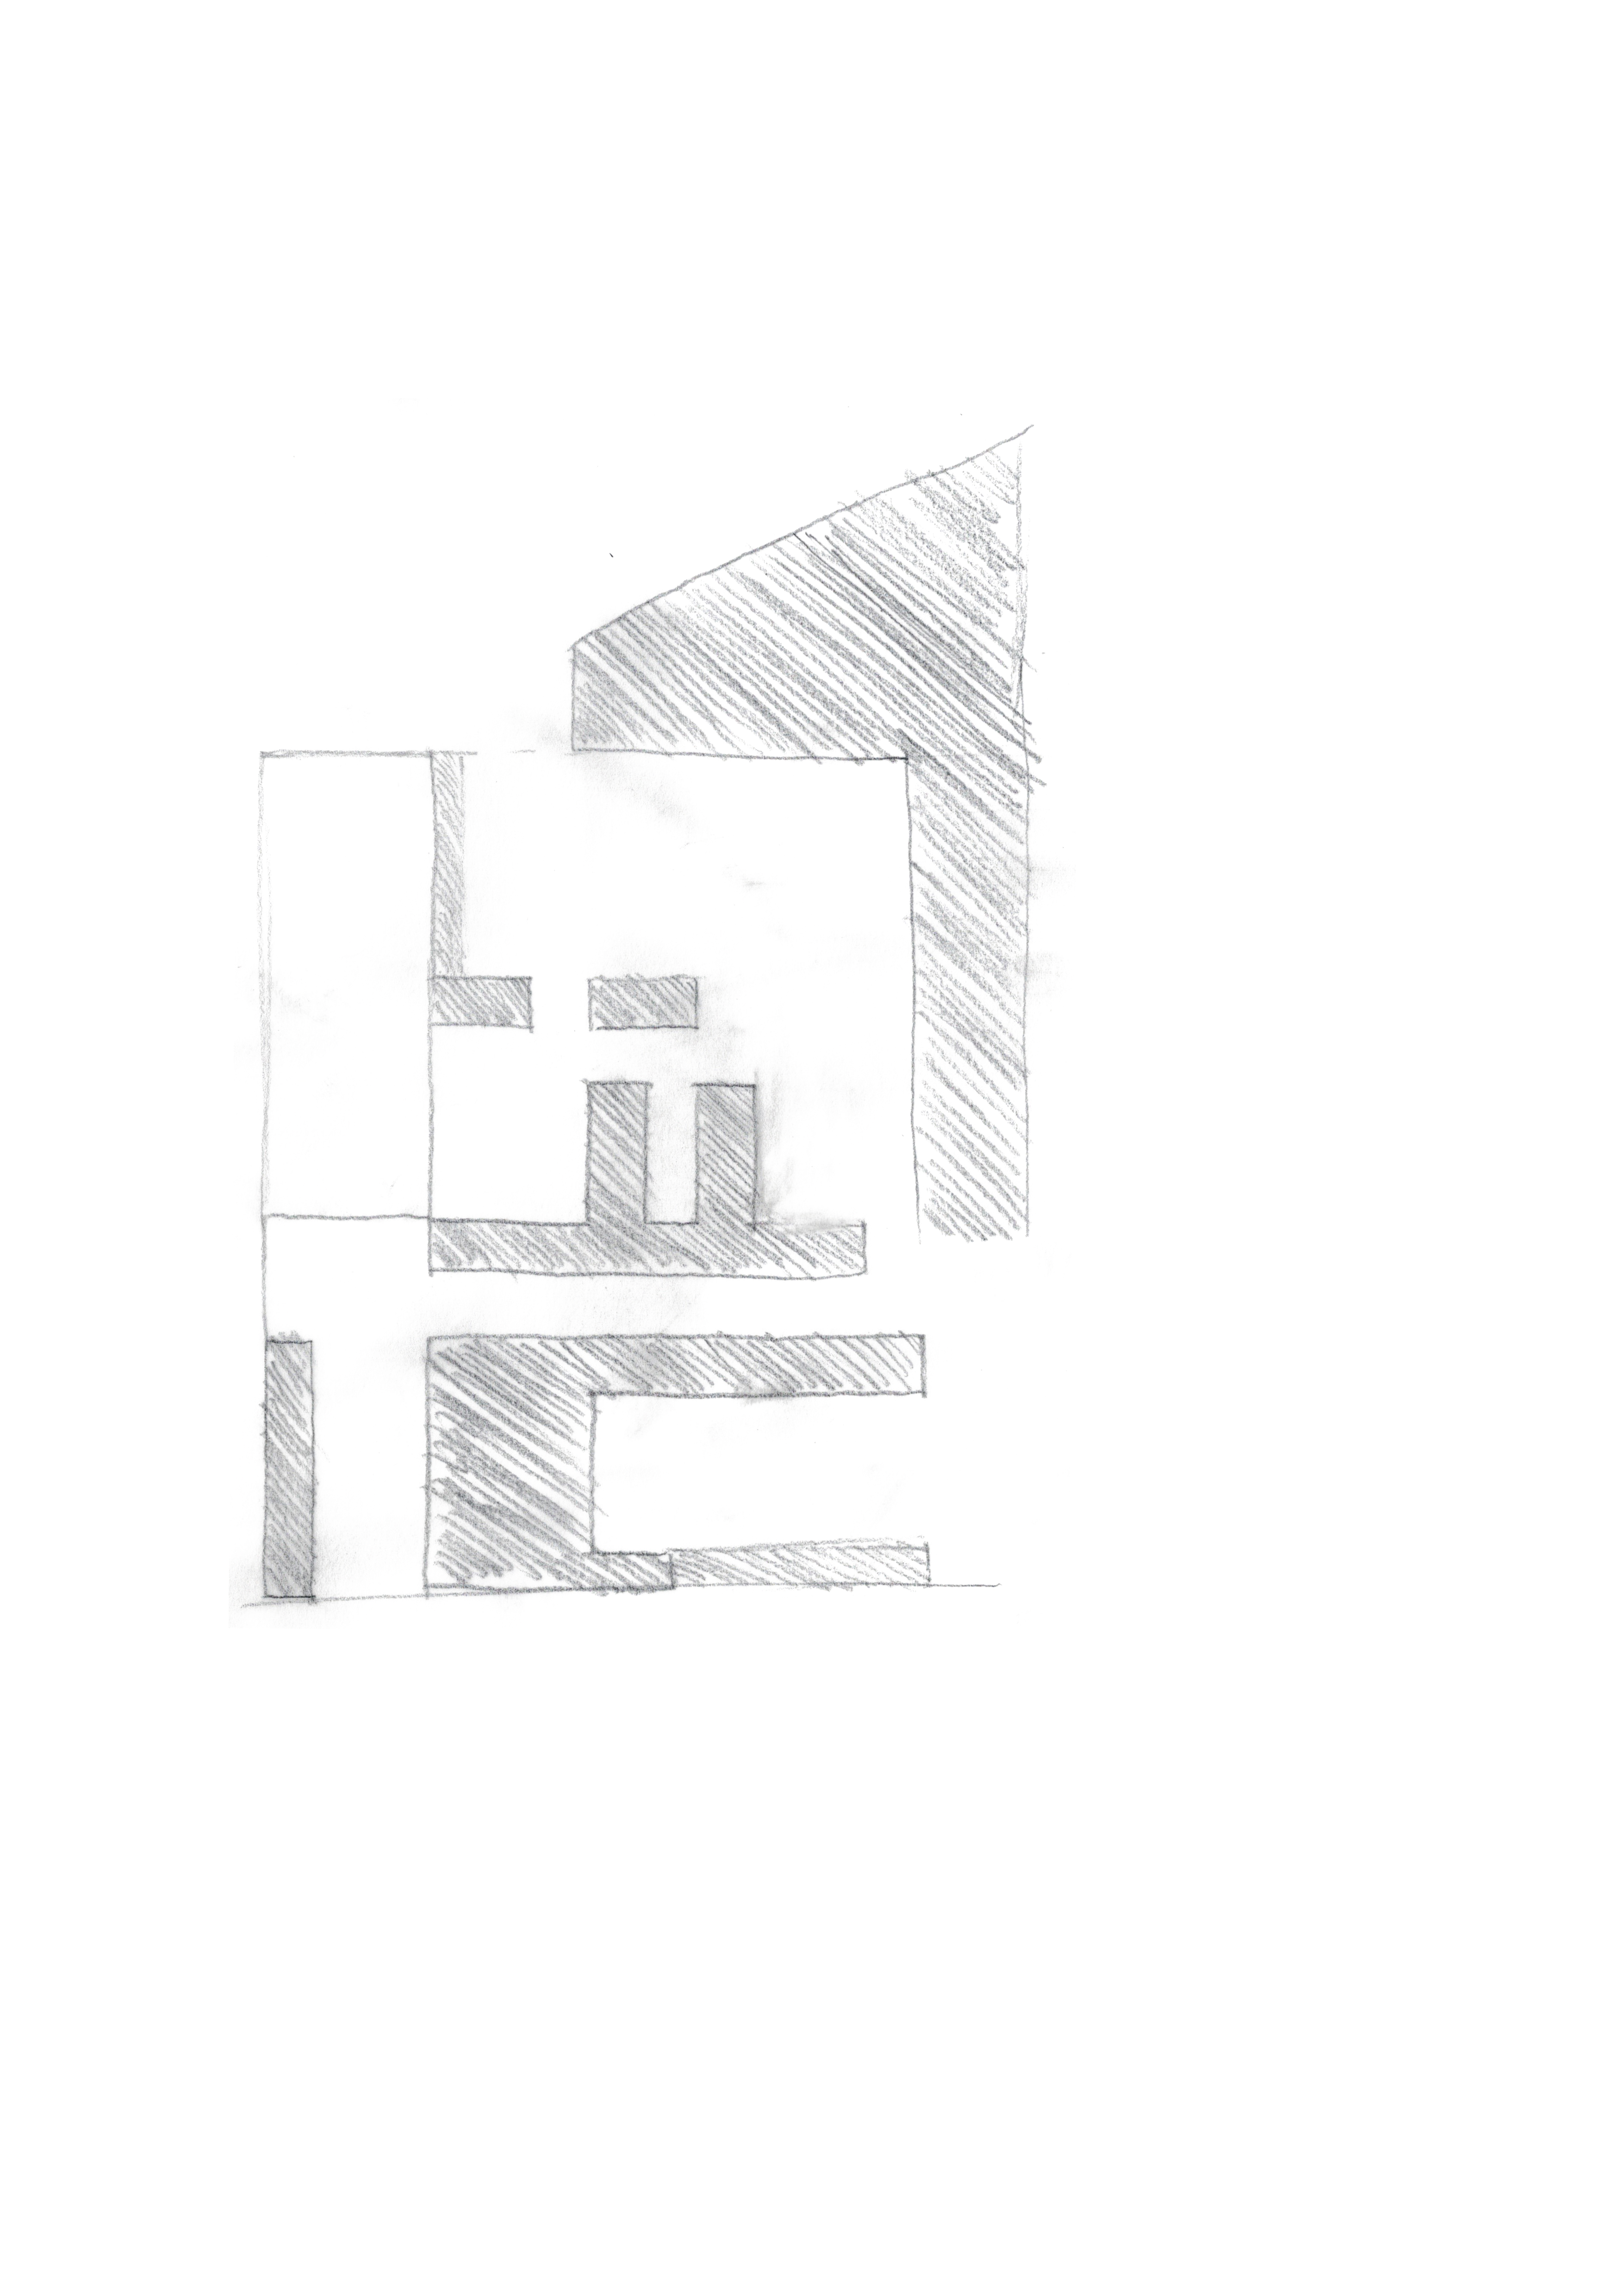 |
| Second rectilinear design. Garden rooms remain in their same locations, although their size and proportions have been altered. | Checking the balance of the second design. Note that there is a far more harmonious relationship between positive and negative space. |
Now we’ve reached the end of the ideation stage and have two concepts for the Martin Garden that we’ve decided to take through to the next stage, which is refinement of the concepts. Our two design concepts are: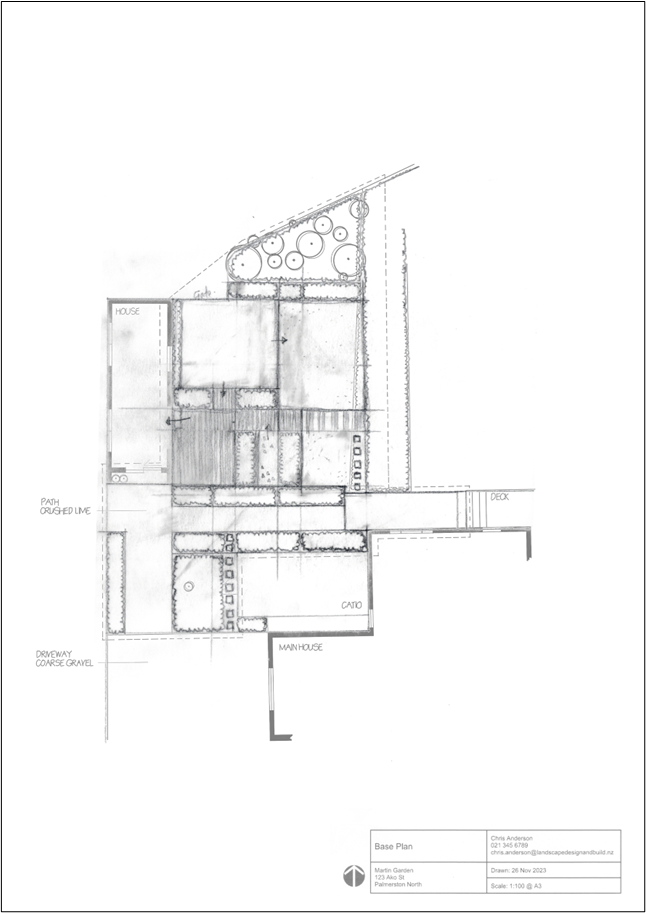
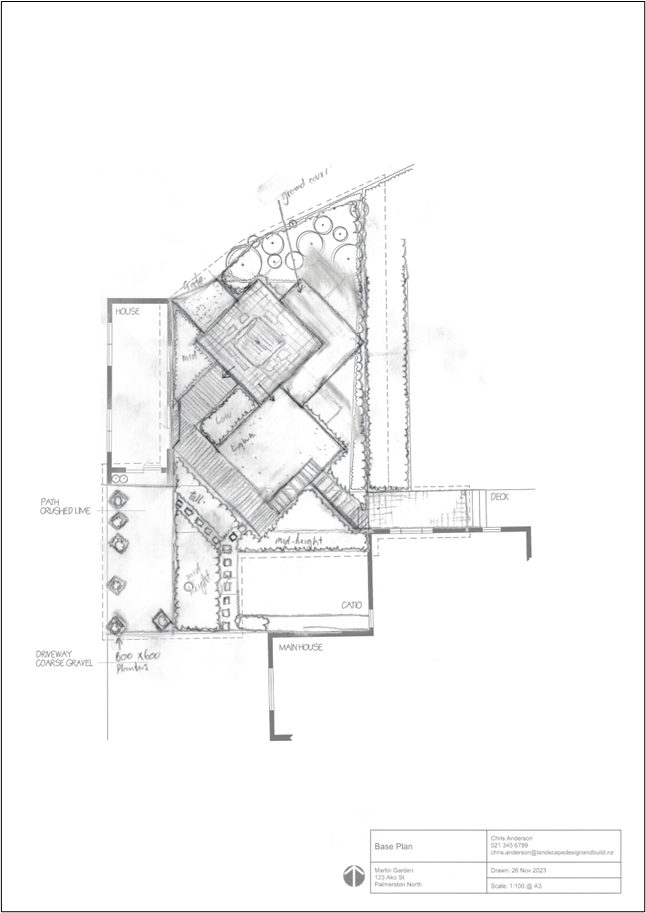
Rectilinear design, inspired by the art of Piet Mondrian.
Angular design, inspired by the diamond pattern on the front wall of the house.
In this topic, we described the stages of the ideation process, from planning to the development of functional (bubble) diagrams, seeking inspiration, through framing up the garden using grids and drawing in the ground surfaces and gardens. We finished by demonstrating a quick way to check the balance of the design.
Now it's your turn
Ideate a range of designs for your site using the process above. You need to follow two designs through to the point where they are as detailed as the two examples above.
For Assessment 1, you’ll need to upload photos or scans of your tracing layers so don’t throw them out.
Once you’ve done this, move on to the next topic.