In this topic, we’ll work through the stages of the concept refinement process, which include:
- confirming the client’s needs
- exploring the draft concept through drawings and 3D models
- resolving design problems
- adding details to the ground surfaces and plant groups
- editing the design to ensure it follows the design principles
- critiquing the design as a form or reflective practice to further develop skills and knowledge.
By the end of this topic, you’ll be able to refine garden design concepts to a point where they are ready to be drawn up as a concept plan.
As the saying goes, “check, check, and check again.” Go back over the client brief and interview notes and make sure the design or designs you plan to refine meet the client’s needs.
If you find that you’ve forgotten something, adjust the design now so you don’t forget it. You can do this by erasing and changing the design, or by placing a new sheet of tracing paper on top and working on that layer instead.
Sometimes it can be hard to visualise your designs to get a sense of what the garden rooms will look and feel like, particularly when you’re starting out as a landscape designer.
A useful way to get around this is to view the design from a different angle, rather than the plan (top-down) view.
If you are already skilled at drawing and know how to create three-dimensional drawings, go ahead and create some additional views of the garden on a separate piece of paper. Think about the most interesting parts of the garden and which angle they will be best viewed from.
Computer-aided design
In this programme we don’t cover how to draw these sorts of images by hand. Instead, we’ll take you through the process of creating a three-dimensional (3D) model of your design using a free software application called SketchUp for the Web.
SketchUp for the Web is an example of computer-aided design, or CAD.
The beauty of using CAD is that once you have created the model of your garden in 3D space, in the application, you can look at it from many different angles. Doing so will help you:
- get a feel for each garden room
- identify areas of the design that may need further attention to resolve
- identify parts of the design that might require additional documentation at a later stage.
In design, the word resolve means to form a solution for a part of the design that lacks detail, doesn’t follow the principles, or just feels like it “doesn’t work.”
We’ll get stuck into using SketchUp for the Web shortly; we have a whole topic dedicated to it.
If you’re interested in developing your landscape drawing skills, the book Landscape Graphics: Plan, Section, and Perspective Drawing of Landscape Spaces, by Grant W. Reid is an excellent place to start.
Here are some things to avoid in your garden designs, wherever possible:
- Solid, tall fences are the only type of screening used – could you use a hedge, or tall planting in some of these situations?
- Un-mowable lawns – sections of lawn that a standard mower couldn’t get to, or parts where there are so many changes of direction that mowing it would be hard work. Redesign the lawn to be a dominant shape like a rectangle, circle, or organic shape with sweeping curves. It is also useful to add a mowing strip – a narrow hard edge, such as a concrete nib – around lawn areas.
- Four or more different materials meeting at one point – move one or more of the shapes back to align with another grid line.
- Shapes that join or overlap weakly (refer to the subtopic on the design element: shape) – adjust so the join or overlap is dominant.
- Left-overs formed where small garden beds meet buildings – adjust the size or shape of the adjoining areas or fill in with a surface material.
Activity: Resolving design problems
Think about what is most important when you are resolving aspects of your design. This will depend on how you want the space to be used (its function) and what it should look like (its form). Remember that form follows function.
Now we move on to adding more detail about the parts of our design.
Surface materials
Choose what materials you are going to use for the ground surface of each part of the design. Remember to choose materials that link to the site buildings and limit the number of different types of materials you use.
At this stage you don’t need to specify the exact product, just an indication of the type of material and colour, such as “recycled red brick pathway,” or “dark grey concrete pavers.”
Plant groupings
In the ideation stage we treated all planted areas as simple blocks of garden mass. Now we need to think about the height and density of the plants.
This doesn’t mean we identify individual plants, except perhaps a few key plants chosen for emphasis, but rather that we can divide the planting mass into low, medium, and tall areas.
Tall planting (say 1.5m and above), if sufficiently dense, will act at the walls for our garden rooms.
Low planting (less than about 0.5m) adjacent to open centres, makes the space feel more spacious while medium-height planting can act to break up garden rooms into smaller ‘rooms within a room.’
Transitions and focal points
Consider what it will feel like moving from one room to another. Is it obvious that you’re now in a different space – one that has a different purpose?
If it’s not clear, redesign that part so it is obvious. Transitions should require people to pass through a physical or psychological barrier.
Some of the ways to make transitions an interesting part of the garden experience are:
- using narrow gates or passages (physical barrier) from one open space to another to create a feeling of compression and release (psychological response)
- changing the material of the ground surface (psychological barrier), such as moving from a brick patio to an area of lawn
- creating a change of ground level, such as a set of stairs or a ramp taking us up or down to a new level (physical barrier).
You might need to go back to your plant groupings and change the height of some as a result.
Check to see if your design encourages people to move through it in the way you want them to. Remember, people will take the most direct route to get to their destination. If you want them to follow a specific (longer) route, make sure it benefits them by either being a nicer surface to move across or by offering interesting views.
Add in focal points to encourage people to move in the direction you want them to and from one garden room into another.
You might like to test these approaches out on a separate layer of tracing paper and only add the information to your design layer when you’re happy with your decisions.
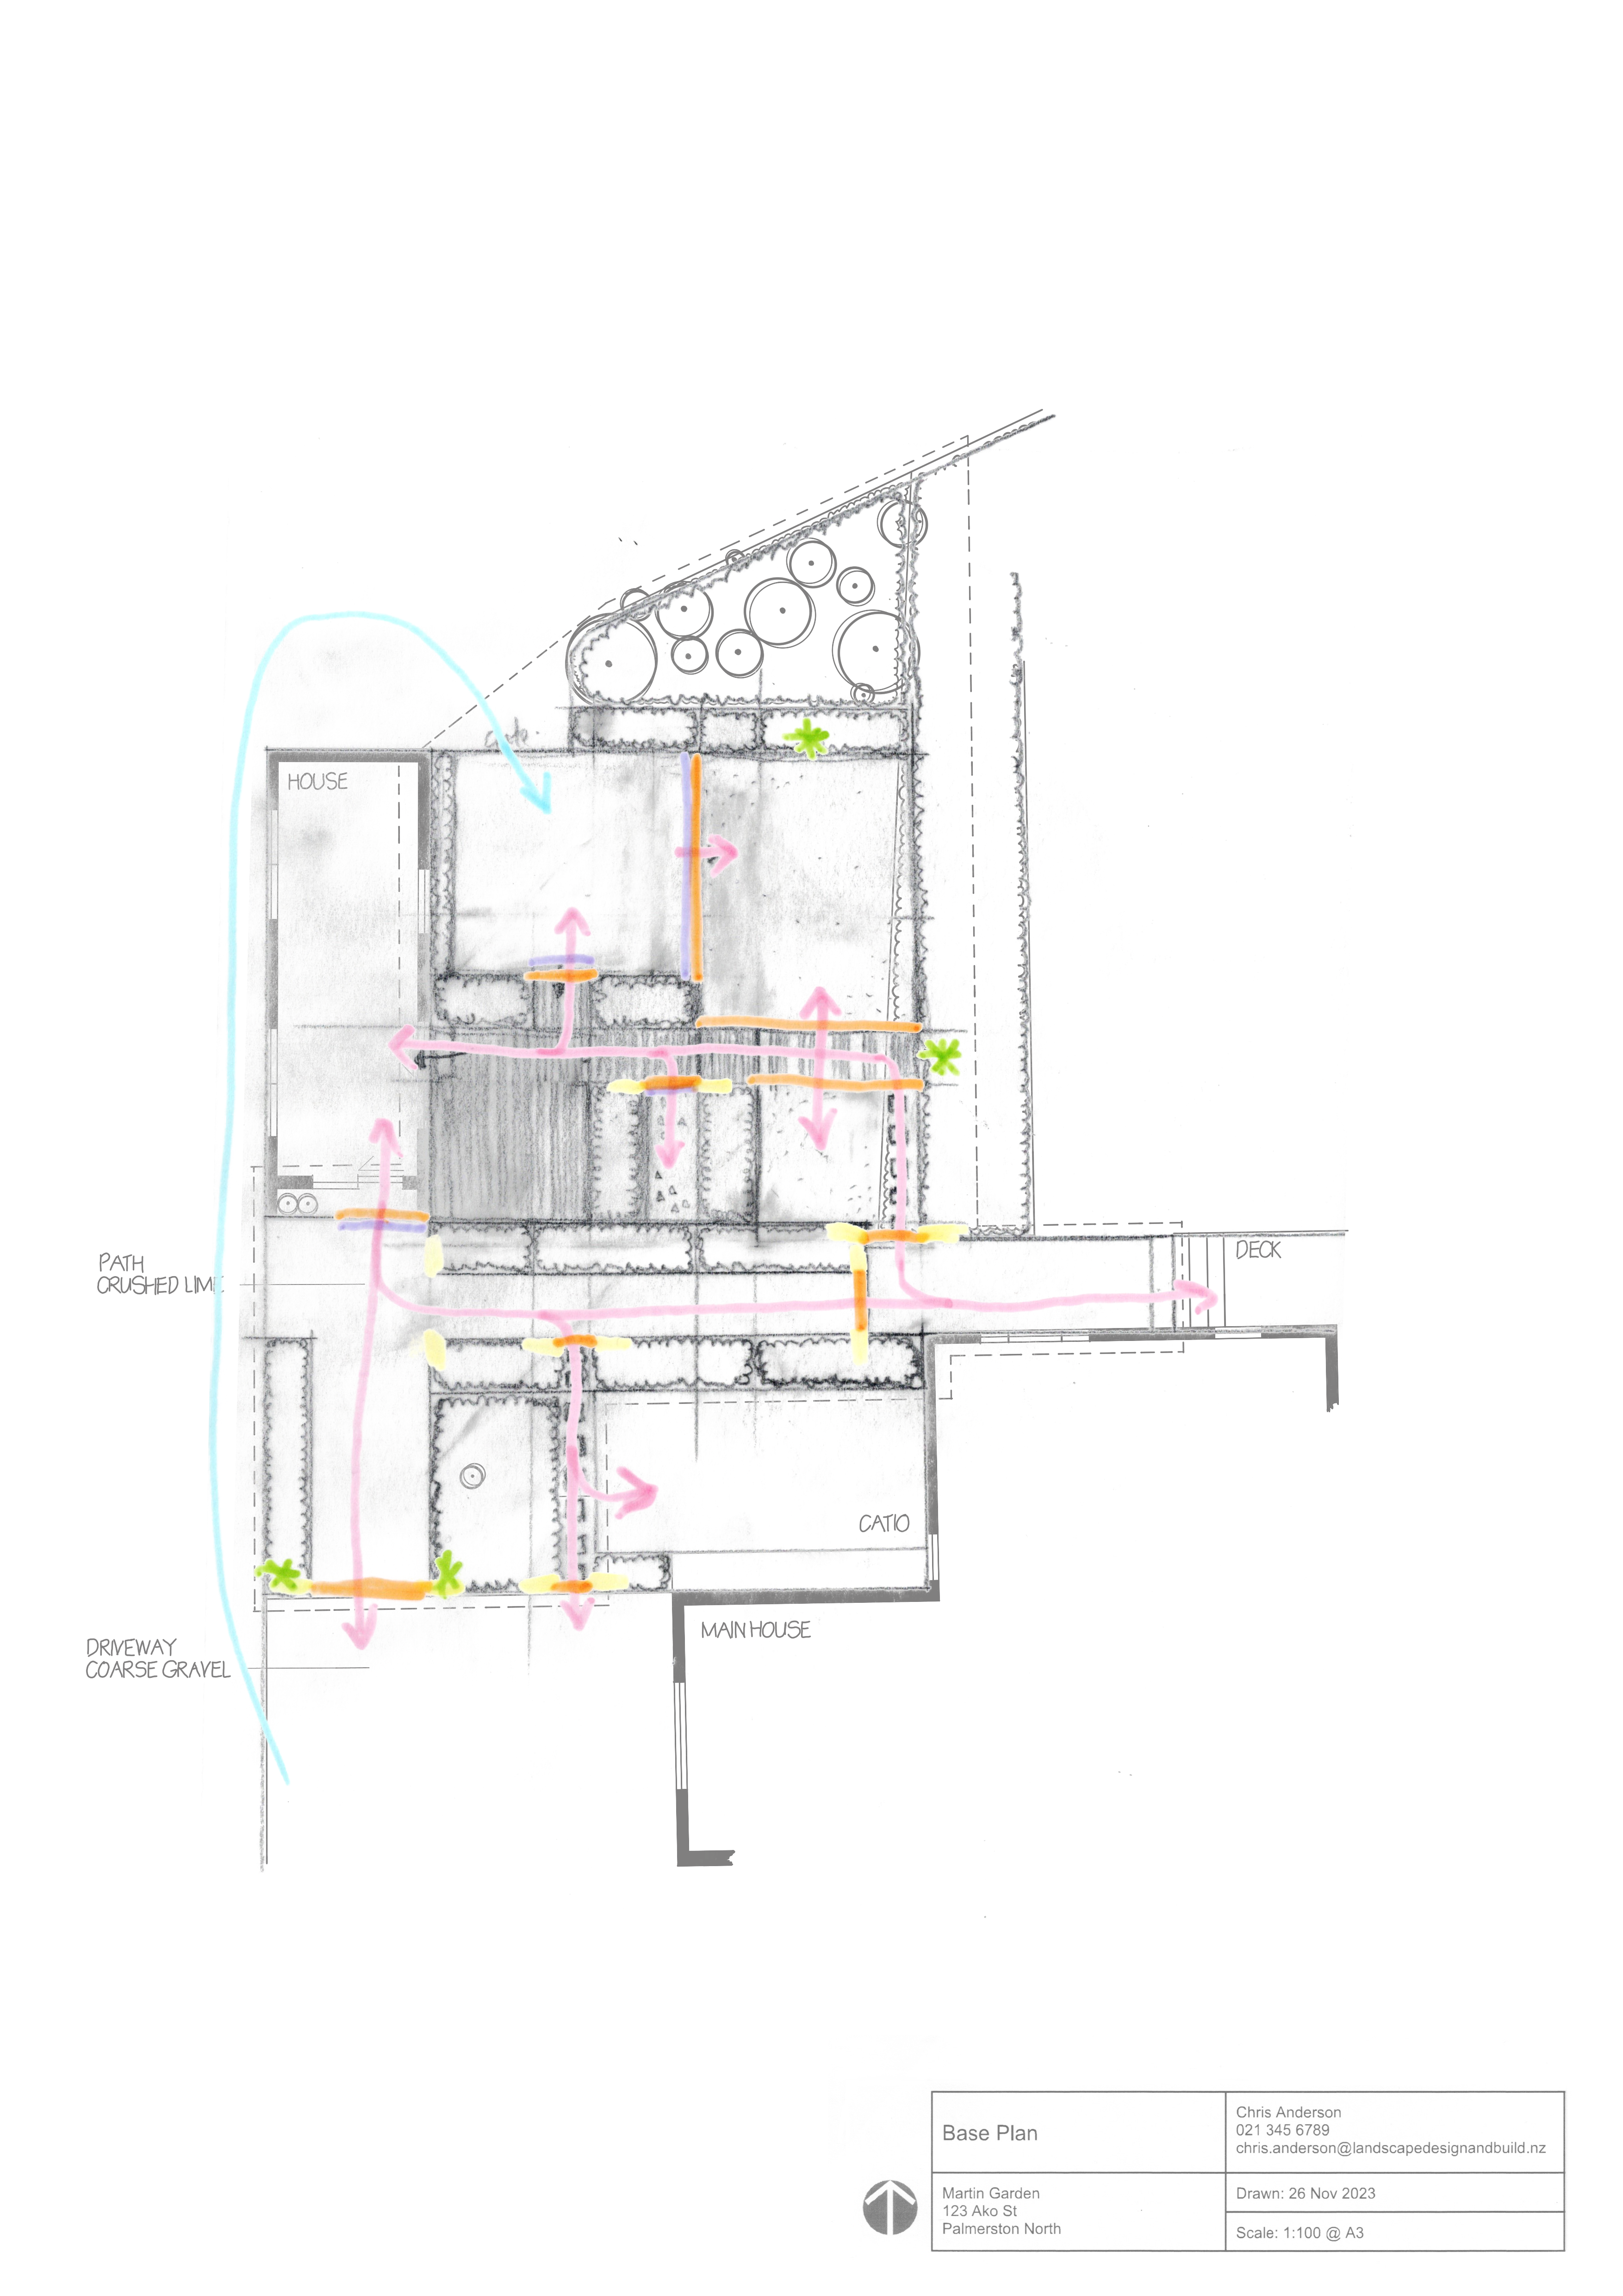
Circulation study of the Martin Garden rectilinear design. Pink lines represent intended circulation of people, blue represents vehicle movement, yellow are points of constriction, orange are surface changes, purple are level changes, and green asterisks are focal points.
We’re nearing the end of the concept design stage. Now we need to review our design against the landscape design principles.
The flip side to adding detail, as we have just done, is selectively removing variation, which supports the principle of simplicity.
Let’s run through a few points to consider and the principles they link to:
- Does each garden room have a single primary use? (Unity)
- Do the materials chosen reflect the buildings? (Unity)
- Does the scale of each room respond to the architecture and is it appropriate for the intended use? (Proportion and scale)
- Is there a balance of positive and negative space? (Balance)
- Does the design have enough focal points or areas of emphasis to draw people through to the desirable spaces? (Emphasis)
- Does the design use a restrained palette of materials – limited to the fewest types of hard surfaces that still create interest? (Simplicity)
Make changes, as necessary.
Finally take a look at your design and ask yourself:
- What are my favourite parts of this design?
- What are the parts I don’t like but am unsure how to resolve?
- What elements of this design would I like to use again for another garden?
You don’t need to make any changes to your design as a result of these questions.
Questions like this, known as reflective practice, are a useful way to help improve your design skills.
This is the end of the topic. In this topic we worked through the stages of the concept refinement process. We talked briefly about using CAD to explore garden designs in 3D. That’s what we'll be doing in the next topic.
