In this topic we’ll:
- visualise plant forms and textures to help decide how to arrange plants in interesting and appealing ways
- create arrangements based on plant type, and then determine plant requirements for these different plant types
- choose plants that have the visual and growth requirements that we’ve specified
- create a list of all the plants we’re going to use in the garden, called a planting schedule
- draw up the planting plan.
By the end of this topic you’ll be able to:
- Follow the planting design process to select and arrange plants to compliment your chosen garden theme.
- Write up a planting schedule.
- Draw up a planting plan following standard landscape design conventions.
The first task is to visualise what plant forms we want in the garden. Some people can do this in their minds, but for most this is difficult.
Drawing plant form sketches
For someone new to landscape design, the best way to come up with a planting plan is to start with plant form sketches.
This involves drawing perspective sketches of different areas of the garden and then sketching in different plant forms and textures.
Start by locating where feature trees will go. Use the arrangement approaches we talked about in the previous topic, such as the scalene triangle.
Draw in their form. Consider which way you want the viewer’s eye to be drawn and the energy you want for the space. Then draw in the texture to show the approximate shape and size of the foliage. Finish off the drawing by adding in trunks and branches.
For shrubs and perennials, stick to the three contrasting plant forms that Michael McCoy talked about in the video on naturalistic planting:
- upright or vase shape
- round and mid-height
- horizontal and low.
Use the drift, start, tier, and weave approaches as appropriate to your design. Draw these forms using a light pencil, then add texture. Choose textures that complement each other by using variations of:
- foliage and flower head shape and
- texture size.
Plant form sketches for the Martin Garden entrance.
Plant form sketches along the path to the main house.
Plant form sketches of the triangular garden. Given that the raised garden beds on and near the boardwalk are going to be for vegetables, we haven’t included those areas.
Now it’s your turn to have a go!
Print out views of your CAD model, showing the garden’s different spaces. For each area:
- Secure it on your drawing board.
- Secure a sheet of tracing paper on top.
- Using pencils, roughly sketch plants to explore what type of plants look best and in what arrangements. Use your eraser to make changes or replace the tracing paper and draw your new arrangement on this sheet. Try out different forms, sizes, textures, and groupings until you settle on an arrangement that you are happy with.
Repeat the process for a different area. Once you’ve done this a few times you find a pattern that is worth repeating throughout the garden.
Only do as many sketches as you need to give you confidence about how best to arrange the plants across the site.
As you spend more time doing planting design you’ll be able to visualise planting combinations without needing to sketch them.
Start with a blank sheet of tracing paper. Draw in the centre and spread of all plants that you are going to retain. You might want to put your concept plan underneath your blank layer to transfer those plant locations to your new drawing. Next we want to transfer the rough plant forms we just sketched into plant arrangements in plain view.
To do this, place your new drawing over the working version of your proposal plan. You shouldn’t need the concept plan anymore so you might want to remove it from your drawing board before adding the proposal plan.
Use your pencils, circle template, and drawing compass to mark the approximate locations of the plants. Label each group according to your plant form sketches, for example “1x1m coarse round foliage, shady” or “0.5m tall, medium texture, upright form”.
Refer to your site analysis plan and your shadows layer (from the concept design stage) and identify any plant groups that need to have specific growth requirements and add this to the existing labels. For instance “wind-tolerant” or “tolerates wet soil.”

Too little overlap (left), a little too much overlap (middle), and just the right amount of overlap (right). For drift planting, the rightmost of these approaches will lead to a dense planting that will feel like one large clump.
Draw up your rough plant type arrangement plan lightly in pencil. Use your eraser and pencil to make changes until you are happy with your planting design.
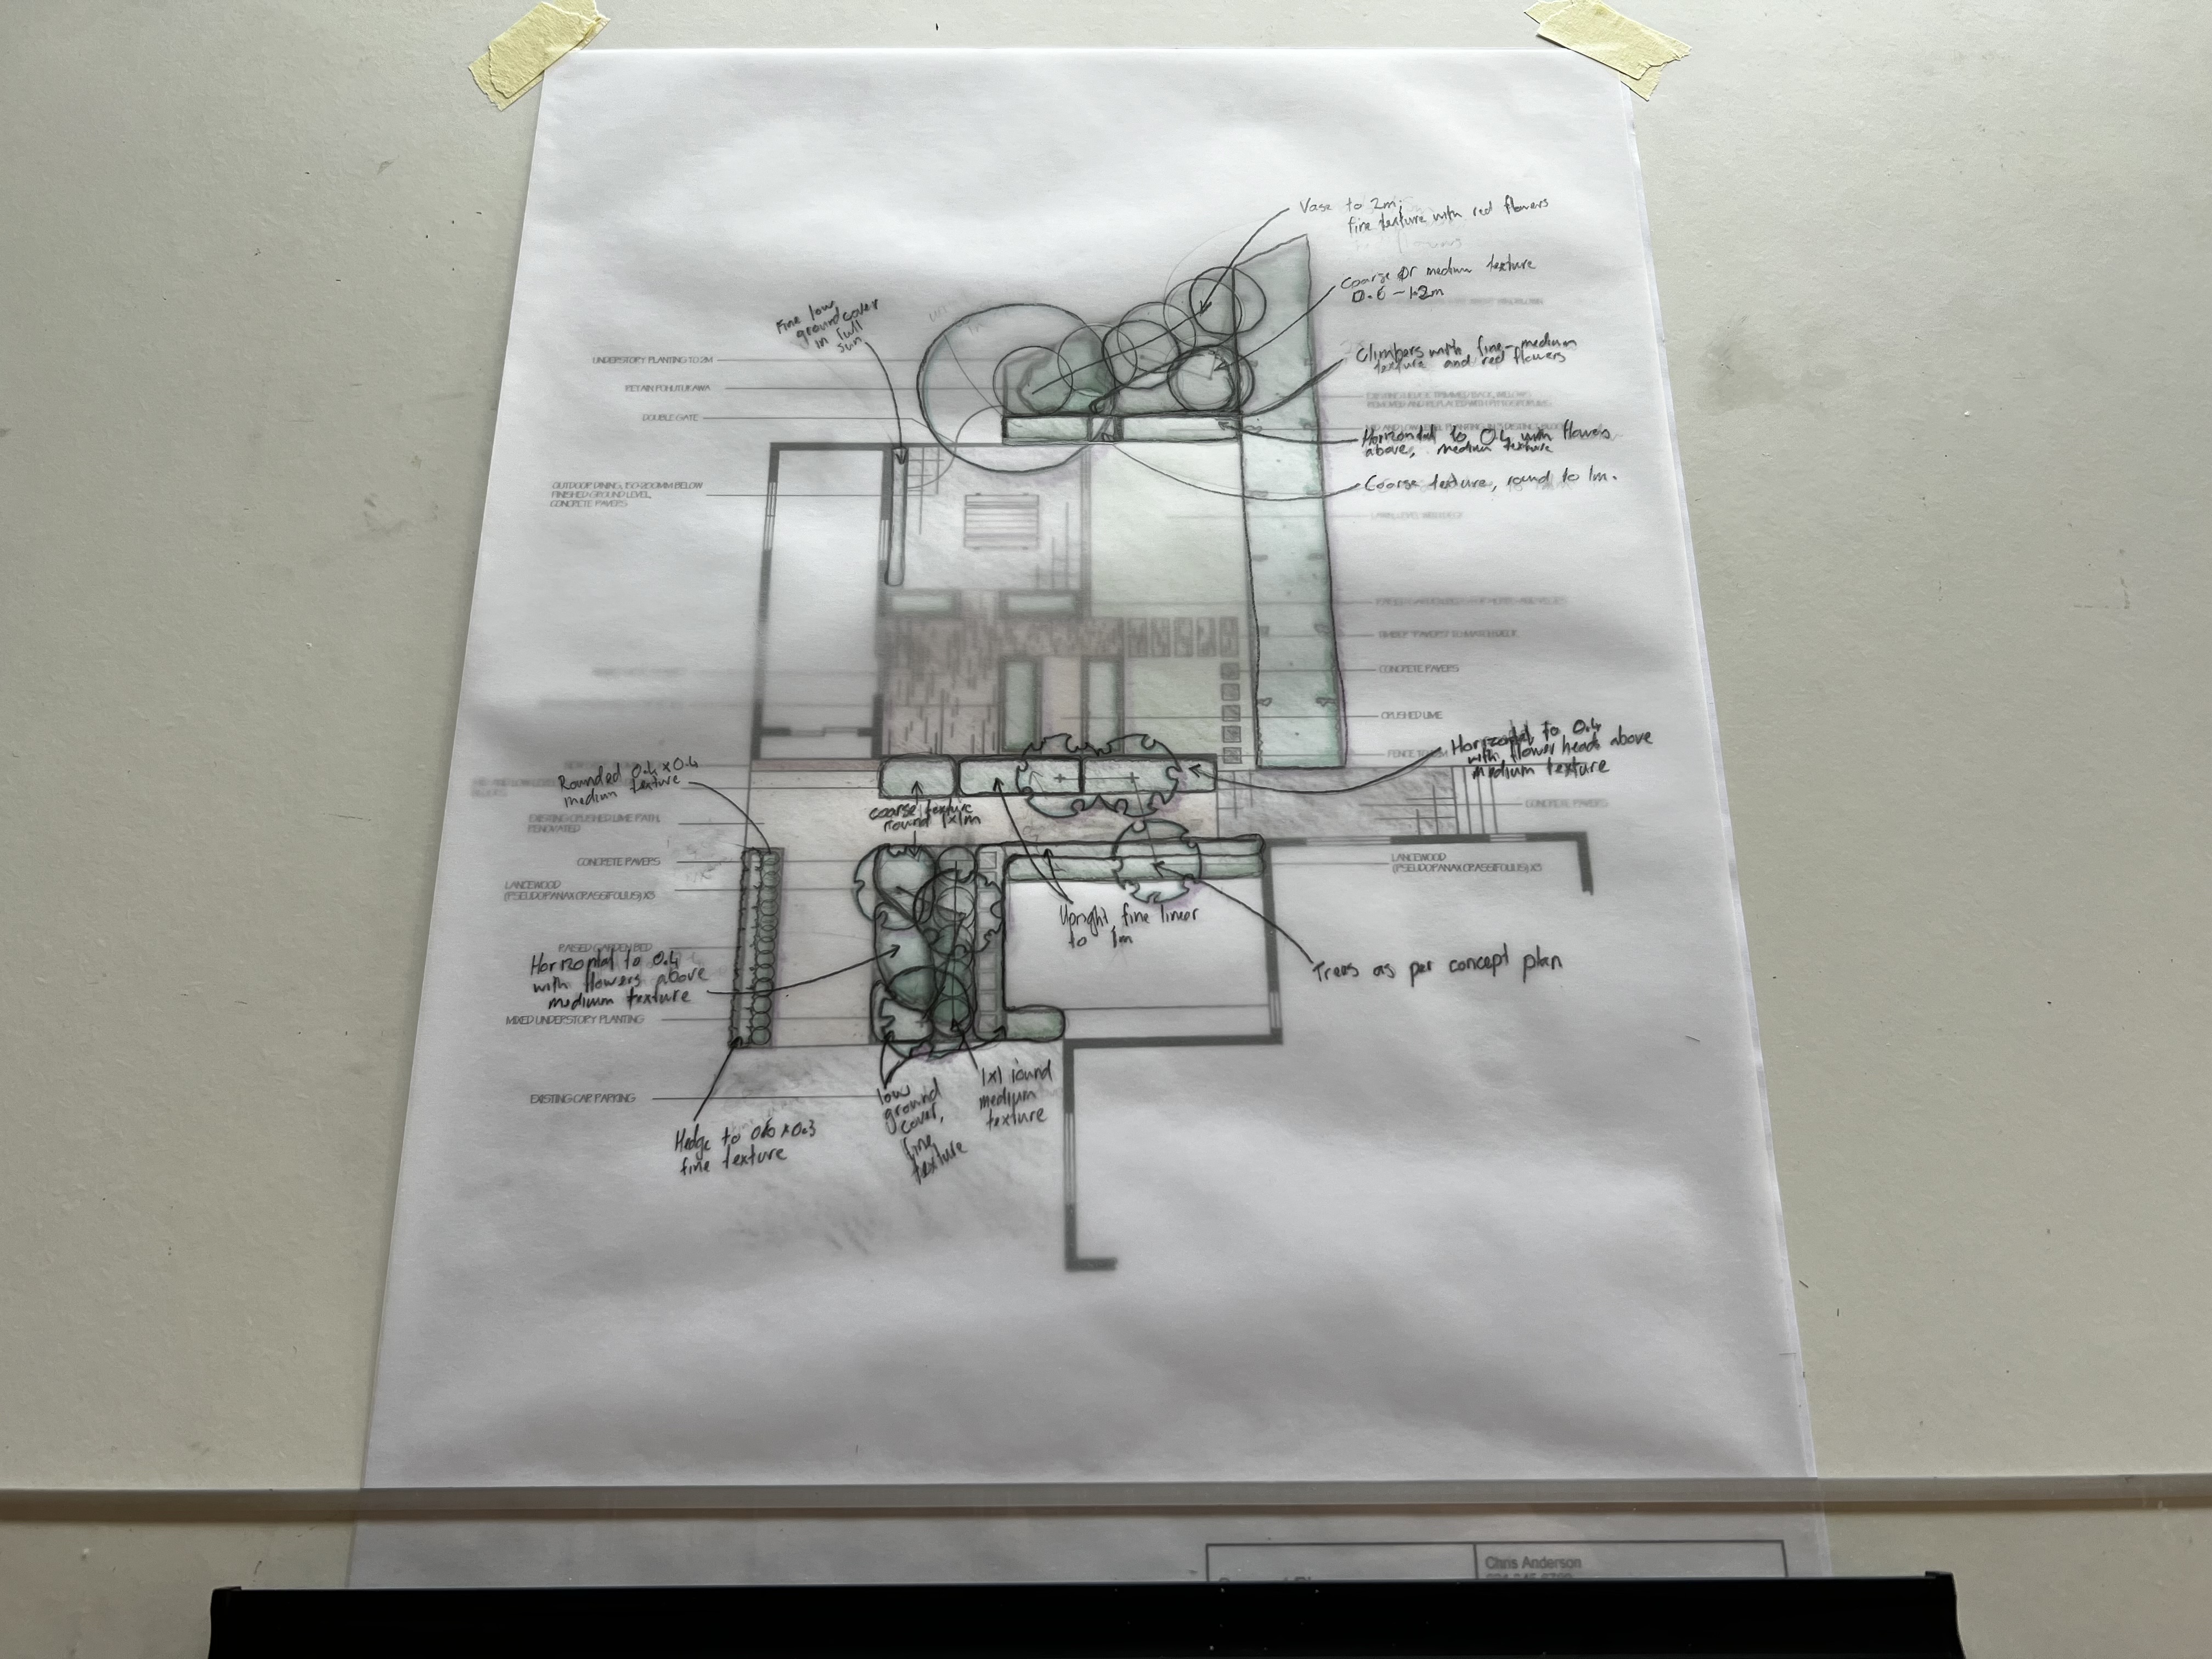
First draft of the plant type arrangement for the Martin Garden.
Next we are going to use the information from our plant type arrangement plan to create a plant requirements list. This lists the plant features and specific growth requirements we are looking for.
You don’t need to specify everything (in other words, it’s ok to have some cells in the table left blank).
To fill in the template, first complete the fields at the top.
- Planting design theme – the overall style that you are going for, such as tropical, cottage garden, contemporary, or Mediterranean.
- Project – the name of the garden, e.g. Martin Garden
- General attributes – the defining characteristics of plants for this theme, for instance:
- Tropical theme: Densely planted high-energy plants with, glossy foliage, predominantly coarse textures, vibrant colours
- Cottage garden: Dense planting layered from tall to short, predominantly fine texture, with some medium and coarse, silvery green and non-glossy foliage
- Colour scheme – for example monochromatic purple with white to blend.
Next, transfer the plant features and growth requirements from your drawing to the table. Where you want plants that have the same features, but the growing conditions differ:
- Try to find one species that can tolerate both, for instance if one area is exposed to the wind and another area is sheltered, go for the wind-tolerant species and use it in both areas.
- Where they compete, add these in as separate rows in the table. For example, one row for a rounded perennial 1x1m with medium texture that needs to grow in full sun and another row for a rounded perennial 1x1m with medium texture that needs full shade.
Download the plant requirements list template and fill it out for your garden and the plant forms you’ve listed on your plant type arrangement plan.
Click here to download the plant requirement list template.
The first part of this step is to find which plants are available that meet your plant requirements. This is about building up a list of actual plant species that could be used in the garden.
If you find a number of different plants that meet the requirements of a plant type in your list put all their names down.
Activity
What’s on offer
Complete steps 1 to 5 below to help you identify which nurseries have the plants that you want.
- Open your plant requirements list and unhide column I, then print it out.
- Go to nurseries near you and write the names of those that meet your plant requirements in the relevant cell in the potential plants column.
- If you find plants you particularly like. Get several of them and put them together in the arrangements you specified, or in other arrangements. This will help you get a sense for how well they work together.
- It might be a good idea to explain to the staff what you’re up to – that you’re studying landscape design and need to do this for an assignment.
- Take photos of your arrangements.
It is a good idea to build a relationship with your local nursery owners and staff. They know plants better than most people. If you plan on getting into landscaping as a career, find out from them how you can work with them in the most efficient way. For instance, do they want you to order on their website, send plant lists to them by email, or bring the list into the nursery?
A nursery differs from a garden centre in that a nursery’s main purpose is to grow plants, while garden centres, in most cases, buy their plants from nurseries and sell them on to gardeners.
Are there any items on your plant requirements list that don’t have plant species names next to them?
If so:
- Consider asking the nursery staff for suggestions.
- Refer to the plant list you created in the garden plants topic. Do any of those plants match items on your plant requirements list? If so, add them.
- Check Aotearoa-based nurseries that sell online and that will ship to your location. Add relevant plants to fill out your list.
- If you still can’t find plants that meet your requirements, update your plant requirements list, and rough plant arrangement plan. For example, changing an “1x1m round, evergreen, perennial, medium texture, with white flowers that likes full sun” to include coarse texture and allow for flower colours that work with the rest of the colour scheme too.
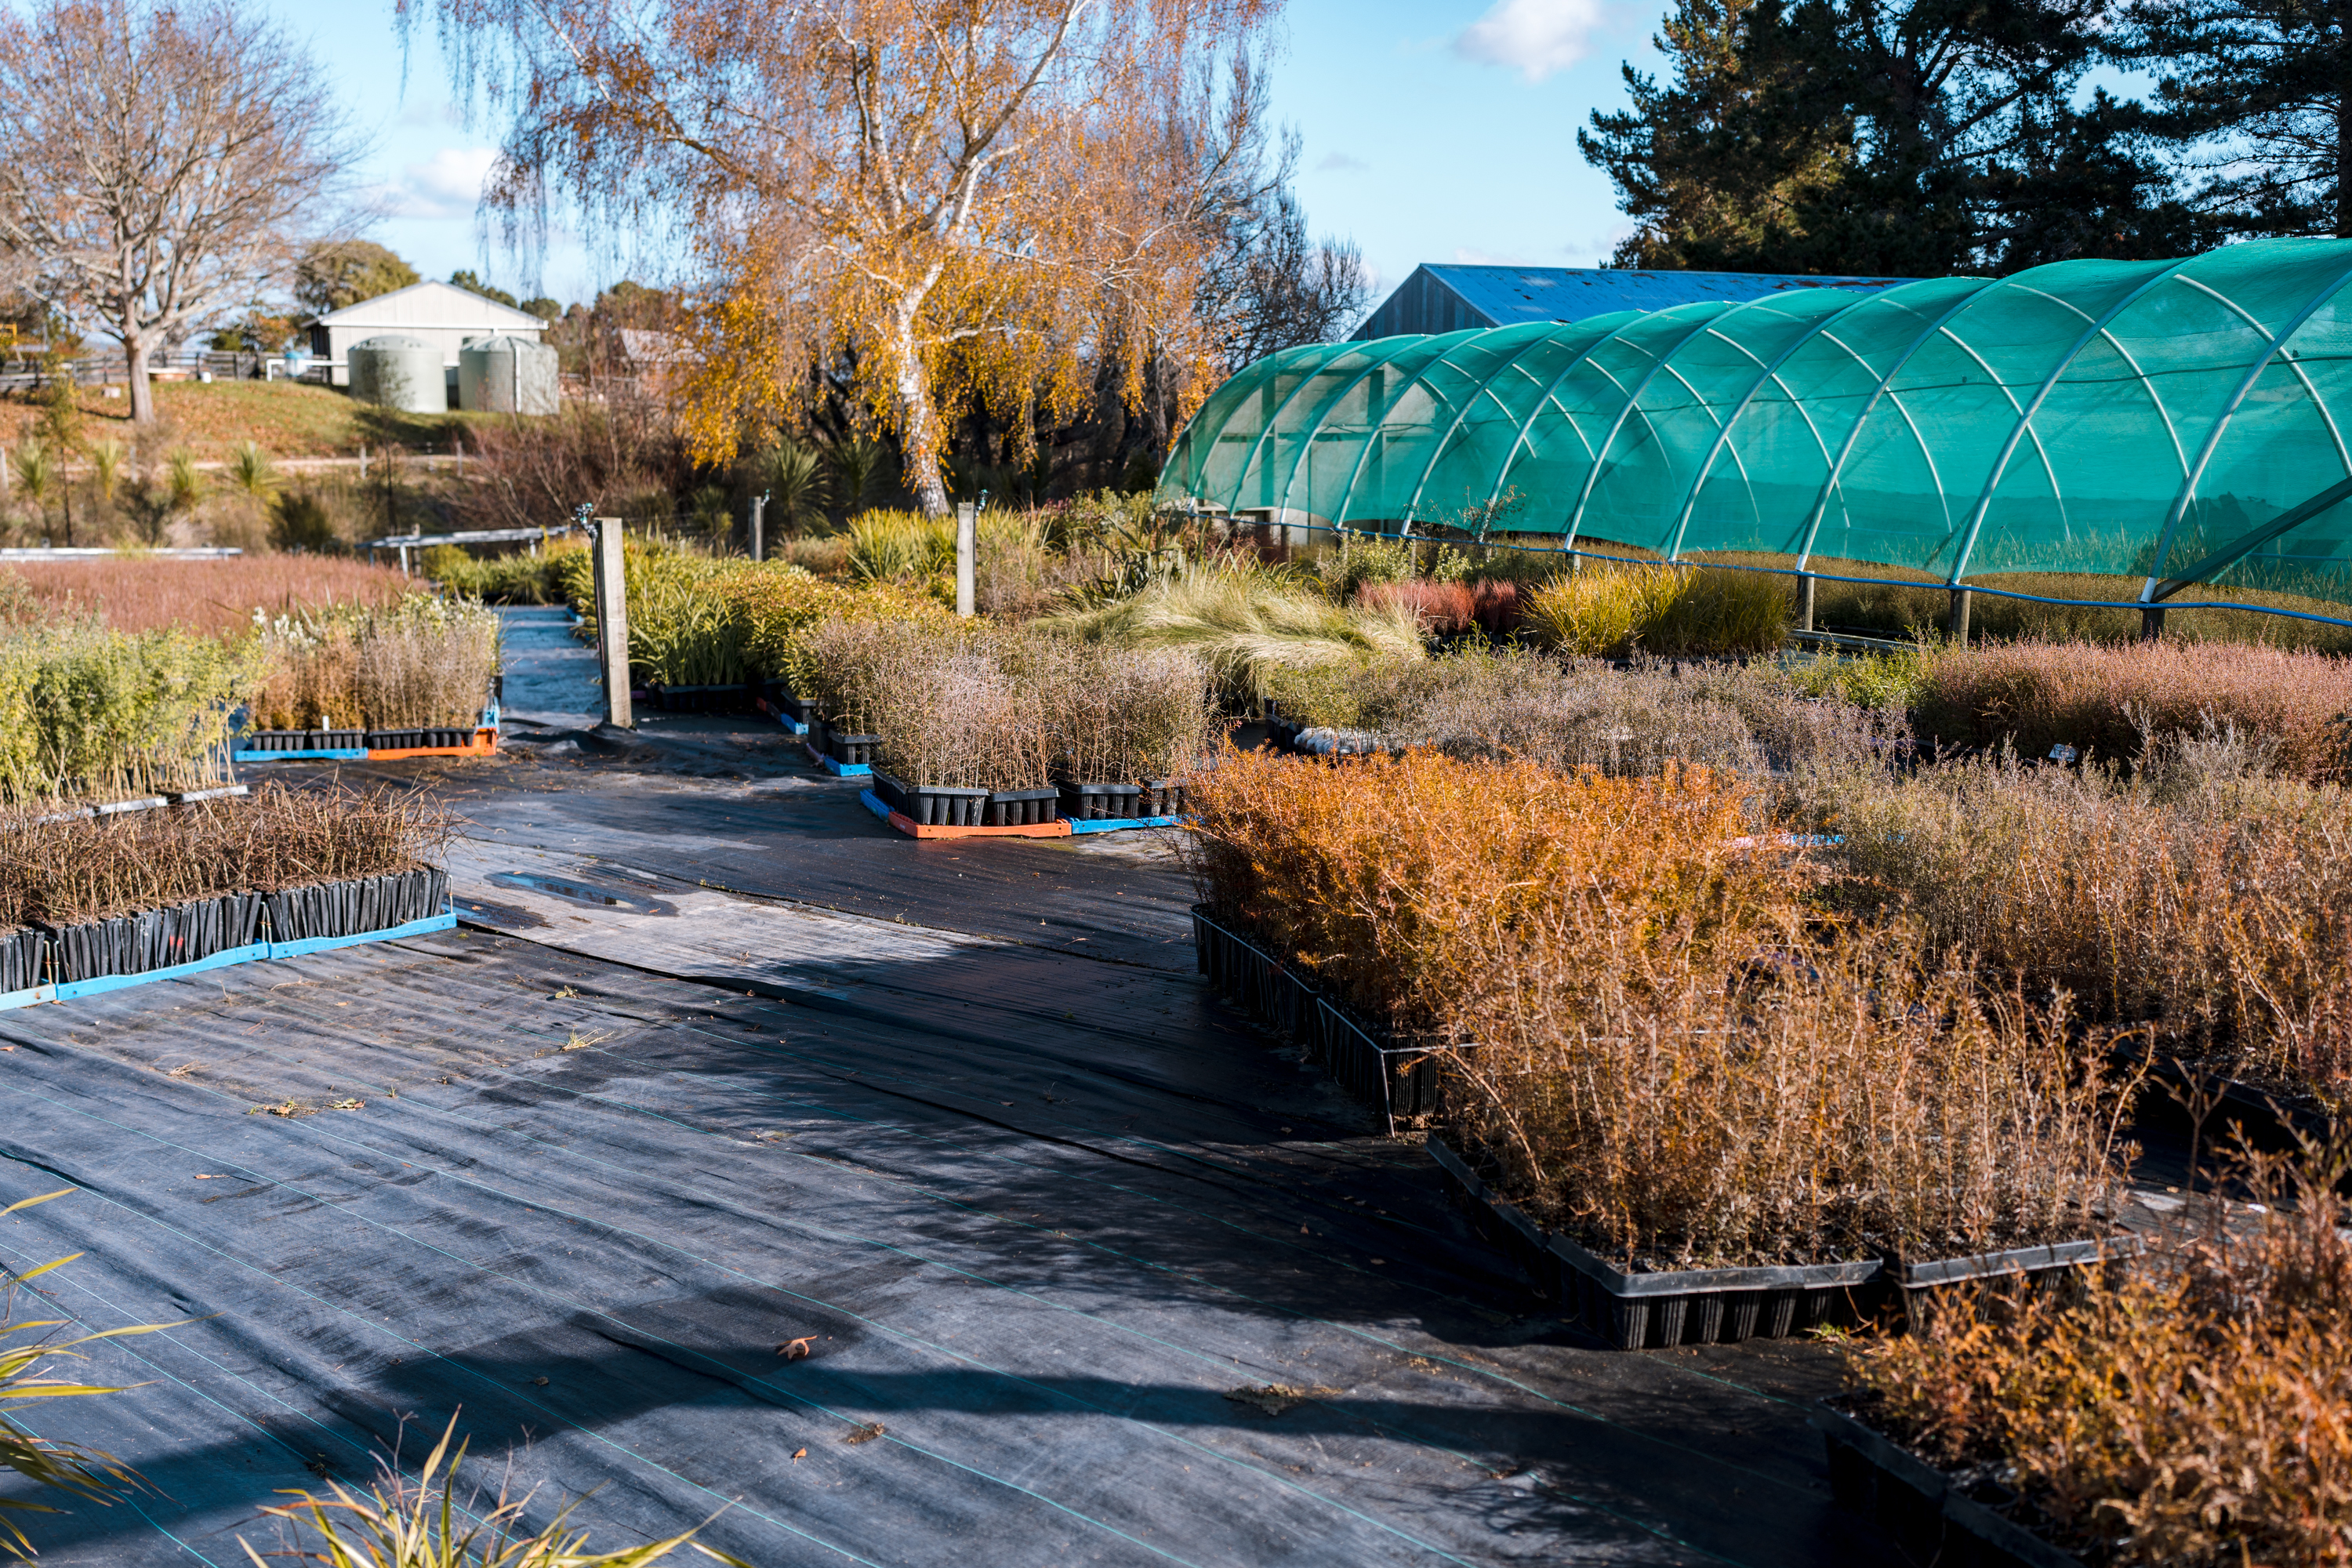
Nurseries will usually have more stock of any given plant and can often grow more, if required. (Photo of Piwakawaka Plants main nursery, used with permission.)
Choosing the best plants
Forming a short-list
For each plant type that you’ve got more than one species listed in column I, choose the best one.
When choosing, consider:
- Can you get enough from your local nursery or online store?
- If you specify plants that can’t be bought easily, the person doing the planting (whether that is you, a landscape contractor, or the home) will have to find an alternative, which may not match your design intent.
- Which looks best for most of the year?
If you’re still trying to decide, you might also want to think about:
- Which is the most resistant to pests and diseases?
- Which requires the least maintenance?
Making edits as you go
As you work through the process, the visual aspects of your plant type requirements might need to change. For instance, if you can’t find any coarse textured plants that will work in a shady spot, you might need to go for one with a medium texture. If you do this, think about how it will affect the whole composition (the plants next to it). You might need to change them too.
Update your plant requirements list with the actual information for each plant you choose. If you are planning on ordering the plants online, you might like to add links to the relevant web pages.
Checking your selection
When you’ve decided on the plants you want to use, which you know you can source, it’s a good idea to see them all together to make sure that nothing looks too far out of place.
A simple way to do this is to create a new board on Pinterest and add photos of all plants from your list and those plants already on the site.
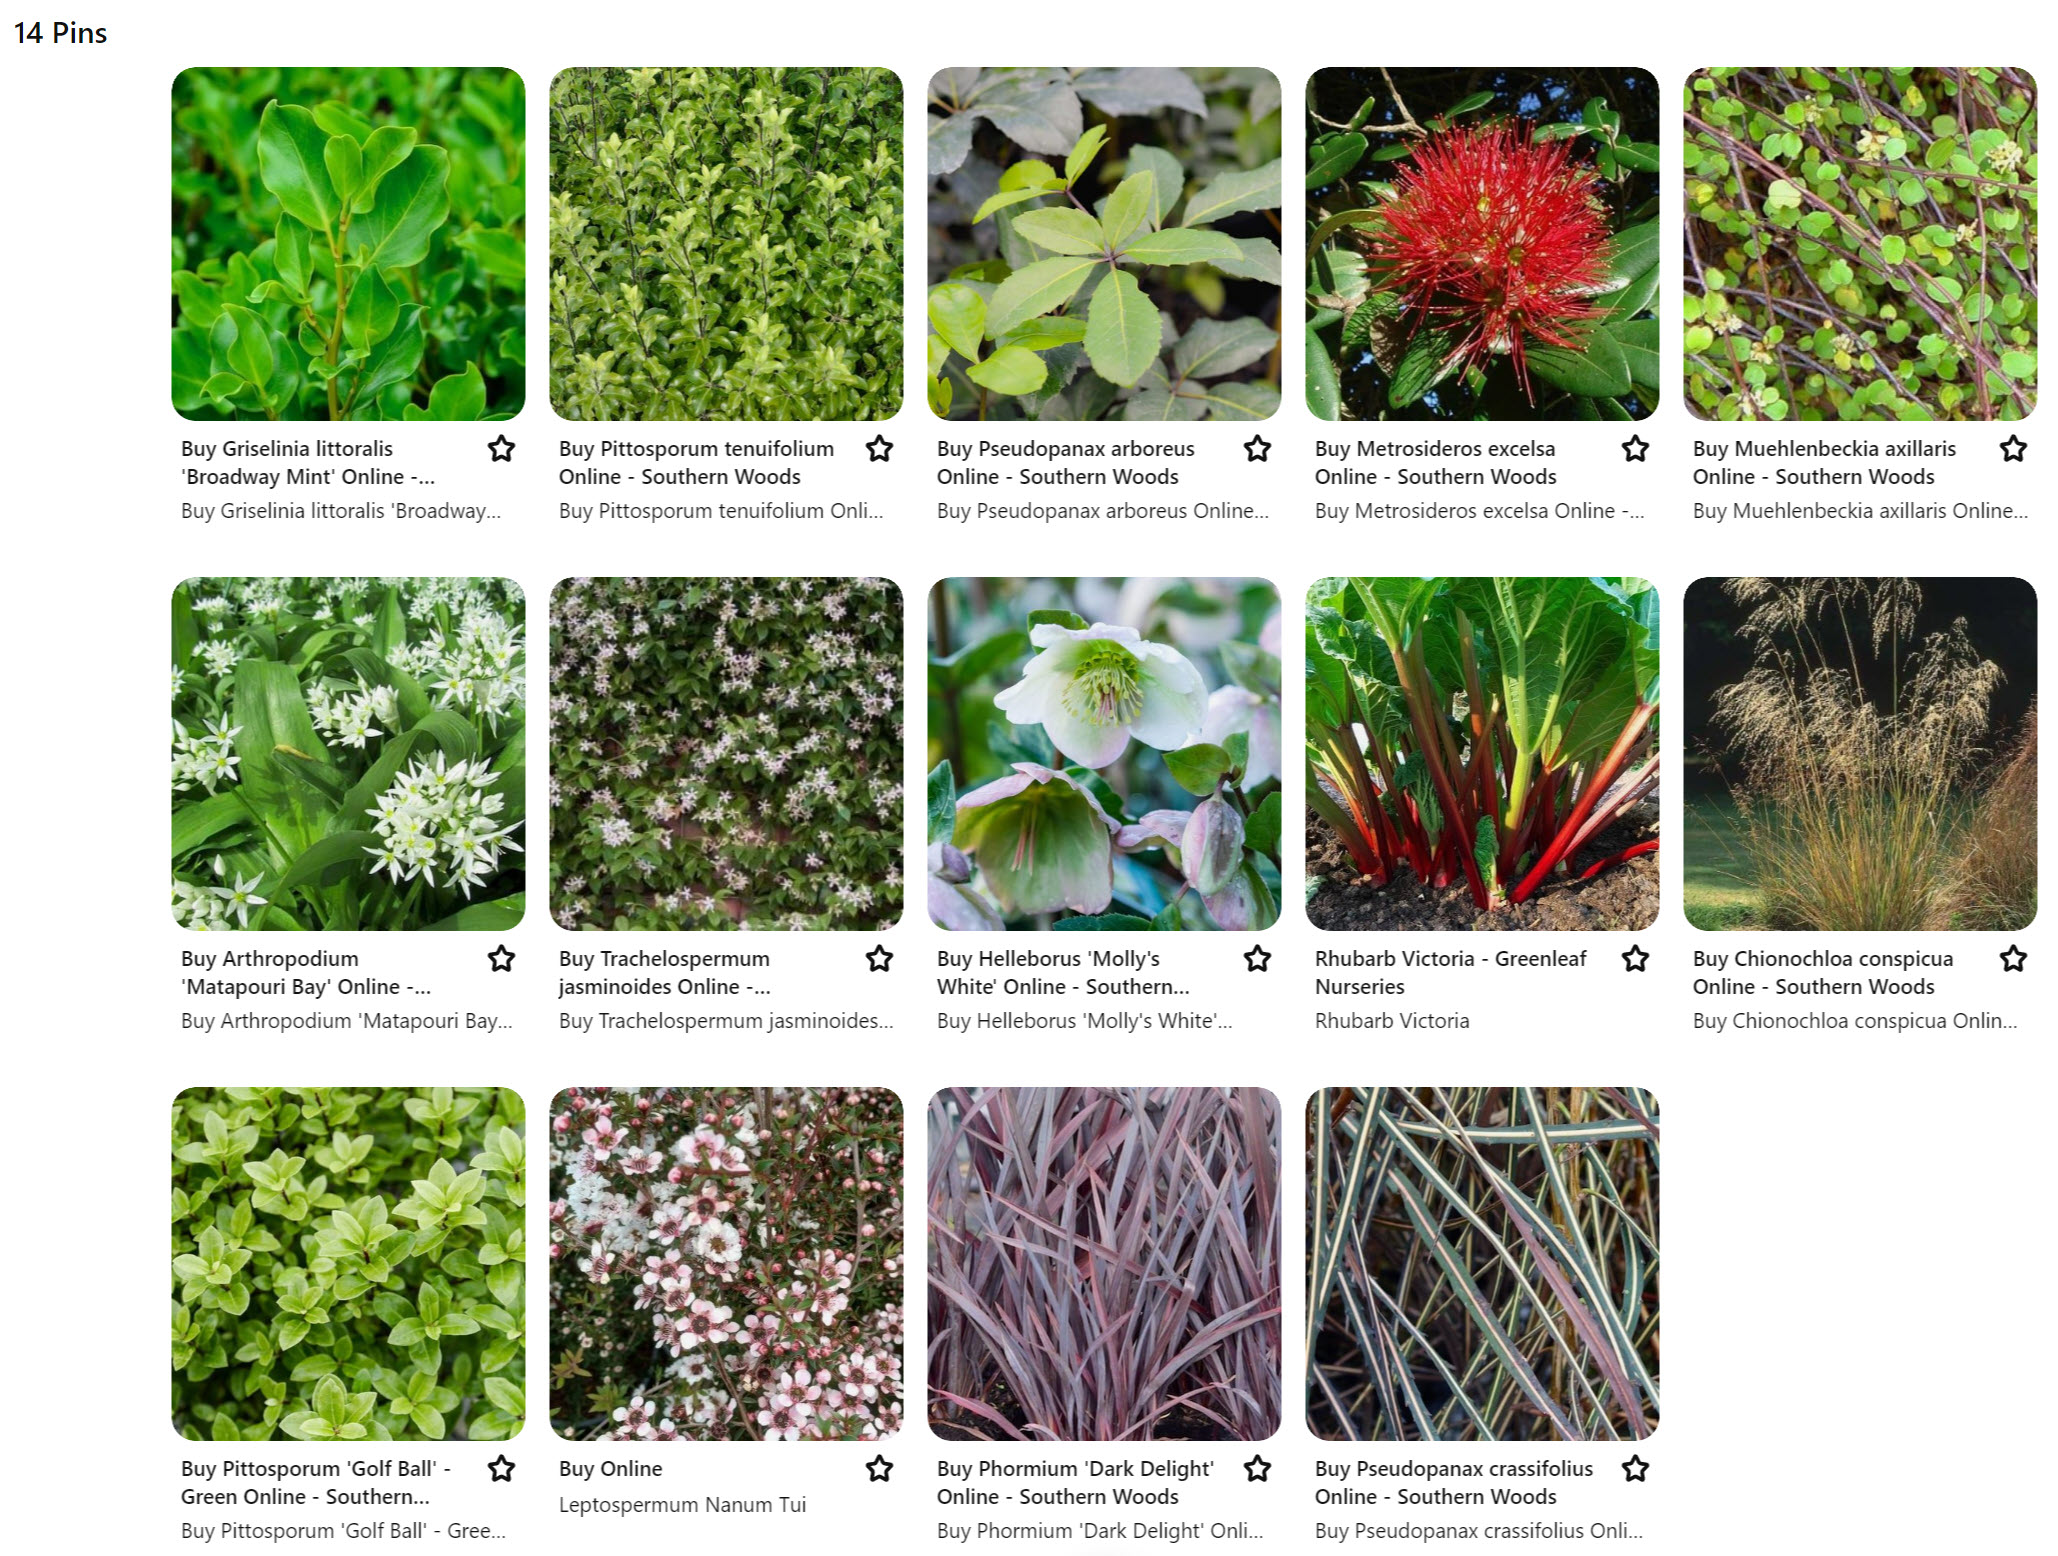
Pinterest board showing the plants selected for the Martin Garden as well as the ones being retained.
Now that you’ve decided which plants you’re going to use in the garden you can write up your planting schedule.
The planting schedule provides key information about the plants you’ve specified in the design. It is used to show what plants go where. This is most important for the person or people who are going to do the planting, but the client may also find it interesting.
On the planting plan each group of plants will have a code, and a quantity. For instance “T-Pieg (10)” which means 10x Pittosporum eugenioides.
The planting schedule contains the following information:
- Code – which matches the one on the planting plan
- Scientific name
- Common names (Māori and English)
- Height and spread (at 10 years)
- Quantity needed for the whole garden
- Notes – usually related to how closely to space out plants in drifts.
Plant species codes
We use plant species codes to keep the amount of text on the planting plan to a minimum.
There is no industry standard for plant species codes. We recommend a five-letter code which is made up as follows: “C-Ggss” where “C” is the plant category, “Gg” is the first two letters of the genus and “ss” is the first two letters of the species.
Where the plant is a cultivar, we replace the letters for species with the first two letters of the cultivar name, using a capital letter for the first one.
The categories are:
- T-Tree
- S-Shrub (woody perennial)
- P-Perennial (herbaceous)
- G-Groundcovers
- C-Climber
Here are some examples:
- T-Meex: Metrosideros excelsa (Pohutukawa)
- P-Cafl: Carex flagellifera (Glen Murray tussock)
- G-Scbi: Scleranthus biflorus (cushion plant)
- S-HeWi: Hebe ‘Wiri Mist’
- S-GrBr: Griselinia littoralis ‘Broadway Mint’ (Kāpuka)
Now you can write up your planting schedule. You might like to use the following template. Add and delete rows as needed. Leave the quantity (“Qty”) column blank for now.
Click here to download the planting schedule template.
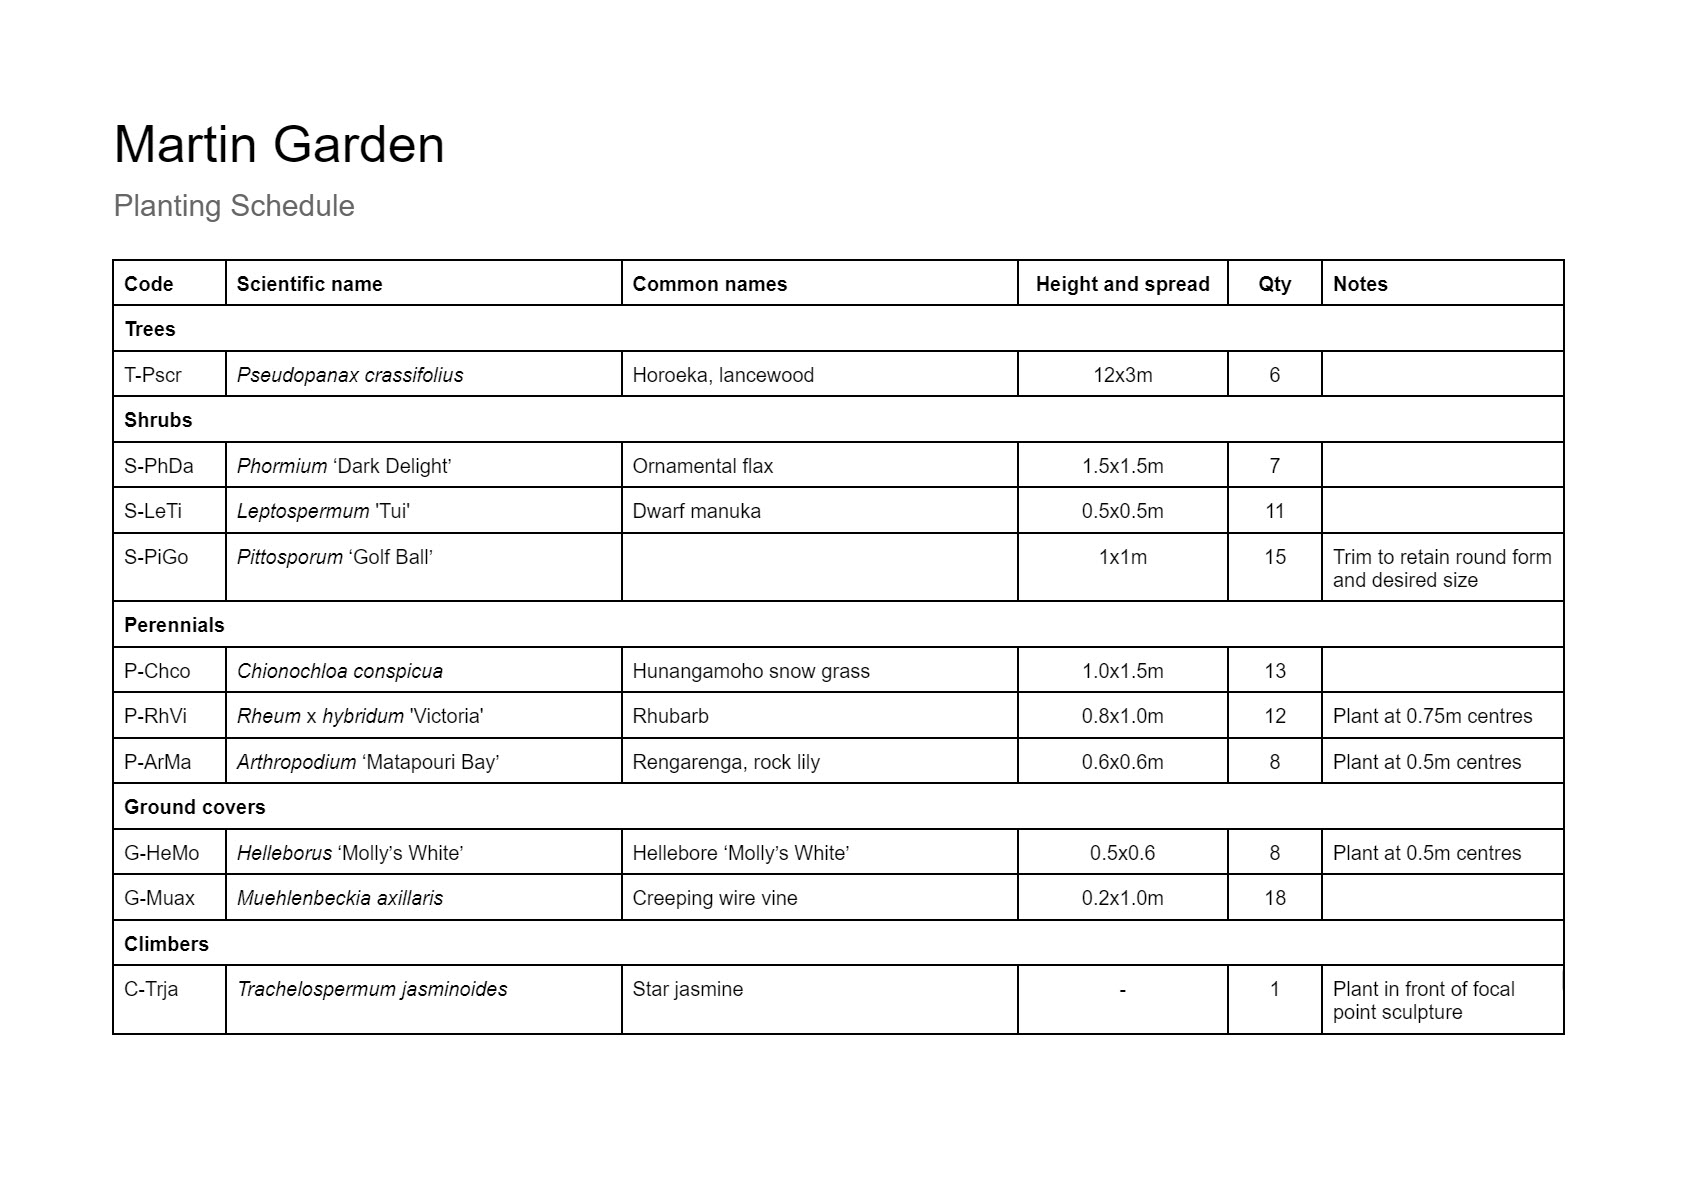
Draft planting schedule for the Martin Garden.
Next we’ll draw up our planting plan. This is an ink drawing rather than a rendered plan.
Revising plant sizes
Start by revising your rough plant type arrangement plan based on the real plant sizes and spacings with a darker pencil or a pen. For instance, if you were looking for a plant that had a spread of 1m but ended up selecting a plant that has a spread of 0.8m at 10 years, go over those plants using an 8mm circle template. For drift plantings, this may mean you end up drawing in more plants than you had before.
Where the plant sizes haven’t changed, go over them with a darker pencil or a pen so they will show through the tracing paper as well as the ones you’ve changed the size of.
Drawing garden edges
Put a clean sheet of tracing paper over your rough plant arrangement plan (which should have the working proposal planunderneath) and secure it in place.
Draw in the edges of all garden beds using a pencil followed by a thin pen (0.1mm or 0.2mm).
Drawing plants
Next use your circle template and pencil and pens to draw the plants. Use the following as a guide for drawing plants:
- Trees: 0.8mm pen, single circle for the spread.
- Shrubs and tall perennials: 0.5mm or 0.3mm pen, circle outlines but joined up rather than overlapping when drawing groups.
- Low planting and groundcovers: 0.2mm pen, dashed curved line to represent the boundary of the area.
For trees and shrubs, add a dot in the centre if it is an existing plant, or a cross if it is a new plant. You don’t need to do this for groundcovers.
For plants that you have added dots (existing) or crosses (new) to the centre, join these up by drawing a line between all of the plants in that group using a thin pen such as 0.05mm.
The aim is to make the drawing as clear as possible, so go ahead and change the symbols if doing so makes the drawing clearer.
Adding the title block
Add your title block to the bottom right corner in the same way you have done for your other drawings. The title of this drawing is Planting Plan.
Adding annotations
The only annotations we are concerned with on the planting plan are those for the plants.
Like with other annotations, the ones on the planting plan need to be joined up to the relevant point on the drawing using leader lines (0.05mm pen). These should be horizontal or vertical. Try to avoid the leader lines crossing each other.
Where you want to annotate a group of plants together, join these with lines that go from the trunk of one plant to the next until all are joined together. Then draw the leader line so it comes off one of the trunks.
Add the annotation using a 0.1mm pen using the letter techniques learned earlier in this programme. The only difference here is that instead of using all capital letters, here we will use capital and lowercase letters for the plant codes.
Add the quantity of plants behind the plant code in brackets. Do this for individual plants too, as it will make it easier to count up at the end.
Update the planting schedule
Once you’ve annotated all of the plants, add up how many of each plant you need across the whole site (add the numbers in brackets for each plant) and record this in the planting schedule.
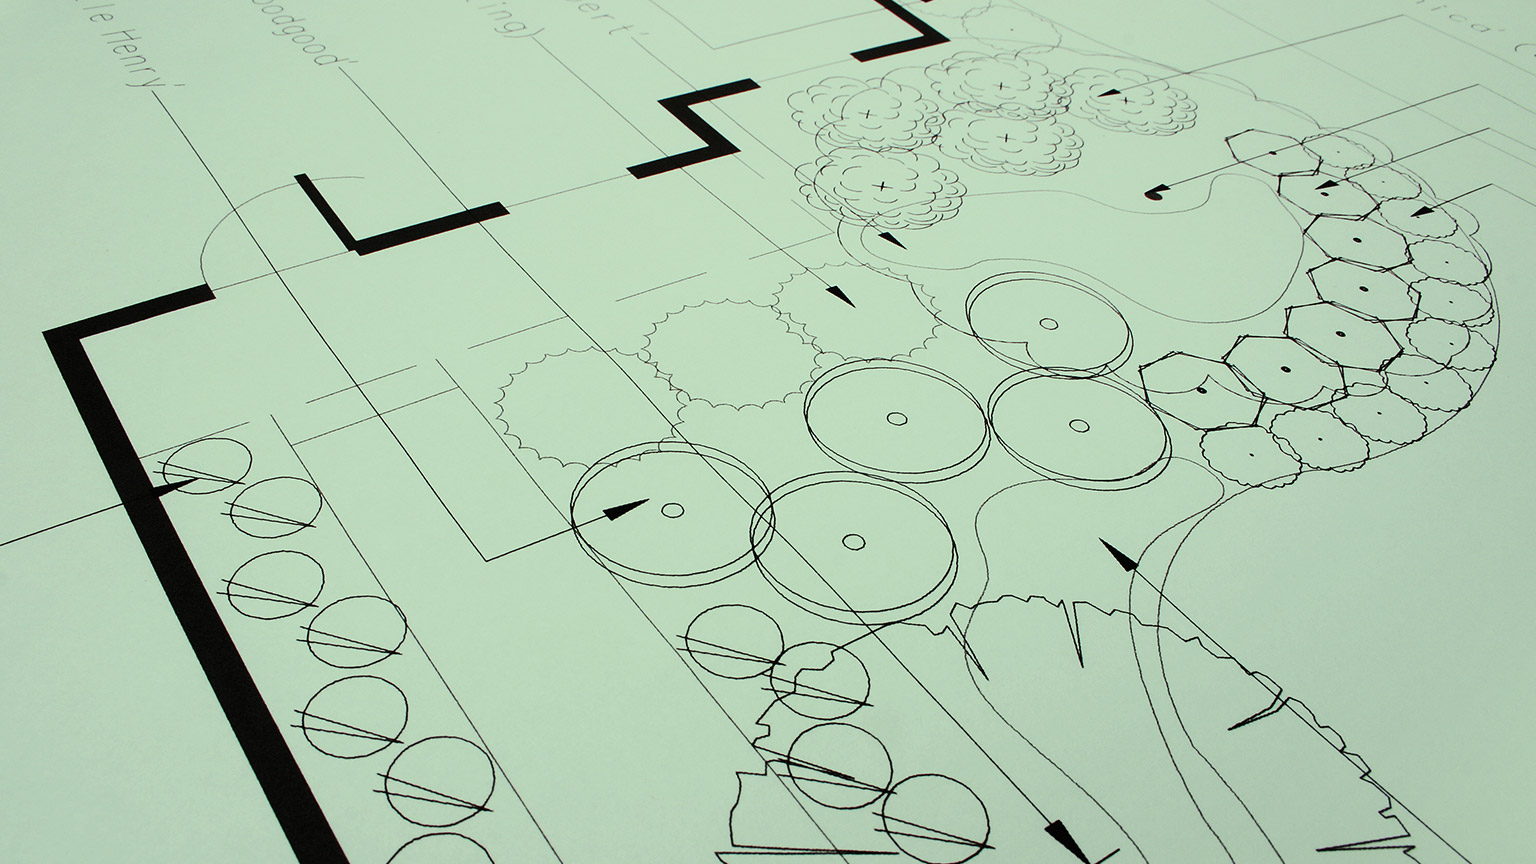
Completed planting plan for the Martin Garden.
In this topic we worked through the steps in the planting design progress which include:
- visualising plant forms and textures
- creating plant type arrangements
- determining plant requirements
- choosing plants that meet our specifications
- creating a planting schedule
- drawing up the planting plan.
In the next topic we’ll finalise the proposal plan by drawing in the plants, adding annotations, a title block and rending the drawing.