In this is short topic we’ll cover the following:
- what a set-out plan is
- what to keep in mind when choosing which features to set out for the assessment
- what to include on your set-out plan.
By the end of this topic you’ll be able to:
- draw a set-out plan.
A set-out plan, also known as a layout plan, provides information about the location, size and orientation of all landscape features for a site.
It generally includes:
- the site boundaries
- the position (location, size, orientation) of buildings on the site
- the position of hard landscaping features
- the location or position of selected soft landscaping features, such as:
- the position of lawns and garden beds
- the location of significant plants, such as trees and large shrubs – the location of other plants is typically achieved by using the planting plan.
Positions and locations are shown with dimensions to help with the set-out process.

Assessment requirements
If you were drawing a set-out plan as part of your job as a landscape designer, you’d include dimensions to set-out all landscape features. However, for the first assessment for this module (LDB05A1) you need to produce a simple set-out plan to correctly locate two features in the real world:
- one hard landscaping feature, from the following list:
- paving – at least 5m2
- raised garden bed or planter box – a volume of at least 1m3, for instance 1m x 5m x 200mm high (1 x 5 x 0.2 = 1m3)
- low fence (1,200mm or less) – at least 5m long
- boardwalk or low, single-level deck – at least 5m2
- aggregate pathway – at least 20m2.
- one soft landscaping feature, from the following list:
- garden bed – an area of at least 10m2
- lawn to be formed from seed or using rolled turf – at least 10m2
- a group of trees or shrubs – at least 4.
If you are unable to meet these requirements, contact your tutor now.
Depending on what you choose to set-out, you’ll need to draw and dimension:
- the centre point of trees or shrubs
- the location of the end and/or corner posts of a fence
- the boundaries of lawns, garden beds, paths, hard surface areas, low decks or boardwalks.
You are going to use this set-out plan to mark out the locations of these features, and then install them, so it is important that you choose features that you can realistically build or install before the end of the programme.
Things to consider
When choosing which features you intend to set-out and then install, consider:
- Your budget – which features can you afford to install now?
- The installation sequence – does each feature rely on other features being installed first?
- For instance, the ground surface of garden beds should be prepared before plants are planted in it. If you are thinking about setting out the location of trees or shrubs that are going to be in a garden bed, it may be better to choose the garden bed itself as your soft landscaping feature to set-out.
- Your physical strength and fitness – some tasks require greater strength and fitness than others. For example, the materials used to create a timber raised garden bed are likely to be lighter than large concrete pavers.
- When it comes to constructing your hard landscaping, you need to work with at least one other person. Will they be strong enough to help?
- Your practical skills – what practical construction skills do you have, what ones do you want to develop, and do you have people who can help you learn these skills?
- It is important to note that this programme cannot teach you how to use specific tools, such as a circular saw. This is the kind of thing that needs to be taught in person by someone who is competent, and for them to supervise you closely while you develop these skills.
- The tools and equipment you can access – what do you own, what can you borrow, and what will you need to hire?
- Find out if hire shops near you hire out the tools and equipment you’ll need to get the job done.
- This may well come back to the question about your budget. In some cases it may be better to buy tools than to hire them, even if doing so costs a little extra. This will mean you have them for other landscaping projects in the future.
Now that you’ve decided which two features you are going to set out and install, you can draw your set-out plan.
Tracing site boundaries, buildings, and features
Begin by placing your proposal plan on your drawing board and securing it. Put a sheet of tracing paper on top and tape it in place.
Trace the building outlines, and site boundaries if relevant. For the buildings you only need to trace their outline, not the locations of windows and doors.
Now trace the two landscaping features that you plan to install. Remember, one must be a soft landscaping feature and the other must be a hard landscaping feature.
Use your ink pens as follows:
- buildings: 0.8mm or 0.5mm
- site boundaries: 0.5mm
- landscape features: 0.3mm or 0.2mm.
Adding set-out dimensions
Just as we learned to take real-world measurements and plot them on our drawings, we can do the reverse to plot them on the site.
When adding dimensions they need to be in millimetres, in the real-world scale. Where possible, write the dimensions so they are horizontal on the page. We’ve provided a few examples later in this topic.
Add your dimension lines lightly with pencil, then pencil in the dimension text. Then use your ink pens to finish it off. Use a 0.3mm pen for the text and a 0.1mm or 0.5mm for the lines.
Parallel and perpendicular to structures
For rectilinear features that are adjacent to site buildings or existing fences, project parallel or perpendicular lines off those structures.
Add dimensions where needed by carefully measuring the length on the plan in millimetres and multiplying it by the scale. For example, a length of 48mm on a 1:100 plan will be dimensioned as “4800 mm”
In some cases, dimensions will not be necessary. For instance, if it is clear that the boundaries of the area are projected directly off the buildings.
Trilateration
Remember that to plot the location of an unknown point, we need to know how far away it is from two known points.
This is extremely helpful if we need to set out point features. Point features are features ones that only have a single point that needs to be located. Examples include a tree, shrub, or rotary clothesline. Therefore, to show this on a set-out plan we need to show those two dimensions.
To set out line features – a straight line like a fence – we need to trilaterate the two end points. For the set-out plan this will need a set of two trilateration dimensions for each end point.
To set out shape features there are a few ways, depending on the shape of the feature. A shape feature (also known as a polygon feature) is one that forms an area. For example:
- For rectilinear features that are at an angle to the site buildings, include trilateration dimensions for two adjacent points.
- For irregular shapes with straight (non-right angled) edges, include trilateration dimensions for points that create the edge of the feature.
- For circular features, such as a circular area of paving or a water tank, include dimensions that trilaterate the centre point as well as a dimension for the radius of the circle.
- For curved features, using the offsets approach is usually the best approach. Recall that an offset is the distance from a baseline to a landscape feature. You can get back to the section on offsets at 2 Site Analysis > 2.3 Measuring up: the site survey > 2.3.6 Offsets.
![[ADD IMAGE'S ALT TEXT]](/sites/default/files/Trilateration%20dimensions.png.jpg)
If you need to refresh your memory about how to use trilateration go back to the relevant section at 2 Site Analysis > 2.3 Measuring up: the site survey > 2.3.5 Trilateration.
Adding datums
Even near-flat sites have contours (changes in height of the ground surface). When constructing hard landscape features these need to be built in relation to a known height, called a datum.
A datum (sometimes also called a benchmark) is the finished height you want the landscaping feature to be.
An example of a datum for a deck is the floor level inside the house. In other words, the finished deck will be at the same level as the floor inside the house.
For a paved pathway, there may be two datums:
- For the start of the pathway and the section that runs alongside the house the datum might be the bottom of the lowest base board on the house.
- For the end of the pathway the datum may be the height of the driveway that it will connect to.
The datum for each hard landscaping feature has not yet been determined. As the designer, you get to determine what it is, though this will usually be in consultation with the client.
A datum is reflected on plans as a triangle outline at the relevant location with an annotation of what it relates to. For example:
- “Paving finished to bottom of lowest base board.”
- “Boardwalk finished height 300mm above ground level.”
It is not that common to see datums included on a set-out plan, but for this assessment you need to include at least one datum.
When selecting what your datum is going to be, keep in mind what already exists on site. If you choose a datum too low you’ll need to dig out a lot of ground to get to the right level. If you set it too high, you may need lots of extra timber to get your deck or boardwalk high enough.
Adding a title block and notes
Like all other drawings, we need to include a title block.
It is also a good idea to include a note that reads “Do not scale from this plan. Contact the designer for additional measurements.”
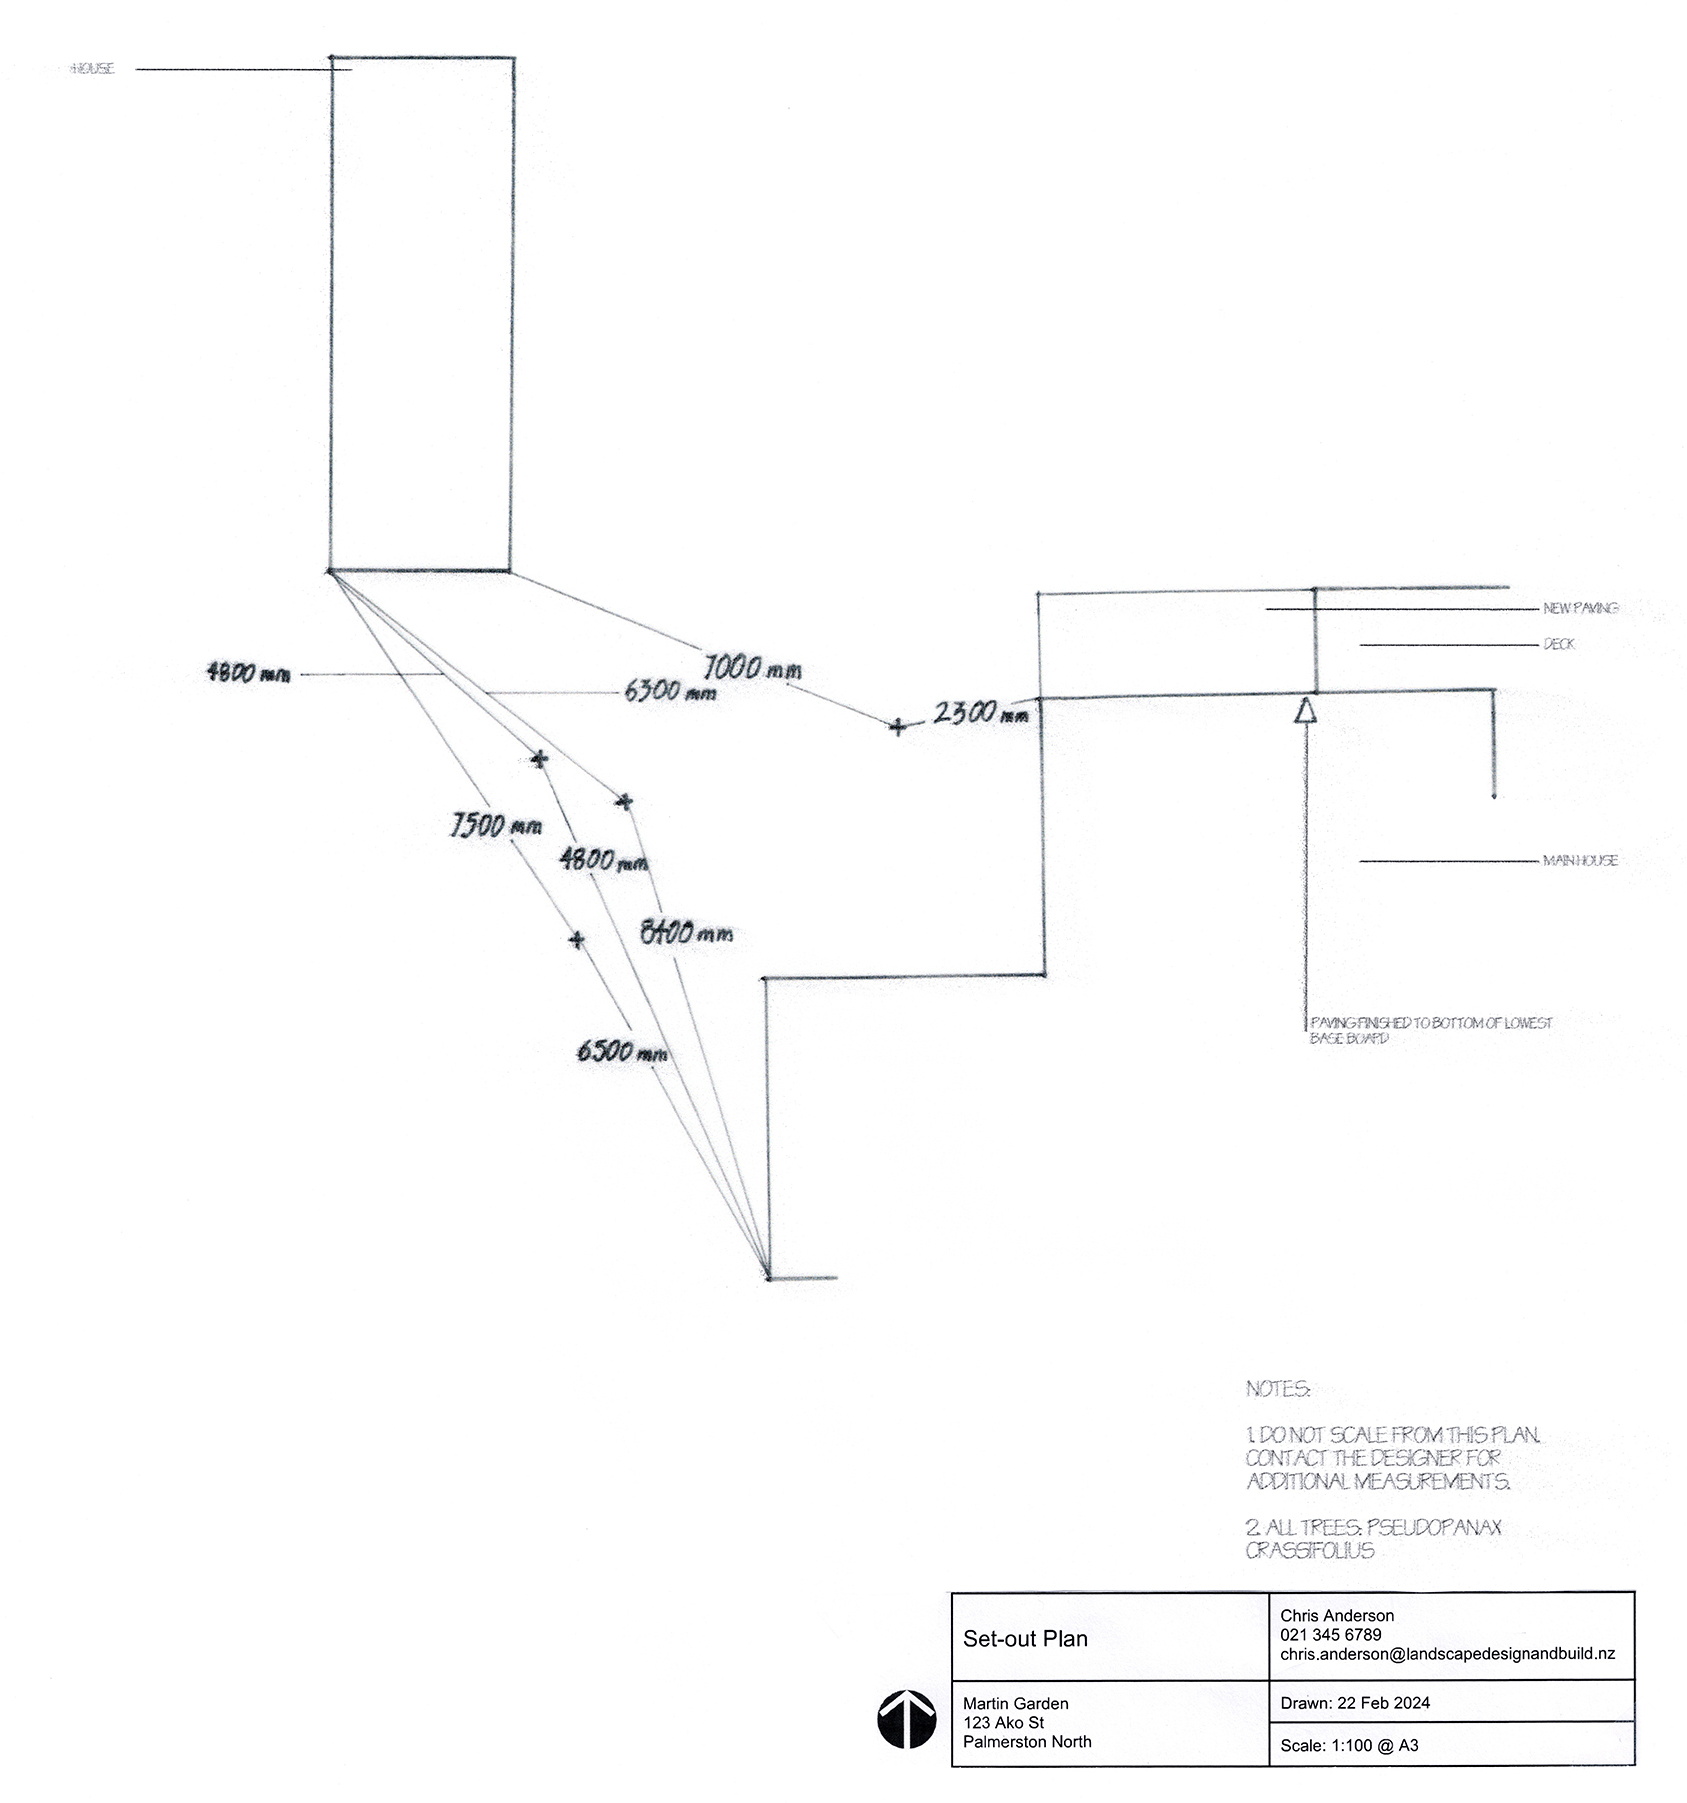
Here is a set-out plan for one hard landscaping feature and one soft landscaping feature for the Marten Garden.
Assessment 1
Now it’s your turn. Complete Assessment 1: LDB05A1: Draw a site set-out plan.
Go to the assessment now to read the full requirements.
Once you have submitted this assessment, move on to the next topic.