In this topic we’ll introduce the two main types of technical documents for hard landscaping and walk you through the process of producing them.
By the end of this topic you’ll be able to:
- produce a working drawing of a hard landscaping feature using SketchUp or pen and paper
- write up a bill of materials based on the working drawing.
Working drawings are technical drawings that provide all necessary information to construct the landscape feature.
Creating a set of working drawings for a landscape feature helps you confirm that what you have designed can be built in the real world. Additionally, they will help you identify additional materials that you may not have considered, which you can then add to your bill of materials.
Bill of materials (or BOM) is a spreadsheet that lists how many or how much of each component you need.
Working drawings are most commonly presented in orthographic or isometric projection but can be in perspective.
You will recall from earlier in the programme that:
- Orthographic means a drawing of three-dimensional objects as if they are flat (two-dimensional) and all parallel lines are drawn parallel. This is different from a perspective drawing.
- Perspective drawings are where all parallel lines are drawn so they converge at a single point, known as a vanishing point.
Isometric drawings are something of a combination of these two projections. In isometric drawings, the object is positioned so that all three of its axes (X, Y, and Z) are visible and there are 120 degrees between each axis. All lines that are parallel in the three-dimensional version of the object are parallel in the isometric projection.
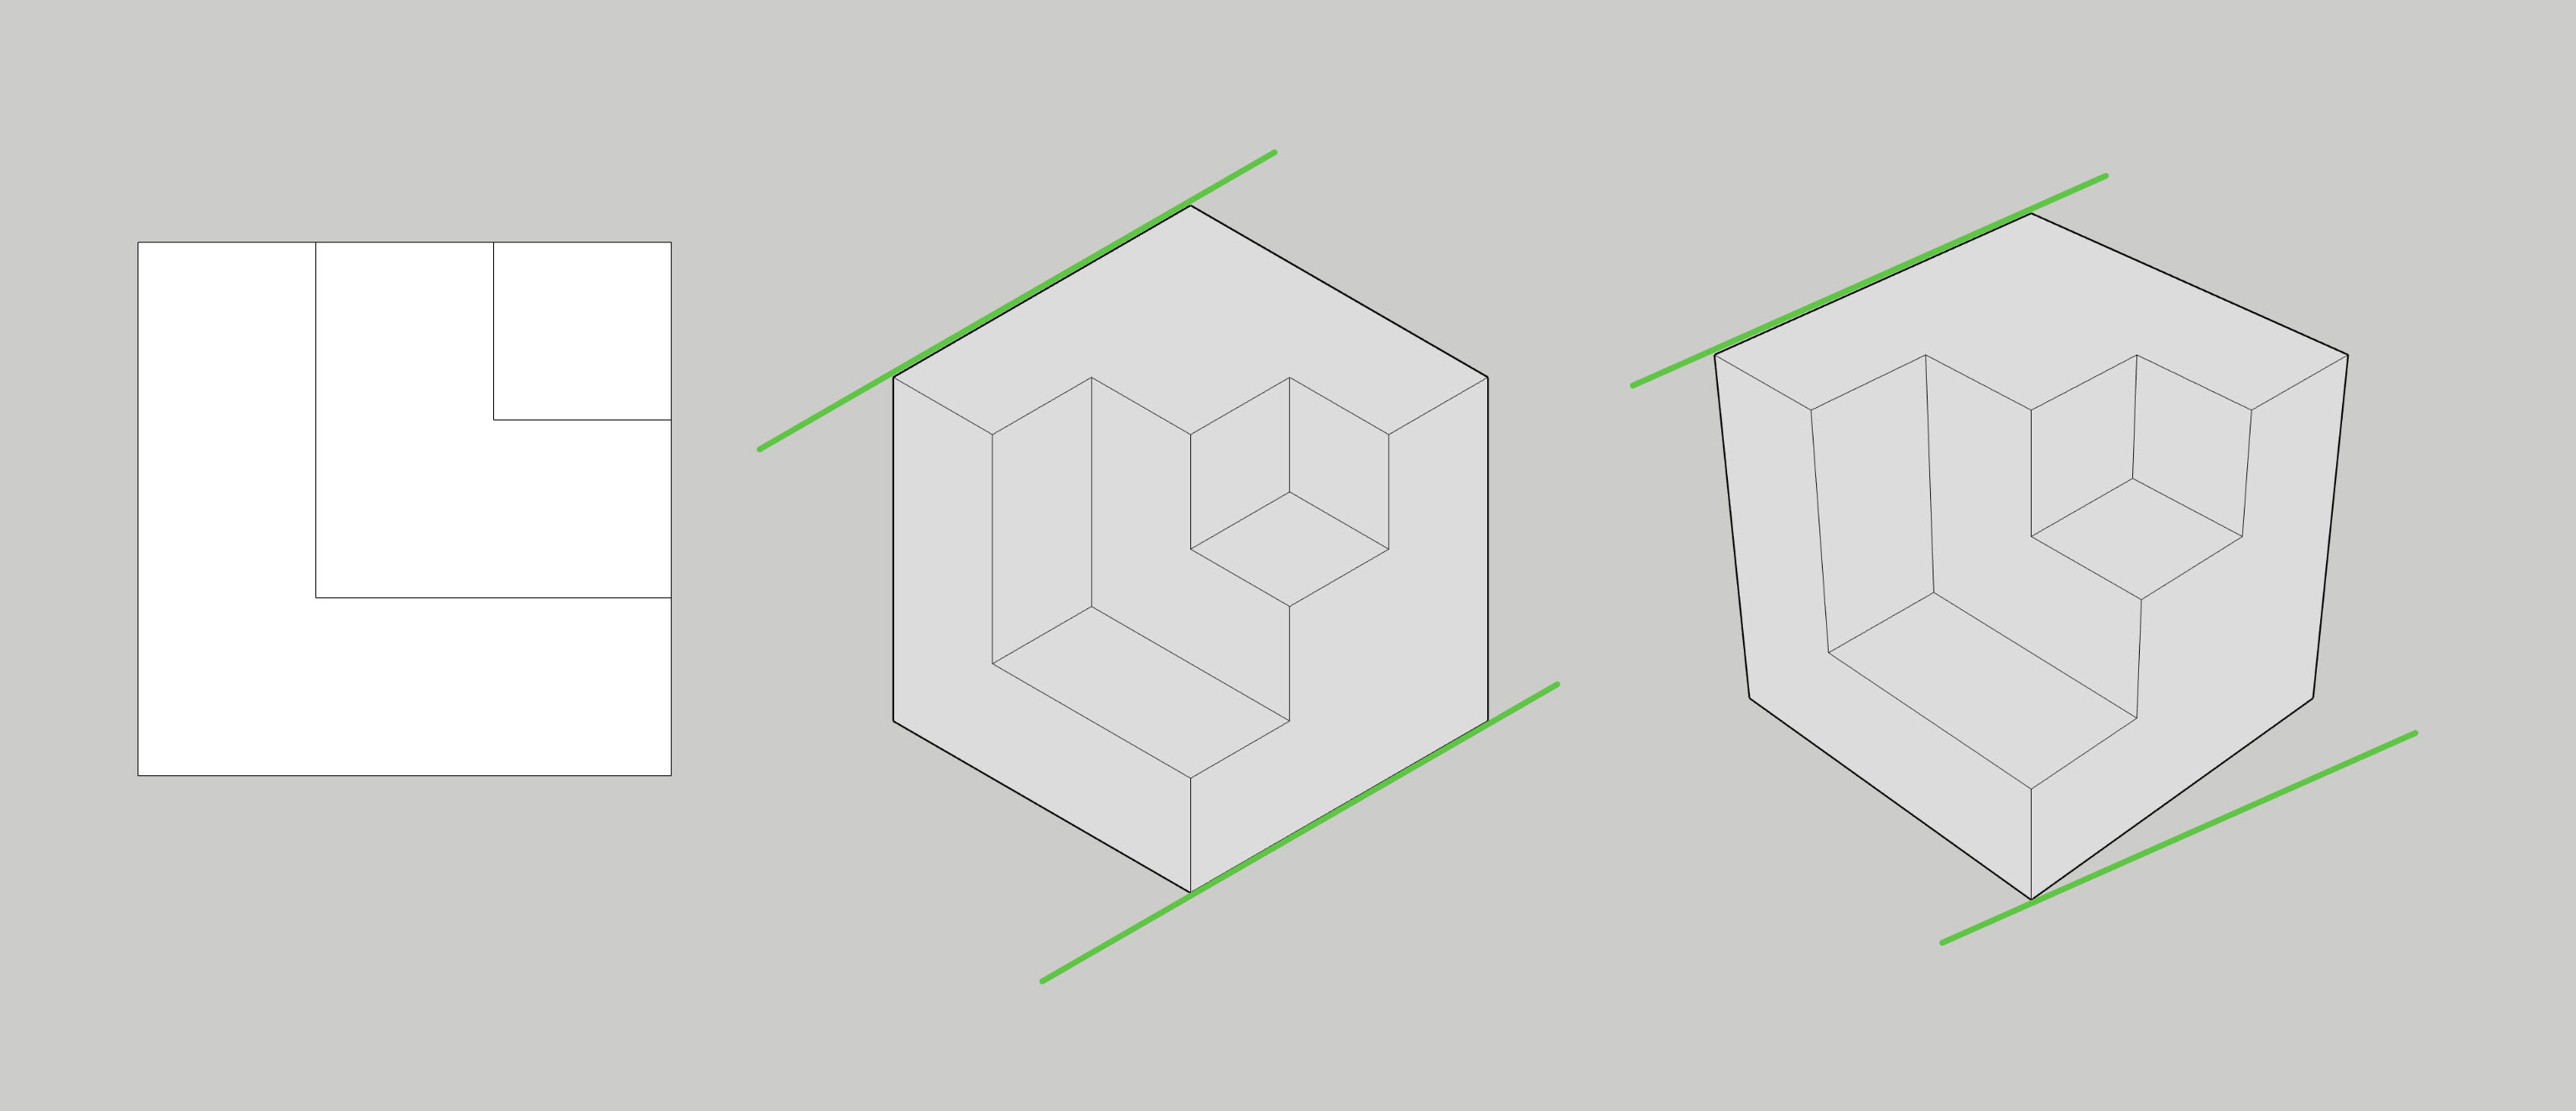
A modified cube shown in orthographic (left), isometric (centre), and perspective (right) projections. The green lines shown are parallel on the page. This shows that parallel lines in isometric drawing are drawn parallel, but parallel lines in perspective are not.
Planning the working drawing
Even if you’ve been provided a full set of technical drawings for a project, it can be helpful to draw your own working drawings to help you understand the construction sequence. To create a working drawing, first, decide on the tools you are going to use: SketchUp or pencils, pens, and paper.
If you choose SketchUp, you can jump ahead to the section called Creating a working drawing using SketchUp.
If you are using pencil, pen and paper, it's a good idea to do a number of rough sketches, lightly in pencil that start with the lowest components adding the next one on top, and so forth.
From that process determine the projection and scale you are going to use. Think about how zoomed in you need to be to see the details, but also how much of the object you can fit on the page.
Think about which angles will show the information you need to get across to the people who are going to construct this feature (you and your assistant(s).
For complex details, it is common to include a main drawing that shows how all the large components fit together and then a series of detail drawings that show exactly how key junctions are constructed. For the projects you are working on in this programme, detail drawings are unlikely to be needed.
Creating a working drawing in SketchUp
If you are working in SketchUp:
- Start by constructing one of the lowest components first, such as a deck pile or fence post. The end grain of timber is shown as a cross.
- Convert it into a “Component” then use the array function (move a copy and duplicate this at a given spacing) to space out the required number in the correct direction. Repeat as needed.
- Repeat the process for the next components working from the bottom up, or from the most to least structural. For a fence this would go: posts, then rails, then palings, and finally capping, if needed.
- Once you’ve completed the 3D model, choose which components to hide – you don’t need to display every single paling or decking board – and hide them.
- Position the model so it shows all of the important junctions (points where components meet).
- Go to the Scenes settings tab and adjust the Camera settings to suit, then click on one of the Standard Views, if desired.
- Add dimensions of key components using the dimensioning tool.
- Add annotations using the annotations tool which specify:
- Fixings – what, if any, products are needed to join the components together, for instance “2x 10x65mm Stainless Steel decking screws, diagonally, offset”.
- Membrane layers – fabrics used to control weeds, or water, such as weed matting, or damp-proof membrane.
- Anything else that is difficult to draw but needs to be specified.
- Use the drop-down menu to Download your drawing as a .png image file.
Creating a working drawing using pen and paper
If you are working with pen and paper, once you have finished your sketches, use your drawing board to construct the working drawing using the following steps:
- Start by drawing in all components using light pencil construction lines, working from the lowest, or most structural components then working to the highest, or least structural. For a fence this would go: posts, then rails, then palings, and finally capping, if needed.
- The end grain of timber is shown as a cross.
- Add dimensions of key components.
- Add annotations that specify:
- Fixings – what, if any, products are needed to join the components together, for instance “2x 10x65mm Stainless Steel decking screws, diagonally, offset”.
- Membrane layers – fabrics used to control weeds, or water, such as weed matting, or damp-proof membrane.
- Anything else that is difficult to draw but needs to be specified.
- Go over your pencil drawing with pens of an appropriate size, such as:
- Outlines of main components: 0.5mm
- Component details, such as end grain: 0.3 or 0.2mm
- Annotations: 0.1mm
- Leader lines and dimension lines: 0.05 or 0.1mm.

Example isometric working drawing created in SketchUp.
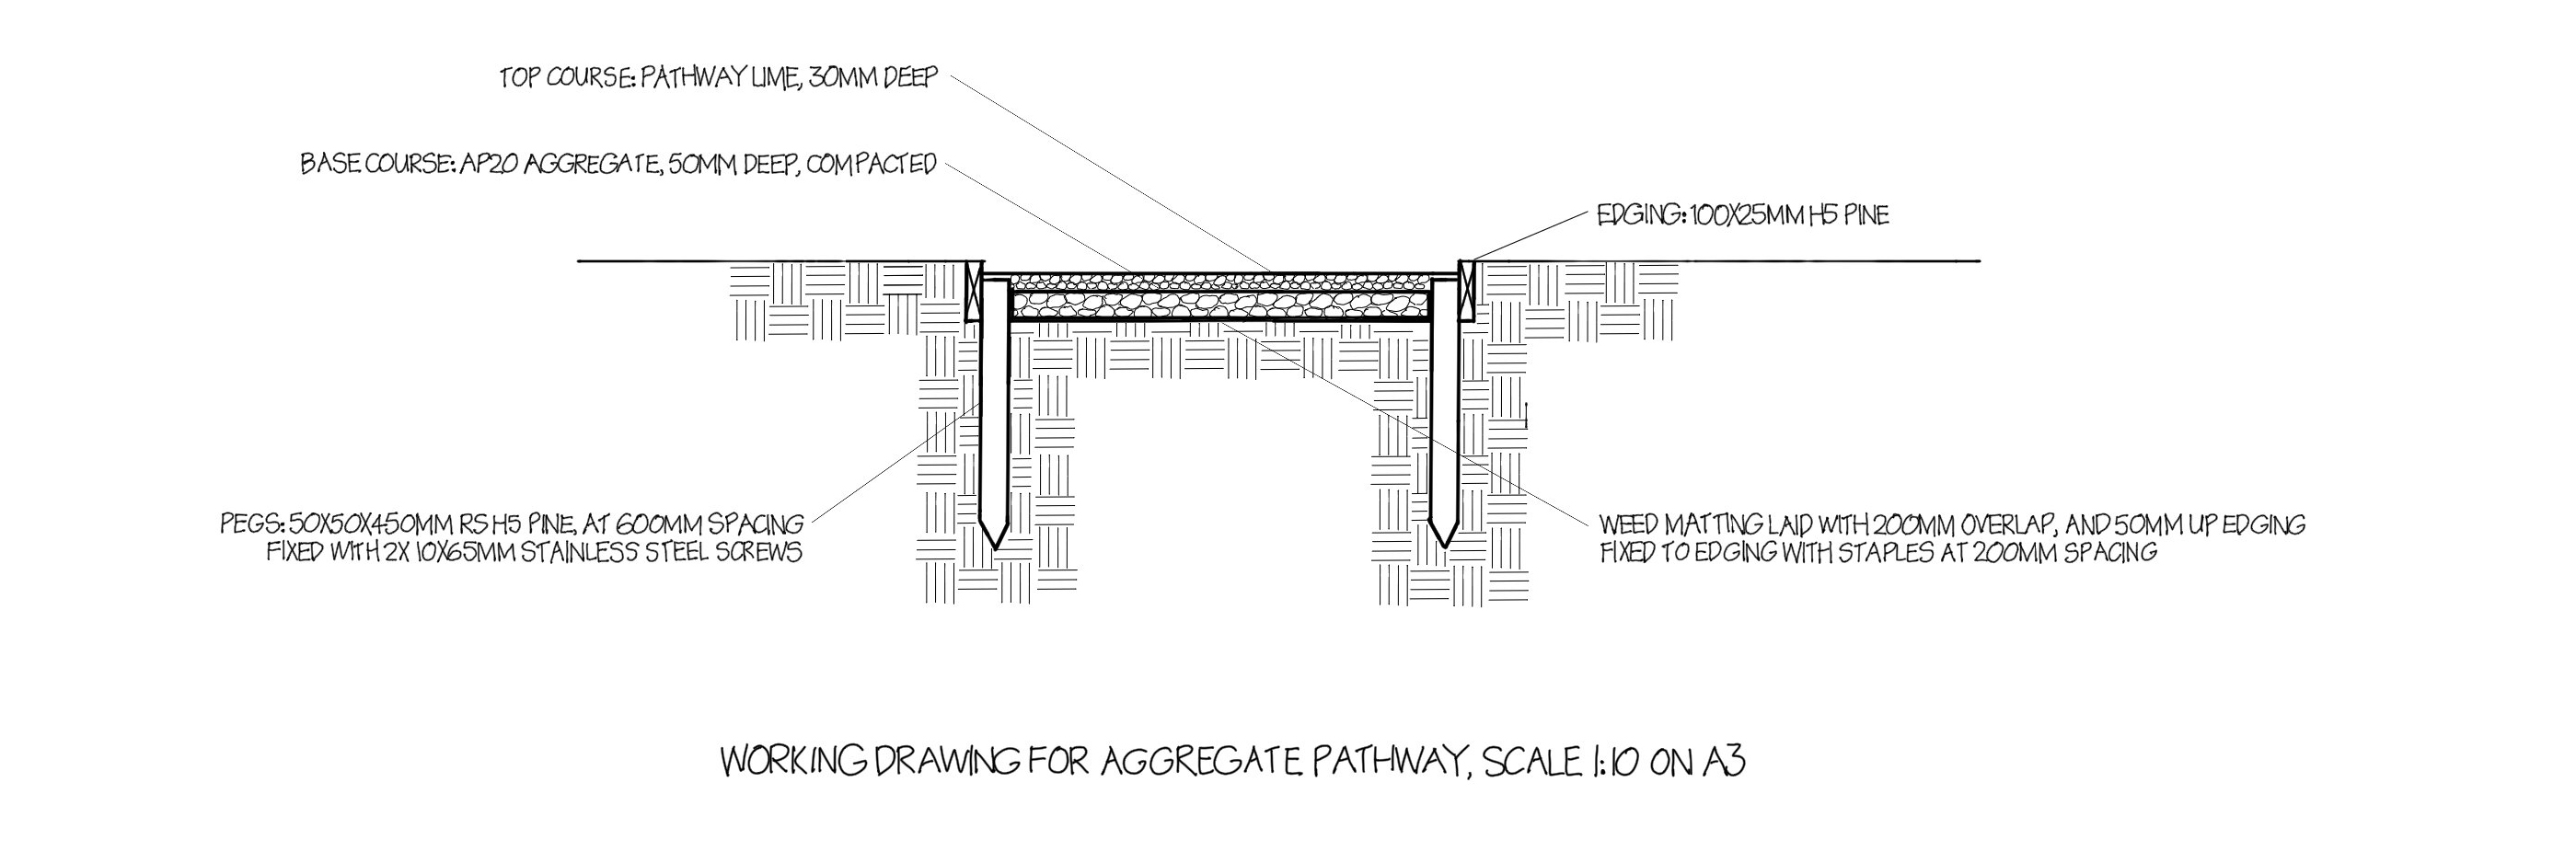
Example orthographic working drawing drawn by hand.
As already mentioned, a BOM is a spreadsheet that lists how many or how much of each component you need.
You can supply the BOM to your preferred landscaping or building supplies yard to get a quote, or to order the materials you need to get started.
In its simplest form, a BOM includes:
- item – a technical description of the product needed
- quantity – how many or how much
- specifications or comments.
It can also be useful to include the units that the product is sold in, a cost per unit, and a contingency amount. The contingency amount is how much extra you should order to account for wastage (small off-cuts, etc.) and calculation errors.
Additionally, if you need to source your supplies from different suppliers, you may want to include a column, or colour-coding system to indicate this.
If you intend to use the BOM to work out the cost of your project inputs, also consider adding hire equipment and other project services, such as underground services scanning.
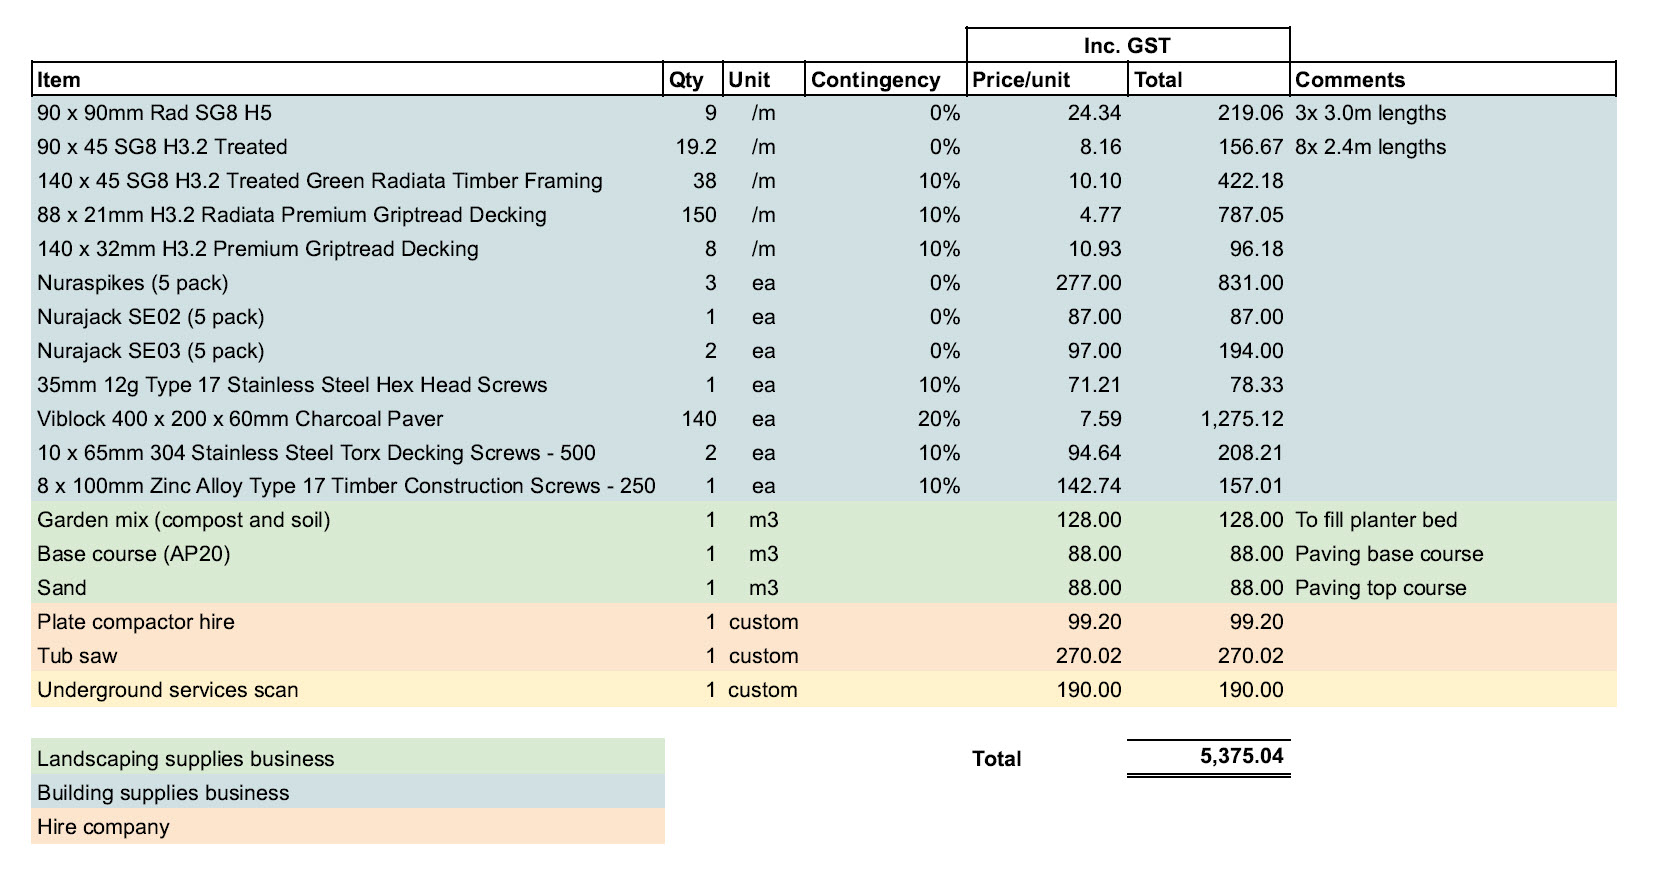
Example Bill of Materials.
You can download the Bill of Materials Template here.
Notes when using this template:
- Fill in a new row for each different product you need. Refer to your working drawings to make sure that you’ve got everything you’ll need for the project.
- When you click on a cell in the “Unit” column, you need to click the down arrow that appears and then choose the unit you want to use:
- /m means per linear metre
- /m3 means per cubic metre
- ea means each
- custom can be used for any other unit, e.g. days or hours of hire time.
- We recommend adding the following unit contingencies:
- 10% contingency for products sold by the linear metre (such as timber) unless you are specifying exact cutting lengths.
- 20% for products needed to cover a defined area, such as paving.
- 50-100% contingency for 50x50mm pine timber pegs.
- If you require timber to be cut in specific lengths, in-store, such as bearers or joints, specify this in the “Comments” column.
- Do not edit any cells that have a red background, as these have formulas.
Returns
Most building supplies yards will allow you to return unused materials for a refund, although there may be some conditions, such as:
- the goods must be in “as new” condition – in the same quality that it left their premises
- you must supply a copy of the receipt
- a time limit may apply
- timber that has been cut to a specific length may not be eligible for refund.
Case Study - Mitre 10
No Hassle Returns
Mitre 10 lists the following main returns conditions:
We are happy to exchange or refund products within 28 days provided that the product is returned with a valid invoice or delivery docket, and;
- is unopened and unused
- in original condition and packaging
- includes all accessories
- is not a customised item
Customised products, which include products cut, made-to-measure, special order or mixed to specific requirements, cannot be refunded or exchanged. Clearance items or products purchased during Clearance events in our stores cannot be returned or exchanged.
Before we get into the practical part of this module, it is worth quickly covering a few key aroro (concepts) and tikanga (procedures) related to landscape construction as they apply across all of the topics that follow.
These are:
- Measure twice, cut once.
- Double check the locations of the objects you set-out and the lengths of materials before you commit to fixing them in place or cutting them.
- Strong base, strong structure.
- Take as much time as you need to get the foundation prepared to specification. Once you have a strong foundation the rest comes easily.
You’ve reached the end of this topic. In this topic we introduced working drawings and bills of materials. You will get a chance to create these two documents for your hard landscaping feature, later in this module.