In this topic we’ll demonstrate two ways to build low decks and boardwalks; one using timber foundations and the other using a New Zealand product called Nurajacks.
By the end of this topic you’ll be able to construct a low deck or boardwalk according to accepted industry practices.
This programme does not teach you how to design timber decks, as this is too complex a subject for an introductory programme like this. You are not being assessed on your ability to design a deck. We strongly recommend you get a Licenced Building Practitioner (LBP) (Design) or someone else knowledgeable to do the design calculations and drawings.
If you choose to build a deck for your hard landscaping assessment, you will need to follow plans that meet the relevant requirements, which are described in this topic.
Let’s recap what we learned earlier in the programme about low decks and boardwalks.
What the legislation says about timber decks
In simple terms, a deck is considered part of the house that it is attached to and therefore must adhere to the New Zealand Building Code (NZBC).
If the deck is over 1.5m or more above cleared ground level, it requires building consent. Cleared ground level (CGL) is the level of the ground surface once it has been scraped back or excavated but before excavation for foundations. Decks that are lower than 1.5m still need to be constructed according to NZBC requirements.
New Zealand Standard NZS 3604 Timber-framed Buildings is considered an acceptable solution for meeting the NZBC. Section 7.4 refers to timber decks. Additionally, the Building Research Association of New Zealand (BRANZ) has produced a helpful guide called: BRANZ Build Supplement: The Right Stuff: Timber Decks which expands on NZ 3604 section 7.4.
You can download the 2011 version of NZS 3604 from Standards New Zealand for free: NZS 3604:2011
Timber deck design
If you plan on designing a timber deck yourself, it will need to adhere to the requirements set out in the NZBC, NZS 3604:2011, and any other relevant standards.
You may find this video by Mitre 10 helpful when designing a deck to meet the requirements of the NZBC; however, we strongly recommend that you engage a LBP (Design) to design your deck.
WATCH
How to Design a Deck | Mitre 10 Easy As DIY
Duration: 5:36 minutes
Kiwis love the outdoors and a deck is a popular addition to many homes. Even better, you can build one yourself.
However, it’s a bigger DIY job, and it’s really important that your deck is designed properly and adheres to the building code.
Click here to go to the Mitre 10 website where you will find a guide to download and a video the goes through the process of designing a deck.
Activity: Preparing construction documents for a low timber deck
If you’ve chosen to build a low timber deck for your hard landscaping feature, create a working drawing and bill of materials (BOM) for the deck.
If someone else produced the technical drawings to meet the NZBC requirements, your working drawing must be based on those plans. Working through this process will help you work out how it all fits together. Your working drawing can be orthographic, isometric, or perspective, and can be done with pen on paper or inside SketchUp.
If you produced the technical drawings yourself, you don’t need to produce any additional drawings.
The BOM will give you the information you need to order the materials. We recommend you use the Bill of Materials template for your BOM. Don’t forget to include concrete and fixings, such as screws and nails.
Timber boardwalks
Timber boardwalks are similar to timber decks but because they are landscape features rather than part of the house, we can argue that their design and construction are not controlled by the NZBC. However, they still need to be strong and durable, so many of the design features of a deck are also found in boardwalks.
As mentioned earlier in the programme, we use the term boardwalk to refer to either:
- a timber structure that is 300mm or less above ground level and does not adjoin the house at its main entrance (front door), or
- a timber structure less than 500mm above ground level that does not adjoin the house at all.
Where we talk about the height above ground level, we are referring to the highest point above finished ground level. Finished ground level (FGL) is the level once the ground has been landscaped, such as the lawn has been established or a garden created.
Now that you’ve got a design that complies with NZS 3604, a working drawing, and a BOM, you can order your materials and make a start.
This Mitre 10 video takes you through the process of building a timber deck using timber piles, concreted into the ground.
WATCH
How to Build a Deck | Mitre 10 Easy As DIY
Duration: 16:44 minutes
There’s nothing quite like enjoying a BBQ or a drink outside on your deck, and it’s even more satisfying building a deck yourself.
Deck building might seem like a big project, but with the right planning up front and a step by step approach you can DIY with Mitre 10.
This guide will show you how to get the job done right.
Before you get stuck in building your deck or boardwalk, take a few moments to check that you understand levels.
If you are building a low timber boardwalk rather than a low timber deck, you probably want a simpler solution for this landscape feature.
Here we introduce a design that you may like to use instead of a full deck design. Remember that this is only applicable if your boardwalk is:
- a timber structure that is 300mm or less above ground level and does not adjoin the house at its main entrance (front door), or
- a timber structure less than 500mm above ground level that does not adjoin the house at all.
Nurajack design
Nurajacks are a New Zealand invention which makes deck construction quick and easy. Nurajacks are commonly used to build a deck over an existing substrate, such as a concrete patio.
When used as an alternative to timber piles, the trade-off for the speed of installation is that they are expensive.
Nurajacks are adjustable height plastic stands that take the place of piles and/or bearers. They are available in a range of different heights, each accommodating a band of heights. For instance, the SE3 has a minimum height of 75mm and can be extended up to 120mm. The SE4 goes from 120-170mm. The tallest, the SE14, goes up to 550mm.
They can be used together with Nuraspikes which are hammered into the ground to form the below-ground part of the piles.
Nurajacks can also be used for decks, but because they do not provide any bracing, other bracing systems, such as braced piles, may need to be used with the Nurajack system.
This video gives a brief look at the system in use.
WATCH
How to build your own Nurajack Nuraspike deck
Duration: 1:08 minutes
Building a small deck in one day using Nuraspikes and Nurajacks.
Using the Nurajack Calculator
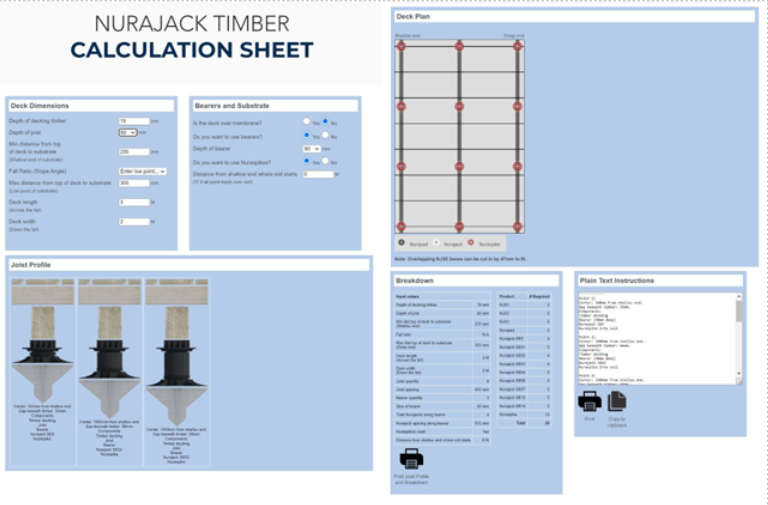
Designing a boardwalk that uses Nurajacks is easy because the Nurajack website has an interactive calculator tool.
To use the calculator you need to know the difference in height from the cleared ground level (which it calls “substrate”) and the top of the decking. Estimate this to begin with. If the ground slopes, choose “Enter low point…” from the ‘Fall Ratio (Slope Angle) drop-down.
Enter all required values. Where it asks if the deck is over a membrane, choose No. This is asking if you are constructing this deck on top of a waterproof layer, such as a deck being constructed on a flat roof.
The series of images below shows the initial values we used to design the boardwalk for the Martin Garden.
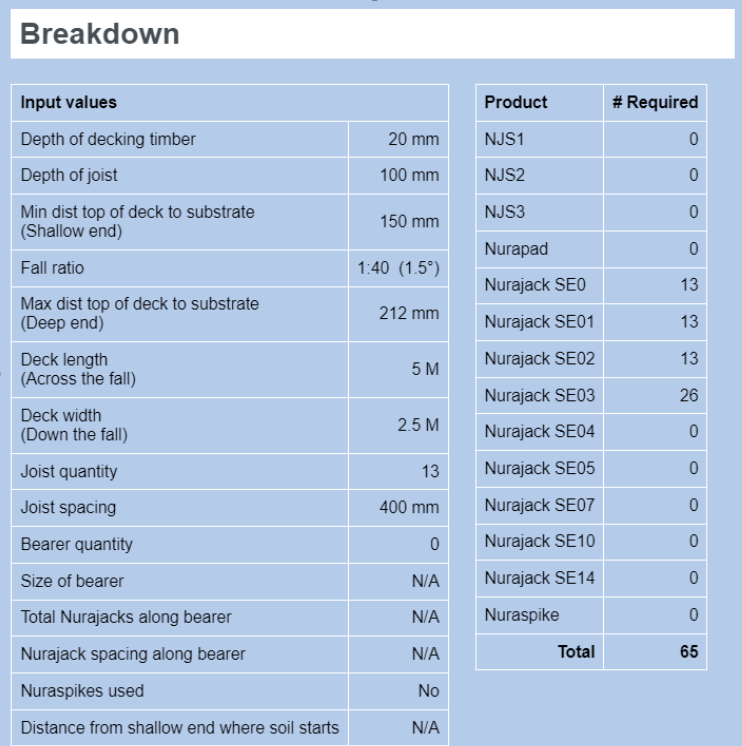
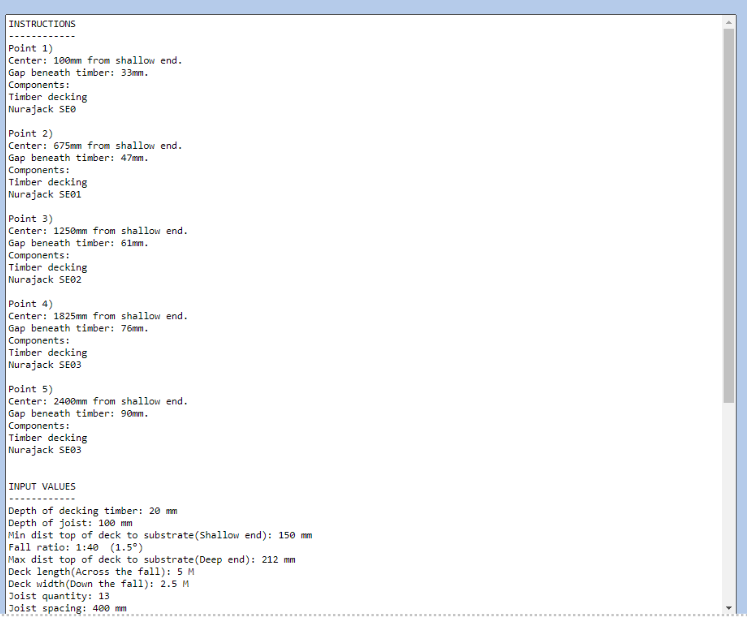
Using the information from the ‘Plain Text Instructions’ section, we can see that the corner Nurajacks are going to be placed 100mm inside each corner of the boardwalk. We can also see that the Nurajack spacing along the bearers, in the ‘Breakdown’ section is 933mm. So starting from the top left of the plan diagram, the first Nurajack will be 100mm in from the left edge and 100mm down from the top edge. The one below it will be 100mm in from the left edge and 1033mm down from the dop edge (100mm + 933mm).
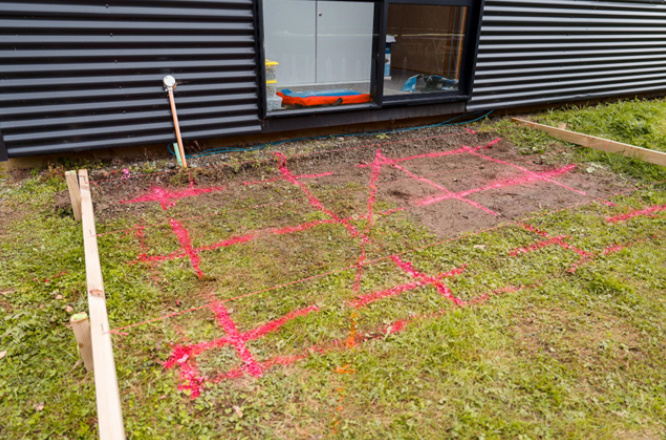
Boardwalk set-out showing the location of Nurajacks (the 12 main crosses), which was set out using profiles and stringlines, and the location of the buried electricity cable (diagonal).
We measured the difference between the ground level and the benchmark level (top of decking) at each Nurajack location to check that the calculator had recommended the correct size Nurajacks, which it had.
Using timber piles

Alternatively you may decide to use timber piles instead of Nurajacks. This is a more cost effective solution.
If you opt to use timber piles for your low timber boardwalk, use 125x125mm square piles, or 140mm diameter round piles, in both cases they must be treated to H5. These need to be set in concrete. For more information on using timber piles, refer to the Mitre 10 video in the subtopic called Building a low timber deck, above.
Put your piles in at the locations specified in the Nurajack Calculator.
Activity: Preparing construction documents for a low timber deck
If you’ve chosen to construct a low timber boardwalk for your hard landscaping feature, create a working drawing and bill of materials (BOM) for the boardwalk.
The working drawing will help you explain the project to your assistant and the BOM will give you the information you need to order the materials.
Your working drawing can be orthographic, isometric, or perspective, and can be done with pen on paper or inside SketchUp.
We recommend you use the Bill of Materials template for your BOM. If you are using the Nurajack system, use the online calculator and then transfer those product quantities into your BOM and add the other materials such as the timber, and fixings, such as screws and nails.
Let’s look at how we created a 3.0x2.0m low timber boardwalk in the Martin Garden.
Installing the foundations and bearers
WATCH
Boardwalk: Foundations and Bearers
Duration: 8:36 minutes
In this video we construct a low timber boardwalk in the Marten Garden, using Nuraspikes, Nurajacks and timber bearers, joists and decking.
The following notes relate to the video:
- When Luke says the decking boards are going to be level with the lip of the sliding door, this is for the small upper level of this boardwalk, as per the Martin Garden Proposal Plan. In this set of videos we only construct the lower level of the boardwalk.
- The self-levelling heads of the Nurajacks will accommodate up to 5 degree difference in level.
Fixing the joists and decking
Once the bearers are in place we can add the joists and then secure the decking to finish off the boardwalk.
WATCH
Boardwalk: Joists and Decking
Duration: 11:08 minutes
In this video we finish off the boardwalk by installing the joists perpendicular to the bearers and then secure the decking boards to the joists.
The following notes relate to the video:
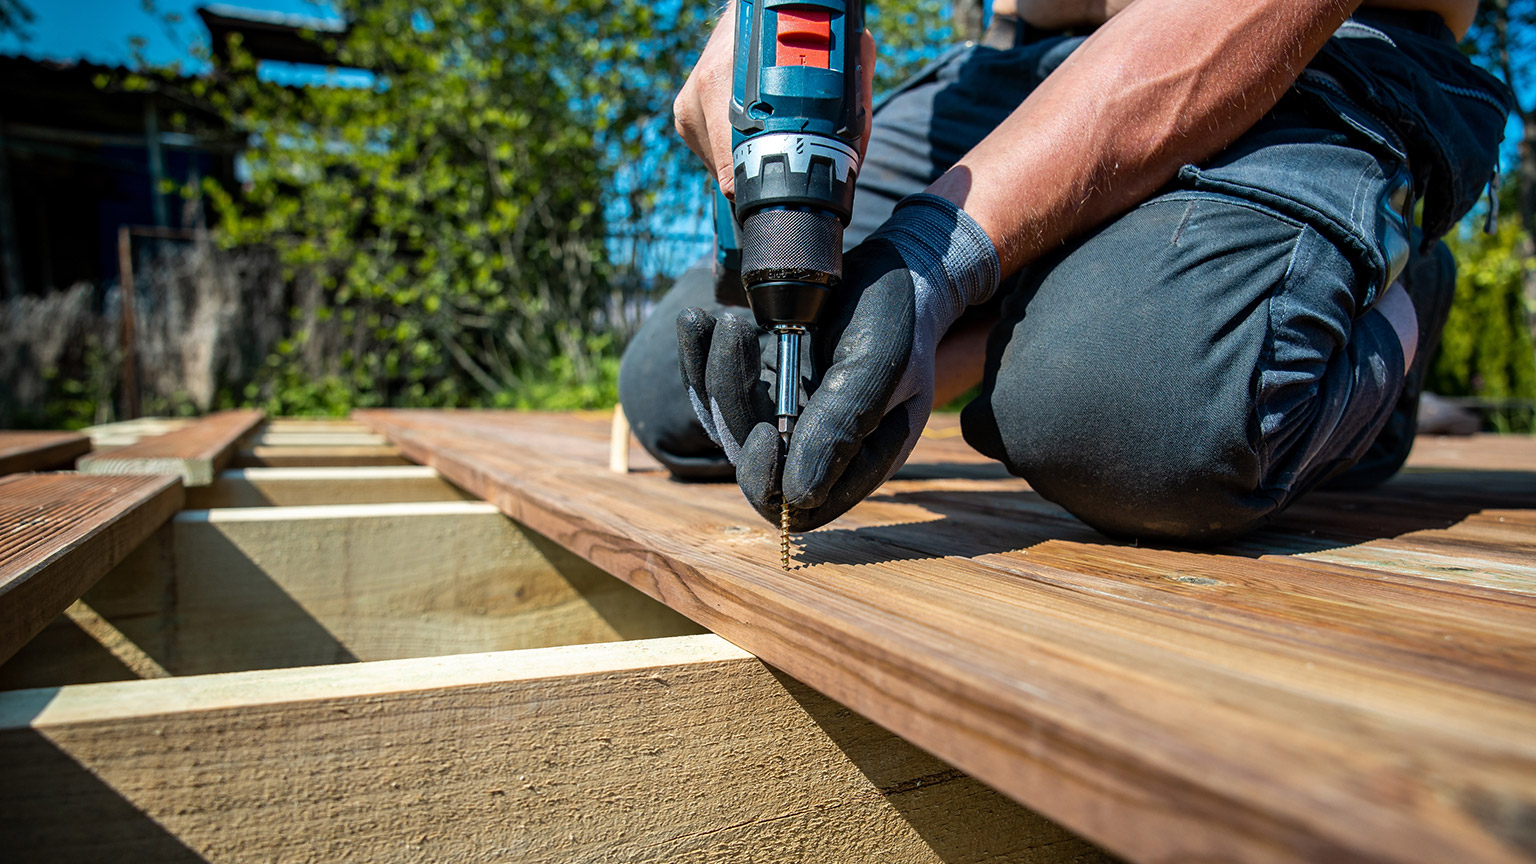
- The drill assembly used for the decking boards is a special tool that drills and countersinks the holes at the same time. It also has a depth gauge which is on bearings to avoid scuffing the decking. These are expensive – over $50 – but worth investment.
- When finished, the screws that hold the decking in place should be flush with the decking boards, or very slightly lower (perhaps 1mm).
- When working as part of a team, keep your wits about you. Your team mate might put boards or tools in a place you weren’t expecting to find them.
- If you use shims to get equal spacing between the boards, fit screws through the top of the shims so they don’t fall through the decking boards. Don’t press the boards too tight or you may not be able to pull the shims out.
- It is a good idea to lay drills and drivers on their side, rather than standing them up, wherever possible. If you knock it over from upright the drill or driver bit could gouge the decking.
- Get screw holes in the right place, by using a drilling template or measuring and marking the locations accurately.
- If working with 88/90mm pine decking, it is a good idea to measure the total width of the decking at each end after every 4-5 boards you install. This is because these boards are very flexible and can easily be pulled out of alignment. If you find that one end is shorter than the other, you can space out the next few boards at that end to bring it back into line.

Checking to confirm that the decking is being laid parallel, by measuring the end after installing every fourth or fifth board.
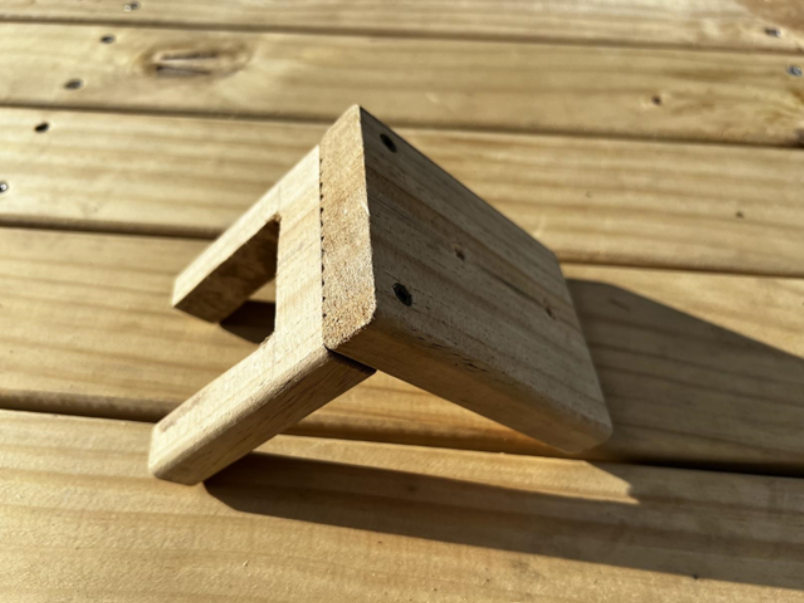
Decking drilling template made from two short pieces of decking board. A section has been cut out of the middle of one board using a hacksaw.

Decking drilling template specifications, where J refers to the joist dimensions, D refers to the decking dimensions and w and h refer to width and height, respectively. For example, Dh + 20mm means the height (thickness) of the decking boards plus 20mm. Construct a template like this from two pieces of your decking boards.
If you’ve chosen to build a low timber deck or boardwalk for your hard landscaping feature, you should be ready to make a start.
Head over to the assessments section and read the full assessment requirements in detail. If you have any questions, contact your tutor.