Hello, Hola, Kia ora!
HTML is one of the web languages that has been widely adopted and is supported by all modern browsers, offering a consistent viewing experience across platforms and devices. HTML5 is the latest version of the HTML standard.
During this topic, a monospaced font, with syntax highlighting is used to present code examples in the learning material to differentiate it from other content:
<p>This is an example of a piece of code.</p>
You will also see codepens that will present code on the left and what its results are on the right. These codepens are interactive, giving different results if you change the values on the right.
What is HTML?
HTML stands for Hyper Text Markup Language and is a method of using plain text to provide a web browser with information about how the content of the page (text, graphics and other multimedia content) should be presented. We use HTML to describe the structure of a web page.
Web page content consists of a series of elements defined within a text document and 'marked up' with special codes known as “tags”. A web browser interprets the tags to format and display the page content.
Tags are written inside angle-brackets. Anything not enclosed in angle-brackets is text content.
The markup code tells the browser how the text should be presented. Headings, paragraphs and lists are examples of text content that require different markup or tags.
The following is an example of HTML tags defining a heading followed by a paragraph:
<p>This is a heading.</p>
<p>This is a paragraph.</p>
As mentioned above, HTML is written using plain text and it is possible to create an HTML document using any application capable of outputting a plain text document. However, it is far easier and more efficient to use a code editor or Integrated Development Environment (IDE).
A code editor is a text editor that is designed to help you write code. It helps you colour your code and provides you with more advanced tools to make coding easier. A simple code editor can either be a stand-alone software program or part of an IDE or web browser.
The following code editors are available for macOS and Windows operating systems:
You should download and install at least one code editor onto the computer you intend to use for web design before continuing this topic.
You may also consider using an online IDE like the one provided by Replit.com.

Boilerplate
To start an HTML document, there are a few minimum requirements you need to include. The code below is called an HTML boilerplate – it is a template we can use to start making a page.
All of the CodePen examples included in this topic are editable. That means you can play with the code, make changes and see how it will preview in the browser. Give it a go and try typing your name within the <body></body> tags.
'Syntax' refers to the structure of a programming language. 'Semantics' refers to the meanings of words.
Syntax works together with semantics.
If we know both the syntax and the semantics of any programming language, we can easily write the code required.
When you get to grips with HTML and move on to other dynamic languages such as JavaScript and PHP, you will want to know the peculiarities of the syntax and semantics of those languages.
Syntax used in this topic
Because HTML5 is backward-compatible with previous versions of HTML which have less-strict syntax, there are some aspects (such as the use of capitals or lowercase) that can vary greatly, but are still be acceptable for HTML5.
This guide will provide examples largely using the XHTML syntax for consistency.
Due to its current prevalence on the web, you may find other sources of HTML5 on the web that may differ slightly--just remember that with HTML5 there is not necessarily a right or wrong way. It is really a matter of personal preference or organisation decision. The key is to be consistent.
Elements and tags

- Element
- Attribute
- Value
- Attribute
- Value
- Attribute
- Value
The first part of the HTML syntax we will look at is its elements.
These are basically labels that are used to identify and structure various parts of a webpage. Most elements in an HTML document have a start tag and an end tag.
These tags are surrounded by angle-brackets <>.
Certain letters or words are used for the different elements.
For example, the letter <b> is short for 'bold'. To make the word 'Whitcoulls' appear in a bold typeface, we can put a pair of ‘b’s inside angle-brackets and wrap these around the word:
Why the need for the angle-brackets?
Well, think about it: if we simply put a couple of ‘b’s around the words without the angle-brackets, how would the browser know what was text and what was markup?
The angle-brackets allow browsers to differentiate markup from content. Anything beginning with a left angle-bracket '<' and ending with a right angle-bracket '>' is understood as markup. Anything else is considered content.
Some examples of element tags are:
<p>marks a block of text as a paragraph<em>marks text to be emphasised<img>inserts an image
Notice how they are often based on English words and are fairly easy to remember.
It is how they are used on the page that is the hardest part of HTML. Several rules for tags and tag-pairs are explained below.
Tags
We use tags to add meaning to the content we are putting into our documents.
Tags in an HTML document are used to represent elements. Each tag can include a number of attributes that provide more information about the element and change the way the element is displayed.

- Start or Opening tag
- End or Closing tag
- An attribute and its value
- Enclosed text content
Along with the tags we looked at above, here are some of the common tags you will see in most HTML documents.
Tag-pairs
Just like the pair, B1 and B2 from Banana in Pyjamas, most elements markup content by surrounding it with a tag-pair: a Start tag and an End tag.
An End tag is simply the same as the Start tag except that it has a forward slash (/) after the first angle-bracket, for example:
<p>This is an example.</p>
Attributes and values
Attributes provide additional information regarding the content of the document and are paired with specific values, enclosed in quote marks. For example:
- Element
- Attribute
- Value
- Attribute
- Value
- Attribute
- Value
In this example, the <img> element has the following attributes:
src(source)width- and
height
each with values to specify the source image’s:
- file name (
mypic.jpg) - width size (
200px) - and height size (
150px).
In HTML, you are only required to enclose attribute values in quote marks (") if they contain spaces or certain characters; for example = ' or >.
However, for consistency’s sake and due to common practice, it is best to always use them.

Nesting elements
Additional elements may be contained within other elements. Take a look at the following example which will markup a paragraph with 'very important' emphasised.
The order of the end tags is very important.
Each End tag must correspond to the last Start tag, for example, if </p> and then </em> was used in this example, 'very important' will not be emphasised.
Remember this little tip:
F I T N E T.
First In, Then, NEsting Twin.
That means that the first tag you use should be the last tag you close, and the nesting elements should go in between; for example:
<!-- First tag opens -->
<p>

  <!-- Nested tag opens -->
  <em>

    First in. Then nesting twin.

  <!-- Nested tag closes -->
  </em>

<!-- First tag closes -->
</p>
Failure to nest tags properly causes invalid codes and potentially browser display problems.
A related problem is the failure to close tags, which can cause big problems throughout your page.
Understanding HTML elements, and the way Start and End tags work, is a very important part of the HTML syntax. Many issues can be resolved by correcting the order in which a pair of tags exists, or adding a missing End tag etc.
Void elements
There are several standalone elements known as 'void elements' that are not permitted to contain content (except for attributes within the Start tag) and must not have an End tag.
For example, the element used to insert an image has a single tag.
<img src="_____">
The image is simply inserted, there is no need for a Start-End tag-pair. This example applies when you create your code on TextEdit or Notepad and save your 'my-picture.jpg' image file into the root folder.
<img src="my-picture.jpg">

Sometimes, our code doesn’t work the way we want it to.
There are a few reasons this can happen and certain errors that we may make, so it is good to keep an eye out for errors as you are coding--it is easier to pick them up at the moment they happen than try to read through all of your code to find out what has gone wrong.
Some things to consistently check are that you have:
- opened and closed your tags properly
- used the right tags for the right elements
- used the right attributes and values for the tag
- saved your HTML and CSS files
- refreshed your browser
- kept in mind that how your site looks in other browsers can vary
- linked images and websites properly.
The exact method for creating a new document will depend on the application that you have chosen to use.
Generally, choose File > New to start a new blank document if you are using Notepad or TextEdit. In some applications, you may be requested to specify additional options (e.g. you may have to specify that you want to create an HTML5 document).
Let’s begin! You are going to add the following items to your first template:
- DOCTYPE declaration
- HTML element
- Meta or character set encoding type
- Title element
- Link element
- Head element
- Body element.
Adding essential code in detail
DOCTYPE declaration
To start your page, it is recommended that you add some information to tell the browser exactly what type of code you will be using. This tells the browser that it is looking at an HTML5 document. Type the following case-sensitive text carefully (if it has not already been created for you), ensuring that you use the same uppercase letters:
<!DOCTYPE html>
Adding the HTML element
Next, add <html></html> tags. Within this element, it is recommended that you specify the document’s language. We’ll specify English "en" here.
<!DOCTYPE html>

<html lang="en"></html>
Everything else in your document should be inserted between these (except for the DOCTYPE which always comes first).
Adding the head element
The next line opens a ‘head’ section with the <head> tag. The head section of an HTML document contains important information used by the browser, that is not displayed in the browser window. The head section is closed a few lines down with </head>.
<!DOCTYPE html>

<html lang="en">

<head></head>

</html>
Declaring the meta/character set encoding type
Characters are described using one of many types of encoding systems, depending on the operating system and the language used. To ensure the browser displays all characters precisely, it is best practice to declare the encoding type used.
To simplify matters, Unicode UTF-8 encoding type is recommended as almost every character in every major language can be contained in this type of encoding. The meta tag is used to define other metadata for the page. This can help with search engine optimisation (SEO).
Add the following <meta> tag between the <head></head> tags. A closing </meta> tag is not required.
<!DOCTYPE html>

<html lang="en">

<head>
  <meta charset="utf-8">
</head>

</html>
Adding the title
The <title> tag-pair defines the title of the page and is displayed as the window or tab name in your browser (see the screen capture below the HTML coding example).
<!DOCTYPE html>

<html lang="en">

<head>
  <meta charset="utf-8">
  <title>My Website</title>
</head>

...

</html>

- The website's title
Adding a link element
The link element defines the location of a CSS stylesheet to be used. (We will look at this in more detail further into the module.)
The link tag can also be used to define the location of specific fonts or a favicon icon.
<!DOCTYPE html>

<html lang="en">

<head>
  <meta charset="utf-8">
  <title>My Website</title>
  <link href="stylesheet.css" rel="stylesheet">
</head>

</html>
Adding the body element
The final essential element to add is a <body> element.
Everything that falls between <body></body> tags is displayed in the browser.
This is where our headings <h1></h1>, paragraphs <p></p>, images <img> and links <a></a> go.
Place them after <head></head> but before </html>.
For example:
And that’s your HTML Boilerplate template completed!
A note on Indentation
Whenever we nest an HTML tag inside another tag, we indent the inner tag so that the overall tag hierarchy is clear. Take a look at the following example of well-structured indents. The <p> tags are not indented, but anything inside them is. Since the <ol> tags are inside the <p> tag, they get indented, and since the <li> tags are inside the <ol> tags, they are indented further.
<p>
   3 Mobile Operating Systems:
</p>
<p>
    <ol>
       <li>Android (Google)</li>
       <li>iOS (Apple)</li>
       <li>Bada (Samsung)</li>
    </ol>
</p>
To indent tags correctly, you should have the opening and closing tags on the same level and indent any content inside them.
Check out the examples below of incorrect and correct indenting. Notice how in the second example, the text/content is indented inside the <p>, and then the </p> is on the same level as the opening tag? This is how easy it is to do, and it makes it much easier to tell what’s inside of what!
<!-- Not indented correctly -->
<div>
<p>
Lorem ipsum dolor sit amet,
minim veniam, quis aliquip
exercitation ullamco laboris.
</p>
</div>

<!-- Indented correctly -->
<div>
  <p>
    Lorem ipsum dolor sit amet,
    minim veniam, quis aliquip
    exercitation ullamco laboris.
  </p>
</div>
Note: Indention also applies to your curly brace nests '{ }' when you begin to program JavaScript, PHP or any other script language. So code indention is a good practice to begin straight away.
Indenting exceptions
There are some elements that we don’t indent for one reason or another:
<h1>Title of the heading</h1>
We don’t generally indent <h1> and other heading tags because they’re short, but feel free if you want to indent heading tags.
<title>Page title</title>
Again, we don’t indent <title> tags because they’re short.
<ul>
  <li>Lorem</li>
  <li>Ipsum</li>
  <li>Dolor</li>
</ul>
We don’t indent <li></li> tags because: the contents are usually short, we’re more concerned about the <ul></ul> tags, and because it can lengthen the overall code. That said, if you want to indent <li></li> tags, feel free.
Inline elements—You never indent inline elements. Treat them like text/content. Here are some examples:
- Link: <a>
- Span: <span>
- Image: <img>
And their code snippets:
<a href="youtube.com">Click this entire sentence to visit YouTube.</a>
<span class="redBold">This would show up as red and bold text.</span>
<img src="..//image.jpg" />

You will see the term ‘root’ folder (or ‘root’ directory) a lot in this module.
This refers to:
All files or folders for the same project must be in the same 'root/project/home' folder.
Remember:
- keep consistent and clear file management
- delete things you don't need
- use lowercase file names.
The most common structure we'll have on any website project we create is:
- A main folder (with specific name) that contains:
- 1 x index HTML file
- 3 folders to contain images, style files and script files.
Don't use spaces or special characters in file or folder names and stick to lowercase. This is because many computers, particularly web servers, are case-sensitive.
Browsers, web servers and programming languages do not handle spaces the same way. It's better to separate words with dashes, rather than underscores:
- my-file.html (using dash - )
instead of:
- my_file.html (using underscore _ )
For these reasons, it is best to get into the habit of creating your folder and file names in lowercase, with no spaces and with words separated by dashes--at least until you're confident in what you're doing.
Create a Project Folder
Folder structure

└── project/
    ├── css/
    ├── img/
    ├── js/
    └── index.html
index.html
This file will generally contain your homepage content; i.e. the text and images that people see when they first go to your site. Using your text editor, create a new file called 'index.html' and save it just inside your test-site folder.
img folder
This folder will contain all the images that you use on your site. Create a folder called 'images', inside your test-site folder.
css folder
This folder will contain the CSS code used to style your content (e.g. setting text and background colours). Create a folder called 'styles', inside your test-site folder.
js folder
This folder will contain all the JavaScript code used to add interactive functionality to your site (e.g. buttons that load data when clicked). Create a folder called 'scripts', inside your test-site folder.
Consider making the page a default page
If the page is to be the default (home) page for the website, then it is a good idea to set the file name as 'index.html'.
The benefit of doing this is that visitors will have a shorter URL to type as they will only have to enter the domain name; e.g. www.mydomain.com instead of www.mydomain.com/mypage.html.
If you are using TextEdit or Notepad, the file should be saved using the Text only/Plain text file format. This is usually an option found in the Save As dialogue box.
Choose the correct text encoding type
The encoding type should match what you declared in the HTML; e.g. Unicode/UTF-8. This will generally be found in either the Save As dialogue box or in the application’s Preferences.
Add an .html or .htm extension
The extension used is .html or .htm—it generally doesn’t matter which you choose, as long as you are consistent.
Some text editors may try to add their own .txt extension on top of the extension that you provide in the file name; e.g. filename.html.txt. This problem is not always apparent in Windows because by default, the operating system is set to hide extensions. To solve this problem, open File Explorer, click on the View tab and add a tick to the File name extensions checkbox.
By default, any file with an .htm or .html extension will open in your default web browser simply by double-clicking the file.
If you find that this default has been changed by a web design application or if you have several browsers that you want to test the file in, you will need to use the File > Open File command in the browser.
Another quick method is to right-click on the file and choose Open With and then select the browser application of your choice.
Test with at least 2 web browsers
It is recommended that you test your webpages simultaneously in at least 2 different browsers as you build them. This is because one browser may be less tolerant of errors than another, or may completely format your correct code differently.
This will provide you with an early warning to fix errors or to find an alternative, more compatible coding solution. Safari and Chrome share the same 'Webkit' engine so they will have similar results. If you are using these, choose another option such as Firefox or Internet Explorer.
The following image shows the browser and the developer view (click F12) on Windows Internet Explorer.

You can also inspect the code in Google Chrome by right-clicking on any webpage and selecting Inspect.

Opening a webpage file for editing
A typical way of working is to leave your code open in the background while you check the progress in a web browser so that you don’t have to continually re-open it.
However, if you have closed the file and need to re-edit it, then you’ll need to use the File > Open command in the editor unless you’ve associated the .htm/.html file type with that editor.
Another quick method is to right-click on the file and choose Open With and select the editor application.
A typical webpage will usually consist of more than just plain paragraphs of text—it will contain text formatted and organised using headings, subheadings, lists, hyperlinks etc.
HTML has a large range of elements that are used to markup content so that the browser or other web technologies understand what the content is meant to be.
In the past, web designers relied on these elements for styling; however, since the addition of CSS for styling, the use of HTML elements should only be used explicitly to markup content semantically (meaning that the elements used should meaningfully describe the content).
For example, if you wanted to set a paragraph in a larger bolder font, you should not use the <h3> (heading 3) tag to achieve this, as this would suggest that the paragraph was a very long third-level subheading.
Instead, it should be marked up as a paragraph using a <p> tag and left for CSS to style it as bold. Semantic HTML markup is particularly important for enhancing web page accessibility.
Text markup elements
Headings and subheadings
There are 6 levels of heading elements that can be used to define a hierarchy of headings and subheadings in your document.
<h1> being the top level (and by default the largest and boldest) and <h6> the lowest level.
An example of it in use is provided below. You go ahead and change the content and the heading levels to see the difference.
By default, the actual size and font style used depends on the browser and how it has been configured by the user.
Paragraph tag
The paragraph tag <p> is used to indicate paragraphs by adding line spacing between each paragraph. For example:
Line break tag
You may have noticed from doing the previous exercises that any line breaks you added using the Return/Enter key are ignored. Text will run-on, only wrapping to a new line when it hits the end of the browser. In HTML, you must use special tags to tell the browser where you intend to have a line break.
Whenever you want to force a line break (i.e. without creating a new paragraph with extra spacing), use the line break tag <br>. Take a look at this example:
Adding extra spaces
In addition to browsers ignoring your Returns, you may have noticed that if you try adding multiple spaces (using the Spacebar) or tabs, that only a single space is displayed.
You must use a special code to indicate any extra spaces, otherwise they will be ignored.
Type (non-breaking space) at any point of your document where you need a space. You can repeat it as many times as you need. It can also be used whenever you want a pair of words to always stay together without being split by word wrapping.
The following is an example of this in use. Try replacing the codes with spaces using the Spacebar and view the result:
Debugging activity
The following CodePen example has intentional code errors in it. Look through the codes and answer the following 3 questions.

Text styling
Bold text
Graphics title for The Bold and The Beautiful, 2021, © BBL Distribution, Inc.
Apply the <b> tag when you want to draw attention to a span of text (by default in a bold typeface) without implying an alternative voice or mood. For example, to highlight keywords, or perhaps the leading paragraph of an article:
Italic text
Use an <i> tag when you want to stylistically use an italic typeface.
For example, it could be used to highlight technical terminology, a quote, a thought, etc.:
Strong and emphasised text
The <b> and <i> tags should not be used for suggesting importance or for changing the tone of voice while reading; i.e. reading the text louder or with more emphasis.
If this is your intention, you should use the <strong> and <em> tags instead, for example:
Visually, they usually have the same default styling as <b> and <i> tags in browsers (although some browsers may display slightly differently).
The advantage of these tags is that some page readers for the visually impaired can alter their electronic voice to read words more strongly (louder) or emphasise words (perhaps in a different tone or pace).
Highlighting text
The <mark> tag can be used to highlight a span of text that you intend to draw special attention to; e.g. specific clauses in a contract or text matching a search query. By default, text will be styled using a yellow highlighted background. For example:
Marking inserted and deleted text
The <ins> and <del> tags can be used to mark changes that have been made to a document. By default, the inserted text is styled using underlining and deleted text has a strike through it:
Small text
The <small> tag can be used to markup text that should appear smaller and less significant—perhaps the fine print of a special offer:
Superscript and subscript
The superscript tag <sup> is used to create a smaller number or letter that is raised, while the subscript tag <sub> creates a smaller number but lowers the position:
Preformatted text
The preformatted text tag <pre> allows you to add content and retain all spaces and returns without the need to use or <br> etc. to force formatting. This can be useful for displaying programming code or perhaps a visually-formatted poem. For example:
Traditionally, a monospaced font such as Courier is used to display preformatted text, with the advantage of consistency of letter spacing. However, browser preferences do affect what font is used and some browsers now do not use a monospaced font by default.
You’ll learn how to specifically choose a font with the help of CSS styles.
Quote text
If you are quoting a block of text, the <blockquote> tag can be used to distinguish the quoted text from other text on the page by indenting it from both sides.
An optional cite attribute can be used to cite a URL source for the quote; however, no browser makes use of it, though search engines do apparently make use of it.
If you want to make a quote within a paragraph of non-quoted text, you can use the <q> tag. Most browsers will surround the text with curly quote marks “ ”, for example:
Abbreviations
If you have a document full of confusing abbreviations or acronyms, you can help your users out by providing expanded definitions that 'pop-up' when the user hovers over them. Try hovering above this abbreviated term:
Some browsers (such as Firefox) will highlight the word to indicate that a definition is available. Other browsers may only offer partial support or none at all.
Machine-readable times, dates and durations
There are many ways that we can write times, dates and durations with different formats or word substitutes and with different degrees of precision.
This can cause problems for computers to automatically read—perhaps for indexing or for translating times into a local time. So HTML5 adds a new <time> element that you can use to add a standardised machine-readable time and/or date in addition to your human-readable preference.
Date, times and durations are included in a <time> element as a datetime attribute value, along with the human-readable equivalent:
<time datetime="machine date/time/duration">human equivalent</time>
For example:
You may have just asked yourself the question, How did the browser read to be a space and not literally something like ‘wealth ’? (with nbsp being the abbreviation for National Bank Savings Programme, for instance).
In HTML, there are 3 characters, known as 'escape sequences', that are reserved for special instructions that cannot be directly used as content. These characters are:
< > &
- The < and > symbols tell the browser that what is contained is an instruction element.
- The & is reserved for the purpose of specifying special character entities that cannot otherwise be displayed directly using HTML (such as < and >, or extra spaces) and is also used for specifying special characters that are not directly accessible on a keyboard.
Some of the character entities used to insert some common symbols within your page content are:
<< lesser than>> greater than&& ampersand¢¢ cent££ pound¥¥ yen©© copyright™™ trademark®® registered trademark÷÷ divide×× multiply
Inserting other special characters from any language
There are hundreds of other special characters you can use. Visit the Web Standards Project for complete charts.
Unicode character codes
Unicode encoding (UTF-8) allows for characters in virtually every language—so many that they need to be specified by a hex-decimal code using � where the 0000 is substituted by the Unicode. Note: For non-European characters, viewers must have appropriate fonts installed. You can look up Character Code Charts at the unicode website.
Writing code comments
It is often useful to write comments in your HTML code to remind you or other web developers about the purpose of a particular block of code.
Anything between
<!-- and -->
will be ignored by web browsers; e.g.:
<!-- This is a code comment and will not be displayed by the browser. -->
It can also be used to temporarily disable (or 'comment out') content for testing purposes.
<!-- <p>This content has been commented out.</p> -->
Lists are a great way to group related items together or to provide information in stages or steps. HTML includes both ordered and unordered lists.
Ordered lists
An ordered list will usually have a number or letter associated with each item on the list, and an unordered list will often include a bullet or other symbol before each item.
Each item of the list will be surrounded by <li></li> tags (list item) and the entire list enclosed with <ol></ol> tags (ordered list) or <ul></ul> tags (unordered list) tags.
Here is an example of an ordered list:
Unordered and Nested lists
You can create a list within a list by simply adding a new <ol> or <ul> element inside of a <li> element, for example:
Because HTML documents only contain text, images can only be included by providing a path to their location. We can use the <img> tag to define the location of the image, and its alt text.
The <img> tag is an example of a self-closing tag, meaning it doesn’t require a closing slash (/).
The src attribute defines the location of the image file. This can be a relative or absolute path.
Enhancing webpages with images
Almost all webpages include images to enhance their appearance.
Even though fast broadband internet connections are now commonplace, it is still important to use correctly optimised graphics saved in either JPEG, GIF or PNG format.
Check that your files have no spaces or capitals in the file names and have suitable extensions (e.g. .jpg, .gif or .png). They should be copied to your wwwroot folder--perhaps in an ‘images’ folder to keep the files tidy.
Finding suitable images
Having images on your websites will make all the difference in the world.
You can edit and optimise your image for the web on image editor applications such as Adobe Photoshop. The following link provides you with a tutorial aimed at beginners and will show you how to resize your image.
So, where can you get images from?
Here are a few ways you can start with your collection of images:
- Your phone and online photo album: You can save the images on an image folder with a clear naming convention and link any image to this folder.
- Using online stock photo websites like shutterstock.com or unsplash.com: For example, search ‘gadgets’ on unsplash.com and it will provide you with options to save the web address of one of these images, you need to right-click and choose ‘Copy image address’. You now have this url as the image address,
"https://images.unsplash.com/photo-1515940175183-6798529cb860?ixlib=rb-1.2.1&ixid=MnwxMjA3fDB8MHxzZWFyY2h8N3x8Z2FkZ2V0c3xlbnwwfHwwfHw%3D&auto=format&fit=crop&w=500&q=60"
and can insert this into your src code.
Inserting an image
Images are inserted inline with other text on a page. Use the <img> element and attributes:
src
The src attribute is an essential attribute. It specifies the location of the source image file in relation to the webpage file. In this example, the browser will look for a file named "my-picture.jpg" inside a folder called 'images'.
width/height
style="width: 500px; height: 600px;"
The width and height attributes tell the web browser how much space to allocate in the layout. This prevents other items on the pages (e.g. text) from being delayed or unexpected shuffling of the layout when the image has fully downloaded.
You can find out the image’s width and height using a graphics program or by using the file's info.
- In Mac OS X: right-click the file and choose Get Info.
- In Windows: right-click the file and choose Properties and then click the Details tab (or the Summary tab if using Windows XP).
Use a graphics application (e.g. Adobe Photoshop) to do any image resizing tasks.
alt
The alt attribute allows alternative text to be displayed in place of images that are not displayed due to a broken link or by preference (some users on slow connections may choose not to download images). Also, it allows page readers for the visually-impaired to describe the images on the page.
title
If you use the title attribute, you can have extra information pop-up as a tooltip whenever a visitor hovers over the image.
Using images in place of text
You may want to consider replacing important headings or titles in your document with graphic versions created using a graphics application. That way you have more control and can use any font or special typographic treatments that may not be possible in HTML.
Of course, the downside of doing this will be slower download times, so keep them to a minimum.
It is especially important that you use an alt attribute containing the text you are replacing. This will help with accessibility and will provide a text alternative if the image fails to be displayed.
Using background images
Background images should only be inserted using CSS.
Grouping images and text using a <figure> element
A new HTML5 <figure> element can be used to group together one or more images with text captures using <figcaption>. For example:
Creating image links
A common purpose for using an image as a link is for navigation buttons or when creating thumbnail images that display a larger image when clicked. The method is the same as creating a text link, except you enclose an <img> element between the <a> tags:
<a href="home.html">
  <img alt="Home button" height="40" src="images/home-button.jpg" title="Click to return to the homepage." width="80">
</a>
You can recreate this code on a new TextEdit or Notepad file, just ensure that you have at least 2 pages:
- a home.html file
- another page (i.e. about.html or services.html) where you can place the above file to link back to the home.html page.
Linking thumbnails to full-sized images
If you are creating a web photo gallery, you may want to display smaller thumbnail images of your photos on an index page and invite viewers to click on the thumbnails of images that they want to view at full size. You do this simply by linking to the full-sized image. For example:
<a href="full-size.jpg">
  <img alt="Thumbnail picture" height="50" src="images/thumbnail.jpg" width="100">
</a>
You can recreate this code on a new TextEdit or Notepad file; just ensure that you have at least 2 images in your root folder:
- a
"full-size.jpg"(full-size image) - a
"thumbnail.jpg"(small/thumbnail image of fullsize.jpg).
If you are unsure how to resize an image, revisit this tutorial.
Relative vs. absolute paths
An understanding of the difference between relative and absolute paths is essential for web developers. These tricky differences can make troubleshooting your code much easier.
Relative
Relative paths define the location of a file, relative to the file being read.
For example, if an image tag:
<img alt="A ginger cat" src="cat.jpg">
appears in an HTML document named index.html, the file cat.jpg will be in the same folder as the HTML file.
If the src was written as:
src="images/cat.jpg"
then we would expect the file to be in a folder named 'images'--in the same folder as the HTML file.
Using "../" in a path means 'look in the folder above this one'.
For example:
src="../images/cat.jpg"
points to a folder named 'images', one level above the one the HTML file is in.
Using a forward slash '/' on its own refers to the root of the directory, the topmost directory.
Traditionally, the root directory contains the first page of a website, an HTML file named 'index.html'. Web servers are usually configured to display this file first.
Absolute
Absolute paths provide the full URL location of the file. For example, the following image provides the location of an image on the unsplash.com server.
We need to use absolute paths when linking to files that are on a different server or outside of the current network.
Tables allow you to organise information clearly into columns and rows, similar to a spreadsheet.
These columns and rows can be lined, coloured or formatted to visually organise information so that a reader can quickly find the data they need.
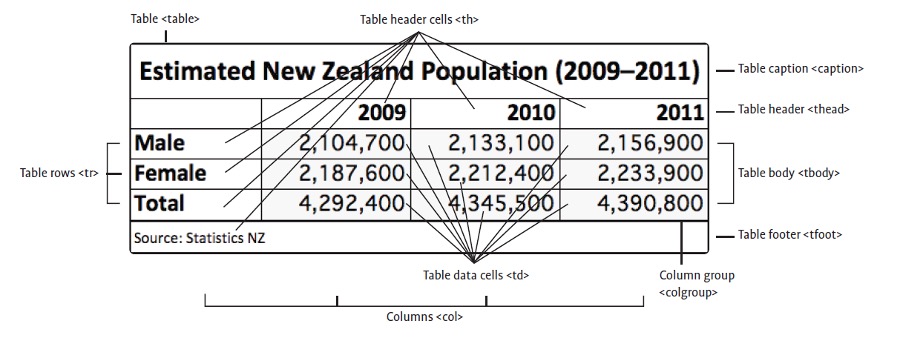
The anatomy of an HTML table
Before you begin building tables, it is a good idea to get an overview of the components of a table and the HTML elements used to define them.
Creating a table
Table elements
Tables are made up of cells, arranged in rows and columns.
- All components of a table are enclosed within a
<table>element. - Table rows are added using
<tr>elements. - Table headings are added using
<th>elements. - Table cell data is inserted using
<td>elements.
For basic table constructions, columns do not need to be explicitly defined as they are automatically created to contain the maximum number of <td> elements within any table row.
Empty cells
You should always specify a table data cell even if you do not intend to fill it with any content, simply leave it empty. For example:
<td></td>
Table captions
The <caption> element can be used within the table to add a title at the top of a table.
Table headers cells
To distinguish a cell that is a label or heading for a row or column you, should specify it using a table header element <th> instead of <td>.
Spanning cells
You can merge two or more cells to form a single larger cell.

The colspan and rowspan attributes are used with a value equal to the number of columns (vertical) or rows (horizontal) you want a cell to occupy. Often, it is a good idea to sketch out a complex table on paper to avoid confusion as you’ll need to remember to omit any cells that have been merged. For example:
Many of the properties covered in the CSS Formatting and CSS Layers sections earlier in this module can be applied to tables, rows, columns and cells. For example:
- font styling and colour
- text alignment
- width and height
- margins
- borders
- padding
- backgrounds (colours and images)
- float
- vertical alignment.
Understanding table borders
Borders are perhaps the trickiest part of a table to style with CSS so this is where we’ll cover how it all works.
The HTML attribute border="1" places a 1px border around the entire table (except for the caption) and around every cell. It is the equivalent of:
table,
td,
th {
  border: 1px solid;
}
To provide better styling control, you should remove it so that you can apply different border styles to the table <td> and <th> elements individually. For example, if you use:
table {
  border: 2px solid;
}
--this will just add a thick border around the entire table. Now, if you add:
td,
th {
  border: 1px solid;
}
--this will add thin borders around the cells.
If you have empty elements that you do not want to have a border (or fill) applied, add the following to the table element:
empty-cells: hide;
If you wanted to adjust the spacing between the cells, you can add the following CSS property to the table element:
border-spacing: 5px;
It's an interesting effect, but it doesn’t look quite like the single borders you would see in an Excel spreadsheet. To fix this, remove the previous property and apply the following property to the table element:
border-collapse: collapse;
This collapses any double borders into a single border and is the standard styling that you’d expect to see.
Adding padding
It is well worth adding some padding to <td>, <th> and <caption> elements to give the information some space to improve legibility.
Alternating row or column background colours
In large tables, using alternating colours for the rows or columns can help guide the eye, to stop it from jumping between rows or columns.
The following can be used to tint the background of every odd-numbered <tr> in the <tbody>:
tbody tr:nth-child(odd) {
  background-color: #ddd;
}
If column tracking is more important, use:
tbody tr:nth-child(even) {
  background-color: #ddd;
}
Here is a snippet--take note of the <style></style> tag pair to add our CSS into the mix.
A form element is useful for collecting data and input from a user. We see them on login screens, address collection pages, and surveys.
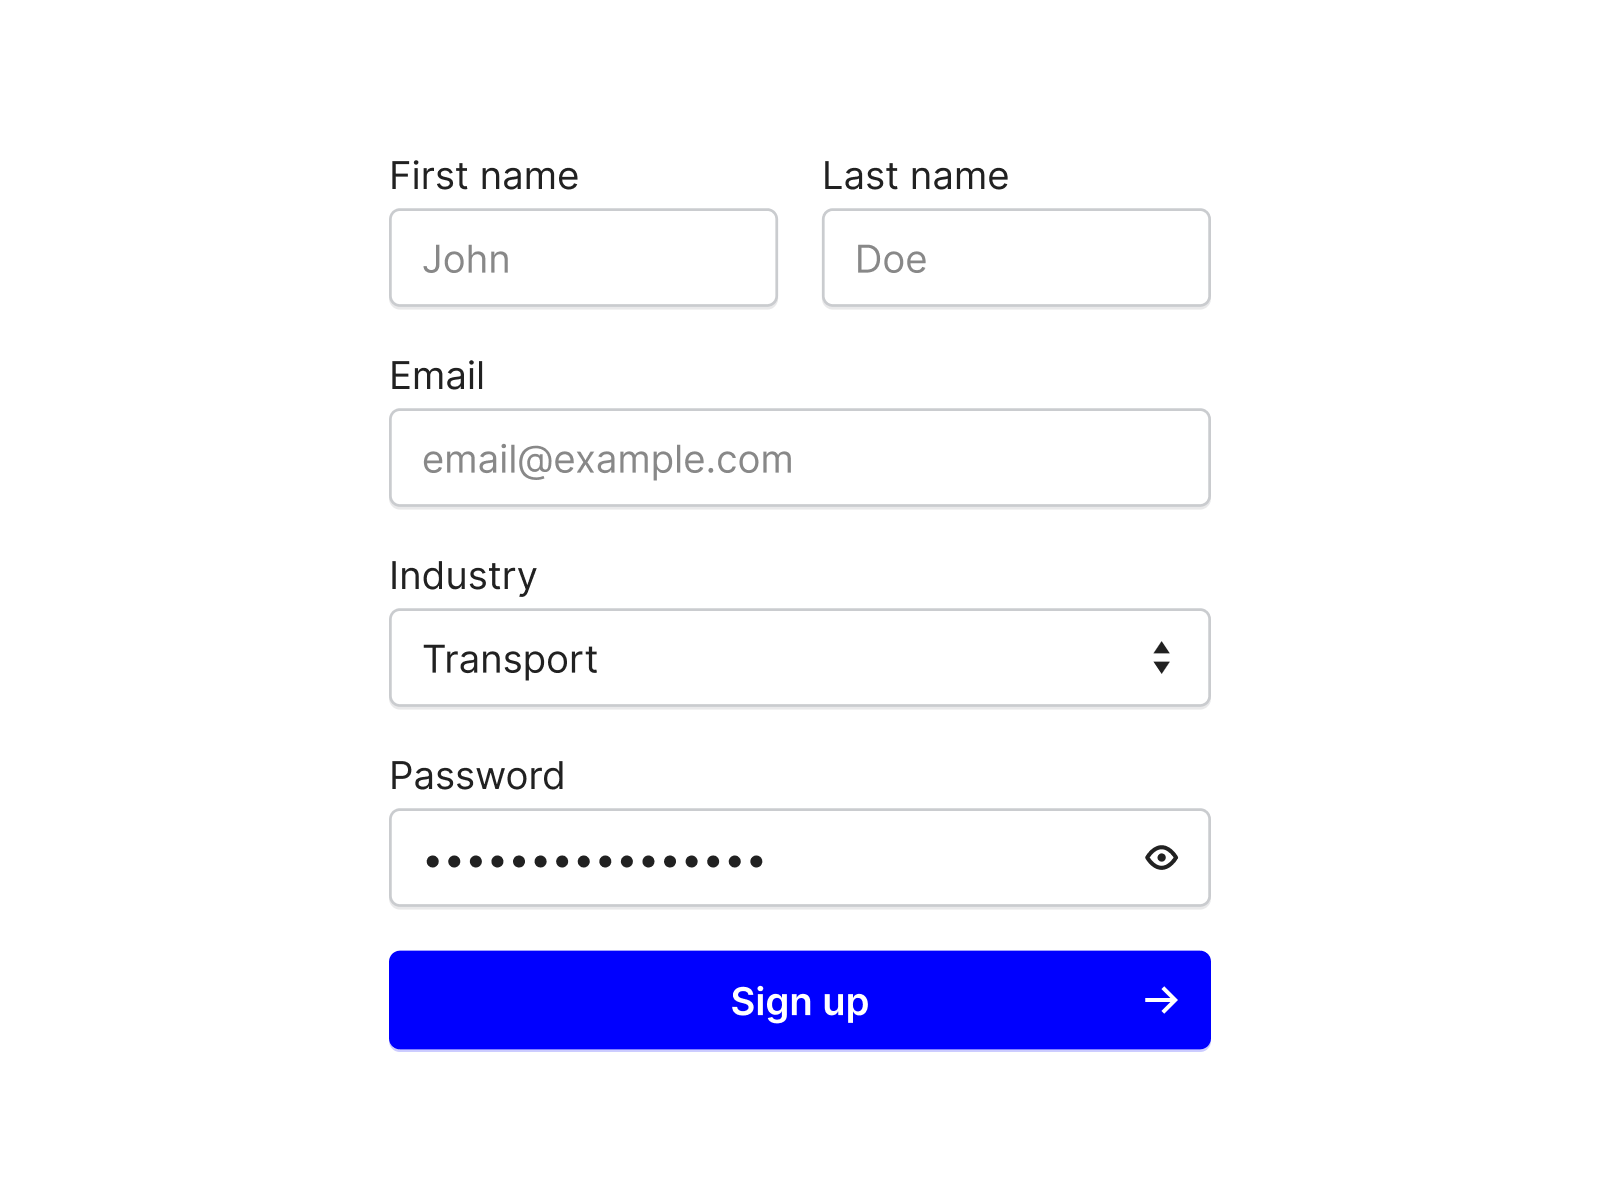
A form is created using the <form></form> tags.
We create input elements inside the form tags using the <input> tag.
Each input tag is given a type attribute to define what type of input it is:
| Type | Description |
|---|---|
<input type="text"> |
Displays a single-line text input field |
<input type="radio"> |
Displays a radio button (for selecting one of many choices) |
<input type="checkbox"> |
Displays a checkbox (for selecting zero or more of many choices) |
<input type="submit"> |
Displays a submit button (for submitting the form) |
Each input is also given a unique id attribute, making it easier to select the data in javascript and PHP when the form is submitted.
Here is an example of a basic form.
Text input
For text inputs, a placeholder can be added to provide additional instruction.
<input id="fname" placeholder="your firstname" type="text">
Radio Buttons
Radio buttons are used when we want users to select one option from a limited number of choices.
We use the same name attribute value to group the options together, and the value attribute to define what data will be submitted by the form.
The label elements used above provide way of indicating what each radio button represents.
Checkboxes
Checkboxes are used when we want the user to be able to select one or more options from a limited number of choices.
The name attribute for checkboxes can be unique.
Submit
The submit element is used to display a button for submitting the form.
The value attribute can be used to change the text displayed on the button.
Form attributes
Action
Form data is usually sent to be processed by a server when the user clicks submit. The action attribute is used to define where to send the data.
<form action="/action_page.php">
In our later examples we will use <form action="javascript:void(0);"> to prevent our page from reloading.
Onsubmit
The event attribute onsubmit can be used to define a javascript function to execute before the form's action is started, making it possible to use javascript to validate the values in the form.
<form onsubmit="myFunction()">
Drop-downs
Another option for user input is to create a drop-down using select element.
HTML5 adds several new structural elements to allow developers to build webpages with an enhanced 'semantic' (meaningful) document structure that will help make the content more accessible and compatible with future web and mobile device innovations.
With previous versions of (X)HTML, the heading elements could be used to define a simple hierarchy of the document’s main content, but if you wanted to organise your document into other blocks of content (e.g. sections, sidebars, navigation areas, footers, etc.), then a generic div or division <div> element had to be used.

The problem with <div> elements is that they have no specific purpose—they can contain anything!
Individual <div> elements can, however, be given an identifier name (id or class) to allow them to be targeted for individual positioning and styling using CSS.
Semantics = the study of the meanings of words and phrases in language.
Semantic elements are elements with a meaning—clearly describing their meaning to both the browser and the developer.
Examples of non-semantic elements are <div> and <span>—which tell us nothing about their content.
This is how the older versions of HTML defined the different parts of a webpage and it made writing code and styling elements a lot more complicated.
Examples of semantic elements are <form>, <table> and <img>—specifying clear descriptions of the elements.
The div element
Some content that you may want to markup (to allow formatting or positioning using CSS) may have no appropriate HTML element that it semantically matches. In these situations, you can use: <div>
They are typically given a class or id attribute to allow CSS to target them.

Use the division <div> elements to markup a block of content that might require special treatment. For example:
The body element
You’ve been using the <body> element from the very beginning. It creates the top-level section of a document within which all document content is contained.
The h1-h6 heading elements
The heading elements provide a heading to a section and create additional sections and subsections. Headings are an important way to add hierarchy to a document and provide context to the information to be displayed.
HTML has 6 levels of heading—<h1> is the biggest, <h6> is the smallest. It is important that headings are used appropriately and in the correct order. You wouldn't use an <h2> under an <h3>.
It is important to understand how headings elements (<h1> to <h6>), when used within the sectioning elements, affect the document outline and how subsections are formed. The following rules apply to all sectioning elements, including the new ones that you’ll be introduced to just ahead:
- If no heading element is used within a section element, it will be listed as an 'Untitled section' in the document outline.
- The first heading element used within a structural element becomes that section’s title in the document outline, no matter what heading level (1–6) is used.
- When additional heading elements are used within the same section, there are 2 possible outcomes:
- if it has a higher level number (1–6) than the previous heading element, a new subsection will be created using the title of that heading element
- if it has the same or a lower level number (1–6) than the previous heading element, a new section will be created (at the same level) using the title of that heading element.
The nav element
The <nav> element should be used to contain a group of site navigation features such as links, buttons, menus, search fields, etc.
- It is best to use a
<nav>element for just the major navigation area on your website. If you have secondary navigation links in a footer using another<nav>element, this is not necessary. Also, never use it for individual hyperlinks contained within content. - A
<nav>element can be nested within another structural element such as a<header>,<footer>or an<aside>(as in the example below), if desired.
The header element
A <header> element can group several elements that combine together as a header for the page. For example, it could contain a page heading or website mast complete with graphics and perhaps navigation links to other pages.
The <header> element has a special power! If the <body> element does not directly contain a heading element (<h1> to <h6>), the <header> element’s heading will be used to name the top-level section in the document outline.
The footer element
A <footer> element can group several pieces of auxiliary information that would normally appear at the end of a section (either the entire page or individual sections/articles); e.g. footnotes, copyright information, contact details, terms and conditions, secondary navigation links, etc.
Hyperlink
One of the key technologies that enables multi-page websites is 'hyperlinking'.
A hyperlink enables clickable words, menus, images or buttons for users to use to go to other pages, rather than have them type in a new URL each time.
Creating text links
The most common type of hyperlink is the text link. By default, text links are highlighted in some way (e.g. coloured blue and underlined) to indicate to the user that the text is clickable. The exact style of links can be changed using CSS styles.
The anchor <a> tag is used to define hyperlinks:
<a href="index.html">Back to home</a>
The href attribute tells the browser which page to link to. Links need to be enclosed within quote marks " and may be absolute paths or relative paths.

Absolute links
Absolute links are links that, no matter where they are placed, are very clear and absolute about where they are linking to.
An analogy would be your postal address—it specifies exactly where you live, and makes sense to any postal office anywhere in the world. It leaves no room for error.
An absolute link typically starts with http:// and goes on to specify the whole web address. They are typically used when linking to other websites.
Relative links
Relative links are relative to the current page location and are typically used when referring to pages within the same site.
An analogy would be 'I live next door to the bakery'. Although there may only be one bakery in town, this address is relative to a given town. It could be any one of thousands of towns.
To link to a page within a folder, we write the folder name and follow it with a forward slash (/). This means 'inside this folder'. For example, if you want to make a reference to the page called 'history.html' that is inside a folder called 'company', you would use:
<a href="company/history.html">Click here to see our company history</a>
To access the parent directory, we use 2 dots and a forward slash (../). This means 'reverse out of this folder'.
For example, to make a link back to the index.html page from the history.html page (that resides inside the 'company' folder), you would use:
<a href="../index.html">Click here for the home page</a>
When the forward slash (/) is used to begin a hyperlink reference, the browser assumes that the path starts from the root directory (the wwwroot folder, or the main folder that houses the entire website). For example, the 2 links you just saw could both be written as:
<a href="/company/history.html">Click here to see our company history</a>

<a href="/index.html">Click here for the home page</a>
As the web server will automatically give you the default page when you link to any folder, that last link could technically (though it is not best practice) be written simply as:
<a href="/">Click here for the home page</a>
Targeting links to different browser windows or tabs
When a visitor clicks on a link, by default, the linked page is opened in the same browser window or tab.
Opening link in a new window
There will be times when you will want the link to open in a new window so that the viewer does not lose their place on the original page. This can be easily achieved by adding the target="_blank" attribute within the <a> element. For example:
<a href="contact.html" target="_blank">Click for contact details</a>
Opening link in a new tab
Alternatively, you can specify a window name (without the preceding underscore) so that multiple links can open in that same new window by adding target="pop-up" for each link that is clicked. For example:
<a href="contact.html" target="pop-up">Click for contact details</a>
Within the content on a page, you can place special references known as 'anchors'.
These can be linked internally (within the same page) or externally (from another page). They are useful if you have long webpages with lots of information as it will scroll the page to the exact location of the information. Often, an anchor is placed at the top of the document to provide handy To the top links to aid navigation.
Examples for using anchor tags are provided below.
Links to other pages are created using anchor tags <a></a>
The href attribute is used to define where the link will go and the text between the opening and closing tags defines what the link will say.
Use relative paths for link access to other pages of your website or pages on the same server or absolute paths for pages on other websites.
<a href="https://www.google.com/">Visit Google</a>
Creating an anchor
The <a> tag is used again, but this time without the href attribute:
<a name="contact info"><h2>Contact details</h2></a>
Linking to an anchor
To make a link to an anchor on the same page, use #anchorname as the link:
<a href="#contact">Click here for contact details</a>
To link to an anchor on an external page, simply add #anchorname to the end of the link without any spaces:
<a href="information.html#contact">Click here for contact details</a>
Creating an email link
When a viewer clicks on an email link their default email application will automatically open with the correct address entered into a new email message window.
The only difference when creating the email link is that it uses the mailto: protocol instead of http://:
<a href="mailto:support@theschool.ac.nz">Click here for support</a>
Create a basic webpage
Instructions:
Scenario - You are an IT Technician for a school. You have been tasked with creating a basic webpage using HTML. Your page will need:
- a title
- a header
- a list (ordered/unordered)
- paragraph content
- an image
- a hyperlink.
Some ideas for your webpage could be:
- a list of equipment that the staff can book out
- a list of Wi-Fi connections that staff, students and guests can login to.
Share a screen capture of your basic webpage in the forum.
In this topic we have introduced HTML as one of the foundational languages used in web development. We have explored the different ways that HTML pages can be created and importantly how to use its syntax correctly.
The following tags and how to use them were also explained:
- Paragraph tags
- Image tags
- Head and Body tags
- Heading tags
- List tags
- Anchor tags
File management is an important process during web development and a clear approach to project organisation was presented in “File management and project folder” subtopic.
This topic has covered many of the fundamental skill necessary to construct a tidy, semantically meaningful web page, ready for styling using CSS.
You should refer back to this for when you need help during your assessment.
Knowledge check
Additional resources
Here are some links to help you learn more about this topic.
It is expected that you should complete 12 hours (FT) or 6 hours (PT) of student-directed learning each week. These resources will make up part of your own student-directed learning hours.