A database is a structured and organized collection of data that allows for efficient storage, retrieval, and manipulation of information. When we gather information on a topic, we create a database.
A flat file database is a type of database that stores data in a simple, unstructured format, typically in a single file. It consists of a set of records, each of which contains a set of fields or attributes. Each record is represented by a single line of text in the file, with the fields separated by a delimiter, such as a comma or a tab. The data in a flat file database is not organized in any particular way, and there are no relationships between the data.
Flat file databases are simple and easy to use, but they lack the structure and organization of more sophisticated databases. They are often used for small-scale applications or personal record-keeping, such as keeping a list of contacts or inventory items. Flat file databases can be created using common productivity tools like Microsoft Excel or Google Sheets, and are typically stored in simple text formats such as CSV or TSV.

Flat file databases are not well-suited for managing large amounts of complex data within an organization. Efficient storage, organization, and management of data require a structured approach. The specific type of information to be collected needs to be defined, such as working with dates, numbers, or text, and may even be a predefined list. Spreadsheets are often used to store such information because they are easy to set up and can ensure that the correct type of information is entered into different fields. However, spreadsheets are limited to collecting information about only one type of record.
As soon as we have multiple types of records, a more sophisticated database management system is necessary. For example, a school has many different types of information – students, staff, classes, and subjects. While you can get a list of staff, students, and classes, the school is also interested in which students are in what classes, or who is teaching a particular subject. There is a relationship between students and classes and teachers and classes. This data could be stored in multiple spreadsheets, but it is not very practical.
There are different types of database structures, including relational databases, NoSQL databases, hierarchical databases, and object-oriented databases. Relational databases are the most commonly used, and MySQL is one of the most widely adopted relational database management systems (RDBMS) worldwide.
Relational databases are widely used in business and other applications. In a relational database, data is organized into tables, with each table consisting of a set of columns and rows. Each column represents a specific type of data, such as a customer’s name or address, and each row represents a single record, such as a specific customer’s information. The important thing to remember is that for traditional databases, each row relates to a single object. This could be a person, a car, a music track, or whatever collecting information about. Each column is information about the object. If it is a car, it could be whether it is a manual or automatic, the colour of the car, the size of the engine, or anything else about the car. A person could include their name, height, and any other information that is relevant.
Under New Zealand privacy law, you cannot just collect information about people. The data collected must be collected for a purpose, and the person told why collecting it. Overall, there are 13 principles outlined in the Privacy Act 2000 that govern the collection, storage, and use of personal information. An IT professional has a responsibility to ensure that these principles are followed, particularly that the information is stored in a safe and secure manner.
Relational databases allow data to be linked between tables through the use of primary and foreign keys. A primary key is a unique identifier for each record in a table, while a foreign key is a reference to a primary key in another table. For example, in a school environment, a student's sign-up for a class is represented in the class database by their Student ID, which is the foreign key pointing to a record in another table that contains the student's information. This makes it easier to retrieve and manipulate related data in various ways while ensuring that updates to the information are reflected wherever it is used.
Relational databases have many advantages over other types of databases. They are highly scalable, flexible, and secure, with features such as access control and encryption to protect data from unauthorized access. However, their complexity and design requirements make them unsuitable for simple data collection purposes, where a flat file in Excel, Notepad, or another application is sufficient.
Relational databases are critical tools for managing and analysing large amounts of data in various applications, offering several advantages over other types of databases. Whether you are working with customer data, financial information, or any other type of data, a relational database can help you store, manage, and analyse that data in a secure, efficient, and flexible way.
A database management system (DBMS) is a software package designed to define, manipulate, retrieve and manage data in a database. The main difference between a database and database management system is that the database management system contains a piece of code that controls, manipulates, and modifies how data is stored inside the database.
There are many Relational Database Management Systems (RDBMS) which are designed to manage different tables that are related to each other. The widely used ones all use SQL as the way that the user interacts with the client. Some of the most widely used RDBMS systems include Oracle, MySQL, Microsoft SQL, and PostgreSQL.

Each RDBMS has its own licencing agreements. Oracle and Microsoft SQL Server both have licences that must be purchased before they can be used (except for a limited time when trialling the products). They are designed for large-scale enterprise internal use supporting in-house applications.

MySQL is an open-source RDBMS based on Structured Query Language (SQL). It’s particularly popular for web applications that require a back-end database, such as e-commerce websites, social media platforms, and content management systems. One of the reasons for its popularity is its scalability and ability to handle large amounts of data. MySQL is also known for its compatibility with various platforms and ease of integration with other technologies, such as PHP, Java, and Python.
MySQL’s flexibility and user-friendliness are additional reasons for its popularity. It provides a simple and straightforward interface for managing databases, enabling users to create, update, and delete data with ease. Furthermore, it offers various security features to safeguard data, including password authentication and encryption.
The open-source nature of MySQL, together with its ease of use, is why MySQL is used in this course.

Like many RDBMS, MySQL has a client which talks to a database server. This allows multiple users to access the data simultaneously. This also means that it works over a network. As with all network clients and servers, it is possible to be installed and run on the same computer. However, they still communicate over network topologies.
In the TCP/IP and OSI model, the client application sits at the application level and passes information to the lower levels. This means that when a user enters SQL commands into the client, they go down through the layers until they are turned into IP packets and ethernet frames (if going over ethernet) to send over the network. The server will receive the frame (if over ethernet) and then pass it up the layers to the RDBMS, which will perform the functions on the database. What the user sees is the response from the RDBMS server.
There are many and varied client packages. SQL allows any software to construct a query. For example, a website will construct a query to retrieve information to display on screen – this is very common in e-commerce sites. In many technology stores, you are asked to “Search by Keywords or Part # when looking for particular parts. This will create a filter for the query and will show all the items that have those strings in particular fields. From there, you can refine by manufacturer, type of product, or price range. As you select more filters, the query is refined until only the products you desire are shown on the page. These are all creating new MySQL statements to help you find the product you are wanting.
In these lessons, we are going to be using a package called XAMPP. This installs a small web server, MySQL server, and a few other things. The MySQL server in XAMPP is also called MariaDB.
While the XAMPP tool MyphpAdmin can be used as a client for MySQL, the client that will be used is called MySQL workbench. This is a powerful tool to manage MySQL servers as well as create and run MySQL scripts.
Installing XAMPP
XAMPP is a free and open-source software package that provides an easy way to install and run a web development environment on your computer. The name XAMPP is actually an acronym that stands for:
- X (cross-platform): works on different operating systems like Windows, Linux, and macOS.
- A (Apache): includes the Apache web server software that serves web pages to clients.
- M (MySQL): includes the MySQL relational database management system for storing and managing data.
- P (PHP): includes PHP, a programming language used for web development.
To download XAMPP go to https://www.apachefriends.org/download.html and choose the latest version.
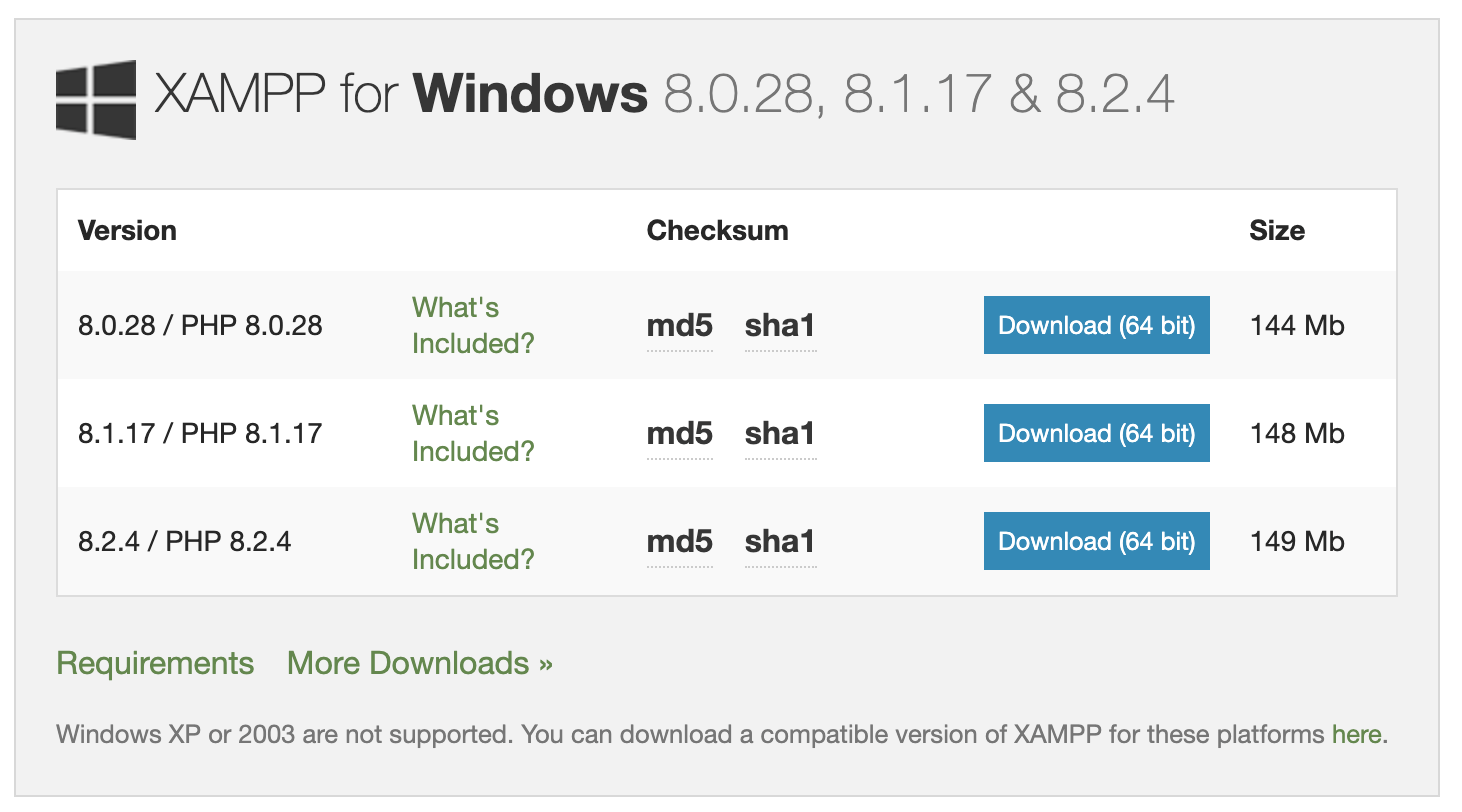
The following video provides an easy-to-follow guide to downloading and installing XAMPP on a window computer.
Follow these instructions, using the default configuration, there should be no need to change the port configuration of Apache or MySQL.
Installing MySQL Workbench
MySQL Workbench is an integrated development environment (IDE) that provides a graphical user interface (GUI) for working with MySQL databases. It is a free and open-source tool developed by MySQL AB, and it runs on Windows, Linux, and macOS operating systems.
MySQL Workbench provides several features that make it easier to design, develop, and manage MySQL databases, including:
- Visual database design: It provides a visual data modelling tool that allows developers to create and modify database schemas using a graphical interface.
- SQL Editor: It includes a SQL editor with syntax highlighting, code completion, and other advanced features that make it easier to write and execute SQL queries.
- Database Administration: It provides a suite of administrative tools that allow users to manage users, permissions, backup and restore data, and perform other administrative tasks.
- Performance and Optimization: It includes tools to monitor and optimize the performance of MySQL databases, including a visual Explain plan tool, and a performance schema reporting feature.
- Collaboration and Migration: It provides tools to collaborate with other developers, share models, and migrate data between different database platforms.
MySQL workbench can be downloaded from https://dev.mysql.com/downloads/workbench/.
Understanding Client-Server Database communications
A client and server communicate over the network. This is true even if both the client and the server are on the same computer. The client will send packets destined for the server to the IP address of the computer and the server will be listening on the network card. Even though the packet is going out and coming back in on the same network card it is still network-based communications.
The IP 127.0.0.1 (IPv4) and ::1 (IPv6) are called the loopback address. They are shorthand for “myself”. The packets will take a shorter route to get to the server and be faster. The command ping 127.0.0.1 is a shorthand test to verify if the network card is working properly.
Most communication involving the transfer of data uses either TCP or UDP packets depending on whether reliability (TCP) or speed (UDP) is the most important factor.
In summary, the client is going to try and establish a connection with the server over the network. The three important factors for this are going to be:
- Server’s IP address
- Port and protocol the server is listening on
- Username and password required to authenticate with the server.
Connecting MySQL Workbench to XAMPP
If you followed the instructions above, you should have both XAMPP and MySQL Workbench installed locally on your computer. The default port for MySQL is 3306, and should be accessible using the localhost IP 172.0.0.1:3306.
Before you begin, make sure XAMPP is running and that both the Apache and MySQL service are running.
Step one
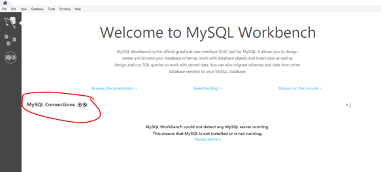
Open MySQL Workbench, this will display the home tab. If this is the first time you have used MySQL workbench it will be empty.
Step two
Add a new connection by clicking the plus icon next to “MySQL Connections”
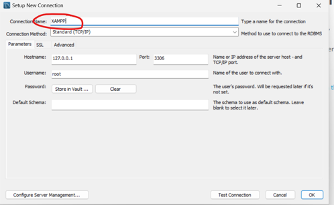
Step three
Fill in the connection information. Remember that we are working locally so the Hostname will be your localhost IP 127.0.0.1 and the port for MYSQL is 3306. Leave Username set to root.
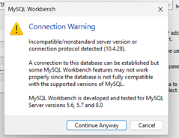
Once the connection information is entered, click “Test connection”. You will likely receive a “Connection Warning”, this is related to the version of MySQL being used in XAMP. Click “Continue Anyway”.
You should now receive a Successful Connection message.
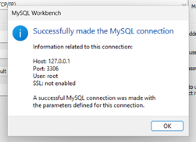
Close the message and click “OK” in the New Connection window to save the connection.
Step four
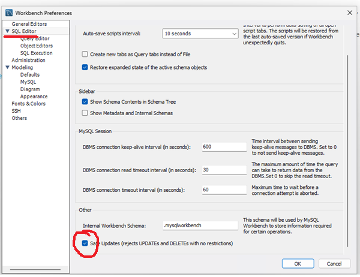
Because we are using simple databases without keys, we need to turn off “Safe Updates” in the preferences.
The setting can be found under Edit->Preferences in the Menu, followed by selecting “SQL Editor” on the left.
Scroll down and untick “Safe Updates before clicking “OK”.
You have now installed XAMPP and MySQL Workbench. You are ready to start experimenting with databases.
Getting started with MYSQL
In MySQL Workbench, open the connection to your XAMPP MYSQL server.
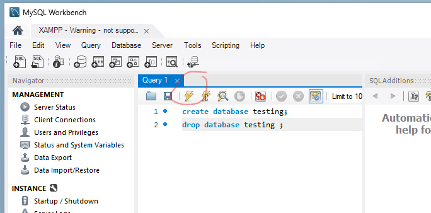
In the Query tab in the centre of the window, enter the following command and press the lightning bolt icon.
CREATE DATABASE testing;
CREATE can be used on multiple items, in this case, we are creating a database named testing. MySQL commands always end with a semicolon “;”.
SQL keywords are NOT case sensitive: create is the same as CREATE. However, it is a common convention to write SQL keywords and commands in uppercase letters to make them more readable and distinguish them from table and column names.
To remove the database, use the DROP command.
DROP DATABASE testing;
Now let’s create a new database called “staff”, and we will use the USE command to select our new database so that the following SQL command will be run against it.
Enter and run the following commands.
        CREATE DATABASE staff;
        USE staff;
Data Types
Before we start creating our table, it’s important to know a little bit about data types.
There are three main types of data that are stored in tables.
- Text (names, addresses, titles, etc)
- Numbers (height, weight, age, stock levels, etc)
- Date and time (birthdays, enrolment date, graduation date, etc)
Text
varchar (variable length character) is usually used to specify a text field, together with its maximum size. For example, varchar(25) means a text field with up to 25 characters. The varchar data type is useful for storing names, addresses, titles, etc. It’s important to set the maximum size of a varchar to accommodate the longest value that is likely to could be entered.
Numbers
The two most common types of numbers are integer and decimal.
An integer (INT) is a whole number (not a fractional number) that can be positive, negative, or zero. -5, 1, 5, 8, 97, and 4132 are examples of integers. Age, queue position and stock level are examples of values that could be stored using INT.
A decimal (DECIMAL) number is a real number that is expressed in the decimal system. Decimal numbers can be positive or negative, and they can have varying precision and scale. 1.5, 6.8, 4.25 are examples of decimal numbers. Height and weight are examples of values that could be stored using DECIMAL.
Date
MySQL comes with the following data types for storing a date or a date/time value in the database:
- DATE - format YYYY-MM-DD
- DATETIME - format: YYYY-MM-DD HH:MI:SS
- TIMESTAMP - format: YYYY-MM-DD HH:MI:SS
- YEAR - format YYYY or YY
Database tables
A MySQL database can be described as a collection of tables. Each table relates to a specific type of object. Tables are designed to hold all the required data and data types of the object. A table could relate to music tracks, cars, or to use the earlier example, students, staff, or classes. In a table, the following terms are used.
- Column, commonly called a field, represents a particular type of data on a table
- Row, also known as a record, contains specific data about a particular subject
This article from Microsoft includes a great introduction to tables.
Create Table
Run the following code to create a table.
        USE staff;
        CREATE TABLE employees (
            first_name VARCHAR(25),
            last_name VARCHAR(25),
            age INT,
            department VARCHAR(25)
        );
To learn more about he CREATE TABLE have a look at his w3schools page
Alter table
The ALTER TABLE command, as you may have guessed is used to alter a table by adding, removing, renaming or modifying the data type of fields, without destroying any data that exists in the table.
The ALTER TABLE command has a special set of sub-commands.
-
to rename a fieldALTER TABLE (tablename) RENAME ......; -
to add an extra fieldALTER TABLE (tablename) ADD ...; -
to remove a field (and discard all the contents)ALTER TABLE (tablename) DROP....; -
to change the datatype for a fieldALTER TABLE (tablename) MODIFY ....;
Drop table
In MySQL, the DROP command is used to delete fields, tables and databases. Dropping a table will remove the table and any data stored in it. You should not use DROP in production without first making a backup.
The syntax to Drop a table is
DROP TABLE tablename;
Working with Data in a MySQL Database
In the previous sub-top we created a table named employees in the staff database. Now we are going to add some data to that table and modify it.
Adding data to a table
To add data to a table, we use the INSERT INTO command, followed by a set of values. The syntax is as follows.
        INSERT INTO (tablename) (field1, field2, field3, field4)
        VALUES (value1, value2, value3, value4);
| first_name | last_name | age | department |
|---|---|---|---|
| Mesa | Loop | 30 | acct |
To add the data above to the table use the following command.
        INSERT INTO Employees (first_name, last_name, age, department)
        values ('Mesa', 'Loop', 30, 'Acct') ;
We previously used the USE command to define the database The following the following SQL command will be run against. Without the USE command tables can be referenced in relation to theor database using database.tablename. For example
        INSERT INTO employees.staff () ;
        Is the same as
        USE employees ;
        INSERT INTO staff () ;
It is possible to add multiple records in the same command by adding additional value sets, separated by a comma.
        INSERT INTO Employees (first_name, last_name, age, department)
        values ('Mesa', 'Loop', 30, 'Acct'),
             ('Smith', 'Oak', 27, 'Devl');
Values are added to the fields in the table in the order they are defined on the first line of the INSERT command.
Activity
Create a command that will INSERT all of the following data.
| first_name | last_name | age | department |
|---|---|---|---|
| Mesa | Loop | 30 | acct |
| Smith | Oak | 27 | Devl |
| John | Jorz | 27 | QA |
| Harry | Gaga | 32 | QA |
You can reveal the solution below.
        INSERT INTO Staff.Employees (first_name, last_name, age, department)
VALUES
    ('Mesa', 'Loop', 30, 'Acct'),
    ('Smith', 'Oak', 27, 'Devl'),
    ('John', 'Jorz', 27, 'QA'),
    ('Harry', 'Gaga', 32, 'QA');
/
Retrieving Data using SELECT Statement
Run the following command to retrieve and display all the records stored in the Employees table. “*” is shorthand for “all columns”.
SELECT * FROM EMPLOYEES;
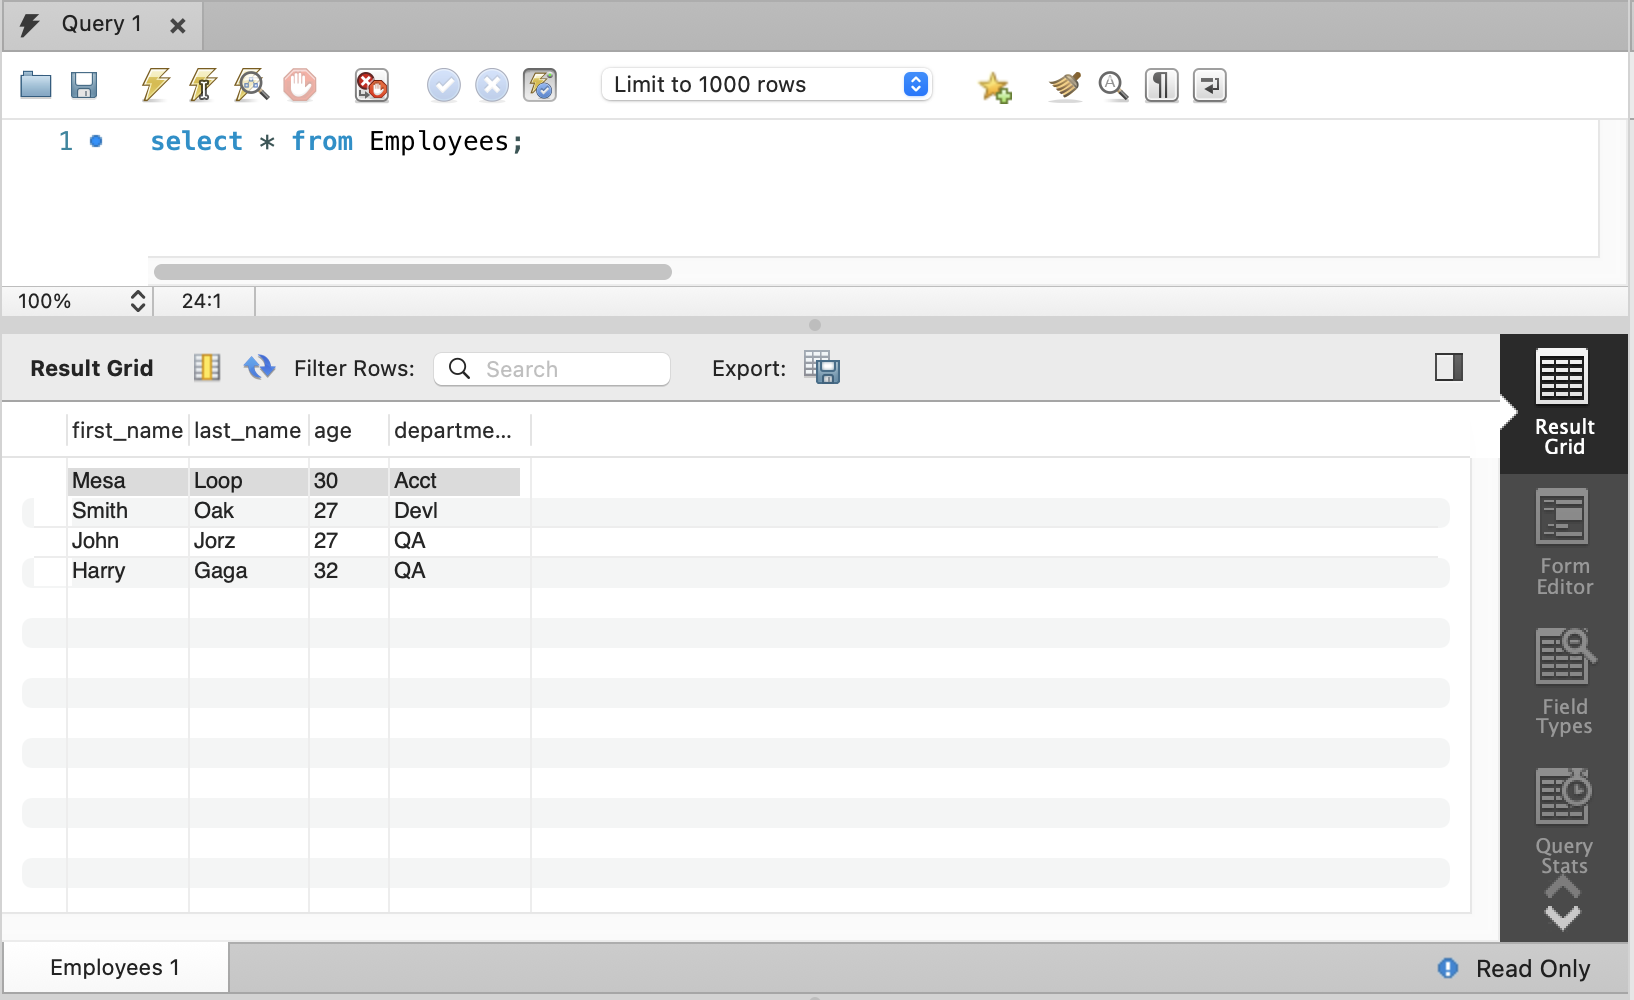
This should verify that all the data has been entered correctly. If you have duplicates, they may be because of running some of the previous commands more than once.
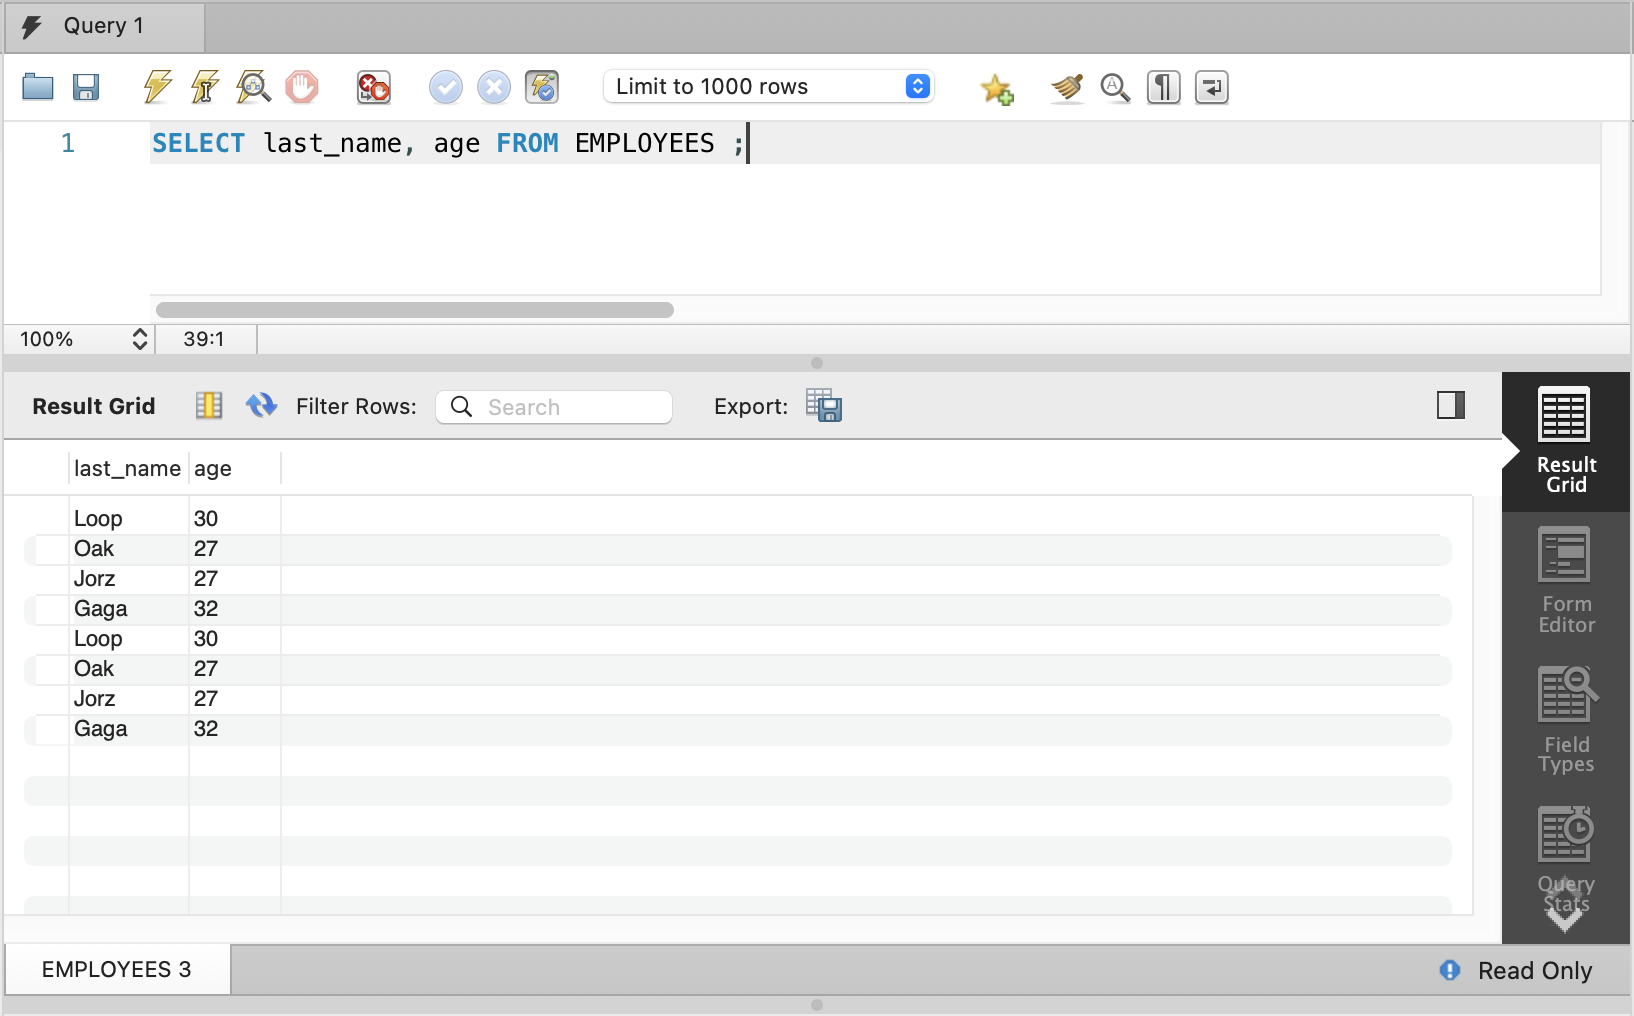
You can limit the retrieval to specific columns by specifying them in the command. For example, to retrieve only the last names and ages of the employees try the following.
SELECT last_name, age FROM EMPLOYEES ;
Filtering the results
When we are retrieving data from a table, we’re often only looking for a specific subset of that data. For example, we may only want to retrieve the records of employees who are under the age of 30.
We can achieve this using WHERE followed by a condition as in the following command.
SELECT * FROM EMPLOYEES WHERE age < 30;
The above condition was “under 30” using the “less than” sign (<). Try each of the following conditions and check who is included in the results for each and why.
- Under 30 is <
- 30 or under is <=
- 30 or over is >=
- Over 30 is >
Modifying results
We rarely just want a list of data. We may want the maximum or minimum value or the mean (often called average).
Run the following code against the employees table
SELECT Max(Age) from employees;
This will return one result. What about
SELECT Max(Age), Min(age), Avg(age) from employees;
We can also use this to find out who the youngest employee is:
        SELECT first_name, last_name
                FROM employees
                WHERE age = (SELECT MIN(age) From employees) ;
This should return Smith Oak.
How would this command be modified to return the person’s age in the result as well?
The output can also be formatted to combine fields so try the following command.
        SELECT CONCAT(last_name, ', ', first_name) name, department
                FROM employees
                ORDER BY name ;
Updating Data Using UPDATE Statement
Periodically tables need to be modified. There may be input errors identified, name changes, organisational changes, or many other reasons why the data needs to be updated.
Run the following command.
        UPDATE employees
                                SET first_name = 'Melissa'
                                WHERE first_name = 'Mesa' ;
The output message should read
![]()
It is a good idea to run the SELECT command first with the WHERE statement before running the update command to ensure that going to modify the correct records.
Remember, when working with databases there is no “undo” command. You need to make sure to verify what the result of a change will be before you do it.
Deleting Data Using DELETE Statement
If Melissa leaves the company, it may be necessary to remove her record from the database. We can do this using the command DELETE FROM (tablename) WHERE (condition). For example.
        DELETE FROM employees
                           WHERE first_name = 'Melissa' AND last_name = 'Loop' ;
W3schools give you an opportunity to practice putting the command together. Do the “Test Yourself With Exercises”
Scripts save time by allowing an administrator to execute one or more commands at once. Scripts also play an import role in automation as they can be executed automatically on a schedule, month, daily or even hourly.
One of the most widely automated tasks is backing up the MySQL database. Even though often included in system wide backups databases often have their own backup systems so that, should data be accidently deleted can be restored from the database backups rather than having to access the system wide ones.
You should take some time to research scripts used to backup MySQL databases.
Understanding Simple Scripts
A script is a list of commands that are run together. To create a script you can either use the MySQL Workbench and save the commands or use a plain text editor like Notepad or Notepad++.
The file that is created should be saved with a “.sql” extention this will tell the system that the file contains an SQL script.
Writing Simple Scripts to Manipulate Data in a MySQL Database
It’s important to document any script you make. A great place to start is by including a comment at the beginning of the script.
Comments can be written between “/*” and “*/” tags. For example.
        /*
         *   Demo script to show how to document  - demo.sql
         *   Author:  (my name)
         *   Date:  (today's date)
         *
         */
You should include:
- What the script is for
- The file name of the script
- The name of the author
- The date the script was written
documentation helps other people read and understand the script. A well written script can be picked up by another administrator, they can read the comments and the code to understand what the script is for and how to update it if necessary.
Running Simple Scripts to Manipulate Data in a MySQL Database
To run a script requires the MySQL client to input the collected commands and process them sequentially.
There are several ways to run scripts. The simplest way is to import it into MySQL Workbench and execute it from there.
Another way is to collect the commands together into a plain text file using Notepad, Notepad++, or a tool like Visual Studio Code. The contents of the file may look something like:
        /*
         *   Script to create demo database (Purpose of command in script)  -  demo1.sql  (name of file)
         *   Script 1 of 3 to demonstrate how to run SQL scripts.  (notes about script)
         *   Author:  (Author)
         *   Date:  (today’s date)
         *
         *   The script will create the database and then list all databases so user can verify database
         *   has been created. (Overview of what script does)
         */
         CREATE DATABASE staff ;
         SHOW DATABASES ;
In this tutorial the MariaDB in XAMPP has been used to demonstrate MySQL. XAMPP installs a MySQL client called “mysql.exe” in the bin folder under MySQL. On a Windows installation the default folder is c:\xampp\mysql\bin. To run the client this folder can either be added to the Windows path or type the full path (i.e. c:\xampp\mysql\bin\mysql in a default installation).
When at the command prompt in the folder that contains the sql script there are two ways that can run the script:
1. Pipe the commands by using a “<” symbol. The command:
         C:\mysql>
         C:\mysql>c:\xampp\mysql\bin\mysql -u root < demo1.sql
Notice that in a command line have to specify the MySQL user otherwise will look to run it as the currently logged on user in MySQL. If the host is not specified it will try to connect to the local host. In the example above the root user does not have a password.
2. Start the client, and then run the script file using “\.”. This is a MySQL shortcut for the “source” command.
         MairaDB [(none)]> \. demo1.sql
         Query OK, 1 row affected (0.002 sec)
Within the client more feedback is provided to the user, including whether the script completed successfully or not.
Develop a simple client-server database application using MySQL and simple scripts to manipulate data.
Choose a topic of your interest and collect data on it. You will need to:
Decide what you are going to collect data on. For example.
- Music
- Games (electronic, board, or whatever)
- Books
- Computer parts
- Sports Teams
- Other interests
If you are unsure about collecting data random data can be created at sites like mockaroo.com. You can specify what fields want and how many records to create. Records will then be randomly generated.
Choose what going to collect about this thing. At the stage restrict it to one thing (table). If choosing music it may be “song tracks I have”
- List all the pieces of information going to collect
- Create a MySQL database for it
- Design the table (list fields and what type of information will be stored in each)
- Create the table
- Save these commands as a script because you will need to change something later on
- Start creating a new script to input the data into the table
- Collect about 10 records