Managing a successful payroll depends on the collection, storage and processing of a wide range of records and information. It may seem overwhelming but MYOB Business™ helps you to organise the payroll process and ensure that all records and requirements are accurate and up to date.
A Payroll system collects, calculates, stores, and provides information about employees' financial and non-financial compensation earned over the financial year.
A business can use a spreadsheet to track and calculate this information, but MYOB offers a more accessible and secure system to get the many tasks and activities done correctly.
The employee's hourly or salaried payroll details can be stored to record usual working hours, and a timesheets feature allows employees to submit their own hours. If their ours do not follow a consistent pattern or you pay them extras like overtime, allowances or bonuses, you can record this on their timesheets. Whether a business tracks time for employees depends on the employment contracts set up. You probably won't need to use this feature if your employees generally work fixed hours.
All things being usual, your employee's record (Salary and Wages tab) should show the correct number of hours for Base Hourly pay items considered the typical work week. The payroll administrator can record changes to that in the Hours field of the Standard Pay tab or while doing the pay run.
Timesheets1
Timesheets record:
- all the hours worked by hourly employees
- extra hours worked by employees (in addition to their standard pay).
Note: Employees can submit their timesheets via the MYOB Team mobile app — a great way to save time and add efficiency in managing payroll tasks. Learn more about the app.
MYOB tracks time using an optional feature called Timesheets. The Timesheets feature must be switched on before it can be used.
To turn on timesheets:
- Click your business name and choose Payroll settings.
- In the General payroll information tab, select the option Use timesheets to track employee hours.
- Specify the first day of your timesheet period from the Week Starts on [...] list, and enter the first day of your timesheet period. Note that if you only use timesheets for payroll and your pay period starts on a different day each period, for example, you pay monthly, you can select any day.
- Click Save.

Not all versions of MYOB Essentials have this feature. For more information about using Timesheets with the MYOB Team Mobile app to submit them, view this article at the MYOB help centre.
If you are attached to old-school ways of doing things or are working without a payroll system, a spreadsheet will be the next best thing. The example below shows a medium level of complexity in terms of separating overtime that has been worked and calculating gross wages. With moderate spreadsheet skills, worksheets can be created to provide data that could be inputted into a manual or computerised payment system to pay employees, store required data and create reports.

Running payroll can feel stressful, as it affects all employees simultaneously and is highly important for each recipient.
Answer these questions and see how much you already know about payday.
If you didn't do well, no worries – we'll go over everything in more detail.
This is an example of part of a pay slip generated by MYOB Business for their example employee, Harry Ford.

The pay run is about more than just paying employees
Creating a pay run involves three activities:
- Transferring the correct amount of pay to your employees using a bank file (.ABA) uploaded to your bank for processing.
- Reporting to the ATO on or before payday
- Giving your employees their pay slips within one working day of their payday.
To minimise pay run errors and enjoy a seamless payday, ensure you have completed the following set-up tasks before starting a pay run.
- Payroll details settings: set default super fund, complete General payroll information and edit your e-mail message for sending pay slips.
- Employee records and details are current and complete.
- Bank account details have been entered for each employee.
- Pay items have been created and assigned.
- STP - Your system is connected to the ATO for Single Touch Payroll reporting.
If you need to brush up on the tasks above, review the topics, Configuring the Payroll System (11.5) and Processing Payroll Data and Reporting (11.7).
The steps to payday success
Initiate and review the pay run
- Create a pay run
- Select pay period according to what has been set up. Is it weekly, fortnightly, or monthly?
- Calculate pays and click the right downward arrow next to all employees for each one that requires updates to their pay, such as uniform or travel allowances or variations from expected to actual hours. Changes made on this screen are only stored for this pay run. Also job codes can be assigned here to help keep track of expenses by job.
- Note: You can save the pay run by selecting the button Save and close. To open it again, select Payroll > Create Pay run and select Edit existing pay run. If changes have been made to an employee's settings after the first pay run was initiated, start a new one, which will abandon the first.
- Before recording the pay run, you may like to select the buttons Preview pay run activity and/or Preview pay details to review the accuracy of the data used for the pay run. The Preview pay details button will create a Payroll Verification Report. This can be reviewed and approved by your supervisor before recording the pay run.
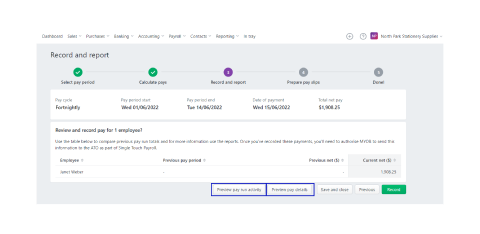
- Fix errors or irregularities — if there are any — before continuing. You may need to reach out to the employee directly, their supervisor, or another payroll officer to provide correct information so you can update the system.
- Record the pays when you are ready, by selecting the green button.

Send pay run data to the ATO2
- Declare and send payroll information to the ATO
- If you have not already connected to the ATO, save and close the pay run and follow the steps to set up STP with the ATO for reporting.
- Go to Payroll > Payroll Reporting
- Click Connect to ATO
- If prompted, click Check Payroll Details to fix any issues with your setup.
- Click Start and follow the prompts to complete the ATO connection.
- Here are a few links that provide additional detail: Single Touch Payroll and Connect to the ATO for STP.
- Provide a declaration by adding your name to the Authorised Sender field, indicating you have authorisation to submit the information and it is true and correct then click Send.
- If you have not already connected to the ATO, save and close the pay run and follow the steps to set up STP with the ATO for reporting.
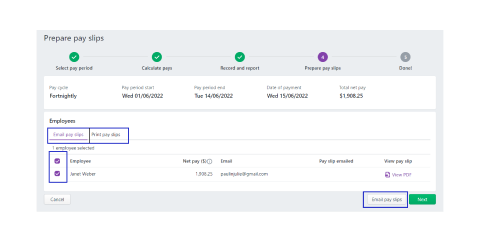
Pay employees with a bank file or electronic payment and send them payslips3
This part of the process will create a single (.ABA) document containing the payment information for all employees, which is submitted to the bank to pay them directly.
Payslips are also generated at this point and can be sent via email or printed.
To Print or email payslips:
- Note: Select View PDF on the employee's line to preview a copy of the pay slip before sending it.
- Ensure the employees to include on this payroll run are selected and choose either Email pay slips or Print pay slips. An example of emailing payslips is shown here.

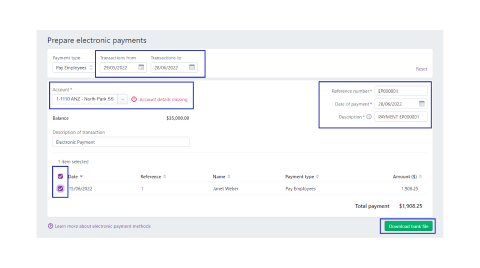
To Record and save the bank file3:
- After sending the payslips, click Next
- Note: You can choose to do this another time by going to Payroll (or Banking) > Prepare electronic payments or you can choose to view the STP reports by selecting Payroll reporting (STP).
- Otherwise, to do this now, select Pay employees via electronic payments.
- Important: Before submitting the file to the bank, ensure all of the employees' BSB and account numbers are correct. You may not be able to recover a payment made to the wrong account!
- Review the data:
- Check that the date of Transactions shown at the top left is correct for this pay run.
- Check the bank account number is correct in the Account field. Note any alerts that may indicate missing information as shown below.
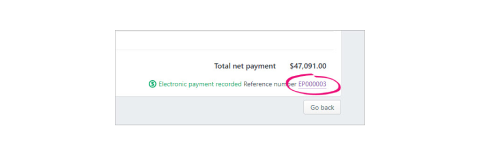
- You can enter a reference number and description in the top right fields.
- Ensure the Date of Payment shows the correct date for the withdrawal.
- If you'll be downloading a bank file to make your payment, you can future date the Date of payment providing it's within the current financial year. This is the date you want your bank to process the payment, but not all banks adhere to future dating bank files. Check with your bank for clarification. If you'll be making a direct payment, the payment will be processed based on when it's authorised.
- Optionally, enter a Description of transaction (such as Electronic Payment as shown below.) This is the description that will appear on the bank statement.
- Use the toggle ALL checkbox to select all of the employees, or individually select the relevant people using the checkbox next to their names.
- Click the green button to record and download the .ABA file.
- When prompted Save the file. Using the default name will help ensure you upload the correct file to the bank.

Deliver the payment information to the bank
Upload the .ABA bank file to your bank’s online business banking portal so your bank transfers the money to your employees at the right time.
Paying via Direct Payment3
Instead of downloading the .ABA file, complete these steps after #6 in the instructions above. You an only complete this if you have previously set up direct payments.
- Click Direct payment. (It will only show up if you have previously set it up.)
- At the confirmation, click Record and submit.
- The payments will now need to be authorised before they can be paid into your suppliers' and employees' bank accounts.
- Note: When you set up direct payments, you'll have set up a mobile phone to allow payments to be authorised securely — either via the MYOB Secure app or via SMS. Have this phone handy to authorise your payments.
- 1. If you are not already there, Go to Banking (or Payroll) > Prepare electronic payments.
2. Click Manage direct payments in the top right corner
3. If prompted, sign in to our MYOB account
4. Click the business you are setting up for direct payments
5. The payment portal appears. Payments to be authorised appear on the Batch payments tab with a status of Needs authorisation.
6. Click the payment to be authorised. The details of the payment are displayed.
7. Click Authorise.4- If you're using the MYOB Secure app, open the app and tap Allow to authorise the payment.
- If you're set up for SMS authorisation, you'll receive a code via SMS. Enter this code into the payments portal when prompted.
- In the payments portal, your payment appears with a status of Processing. Once it's been processed, its status will change to Processed.
To view a payment's status
- Follow steps 1-4 above.
- Click the Batch payments tab. A list of electronic payments appear with their statuses.
- Click the Batch name for a payment to see its details.
| Status | Description |
|---|---|
| Needs authorisation | The payment is yet to be authorised. |
| Processing | The payment has been authorised and is being processed by the bank. |
| Processed | The payment has been cleared by your bank and sent to your payees. |
| Errors |
The payments portal has encountered an error. Click payment to view the error message for information on what caused the error. If you can't fix the issue in the payment that caused the error, you'll need to contact MYOB's support team for help, by either:
|
You can learn more about using direct payments at MYOB's help centre, including how to change the authoriser, future dated payments, and disbursement information.
You may also like to review the entire process of creating a pay run on this video tutorial:
Video Walk through
Read through the following scenario and then follow along the walkthrough as you do a pay run for IckyLeaks employees, Paula and Jeff.
Scenario:
IckyLeaks' pay day is fortnightly on a Thursday and it's time to pay Paula and Jeffery.
No changes are required for Jeffery's pay. As usual, Paula is paid her travel allowance.
The Payroll officer, Steve, will need to create a bank file that he can upload to his bank so funds can be transferred to the employees. He will also email payslips to them.
Take some time to see how all this would be done in MYOB Business. Once you have done that, follow and interact with this video walkthrough.
Changing or deleting a pay5
Whether it's an overpayment, an underpayment or something else in a recorded pay that needs fixing, there are options. A pay can be:
- deleted or reversed
- adjusted on the employee's next pay
- recorded as a separate pay for the adjustment at the next pay run.
The best course of action will be dependent on whether the bank file and STP files have been submitted.
Note: If all employee pays for a pay period in a pay run need to be deleted or reversed, you'll need to delete or reverse each employee's pay individually.
A pay can only be deleted or reversed if:
- it's not part of a processed electronic payment
- it's not part of a Pay Super Payment.
For pays that have been submitted to the ATO via STP, the status of the report submission determines if you can delete the pay or if you'll need to reverse it instead. To see the status, go to the Payroll > Single Touch Payroll reporting > STP reports tab.

This video provides information about determining the best method to fix an error.
How to fix incorrect pays5
Note: If the pay to be deleted or reversed is included in an electronic payment transaction, the electronic payment transaction must be deleted first.
Leave or super amounts: To fix a pay that contained the wrong leave or super amounts, you can either:
- make the adjustment on the next pay by increasing or decreasing the leave or super, or
- record a new pay for the adjustment
PAYG amounts: To fix a pay where the wrong amount of PAYG tax was withheld, work out how much PAYG tax has been overpaid or underpaid, then adjust the PAYG on the employee's next pay.
Alternatively, you can create a separate pay for the adjustment and enter the adjustment value against the PAYG Withholding category. Remember to zero out all other hours and values on the pay.
If the employee had overpaid PAYG, enter the adjustment as a negative value. If it's to adjust an underpayment, enter a positive value.
Overpayment: If an employee has been overpaid an adjustment can be made on their next pay to pay them less (to counter the overpayment).
- Reduce the Hours or Amount as required for the pay item that was overpaid.
- You can also use the Pay slip message field on the employee's pay to enter a note about this payment.
If the employee has paid back the overpaid amount, delete or reverse the incorrect pay (see below) then record it again with the correct amount.
Underpayment: If you've underpaid an employee you can:
- make the adjustment on the next pay, or
- record a new pay for the adjustment.
If you enter a new pay for the adjustment, enter the adjustment value against the hours or amount for the pay item that was underpaid. Remember to zero out all the pay items that you're not adjusting. The net pay amount should be equal to the underpayment.
If the pay you need to change is in a payroll year that's been finalised with the ATO, see the section below about Changing a pay after finalising with Single Touch Payroll.
How changing a pay affects STP5
With STP, employees' year-to-date (YTD) figures are sent to the ATO after each pay run. So if changing an employee's pay affects their YTD figures, it will be updated with the ATO the next time a pay run is completed.
If it is necessary to remove or "undo" a pay that has been sent to the ATO, check the status in the Payroll Reporting Centre. For example, a pay can be deleted if its status is Rejected, but if the status is Accepted you can only reverse it. This ensures you're not deleting anything which has already been accepted by the ATO. Pay runs will remain listed in the payroll reporting centre even after deleting or reversing a pay in MYOB.
Steps to delete or reverse a Pay
- Go to the Payroll > Pay runs.
- Click the Date of payment to display the details.
- Click the name of the employee whose pay you want to delete. Based on the status of the pay run in the Payroll Reporting Centre, you'll have the option to either delete or reverse the pay. See above for more details.
- Click Delete or Reverse Pay (the option available will show)
- This shows the Delete option.

- At the confirmation message, click Delete or Record Reversal.
- When prompted to send your payroll information to the ATO, enter the relevant details and click Send to submit the reversal to the ATO. The employee's year-to-date payroll amounts are updated accordingly.
- This shows the Delete option.

The steps to delete a payroll electronic payment transaction5
Note: This only deletes the electronic payment transaction in MYOB but doesn't affect your actual bank accounts.
An electronic payment can only be deleted if:
- the electronic payment was a direct payment that has not been authorised, or
- the electronic payment was a bank file that has not been uploaded to your bank for processing.
- Go to the Banking menu and click Find transactions.
- On the Debits and credits tab:
- Enter a date range that includes the pay date in the Date from and Date to fields.
- In the Account field, choose the Electronic Clearing Account.
- Click the Reference no to open the pay transaction.
- In the lower right corner, click the electronic payment reference number.
Details of the electronic payment are shown, including all payments within the electronic transaction. - Click Delete.
- At the confirmation message, click Delete. All the payments included in the electronic payment are now listed again on the Prepare electronic payments page.

The pay can now be deleted or reversed, or the electronic payment can be processed again.
To record the updated pay
Record the updated pay by doing a new Pay run (correcting whatever was wrong in the pay that was just deleted or reversed) and report it to the ATO, which lets the ATO know about the updated details.

When an employee leaves the business, several things must be done to manage the change. All of the activities at this point involve paying the employee’s final wages and salary and paying out their annual leave balances. It is advisable to make two separate payments for those items to keep communication clear about what has been paid and why. An Early Termination Payment (ETP) may also be required, which would be the third payment.
6Depending on the employee's workplace agreement and their reason for leaving, there may also be other payments you'll need to finalise, such as:
- unused long service leave
- redundancy
A note about Rules, tax and other complexities
Final pays can get complicated, and no two are exactly the same, so we recommend consulting with an accounting advisor about the specifics of a final pay. To learn about tax on final pays, see this ATO information. For the rules, calculators and other final pay resources, check the Fair Work website.
Tasks required to manage final pays in MYOB Business:
- Process a final payment for regular pay.
- Manage leave balances and payment.
- Deactivate the employee.
- Report the termination to the ATO.
- Processing an Early Termination Payment
1. Process a final payment for regular pay6
If the employee is owed any pay for the current pay period (up until and including their final day at work), process this like a normal pay. Their hours or salary may need to be adjusted and the tax withheld because this will likely be a shortened pay period for the departing employee.
Remember - this is only their final regular pay and won't include any unused leave (which we'll cover below).
Processing this final pay ensures all applicable leave is accrued up to the employee's last day. Keeping this pay separate from any unused leave payment is a good way to show exactly how the final payments break down.
2. Manage leave balances and payment
Determine how much paid leave the employee is owed:
- To Go to Payroll > Employees.
- Click the employee's name.
- Click the Payroll details tab.
- Click the Leave tab.
- Take note of the total hours of accrued leave that you'll need to pay out, such as annual leave.
What about long service leave? Long service leave rules vary from state to state, so if you need help working out a payment for unused long service leave, speak to your accounting advisor.
Set up unused leave pay items6
Pay items need to be set up for each type of unpaid leave paid out to the employee. Not only does this make it clear on the employee's pay slip what they're being paid, but it ensures superannuation and leave isn't accrued on the unused leave payments.
- Go to the Payroll > Pay items.
- On the Wages and salary tab, click the Unused Annual Leave pay item. If this doesn't exist, click Create wage pay item to create it.
- Enter or confirm the details of this pay item.
- For a more personalised name for this pay item on the employee's pay slip, enter it in the Name for pay slip field.
- Set the Pay basis to Hourly.
- Choose the applicable ATO reporting category. If unsure, check with the ATO or an accounting advisor.
- Set the Pay rate to Regular rate multiplied by and make sure the rate is 1.0000
- Under Employees using this pay item, choose the relevant employee
- Click Save.

Repeat steps 2-5 above for any other accrued leave that needs to be paid out to the employee, such as unused long service leave calculated in the previous section.
Prevent super and leave accruing on unused leave payments6
Typically super and leave shouldn't be calculated on unused leave payments. Your MYOB business file might already be set up to prevent these calculations, but you should check to make sure.
To prevent super from accruing on unused leave payments
- Go to Payroll > Pay items.
- Click the Superannuation tab.
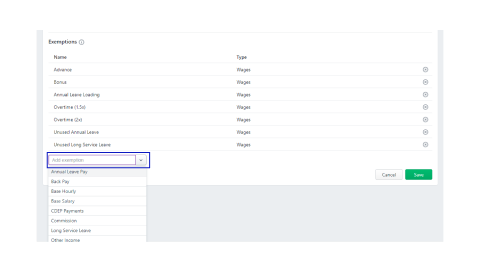
- Click the Superannuation Guarantee pay item.
- Under Exemptions, make sure all the unpaid leave pay items that you set up earlier are listed. If they're not, click the Add exemption dropdown arrow and choose the relevant exemptions.
- Click Save.

Repeat steps 3-5 for each superannuation pay item that applies to the employee.
NOTE: If you are unable to click Add exemption it means the superannuation pay item isn't set up to calculate as a percentage of wages. In this case, manually remove the superannuation amount when the unused leave is paid.
To prevent leave from accruing on unused leave payments6
- Go to Payroll > Pay items.
- Click the Leave tab.
- Click the Annual Leave Accrual pay item.
- Under Exemptions, click the Add exemption dropdown arrow and choose the unpaid leave pay items you set up earlier.
- Click Save.
Repeat steps 3-5 for each leave accrual pay item that applies to the employee.
NOTE: If you are unable to click Add exemption it means the leave accrual pay item isn't set up to calculate as a percentage of wages. In this case, manually remove the leave accrual amount when the unused leave is paid.
Pay unused leave6
You can now pay the employee their unused leave.
- Start a new pay run for the employee.
- Select the employee and click the down arrow to view their pay details.
- Enter the hours of leave being paid out against the applicable unused leave pay item. For example, if the employee is being paid out for 10 hours of unused annual leave, enter 10 hours against the Unused Annual Leave pay item.
- Make sure all other hours and amounts are removed from the pay. Super and leave shouldn't calculate on this pay.
- If required, click into the PAYG field and change the amount. (This ATO article might help).
- Finish processing the pay as normal.
3. Deactivate the employee6
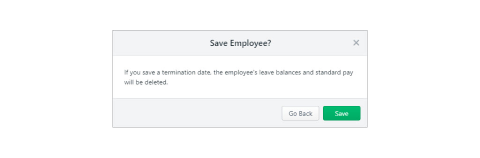
When you enter a Termination date for an employee, their leave balances and standard pay details are automatically deleted because you no longer need this information.
- Go to payroll < Employees.
- Click the employee's name.
- Click the Payroll details tab.
- On the Employment details tab, enter or choose the Termination date.
- Click the Contact details tab.
- Select the option Inactive employee.
- Click Save.
- Click Save on the message confirming the termination.

Important! If the employee will receive an Early Termination Payment, this task must be completed after you do the pay run that creates the EPT payment for the employee. Instructions for making the ETP payment are shown later in this section.
4. Report the termination to the ATO
As part of STP reporting, the ATO must be informed that the employee has ended their employment. Specifically, they need to know:
- the employee's end date
- that you won't be paying the employee again this payroll year (known as finalising).
To provide the employee’s end date6
- Go to Payroll > Single Touch Payroll reporting.
- Click the Employee terminations tab.
- Choose the applicable Payroll year and click Add Termination.
- Enter the termination details and click Notify the ATO
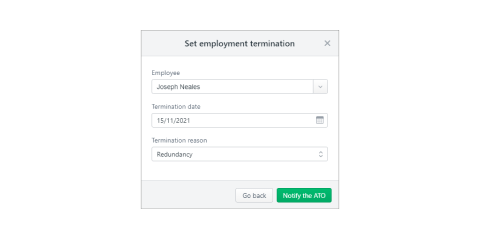
- When prompted to send your payroll information to the ATO, enter your details and click Send.

If the employee returns to work, follow these instructions to reactivate an employee.
5. Processing an Employment Termination Payment (ETP)
And because the EPT will be reported to the ATO via STP, all that needs to happen is set up ETP pay items and do a pay run.
This section assumes you have already paid the employee their final regular pay and annual leave accrual amount.
Set up ETP Pay items
Before processing the ETP, ETP pay items must be set up. These pay items will be assigned to the employee who's leaving but can be re-used whenever an ETP is required.
ETPs can be made up of taxable and non-taxable pay items, and tax-withheld deductions. Note, however, that all three pay items may not be required for each ETP.
Creating the ETP taxable and non-taxable earning7
- Go to Payroll > Pay items.
- Click Create earning. The Create new earning window appears.
- Choose ETP from the Type dropdown box. If ETP isn't listed, make sure you're set up for Single Touch Payroll reporting.
- Enter a Name and Name for payslip. By giving it a meaningful name, such as ETP - Taxable or similar it is easily found in earnings lists and can be identified on payslips.
- In the Rate dropdown, choose Fixed.
- Enter 0 in the Amount $ field. You can change the amount when you process an ETP pay run.
- In the Tax field, choose Taxable or Non-taxable as appropriate. The ATO reporting category is automatically set to ETP – taxable or ETP-Non-taxable based on the tax field.
- Click Save.
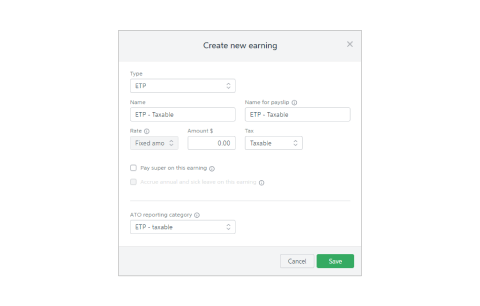

This is a screenshot of the Taxable earning pay item
Creating the ETP tax-withheld deduction
- Go Payroll > Pay items.
- Click Create deduction. The Create new deduction window appears.
- Choose ETP from the Type dropdown box. After choosing ETP, the Tax field is automatically set to After tax, and the ATO reporting category is automatically set to ETP - Tax withheld
- Enter a Name and Name for payslip. By giving it a meaningful name, such as ETP - Tax withheld or similar it's easily found in earnings lists and identified on payslips.
- Enter 0 in the Amount $ field. You can change the amount when you process an ETP pay run.
- Click Save.
Superannuation on ETPs7
Generally ETPs don't attract superannuation, but this will depend on the ETP you're paying. To get clarification, check with your accounting advisor or speak to the ATO. The ATO also has a page showing a List of payments that are ordinary time earnings.
If an ETP does not attract superannuation, you'll need to prevent super from calculating on the ETP pay items you've just created.
To prevent super calculating on an ETP7
- Go Payroll > Pay items
- Click the Superannuation tab.
- Click to open the superannuation pay item to be excluded from the ETP, for example Superannuation Guarantee.
- Under Exemptions, click Add exemption and choose the ETP taxable pay item.
- Click Add exemption again and choose the ETP non-taxable pay item.
- Click Save.
Repeat for any other superannuation pay items to be excluded from the ETP.
Process an EPT pay run
After ETP pay items have been set up and assigned to the terminated employees, then a pay run can be initiated to pay the ETP.
Note: If the employee has already been made inactive during the termination process, they will need to be reactivated on the Payroll > Employee > Contact details page.
To process an ETP7:
- Start a new pay run.
- Click the dropdown arrow for the relevant employee to view their pay details.
- For any non-ETP earnings or deductions, enter 0 in the Hours or Amount column. This is because you should only pay ETPs in this pay run.
- Enter required amounts against the applicable ETP pay items.
- Click the Select ETP code button. The Employment termination payment benefit (ETP) code page appears.
- Select a Benefit type from the dropdown list and choose a Benefit code. If unsure, check with your accounting advisor or the ATO.
- Clear all other hours and amounts from the pay. This ensures only the ETP amounts are paid and no super or leave is accrued on this pay.
- When you're finished, click Save.
- Click Next.
- Review the pay cycle, pay dates and the total net pay. When you're ready, click Record.
- When prompted to send your payroll information to the ATO, enter your details and click Send.
- Email or print pay slips. Need to change an employee's pay slip delivery method?
- On the Email pay slips tab, select the employees requiring their pay slips to be emailed then click Email.
- On the Print pay slips tab, click the document icon to display the employee's pay slip in a new window. You can now save or print the pay slip.
- Click Next.
- Finally, you can click Pay employees via bank file to create a bank file to pay the ETP directly into your employee's bank account.
- When you're done, click Close.
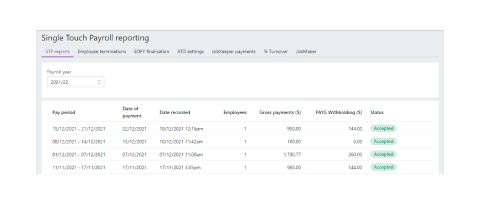
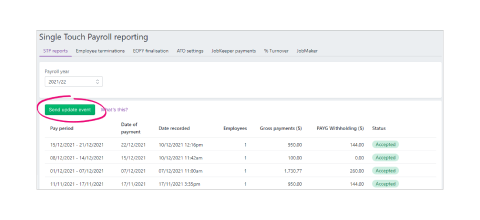
8You can view your submitted payroll reports in the STP reporting centre:
Go to Payroll > Single Touch Payroll reporting > STP reports tab and click a report to see more details.
On this page you can:
- view submitted STP reports (one report per pay run)
- send an update event to the ATO to sync payroll data (STP Phase 2 only)
- download a PDF report showing what has (and hasn't) been sent to the ATO
- send payroll reports that are yet to be sent (those with a status of Not Sent)
- view the ATO's response to a submission (to help work out why a report was rejected
To send an event update8
Syncing your payroll totals in MYOB with the figures held by the ATO is a quick way of ensuring the ATO has the current year-to-date payroll figures for your employees.
If you're reporting via STP Phase 2, you can send an update event from the STP reporting centre. Otherwise you'll need to record a zero dollar ($0) pay for each employee whose year-to-date payroll totals you want to send to the ATO.
Note: To find out if you are reporting in STP Phase 2, open a wage pay item (Payroll > Pay items > click to open a wage pay item). If there's only one ATO reporting category field, you're on STP Phase 2. If there are two ATO reporting category fields, you're on STP Phase 1 — which is okay.
Sending an update for STP Phase 29
- Go to Payroll > Single Touch Payroll reporting.
- Click the STP reports tab.
- Choose the applicable Payroll year.
- Click Send update event.
- When prompted, enter your details and click send.

Sending an update for STP Phase 1
You can send an update event for an employee by recording a $0 pay. This type of pay is also called a void pay and it's like any other pay, but you'll enter zero for all hours and amounts.
When you record a $0 pay, the employee's latest year-to-date payroll totals will be sent to the ATO.
- 9Start a new pay run (Payroll > Create pay run).
- Ensure the Date of payment is in the payroll year you're sending the update event for.
- Select only the employees you want to send an update event for.
- Remove all hours and amounts from each employee's pay, like in the example below.
-
Complete the pay run as you normally do and declare it to the ATO.


To download the report as a PDF
- Go to payroll > Single Payroll Payroll reporting.
- Click the STP reports tab.
- Click the report you want to view.
- Click View Employee YTD report (PDF). The report downloads and displays in a new browser tab.
What the report shows
The report has two parts identified with these headings:
- Payroll reporting - employer pay period - if the report has been accepted by the ATO, this part of the report shows the amounts that have been submitted for the pay period (pay run).
- Payroll reporting - employee year-to-date - this shows the year-to-date amounts submitted to the ATO for each employee that was paid in this pay period (pay run).
- View a description of the report statuses.
To view the ATO response8
If a report you've sent to the ATO is rejected, you can view the ATO's response to find out why.
- Go to Payroll > Single Payroll Reporting.
- Click the STP reports tab.
- Click the report you want to view. Details of the ATO's response are displayed.
Some reporting is done at the end of every pay period or month. The ATO uses the financial year for Payroll Reporting.
End-of-year Payroll Reporting

In years past, you may have heard this was a complicated activity, but using Single Touch Payroll with MYOB makes this task easy and quick, as long as you have maintained a clean payroll system by rooting out and fixing errors as they occur.
Essentially, the ATA wants to know how much you have paid each employee over the financial year period of July 1 of the previous year to June 30 of the current year. Each time your pay run goes through the STP process, year-to-date payment totals are included — so for the most part, this task has been done already. Employees can go to their myGov account to see their total pay at any time throughout the year.
You now need to let the ATA know there won't be any more payments from the business before the end of the year, called finalising. Once that is done, employees have the right to prefill and lodge their tax returns at myGov.
You may have heard of the terms PAYG Payment summaries, and EMPDUPE files, but those administrative tasks have been replaced with the end-of-year reporting that happens automatically by using STP. Payment summaries do provide the business with useful information, but are not required at the end of the payroll year.
Important Dates
- Determining when to finalise is based on the payment date.
- Pay date prior to and including June 30 →Include payment in current year.
- Pay date after July 1 → Do not include this pay until next year.
- Before 30 June: Pay Superannuation Guarantee Contributions (SGC) so that the payments are received by 30 June to qualify for a tax deduction.
- Before 14 July: Finalise payroll information to keep your employees and the ATO happy.
If an employee leaves the business during the year, you can finalise their payroll information at any time. Just make sure it's done before 14 July. - Extension: A business may apply for an extended date directly with the ATO.
Before you finalise
There are a few tasks that need your attention before you finalise your payroll with Single Touch Payroll (STP). Getting them done will mean a smoother end of the payroll year.
- Finish entering all of your pays for June.
- Fix any incorrect pays by:
- adjusting the employee's next pay, or
- recording a separate pay for the adjustment, or
- delete or reverse the pay and start again.
- Check that all pay runs sent during the payroll year have been accepted by the ATO.
- Ensure you have already notified the ATO of any terminated employees within Single Touch Payroll reporting.
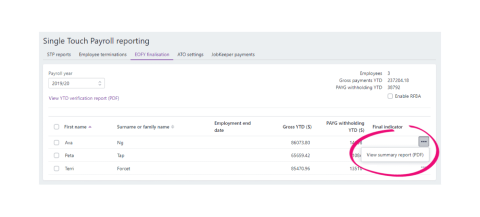
- Check the Year-to-Date (YTD) verification report to ensure that reported totals for all employees for this payroll year are correct.
- Go to Payroll > Single Touch Pay Reporting > EOFY Finalisation
- Click View YTD verification report (PDF) to see the total YTD amounts that have been reported to the ATO for all employees.
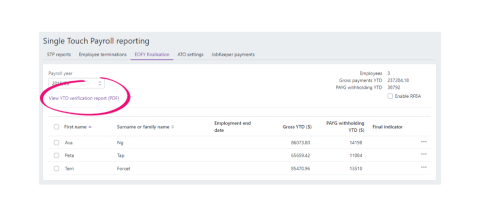
- Go through and click View summary report (PDF) for each employee to see the total YTD amounts that have been reported to the ATO. The total of all these individual employees' Summary of Payment reports is what is reported in the TTD verification report.
- Compare payroll register and activity reports. Do this before the first pay run of the new financial year.
- 9Go to Reporting > Reports.
- Click the Payroll tab.
- Click to run the Payroll register and Payroll activity reports.
- Set the date range of each report as the entire payroll year, e.g. 1 July 2021 - 30 June 2022.
- Compare the totals at the bottom of each report. If they match, great! You're ready to continue with your finalisation process as described in the next task.
- Note: Often the reason for a discrepancy is that an employee's pay history has been manually altered, commonly done when entering opening balances. It's time to investigate and fix before moving on.


If employees are missing from the finalisation list
Employees will only show in the list for finalising if they have been paid in the current payroll year.
So if they are missing, it's best to check the following:
- At least one pay for them — in this payroll year — has been recorded after setting up STP.
- The Employment Basis has been set for the employee to Full time, Part-time, Casual or Labour hire.
If the Employment Basis is set to Other, the employee won't appear in the list.
If everything checks out but they are still not showing, record a $0.00 pay for them. This will push their YTD amounts to the ATO again and then your employee(s) will appear in the finalisation list.
What to do if the YTD verification report is incorrect
- The culprit is often ATO reporting categories
- Make sure all payroll categories have been assigned the correct ATO reporting category.
- If you make changes to the ATO reporting categories, remember to process a 0$ pay to update your STP details for the affected employee.
What gets reported when
Reported with pay runs
- Gross payment - this amount is reduced by any salary sacrifice amounts and pre-tax deductions or wages
- PAYG withholding
- Superannuation Guarantee Contributions (SGC)
- Reportable Employer Superannuation Contributions (RESC)
- Employment Termination Payments (ETP)
Reported at finalisation
- Reportable Fringe Benefits Amounts (RFBA)
- RFBA that is exempt from Fringe Benefits Tax under section 57A
Find out more about RFBA from the ATO: Fringe benefits tax - ATO guide for employers.
Finalise and notify
Finally all the payroll records indicate everything is in order, and the final steps can be put in place to put the payroll year to bed.
- Go to Payroll > Single Touch Pay Reporting
- You should see that all Pay runs have been Accepted by the ATO
- Click the EOFY finalisation tab
- Ensure the Payroll year shows correctly
- For a final check, select the View YTD verification report and ensure the Gross Payments and the PAYG Withholding amounts match those amounts on the previous screen, shown here, circled in the right corner.
- If you have Reportable Fringe Benefits Amounts (RFBA), you can enter them now. Click the checkbox next to Enable RFBA and note the two extra columns that appear.
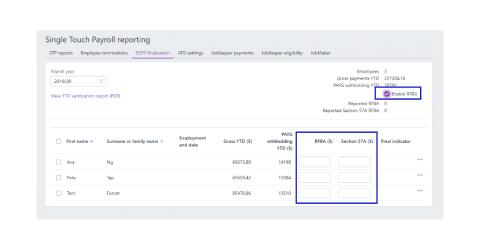
You can now report the RFBA (first new column) and the RFBA that is exempt from the FBT under section 57A (second new column). The total value of both these amounts must be above the threshold set by the ATO. - The job is nearly done. Select the checkbox to the left of First Name that will select all employees at once, or individually select the relevant employees.
- Click the Finalise and notify the ATO button that now appears
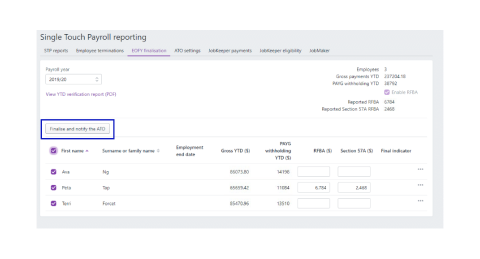
- Make the declaration of truth and authorisation by entering your name, which will complete the submission.


Each employee will now show a tick in the Final indicator column.
Now that you have been shown the steps here, go ahead and complete the interactive video walkthrough for Peta Tap and two other employees of IckyLeaks.
Try your hand at finalising the payroll by completing the interactive video walkthrough:
Changing a pay after finalising Single Touch Payroll10
Mistakes happen, and life is unpredictable. To change an employee's pay after finalising, you need to indicate this to the ATO by undoing the finalisation. Once you've made your changes, and updated the ATO about it, you can finalise again.
You might do this to:
- fix a pay
- prevent an employee completing their tax return while you investigate an issue
- update pay items or ATO reporting categories.
To do this, you need to:
- undo the employee's finalisation
- make the change and update the ATO
- re-finalise the employee.
1. Undo the employee's finalisation
Before you can change an employee's pay, you'll need to undo their finalisation. This lets the ATO know your payroll year information isn't complete. It also prevents the employee from pre-filling and completing their tax return.
- Go to Payroll > Single Touch Payroll reporting.
- Click the EOFY finalisation tab.
- Choose the applicable Payroll year.
- Select the finalised employee. Finalised employees have a tick in the Final indicator column.
- Click Remove finalisation and notify the ATO. This button only appears after you've selected a finalised employee.
- When prompted to send your payroll information to the ATO, enter your details and click Send.
2. Make the change and update the ATO
There's a lot that you may need to change depending on your scenario, such as pay amounts, pay items, superannuation or leave accruals. We can't cover all scenarios, but here are the basic steps for deleting or reversing an incorrect pay and recording it again.
Whether you can delete or reverse a pay is based on its status in the STP Payroll Reporting Centre. This ensures pays which have been accepted by the ATO can't be deleted. Instead, you'll only have the option to reverse the pay then report that reversal to the ATO.
| If the status is... | You can only... |
|---|---|
| Rejected or Not Sent | Delete the pay |
| Sent, Accepted, or Accepted with errors | Reverse the pay |
Delete or reverse the pay
Follow the instructions provided in the subtopic: Creating a Pay run
3. Re-finalise the employee10
- Go to Payroll > Single Touch Payroll reporting.
- Click the EOFY finalisation tab and choose the Payroll year you're finalising.
- If you need to report fringe benefits for an employee (what is this?):
- Select the option Enable RFBA.
- For each applicable employee, enter values for both:
- RFBA ($)
- Section 57A $ - The combined value of these must be above the thresholds set by the ATO.
- Select each employee you want to finalise, then click Finalise and notify the ATO.
- When prompted to send your payroll information to the ATO, enter your details and click Send.
The employee is now finalised again.
Invite an advisor into your account.11
If you find you need a helping hand, or someone to advise and review your work, you can invite them into your MYOB business.
- Click your MYOB business name, and choose Users.
- Click Create advisor at the top right
- Enter the advisor's Name and Email. The advisor will have the role of Administrator and the User Type of Advisor which gives them access to all businesses with this serial number.
- Click Save and send invitation. The invitation is sent to your advisor. A message appears next to the advisor's email address that the invitation is pending.
When the advisor accepts their invitation, they'll be prompted to log in with their MYOB account details or create an account.
Business Activity Statements (BAS) - An Overview
All businesses that have employees and/or are registered for GST need to lodge a BAS. The completed form provides information to the government about tax liabilities so if that expense has not been planned for, this time of year can bring with it some stress.
Any anxiety associated with BAS time can be more easily managed when you fully understand what activity statements are, when and if they need to be lodged and when they need to be paid by. If you have a system in place that prepares you for BAS time, the “red tape” process can actually be positive for you and your business.
What are activity statements?
Activity statements are issued by the ATO so that businesses can report and pay a number of tax liabilities on the one form at the one time.
There are two types of activity statements:
- an instalment activity statement (IAS)
- a business activity statement (BAS).
What is an Instalment Activity Statement (IAS)?
The IAS is the simpler of the two forms and is only issued quarterly.
On the IAS, the ATO tells you what your GST instalment amount is and where applicable what your PAYG instalment amount is.
If you are using MYOB, there is no need to print any reports or make any calculations. However, there certainly are benefits if you can accurately calculate your liability which will be explained in more detail shortly.
If the ATO considers you to be eligible for the IAS system, you will have the option to take advantage of this easier method on your September BAS — the first BAS of the financial year. If you elect this option, for each of the next three quarters you will simply be sent an amount that needs to be paid to the ATO.
Instalment activity statement (IAS):
A form similar to the BAS but without GST and some other taxes. Businesses that are not registered for GST, and individuals who are required to pay PAYG instalments or PAYG withholding (such as self-funded retirees), use this form to pay PAYG.
If you feel the instalments advised are too much or not enough to cover your liabilities, you may be able to vary the amounts. Alternatively, you may be in a position to wait until the end of the year and pay in one lump. In these situations, any adjustments for GST will be calculated when your annual GST return is lodged and any adjustments on PAYG will result in an amount payable or refundable when your income tax return is lodged.
If you’re paying the amount shown on the form, you do not need to physically lodge anything with the ATO. However, if you wish to vary the amount shown, you will need to lodge the form by the due date.
| Quarter | Due date |
|---|---|
| July – September | 28 October |
| October – December | 28 February |
| January – March | 28 April |
| April – June | 28 July |
What is a Business Activity Statement (BAS)?
Business Activity Statement (BAS) is a government form that all businesses must lodge to the Australian Tax Office (ATO). Like the IAS, it’s a summary of all the business taxes you have paid or will pay to the government during a specific period.
Most Australian businesses will lodge their BAS monthly, quarterly or annually.
What to include in a BAS
A BAS involves a bit more detail. They can include some or all of the following payments.
- Goods and services tax (GST)*
- Pay as you go (PAYG) income tax instalment*
- Pay as you go (PAYG) tax withheld
- Fringe benefits tax (FBT) instalment
- Luxury car tax (LCT)
- Wine equalisation tax (WET)
- Fuel tax credits
*Only those marked by an asterisk are included on the IAS.
BAS are issued by the ATO either monthly or quarterly. A form needs to be lodged with the ATO and payment made to the ATO by the due dates as follows:
- For monthly BAS: within 21 days of the end of the month on the form
- For quarterly BAS: as above for IAS.
BAS form examples
Download this example BAS and review the fields required. You will need to submit the PAYG withholding and instalments.
Download this BAS form for businesses that pay Fringe benefits (FBT) instalments. View instructions for completing each of the fields in this form.
Each business needs the BAS form that matches their financial requirements. This page indicates which form is required depending on what the business needs to report.
Fringe Benefit Tax (FBT)
The ATO does not notify employers of how much FBT is due. Each employer must calculate their FBT liability every FBT year (which runs from 1 April to 31 March). The FBT rate may vary from year to year.
The ATO provides instructions on how to lodge an FBT return. If a business has paid FBT of $3,000 or more for the previous FBT year it must make FTB instalment payments on BAS and complete the specific fields relating to FBT. These were published for the 2022 financial year.
This table provided by the ATO will help you calculate your Fringe Benefit Tax amount.
| Step | Instruction |
|---|---|
| 1 | Determine what type of fringe benefits you provide. |
| 2 | Work out the taxable value of each fringe benefit you provide to each employee. The rules for calculating the taxable value of a fringe benefit vary according to the type of benefit. |
| 3 | Work out the total taxable value of all the fringe benefits you provide for which you can claim a GST credit. |
| 4 | Work out the total taxable value of all those benefits for which you cannot claim a GST credit, for example, supplies you made that were either GST free or input taxed. |
| 5 |
Work out the grossed-up taxable value of the benefits by multiplying the total taxable value of all the fringe benefits you can claim a GST credit for (from step 3) by the type 1 (higher) gross-up rate. 'Grossing-up' means increasing the taxable value of benefits you provide to reflect the gross salary employees would have to earn at the highest marginal tax rate (including Medicare levy) to buy the benefits after paying tax. |
| 6 | Work out the grossed-up taxable amount by multiplying the total taxable value of all the fringe benefits you cannot claim a GST credit for (from step 4) by the type 2 (lower) gross-up rate. |
| 7 | Add the grossed-up amounts from steps 5 and 6. This is your total fringe benefits taxable amount. |
| 8 | Multiply the total fringe benefits taxable amount (from step 7) by the FBT rate to get the total FBT amount you are liable to pay. |
How do IAS and BAS help your business?
IASs and BASs can help you keep an eye on your business finances.
Since you need to track your income and expenses to be able to calculate your GST and other liabilities on your BAS, it makes sense to stay on top of it and track it consistently.
Waiting until the end of the quarter turns it into a much bigger job than it needs to be. It also means that there would be only four occasions yearly to make observations or small adjustments – such as setting aside the correct amount of money for the payment.
How to prepare and lodge your BAS
- Get everything up to date
Make sure that the system you are using is up to date. If that's MYOB, make sure all information is up to date and all bank feeds (if you use them) are imported, allocated and bank reconciliations done. - Print off your report
At the end of the week or month, print off the reports you'll need to prepare your BAS. Now you have an estimate of what you would have to pay should your BAS be due right now. - Check your bank balance
Ideally, you should have enough money in your business bank account to cover it. (This account could also be used to set aside employee obligations such as superannuation guarantee.) - Lodge online or via tax agent
You can lodge your BAS online through MyGov or through a registered tax agent. If you have an accountant or bookkeeper, this is a task that they can take care of for you.
READ: Top 10 common GST mistakes in BAS reports you’re probably making.
How to use MYOB to lodge a BAS
The help centre at MYOB provides detailed instructions on how to prepare and lodge your BAS or IAS.
Routine reports
The frequency and types of reports needed to monitor payroll activity, and ensure the payroll transaction history matches what actually happened, will be different for every business and depends on how often they report to the ATO and pay Super Guarantee. Diligence around reporting and reconciling differences will ensure that problems don't compound at the end of the year. Performing these reporting tasks in accordance with a solid Payroll Policy will ensure your business stays in compliance with legislative and management deadlines.
Routine reports for reconciliation
| Report Name | Frequency | Depending on... | Purpose |
|---|---|---|---|
| Payroll summary | Weekly, Fortnightly, or Monthly | pay frequency. | Summarised view of Payroll activities. |
| Payroll activity | Weekly, Fortnightly, or Monthly | pay frequency. | Detailed view of Payroll activities. |
| Payroll pay item transactions | Monthly or Quarterly | whether they report monthly (IAS) or quarterly (BAS) to the ATO. | Monitoring pay items to prevent errors from compounding. |
| Accrual by fund (detail) | Monthly, Quarterly, or Yearly | whether they pay Superannuation Guarantee monthly or quarterly. |
Monitoring and reporting superannuation contributions. |
Watch this MYOB tutorial to confirm your understanding before answering the questions below.