When approaching, securing, and protecting an animal in an emergency or first aid situation, following a careful and deliberate strategy is essential. Here are some key strategies to ensure a safe approach and protect the animal and yourself.
| Approach the Animal Calmly | Maintain a Safe Distance | Use Protective Equipment | Establish a Secure Area |
|---|---|---|---|
| Protect the Animal from Further Distress | Secure Your Position | Protect Others and Seek Help | |

One of the fundamental rules of safe animal handling is that safe distance is safe handling. Safe handling is safe distance. We need to maintain what is safe distance for the circumstances.Peaveler J. 2020
Safe and humane animal handling techniques and procedures

Before you can assess an animal to determine what first aid it requires, you must approach it and be able to handle it in a manner that is safe for both you and the animal. The techniques you use to approach, secure and handle an animal will depend largely on the species, its temperament and how familiar it is to being handled. However, there are a few common considerations to keep in mind and low stress techniques to use, regardless of the animal you are working with, such as:
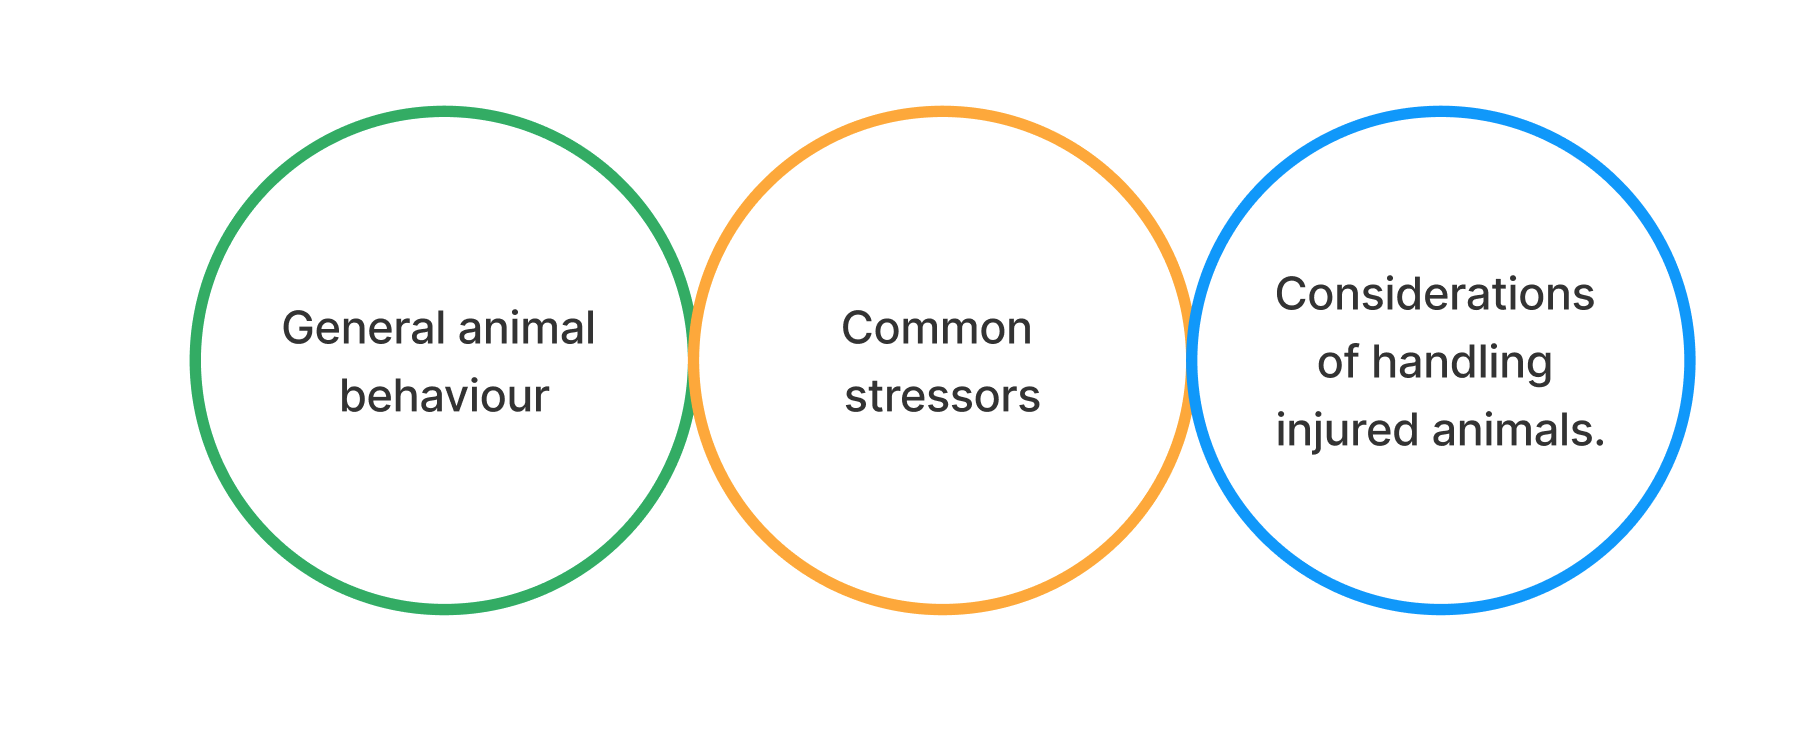
- General animal behaviour
- Common stressors
- Considerations of handling injured animals.
When handling an animal, it is important to remember that:
| 1. Understand Animal Behaviour and Body Language |
|
| 2. Approach the Animal Calmly and Confidently |
|
| 3. Use Proper Restraint Techniques |
|
| 4. Prioritise Safety with Protective Gear |
|
| 5. Create a Calm Environment |
|
| 6. Handle Specific Species with Care |
|
| 7. Practice Safe Lifting and Transport |
|
| 8. Provide Comfort and Reassurance |
|
| 9. Follow Safety Protocols for High-Stress Situations |
|
Some examples of Safe and humane animal handling techniques for different animals include:
Animal |
Safe and humane animal handling techniques |
|---|---|
| Dogs | - Approach calmly and let the dog sniff your hand. - Use a slip lead or harness to prevent pulling or lunging. - Support the dog's chest and hindquarters if lifting a small dog. - Use minimal restraint; avoid excessive pressure. |
| Cats | - Allow the cat to approach you and avoid sudden movements. - Use a towel for a "burrito wrap" to restrain gently without stress. - Use minimal scruffing only if necessary for control. - Provide a quiet environment to reduce stress. |
| Horse | - Approach from the side, keeping your movements calm and steady. - Use a halter and lead rope for control. - Avoid standing directly behind or in front. - Hold with one hand near the lead rope, keeping a safe distance if necessary. |
| Snake | - Approach slowly and avoid sudden movements. - Use a snake hook or protective gloves if necessary. - Support the snake's body evenly to avoid stressing or injuring it. - Avoid handling near the head. |
| Fish | - Use a soft net or wet hands when handling to avoid removing protective slime coating. - Avoid squeezing or pressing the fish's body. - Limit handling time to avoid stress. - Ensure the fish is kept wet when out of water briefly. |
| Bird | - Gently wrap smaller birds in a towel for minimal restraint. - Avoid squeezing the chest, as this can restrict breathing. - Handle wings carefully, supporting the bird's body. - Move calmly to avoid startling or stressing the bird. |
| Livestock | - Use a halter for large animals like cows and goats. - Approach from the side to prevent startling. - Use safe handling pens or chutes for movement control. - Avoid loud noises or sudden movements that could cause stress. |
| Rabbit | - Support the rabbit's hindquarters and body to prevent injury. - Use a towel wrap if the rabbit is nervous or prone to kicking. - Approach from the side rather than above, as rabbits are prey animals. - Keep the handling calm. |
| Guinea Pig | - Approach slowly and gently scoop up, supporting its entire body. - Avoid loud noises and sudden movements, as they stress easily. - Hold close to your body for security. - Limit handling time to reduce stress. |
Animal behaviour

Safe and effective animal handling requires a thorough understanding of the normal behaviour and typical responses for each species of animal you are likely to work with. This knowledge will assist you in providing safe and effective animal handling techniques.
Always approach all animals involved in an incident with caution. Stress and pain can make even the most gentle and calm animal aggressive. If you have any doubt about the behaviour or temperament of an animal, ask for assistance. The safety of all staff and patients, as well as other people and animals, is vital.
If you are working with a known animal that shows signs of potentially aggressive behaviour, there should be a caution sign posted in their file as well as on any holding pens used. This warning sign will alert others who may also be handling the animal. If the animal is aggressive, advise the owner that you may have to use a restraint to reduce the risk of people (animal carer, vet, nurse, staff or owner) getting injured.
Use caution when approaching unknown animals because you have no way of predicting how they will respond to you. Once you have decided that the environment is safe for you to approach the animal, carefully observe their behaviour. Are they showing submissive, relaxed or alert and fearful body language?
If the animal is exhibiting aggressive behaviour, consider what PPE or equipment you have available to reduce risks and hazards when capturing and handling the animal.
| Animal | Normal Behaviour | Typical Responses |
|---|---|---|
| Dogs | - Social, seeks attention, may wag the tail when happy. - Can be alert, sniffing around, exploring. - Enjoys chewing and playing. |
- May bark, growl, or whine to communicate. - Wags tail when friendly; tucks tail when scared. - Shows teeth or raises hackles when threatened. |
| Cats | - Independent, may rub against objects or people for scent marking. - Enjoys grooming and stretching. - Likes high places. |
- Purrs, when content, may knead with paws. - Hisses or swats when agitated. - Ears go back or tail swishes when annoyed or scared. |
| Horse | - Grazes for extended periods. - Social within the herd; enjoys grooming with others. - Flick's ears to listen in different directions. |
- May whinny, nicker, or snort for communication. - Kicks or bites if threatened. - Stomps or pins ears back when irritated. |
| Snake |
- Flicks tongue to smell surroundings. - Sheds skin periodically. |
- Remains calm if approached gently. - Can coil or hiss if threatened. - May strike or bite if frightened or handled improperly. |
| Fish |
- Gills move rhythmically as they breathe. - Fins and tail should be intact and smooth. |
- Dart away quickly if startled. - May gasp at the surface if oxygen levels are low. - Can appear sluggish if water quality is poor. |
| Bird | - Chirps or sings, especially in the morning. - Grooms feathers, preening often. - Flaps wings and may hop around the cage. |
- May squawk or flutter if startled. - Puffs feathers when relaxed or to stay warm. - May bite if scared or feeling territorial. |
| Livestock | - Grazes and ruminates for long periods. - Social within the herd; forms bonds with other animals. - Vocalises to communicate needs. |
- May moo, bleat, or grunt when hungry or alert. - Can kick or push if cornered. - Shows agitation with pacing or stomping. |
| Rabbit | - Hops around and explores surroundings. - Grooms self and other rabbits. - Often quiet, but may thump hind legs when alert. |
- May thump or freeze when scared. - Can bite or scratch if restrained too tightly. - Grinds teeth softly when relaxed. |
| Guinea Pig | - Whistles or squeaks when excited, especially for food. - Moves around cage, burrows in bedding. - Social, enjoys being with other guinea pigs. |
- May "popcorn" (jump excitedly) when happy. - Squeals or grumbles if uncomfortable. - Freezes when scared or startled. |
Common stressors

Stressors are factors that cause or increase stress.
Stress affects animals’ behaviour and may make them unpredictable. Animals requiring first aid will likely already be stressed. However, you can minimise additional stressors and help prevent the animal from going into shock or injuring themselves in an attempt to get away.
Whether you are in an animal care facility or the field, consider the following common stressors:
- loud noises
- slippery flooring or examination tables
- prey animals near predatory animals
- smells and other stimuli, which are likely to confuse and distress some animals
- change in routine
- unfamiliar environments
- separation anxiety
- illness or injury
- temperature changes
- inadequate enrichment or stimulation
- poor diet and dehydration
- weather events
- unpredictable human interactions
To determine the source of stressors, it is useful to obtain the history of the animal (if known). For example, animals that:
- have lived entirely outdoors may panic when put into an enclosed space, such as a car or examination room
- have not been handled or examined before may become stressed and agitated
- may not have any experience on a leash and may panic in response
- Poor socialisation may result in aggression toward other animals, particularly if they are stressed and in a strange environment.
Minimising stressors typically includes keeping the animal in a quiet place, reducing interaction with people and other animals as much as possible, and restraining or handling them in a manner that prevents injury. Remember that animals may become aggressive toward people when over-stimulated or stressed. Some examples of strategies to minimise stressors can include:
- provide a calm, quiet environment
- establish and maintain routine
- gradual exposure to new people and new environments
- using positive reinforcement
- providing adequate space and privacy
- offering enrichment activities
- minimising confinement time
- ensuring proper diet and hydration
- manage temperature and climate
- monitoring body language for signs of stress
Handling an injured animal

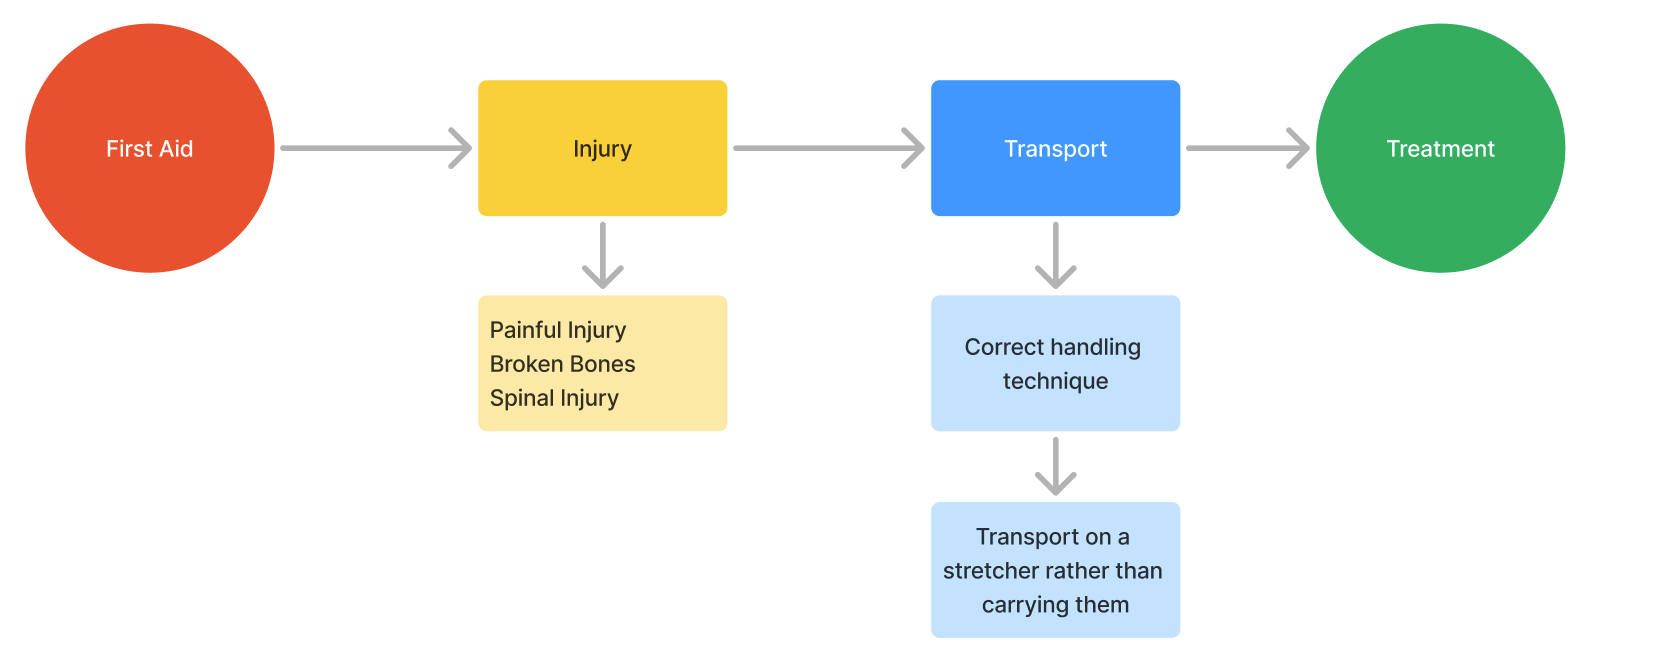
When attending to an animal in a first aid situation, be aware that the animal may have spinal injuries, broken bones or other painful injuries. Take great caution to move animals in this condition using the correct handling techniques. In most instances, it is safer for the animal to be carried on a stretcher to minimise their movement as you pick up and carry them.
When picking up and moving an animal, take care to avoid touching the injured area to avoid causing additional pain. Be as gentle as you can at all times.
Watch
The following video, ‘How to Move an Injured Dog’ (1:11 min), will teach you how to roll a dog safely onto a makeshift stretcher.
Reassuring the animal
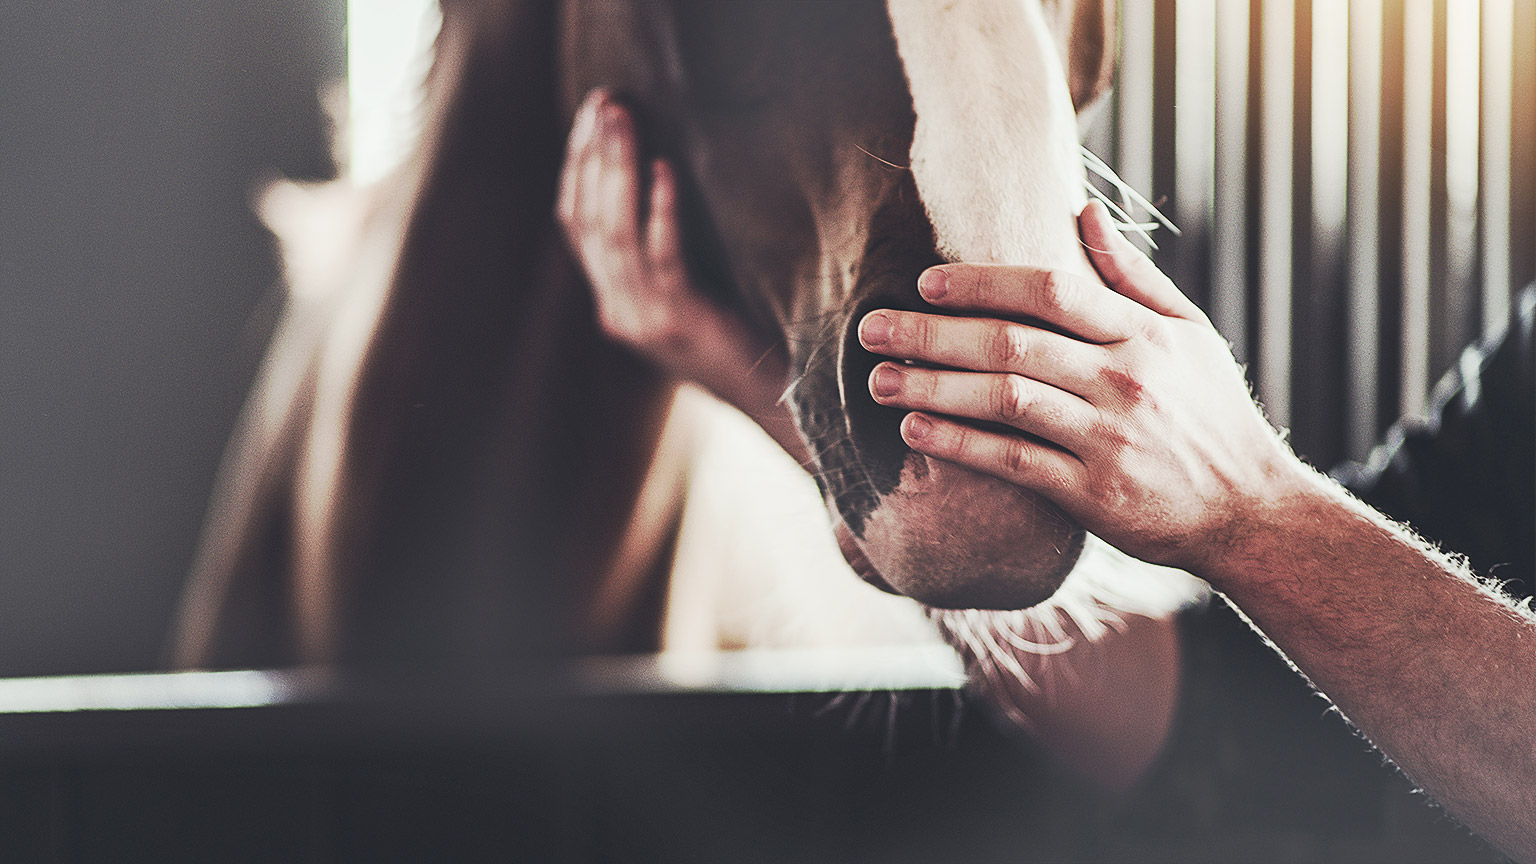
All animals in a first aid situation will be stressed. Try to minimise this stress by reassuring the animal in a caring manner. For domestic animals, this may include talking softly and comfortingly, and gently petting the animal.
Wild animals, including strays and wildlife, will likely find human interaction of any kind stressful. With these animals, it is best to limit touching them as much as possible. When assessing wildlife, just focus on checking the key vital signs and get them to appropriate medical care as quickly as you can.
Talking to wildlife tends not to be reassuring. Instead, make sure you handle the animal in the way that is most appropriate to the species. For instance, make sure you support the animal in a way to ensure it feels stable and secure. Poor handling may cause the animal to feel like it is falling.
Approaching the animal

Be aware of your own behaviour. A human’s friendly approach may convey body signals that mean the opposite to the animal. For example, most people will try to pet a dog or approach a dog from the front, lean over and extend their hand to allow the dog to sniff it. This approach, in many cases, will directly threaten the dog. This is intensified if the person’s actions are quick, tense or agitated.
Once you have secured the scene and it is safe for you to approach the animal, consider the following low stress techniques that are most appropriate for the situation:
- remain calm
- reduce noise
- take your time, do not rush the animal - allow them to become comfortable with your presence
- use appropriate, species-specific techniques
- use slow movements
- use the animal’s name, if known
- if barking dogs are present, close doors or ask the owner to move them away to minimise noise
- plan for an exit or distancing strategy to protect yourself in the event an animal becomes unexpectedly aggressive
- lower yourself to the animal’s level but do not sit on the ground as you will be unable to move away or protect yourself if necessary
- do not make direct eye contact with the animal, but maintain safe visual contact
- talk to the animal in soothing tones using a soft, gentle voice
- avoid high-pitched, excited talk
- pat your leg or the ground, if necessary, to motion the animal to come closer to you
- for large animals, make sure they know you are approaching - stay in their line of sight and make calm, purposeful movements
- in the case of cats, do not scruff them
- apply low-stress handling techniques, such as using a towel for small to medium animals like guinea pigs, rabbits and cats
- use pheromones (such as Feliway for cats or dog appeasing pheromone for dogs) to calm animals down before handling. Pheromones are a type of hormone that work outside the body and influence the behaviour of animals. You can think of them like a fragrance that humans can’t necessarily smell.
- be aware of the injured site on the animal and do not hold the animal where the injury is located or use the normal restraint method if it will rub against the site
- the way you handle the animal will depend on its injuries as well as the species
- transport small, injured animals in a carrier or box safely shut with wide tape
- keep the animal at an appropriate temperature according to the time of year/day/situation
- remember that your approach to wildlife or feral animals will be different as they may be less predictable than companion animals; you may not be able to calm them down – aim to use the least threatening approach possible.
Remember: Never take your eyes off the animal as you or they approach.
Restraining the animal

Restraining an animal means to prevent it from moving away. Only consider restraining an animal if it is necessary for either their safety or yours. Restraint will also hold the animal still, making sure that you can provide the care they need effectively.
Good restraint has little to do with strength. Choosing the right techniques that build on natural animal behavioural responses results in a greater likelihood of success.
“If you are considering restraining an animal, then ask the following questions:
- Why is the animal being restrained? Is it necessary?
- Which method should be used? (greatest gain, least hazard).
- Who is best qualified to carry out the procedure? (Least amount of time, least amount of stress.)” (Big Cat Rescue, 2018).
Physical restraint, however brief, can disturb or stress an animal. Decide on the best method of restraint before you approach them.
Examples of Physical Restraints for different types of animals:
| Animal | Restraint Technique | Description |
|---|---|---|
Dog |
Muzzle | A soft or basket muzzle is often used to prevent biting during exams or grooming. |
| Leash and Collar |
|
|
| Towel Wrap | For smaller or nervous dogs, a towel wrap can restrict movement gently and prevent bites. | |
Cat |
Cat Bag | A fabric bag with openings for limbs, allowing veterinary access while limiting movement and protecting handlers. |
| Scruffing (lightly) | Gently holding the skin at the back of a cat's neck is often used temporarily to manage behaviour without causing discomfort. | |
| Towel Wrap (Burrito Technique) | Wrapping a cat snugly in a towel, leaving only the head exposed, can reduce anxiety and prevent scratching. | |
Horse |
Halter and Lead Rope | A halter placed over the horse's head allows handlers to control the head and lead the animal safely. |
| Twitch (for short-term restraint) | A device applied to the horse’s upper lip can have a calming effect during brief, stressful procedures. | |
| Stocks | A secure, enclosed structure that holds a horse in place is often used for veterinary procedures. | |
Snake |
Snake Hook | A tool to gently lift or move snakes, keeping them at a safe distance to minimise stress and risk of bites. |
| Tongs (for larger or venomous snakes) | Soft-tipped tongs allow handlers to grasp the snake gently without direct contact, which is useful for quick handling of venomous species. | |
| Tube Restraint | A clear plastic tube that holds a snake’s head and part of its body is useful for close examination of venomous snakes. | |
Fish |
Net | Used to scoop fish out of water carefully, preventing damage to delicate fins. |
| Wet Hands or Gloves | Handling fish with wet hands or gloves minimises damage to their protective slime coat. | |
Bird |
Towel Wrap | Birds are gently wrapped in a towel, which helps to immobilise the wings and prevent flapping. |
| Two-Handed Hold (small birds) | Gently cupping a small bird with both hands, with slight pressure around the body to prevent escape. | |
Livestock |
Chute or Crush | Used to safely contain larger animals like cows for exams, preventing movement without causing harm. |
| Nose Rings (cattle) | A nose ring can control the head in larger livestock species like bulls. | |
Rabbit |
Bunny Burrito (Towel Wrap) | Wrapping a rabbit in a towel keeps it calm and prevents scratching, particularly during grooming or exams. |
| Scruff and Support Technique | Gently holding the scruff and supporting the hindquarters to prevent kicking is commonly used in rabbits. | |
Guinea Pig |
Two-Handed Hold | Gently hold the guinea pig with one hand supporting the chest and the other supporting the hindquarters to keep it secure. |
| Small Towel Wrap | Wrapping a nervous guinea pig in a towel helps prevent sudden movements and scratching. |
Verbal restraint

The key to safety for handlers and comfort for the animal lies in the specific amount of restraint used to control the animal. This is because too little restraint can result in injury to both personnel and the animal if the animal escapes. However, too much restraint can encourage the animal to fight back or cause unnecessary stress.
Keeping in line with using the least restraint necessary, use verbal restraint as the first option to restrain a tame animal. Many companion animals will know some verbal commands or can at least recognise authority even when the command is unfamiliar to them.
“Commands such as SIT, STAY, COME, DOWN, NO or even HEEL may be useful tools to encourage a dog to cooperate. Also, soft, quiet words can calm a frightened animal. Yelling or screaming should never be used as it can cause the animal to become more fearful or aggressive” (Rural Area Vet n.d.)
Reassuring the animal as well as their owner is a key part of having the procedure run smoothly with no incidents. Throughout the process of approaching, catching, restraining and securing an animal, use verbal reassurance, talking softly to the animal or using familiar commands to attempt to calm them down.
Avoid having the owner reassure the animal during the procedure, as an owner may become anxious, and the animal will pick up on this. Should the owner become injured because of their presence in the procedure, the animal care facility can be held accountable.
Some examples of different situations with different animals and examples of verbal restraints and their purpose.
| Animal |
|
|
Purpose |
|---|---|---|---|
| Dog |
|
"Sit" / "Stay" | Commands to help keep the dog still during examination. |
| Reacting to unfamiliar sounds | "It’s okay, good dog" | Calming phrases to reassure and soothe an anxious dog. | |
| Cat | Trying to escape during grooming | "Easy, easy" | Soft, repetitive words to reduce tension and keep the cat calm. |
| During a nail trim | "Almost done, good kitty" | Reassuring phrases to keep the cat calm while handling sensitive areas. | |
| Horse |
|
"Whoa" | Command to encourage the horse to stop moving and relax. |
| During haltering or hoof inspection | "Steady" | Calming word to promote stillness and cooperation. | |
| Bird | Attempting to fly off handler’s hand | "Stay here, good bird" | Reassuring phrases to keep the bird calm and prevent flapping. |
| Reacting to new people | "Hello, you’re okay" | Calming phrases to reduce stress and encourage relaxation. | |
| Livestock | During medical check-ups | "Stand, easy" | Calm commands to encourage the animal to remain in place. |
|
|
"Let’s go, keep moving" | Commands to guide animals in a calm, predictable manner. | |
| Rabbit | Reacting to being lifted or handled | "Good bunny, almost done" | Gentle reassurance to keep the rabbit calm and reduce fear. |
| Snake | Moving during handling or exam | "Easy, easy" | Soft, repetitive words to calm and keep the snake still. |
| Guinea Pig | During a health check or grooming | "Good piggy, almost done" | Soothing words to reassure and reduce wriggling or movement. |
Equipment for catching, restraining and securing animals

“When selecting a restraint technique, [consider the] safety of the person(s) involved in the procedure [and] safety of the animal. Will the restraint method do the job? (Does it suit the conditions, type of animal, available staff and equipment[?]) Does the method allow the animal to return to the normal pre-restraint condition?
Always use a method or technique that safeguards both the [animal handler] and the animal. The safety of the public should also be taken into consideration.
When working with animals, particularly in restraint situations, the following knowledge is necessary:
- A knowledge of the behaviour and psychological make-up of the animals involved.
- An understanding of the tools of restraint – voice, manual and chemical restraint equipment” (Big Cat Rescue, 2018).
Remember, once you take hold of an animal, don’t let go until it can be released safely.
Review the following types of equipment used for catching, restraining and securing animals:
- your hands
- collar
- leash, lead or harness
- catch or control pole
- muzzle
- towel, pillowcase, sheet, tea towel, blanket or clothing
- EZ-nabber or catch net
- hessian or calico bag
- plastic container, bucket, clean ice cream container for aquatic animals
- gloves/gauntlets
- cage or cat trap
- halter and/or length of rope for a horse or livestock.
Your hands
One of the most effective methods of restraint is using your hands. They are sensitive to the amount of pressure applied to the animal. Therefore, pressure can be adjusted quickly and as required.
Hands can also be used to gently stroke a dog, for instance, to calm the animal, or to grasp a struggling cat firmly to restrain them. Although extremely versatile and useful, hands are also the most vulnerable to injury. Therefore, recognising when they would not be effective is very important.
Collars, leashes and leads

Collars, leashes, leads and tethers are the most common restraint tools used to handle animals in a facility. They are also useful for protecting the animal, the handler and people passing by. When collars and leashes are put on an animal, if trained, you will have control of even the largest dog. Other animals that are trained on leash may include cats, pigs, ferrets and rats. However, with these animals, the leash is typically attached to a harness rather than to a collar. Horses and livestock animals such as pigs, sheep and cows may also be able to be lead.
Leashes and leads can be abused. If an animal struggles with the leash, do not drag or pull them. This may cause more stress or even strangle the animal.
If the animal starts to become stressed, struggles, pulls or jerks away from you, this may indicate they have not been leash-trained. In this situation, pause to let the animal calm down and get used to the sensation of the leash around its neck. Once the animal has calmed down, try again while reassuring them.
In some circumstances you may be able to give a short, sharp tug on the leash and use the command to ‘come’ or ‘heel’, encouraging the animal to follow. If the animal still shows signs of fear, refuses to walk and if it is safe to do so, you should carry them. Assess if the animal shows signs of stress and aggression. It may be necessary to muzzle them prior to lifting and carrying.
A leash should be used as a backup option when handling cats in case the cat becomes frightened and resists restraint. For yours, other people’s, the animal’s and other animals’ safety, an animal being moved around the facility should always wear a slip-lead.
It is very easy for an animal to become frightened, get loose and escape and, therefore, should have a leash on. When an owner brings their animal into the facility the policy should state that they must be restrained by leash or in a cage. When they come in on a lead, transfer them to the organisation’s slip lead and leash and return the lead to the client so that it is not lost during the animal’s stay.
Muzzles
Muzzles are used when a snappy or potentially aggressive animal must be handled. They restrict the movement of the animal’s mouth and prevent them from biting. There are a range of different muzzle styles and materials such as nylon muzzles and plastic basket muzzles and Velcro ‘C’ muzzles.
A leash or strip of rolled gauze may be used as a temporary muzzle. Place the muzzle on securely as the animal may try to remove it. A poorly secured or constructed muzzle may lead to a false sense of security, increasing the possibility of being bitten. Even when properly secured, use appropriate handling techniques to prevent injury from or to an animal who resists the muzzle.
Muzzles that are used for cats cover their mouth and eyes. This helps to reduce any visual stimulation. For some cats, these can be very useful for calming them and protecting their handler from injury. Review the video ‘How to Make a Muzzle Using Your Pet's Leash’ (1:08 min) to learn an important restraint technique.
Towel, clothing or blanket
Placing a light cloth over the head of the animal can lessen external stimuli that may cause fearful and aggressive reactions.” (Linklater A., 2020).
Towels, clothing, blankets or other pieces of material are extremely useful handling tools to use on small animals. A towel or blanket can help to decrease an animal’s stress by covering the head and body. It can help protect the handler from sharp claws and possibly teeth. Learn how to use the following towel wrapping technique – kitty burrito – for a small animal.
The kitty burrito method
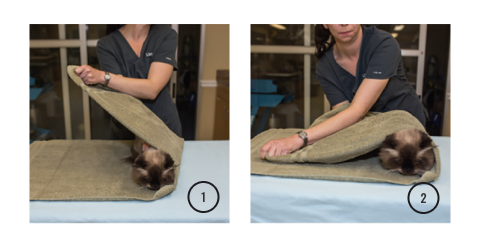
First, wrap the towel over the animal.
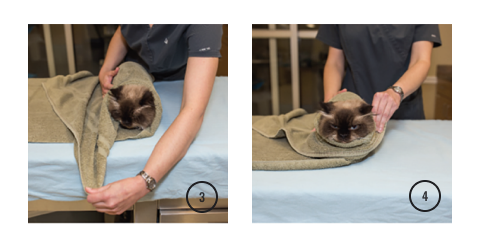
Bring the end of the towel around the patient’s neck and under the chin.
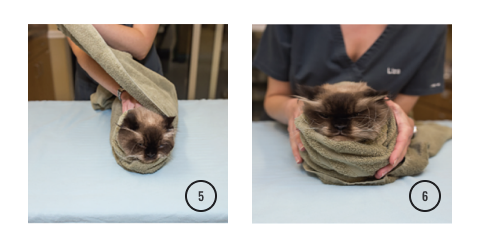
Repeat with the opposite side. The animal is snugly but comfortably wrapped.
Another way to use a towel to safely handle a cat is demonstrated in the video ‘Low Stress Handling: Examining a Feral Cat’ (2:11 min).
Review the video ‘How to Safely Restrain Pet Birds’ (2:44 min) for important tips on handling birds using a cloth.
Gloves and gauntlets
There are many gloves specifically designed for handling dogs, cats, birds and other animals that are scratch and teeth resistant. Animal gloves are often made from leather. Some are reinforced with Kevlar, a cut, bite and scratch resistant material. Some gloves only reach the wrist, while others (often called gauntlets) cover up and over the elbow.
Choose the most appropriate type of gloves for the animal you are handling.
EZ-nabber or catch net
An EZ-nabber or a catch net is designed to be eased into a cat cage or confined area, then restrain and control an animal without getting bitten. The nets can then be used to transfer the animal from one area to another without injury to the animal or handlers. Catch nets are typically only used if the animal is too aggressive or fractious to be handled directly.
An EZ-nabber or catch net may also control an animal when administering intramuscular injections, as these can be given through the net.
Catch or control pole
A catch or control pole is typically used as a last resort for restraining an animal. The poles are only used to handle extremely aggressive, wild or stray dogs safely. If the animal is not a stray, you should ask the owner to fit a muzzle and leash before resorting to a control pole.
A catch or control pole can be used like a long-distance hand to make contact first contact with the animal. When used appropriately, they are effective tools. However, inappropriate or unskilled use can cause serious injury to the animal or the person using it. The catch or control pole may further distress an upset animal and should only be used when your safety or the safety of the animal is genuinely threatened.
Seek assistance from another staff member in your facility who has experience using the pole if there is an instance where it needs to be used.
If an animal is aggressive enough to warrant the use of a catch or control pole, it may not be safe for you to assess or provide first aid to the animal.
In the next table, we have sourced some examples of different restraining equipment and their purpose for various animals. Remembering that not all equipment can be used on all animals and have the same purpose with that animal.
| Animal | Equipment and Purpose |
|---|---|
| Dogs |
|
| Cats |
|
| Horses |
|
| Snakes |
|
| Birds |
|
| Livestock |
|
| Rabbits |
|
| Fish |
|
| Guinea Pigs |
|
Common techniques to catch animals

The following are some examples of handling techniques that are suitable for a particular species.
Dogs
When it comes to catching dogs, be aware of the nature of the dog, the area you are in and what condition the dog is in and where its injury is. Remember, the nature of an animal can change suddenly when they are in pain or sick.
When you attempt to catch a dog, consider the following:
- Use a slip lead or loop a leash around the patient’s neck. It is important you do not attach a lead to the dog’s collar as the collar could be unreliable or too loose and the dog will be able to slip out.
- You may need a second person to assist you with restraining the head or distracting the dog. You can place a muzzle on the dog if required. One can be made from a slip lead or bandage.
- Place a large towel or blanket over the top of the patient, then pick up the patient making sure your hands are not near the mouth, allowing the dog to bite you.
- Dog poles are fantastic for aggressive patients as you do not need to get close to the dog to secure it.
Watch- Handling small dogs
Dr Sophia Yin demonstrates how to handle a small dog in the video ‘Which Hold Provides the Most Control of Small Dogs?’ (0:49 min).
Video transcript
Which Hold Provides the Most Control of Small Dogs? (YouTube, 0:49 min)
Screen title: Handling, Moving and Restraining Small and Medium-sized Dogs with Skill and Ease | Essential Exercises & Special Techniques | Dr Sophia Yin, DVM, MS
On screen text: Ever had trouble stabilizing an animal on the exam table?
[Video of animal handler with dog on examination table demonstrates these techniques:
- Hand of handler is behind the rear of the dog.
- Arm of handler is behind the rear of the dog.
- Arm of handler is over the rear and back of the dog.
- Hand of handler is under the dog’s belly.]
Narrator: Which hold provides the MOST control?
If you guessed this hold [Image of: Arm over the rear and back], then you’re right.
This hold controls movement to the right, to the left, forwards and upward movement right here and it has the most surface area control.
[End of transcript]
Restraint for dogs
There are two popular methods of restraint used for dogs: lying down (placing in lateral recumbency) and a headlock. The choice will depend on the animal’s condition, injuries and temperament.
Watch
Review the instructions on how to move a dog from standing to a lying down position in the video by Dr Sophia Yin: ‘Placing a Dog on His Side’ (0:27 min). Notice Dr Yin uses a non-slip surface, which makes the dog feel more secure than if on a slippery examination table.
“The following tips have been adapted from advice provided by US veterinarian Dr Marty Becker.
- Wrap the dog’s body to protect it from struggling and further injury or pain.
- Wrap a towel around its neck to help stabilize it and help prevent biting. If you don’t have a towel handy an item of clothing will do.
- If the injured dog is biting, you can make a makeshift muzzle out of a long sock or gauze from an emergency kit.
- If the materials are available, create a makeshift stretcher and slide the dog onto it.
- Cover their eyes. This often has an amazingly hypnotic effect.
- Call your vet or the emergency clinic and tell them you’re on the way.
- Stay calm. The more anxiety you show, the more the animal will mirror these feelings. Fear, anxiety and stress amplify pain and can make the medical condition much worse.” (Philpott, n.d.)
Examine this helpful resource on an Introduction to Canine Restraint and Handling from the Small Animal Clinical Skills Textbook.
If possible, practice the following under close supervision – how to:
- approach a dog safely
- apply restraint to a standing dog and a sitting dog
- place a standing dog into the lying down position
- muzzle a dog.
Cats and rabbits
Video- Restraint for cats
Review the video ‘How to do a cat swaddle (aka kitty burrito)’ (1:06 min), which demonstrates using a towel to restrain a cat.
Next, examine this helpful resource Feline Restraint and Handling from Clinical Medicine 1: Small Animal Clinical Skills Textbook.
If possible, practice performing the following techniques on a stuffed cat:
- ring hold
- three-finger hold
- towel wrap (Kitty Burrito)
- placing a muzzle on the face.
Restraint for rabbits
Restrain a rabbit using an appropriate technique as they may easily injure themselves by breaking their backs. Use one of the two most common restraint techniques for rabbits – towel wrapping or underarm carrying. Examine the following step-by-step instructions for each.
Handling wildlife
- Towel wrapping:
- Place a towel on the examination table.
- Pick up the rabbit while continuing to support its back.
- Place rabbit onto towel.
- Wrap towel under neck and around body of rabbit – leaving just the head and ears out.
- Underarm wrapping:
- Tuck rabbit’s head under your elbow while putting the hand of that same arm under the rabbits’ stomach.
- Using your free hand, scoop the rabbit’s backside up while lifting the rabbit off the table.
Review the information in A Guide to the Care and Use of Australian Native Animals in Research and Teaching (pdf), which explains in detail how to capture and handle brushtail possums.
The guide mentions that brushtail possums can be lured using a variety of tasty treats into wire-mesh cages, then carefully transferred into hessian bags or cloth sacks ready for transportation. Warnings are made about the possums biting, scratching and struggling if grasped by the base of the tail.
Note the importance of understanding the unique characteristics of the animals you need to capture, handle and secure. Only handle the animals in your care once you are fully informed and trained in appropriate techniques for those particular species.
Transporting injured animals
After you have caught or secured the animal, you may need to transport them to a place that is safe for you to assess and provide them with first aid. You may have to place them into a well-ventilated and secure box so that they can’t escape and can be safely transported for further care. Tape the lid shut securely with wide tape, such as packaging tape.
If transporting smaller animals, a sturdy cardboard box shut securely and with air holes will suffice. You may have a small cage readily available (such as a cat cage) with close-set bars that you could use for a number of small animals, such as small puppies, rabbits or guinea pigs.
Knowledge Check 4

Once you have determined that the environment is safe and you have a secured the animal, it is time to assess the physical condition of the animal and check its vital signs to determine what first aid procedures are required.
The following table lists some of the most common industry standard abbreviations used related to monitoring the health of animals. You will find a more comprehensive list of abbreviations and key animal care terminology in the introductory module for this course.
| Abbreviation | Description |
|---|---|
| BAR | Bright, alert and responsive |
| BP | Blood pressure |
| bpm | Beats per minute - used for heart rate and pulse rate recording Breaths per minute - used for respiratory rate recordings |
| C | Celsius - temperature |
| CRT | Capillary refill time |
| Cx | Clinical sign |
| HR | Heart rate |
| Hx | History, for example, patient has Hx of vomiting after eating |
| MM | Mucous membrane |
| NAD | No abnormalities detected |
| NWB | Non-weight bearing |
| QAR | Quiet, alert, and responsive |
| QOL | Quality of life – an assessment of the animal’s quality taking into consideration normal functions, temperament, happiness, mobility, and joy |
| RR | Respiratory rate |
| TRP | Temperature, pulse, respiration |
Assessing first aid requirements
There are two broad types of assessments you need to conduct to determine the condition of the animal and the specific first aid it requires:
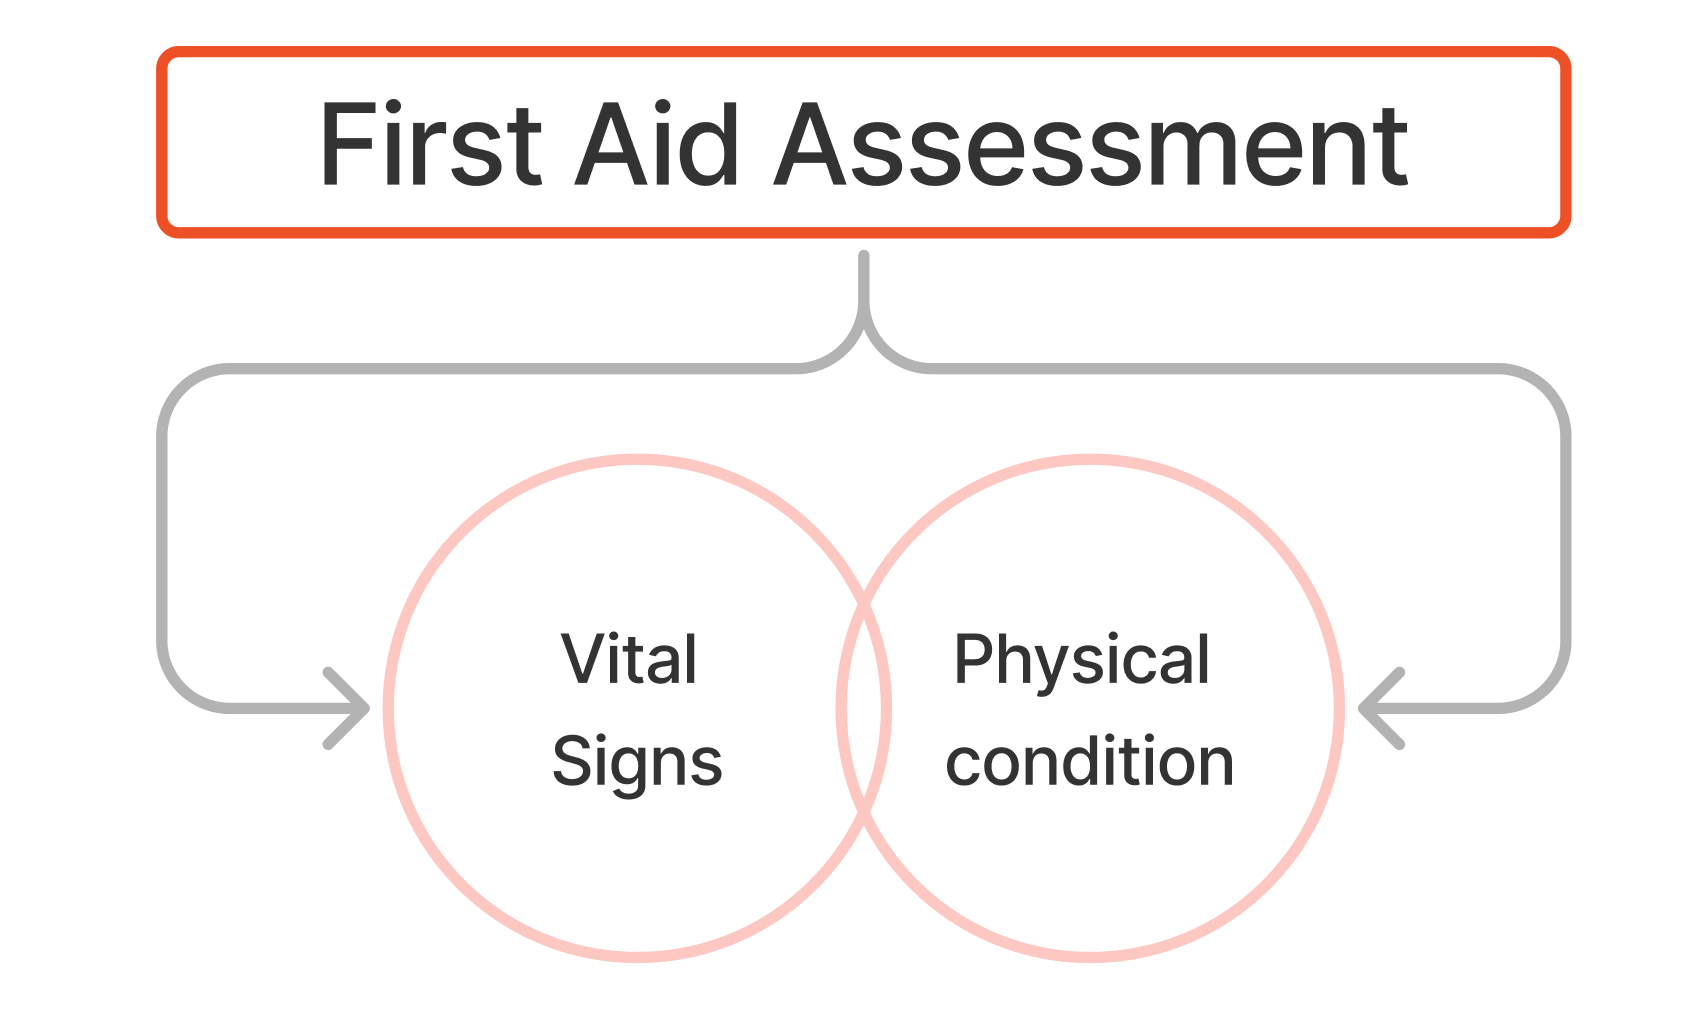
- Vital signs
- Physical condition.
Before you begin your assessment of the animal, first assess how frightened and stressed the animal is. Provide comfort and reassure the animal as much as possible and take care to protect yourself. If human handling further stresses the animal, it may react in fear or aggression, exasperating its condition and potentially injuring you, the first aider.
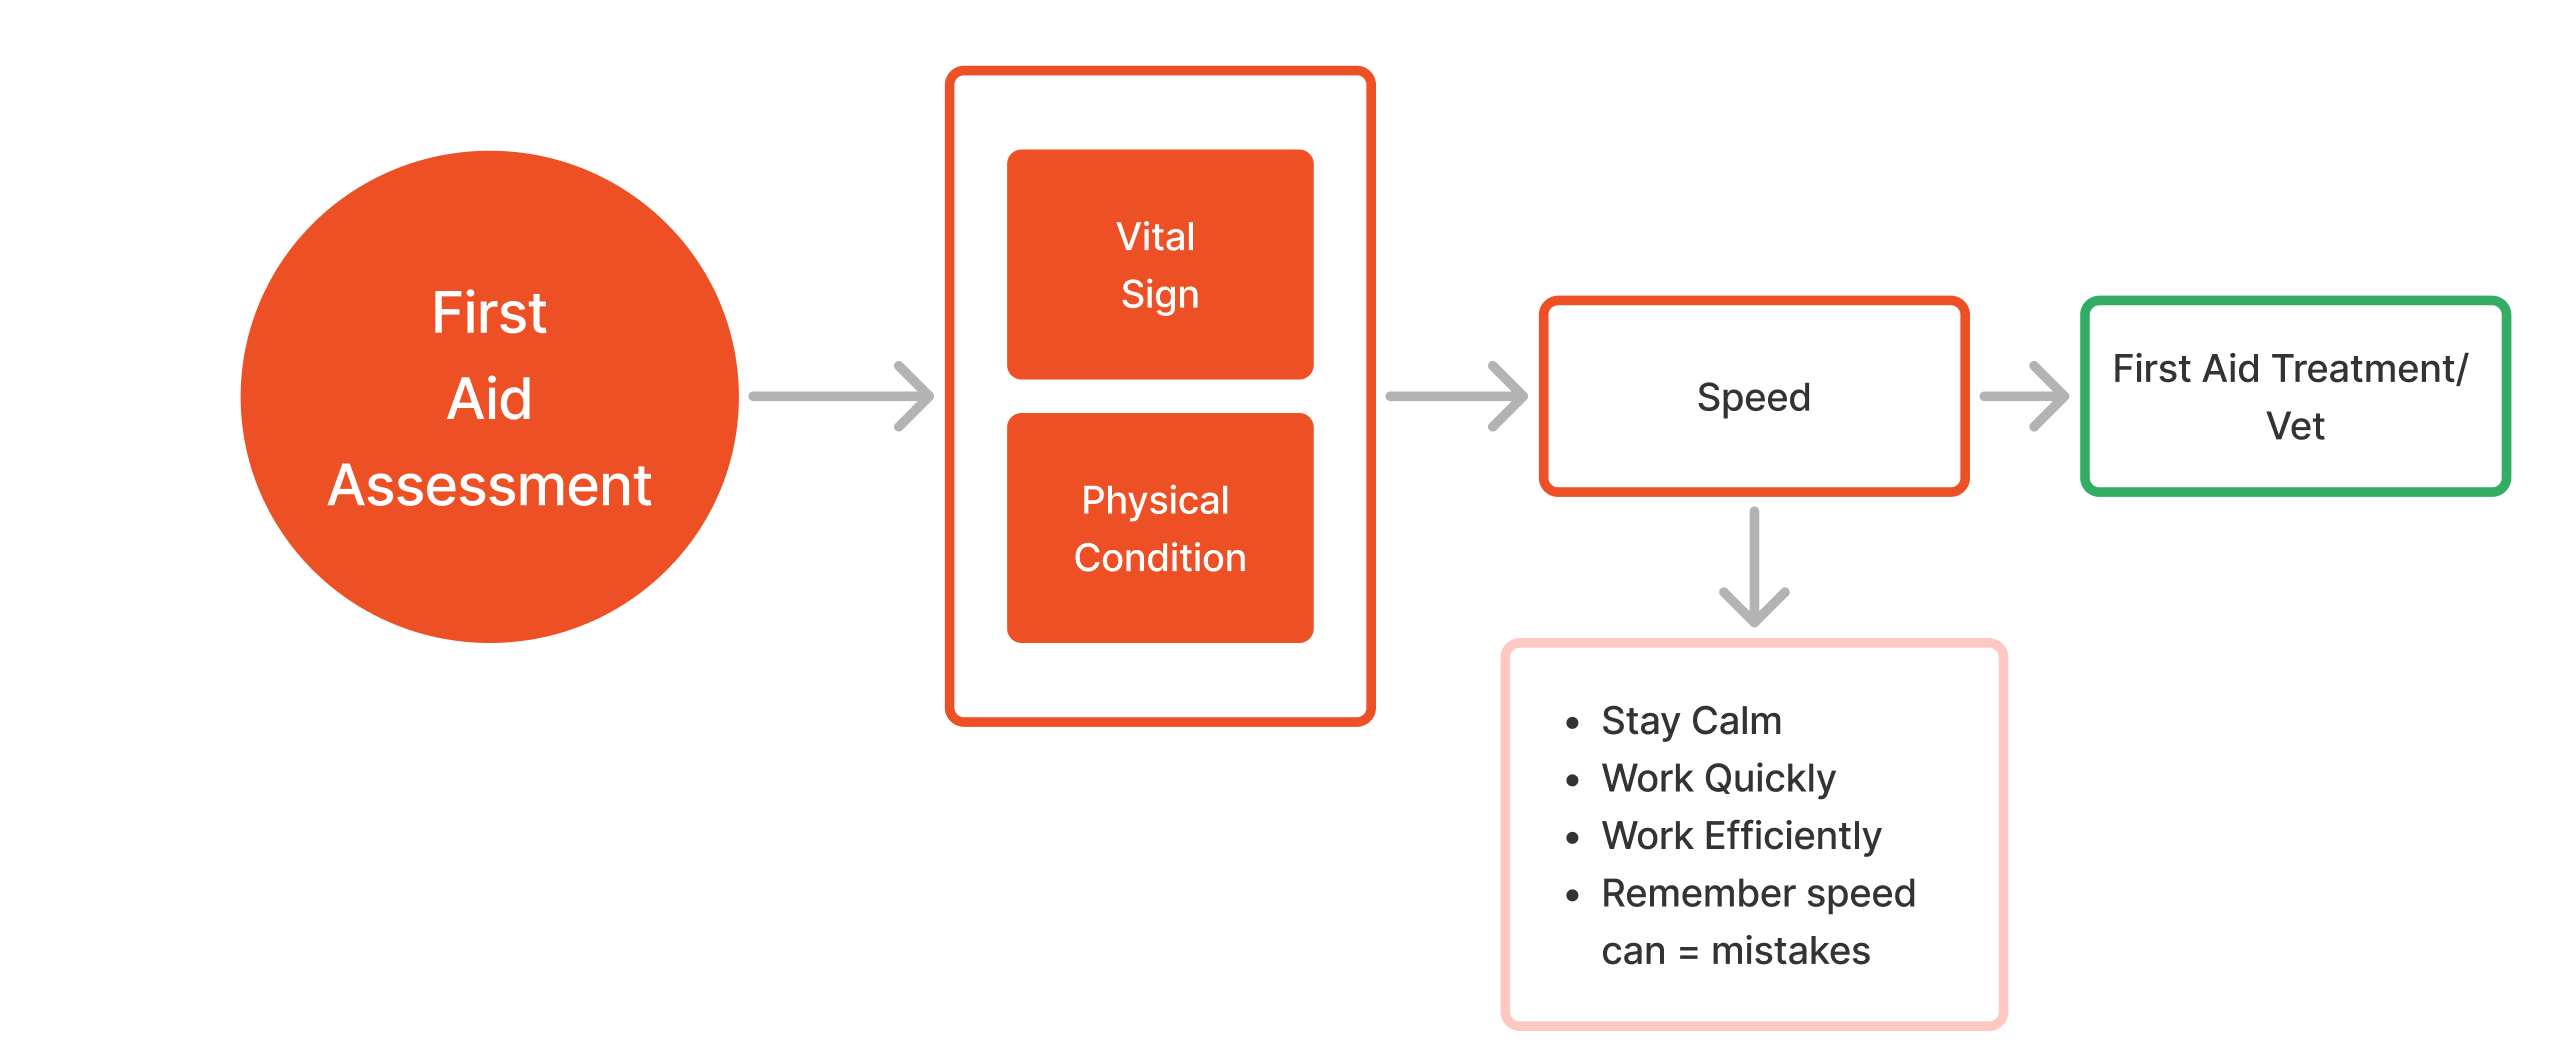
An essential part of providing first aid is speed. The quicker you can assess the animal, provide the necessary first aid treatment and transport them to a vet, the better. This is especially true when providing first aid to wild animals, where the longer you handle them the more stressed they may become.
However, with that in mind, it is important not to rush. An emergency situation is not the time to make mistakes in your haste. Stay calm and work quickly and efficiently. The more practice you have carrying out first aid procedures and the more prepared you are, the quicker and calmer you will become.
Measure the vital signs of the animal

Vital signs are measurable indicators of the body’s most basic and critical functions – they are indicators of life. If the patient is unresponsive, checking for vital signs will help you determine if the animal is alive or not.
For each vital sign, there is a range of values that are considered normal for a healthy individual of that species. Vital signs that are outside the normal range tend to indicate health problems. It is important for you know the normal ranges for an animal’s health to quickly identify what is abnormal. You can then decide if the situation requires medical intervention. Early recognition of abnormal conditions is key an animal first aid. It can save their life.
Know what is normal for [the animals in your care] and monitor the animals' health on a regular basis to check for and identify any deviations from the norm.
animal emergency centre, n.d.
Animal vital signs
There are five key vital signs that are measured to assess the health of an animal:
- Heart rate (HR)
- Pulse rate
- Respiratory rate (RR)
- Mucous membrane (MM)
- Temperature.
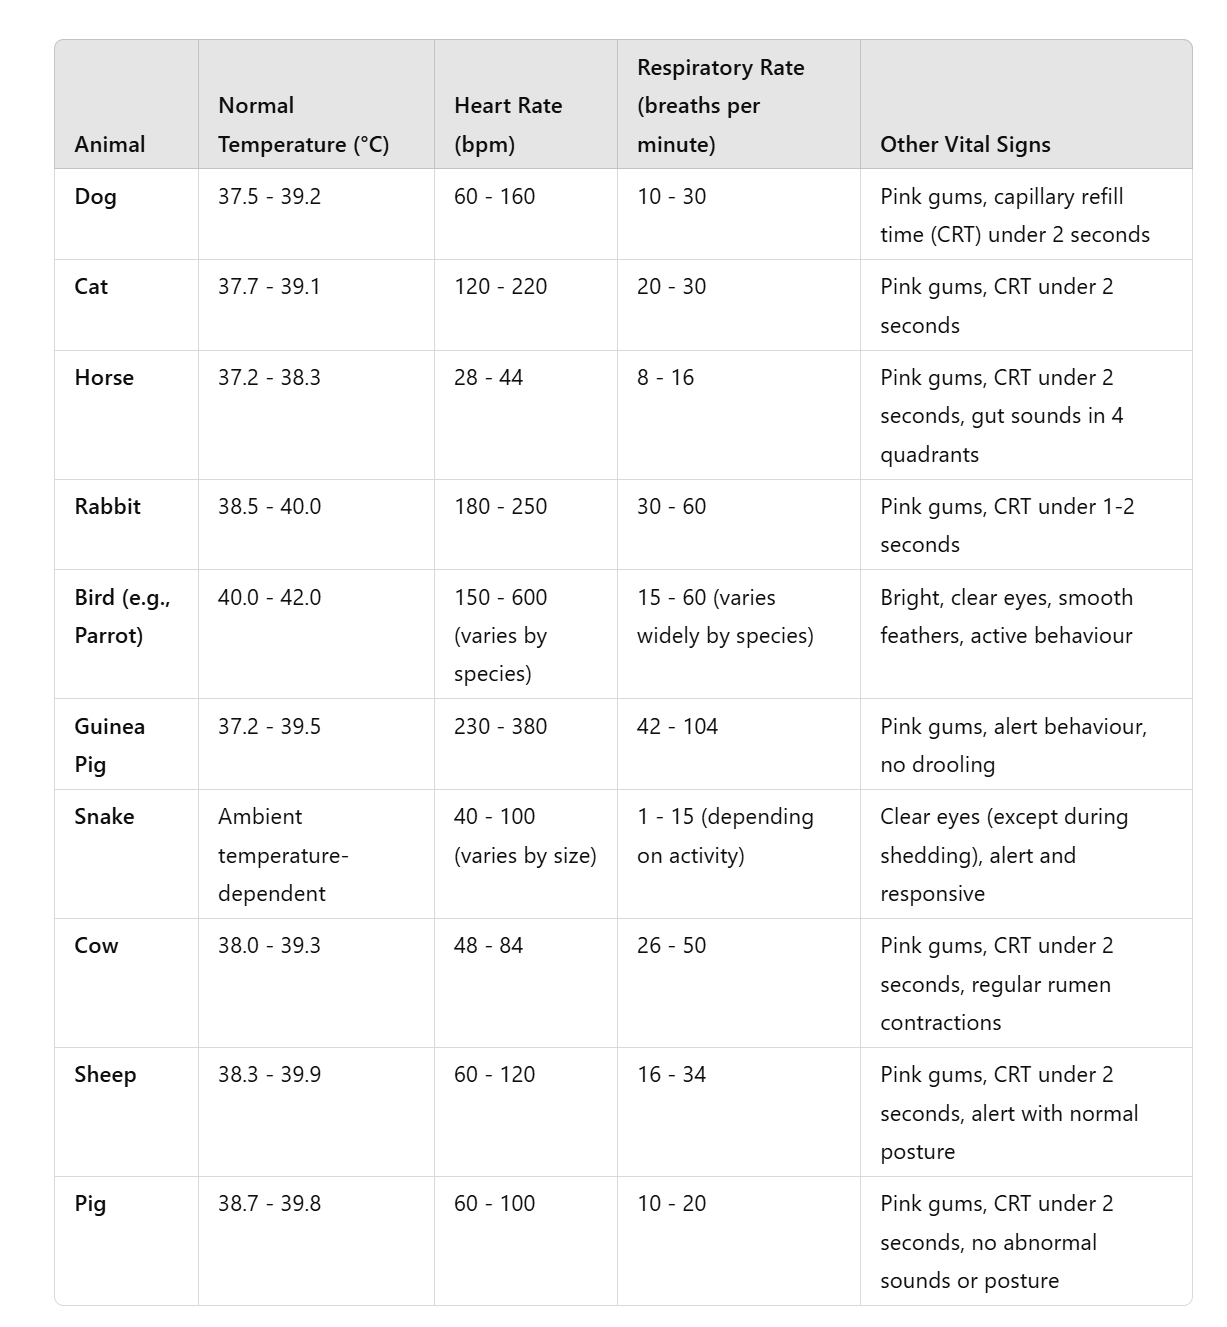
Collectively, temperature, pulse rate and respiratory rate are known as TPR. The following table lists the normal ranges for temperature, pulse rate and respiratory rate in seven different species (Cooper, Mullineaux & Turner (eds.) 2011). In Australia, temperature is measured in degrees Celsius (°C), pulse rate is measured in beats per minute (bpm) and respiratory rate is measure in breaths per minute (bpm).
Abnormal vital signs
There are several physiological and environmental factors that will affect an animal’s TPR values. Very young animals also often have increased TPR values.
It is advisable that if the TPR values are high, the TPR should be assessed again after the environmental effects of the animal have diminished. There are several reasons for deviations from the normal TPR value. These include:

- Stress – fear of an unfamiliar environment, smells or sounds, which will increase TPR.
- Heat – Exercise and being tied up in the sun or just on a hot day will increase TPR values.
- Exercise – activity in any weather conditions will increase TPR values.
- Female animals in season agitate male animals, increasing TPR values.
- Inability to urinate or defecate (for example, house-trained dogs locked in a cage will increase the TPR value).
- Sleep – this will decrease an animal’s TPR values.
Remember that normal TPR values will vary between different species and individual animals. Variances occur between young, adult, very old, healthy or sick animals. Therefore, it is important that you can identify normal values for each species and take any relevant environmental factors into account as possible reasons for deviations from the normal.
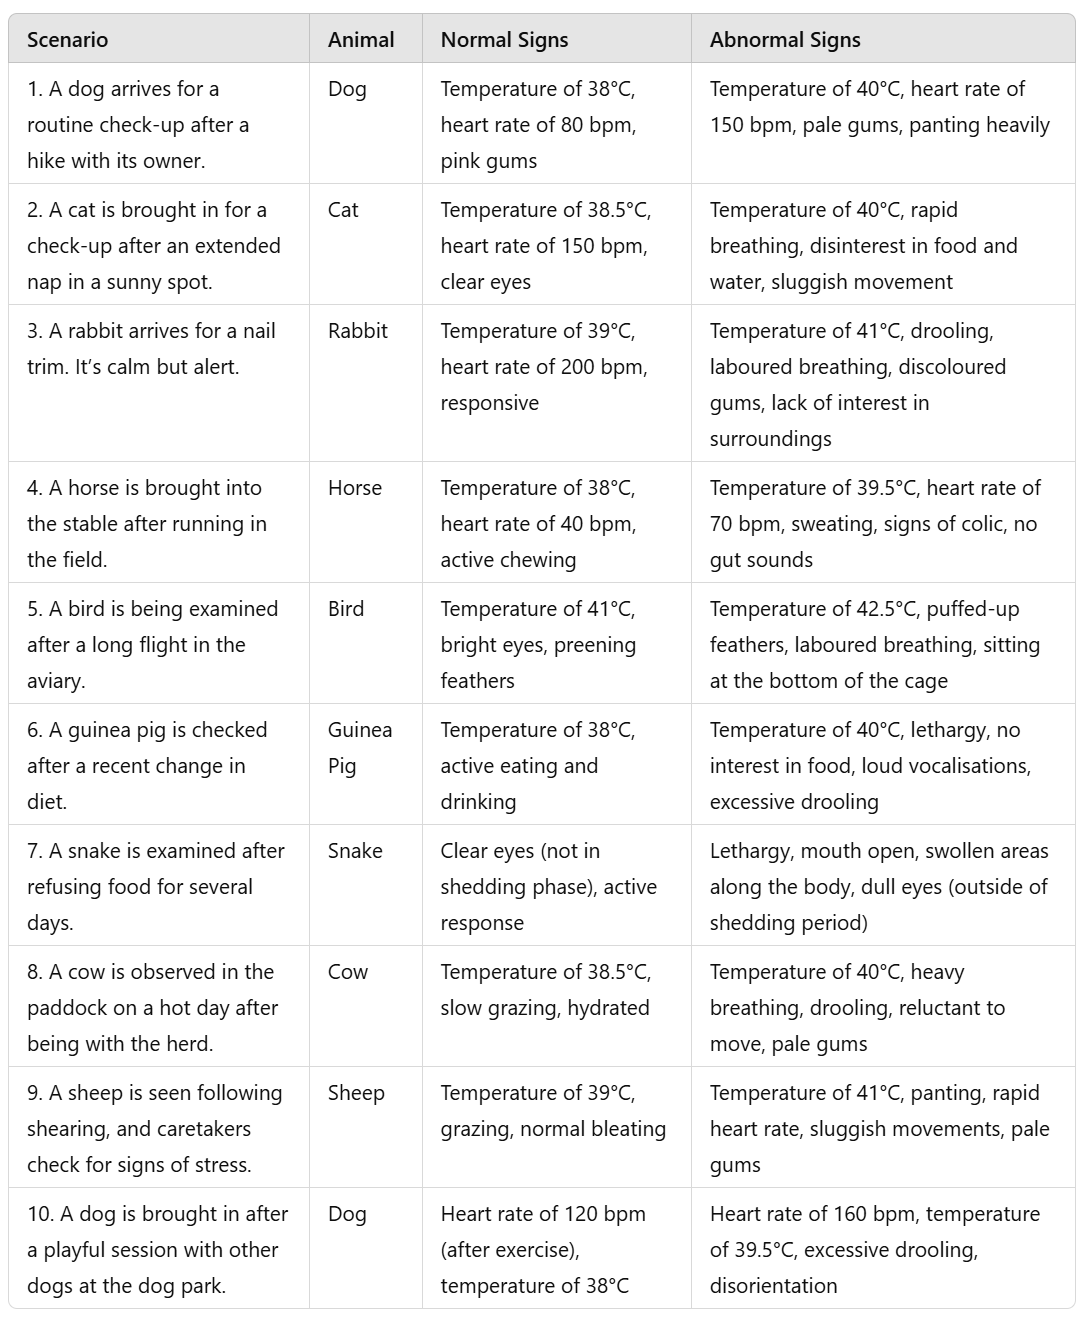
The table below contains some examples of normal and abnormal vital signs you may see in different animals.
Heart rate and pulse rate

The heart pumps blood around the body as it contracts. The number of times the heart beats per minute is the heart rate. The surges of blood can be felt around the body as a pulse. The number of pulses per minute is the pulse rate.
In a healthy animal, the heart rate and pulse rate should be the same. When they are different, it is a clear indication that something is wrong.
The rate and strength of a pulse also depends on the blood pressure and hydration of the animal. Injury may also disrupt the pulse or make it very difficult for you to find. So, it is important that you can take both a heart rate and a pulse rate in an emergency.
Heart rate
To take the heart rate using a stethoscope:
- If required, obtain assistance to restrain the patient.
- Place the stethoscope over the left side of the chest – the best access is usually over the rib cage, just behind the front left leg.
- Listen carefully and count the number of the thumps over 15 seconds then multiply by 4 to calculate beats per minute (bpm).
- Record this information.
To take the heart rate without a stethoscope:
- Place your hand over the left side of the animal’s chest. Depending on the side of the animal you can use your whole hand or just your middle and index fingers. Be careful not to use your thumb. You have a strong pulse at the tip of your thumb, which can make it difficult to detect the heart rate of the animal.
- Feel for the heartbeat.
- Once you have a good hand position, count the number of the thumps over 15 seconds then multiply by 4 to calculate bpm.
- Record the heart rate.
Pulse rate
The pulse can be measured on any part of the body where a major artery runs close to the surface of the skin. Each pulsation corresponds with a contraction of the heart.

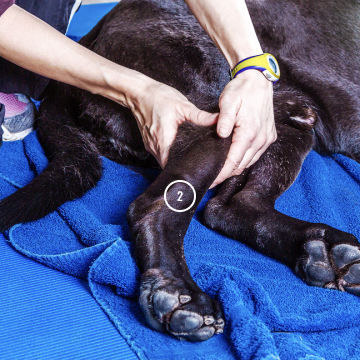
Two easily accessed arteries in mammals are the (1) femoral artery and the (2) dorsal pedal. The femoral artery is located on the inner thigh and is the easiest place to find a pulse in dogs, rabbits and cats. To find it, lay the animal on its side, then run your hand along the inside of the hind leg until you are almost to the point the leg joins with the body. You will feel a slight dip where the femoral artery is closest to the skin. The artery feels like a thin cord between two muscles. Use your fingertips (not your thumb) to press down gently and feel for a pulse.
As with taking the heart rate, count the number of pulses over 15 seconds then multiply by 4 to calculate bpm.
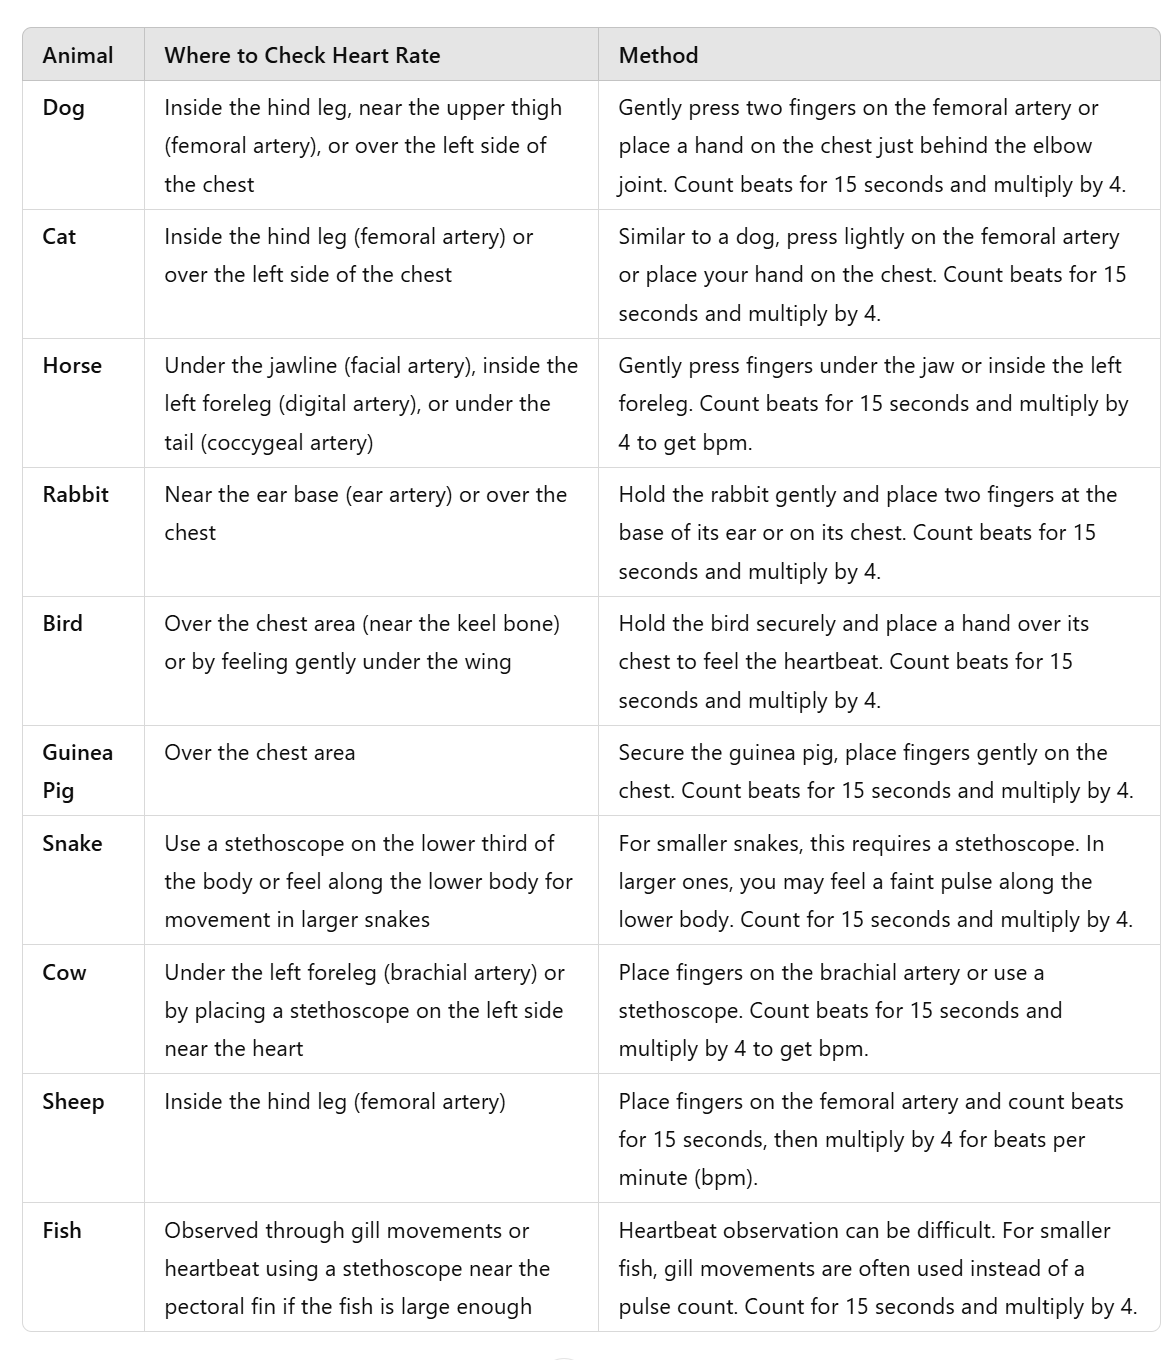
Visual Aid (Explanation for Reference)
- Femoral Artery (Dogs, Cats, Sheep): Gently place two fingers inside the hind leg, about halfway up the thigh, where the femoral artery is closest to the skin.
- Facial Artery (Horses): Under the jawline where the facial artery crosses, place fingers lightly against the skin.
- Ear Artery (Rabbits): Feel around the base of the ear to find a gentle pulse.
- Chest Palpation (Birds, Small Mammals): Hold gently and feel for a heartbeat on the chest or, for larger birds, under the wing.
- Digital and Coccygeal Artery (Horses, Cows): Feel the artery under the tail or near the base of the front leg.
- Stethoscope (Snakes, Fish, Large Livestock): Place the stethoscope on the lower third of the body (for snakes) or near the heart or pectoral fin area (fish) for heart sounds.


Respiratory rate

The best way to check the patient’s respiratory rate (RR) is to watch the movement of the chest rise and fall or listen closely and count the number of expirations (breaths out) for a period of 15 seconds and multiply this number by 4.
It is often a good idea to assess the physical conditions of the animals’ breathing while you are determining the RR.
Mucous membranes

Mucous membranes (MM) are a type of tissue that line body cavities. They typically contain a dense network of capillaries and so are a good indicator of blood flow and of how much oxygen is circulating in the blood of an animal.
The mouth is a relatively easy location to assess the MM of an animal. Check the colour of the gums and the inside of the lip. The colour of the MM can change depending on the health status of the animal.
- Moist and pink – normal and healthy
- Pale – may indicate shock or reduced blood flow
- Yellow, also known as jaundice – may indicate problems with liver function
- Blue – cyanotic (lack of oxygen) – may indicate poor breathing or poor circulation
- Bright red – may indicate poisoning or heatstroke.
Capillary refill time
Capillary refill time (CRT) is the time taken for blood to fill a small blood vessel that has been temporarily blocked. It indicates the rate at which blood travels to the peripheral tissues, such as ears, toes and gums. CRT confirms what you have detected by examining the colour of the mucous membranes.
If it is safe to put your finger in the animal’s mouth, CRT is typically assessed at the same time as MM. To check the CRT:
- Lift the animal’s lip.
- Apply a small amount of pressure with the tip of one finger to the side of the gum. As you press down, the blood leaves the area and makes the gum appear pale - blanches.
- Remove your finger and observe how long it takes for the gum to return to a pink colour.
CRT should only take 1-2 seconds in a healthy animal. Longer than this may indicate dehydration, low blood pressure, circulatory problems or blood loss.
Temperature
It is possible for you to judge whether an animal's temperature is very high or low by feeling their extremities, such as the ears and paws. If you are in a first aid situation on the field and do not have a thermometer, it is enough to allow you to estimate if the animal needs warming or cooling.
However, this technique is subjective and very unreliable. You should use a thermometer whenever possible. If you are actively heating or cooling an animal, you must use a thermometer to monitor changes in the animal’s temperature to ensure they don’t become too hot or too cold.
The temperature of an animal is usually taken using a digital rectal thermometer because it is the most accurate method.
Please note that taking temperature with a rectal thermometer is the most invasive technique of checking vital signs, and it can be stressful for the animal and increase their HR and RR. So, it should be done last in your assessment.
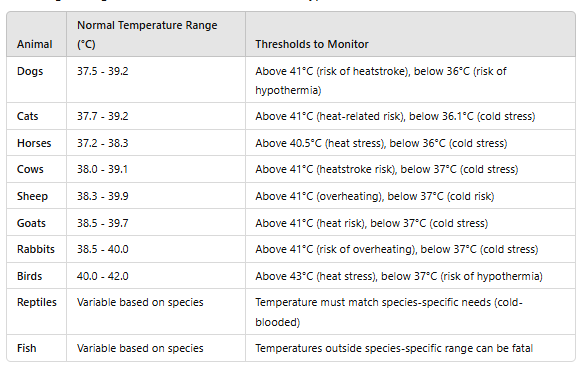
The table below provides examples of the temperature threshold for animals.
Taking an animal’s temperature
Many animals resist when their temperature is taken with a rectal thermometer. So, before taking their temperature, restrain the animal and hold them firmly. Ideally, have someone else hold the animal’s head while you conduct the procedure. If possible, lubricate the thermometer to make the procedure more comfortable for the animal.
The procedure for taking temperature using a rectal thermometer is as follows:
- Place a clean probe cover on the thermometer and lubricate the bulb.
- Lift the tail and gently insert the thermometer into the rectum, slightly rotating it as you go. Do not force entry. Gently push the thermometer against the wall of the rectum – you are taking the temperature of the animal, not its faeces!
- Keep the thermometer against the wall of the rectum for a minimum of 60 seconds (or until you hear the beep sound on some thermometers). For large animals, ensure the thermometer stays in contact with the wall of the rectum for a correct reading. Most digital thermometers will beep when you turn them on, and beep again when it’s ready to read – after maintaining a constant temperature for several seconds.
- Gently remove the thermometer. Immediately read the temperature and record the finding.
- Dispose of the probe cover appropriately, wipe away any faeces and wash and sterilise the thermometer before using again.
Watch
Watch the following video, ‘Taking your dog's temperature’ (6:11 min), for a demonstration of how to take an animal’s temperature with a rectal thermometer. The procedure is essentially the same regardless of species.
Note: The normal temperature range mentioned in the video varies from the figures in the previous table. The accepted normal range is dependent on what the local veterinarian may recommend. Please refer to the table of animal vital signs in the previous section for the range you are expected to know for this course.
Temperatures outside the normal range
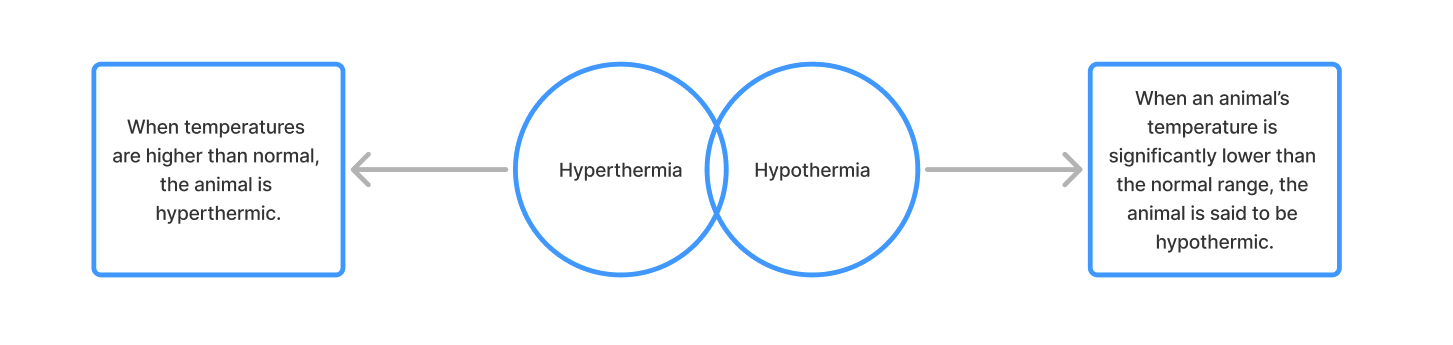
Hypothermia
When an animal’s temperature is significantly lower than the normal range, the animal is said to be hypothermic. Hypothermia can be caused by prolonged exposure to cold conditions, some diseases, blood loss, and even anaesthetics.
Symptoms of hypothermia include:
- In mild cases:
- Shivering
- Stiff or clumsy movement
- Pale gums
- Confusion.
- In severe cases:
- No shivering
- Rapid decrease in body temperature
- Slow breathing
- Fixed and dilated pupils
- Collapse or lack or responsiveness (Coates 2021).
To treat hypothermia, you must actively warm the animal. While warming, frequently check the animal’s temperature to make sure they don’t overheat.
- If the animal is wet, first dry them.
- Wrap the animal in dry, warm towels or blankets.
- Provide the animal with a hot water bottle or heating pad, making sure the item is not too hot. You should be able to comfortably handle it with your bare hands. If the animal cannot move on their own, move them regularly to prevent burns. If the animal is mobile, provide them space to move off the heat pad of their own accord.
- If you have access to one, use a Bair Hugger blanket and set the temperature to be appropriate to the species (Coates 2021.).
Hyperthermia
When temperatures are higher than normal, the animal is hyperthermic. A high temperature is a common indication of infection and other serious health issues. Hyperthermia is often caused by extreme environmental heat, such as being locked in a car on a hot day, or by excessive activity on a hot day.
Hyperthermia can cause serious damage to the body and quickly lead to death if not treated.
Early symptoms of hyperthermia include:
- Panting
- Drooling
- Bright red MM.
Symptoms of severe hyperthermia include:
- Seizures
- Spontaneous bleeding
- Extreme lethargy
- Collapse
- Coma and death (Jones 2022).
To treat hyperthermia, you must actively cool the animal. While cooling, frequently check the animal’s temperature to make sure they don’t get too cold.
- Apply cool water from a tap to the skin, especially around the groin, armpits and neck. Do not use cold water or ice because they can cause the blood vessels to constrict too quickly, which prevents cooling.
- Use fans to keep the air moving over the animal. This helps dissipate excess heat.
- Offer small amounts of cool tap water for the animal to drink (Jones 2022).
Watch
Watch the following video, 'How to Check Your Pet's Vital Signs' (5:27 min), which gives great tips on how to assess an animal. Note: There are often variations in what the normal vital sign ranges in an animal should be. This depends on the veterinarian. Also note, this video is from the USA where temperature is measured using the Fahrenheit scale. In Australia, temperature is measured using degrees Celsius (°C).
Physical condition

The physical condition of an animal is made up of the outward signs of its health and wellbeing. You do not generally need specialist equipment to assess the physical condition of an animal. In most cases what you can see, hear and feel is enough to identify significant health problems that require first aid.
Assess the physical condition of the animal
To assess the physical condition of an animal you should:
- Look for any obvious signs of bleeding, vomiting or unusual evacuation (diarrhoea)
- Listen to and watch the animal’s breathing
- Observe the animal’s demeanour
- Look for damage to or unusual discharge from the eyes, ears and nose
- Check for broken bones, wounds and foreign bodies
- Assess the animal’s hydration level
- If the animal is standing, observe for unusual posture or movement. If you suspect broken bones or spinal damage, do not encourage the animal to stand or move.
Make a note of all your observations, including the absence of symptoms. In other words, rather than leave it blank, make a note that a particular symptom was not present at the time of your assessment. This can be helpful if new symptoms develop over time. For example, if you didn’t observe vomiting or diarrhoea, put that in your notes - “No vomit or unusual evacuation observed”.
Assess breathing
Watch and listen to the animal breathe. Observe the movement of chest and stomach and take notes about the way the animal is breathing. Use the following questions as a guide to the type of notes you should take.
- How much effort is needed to take each breath? Is breathing easy or laboured?
- How deeply is the animal breathing? Are the breaths deep, shallow or irregular?
- Is the animal making unusual sounds while breathing? Can you hear choking, whistling, gasping, excessive coughing or wet noises?
Assess the demeanour
Demeanour is the general, observable behaviour and alertness of an animal. An animal’s demeanour is an indication of injury, illness or disease.
Observe the animal’s behaviour and note its demeanour. The following terms are commonly used to indicate the demeanour:
- BAR - Bright, alert and responsive
- QAR - Quiet, alert and responsive
- Altered mentation
- Post-ictal – phase immediately following a seizure
- Depressed or dull
- Obtunded – lethargic or sleepy
- Stuporous - unconscious or very difficult to rouse
- Comatose.
Assess external injuries
Check the animal’s eyes, ears and nose for damage or unusual discharge. Carefully run your hands over the animal’s limbs and body to check for broken bones, wounds, foreign objects and ectoparasites, such as ticks.
Wounds include lacerations (cuts and scratches), abrasions (scrapes and grazes) and punctures. Missing fur can be a clue for finding wounds.
Make a note of all external injuries.
Assess hydration
Hydration is the level of water present in the body. Water is essential for most bodily processes as well as maintaining good blood pressure. Dehydration occurs when the animal does not have enough water in its body. Dehydration can cause organ damage and, in severe or prolonged cases, even death.
Dehydration occurs if the animal does not take on enough fluid (won’t or can’t drink) or if they lose a lot of fluid quickly, such as through repeated vomiting or diarrhoea. Dehydration is particularly dangerous in small and young animals, such as puppies and kittens, because it can happen very quickly.
There are two common ways to assess the hydration status of an animal.
- The skin tent test. Gently pinch and lift the skin between the shoulder blades, forming a ‘tent’ shape. Drop the skin. In a well-hydrated animal, the skin should spring straight back to its normal position after you release it. If the skin returns slowly or remains in the tented position, it indicates dehydration. The longer the skin takes to return, the more severe the dehydration. Note: keep in mind that older animals may have less elastic skin that may tent a little longer than younger animals (Australian Red Cross n.d.)
- The gum test. Note: Always be careful when going near an animal’s mouth. If there is any risk of being bitten, do not attempt this test. Gently lift the upper lip of the animal and look at the gums. Use your finger to gently touch the surface. In well-hydrated animals, the gums should look glossy and wet. In dehydrated animals, the gums tend to look dull and are sticky to the touch (Bond Vet 2020).
Watch
The following video from eHow (2:34 min) demonstrates how to perform the gum test and the skin tent test on a hydrated dog.
It is not safe to offer water to an animal in a first aid or emergency situation unless you are directed to by a vet or a registered wildlife care centre. Many Australian native animals do not drink water in the same way as cats and dogs. Giving them water may increase the risk of further illness or injury. Even offering water to domestic animals may cause further complications.
The safest way to rehydrate an animal is via an intravenous drip, administered by a vet.
Assess ambulation
Ambulation is the ability for an animal to walk. In an emergency, you can classify the animal as:
- Ambulatory - able to walk
- Non-ambulatory - unable to walk.
If the animal is lying down when you arrive on the scene, do not encourage them to stand or walk in case they have broken limbs or spinal damage. However, if they stand up of their own accord, or are standing on arrival, note any unusual posture or movement.
Ambulatory animals may be allowed to walk a short distance, for example, to a vehicle to transport them to a vet. However, first consider their safety. If there is any risk of further injury or harm, stretcher or carry the animal.
We will discuss methods of transporting animals later in this module.
Knowledge Check 5

Ramona the cat
| Animal name: Ramona Owner name: Petrie Owner number: 0400 700 700 |
Species: Feline Breed: Devon Rex Age: 5 years Life stage: Adult |
Colour: Tabby Sex: Female; entire Weight: 3.2 kg |
Heath problem: Suspected Brown Snake envenomation
Ramona’s owner, Justin Petrie, brought her in after he realised that she could not support her weight on her back legs and had blood coming out of her mouth. An injured snake was also spotted in the garden.
Assess physical condition and vital signs of the animal
Upon arrival at the clinic, Ramona is taken immediately to the treatment area, which has been set up with soft bedding on the table as well as examination, testing and treatment requirements. The veterinarian on duty, Dr Phillips, and Head Nurse Sophie commences the triage examination.
They handle Ramona as little as possible. However, an examination is essential to gather details about her current condition.
Ramona was transported in a padded cat carry cage to prevent bruising and bleeding on her trip to the clinic. Sophie undoes all the clips on the cat cage and then lifts Ramona, along with the padding, onto the examination table. As Ramona is very dull, little restraint is needed.
The two staff members reposition her gently using calm, slow but purposeful movements. Sophie always has a hand hovering over Ramona so that she can easily restrain her if she tries to jump but not actually on her, ensuring she doesn’t cause Ramona pain or injury. Sophie also speaks softly to Ramona in a calm, soothing voice and when Dr Phillips and Sophie communicate verbally, they use soft tones.
Sophie records Dr Phillips's findings on the following Triage Examination Form, which is printed with owner’s and pets’ details from their system:
| Triage Examination Form | ||||
|---|---|---|---|---|
| Animal name: Ramona Owner name: Petrie Owner number: 0400 700 700 |
Species: Feline Breed: Devon Rex Age: 5 years |
Colour: Tabby Sex: Female; entire Weight: 3.2 kg |
||
| Date: 27/09/22 |
Time: 9:05 am |
Location of incident: Home |
||
| Demeanour:
BAR
QAR
Dull ✔
Obtunded
Stuporous ✔
Comatose
Seizure / Post-ictal
|
||||
| RR and effort: 40 bpm Moderate |
HR: 200 bpm |
Pulse: | MM / CRT: Pale |
Temperature: |
| Triage level:
Life-threatening ✔
Intermediate
Minor
Non-emergency
|
||||
| Reason for visit: Suspect brown snake envenomation. Brown snake found on property with wounds. Collapsed at home. Last seen normal 7 am this morning. Blood coming from the mouth at home, nose started bleeding on way to clinic. Puncture wounds found on right lip and right paw. |
||||
| Completed by: Dr Phillips |
Name of Vet notified: | |||
During the assessment, Bianca, the receptionist speaks to the owner. She asks if they managed to obtain a photo of the snake. Mr Petrie forgot to take a photo in his concern for Ramona. Bianca communicated this to Dr Phillips. Once the assessment is completed and before moving on to more tests to determine the type of snake, Dr Phillips speaks to the owners. He relays his findings and that he is confident Ramona has sustained a snake bite, however, he cannot be sure of the type unless he performs a urine test which will tell him the species.
Dr Phillips updates the owners on the costs so far, including the urine test. The owner consents to the testing.