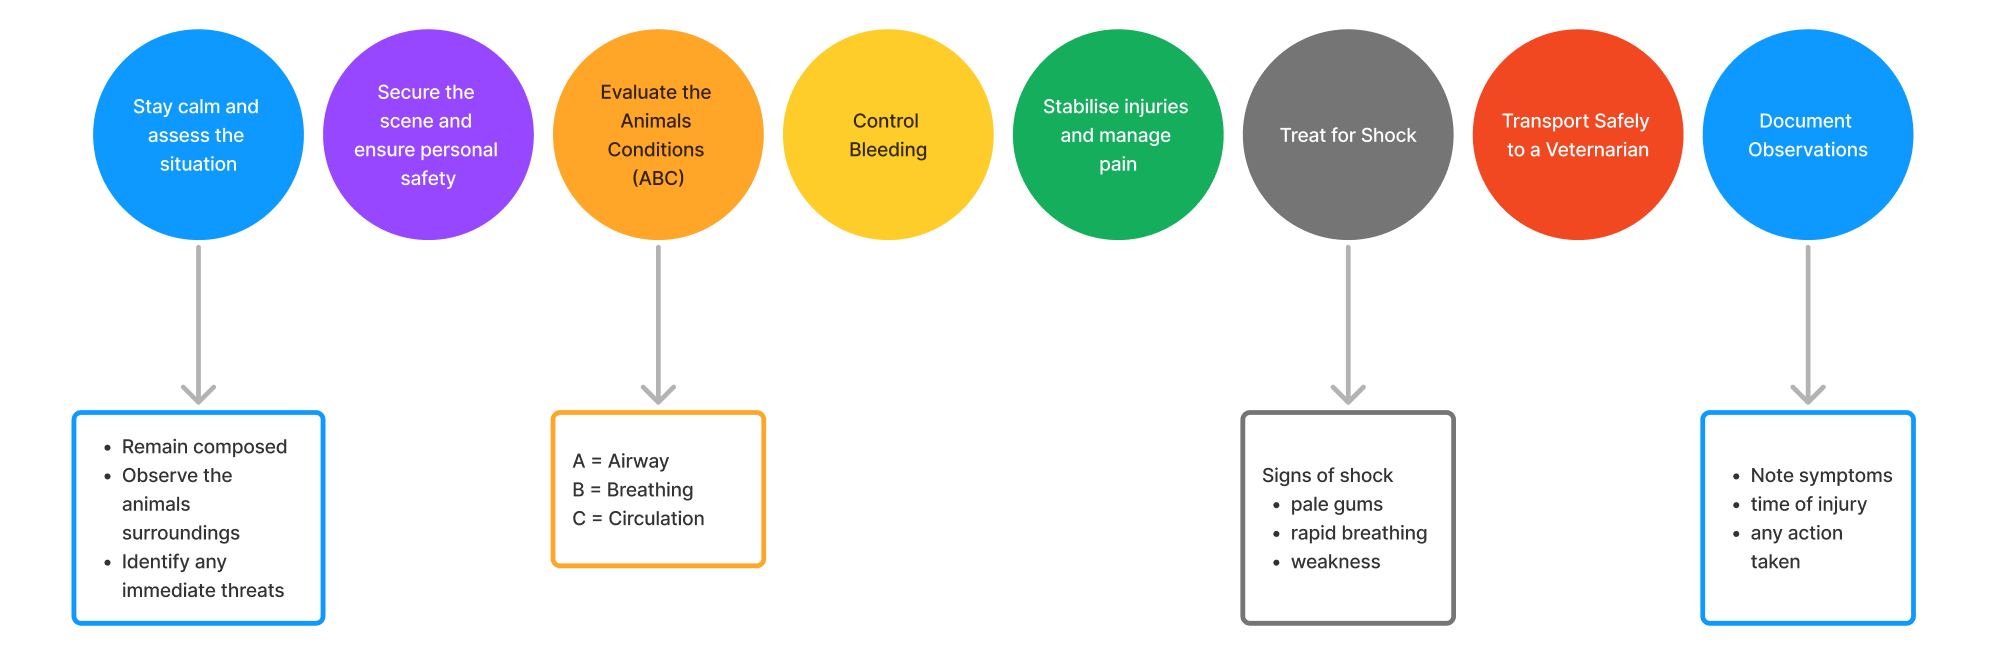
Providing basic first aid to an animal involves several fundamental steps to stabilise its condition and minimise harm before professional veterinary care can be accessed. Here are the key fundamentals:
Watch
The next video is from Bondi Vet showing how a dog has been provided first aid after being attacked by burglars.

Once you have assessed the physical condition and vital signs of the animal, you can decide which first aid techniques are appropriate for the situation.
If an animal requiring first aid is brought to you at your workplace, you should have all the relevant equipment easily available. However, in the field, you may need to be creative. It may be a good idea to carry an animal first aid kit with you when you are out and about so that you can be better prepared in case of an emergency. The following list outlines some key items that you should include in your first aid kit.
First Aid Kit Checklist:
- Slip lead × 2
- Disposable gloves$
- Clippers/shearers
- Thermometer
- Sterile rinse solution (saline) (wound wash)
- A towel or blanket to use as a stretcher
- Gauze swabs
- Stretchy bandage
- Bandage scissors (blunt ended)
- Tweezers
- Tick tweezers
- Hand sanitiser
- Non-stick sterile wound dressing
- Splinting items, a ruler, for example
- Self-adhesive tape, including packaging tape
- Conforming bandage (stretchy gauze)
- Foil blanket
- Antiseptic wipes
- Cotton wool
- Box or cat cage – you can store all items neatly in it and use for transporting of animals.
Basic animal first aid techniques

Basic first aid, whether it is for native animals, domestic animals, or people, is very similar. By applying the basic first aid treatment principles, you might be able to save an animal's life. Remember, though, that first aid does not treat animals. It just maximises the chance of survival until a vet can attend the animal.
Recall the seven principles of first aid:

- Preserve life
- Prevent deterioration
- Promote recovery
- Take immediate action
- Calm the situation down
- Call for medical assistance
- Apply the relevant treatment.
There are many different first aid techniques you can use. The techniques you choose will depend on the situation and your physical condition and vital sign assessment of the animal.
There are several first aid practices you may become aware of at your clinic or animal care workplace. Speak to your supervisor to determine and understand workplace specific procedures relating to first aid.
Case Study

At Happy Paws Animal Care, Max, a 5-year-old Labrador, was brought in with a severe cut on his paw pad after stepping on broken glass in the yard. The wound is bleeding heavily, and Max appears distressed, whimpering and limping. The team needs to follow the seven principles of first aid to ensure Max receives immediate care in a safe, effective manner.
First Aid Principle |
Application in this scenario |
|---|---|
| 1. Preserve Life | The priority is to address Max’s immediate needs and prevent excessive blood loss. Alice, the lead attendant, stays calm and reassures Max while gently restraining him to assess the wound and stop the bleeding. |
| 2. Prevent Deterioration | Alice applies firm pressure to the wound using a clean cloth to control bleeding. She instructs a colleague to gather first aid supplies and a muzzle to ensure everyone’s safety, as Max may react from pain. |
| 3. Promote Recovery | Alice wraps Max’s paw with a sterile dressing, carefully securing it without cutting off circulation. This initial bandage will keep the wound clean until Max can be assessed by the on-call veterinarian. |
| 4. Provide Comfort | Throughout the process, Alice uses a soothing voice to keep Max calm. She strokes his back and speaks to him reassuringly, reducing his stress and helping to keep him still for treatment. |
| 5. Reassure | Alice explains to Max’s owner, Ms. Harper, that he is in good hands and outlines the care steps taken. She also assures Ms. Harper that the on-call vet will be arriving soon to provide further assistance. |
| 6. Assess the Situation | Alice quickly assesses Max’s vital signs—his breathing rate and pulse—to ensure there are no additional signs of shock. She observes his behaviour and level of pain to determine if there are any other underlying injuries. |
| 7. Protect Yourself and Others | The team uses gloves to avoid contact with blood and keeps Max in a separate treatment area to avoid startling other animals. Alice places a soft muzzle on Max to ensure everyone’s safety as they work on his injury. |
Communication and Record Keeping
Once Max is stabilised, Alice contacts the vet, giving a thorough description of the injury and first aid provided. She also completes an incident report, noting the time, nature of the injury, and the steps taken. This record ensures continuity of care and provides valuable information for future reference.
Sample Incident Report for Max
|
|
|---|---|
| Animal Name: Max | |
| Species/Breed: Dog / Labrador | |
| Incident Date/Time: [Insert Date & Time] | |
| Injury Description: Laceration on front paw pad, moderate blood loss | |
| First Aid Administered: Pressure applied to stop bleeding, sterile dressing applied | |
| Observations: Calm behaviour; no additional signs of trauma or shock | |
| Staff Involved: Alice Smith | |
| Follow-Up: Vet assessment required |
This scenario highlights the importance of first aid principles to provide timely and effective care. By following these principles, Happy Paws staff were able to help Max through an emergency calmly and safely, protecting both the animal and the caregivers.
However, in this module, we will focus on five of the most common basic techniques that you are likely to use:
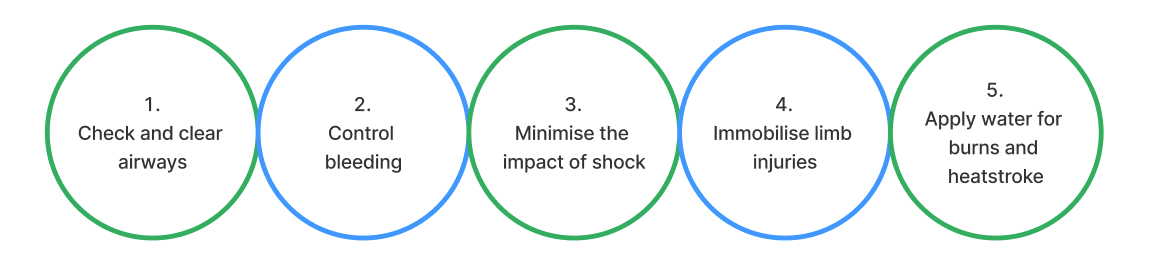
- Check and clear airways
- Control bleeding
- Minimise the impact of shock
- Immobilise limb injuries
- Apply water for burns and heatstroke.
Check and clear airway
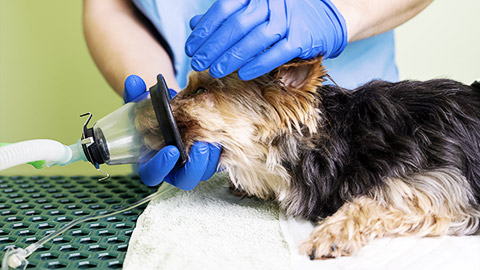
Oxygen is critical for survival. If an animal can’t breathe effectively, it will likely die within a few minutes.
If at any point you are concerned the animal isn’t breathing well, for example you can hear gasping or bubbling sounds as they breathe, check its airway to ensure there is no obstruction (something blocking the airway). If you see something, you will need to remove the obstruction to clear the airway and give the animal the best opportunity to breathe.
To check and clear the airway:
- Position yourself on one side of the animal
- Place one hand across the top of the animal's muzzle and slide your thumb and index finger gently into the mouth, between the teeth.
- As the top and bottom teeth separate, insert the pointer finger of your other hand between front incisor teeth, apply pressure to bottom jaw and tongue to open the mouth fully.
- Look inside your mouth and as far down the throat as you can.
- If necessary, use a sweeping motion with your pointer and middle fingers across the tongue to remove excess saliva.
- If you see an obstruction and can clearly see the entire object (in other words from start to finish), you can use your fingers or tweezers to remove the object carefully. When using tweezers, be extremely cautious in case you injure the mouth or throat. If the object is too far in or you cannot see how far down it goes, do not attempt to remove it. Removing obstructions like this may cause further injury or bleeding. Immediately take the animal to a vet.
- If you have access, administer oxygen. This can be done by simply holding the oxygen tubing close to the animal’s face – fly-by O2. You can also use an oxygen face mask, hood or tent for a more direct delivery of oxygen.
Watch
Watch the following video, 'How to Help a Choking Dog’ (3:03 min), which demonstrates how to check and clear the airways of a choking dog.
Reading
Read the article, ‘First aid for pets struggling to breathe’, to learn about what to do if an animal is having difficulty breathing.
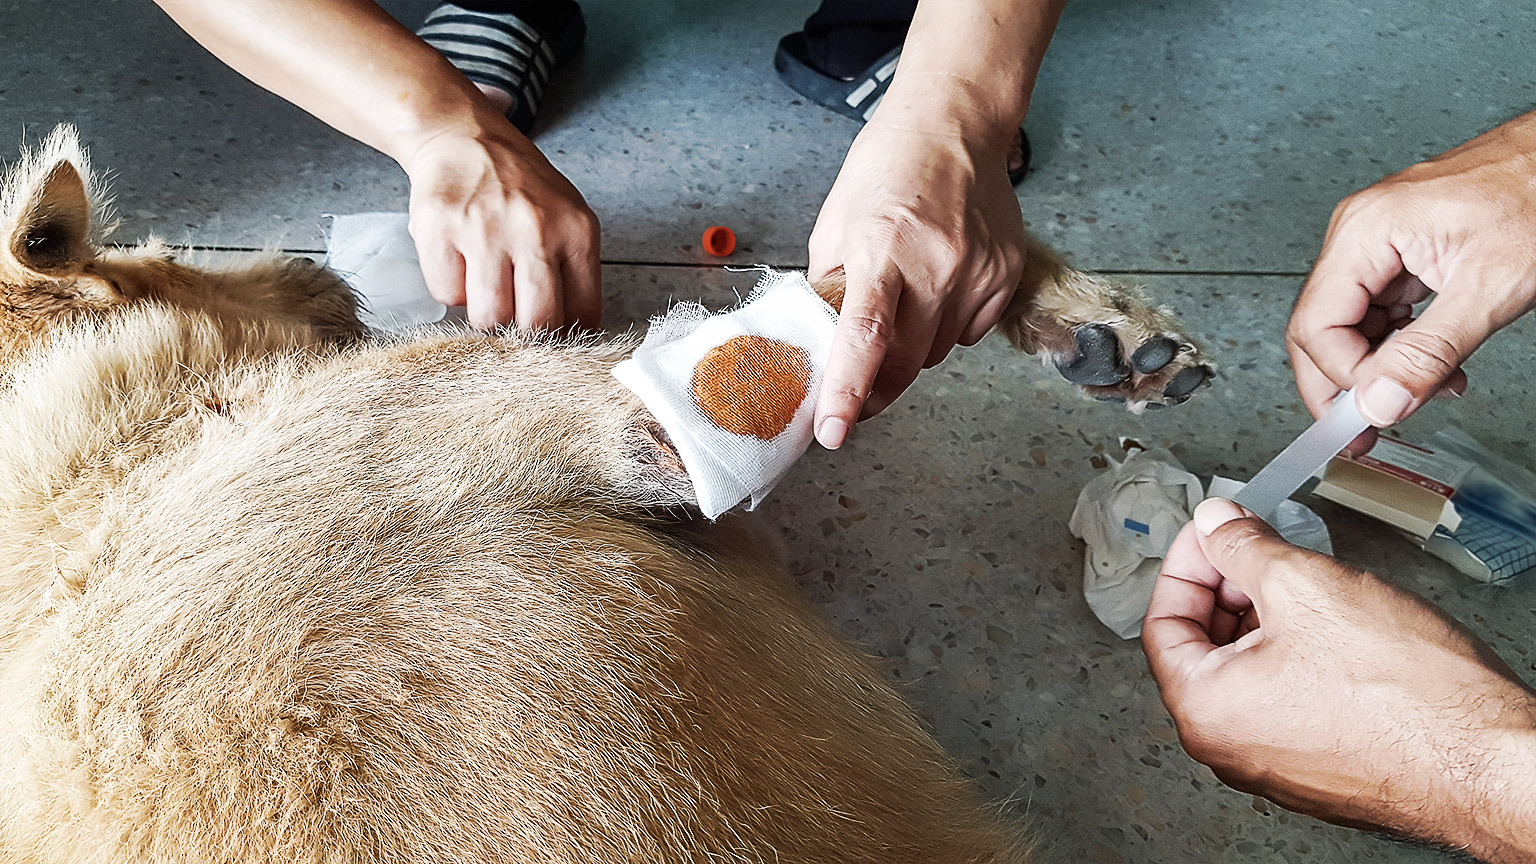
Control bleeding

If you see blood, check the animal for wounds. Where blood is oozing or only dripping slowly, such as from a graze or a scratch, clean the wound and apply a clean dressing or bandage.
The following steps will assist you if you have an animal that is bleeding and require attention:
- Stay calm and assess the situation
- Approach the animal slowly and carefully, ensuring your safety as animals in pain may bite or scratch.
- Observe the severity of the bleeding and locate the source.
- Apply pressure to control the bleeding
- Use a clean cloth, gauze, or dressing and press gently but firmly over the wound.
- Maintain a steady pressure until the bleeding slows. Avoid lifting the cloth to check too often, as this can disrupt clotting.
- Elevate the wound (if possible)
- If the wound is on a limb, gently elevate it above the level of the heart to slow bleeding, but only if this does not cause the animal distress.
- Bandage the wound
- Once the bleeding has slowed, keep the pressure in place by securing a bandage or dressing over the wound.
- Wrap it firmly but not too tightly, as excessive pressure can restrict blood flow.
- Watch for continued bleeding
- If blood soaks through the bandage, apply additional layers without removing the existing bandage to avoid disturbing clotting.
- Treat for Shock (If Necessary)
- Keep the animal calm and warm by covering it lightly with a blanket.
- Monitor breathing and keep the animal as still as possible.
- Seek Veterinary Assistance
- Once the bleeding is under control, transport the animal to a vet as soon as possible for further treatment.
- Call ahead to inform the vet of the situation so they are prepared to act upon arrival.
Watch
Review the video ‘Direct digital Pressure’ (1:59 min) to learn how to apply direct digital pressure to a minor bleed.
Video transcript
Direct digital pressure (2:00 min)
Title slide: ‘Otago Polytechnic School of Veterinary Nursing’
Slide text
First aid: Direct digital pressure (used for minor wounds
IMPORTANT
Before approaching assess the animal’s demeanour
If you are unsure consider applying a muzzle
[Video shows dog’s left-hand paw with several spots of blood on it]
You will be using your fingers (digits
To put direct pressure on the wound
[Video shows gloved hand and three middle fingers putting pressure on the bloodied spot on dog’s paw
Notice the nurse is wearing gloves
This helps reduce the risk of contamination
[Video shows ungloved hand putting pressure on the same wound]
You can still apply pressure if you don’t have gloves
Try to make sure your hands are clean though
[Video shows a gloved hand applying a piece of cloth over the wound and applying light pressure]
You can also use a swab
Or a clean household cloth
Apply pressure for up to 15 minutes
Minor bleeding should clot in that time
[Video shows gloved hand slightly pinching together the paw wound with nail and forefinger]
You can also pinch the edges together
Again hold for up to 15 minutes
What if there’s glass in the wound?
[Video shows gloved thumb and forefinger lightly pinching same dog’s paw wound together]
Use the pinch method
leave the glass in the wound
Or apply a pad either side of the glass
And bandage around the glass
IMPORTANT
[Video shows original image of dog’s bloodied paw]
This technique is only useful for minor wounds
if blood flow is heavy or spurting use a pressure bandage
Don’t remove any foreign objects (like glass) form the wound
it might be preventing arterial bleeding
Avoid putting pressure on a foreign object
you might push it further in
Minor bleeding should stop within 15 minutes,
if it hasn’t consider a pressure bandage
Make sure the animal is seen by the veterinarian
even for minor bleeding (could be complications)
Thanks To
Hannah as the Nurse
Fin as Himself
Animal injuries simulated
[Slide shows Otago Polytechnic Te Kura Matatini ki Otago logo]
[End of video and transcript]
If you see blood steadily dripping or spurting, the animal is at risk of excess bleeding. Excessive blood loss is very dangerous for an animal because it means that its organs and tissues won’t receive enough oxygen or nutrients to function properly. An important step in first aid is to control bleeding – slow or stop the bleeding.
To control bleeding of laceration on the hindlimb of a dog:
- Appropriately restrain the animal.
- Apply firm pressure to the wound for at least 3 minutes, using a clean towel, swab, dressing or bandage.
- If the blood soaks through the first dressing, add another. Do not remove the first dressing in case it disturbs a clot that is forming and reopens the wound.
- Secure the dog in the vehicle, ensuring it is adequately restrained and cannot tamper with the dressing or cause further injury to itself.
- Transport the animal to a vet when it is safe to do so.
Watch
Watch the following video, ‘Pet First Aid: How to Stop Bleeding’ (2:29 min), for some basic techniques to help stop and control bleeding.
Reading
Read the article, ‘First aid for bleeding’, to learn about what to do if an animal is bleeding.
Minimise the impact of shock

Shock is an emergency medical condition that is caused when the body’s ability to circulate blood efficiently is disrupted. As a result, blood flow and oxygen delivery to vital organs is reduced. There are several causes of shock, including blood loss, heatstroke, burns or severe infection. As with difficulty breathing or excessive bleeding, shock means that tissues and organs are not getting enough oxygen and nutrients to function effectively.
As an animal first aider, to minimise the impact of shock:
- Remain calm yourself, and try to keep the animal quiet and calm and by:
- Using low stress handling techniques, such as handling with a towel
- Keeping the animal away from noise and activity as much as possible
- Keep the animal warm
- If available, administer oxygen.
Watch
Watch the following video, ‘Basic Animal First Aid’ (5:51 min), which explains how to recognise and treat shock in animals.
Immobilise limb injuries
Immobilising a limb (keeping the limb still) will help prevent additional injury from occurring. Immobilisation is useful for all types of limb injury, but critical for broken bones.
In the case of fractures or other limb injuries, most animals will hold the affected area up and will not put pressure on it. Some will place pressure on it but limp or whine or make other sounds indicative of pain.
There are two main types of fractures.
- A closed fracture occurs when a bone is broken, but the skin is intact. You may notice swelling or abnormal movement of the limb.
- An open fracture (or compound fracture) is when a broken bone is accompanied by an open wound. The wound is often caused by the broken bone breaking through the skin.
Immobilise the limb
If you suspect or observe soft tissue damage or a bone fracture, and it is safe for you to do so, immobilise the limb using bandaging.

You can use the following steps to immobilise the limb.
- Firstly, do not pull on the limb. Do not try to straighten the limb or the broken bone. This will only cause pain and more injury.
- Attend to any bleeding.
- Try to limit the animal’s movement of and pressure on the limb. If possible, elevate the limb with a pillow, towel or suitable alternative.
- When transporting the animal to a vet, provide additional padding to reduce any movement while in transit.
Watch
Study the following video, ‘Dog and Puppy First Aid : Fractures’ (0:37 min), which demonstrates how to provide basic first aid for a dog with a broken bone.
Reading
Read the article, ‘First aid for broken bones’, to learn about what to do if you suspect the animal has a broken bone.
Apply water
Clean water is very useful in the basic first aid of animals. You can use water to clean the animal or area as well as to cool the animal. Water is particularly important in the first aid treatment of burns and heatstroke.
Burns
Burns rapidly cause soft tissue damage, typically to the skin of the animal. Burns may be caused by:
- Fire or very hot objects
- Electricity
- Sunburn
- Very hot water or steam
- Chemicals.
Visible signs of a burn may appear immediately or can take 12-24 hours to appear after the incident, depending on the cause and severity of the burn. The symptoms of a burn depend on the severity of the injury.

- First degree burns only affect the top lay of the skin. Symptoms are typically:
- redness
- pain.
- Second degree burns affect the top two layers of the skin. Visible signs include:
- red, white, or blotchy skin
- swelling
- blisters.
- Third degree burns affect the tissue underneath the skin and may cause nerve damage. Visible signs include:
- exposed tissue (missing skin)
- bleeding
- burnt areas may appear brown, red, or white (Mayo Clinic Staff n.d.).
Regardless of the severity of the burn, cool the area immediately by:
- Applying cool running water to the area or immerse in cool water for a minimum of 10 minutes, for example by placing the burnt area under a running tap or shower. The longer the better.
- Applying a cool pack or cool wet compress to the area for a minimum of 30 mins. Note do not place the cold pack directly on the skin, always wrap it in a clean cloth.
Note: use cool water, not ice. Ice can cause further damage to burnt tissue.
Reading
Read the article, ‘First aid for burns’, to learn about what to do if the animal is burnt.
Another injury to consider with fire burns is the possibility of smoke inhalation. Document your concerns if you have them, so the vet can treat the animal appropriately if required.
Heatstroke
Recall that heatstroke is another term used for hyperthermia, which results from body temperature exceeding the normal range.
As with applying water for burns, use cool rather than cold water. A rapid decrease in temperature will cause blood vessels to constrict, reducing blood flow, which will prevent the animal from cooling.
To provide first aid to an animal for heatstroke:
- Remove the animal from the hot environment
- Gradually lower the animal’s body temperature using one or more of the following techniques:
- Apply cool water from a tap to the skin, especially around the groin, armpits and neck
- Place the animal under cool (not cold) running water
- Place the animal in front of a fan or air conditioner
- Move the animal to a shady or air-conditioned area
- Wet the area around the animal to lower the ambient temperature
- Assess animal's core temperature regularly (every 5 minutes) while actively cooling; keep your supervisor informed of animal’s temperature and stop active cooling techniques when advised by them.
It is possible to cause hypothermia and the animal becoming too cold if active cooling continues, hence it is essential to be in constant communication with your supervisor.
Watch
Study the following video, ‘Dog first aid: heatstroke’ (6:44 min), which explains how to detect if a dog has heatstroke and what to do.
Reading
Read the article, ‘First aid for heatstroke’, to learn about what to do if the animal is suffering from heatstroke.
Case Study

Bella, a 6-year-old Labrador, was brought into Happy Paws after an accident involving a fall and subsequent exposure to extreme heat while outside. She sustained a minor cut on her leg, appeared overheated, and was having difficulty standing. Happy Paws staff quickly assessed her condition and began applying first aid, focusing on key areas: airway clearing, bleeding control, shock minimisation, limb immobilisation, and cooling for heat stress.
Step-by-Step First Aid Response
First Aid Technique |
Steps Taken |
|---|---|
| Check and Clear Airways | Jade, an animal care attendant, approached Bella and noticed her breathing was laboured. Jade gently extended Bella’s neck and checked her mouth for any obstructions. She carefully removed a piece of debris near her throat, allowing her breathing to stabilise. |
| Control Bleeding | Jade then turned her attention to Bella’s injured leg, which had a moderate cut with steady bleeding. She applied firm, gentle pressure using sterile gauze, successfully stopping the bleeding within a few minutes. Once under control, she bandaged the wound with a dressing. |
| Minimise the Impact of Shock | Recognising signs of shock (shallow breathing, lethargy), Jade worked to keep Bella calm and reassured her with a soothing voice. She elevated Bella’s back legs slightly and covered her with a light blanket, helping maintain body warmth and preventing further shock. |
| Immobilise Limb Injuries | After controlling the bleeding, Jade noted Bella’s leg seemed tender. To prevent further injury, she used a soft splint to immobilise Bella’s limb. She secured the splint with bandaging to minimise movement, keeping Bella as comfortable as possible. |
| Apply Water for Burns/Heatstroke | Bella showed signs of heat exhaustion due to prolonged sun exposure. Jade promptly used cool (not cold) water to dampen a cloth and applied it to Bella’s paws, belly, and neck. She then placed a fan nearby to provide gentle airflow, monitoring her temperature until it returned to normal. |
Outcome and Follow-Up
Bella began to show signs of recovery as her temperature stabilised, her breathing improved, and her overall demeanour became more relaxed. The team ensured her injury was well-protected and monitored her closely while waiting for the veterinarian to arrive for further evaluation.
This scenario illustrates key first aid steps and techniques to stabilise an animal experiencing multiple traumas, from airway checks and bleeding control to shock management, immobilisation, and heat stress treatment. Each step helped keep Bella safe and comfortable, allowing for a smooth transition to veterinary care.
Tick paralysis

Ticks are a type of ectoparasite and feed on the blood of other animals. Some species of tick can cause paralysis by injecting a toxin not the animal as they feed.
If you find a tick on an animal during your assessment, remove it using tweezers or a dedicated tick removal device by twisting and plucking. Make sure you remove the entire tick, including the head (it often snaps off during removal). Keep the tick in a jar to have the vet positively identify it.
Ticks will drop off by themselves once they had fed enough. Once the tick is gone, the animal may or may not show signs that it had a tick attached. If the hind legs of the animal are not coordinated, this may progress to paralysis. The animal may hyperventilate (breathe too quickly), have a change or loss of voice, have no appetite, vomit or regurgitate.
If you suspect tick paralysis, urgently seek veterinary assistance, no matter what degree of the signs.
While awaiting help, to manage the animal, make sure you:
- Don’t give them any food or water.
- “Keep the animal quiet, free from stress and excitement.
- Keep the animal in a temperature-controlled environment” (Australian Tick Paralysis Advisory Panel, 2016).
The size of the tick does not determine the possible severity of the outcome – both small and large paralysis ticks are potentially lethal. The tick may not be obviously visible on the animal, for example they may be located in the ear or under the lip in the gum.
Cats with tick paralysis have several unique additional treatment considerations which are different to dogs. According to the Australian Tick Paralysis Advisory Panel (2016), they are to:
- Handle away from dogs to reduce stress
- Cats are more likely to have an anaphylactic reaction to tick antitoxin serum (TAS) than dogs
- Treat in a quiet, dark, temperature-controlled environment
- Supplement oxygen if indicated using an oxygen cage.
Reading
Review A Guide to Diagnosis, Management, Treatment and Prevention (pdf) for comprehensive information about paralysis ticks in cats and dogs.
Watch
The next couple of videos are snippets from the Australian TV Show Bondi Vet. In these episodes they demonstrate how dangerous ticks are and some of the treatment options for the animals due to the severity.
Case Study

Lucy, a 4-year-old Border Collie, was brought into Happy Paws by her owner, who noticed she was having trouble standing and seemed unusually lethargic. Over the past day, Lucy had begun to lose coordination in her hind legs, was weak, and her breathing sounded laboured. Staff immediately suspected tick paralysis, a common issue in Australia, especially during warmer months.
First Aid Response
First Aid Technique |
Steps Taken |
|---|---|
| Initial Assessment | Jade, a staff member, quickly assessed Lucy’s condition, noting her laboured breathing, drooling, and loss of coordination. Recognising the signs of tick paralysis, she prepared to act immediately to stabilise Lucy. |
| Check for Ticks | Jade began a thorough examination of Lucy’s body, running her fingers gently over her fur, particularly around the head, neck, and ears. She found a tick embedded near Lucy’s ear and prepared to remove it carefully. |
| Remove the Tick | Using tick removal tweezers, Jade carefully grasped the tick as close to Lucy’s skin as possible, pulling it out in a steady motion to ensure it was removed completely without squeezing the tick’s body. |
| Monitor Breathing and Keep Calm | Jade noticed that Lucy’s breathing was shallow, a symptom of respiratory distress from tick paralysis. She gently positioned Lucy on her side, keeping her calm and encouraging her to remain still. |
| Apply Oxygen if Available | Since Lucy’s breathing was compromised, Jade placed an oxygen mask near her nose, as Happy Paws is equipped with oxygen supplies for emergencies. The oxygen helped stabilise Lucy’s condition until further veterinary support arrived. |
| Prevent Further Stress and Monitor Vital Signs | Jade kept Lucy in a cool, quiet space to avoid any additional stress and monitored her vital signs closely, tracking her heart rate and breathing every few minutes. She reassured Lucy’s owner that the team was doing everything to support Lucy until she could see the vet. |
Veterinary Follow-Up
The team contacted the local vet to prepare for Lucy’s transfer, explaining the signs of tick paralysis and first aid steps taken. Lucy was transported to the veterinary clinic for antitoxin treatment and supportive care, including ongoing respiratory support, as tick paralysis can worsen over the next 24-48 hours, even after tick removal.
Outcome and Record Keeping
Lucy was stabilised and responded well to treatment after receiving antitoxin and respiratory support. Staff at Happy Paws documented the incident thoroughly, noting the location of the tick, symptoms, and first aid steps taken, ensuring a clear record of her medical history.
This scenario illustrates the critical first aid steps for suspected tick paralysis, including thorough tick checks, careful tick removal, respiratory monitoring, and stress minimisation. By acting promptly and contacting the veterinarian, Happy Paws staff provided Lucy with the best chance for a full recovery.
Other first aid techniques
Reading
Read the ‘Initial treatment and care guidelines for rescued possums and gliders’ from the NSW Government for specific information about common first aid requirements of these Australian marsupials.
The following table outlines some other first aid situations and the relevant procedures. Select the links to extend your knowledge.
| First aid situation | Procedures | Additional resources |
|---|---|---|
| Tick toxicity |
|
|
| Snake envenomation |
|
|
| Cardiac arrest |
|
|
| Ingestion of toxins |
|
Transport the animal safely

Once you have provided first aid to the animal, you must then transport it to the veterinary facility for full treatment.
Moving and transporting an animal is risky because it can cause injury to both the animal and the first aider if not done appropriately. Unless the animal is present at an animal clinic or hospital, you will likely need to move the animal into a vehicle, then transport it to a veterinary facility.
In many first aid situations, the animal should not be encouraged to walk to the vehicle. They should be carried. So, remember your manual handling techniques and take care when you pick up and carry an animal. Ask for assistance to move large, heavy, awkward or aggressive animals.
The specific techniques needed to move and transport the animal will depend on the species involved. For example, a possum could be transported in a hessian bag, while an injured horse may require a horse float. However, two key aspects to consider when transporting an injured or ill animal are:
- Minimising movement and providing support to reduce further injury
- Reducing stress.
If possible, call ahead to make sure the veterinary facility knows you are on your way and are ready for the animal’s arrival.
Minimise movement
When moving the animal, motion of the head, neck, and spine should be minimized.Linklater A., 2020
If you suspect spinal injury or are not confident about transporting the animal, do not attempt to move the animal until you have spoken to a vet.
As a rough guide, if the animal weighs more than about 15 kg, ask for assistance to move them (pdsa 2020). Where possible, use a flat, firm surface, such as wood, thick cardboard or thick material, as a stretcher to provide support to the animal as you move it. It may be appropriate to strap the animal to the stretcher. X-rays will pass through most non-metallic materials, which means the animal won’t need to be moved once it arrives at the clinic or hospital (Linklater A. 2020).
The following steps are a general guide to moving an injured animal into a vehicle. Specific situations may require different techniques.
- Throughout the process, talk calmly and reassuringly to the animal.
- Support the head, neck and back by placing one arm under their head and shoulder and the other under their pelvis. Two people may be required to lift larger animals.
- Slowly and smoothly, with no jerky movements, lift the animal onto the support. When choosing a stretcher, make sure it is large and strong enough to support the whole animal.
- Check the path to the vehicle is clear and safe.
- Get a firm grip on all four corners of the stretcher if you are transporting a small animal. If two or more people are required to lift the animal, make sure everyone involved has a clear understanding of their role in the process so you can work together.
- Bend your knees and slowly life the animal by the stretcher.
- Walk slowly to the vehicle trying not to jolt the animal.
- Place the animal in the vehicle and secure them with seatbelts, towels, or clothing to provide padding so they do not move around during transport (pdsa 2020).
“Animals with altered mentation after trauma should be transported with the head level with the body or elevated 20 degrees. There should not be any jerking or thrashing motions, and manipulations of the neck or occlusion of the jugular veins should be avoided” (Linklater A. 2020).
Watch
Examine the following video, ‘Getting a dog safely in and out of the car’ (1:57 min).
Minimise stress

Ill and injured animals are at risk of shock. The additional stress of being moved and transported increases that risk. So, it is critical that you try to minimise this risk as much as possible through handling them animal as little passible and by using appropriate handling when you do. Be aware of where the pain or injuries are and do not touch the animal in that area.
An understanding of additional stressors for specific species can help. For example, “cats can be placed in dark boxes to minimize stress during transport; the box should have holes large enough so that the cat can be observed and to allow adequate fresh air” (Linklater A. 2020).
Wrapping or padding the animal with towels or blankets helps to keep the animal warm, reducing the impact of shock, as well as supporting them and protecting them from jolts during transport. However, consider the ambient temperature of the vehicle. You may need to turn on the heating or air conditioning to make sure the animal does not suffer hypothermia or heatstroke.
Minimising noise (turn the radio off in the vehicle) and making it dark for the animal, such as placing the animal in a dark room or placing a cover over their box can also help reduce the animal’s stress and impact of shock. However, make sure the animal always has access to fresh air. Do not cover the animal’s head at all if they are not breathing well.
Reading
Review How to safely move an injured pet (pdf) for great tips on handling to avoid further injury during transportation of the patient.
Reducing stress in animals is critical for their wellbeing, recovery, and effective handling. Strategies depend on the species, environment, and situation. Here are general and species-specific strategies:
General Strategies |
|
|---|---|
| Minimise Noise and Sudden Movements |
|
| Provide Familiar Scents or Items |
|
| Limit Handling Time |
|
| Create a Safe Space |
|
| Use Positive Reinforcement |
|
Environmental Adjustments |
|
|---|---|
| Control Temperature and Ventilation |
|
| Adjust Lighting |
|
| Separate from Predators or Stressors |
|
Handling Techniques |
|
|---|---|
| Use Species-Specific Restraints |
|
| Provide Slow and Gentle Touch |
|
Species-Specific Strategies |
|
|---|---|
| Dogs |
|
| Cats |
|
| Horses |
|
| Birds |
|
| Reptiles |
|
| Livestock (e.g., cows, sheep) |
|
| Aquatic Animals |
|
| Small Mammals (e.g., rabbits, guinea pigs) |
|
Long-Term Stress Reduction |
|
|---|---|
| Enrichment Programs |
|
| Regular Health Checks |
|
| Routine and Predictability |
|
Scenario Examples of dealing with Animals that are showing signs of stress

| A Dog Newly Admitted to a Shelter |
|
| A Cat Visiting the Vet |
|
| A Horse in a Trailer for Transport |
|
| A Rabbit in a New Environment |
|
| A Bird After Being Separated from Its Mate |
|
| A Snake in a Tank with Improper Humidity |
|
| A Cow in a Crowded Holding Pen |
|
| A Puppy During Socialisation Training |
|
| A Fish in an Overcrowded Tank |
|
| An Alpaca During Shearing |
|
First aid assistance

It is critical that you seek assistance to provide first aid to animals if you require it. A medical emergency is not the time to guess or struggle on your own. Persisting without assistance may result in further injury to the animal, or harm to yourself.
Some reasons for seeking assistance may include asking for:
- advice about a first aid treatment
- advice about a specific animal such as a native animal or exotic pet
- help moving a large or heavy animal
- help securing or restraining an animal
- someone to direct traffic
- assistance with a first aid treatment you are not qualified to administer, such as CPR.
Where to seek first aid assistance
The type of assistance you need will depend on the emergency at hand, the species of animal and the location of the incident. For example, if the patient presents at a veterinary clinic, you will have vets and vet nurses on had to assist and give advice. However, if you are in the field or somewhere with limited access to medical supplies and equipment, you may need to rely on phone calls to professionals or the general public for assistance.
Some examples of different facilitiy/ service assistance may include:
Emergency Veterinary Care |
|
|---|---|
| Surgery and Surgical Facilities |
|
| Diagnostic Imaging Services |
|
| Poison Control and Toxicology |
|
| Cardiology Services |
|
| Intensive Care Unit (ICU) |
|
| Internal Medicine and Infectious Disease Control |
|
| Orthopaedics and Rehabilitation |
|
| Anaesthesia and Pain Management |
|
| Ophthalmology Services |
|
| Exotics and Wildlife Specialist Care |
|
| Neurology Services |
|
| Dermatology and Wound Care |
|
| Laboratory and Pathology Services |
|
| End-of-Life and Palliative Care |
|
Watch
The next video is an explanation video of a vet service that is located in Sydney NSW. SASH (Small Animal Specialist Hospital), which is famous for being featured on Bondi Vet, is opening a new state-of-the-art facility providing 24-hour emergency care and a range of specialties. Watch the demonstration.
Qualified assistance
Regardless of whether the incident takes place in an animal medical facility or not, you can seek qualified assistance from people who are trained in animal medical care. If they are available in person, such as the vet doing routine health checks in a stable, speak to them directly. They will be able to provide you with both verbal advice and hands-on assistance if you require it.
If no qualified staff are present, you can simply call them. A mobile phone is a critical piece of equipment for first aid. People you can call in an emergency include, but are not limited to:
- your supervisor
- a veterinary
- an animal hospital
- a registered wildlife carer or care facility
- rangers
- state and local government emergency services
- animal welfare bodies and support facilities.
Who you should call will depend on the specific situation. It’s a good idea to keep relevant numbers on speed dial and/or attached to your first aid kit for easy reference. Remember, that if you are travelling to a new location, look up and record the animal emergency numbers specific to that area before you leave. It will save precious time should you need to contact any of them. Phone numbers for local wildlife rescue and care facilities are often displayed on road signs.

At the very least, you will need to notify the animal medical facility that you will arrive with a patient and provide them with the specific information relevant to the situation. Every animal must be attended by a veterinary following first aid treatment, regardless of the type of emergency.
Animal emergency network contact details

There are many different animal care facilities across Australia that make up the animal emergency network. It is important to be familiar with the emergency care facilities in your local area. The following table described the five main types of animal emergency network organisations and includes an example of each type.
| Animal emergency network | Description | Example |
|---|---|---|
| Veterinary services | During business hours, all veterinary clinics will provide advice for first aid emergencies and receive emergency patients if they are equipped for the species and specific emergency. | Kings Road Veterinary Surgery Phone: (07) 4772 4189 After Hours: 0455 420 807 Shop 3, 36 - 48 Kings Road, Hyde Park, QLD, 4812 https://kingsroadvetsurgery.com.au/ |
| Emergency and after-hours veterinary clinics | These clinics specialise in emergency treatments and are staffed outside of normal business hours, sometimes 24-hours a day | Perth Vet Emergency Phone: 1300 040 400 Unit 3, 162 Wanneroo Road, Yokine, WA, 6060 https://pve.net.au/ |
| Wildlife rescue and care facilities | Many normal veterinary clinics are not equipped to care for wildlife. Wildlife rescue and care facilities and registered wildlife carers are trained and experienced with the specific care needs of Australian wildlife | NSW Wildlife Information Rescue and Education Service (WIRES) Wildlife Rescue Line: 1300 094 737 https://www.wires.org.au/contact/contact-us |
| Animal welfare bodies and support facilities | Animal welfare bodies provide advice and guidance regarding breaches of the animal welfare principles. You may need to speak to one regarding an animal you suspect of being abused or neglected | RSPCA South Australia 24-hour hotline: 1300 477 722 https://www.rspcasa.org.au/ |
| State and local government emergency services relevant to animal incidents | State and local governments have emergency phone numbers to report animal incidents or call for emergency services relating to animals. | Wildlife Victoria – report a wildlife emergency form https://www.wildlifevictoria.org.au/wildlife-information/report-a-wildlife-emergency |
Veterinary clinics are quite common in urban areas and medium to large rural towns but may be rarer in remote areas. Wildlife rescue organisations tend to be state- or territory-based. Some examples of wildlife rescue centres include:
- WIRES (New South Wales and Australian Capital Territory)
- Wildlife Rescue Queensland
- Australian Wildlife Health Centre (Victoria)
- Foundation for National Parks and Wildlife (South Australia)
- Native Animal Rescue (Western Australia)
- Bonorong Wildlife Rescue (Tasmania)
Here are some examples of qualified veterinary services across Australia that people can call in case of an animal emergency. These services offer various types of emergency and specialised care:
| Animal Emergency Service (AES) |
|
|---|---|
| Melbourne Veterinary Specialist Centre (MVSC) |
|
| Small Animal Specialist Hospital (SASH) |
|
| University of Sydney Veterinary Teaching Hospital |
|
| Adelaide Animal Emergency & Referral Centre (AAERC) |
|
| Perth Veterinary Specialists |
|
| Animal Referral Hospital (ARH) |
|
| University of Queensland Veterinary Medical Centre |
|
| Pet Emergency & Specialist Centre (PESC) |
|
| Northside Emergency Veterinary Service (NEVS) |
|
Activity – your local animal emergency network
Research the contact details for the following types of emergency animal care facilities. Record the information in your phone, on a card in your car or attach it to your first aid kit.
| Animal emergency network | Name of local organisation | Phone number | Physical address | Website URL (if applicable) |
|---|---|---|---|---|
| Veterinary clinic A | ||||
| Veterinary clinic B | ||||
| After hours/emergency veterinary clinic A | ||||
| After hours/emergency veterinary clinic B | ||||
| Wildlife rescue and care A | ||||
| Wildlife rescue and care B | ||||
| Animal welfare body A | ||||
| Animal welfare body B | ||||
| Local government animal incident emergency services |
Unqualified assistance
You can also seek assistance from unqualified people, such as the owner of the animal or even people passing by. However, you would not seek advice from unqualified people. Rather, you would ask for physical assistance with handling or providing first aid to the animal.
Why can this be an issue?
1. Administering Medications Without Veterinary Approval
|
2. Improperly Bandaging or Splinting Injuries
|
3. Forcing an Animal to Eat or Drink
|
4. Inappropriate Handling or Restraint Techniques
|
5. Improperly Cleaning Wounds
|
6. Attempting to Relocate or Move Severely Injured Animals
|
7. Providing Respiratory Assistance Incorrectly
|
8. Using Inappropriate or Dangerous Tools for Restraint
|
9. Misjudging the Severity of Symptoms
|
10. Attempting to Extract Foreign Objects Without Professional Help
|
11. Ignoring Safe Practices for Zoonotic Diseases
|
The importance of oral communication skills

When asking for advice or physical assistance, recall your active listening and other communication skills from earlier in this module.
- Speak clearly and calmly
- Be specific about the assistance you require:
- Do you need advice? What specific information do you need?
- Do you need hands-on assistance? What specific task do you need the other person to do?
- Actively listen to the responses from the person you are seeking assistance from:
- Do they understand the assistance you require?
- Do they have any questions for you?
- Do you understand the advice they are providing?
- Do you have any other questions?

Key Aspects of Active Listening:
- Focusing Completely: Active listening means setting aside distractions and focusing entirely on the speaker. This can involve maintaining eye contact, nodding, and using other non-verbal cues to show engagement.
- Understanding and Reflecting: An active listener often paraphrases or reflects back what the speaker has said to ensure understanding and show they are following along. For example, saying, "So what I hear you saying is…" can clarify and confirm details.
- Withholding Judgment: Active listening involves being open-minded and refraining from passing judgment or interrupting with one’s own opinions. This helps the speaker feel safe and understood, encouraging them to share more openly.
- Responding Thoughtfully: Rather than giving an immediate, reactive response, active listeners consider the speaker’s message and reply in a thoughtful, empathetic way. They ask relevant questions or offer supportive comments that show their attentiveness.
Why Active Listening Matters
Active listening fosters mutual respect, strengthens trust, and creates a positive, open environment for communication. It is especially valuable in settings where understanding others deeply—such as in healthcare, counselling, or team-based work environments—is essential. It’s a critical skill for resolving conflicts, building relationships, and ensuring that everyone involved feels valued and understood.
Knowledge check 6
Case Study
Sarah, the receptionist at Happy Paws Veterinary Clinic, received a call from a distressed pet owner, Mark, who was dealing with an emergency involving his dog, Max. Max had eaten something poisonous, and Mark was panicking about what to do. This scenario will showcase how Sarah uses active listening skills to respond effectively to Mark and how she could assist a caller with finding a nearby emergency clinic.
Step-by-Step Scenario
| Step 1: Researching and Identifying Nearby Clinics |
Before the call, Sarah had anticipated situations where emergency assistance might be needed outside Happy Paws’ operational hours. She had already researched and compiled a list of nearby 24-hour emergency veterinary clinics to help clients in case of emergencies. This list included contact numbers, addresses, and driving directions for quick reference. When Mark called, Sarah was prepared with options if Max needed urgent care elsewhere. |
|---|---|
| Step 2: Receiving the Emergency Call and Demonstrating Active Listening |
Phone Rings Mark: [In a panicked tone] “Hi, it’s an emergency! My dog, Max, just swallowed some rat poison. I don’t know what to do. I’m so worried!” Sarah remains calm, focusing on active listening to absorb the critical information Mark is providing without interrupting. She empathises with his concern and offers supportive responses to reassure him. Sarah: “I’m so sorry to hear that, Mark. I can imagine how scary this must feel right now. I’m here to help. Can I get a few quick details so we can get Max the best care possible?” Sarah gently asks clarifying questions to gather the essential information about Max, his symptoms, and how recently he ingested the poison. |
| Step 3: Responding with Empathy and Support |
Sarah: “Thank you for sharing that information with me, Mark. I understand how urgent this is, and you’re doing the right thing by calling.” Using active listening techniques, Sarah summarises the information to confirm her understanding. Sarah: “So, if I understand correctly, Max ingested the rat poison around 10 minutes ago, and he’s already starting to drool and seem lethargic, right?” Mark: “Yes, that’s right.” Sarah: “Okay, thank you for confirming that. Based on what you’ve told me, I think it would be best to get Max immediate care.” |
| Step 4: Advising the Client on Immediate Next Steps |
Sarah then refers to her list of emergency contacts and finds a nearby 24-hour emergency vet clinic. Sarah: “Mark, I have the details for an emergency clinic just a few minutes away from you. Let me give you their address and phone number. They’ll be able to provide the immediate treatment Max needs.” She pauses to ensure Mark is following along and to give him time to write down the information. Sarah: “Once you’re there, please let them know everything you’ve shared with me today. You could also mention that you’re coming from Happy Paws, and they’ll have some background on your case if they need to call us.” |
| Step 5: Offering Final Support and Reassurance |
Before ending the call, Sarah reassures Mark with empathy, making sure he feels supported. Sarah: “You’re doing a great job, Mark. Just get Max over to the clinic as quickly and safely as possible. If you need anything else or have questions later, please don’t hesitate to call us back.” |
Key Elements of Active Listening Demonstrated
- Empathy: Sarah acknowledged Mark’s fear and urgency, validating his emotions.
- Clarifying Questions: She asked follow-up questions to ensure she had all necessary details about Max’s condition.
- Reflective Summarising: Sarah summarised what she’d heard to confirm her understanding and ensure there were no misunderstandings.
- Providing Reassurance and Information: She calmly provided directions and contact information for emergency care, making sure Mark felt supported throughout the conversation.
Incident Report Documentation Example
After the call, Sarah documented the incident in Happy Paws’ records, including:
- Date and time of the call.
- Client’s name and contact information.
- Details of the emergency (Max ingested rat poison).
- Recommended emergency vet clinic.
- Actions taken during the call and confirmation that Mark received the necessary information.
This case study demonstrates effective active listening, clear communication, and the value of prior research to provide prompt, compassionate support in an animal emergency.

Keep relevant staff informed about the animal’s condition
After administering first aid, you should monitor the animal and keep your supervisor, veterinarian or other appropriate personnel informed about their condition. If you notice any changes in the animal’s condition, especially any deterioration in the condition, you must report it immediately.
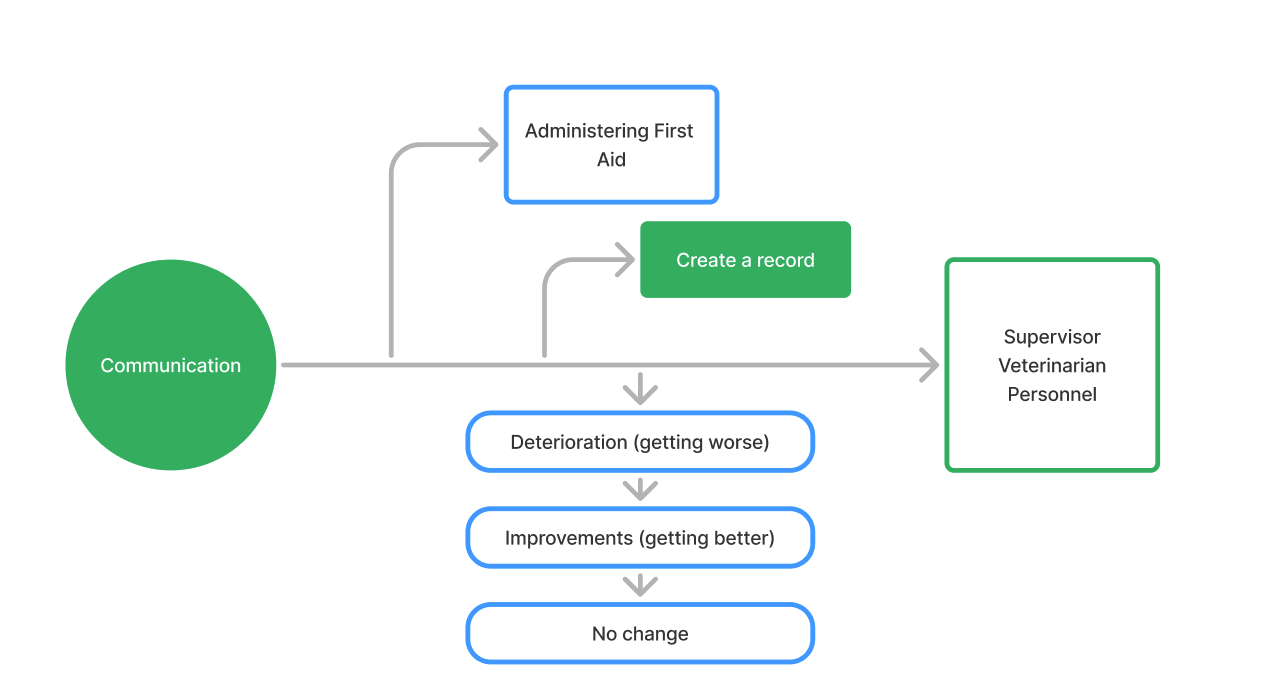
The three general updates regarding animal condition are:
- Deterioration (getting worse)
- Improvements (getting better)
- No change.
While verbal updates may be appropriate, you should also record all observations and interactions with the animal.
These records must be concise and accurate, noting all the relevant details in the appropriate locations. Forms must be completed in full and should be safely stored in the appropriate area.
When communicating verbally, make sure to speak clearly and calmly. However, do not downplay the seriousness of the situation, particularly if the animal’s condition is worsening and they need immediate veterinary attention.
Recall the different levels of emergency. If your first aid treatment stabilises the animal, the emergency may be downgraded. However, if the animal starts to deteriorate or you notice a new symptom, the emergency may be upgraded to a life-threatening situation. You must inform your supervisor or the vet that they need to attend the animal immediately.
Recording information about the animal or incident

Every animal care facility will have different methods and technology for recording information. You will need to learn the procedures and systems that relate to your organisation in terms of what information should be recorded, as well as how and where. These instructions should be provided to you upon induction. If you are at all unsure of the requirements relating to recording procedures, systems and/or technology, discuss these with your supervisor. Your organisation should also keep up to date policies and procedures relating to health and safety and emergency situations.
What information to record
The type of detail you need to record will depend on your workplace procedures. For example, the details of the first aid treatment you provided, which you need to record may be different if you are working in a boarding facility compared to if you are working in a veterinary clinic. You may be required to complete an incident report or contribute to the animal's medical records. As always, follow the procedures of your specific workplace.
Remember that the point of recording information is to allow anyone who reads it the ability to “understand what took place and why” (Risk HQ n.d.). So, make sure the information you include is relevant and concise, while being detailed enough to describe the situation properly.
You should also ensure that all information is recorded:

- Accurately
- Objectively (in other words, factually without including emotive language or personal opinion)
- Using appropriate industry terminology and abbreviations.
Below are some examples of ways that you may be documenting information at your animal care facility.
| 1. Handwritten Notes and Paper Records |
|
|---|---|
| 2. Digital Forms and Spreadsheets |
|
| 3. Electronic Health Records (EHRs) and Animal Management Software |
|
| 4. Mobile Apps for Record-Keeping |
|
| 5. Voice Recorders and Speech-to-Text Tools |
|
| 6. Video and Photography |
|
| 7. Digital Whiteboards or Smartboards |
|
| 8. Barcoding and RFID Scanning Systems |
|
| 9. Cloud-Based Record Systems |
|
| 10. Sensor-Based Monitoring Systems |
|
Case Study

At Happy Paws Animal Care, Max, a dog recovering from surgery after swallowing a foreign object, is receiving ongoing treatment. Sarah, a veterinary technician, is responsible for monitoring his recovery, recording relevant information, and keeping the staff informed of his condition.
| Step 1: Monitoring Max’s Condition | Sarah closely observes Max’s condition, checking for signs like changes in appetite, hydration, and pain levels. She notices that he’s showing mild discomfort and reduced appetite, and she decides to record these observations to ensure proper care is provided. |
|---|---|
| Step 2: Recording Information |
Sarah uses the facility’s animal care software to record her observations. She includes:
Sarah also adds her notes to a shared digital log that all staff members can access, enabling everyone to stay updated on Max’s recovery. |
| Step 3: Communicating Updates to the Team |
Sarah then informs other relevant staff members about Max’s condition during the daily staff meeting. She shares the following:
This communication keeps the entire team aware of Max’s needs and ensures continuity of care. |
| Documentation Example |
|---|
|
Following the meeting, Sarah completes a brief incident report and notes in Max’s medical record:
|
| Summary |
|---|
| Through clear documentation and regular communication, Sarah ensures that all staff at Happy Paws are informed about Max’s condition, enhancing his care and supporting continuity of treatment. This scenario demonstrates how accurate record-keeping and effective communication play critical roles in managing animal health and ensuring team coordination. |
Incident reporting
Information collected about the animal incident may be helpful in preventing a similar incident in the future. Follow your workplace recording and emergency procedures regarding the specific information you need to record about the incident.
Common details include:
- The date, time and location of the incident (location is particularly important for wildlife rescues so that animal can be returned to the same location)
- The name, species, sex and age of the animal involved
- Details of the injury or illness
- Details about the first aid treatment that was given
- Details about what happened to the animal after first aid treatment (for example, stayed at home or attended local veterinary or emergency clinic)
- Name and signature of the first aider (RT Training n.d.).
Below, see an example of an Incident Report Template. As explained every facility/ workplace will have different forms suitable to their service and clinic.
Incident Report Form |
|
|---|---|
| Date of Incident: | |
| Time of Incident: | |
| Location of Incident: | |
| Nature of Incident (select all that apply): |
|
|
Description of Incident: [Provide a detailed account of the events leading up to the incident, what occurred, and any notable details.] |
|
| Animal(s) Involved: |
|
| Injuries and Medical Attention: |
|
| Witnesses: |
Witness Statements (if applicable): |
|
Possible Causes: [Describe any potential causes of the incident, such as environmental factors, animal behaviour, or equipment issues.] |
|
|
Preventative Actions and Recommendations:
|
|
| Incident Reporter Information: |
Signature: ____________________ |
Medical records
After providing basic first aid to animals, you may need to ensure you accurately record any treatment provided to the animal along with any other observations or additional information relevant to the treatment of the animal.
Medical records must be concise and accurate, noting all the relevant medical details in the appropriate sections. Forms must be completed in full and should be safely stored in the appropriate area.
Your workplace may have a specific first aid incident report form. However, if you don’t have access to a form, include the following details in your medical records:
- Assessment of physical condition:
- Breathing
- Demeanour
- External injuries
- Hydration status
- Ambulation
- Assessment of vital signs:
- Temperature
- Heart rate
- Pulse rate
- Respiratory rate
- Mucous membranes
- Any known allergies or medications
- Any known medical history
- Description of signs and symptoms
- Description of the first aid treatment(s) provided.
Below is an example of a Medical Record Template. Again, every facility/ clinic will have their own template.
Medical Record Template |
||
|---|---|---|
| 1. Animal Information |
|
|
| 2. Owner Information (if applicable) |
|
|
| 3. Presenting Complaint / Reason for Visit |
|
|
| 4. Medical History |
|
|
| 5. Examination Notes |
|
|
| 6. Diagnosis |
|
|
| 7. Treatment Plan |
|
|
| 8. Follow-Up Instructions |
|
|
| 9. Progress Notes (for ongoing visits) |
|
|
| 10. Laboratory / Diagnostic Results (if applicable) |
|
|
| 11. Veterinarian / Staff Information |
|
|
You are likely to assess the animal’s vital signs repeatedly during its first aid treatment, transportation and monitoring. You may find it easiest to record these data in a table, such as the one following, noting the times at which you assessed them.
| Time | Temperature (°C) |
Heart rate (bpm) |
Pulse rate (bpm) |
Respiratory rate (bpm) |
CRT |
|---|---|---|---|---|---|
Other records
In an animal care facility, maintaining comprehensive records is essential for tracking animal health, ensuring safety, and managing facility operations. Here are some other types of records you might need to complete:
|
Daily Observation Logs
|
|
Feeding and Nutrition Records
|
|
Enrichment and Activity Logs
|
|
Cleaning and Sanitation Records
|
|
Medical Treatment Logs
|
|
Vaccination and Preventative Care Records
|
|
Incident Reports
|
|
Intake and History Forms
|
|
Adoption or Rehoming Records (for rescues and shelters)
|
|
Behavioural Assessment Reports
|
|
Weight and Growth Charts
|
|
Inventory Records for Supplies
|
|
Equipment Maintenance Logs
|
|
Pathology Reports
|
|
Animal Transfer and Transport Logs
|
|
Volunteer and Staff Training Logs
|
|
Temperature and Environment Control Logs
|
|
Legal and Compliance Records
|
Another place you may need to record information about the incident or the animal is a surrendering form for wildlife, strays or other rescued animals. The following is an example of a typical wildlife surrender form.
| Wildlife Surrender Form | |
|---|---|
| Your details: | |
| Title | Ms |
| First name | Vivian |
| Last name | Nguyen |
| Contact number | 0401 222 333 |
| Rescue location: | |
| Street number | |
| Street name | Lower Dandenong Road |
| Suburb | Braeside |
| Postcode | 3195 |
| Is this your home address? (Y/N) | N |
| Is this where you found the animal? | Y |
| Any other details | Found on the verge between the northern boundary of Braeside Park and the road |
| Animal rescue details: | |
| Species/breed | Wombat |
| Description of the animal's condition |
|
| Description of first aid provided | Bleeding controlled with bandages, kept warm. |
Knowledge Check 7
How to fill out a form?
When completing documentation, it is important to complete the form as accurately and authentically as possible. Below is a step-by-step guide on completing an Animal Intake Form.
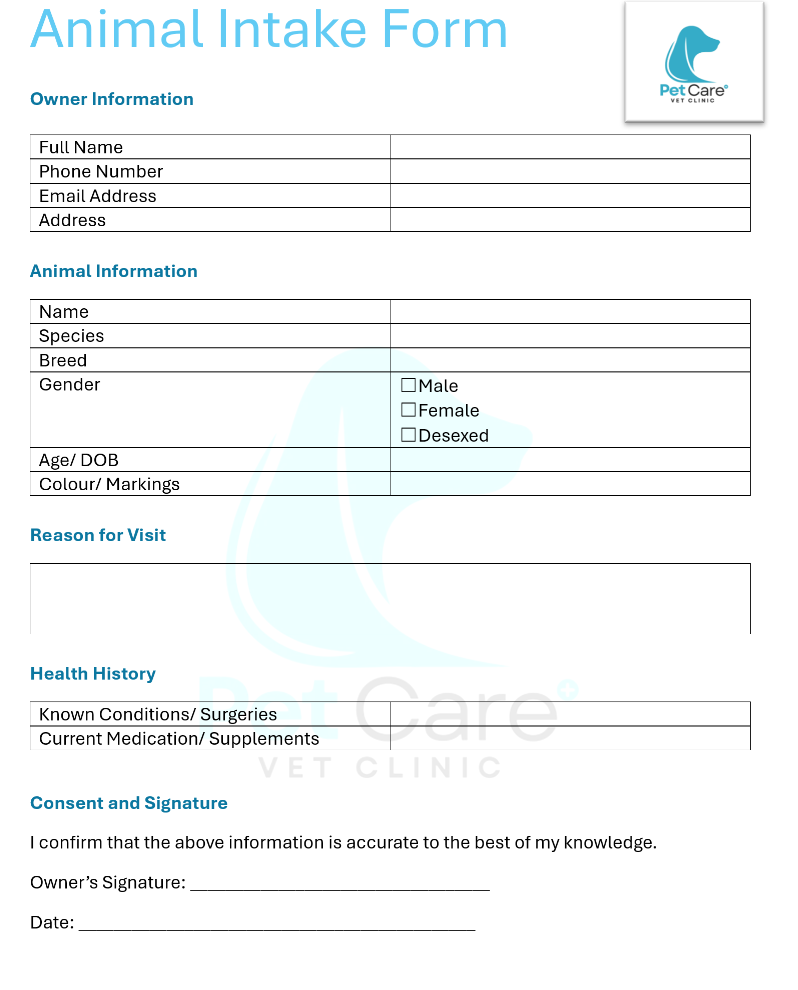
How to Fill Out an Animal Intake Form: Step-by-Step Guide |
|---|
Step 1: Collect the Required InformationBefore starting, ensure you have:
|
Step 2: Begin with the Owner’s Details
|
Step 3: Fill Out the Animal’s Details
|
Step 4: Reason for Visit
|
Step 5: Health History
|
Step 6: Review and Sign
|
Tips for Accuracy
- Use clear and legible handwriting if filling in manually.
- Always confirm details with the owner to avoid errors.
- If any section is unclear, ask the clinic staff for guidance.

Pablo the dog
| Animal name: Pablo Owner name: Brown Owner number: 0400 100 100 |
Species: Canine Breed: Beagle Age: 4 months Life stage: Puppy |
Colour: Black and tan Sex: Male; entire Weight: 4.2 kg |
Heath problem: Suspected closed fracture and spinal injury.
Sarah works at ABC Kennels and works in the doggie daycare room.
Two large dogs were playing roughly when Pablo joined in. One of the larger dogs fell awkwardly on to Pablo. Sarah heard a loud squeal and saw Pablo lying on his side when the larger dog moved away.
After calling for assistance to manage the other dogs in the play area, Sarah quickly assessed Pablo’s condition. He was panting and whining quietly, she also observed that he was shivering and lip smacking. He also made no attempt to stand. When feeling his limbs, Sarah saw Pablo noticeably flinch when she touched his back right leg.
Concerned he may have also hurt his spine, Sarah did not encourage Pablo to stand and, although he was small enough for her to easily pick up and carry, she decided it would be safer for him to use a stretcher.
Once Sarah had moved Pablo out of the play area and into the first aid room, she applied a conforming bandage to his injured leg and called the veterinary clinic. While she was waiting for the veterinarian to arrive, Sarah stayed with him keeping him calm by reassuring him in a gentle voice and made sure he was comfortable and warm.

Max, a playful 2-year-old Labrador, arrives at Happy Paws after his owner notices a deep cut on his front paw, likely from stepping on broken glass. Max is limping, his paw is bleeding, and he’s showing signs of discomfort and mild anxiety.
Step 1: Assessing the Situation and Securing the Scene |
|
Upon arrival, Sarah, an animal care attendant, sees that Max is anxious but cooperative. She puts on gloves, calmly approaches him, and reassures him with a gentle voice.
Sarah ensures that the area around Max is clean and free of anything that might further stress or injure him. She observes Max’s breathing, which is steady, and notes that he isn’t displaying signs of severe shock. |
Step 2: Initial First Aid Assessment |
|
Sarah uses her first aid training to assess the injury, deciding that pressure is needed to stop the bleeding. She gently examines the paw while keeping Max calm with soothing words.
|
Step 3: Providing First Aid |
|
Sarah follows the following first aid steps:
|
Step 4: Communicating with the Owner and Veterinary Referral |
|
After providing first aid, Sarah calls Dr. Allen, the in-house veterinarian, to assess whether stitches are needed.
Dr. Allen agrees to see Max immediately. Meanwhile, Sarah updates the owner, explaining the situation and providing reassurance.
|
Step 5: Record Keeping |
| Sarah documents the incident in Max’s medical file and completes an incident report. The record includes details of the injury, first aid steps, observations, and the vet referral. Below is an example of the documentation. |
Incident Report |
|
| Animal Name: | Max |
| Species/Breed: | Dog / Labrador |
| Date/Time of Incident: |
Date: 25/12/2024 Time: 3:50pm |
| Injury Description: | Deep cut on left front paw, bleeding observed |
| First Aid Steps Taken: |
|
| Observations: |
|
| Referral: | Referred to Dr. Allen for further assessment and potential stitches. |
| Staff Member: |
|
Max’s first aid was completed successfully, thanks to prompt action, clear communication, and detailed record-keeping. This case study exemplifies the essential steps in animal first aid, demonstrating Sarah’s skills in injury assessment, providing care, communicating with the veterinarian and owner, and maintaining thorough records.

A horse named Dusty, a 6-year-old gelding, is found in his paddock with a deep laceration on his right hind leg. The wound is bleeding, and Dusty appears distressed and hesitant to put weight on the injured leg. Katie, an experienced horse handler at Happy Paws, is alerted by another staff member.
Step 1: Assessing the Situation and Securing the Scene |
|
Katie quickly assesses the environment to ensure safety. She removes any nearby objects that could cause further injury and keeps other animals away. Katie speaks in a calm, reassuring tone to help Dusty relax.
Katie approaches Dusty slowly, gauging his reaction to avoid startling him. She is mindful of her positioning to prevent herself from being kicked, staying slightly to the side of his hindquarters. |
Step 2: Initial First Aid Assessment |
| Katie examines Dusty’s wound, noting that the bleeding is steady but not excessive. She carefully checks his vital signs, looking for any signs of shock. Dusty’s breathing is slightly elevated, but his heart rate is within normal limits. |
Step 3: Providing First Aid |
|
Katie applies first aid using the following steps:
|
Step 4: Communicating with the Vet and Other Staff Members |
|
Katie calls the on-call veterinarian, Dr. Foster, to arrange for a more detailed examination and possible stitches.
After coordinating with Dr. Foster, Katie updates the other staff members to inform them of Dusty’s condition and what to watch for in his behaviour and comfort level. She also reassures Dusty’s owner by providing a summary of the first aid steps taken and the plan for veterinary care.
|
Step 5: Record Keeping |
| Katie documents the incident in Dusty’s medical records, noting the details of the injury, the first aid administered, observations of his behaviour, and the veterinary referral. |
Incident Report |
|
| Animal Name: | Dusty |
| Species/Breed: | Horse / Gelding |
| Date/Time of Incident: |
Date: 15/07/2024 Time: 10:45am |
| Injury Description: |
|
| First Aid Steps Taken: |
|
| Observations: |
|
| Referral: | On-call vet Dr. Foster contacted for further assessment and possible stitches. |
| Staff Member: |
Katie Brown |
Katie’s prompt and careful first aid response exemplified the importance of assessing safety, using appropriate first aid techniques, clear communication, and thorough record-keeping. Through this careful handling, Dusty received the initial care he needed, with arrangements made for further treatment.

Bella, a four-year-old domestic short-haired cat, was brought into the animal care facility after being found limping in a suburban park. The person who found Bella reported she had likely been hit by a bicycle. Bella's right hind leg appeared swollen, and she refused to put any weight on it.
What Happened to Bella
Upon initial assessment, Bella showed signs of a possible fracture:
- She was vocalising in pain and limping.
- Her right hind leg was swollen and held in an unnatural position.
- Bella showed defensive behaviours (hissing and swatting) due to pain and fear.
Step-by-Step First Aid Process
1. Ensure Safety for Both the Handler and the Cat
|
2. Assess the Injury
|
3. Provide Initial Pain Management (If Applicable)
|
4. Prepare the Materials for Immobilisation
|
5. Immobilise the Leg
|
Aftercare
1. Transport to a Veterinarian
|
2. Follow-Up Care Instructions
|
3. Long-Term Care
|
Video
The next few videos demonstrate how to immobilise/ splint a cat's leg.
Tip
The next couple of links/ resources help to explain how to immobolise a cat leg.
- How to Splint a Cat's broken leg: Wiki How
- Bandage and splint care for cats: VCA Hospitals
- Casting and splinting in cats: Wag!
The following links may be useful to extend your knowledge or support your interest in first techniques for animals.
- Virtual Pet First Aid Workshop (57:55 min)
- First Aid for Pets: How to Prepare for the Unexpected (1:05 hour)
- Pet First Aid
- First Aid for pets, including links to specific factsheets and downloadable checklists
- Pets First Aid- Pets Australia
- RSPCA Australia
- Vet Med Australia
- Vetfolio
Vetpedia- Ticks and Fleas in Cats and Dogs
Book
- "Pet First Aid for Dummies" by Melinda D. Merck
- This book is a great beginner’s guide for pet first aid, covering key skills such as checking vital signs, managing bleeding, and handling choking incidents. You can purchase the book as an eBook at Barnes & Noble
Australian Red Cross Pet First Aid Course
- While primarily available in the U.S., the Red Cross Pet First Aid course offers fundamental skills for handling emergencies with pets, applicable in many settings. The Australian Red Cross also provides pet-focused resources and courses. Visit Australian Red Cross to learn more about available courses.
Australian Veterinary Association (AVA)
- The AVA offers various online courses and webinars that sometimes cover pet first aid, including animal handling and emergency care, particularly useful for rural or emergency-focused students. Explore their resources on the AVA website to find current offerings.