A spreadsheet is a document that is created to store, organise, and analyse data. Spreadsheet software can be used in business to complete tasks that involve data, such as account management, business analysis, office administration and many others.
The preparation and planning stage involves analysing the given spreadsheet task and determining the requirements for the output. Before creating your first complex spreadsheet, you must first ensure that your personal work environment is organised to maximise comfort and productivity and understand the requirements of the task you are being asked to perform. You should also organise your work tasks to conserve energy and resources.
In this topic, you will learn to:
- organise your personal work environment in accordance with ergonomic requirements
- analyse the task and determine specifications for spreadsheets
- identify requirements of data entry, storage, output, reporting and presentation requirements
- apply work organisation strategies and energy and resource conservation techniques.
Whilst most users use spreadsheets at a basic level, Excel is a very powerful application that can perform tasks far beyond what any regular user would require. In order to fully appreciate the vastness of Excel’s functionality, a user would require advanced training and programming education. This is good news because it is likely that no matter what function you are looking to perform, Excel can manage it. That said, spreadsheets can become overly complex and messy quickly if the design of the spreadsheet is not considered from the beginning and kept tidy as the task expands.
Watch the following 4-minute video for an overview of the basics of Excel.
Health and Safety Legislation
The Work Health and Safety Act 2011 requires a person conducting a business or undertaking (PCBU), so far as is reasonably practicable to:
- provide and maintain a work environment that is without risk to the health and safety of workers
- provide adequate and accessible facilities for the welfare of workers to carry out their work
- give workers the necessary information, instruction, training or supervision to do their job safely and without risks to health, and
- consult with workers and health and safety representatives (HSRs) if you have them about health and safety issues that may directly affect them.
Under the Act, all workers are responsible for the workplace health and safety (WHS) impact of their own actions. They have a duty to make sure they:
- take reasonable care of their own health and safety while at work
- take reasonable care to not adversely affect others’ health and safety
- comply with reasonable instructions
- co-operate with reasonable policies and procedures.
Organisations are required to implement policies, procedures and plans that systematically manage health and safety at work and can help to minimise the risk of injury and illness from workplace operations.
Employers are required to establish a health and safety management system to meet their duties and responsibilities under the Work Health and Safety Act 2011. This includes implementing a set of policies, procedures and plans designed to protect your health and minimise the risk of injury and illness form while using digital devices.
To access more information on your state-based WHS Act and Regulation, click on the links below.
Organisational Requirements, Policies and Procedures for Ergonomics
Different organisations may require different ergonomic practices based on their situation and needs. The organisational requirements, policies and procedures for ergonomics are usually found in the organisation handbook.
Examples of policies and procedures your organisation may have to protect your safety while using digital devices could include:
- new employees must attend an induction course where safe work practices are discussed
- take rest pauses every hour when sitting for long periods
- connect your portable device to a monitor, keyboard and mouse
- adjust your desk and chair position following safe working practices and rules
- reframe from eating your lunch at your workstation
- report any WHS issues to your supervisor.
Coordinate with your organisation to ensure that your personal work environment addresses the ergonomic requirements for your specific role.
Analyse the following example from the simulated business, Aussie Tool Sheds. They implement the following policies and procedures related to ergonomics as seen in their staff handbook:
| Ergonomic Requirement | Description |
|---|---|
| People sitting should try and change posture frequently. | Employees should not sit in the exact same posture for long, and at a minimum, should get out of their chairs every hour and walk around. |
| Performing different tasks throughout the day addresses the problem of sitting in one position for too long. | Performing different tasks throughout the day will encourage different postures and can help alleviate many of the problems people experience due to sitting for extended periods. |
| Frequently used items must be placed in the ‘optimum reach zone’ of the desk or work surface. | The most convenient location for the placement of equipment is the area that the hands can reach with the upper arms hanging down freely beside the body. |
| An external pointing device should be used when working on the laptop for extended periods of time. | Having either an external monitor or laptop station with an external keyboard and mouse in the most common locations of use allows an important degree of freedom in setting one’s posture that is not possible with just the laptop. |
| It is important that when people use a mouse, they do so without high muscle stress. | The arm, wrist and fingers should not be in great tension when using the mouse. |
In this case, Aussie Tool Shed documents the specific ergonomic requirements that are most applicable to their organisation. If you are an employee at Aussie Tool Shed, you are expected to follow these ergonomic requirements and integrate them into your day-to-day tasks.
The Coronavirus pandemic (COVID-19) has changed the way the business world operates, with the workforce transitioning from a traditional office environment to working from home for long periods of time and, in some cases, indefinitely. This shift has resulted in an increased risk of employees experiencing discomfort and injuries due to poorly set up home workspaces and a lack of movement.
Before working on any spreadsheet document, you must ensure that your personal work environment, whether in a designated office space or working remotely offsite, is in a condition that allows you to do your tasks comfortably and meets your organisation's WHS responsibilities. While completing this module, you should adhere to the following ergonomic requirements included in this unit:
- Allocate a designated workspace
- Ensure your desk and chair are adjusted correctly
- Ensure the correct positioning of the monitor, keyboard and mouse
- Ensure adequate lighting and ventilation
- Take regular rest breaks.

Your personal work environment is a designated space where you perform your assigned roles and responsibilities. This will generally consist of the following:
- a work desk
- a chair
- storage (e.g. drawers)
- a computer workstation.
At the minimum, every workstation should have:
- a flat worktable surface so that the keyboard and mouse can be used on the same surface level
- enough space for all equipment so that you can maintain posture and move freely
- a work surface with a suitable height in relation to your standing height
- enough space under the desk for you to stretch your legs.
Remember: You have a duty to take care of your own health and safety and ensure that your actions do not negatively affect the health and safety of others. Part of this duty of care is to organise your workspace to maintain a healthy work environment and avoid accidents.

Ergonomic Requirements in the Workplace
Ergonomic requirements are guidelines for setting up your work environment to ensure your comfort and well-being while working. Many organisations have policies and procedures on how to safely organise your personal work environment.
These guidelines include ergonomic requirements such as, but not limited to:
Office Furniture Arrangement
- Desk position
- Chair adjustment
- Footrest
Workstation Arrangement
- Monitor position
- Keyboard and mouse position
- Positioning other work items
Environmental Controls
- Lighting
- Ventilation
- Noise control
Work Design
- Task schedule
Safe and healthy practices when using computers for long periods
- Reduce and interrupt periods of sitting. A brief rest break is recommended every 30 to 60 minutes.
- Stretching at your desk
Following are some guidelines and tips you can use to set up your workstation according to ergonomic requirements.
Importance of Ergonomics in the workplace
Office Furniture Arrangement
Desk Position
Adjust the height of your desk and/or the height of your chair so that:
- you can bend your elbows at a 90° angle
- your forearms are parallel to the floor
- your arms and hands have a free range of motion
- your wrists are in front of your body and resting on the desk surface
- your shoulders are relaxed.
It will also help to place all controls and task materials in a 90° arc in front of your body, within comfortable reach of both hands, so that there is no unnecessary twisting of any part of your body.

Chair Adjustment
You will be in a seated position in front of a computer for most of the day when working on your spreadsheets. Coordinate with your organisation to provide you with seating that is adjustable and supports your entire body, especially the lower back, so that you can maintain good posture.
Adjust your chair so that:
- your back maintains an upright position
- you have enough leg space under your desk
- your knees are bent at a comfortable angle
- both of your feet are flat on the floor (use a footrest to elevate your feet, if necessary)
- you are within a comfortable distance from your keyboard, mouse and other equipment that you use regularly.
Office Ergonomics- Adjusting your chair
Footrests
An ergonomic footrest is useful to ensure that your feet are always flat and weight is properly distributed to increase your comfort levels while you work. Using a mat and having your feet firmly planted on a surface, you are less likely to develop muscle aches and poor blood flow from having your feet hang loose. Footrests should have height and angle adjustability and be large enough to permit some movement while supporting the feet. A footrest should not be so big that it clashes with the chair base.
Workstation Arrangement
Your organisation will provide you with basic computer workstation equipment, such as a monitor, keyboard and mouse, that you will use to accomplish tasks. You need to arrange the equipment so that you are comfortable and productive while working.

Monitor
Set up the monitor in a position that allows you to maintain proper posture and reduce visual fatigue while working. To achieve this, you must ensure the following:
- The monitor should be free from defects.
- The screen settings, such as brightness and contrast, should be adjusted for eye comfort.
- The monitor should be right in front of you so that you avoid twisting your neck or body.
- The top of your screen should be at eye level.
- The screen should be about an arm’s length away from your eyes.
Keyboard and Mouse
The keyboard should be positioned so that you are comfortable while typing. To achieve this, you must ensure the following:
- The keyboard should be positioned in front of you so that you avoid twisting your neck or body.
- The angle, height and distance of the keyboard should be positioned in a way that allows you to rest your forearms on the desk while typing.
When setting up and using your mouse, you may follow these general guidelines:
- The mouse should be the right size for you to avoid discomfort on your wrist and hand.
- Place the mouse close to the keyboard for easy reach.
- Ensure there is enough space on your desk so that you can move your mouse without any obstructions.
Other Work Items
In addition to the computer equipment, you may also be provided with other tools and resources to help you do your job. This may include writing instruments, papers, folders, paper clips and the like. It is important to keep your workstation clean and well-organised.
As well, thinking from the perspective of a bookkeeper/ accountant, additional items you may need to incorporate into your workspace, including calculators, stamps, various stationary items, cheque and deposit books, ledgers and filing systems you may have in place (both physical and digital).
There is no one-size-fits-all approach when it comes to arranging your workstation. However, here are a few ideas that you may consider implementing:
- Keep clutter to a minimum. Infrequently used items should go in drawers or on shelves behind or above your main workspace.
- Use organizers to separate small items stored in drawers. Don’t be the accountant who’s always hunting around for a pen or a calculator.
- Use a combination of vertical and horizontal file folder organisers to maximize your available storage space.
- Use two or three computer monitors. This saves time and minimises confusion caused by switching between programs.
Not everyone will be fortunate enough to have a proper desk, chair and computer screen in their home, but there are some ways you may be able to improve your makeshift office.
- If you have a limited budget, just having an external keyboard and mouse for your laptop will make a big difference
- raise the height of your laptop on a pile of books to get it to the right height.
- Laptops often have small screens, which can be an issue for some people, so a separate screen is also a good idea.
- Having an adjustable chair — even a cheap one — is a good idea. This can help make sure you are working at a good height and your back is supported.
- if you need to have a footstool, find something, an old shoe box or books
- Using a headset or earphones for calls will allow you to get up and walk around, and you can tune out background noises.
Environmental Controls

Lighting
Section 40 (d) of the Work Health and Safety Regulation 2011 (WHS Regulation) requires that a person conducting a business or undertaking (PCBUs) ensures, so far as is reasonably practicable, that lighting enables: each worker to carry out work without risk to health and safety safe evacuation in an emergency.
Sufficient lighting must be provided in your work environment to ensure that you can safely move around and accomplish your tasks without experiencing eye strain or discomfort. A general rule is to position your monitor and desk to the side of a light source and not directly underneath. This reduces glare on your screen, which is more comfortable for your eyes.
The following 6-minute video discusses how appropriately lighting a home workspace and spending time outside in the daylight can boost mental health, mood and productivity.
Ventilation
Your organisation is required to provide a workplace with proper ventilation so that you can do your work without risk to health and safety. If you think that your work environment is poorly ventilated, coordinate with your organisation so that they can make immediate adjustments. Here are some signs of a good ventilation system at the workplace:
- There are minimal to no signs of unpleasant odours throughout the day.
- Both intake and exhaust of air are well-controlled so that airflow in interior spaces is consistent.
- There are no signs of dampness or mould growth in the office.
- Temperature is well-regulated to provide a comfortable workspace.

Noise Control
In an office environment, too much noise may interfere with speech and communication and cause annoyance and distraction. Your responsibility as an employee is to eliminate or minimise the noise coming from your personal workspace. Always be considerate to your co-workers. If you must engage in meetings or conversations, do so in an area where you will not disturb others. If you find that you are experiencing too much noise that interferes with your work performance, coordinate with your employer to identify these noise sources and provide solutions.
A noisy environment is one of the top distractions when working from home. To minimise noise at home:
- position your workstation in as quiet a location as possible. Preferably in a location where you can close the door.
- Consider investing in a pair of noise-cancelling headphones to block out any unwanted noise
- rearranging your workspace. Bookshelves, cabinets and other furniture items can help block sound and position these items against thin walls.
Ergonomics for Portable Devices
Over the last few years, employers have begun to reconsider the concept of the office environment. With the mass transition to working from home in 2020, the traditional office space has been redesigned with a greater emphasis on technology which allows employees to socially interact, collaborate and build working relationships online using portable devices. For employees, their workstation may now be their car, bench top, or couch. This type of working environment comes with its own set of ergonomic considerations.
Laptops provide a convenient, portable platform for users but are not ergonomically appropriate for long-term use. Mobile phone and tablet technology has created convenient access to email, the Internet, and text messaging. However, they present a new set of possible musculoskeletal stressors.

Ergonomic tips for the use of portable devices
- Keep your head up in a neutral position as much as possible, with your elbows relaxed below your shoulders.
- Try to avoid using your thumbs.
- Write fewer and shorter messages.
- Take frequent breaks from typing.
Work Design and Scheduling Tasks
The way you organise your work tasks and the order in which they are done should also follow ergonomic requirements. The ergonomic aspect of work design involves the creation and organisation of work tasks to minimise physical discomfort.
When you are assigned multiple tasks, you may switch between tasks to have regular changes between different types of movement. Keep this in mind but make sure to schedule your tasks properly so that you have enough time to finish everything.
Occupational Overuse Syndrome
Occupational overuse syndrome (OOS), also known as repetitive strain injury (RSI), is a common type of injury that affects the fingers, hands, wrists and elbows. Repetitive movements or awkward postures induce it. Common signs and symptoms include:
- pain
- muscle weakness
- swelling
- numbness
- tingling
- burning
- restricted mobility of the joint.
Changes to workplace design and practices can reduce symptoms or prevent the condition.
Safe and healthy practices when using computers for long periods
There are several health and safety practices you can use to improve how you work at your computer. Most of these behaviours fall into two main groups:
- Reduce and interrupt periods of sitting.
- Set up an ergonomic workstation.
Let us look at these types of behaviours more closely.
Reduce and interrupt periods of sitting
Safe Work Australia recommends substituting periods of sitting with standing and interrupting periods of sitting with walking. The figure below shows some examples of how you could break up your day by standing and walking.
For more information, check out Safe Work Australia.

Some behaviours you can do to reduce and interrupt the time you spend sitting include:
- using a standing desk for part of your day
- taking regular breaks
- stretching at your desk
- making or taking phone calls while standing or walking
- standing or walking meetings.
Stretching at Your Desk
Stretching is a great way to break up blocks of sitting. Stretching can also help relieve any muscle stiffness or soreness you may have from sitting still. There are many simple stretches you can do at your desk. You should consult a health professional if you have any questions or concerns about the stretches that may be appropriate for you.
Stretching should be gentle. It should not hurt. Do not bounce when stretching. Instead, slowly move into the stretch until you feel it working. SafeWork NSW recommends ‘slow, sustained stretches’ and to ‘hold each stretch for 10 to 20 seconds’. Simple stretches you can do at your workstation include:
- Neck stretches
- Shoulder rotations
- Wrist and forearm stretches
- Back twist rotations
- Arm stretches/ side bends
Watch the following 3-minute video for demonstrations of neck, shoulder and back rotations, wrist stretching, and side bends.
Some tips to help support the transition and maintain a healthy work-life balance include:
Some people prefer to sit, others prefer to stand, but if there's one piece of advice to highlight, it is to move, move, move.
Both sitting and standing for long periods of time are problematic. Ideally, you should alternate between sitting and standing. In either position, there are some basic rules to try to follow:
- You should maintain a symmetrical body position — do not cross your legs or lean over or twist your body.
- Your arms should be above the desk. A good way of checking this is to make sure your arms are flat on the surface when your elbows are 90 degrees and tucked into your side.
- Your screen/keyboard/work surface should be directly in front of you.
- If you use two screens, they should be at a similar height and side by side to avoid too much twisting.
- Your eyes should be level with the top — or just below the top — of your screen.
- Your screen should be about an arm's length away from you.
- Your hips should be flexed between 90 to 110 degrees if you are sitting.
- You should have support in the lower part of your back if you are sitting to help prevent fatigue.
- Your feet should be flat on the floor (or resting on a footrest to keep your hips bent in the right position).
Regular breaks are crucial for maintaining well-being. Whether it's a short walk, a coffee break, or some stretches, taking time away from work can alleviate eye strain and prevent repetitive strain injuries (RSI). Moreover, a study conducted at an American university suggests that breaks may not only reduce these health risks but also boost productivity by enhancing focus.
When we work or study from home, we become a lot more sedentary. We don't have to walk and get a coffee, speak to someone on a different floor, or catch public transport. This is why there is a need to put triggers in place to remind us to move and break up the day.
When deeply engrossed in a task, it's easy to lose track of time. Fortunately, there are timers designed to serve as reminders. Some provide notifications, while others simply emit a sound to prompt you to take a break.
You may want to check out the following:
Stretchly - Stretchly is an app that reminds you to take breaks when working on your computer.
Awareness - Awareness makes a sound at set intervals, one hour by default. It's perfect if you're the sort of person who knows breaks are important but cannot stand interruptions.
Youtube has a great library of at home videos of different exercises and classes to help you keep moving whilst being at home and in the work zone. In the following, you can see a few examples:
Ergonomics for working from home:
Working from home - setting up an office space at home:
Supporting your mental wellbeing while working from home:

Energy Conservation Techniques
Staying energy-conscious has become increasingly important. For a business, it is not only beneficial to their bottom line, but it is also the right thing to do for the environment. More than one-third of Australia’s carbon emissions come from electricity consumption. Small changes to the way businesses use energy can make a big difference.
All businesses should have documented procedures in place to conserve resources and energy. These should be centred around sustainability:
- Reduce the amount of waste you create
- Reuse items that could have a future purpose
- Recycle whatever you can
In an office environment, energy is mainly used to power:
- lighting
- air conditioning, ventilation and heating
- office equipment (e.g., computers and printers)
- pantry equipment (e.g., coffeemaker, microwave, etc.).
Your organisation will provide you with guidelines on how to save energy and maximise office resources. The common organisational requirements for energy conservation include:
- switching off lights in unoccupied rooms
- turning off equipment when not in use
- shutting down computers and turning off lights and appliances at the end of the day
- ensuring air conditioning and heating systems are set to timers and not scheduled to come on over the weekend or public holidays
When creating spreadsheets, you will be using computers and printers to produce documents. Be mindful of these energy conservation techniques as you go about your work.
Resource Conservation Techniques
You also need to be mindful of your use of office resources. Resource conservation techniques refer to the efficient use of organisational resources when performing tasks. These resources may include paper products, writing instruments, printer ink etc.
Some examples of resource conservation techniques are:
- use electronic communication such as email instead of paper correspondence
- printing on the blank side of used paper for drafts
- printing on both sides of a clean piece of paper.
- print using black and white unless colour is absolutely necessary
- Position a recycling box next to individual desks and printers
- Reuse office items like packaging, boxes and stationery
In spreadsheet development, these techniques will apply when you are required to print your spreadsheet documents. When following the requirements of your task, identify at which steps of the process you may be able to save resources.
As accountants or bookkeepers, some of your tasks will require you to create spreadsheets. Tasks will need to be completed within a specific timeframe. When you have timeframes to meet, it is important that you manage your time and organise the task so that the timeframes are met.
Time Management
Time management strategies are about identifying where you should focus your energy to achieve results. They can help you to get things done more efficiently to avoid work overload and stress.
Three (3) steps you can follow to manage your time are:
- Set Goals

Setting realistic and achievable (SMART) goals:- Specific—think about what you will need to do.
- Measurable—can be checked and measured.
- Attainable—can be achieved within the time frame.
- Realistic—what you are willing and able to do.
- Timely—needs to be done now.
- Prioritise
Take the time to list all the things that you need to get done. Sort this list from most important to least important. You should be honest and realistic when prioritising tasks to avoid overcommitting to something that may not be achievable within the time frame. - Plan
Your list of prioritised tasks will become your plan. You should revisit the plan regularly and make adjustments to it when needed.

Example
You have been tasked by the Financial Controller (FC) with producing a complex budget spreadsheet for a management report by 20 January 2022. Let us use the principles above to manage this task:
Goal
- Specific - to create a budget spreadsheet for your company's management report
- Measurable – the final version of the spreadsheet is to be sent to the FC by 20 Jan 2022
- Attainable – you have two weeks to create the spreadsheet
- Realistic – you are employed full-time and have no other pressing work priorities
- Timely – the spreadsheet needs to be completed by 20 Jan 2022.
Prioritisation
| Prioritised Tasks |
|---|
| Access Raw data |
| Create draft spreadsheet |
| Submit draft spreadsheet for review by manager |
| Make any required changes |
| Submit the final version of the spreadsheet to the Financial Controller. |
Planning
| Prioritised Tasks | Due | Done |
|---|---|---|
| Access Raw data | 10 January 2022 | Yes |
| Create draft spreadsheet | 14 January 2022 | Yes |
| Submit draft spreadsheet for review by manager | 15 January 2022 | Yes |
| Make any required changes | 17 January 2022 | |
| Submit the final version of the spreadsheet to the Financial Controller. | 18 January 2022 |
In some instances, deadlines may need to be negotiated and agreed upon with your manager. It is important that you don’t sacrifice accuracy over meeting a deadline. If, when completing a task, you identify a deadline that is not going to be met, you need to alert your manager to this as soon as possible. Your manager may be able to allocate more resources to the task or adjust the deadline. Failing to meet agreed deadlines may impact other people and projects within the organisation.
Take care when creating a spreadsheet and entering data. This sounds so obvious, but it is amazing how often mistakes are overlooked. To identify errors, you can:
- do a 'Reasonability Check' by adding an entire worksheet/tab for checking errors – e.g., do all tables add up to the same thing across as down?
- check your results with an ultimate truth – the data in your spreadsheet generally comes from one or two sources – always monitor the spreadsheet to see if it diverges from these original “truths.”
- have someone else check your data. This should be factored into the planning.
Analyse the Task
Before you open any spreadsheet software, you must first understand the task given to you. It is important to analyse your task and determine what specifications for spreadsheets you would need so that you know:
- what data to present in your document
- which spreadsheet design features to use for your document
- how to best structure your document to address the task requirements.
This will save you and your organisation a lot of time and resources in the process of producing the spreadsheet document.
A spreadsheet task is any workplace task that will require you to collect, organise, analyse and/or store data and record them in tabular or graphical form. For example, in a finance setting, you can utilise spreadsheet software in tasks related to:
- business analysis
- data gathering and analysis
- people management
- project management
- account management
- recordkeeping
- office administration.
The best way to analyse your spreadsheet tasks is to break them down into requirements and spreadsheet specifications.
| Task Requirements | Spreadsheet Specifications |
|---|---|
| A set of criteria is used to determine if a task has been completed | How a spreadsheet can address the task requirement |
First, you must analyse your task and determine the task requirements. Specifically, you need to determine the following requirements:
- Formatting, design and layout requirements
- What should your spreadsheet look like?
- Functions and formulae requirements
- What functions and formulae are needed for your task?
- Automation requirements
- Which parts of your task can be automated, and how should they be automated?
- Import and export requirements
- How should your spreadsheet be connected to other documents?
- Presentation requirements
- How should your spreadsheet be presented to stakeholders?
- Organisational requirements
- What organisational policies and procedures must you follow when making your spreadsheet?
Each requirement will help you determine the specifications for spreadsheets that you need to apply to your document. In the following table, you will see examples of the possible spreadsheet specifications that you will need for each given requirement.
| Spreadsheet Task Requirements | Spreadsheet Specifications |
|---|---|
| Data requirements |
|
| Linking requirements |
|
| Formatting, design and layout requirements |
|
| Functions and formulae requirements |
|
| Automation requirements |
|
| Import and export requirements |
|
| Presentation requirements |
|
| Organisational requirements |
|
You may use these task requirements and spreadsheet specifications as a guide in planning your document. However, the specifications that you will use for your specific task should be based on your organisation’s policies and procedures. These specifications must be part of your spreadsheet plan and must also be reflected in your planning document, should you be required to produce one. Your organisation may also expect you to provide other requirements and specifications in your plan before developing your spreadsheet.
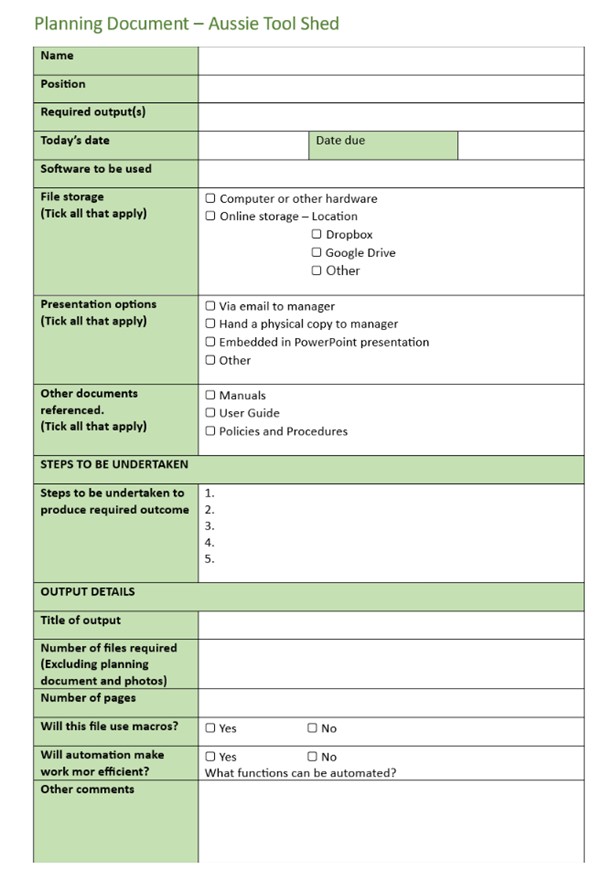
For example, take a look at the following planning document template of Aussie Tool Shed. To correctly determine the specifications for your spreadsheet according to organisational policies and procedures, you must provide the information listed in this planning document.
The following 3-minute video will guide you through the basics of navigating Excel, ensuring you have a solid foundation to build your spreadsheet:
Spreadsheet Requirements
When instructed to create a spreadsheet, you will be given a list of requirements. These requirements may be communicated to you orally, e.g., face to face, via phone, Teams meeting or in writing, e.g., by email or internal memo. If you are unsure about the instructions or spreadsheet requirements, ask for more information. It is better that you clarify the requirement straight away rather than misunderstanding the requirements and producing something that is incorrect.
Spreadsheet requirements may include:
- The purpose of the spreadsheet, e.g. The purpose of the spreadsheet is to calculate the long service leave accrual of all staff.
- The intended audience the spreadsheet is being created for, e.g., Director's meeting, Human Resources Manager. You need to understand your audience so that you can present the data in a suitable manner.
- The content contained in the spreadsheet, e.g. where the raw data will come from, graphs or charts required, calculations required
- The format the spreadsheet should be presented in, e.g. PowerPoint, printed in a report, electronically
- How to access the file, e.g. where the file is to be stored
- When the spreadsheet is required.
Organisational policies and procedures provide general guidelines on how the business operates. The following types of policies and procedures may include information regarding spreadsheet design and use:
- A data management policy and procedure may include guidelines for designing, developing and saving spreadsheets and data management files used in producing, compiling and reporting data.
- A privacy policy and procedure may include guidance on how to collect, maintain, disclose, store, and destroy personal information contained in spreadsheets.
Style Guide
Many organisations have rules and guidelines on how documents are formatted. These instructions are usually detailed in a style guide. There will be some documentation that falls outside these guidelines, but the general format should be followed wherever possible. An organisation's style guide could include information on:
- use of company logo
- font styles
- colour palette
- use of headings and subheadings
- use of figures and numbers
- border and table format
- templates
- headers and footers that need to be included in documents
- use of abbreviations
Accessing Excel
- Click on the Start Button
- Select Excel from the list of apps displayed
- Click on the app to open.
When you open Excel, you are presented with the start-up screen. The start-up screen is divided into two panels. The left panel has three tabs Home, New and Open. These tabs will assist you in getting started working on any document or give you access to an existing document. Excel refers to individual spreadsheets as worksheets
The right panel shows you the options you have for the three main tabs in the left panel.
Home
The home tab is an overview of the 3 main tabs. From this tab, you can:
- open a blank workbook
- open a tutorial
- choose a template
New
This tab identifies what you can do with an Excel workbook. From this tab, you can:
- open a blank workbook
- search and access a tutorial or take a tour of Excel
- access ready-to-use templates
Open
The open tab gives you access to all the Excel workbooks that you have on your computer, drives and workbooks that are shared with you.
Account/Feedback/Options
- Account: This tab gives you access to your Microsoft account
- Feedback: This tab allows you to rate your Excel experience
- Options: This tab allows you to customise your Excel application based on your preferences
Practice Exercise
From the startup screen, select 'blank workbook'. A new workbook will open.
Excel Screen Layout
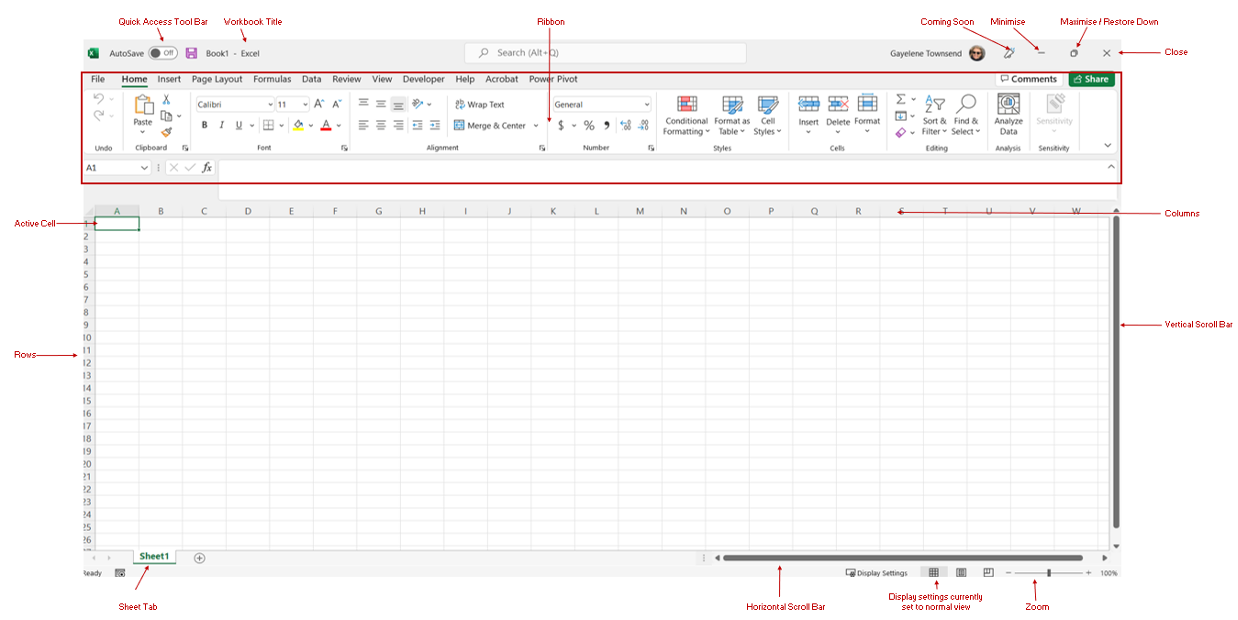
Tip: If you right click on the image, you can zoom in using the 'Magnify image' option to be able to have a closer look at it.
Quick Access Tool Bar
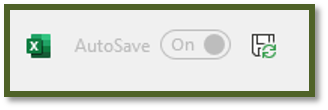
The quick-access toolbar is positioned above the ribbon in the top left corner of the worksheet. It contains the save command and can be customised to include other frequently used commands. The Autosave option is only available if you are using Excel 365 and have access to the cloud.
For more information on how to customise the quick access toolbar, watch the following 5-minute video.
Excel Ribbon
The ribbon is the control panel for Excel. It provides you access to all the tools you will need when working with a worksheet. Each tab provides access to a different set of Excel commands.

Tabs are split into groups; for example, the home tab is split into Clipboard, Font, Alignment, Number etc.
For an overview of the main tabs on the Excel ribbon and their content, watch the following 2-minute video.
File Tab
The File Tab is the first tab on the ribbon. It opens a backstage view of Excel and contains all the commands for opening, closing, saving, and creating new Excel workbooks. It also includes document properties and print, share, export, and publish options.

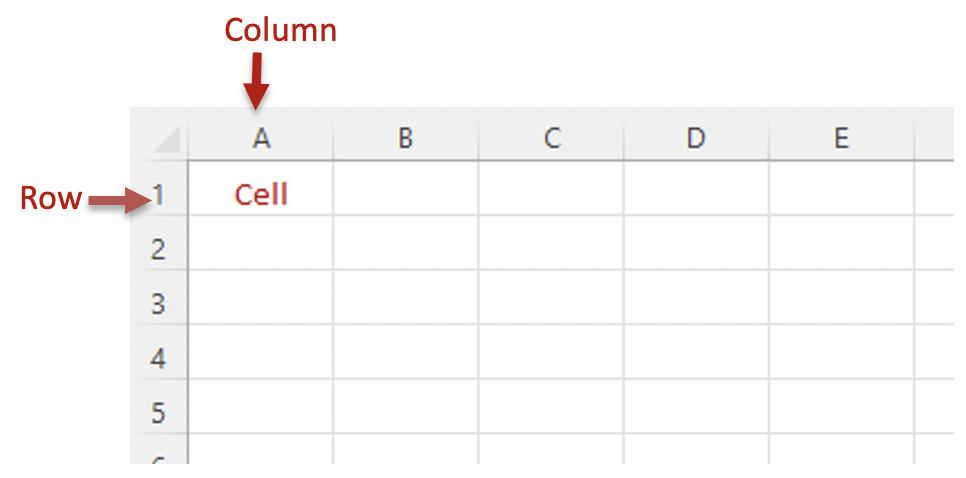
Spreadsheet Structure
Excel worksheets contain cells in rows and columns. Rows are identified with numbers, and columns are identified with letters. The cell reference is a mechanism that defines a cell on a worksheet. In the example below, the cell reference is A1. (Column A Row 1). The 2007 onwards versions of Excel have 10,48,576 rows and 16,384 columns per sheet.
Elements of a spreadsheet
In your workplace, you will be asked to use spreadsheets to manipulate data and organise them logically into useful information. To do this, you must identify the requirements of data entry, storage, output, reporting and presentation.
| Requierment | Description |
|---|---|
| Data entry | Adding data to your spreadsheet |
| Data storage | Recording the data you entered by saving the spreadsheet as per the policies and procedures |
| Data output | Extracting new data from the initial data that you entered |
| Data reporting | Submitting data for the purpose of analysis |
| Data presentation | Conveying information from your data with the use of charts and graphs |
Data Entry Requirements
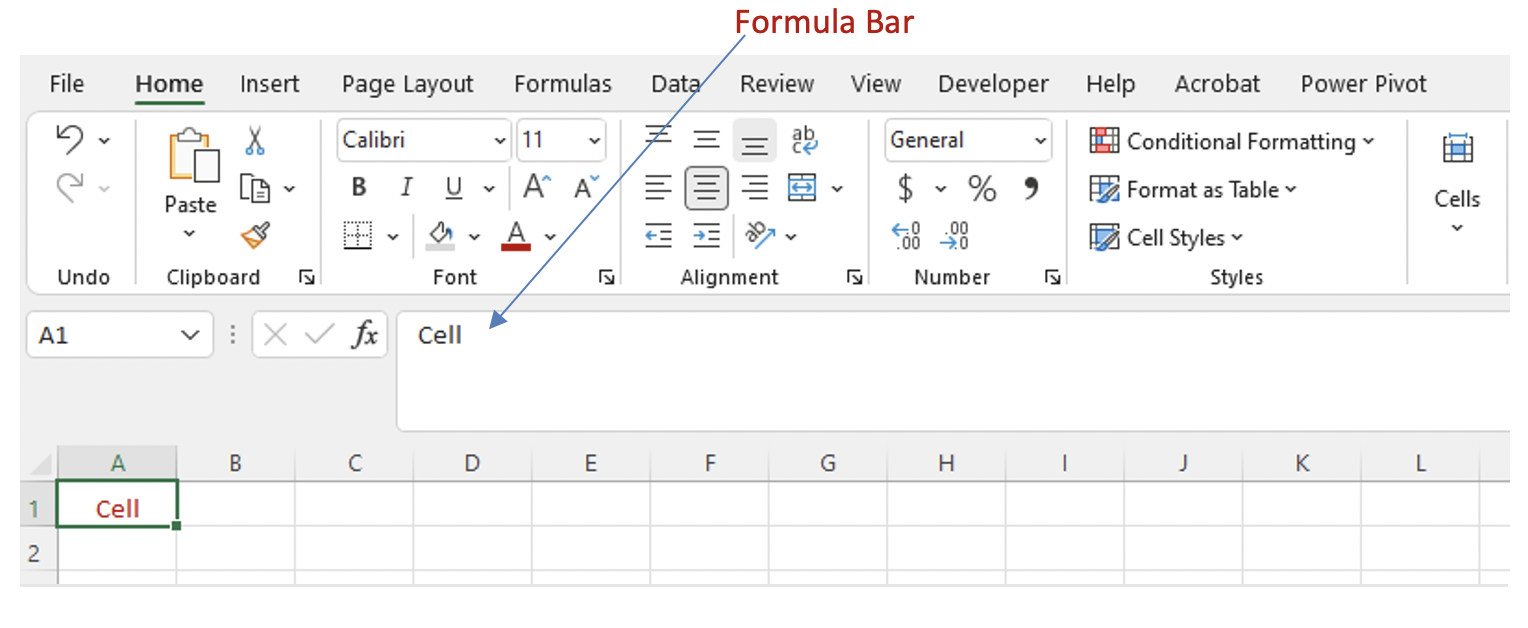
When using spreadsheets, your main tasks will always involve a type of data. Data is the term used for a group of raw facts and figures. Excel allows you to enter any type of data in cells, for example, numeric, text, date, and time data. Whatever you enter in a cell will appear inside the cell and as well as in the formula bar.
Datum, in itself, will not convey any meaning unless it is logically organised and contextualised with other data. Take the following table, for example:

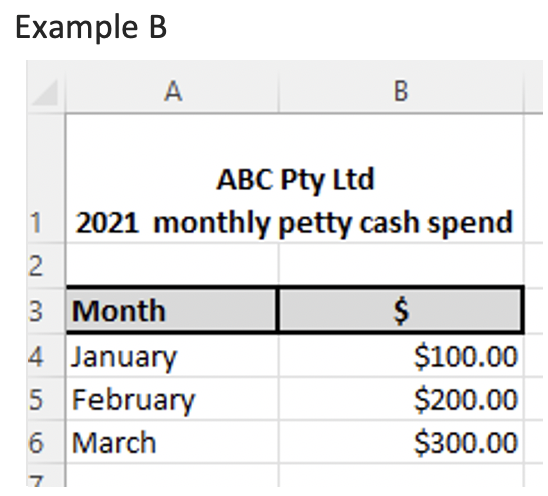
In Example A, the figures $100, $200, and $300 are examples of raw data without any context. You know that they are monetary values, but beyond that, they do not carry any meaning.
In Example B, context has been added. We now know that in Jan 2021, ABC Pty Ltd had $100.00 of petty cash expenses. In February 2021, they had $200.00 in petty cash expenses, and in March 2021, they had $300.00 in petty cash expenses.
To identify the data entry requirements of your task, you must answer the questions: ‘What data do you need to enter?’ and ‘How should you enter the data?’
Excel uses two types of data in a cell:
- Constants - a set value that doesn’t change and that’s directly inserted into a cell. Constants can include text, numbers, dates, times.
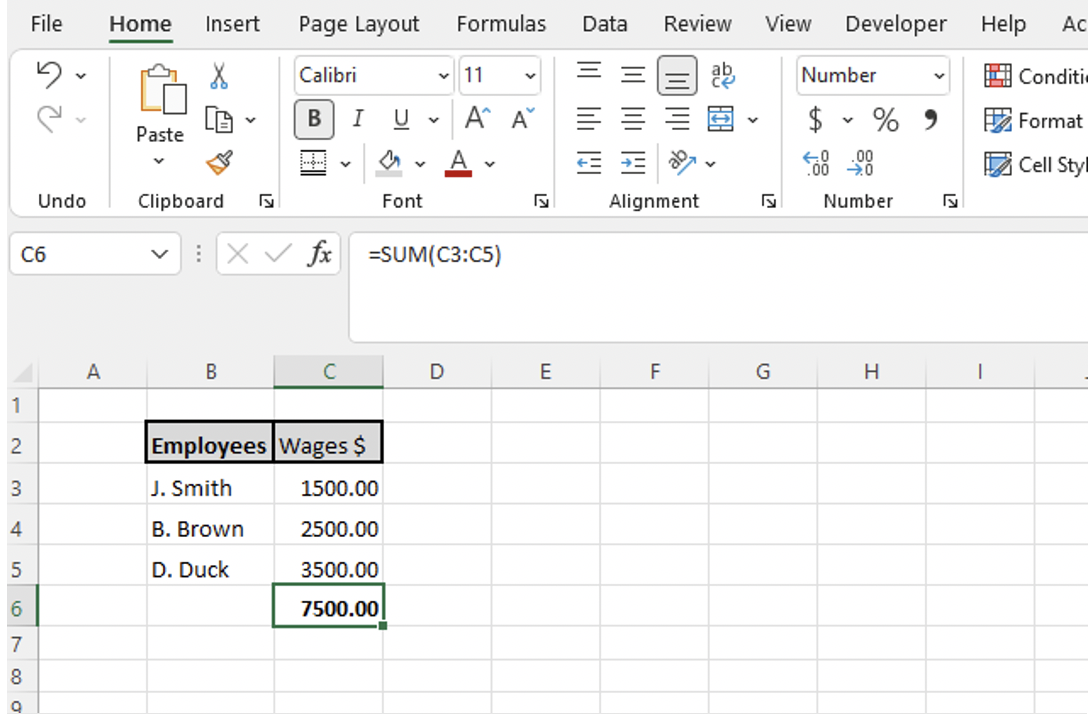
- Formulas - an equation that calculates the value of a cell. SUM is the most widely used formula in Excel. It adds the content of multiple cells. In the following example, the SUM function has been used to calculate the total wages paid to employees. It adds cells C3, C4 and C5.
Data entry information will be provided by whoever gave you the spreadsheet task. They should be able to tell you:
- what the data will be used for
- the documents in which the data should be entered the templates and formats you need to use to enter the data.
This information will need to be considered when designing the spreadsheet.
There are two major issues when entering large amounts of data in Excel. Data entry can be:
- Time-consuming: Data needs to be entered in one cell at a time.
- Error-prone: The user unintentionally may enter the wrong data in the cell.
The following 3-minute video explains how to eliminate these problems by creating an easy data entry form in Excel.
Data Storage Requirements
To identify the data storage requirements of your task, you must answer the question: ‘How should you store the data you entered?’
These requirements will once again come from your organisation. Data storage requirements include the naming, saving and security considerations that you need to apply to your spreadsheet document.
- Naming – Your organisation may require you to follow a naming convention for easier tracking of documents.
- Saving – Your organisation may require you to save the spreadsheet file in a particular folder in your computer or the cloud.
- Security – Your organisation may require you to protect files containing privileged information by locking the files with a password or limiting sharing permissions to selected individuals.
Data Output Requirements
To identify the data output requirements of your task, you must answer the question: ‘What new data should you gather from your initial data?’
In spreadsheet software, this is achieved through spreadsheet design with features such as functions and formulae, which will be discussed later in this module. In addition to identifying what new data you can gather, you also must figure out how to manipulate the data so that it addresses the task requirements.
Data Reporting Requirements
To identify the data reporting requirements of your task, you must answer the questions: ‘What data is needed to make analyses and inform decisions?’ and ‘How should the data be reported to make the analysis and decision-making process easier?’
In business settings, spreadsheet data are rarely used as standalone documents. They are usually used to support other documents or make interpretations and projections. To identify the data reporting requirements, you must know how you or other people in your organisation will use the spreadsheet you produced.
Data Presentation Requirements
To identify the data presentation requirements of your task, you must answer the question: ‘How can you best explain the data to other people?’. Remember that the spreadsheet software will process mostly numerical information. The implications of the data entered may not be apparent to everyone who reads your spreadsheets. You must figure out how to explain the data to other people beyond the numbers that you enter in your spreadsheet. This will involve a graphical representation of your data through charts and graphs. The type of chart or graph needed will depend on what type of data you are presenting and what information you want to convey to your audience.
An Example of Identifying Requirements
As an example, say you are given the figures for total sales for each month of the current year, and you are tasked to compute the average monthly sales for the year. You may break down this task into the following requirements:
| Requirement | Example |
|---|---|
| Data entry requirements What data do you need to enter? How should you enter the data? |
Total monthly sales for each month of the year Data will be entered in a table |
| Data storage requirements How should you store the data you entered? |
Save as a spreadsheet file in the proper folder and with the proper file name following organisational policies and procedures |
| Data output requirements What new data should you gather from your initial data? |
Average monthly sales for the year |
| Data reporting requirements What data is needed to make analyses and inform decisions? How should the data be reported to make the analysis and decision-making process easier? |
The sales spreadsheet will be used to determine if the business is meeting sales targets. Show the sales figures per month in tabular form with the average monthly sales at the bottom of the table. |
| Data presentation requirements How can you best explain the data to other people? |
Show the sales for each month in a bar or line graph accompanied with text showing the average monthly sales. |

Picture yourself on a typical workday: your supervisor assigns a spreadsheet task to you and gives you a deadline. You may be thinking about where you should even begin with the task. What steps should you take to complete the task in time?
As you work on your task, you consume organisational resources. For example, you may have to print or make copies of some documents. In this case, you would need a printer, a copy machine, and blank paper.
Applying work organisation strategies will allow you to quickly produce quality output for your organisation. In the same way, using conservation techniques will save your organisation's energy and resources. This section will discuss what steps you can take in organising your work.
Work Organisation Strategies
Earlier, you learned how to properly organise your workstation according to ergonomic requirements, health and safety, and organisational policies and procedures. Keep these concepts in mind as you apply other work organisation strategies. In this section, you will learn how to organise your work by:
- obtaining/clarifying information and instructions with your supervisor
- planning the task to be undertaken.
Obtaining/Clarifying Information and Instructions
Before planning your spreadsheet task, you need to talk to your supervisor to gain as much information as you can about your assignment. This ensures that you can fully address the requirements and expectations for the task. Ask them for specific details for the spreadsheets that you need to prepare. Here are some guide questions you can use:
- What type of spreadsheet document is needed?
- What would be the contents of the document?
- Are the spreadsheets macro-embedded? What macros will I need to apply?
- Where can I obtain the data needed for the spreadsheets?
- Are there any style guides, formats or templates that I need to follow?
- How should I store the spreadsheet?
- How will the spreadsheet be reported and presented?
When asking questions, your goal is for the requirements of your task to be clear to you at the end of your consultation.
Here are a couple of tips when asking your supervisor task-related questions:
Ask open-ended questions
- Encourages a detailed explanation of an idea
- Encourages longer responses e.g. 'What common challenges will I encounter while doing this task?'
Ask probing questions
- Aims to ask for more details on a previously discussed matter
- Often formed as a follow-up question, e.g. 'You mentioned earlier that my spreadsheet would be presented in a meeting. How will it be presented?'
Be mindful of all the details your supervisor will provide during your discussion. It will help to take notes during your meeting so that you have a guide to refer to when you start doing the task. You must also avoid asking repetitive questions about items that have already been discussed. To make the most out of your discussions, practise active listening skills such as:
- clarifying by paraphrasing information relayed by your supervisor
- clarifying by summarising information relayed by your supervisor
- using non-verbal cues (e.g. nodding, eye contact etc.).
Planning the Task to be Undertaken
Once you have clarified all information and instructions, your next step is to plan your spreadsheet task. When planning a task, take note of the task requirements and spreadsheet specifications discussed earlier. Some organisations use a planning document template to aid in detailing the task, as per the Aussie Tool Shed example. If accomplished correctly, you will be able to use this planning document later as a guide in designing and producing your spreadsheet.
Some details that you need to input in the planning document may include:
| Information | Example |
|---|---|
| Required output What type of output is expected from you? |
Sales Report |
| Due date When do you need to submit the file? |
Five working days after the assignment |
| Software to be used What software will you need? |
Microsoft Excel |
| Filename What should you name the file? |
Sales Report Planning Document |
| File storage options Where will you store the file? |
Online storage via Google Drive |
| Presentation options How are you required to present the output? |
Via email and printed copy |
| Required resources What resources do you need to access? |
Organisation style guide |
| Steps needed to produce the output What steps do you need to take to finish the document? |
|
| Macros and automation requirements Will macros and automation be needed for the document? How will they be used? |
Yes. Will be used in importing and formatting data |
Try to complete the following quiz questions to test your understanding of this topic:
Question 1:
Question 2:
Question 3:
Question 4:
Look at the following two (2) images, then answer the question that follows:
Image A:

Image B:

Question 5:
Question 6:
Question 7: