Now that you've added lighting and rendering to your digital repertoire, it's a good time to focus on sculpting. Work through this topic to learn how to:
- digitially sculpt surface details of your models using Autodesk Mudbox
- work with additional, advanced, textures to apply to your models.
The main subtopics you will explore in Sculpting include:
- Digital Sculpting
- Mudbox - Basic Sculpting Process
- Texture 2.0
Learning tasks that will support your skills in digital production have been outlined in the following table.
Practice
Put your skills into practice and extend your knowledge
As you work through the learning, you will encounter a series of learning tasks that you must complete within this Sculpting topic and showcase on the discussion forums.
Keep an eye out for the PRACTICE boxes as you progress through the learning process to identify the learning tasks, resources, and instructions for what you must do. They also house the information regarding the specific subtopics, and how long you will need to allocate for these tasks. This has been briefly outlined below.
Remember, there will be learning tasks that you will need to complete that link directly to your assessment, so please read through them carefully.
| Learning task # | Learning Task Name | Duration (Hours) | |
|---|---|---|---|
| 1 | Design a treasure chest for modelling in Maya | 2 |
|
| 2 | Model and UV treasure chest in Maya | 6 |
|
| 3 | Create sculpted detail for your treasure chest in Mudbox. | 4 |
|
| 4 | Create materials and textures for chest | 8 |
|

Feedback and support are woven through the learning tasks as you complete them. Reach out if you have any questions about what to do!

This subtopic will look at how you can use a digital sculpting tool like Autodesk Mudbox or Maxon Zbrush to add surface detail to a base mesh you have modelled in Maya.
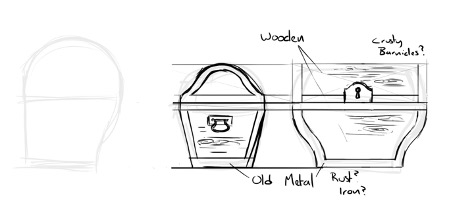
First, design a Treasure Chest
To begin, spend some time designing a Treasure Chest in your design sketchbook that you can model in Maya later. See Task 1 below for more guidance on how to do this.
While designing your chest, consider the materials from which it will be made. How old is it? What condition will the chest be in? Try several different shapes and sizes, and experiment with different proportions and details.
Try to keep your design relatively simple; the idea is to create a model that you can then add detail to using the sculpting programme.
Practice
Task 1: Design a Treasure Chest for modelling in Maya
Design a treasure chest using your sketchbook or photoshop that will be modelled in Maya, considering materials, age, condition, shape, and size.
What tools or resources do you need?
- Sketchbook
- Pencils/Pen
- Photoshop
- Drawing Tablet
What steps should you take?
2 Hours

Set aside two hours to complete steps 1-8 below.
- Brainstorm some ideas for your treasure chest design. Consider its purpose, the environment it exists in, and the era it belongs to.
- Sketch various shapes and sizes of treasure chests in your design sketchbook. Experiment with different proportions and details such as locks, hinges, and ornaments.
- Think about the materials the chest is made from. Will it be wooden, metal, or a combination of both?
- Consider the age and condition of the chest. Is it brand new, old and worn, or somewhere in between? Add details to reflect its age and history.
- Try to keep your design relatively simple, focus on the overall silhouette and main features. Avoid excessive detailing at this stage, as those can be added later during the modeling process in Maya.
- Refine your sketches, selecting the design that best fits your vision for the treasure chest. Make any necessary adjustments to ensure it meets your desired criteria.
- Once satisfied with your sketch, finalise it by adding any additional details or annotations that will aid in the modeling process.
- Prepare to transfer your finalised design into Maya for 3D modeling. Take reference photos or create digital scans of your sketch to assist in accurately recreating the design.
What should you do after?
- What factors did you consider when determining the materials and age of your treasure chest?
- Reflect on the process of experimenting with different shapes, sizes, and proportions. How did this exploration help you refine your final design concept?
- Share the Treasure Chest to Forum:
- Select your forum thread in Forum: Sculpting and Texture 2 0
- Select Reply to your first Forum post.
- Enter the words ‘Task 1 Treasure Chest Model’ in your reply.
- Select the Post your response button, then select Edit in your new reply when it shows up.
- Upload your photo(s) or files using the Attachment field.
- Select Save changes to share your coursework to your forum thread.
- All live sessions are recorded so you can watch them later if you miss a session.
- Get feedback on this and other learning tasks at the next Live Session – check the Live Session calendar for dates and times.
Model your Treasure Chest
Your next task will be modelling your treasure chest.
Watch the (19:23m) video demonstration below to guide you through modelling a treasure chest.
Using your design as a reference, model and UV your Treasure Chest in Maya.
If you need any pointers for the modelling and UV process, you can watch the modelling videos for your Treasure Chest design. Or, go directly to the video below (21:50m) to watch Geoff create a treasure chest asset, ready for sculpting.
Practice
Task 2: Model and UV Treasure Chest in Maya
This learning task guides you through the process of modelling and UV mapping a treasure chest in Maya. For assistance during modelling and UV mapping, you can refer to the instructional video provided for your specific treasure chest design.
What tools or resources do you need?
- The treasure chest designed in the previous task.
- Maya.
What steps should you take?
6 Hours
Set aside six hours to complete steps 2-11 below.
- Review the learning for Digital Sculpting and the corresponding videos Model a treasure chest and UV the treasure chest model to help you complete this task.
- Use the treasure chest you designed in the previous task as your reference.
- Start by modeling the basic shape of the treasure chest using primitive shapes like cubes and cylinders. Refer to your design sketches for accurate proportions.
- Incorporate additional details such as metal bands, locks, and rivets to enhance the realism of the treasure chest.
- Model the lid of the treasure chest and create hinges for it to open and close realistically. Pay attention to the scale and placement of these elements.
- Use the UV editor and UV workflow in Maya to create a UV layout for the treasure chest model to prepare it for texturing. Ensure proper seam placement for minimal distortion.
- Arrange the UVs in the UV editor in a logical and organised manner to maximize texture resolution and minimise wastage.
- Export a UV snapshot for use during texture creation. This will serve as a guide for painting textures accurately on your model's surface.
- Save your model and create a screenshot of the complete model for sharing in the forum.
What should you do after?
- Reflect on your experience with modelling and UV mapping your treasure chest. What strategies did you employ to efficiently unwrap the treasure chest?
- Were there any unexpected challenges that arose during the task? How did you overcome them?
- Share the Modelled and UV Treasure Chest to Forum:
- Select your forum thread in Forum: Sculpting and Texture 2 0
- Select Reply to your first Forum post.
- Enter the words ‘Task 2 Modelled and UV Treasure Chest’ in your reply.
- Select the Post your response button, then select Edit in your new reply when it shows up.
- Upload your photo(s) or files using the Attachment field.
- Select Save changes to share your coursework to your forum thread.
- All live sessions are recorded so you can watch them later if you miss a session.
- Get feedback on this and other learning tasks at the next Live Session – check the Live Session calendar for dates and times.
Your next task requires you create sculpted details for your treasure chest in Mudbox.
This subtopic will guide you on how to use Mudbox for basic sculpting. If at any point you need to refer to the steps, select this subtopic in your navigation bar.
Setting up your scene
Follow the system steps below to set up your scene in Mudbox.
- You can send models directly to Mudbox from Maya by selecting the file menu option and choosing:
- Send to Mudbox>Send as a new scene option.
![[ADD IMAGE'S ALT TEXT]](/sites/default/files/File%20Window.png)
- Your model should open inside Mudbox automatically.
- You can also export models from Maya by:
- selecting the File menu option and choosing either Export All (Exports the full scene) or
- export Selection (exports only the objects that you have selected).
There are several different file formats that you can choose in the Export options, so select the option that you need for the sculpting programme that you are using and save out your model.
![[ADD IMAGE'S ALT TEXT]](/sites/default/files/File%20Window%202.png)
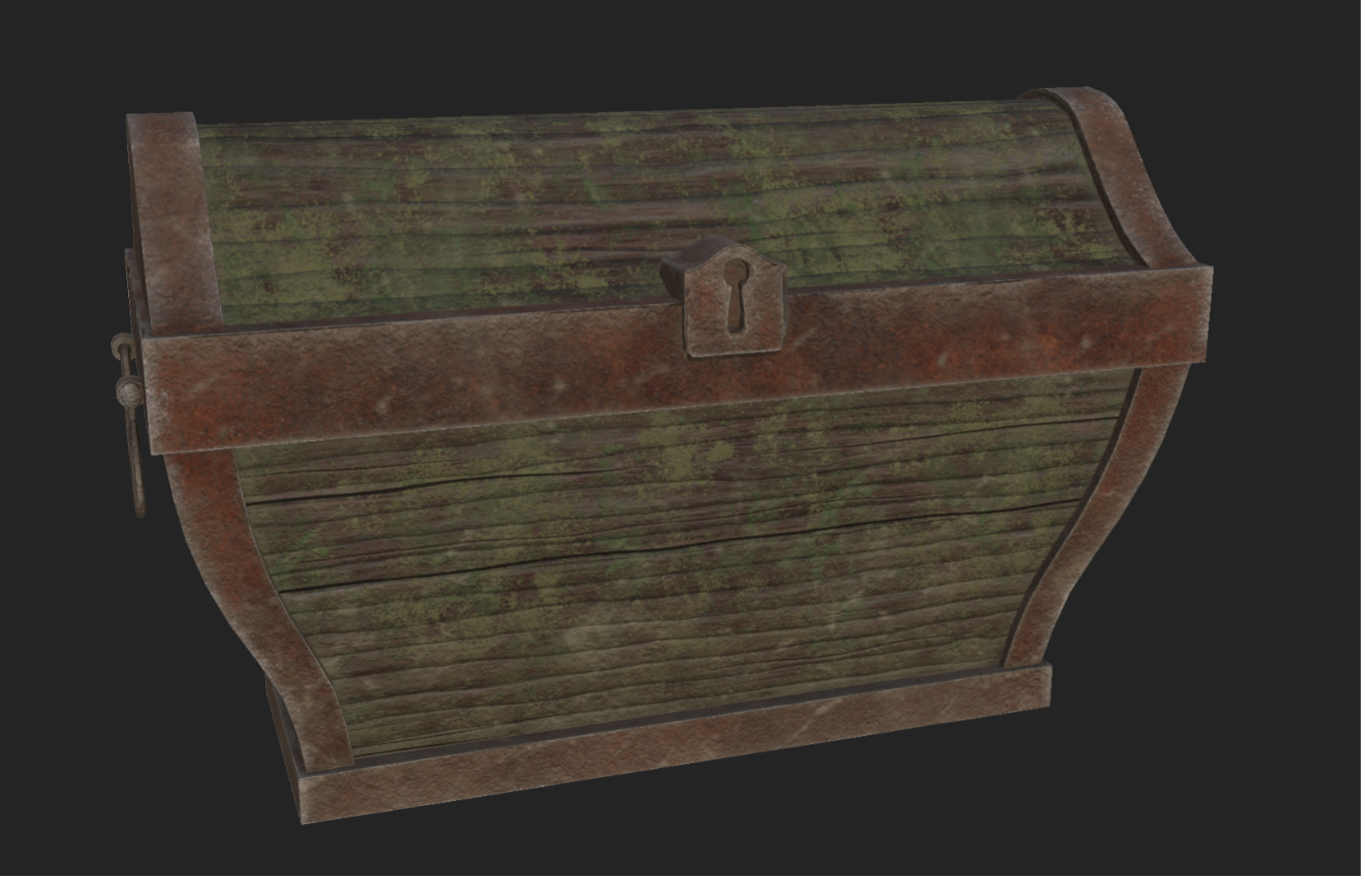
Sculpting detail
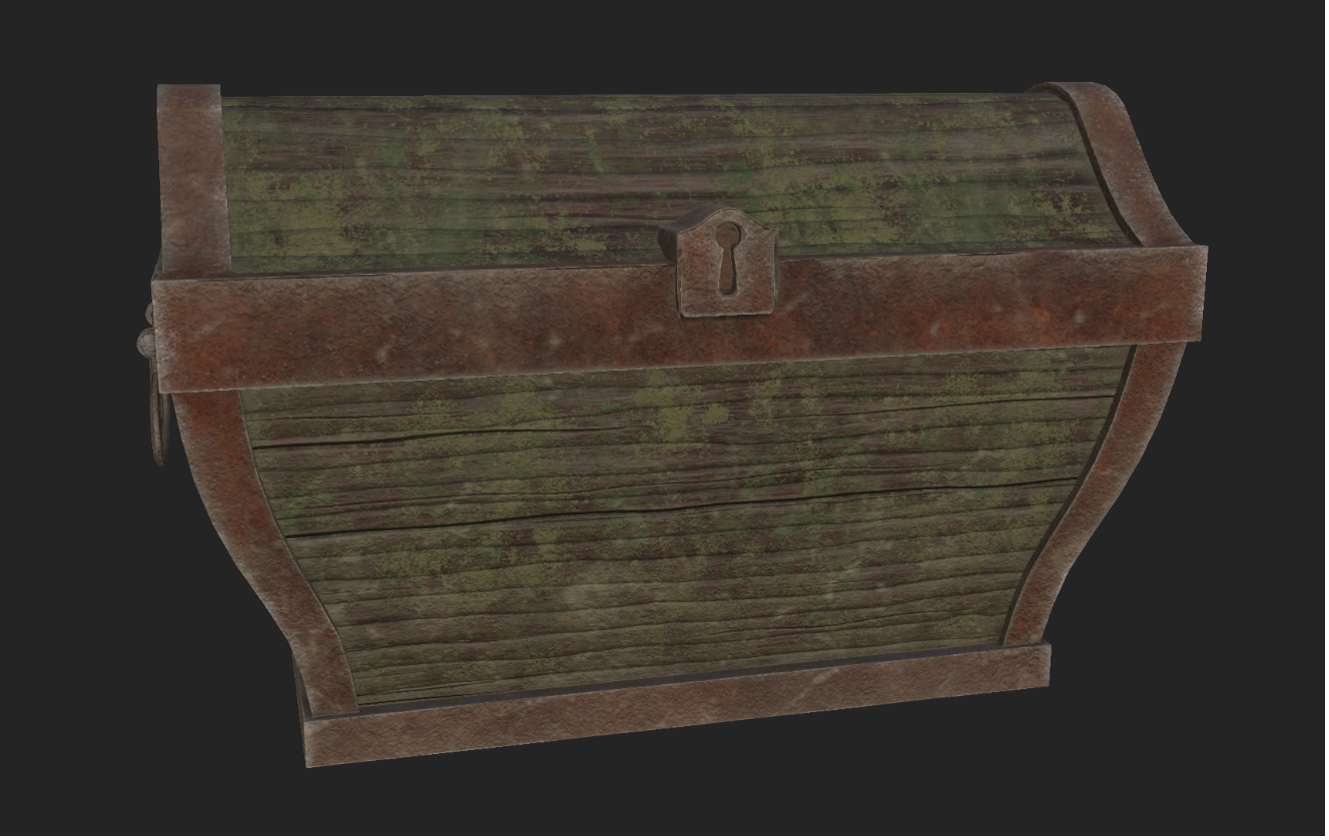
For the Digital sculpting portion of the activity, you will be using Autodesk Mudbox. Mudbox is a straightforward sculpting tool with some nice sculpting and detailing tools and features.
![[ADD IMAGE'S ALT TEXT]](/sites/default/files/Treasure%20Chest.png)
Introduction to Autodesk Mudbox
Watch the video (17:37m)below as Geoff takes you through a general overview and introduction to Autodesk Mudbox.
Mudbox tools
Take a closer look at the tools you will be using in Mudbox. The screenshot below illustrates the various sculpt tools in Mudbox.
![[ADD IMAGE'S ALT TEXT]](/sites/default/files/Mudbox.png)
The main Mudbox tools can be found at the bottom left of the screen, and they are grouped in tabs. You will be focussing on the sculpting tab. The basic sculpting brush will be your main tool when sculpting detail onto your base mesh shapes.
Sculpt tool
Using the sculpt tool will pull parts of the mesh out from the surface.
- hold the Ctrl key while using the sculpt tool the tool will push into the mesh.
- to add levels of detail to the mesh by using the Shift + D key on the keyboard.
Each time you add a level of do detail the number of polygons in your model will quadruple, so be sparing with the level of detail and only add more detail if you find you need it to sculpt in the details you need.
To go up and down through the levels of detail in your project:
- use the page up and page down keys on the keypad.
Sculpt any detail on your model on a sculpting layer so that it is easy to erase and remove sculpted details from your model. Try not to sculpt on the base mesh.
![[ADD IMAGE'S ALT TEXT]](/sites/default/files/Layer%20Window.png)
Stamps
Mudbox comes with a range of stamps that you can use to add texture to your sculpting strokes. Just select the stamp you want to use from the ones available.
![[ADD IMAGE'S ALT TEXT]](/sites/default/files/Mudbox%20Stamp%20Collection%201.png)
There are settings for the brush strokes size strength etc on the right of the screen in the properties area.
Stencil
Like the stamp option, you can also use a stencil to add detail to a model.
![[ADD IMAGE'S ALT TEXT]](/sites/default/files/Mudbox%20Stamp%20Collection%202.png)
The stencil mode creates an image that is super imposed over the model which you can then use to paint texture into the model geometry.
![[ADD IMAGE'S ALT TEXT]](/sites/default/files/Stencil%20Mode.png)
You can adjust the stencil position, scale and rotation to get the detail into the exact position that you need to add detail to your model.
The steps for adjusting the stencil position have been outlined below.
- Move stencil S + Middle Mouse Button
- Rotate stencil S + Left Mouse Button
- Scale stencil S + Right Mouse Button
- For a full list of Keyboard shortcuts go to Windows>Hotkeys.
Exporting Maps
With sculpting of the main details complete, you can export a displacement and normal map from the highpoly model in Mudbox and use those maps to recreate the sculpted detail on the low poly model in Maya.
![[ADD IMAGE'S ALT TEXT]](/sites/default/files/Normal%20Map.png)
![[ADD IMAGE'S ALT TEXT]](/sites/default/files/Displacement%20Map.png)
The Low poly base mesh with the normal map was applied to the shader material. The Displacement map is applied to the shader group node.
![[ADD IMAGE'S ALT TEXT]](/sites/default/files/Low%20Poly%20Base.png)
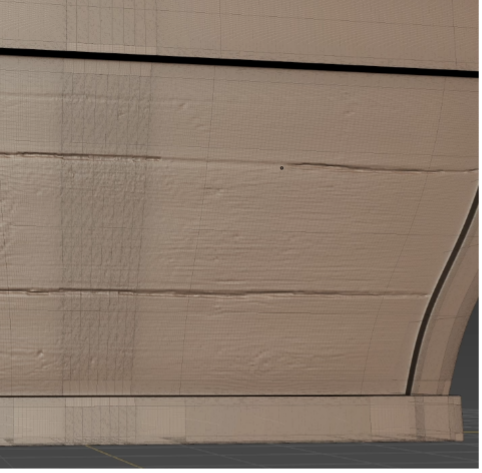
In the Treasure Chest example, you may notice some artefacts happening in the bump information in the area around the lock and on the chest surface directly above and below the lock.
This is caused by the large number of extra loops in this area because of how the lock was modelled. This disparity between the level of mesh detail on either side of these loops is creating some unwanted artefacts in the normal map.
To resolve this issue, it would have been better to either model the locking mechanism using a separate piece of geometry rather than try to model the lock into the chest geometry or to localise the topology in the area around the lock without taking the loops all around the rest of the model.
Watch Geoff demonstrate fixing the topology in the video below (22:28m).
In addition to the adjusting model topology video above, watch the sculpting playlist below to help you with the next learning task.
Practice
Task 3: Create sculpted detail for your treasure chest in Mudbox.
In this learning task, practice digital sculpting using Mudbox to enhance the detail of your treasure chest model.
What tools or resources do you need?
Maya- Mudbox
What steps should you take?
4 Hours
Set aside four hours to complete steps 1-8 below.
- Review the learning, for Digital sculpting including the videos Sculpting surface detail to a model, Detailing the model in Mudbox, Extracting the surface information to help you with this task.
- Export your treasure chest model into Mudbox using the 'send to Mudbox' option in Maya.
- Ensure that your model is properly positioned and scaled in Maya so that it is large enough to work with in the Mudbox workspace.
- Select the Sculpting tab from the toolbar.
- Choose appropriate sculpting brushes from the sculpting tab.
- Experiment with sculpting tools like 'Grab', 'Pinch', and 'Smooth' to create different surface effects.
- Use Stamps and Stencils to help add more detail to the surface of your model.
- Use the selected tools to sculpt intricate patterns, textures, and decorations onto the surface of your treasure chest. Pay attention to details such as wood grain, metal accents, or engraved designs.
- Use the smoothing tool to refine and smooth out any rough areas on your sculpted detail. Ensure that transitions between different elements of your design are seamless.
- Regularly preview your progress by rotating the model and inspecting it from different angles. Make necessary adjustments to the sculpted detail to achieve the desired aesthetic.
Mapping steps - Generate the normal map.
- Once satisfied with the sculpted detail, navigate to the 'Texture' tab.
- 'Create New Paint Layer' and choose 'Normal Map' from the dropdown menu.
- Adjust settings as needed and select 'Generate' to create the Normal map.
- Export Normal Map. After generating the Normal map, navigate to the 'Texture' menu again.
- Select the Normal map layer and choose 'Export Selected Texture' from the dropdown.
- Save the exported Normal map to your desired location.
- Export Displacement MapSimilarly, navigate to the 'Texture' tab.
- Select 'Create New Paint Layer' and choose 'Displacement Map' from the dropdown menu.
- Adjust settings and generate the Displacement map.
- Export the Displacement map following the same steps as the Normal map.
- Save and create a screen shot of your treasure chest as a .jpeg
What should you do after?
- Reflect on the importance of attention to detail in sculpting and digital 3D design. How does it contribute to the overall quality and realism of your creations?
- Consider the adjustments you made along the way. Which adjustments had the most significant impact on the overall appearance of the treasure chest?
- Share the Sculpted Treasure Chest to Forum:
- Select your forum thread in Forum: Sculpting and Texture 2.0
- Select Reply to your first Forum post.
- Enter the words ‘Task 3 Sculpted Treasure Chest’ in your reply.
- Select the Post your response button, then select Edit in your new reply when it shows up.
- Upload your photo(s) or files using the Attachment field.
- Select Save changes to share your coursework to your forum thread.
- All live sessions are recorded so you can watch them later if you miss a session.
- Get feedback on this and other learning tasks at the next Live Session – check the Live Session calendar for dates and times.
Get ready for your next task, where you will add materials and textures to your chest.
In this subtopic, you will go through the additional textures - known as Textures 2.0 - that you can use on your models. If at any point you need to refer to the steps, select this subtopic in your navigation bar to take you back.
Substance 3D Painter is a PBR workflow texture program. It allows you to create textures that fit into a physically based render workflow like Arnold for Maya or many other game engine workflows.
Substance 3D painter uses layers, masks, paint tools and a vast library of completely customisable materials to create detailed, stylised, or realistic textures.
To get an overview, watch the Introduction to Substance 3D series of videos in this course's Software module (near the top of your navigation bar), or by selecting the four links below:
Texturing and importing models into substance 3D process
Follow the steps below to texturing your Treasure Chest model and import your models into Substance 3D.
To begin the texturing process:
- create a project and import the model you want to work on into Substance 3D
- to create a new project, go to File>New (Ctrl + N).
![[ADD IMAGE'S ALT TEXT]](/sites/default/files/New%20Project.png)
- First select a Template from the dropdown menu.
The templates correspond to the workflow that you are currently creating. There are templates for Unity, Unreal, Blender and many others.
Follow the template steps below.
- Leave the template on the default PBR – Metallic Roughness option.
- Next select your model file using the 'Select...' button.
- (You will need to have exported the model out of Maya as a file format that Substance 3D can recognise .obj or .fbx both work)
- Then chose a document resolution, it is recommend changing the resolution to 2048 pixels.
2048 pixels is a reasonable map size for detail but not too large to make the program slow down while working.
Texture maps in Substance are completely non-destructive. This means that they can be up or downscaled at any time with any destructive changes to the textures.
Lastly, you need to:
- change the Normal Map format to OpenGL.
- with your settings decided, select the OK button.
![[ADD IMAGE'S ALT TEXT]](/sites/default/files/Template%20Set%20Up.png)
Your model should load, and you should see the model in the viewport.
To navigate the 3D viewport, you can use the same navigation keys as in Maya.
Hold the alt key:
- left mouse button to rotate/tumble
- right mouse button to zoom in/out
- middle mouse button to move the camera up/down left/right
Holding the shift key and right mouse button rotates the IB Light around the model.
Tools and Asset libraries are on the left of the screen, layers and properties are on the right.
The properties area to the bottom right of the screen is context sensitive and will display different options depending on which tool, layer, or mask you have active at the time.
You can also change the viewport view using the F keys on the keyboard:
- F1: Side by side view of the 3D model and 2D UV Texture layout
- F2: 3D view only
- F3: 2D UV layout only
Baking mesh maps
A very important step before you start painting and applying any materials or textures to a model is to bake the mesh maps. This step analyses the model and create a series of maps that Substance 3D uses to help generate different masking effects that you will want to use later when texturing the model.
To bake the mesh maps, you can either:
- Go to the baking window by selecting the baking button at the top right of the screen (resembles a croissant), or
![[ADD IMAGE'S ALT TEXT]](/sites/default/files/Baking%20Windows.png)
- Use the shortcut key F8, or
- Find a hidden button for baking mesh maps in the texture set settings tab on the right of the screen next to the layers tab.
![[ADD IMAGE'S ALT TEXT]](/sites/default/files/Layers.png)
- Scroll down the list until you see the Bake Mesh maps button.
![[ADD IMAGE'S ALT TEXT]](/sites/default/files/Bake%20Mesh.png)
Use one of these methods to bring up the baking options window:
![[ADD IMAGE'S ALT TEXT]](/sites/default/files/Texture%20Set%20List.png)
Here you can set your mesh map options.
- start by setting your preferred output size
- setting the output size to be the same as the texture size you set earlier (2048x2048) is recommended.
- then under mesh map bakers in the bottom left of the window select the maps you want to bake.
- Leave these at the default options.
With your baking options set:
- use the big blue Bake selected textures button to bake the texture maps into the project.
![[ADD IMAGE'S ALT TEXT]](/sites/default/files/Blue%20Bake.png)
Substance 3D Layers
In Substance 3D there are 2 main types of Layers that you can use to create textures for your models. Take a look at these layers:
![[ADD IMAGE'S ALT TEXT]](/sites/default/files/Layers%202.png)
Paint layers
The first is a Paint layer which functions in a very similar way to Adobe Photoshop.
To create a paint layer:
- select the paintbrush icon in the layers tab.
![[ADD IMAGE'S ALT TEXT]](/sites/default/files/Paintbrush%20Icon.png)
Paint layers can be painted on using the brush, eraser, and pen tools from the Toolbar on the left of the screen.
The brush settings can be changed either at the top of the screen, or to quickly change the brush size you can also use the keyboard shortcut:
- Ctrl and right mouse drag left and right to increase decrease the size of the brush.
- Ctrl and right mouse drag up and down will change the hardness and softness of the brush.
There are more properties for the brush tool in the properties panel underneath the layers area on the right of the screen.
![[ADD IMAGE'S ALT TEXT]](/sites/default/files/Paint%20Properties.png)
The brush display image shows you both the shape of the brush strokes on the left and the material that you are painting with in the sphere on the right. You can select any of the materials from the library area while you have the brush tool selected to quickly change and paint with a material on your model.
Fill layers
The second layer type is called a Fill layer. The fill layer floods a model with a selected colour, texture, or material type.
To change the colour of a fill layer:
- choose a Base colour from the properties area on the bottom right of the screen.
![[ADD IMAGE'S ALT TEXT]](/sites/default/files/Base%20Colour%20Window.png)
- select the colour bar to bring up the colour picker or
- use the eye dropper to select colour from an image.
A procedural texture can be added at this point from the library by:
- select the base colour button above the colour bar and
- selecting from the pop-up window.
To Add a material to the Fill layer:
- select one from the materials library on the left of the screen
- drag it into the fill layer in the layers tab.
Masks
As you create increased layers with varied materials and painted textures in your layer tab, you will see that only the top layer is displayed on the model. This is where you need to create and attach masks to each layer, allowing the materials underneath the uppermost layer to be displayed.
Group layers together that are in the same material family, for example, all the layers that are being applied to the wooden part of the chest are grouped together.
![[ADD IMAGE'S ALT TEXT]](/sites/default/files/Grouped.png)
Creating groups
Follow the steps below to create groups.
- select the folder icon in the layers tab
- then select and drag the layers you want into the group.
- do not forget to rename your layers and groups so your project stays organised.
![[ADD IMAGE'S ALT TEXT]](/sites/default/files/Folder%20Icon.png)
It is recommended to apply the main mask that tells Substance where on the model you would like the material to display to the group.
Putting the mask on the group means that all layers inside the group folder have the same mask applied to them.
Creating a mask
To create a mask follow the steps below:
- right click on the group
- select 'Add black Mask'.
This creates a mask and floods it with black which tells Substance to display nothing from this layer in the 3D view.
You can now either paint or select an area to display, this is the next step.
- Using the 'Polygon Fill' tool from the tools on the left of the screen.
![[ADD IMAGE'S ALT TEXT]](/sites/default/files/Polygon%20Fill.png)
- Ensure you have your mask layer selected (the blue box around the mask shows that it is currently selected).
![[ADD IMAGE'S ALT TEXT]](/sites/default/files/Selected%20Mask.png)
- Change the tool properties in the properties area on the right of the screen so that you are using UV Chunk Fill- it’s the button with a Checkerboard pattern.
![[ADD IMAGE'S ALT TEXT]](/sites/default/files/Chunk%20Fill.png)
Now you can select and fill whole UV shells on your model, or you can also select UV shells in the UV view.
- select and mask all areas of the model that you want to display the material inside of your group
- create all the materials and material groups you need for your model.
For the chest model there are two groups; one for the wooden parts of the model and another for all the metal parts.
![[ADD IMAGE'S ALT TEXT]](/sites/default/files/Various%20Groups.png)
Using Generators
One of the reasons why Substance 3D has become so popular is because of the generators feature. Generators use the information stored in the baked mesh maps you created at the beginning of the project to create procedurally generated effects on the texture layers and materials of the object.
The mesh maps include ambient occlusion, which calculates how close surfaces are to one another. This is precisely the type of information you need to create a mask that references all the cracks and crevasses in a model (for adding dirt in corners, etc).
Another of the mesh maps calculates where a model's edges and corners are. Again, this information is what you want to know if you want to create a damaged edge look to a material.
You will use a generator to create some algae on the surface of the timber parts of the model.
Follow the steps below to guide you through using the generator.
- Start by creating a new fill layer inside the timber group.
- arrange the fill layer on top of the timber material.
- Select a suitable colour for your algae using the colour bar in the properties area.
- Here you can also set how Rough the fill layer is (roughness in Substance 3D relates to how reflective/specular a material is)
- create a black mask for the algae fill layer.
- with the mask selected
- right click on the mask
- choose add generator from the options.
![[ADD IMAGE'S ALT TEXT]](/sites/default/files/Add%20Generator.png)
There should now be an empty generator option in the properties area.
![[ADD IMAGE'S ALT TEXT]](/sites/default/files/Empty%20Generator.png)
To add a mask to the generator, use the Smart masks in the library are on the left of the screen. To access the smart masks:
- open the smart masks tab
- select one from the list
- drag and drop it onto the generator button.
![[ADD IMAGE'S ALT TEXT]](/sites/default/files/Smart%20Mask%20Options.png)
Each mask has its own set of options and settings so have a play with the sliders to see what each one does.
Isolate and display
You can isolate and display the mask on your model. The steps below to guide you through isolating and displaying the mask.
- Alt click the mask you are working on.
This makes it a little easier to see what the mask looks like and consequently what each attribute does.
![[ADD IMAGE'S ALT TEXT]](/sites/default/files/Isolated%20Mask.png)
To return to the material view:
- press the M key on the keyboard.
The generators are where you can really add layers of detail and real-world textures to an object in Substance. So have fun playing with all the layer types, materials, painting, and generators.
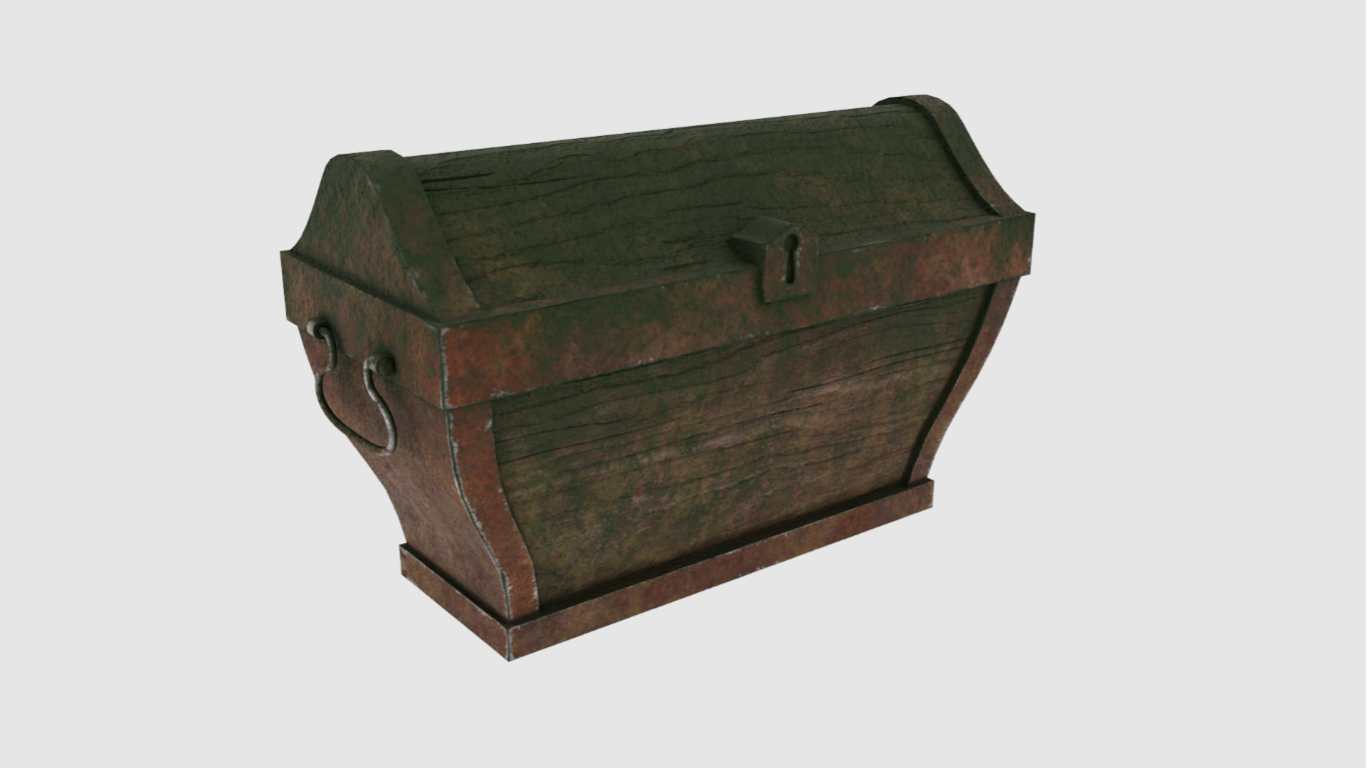
For a more in-depth demonstration of the texturing process for the Treasure Chest model you can watch the video demonstrations below.
Exporting Substance textures for use in Maya
Now that you have completed texturing your model using Substance 3D, you need to export the texture maps and set them up for use back in Maya.
Follow the steps below for exporting the maps.
To export the maps from Substance 3D go to:
- File>Export Textures (Keyboard shortcut: Ctrl+Shift+E)
![[ADD IMAGE'S ALT TEXT]](/sites/default/files/Export%20Textures.png)
In the export texture window, you can adjust the export settings to match the requirements of your production pipeline.
The first step is to:
- change is the Output directory.
This is where substance will save the generated maps. As you will be using the maps in Maya, you will need to:
- change the output directory to the 'Source images' folder in your Maya project file system
- export the files directly where Maya reads them from.
Next, you will need to
- select an output template.
You will be using Maya, so ensure you:
- select the Arnold (AiStandard) Template.
The output template tells substance how to export the maps in a format that is optimised for the software that the maps will be used. There are many preset output templates you can select in the dropdown list.
You can also create your own template in the output templates tab at the top of the window.
Next, you will need to
- select a File type from the dropdown list .png is a good all round file format but there are many others to choose from.
- select a map size.
If you leave this set at the default option, then Substance will export a map of whatever size your project is set at currently. You can export maps all the way up to 8K if required.
With the settings set, you can go ahead export your texture maps by:
- selecting the Export button at the bottom right of the window.
The AiStandard template exports six different maps that when combined create the surface textures simulated materials and colour for the model.
![[ADD IMAGE'S ALT TEXT]](/sites/default/files/Six%20Texture%20Maps.jpg)
You may find that one or more of the maps do not contain any information and appear black. In this example the Emissive Map is black, which is because that are no materials used in your Treasure Chest model that emit light and therefore there is no information to include in this map.
Watch the following video (3:05m) to guide you through exporting texture maps to Maya.
Importing the maps into Maya
Bringing your substance generated maps into Maya is an extremely easy process. You will first however need to make sure that the substance plugins for maya are loaded and ready for use.
In Maya go to:
- Windows>Settings and Preferences>Plugin manager
In the search area of the plugin manager:
- search for Substance.
- four plugins should be displayed
- ensure that the checkbox next to each is 'Loaded'
- Check the 'Auto Load' box for each - this will ensure that the substance plugins are automatically enabled when you start Maya in the future.
![[ADD IMAGE'S ALT TEXT]](/sites/default/files/Plug-in%20Manager.png)
With the plugins enabled you should now have a new Shelf called Substance and a new Substance menu at the top of the screen.
![[ADD IMAGE'S ALT TEXT]](/sites/default/files/Substance%20Menu.png)
The substance plugin has a nifty feature that enables you to import substance maps and automatically create the shading network for the material.
To import the texture maps and create a shader:
- select the 'Apply workflow to Maps' button in the Substance shelf (three checker boxes going into a material icon).
![[ADD IMAGE'S ALT TEXT]](/sites/default/files/Material%20Icon.png)
The Apply Workflow to Image Maps window will open.
![[ADD IMAGE'S ALT TEXT]](/sites/default/files/Apply%20Workflow.png)
- select the Select Multiple Maps button
- select all the maps that were generated by Substance when you exported your texture maps
- select OK
- all the Maps should be arranged in their correct channel in the window.
![[ADD IMAGE'S ALT TEXT]](/sites/default/files/Arranged%20Maps.png)
Once you are happy that each map is in the correct channel:
- Select the Apply button.
- open the Hypershade window.
There should be a new aiStandardSurface material in the materials area.
![[ADD IMAGE'S ALT TEXT]](/sites/default/files/Hypershade_0.png)
- right click the material to bring up its marking menu.
- select graph network to bring the shader into the work area and show all its connections.
![[ADD IMAGE'S ALT TEXT]](/sites/default/files/Marking%20Menu_0.png)
You can see from the shading network for the material that the plugin has automatically created all the required nodes and connections for the exported maps and then plugged them into an aiStandardSurface material.
![[ADD IMAGE'S ALT TEXT]](/sites/default/files/Nodes.png)
Give the new shader meaningful name and apply it to the model in Maya.
You can apply the material by:
- middle mouse dragging
- dropping it into each of the parts of the chest model or
- selecting all the chest geometry first
- right mouse click and hold on the shader to access the marking menu
- selecting the 'Assign Material to Selection' option.
![[ADD IMAGE'S ALT TEXT]](/sites/default/files/Assign%20Material.png)
- Press the shaded display mode hotkey (6) on your keypad.
You should now be able to see the textures being displayed on the model.
To render the model, you will need to create some lights. The Arnold Skydome light is perfect for quickly viewing texture renders when working with Substance generated textures. Create a Skydome light and either attach an HDRI Environment to the colour for image-based lighting or just use the default colour settings.
Render your model using Arnold. The textures you created using Substance should be very close in appearance to the viewport in Substance.
Watch the video below (4:38m) to help you with re-importing and applying texture maps .
Practice
Task 4: Create materials and Textures for Chest
In this task, you will create materials and textures for your chest model using Maya. You will learn fundamental techniques for applying textures, adjusting material properties, and enhancing the realism of 3D objects.
What tools or resources do you need?
- Treasure chest you have been working on.
- Autodesk Mudbox
What steps should you take?
8 Hours
Set aside eight hours to complete steps below.
- Review the learning for Texture 2.0 along with the video content: Substance 3D painter series, Export texture maps to Maya, Re-import and apply the texture maps to help you complete this task.
- Open Autodesk Maya and export your treasure chest model as an .obj or .fbx file type.
- Follow the learning steps to create a project for your Treasure Chest and import the model into Substance 3D Painter.
- Bake mesh maps for your treasure chest model
- Follow the learning steps to create materials and textures for your treasure chest model.
- Regularly take screenshots of your texturing process and post to the forum for feedback.
- Export your texture maps for use in Maya.
- Import texture maps into Maya using the learning steps and apply them to your treasure chest model.
- Create an Arnold Skydome light in your scene and render your textured model.
- Save and export the treasure chest as a.jpeg.
What should you do after?
- Reflect on your overall experience with this learning task. What aspects did you find most enjoyable or satisfying, and which aspects presented the greatest challenges?
- Consider how the skills and techniques you learned in this task could be applied to other 3D modeling and texturing projects in the future.
- Share your Treasure Chest to Forum:
- Select your forum thread in Forum: Digital Sculpting
- Select Reply to your first Forum post.
- Enter the words ‘Task 4 Texturing the Treasure Chest Model’ in your reply.
- Select the Post your response button, then select Edit in your new reply when it shows up.
- Upload your photo(s) or files using the Attachment field.
- Select Save changes to share your coursework to your forum thread.
- Get feedback on this and other learning tasks at the next Live Session – check the Live Session calendar for dates and times. All live sessions are recorded so you can watch them later if you miss a session.
Well done! You have completed the final layer of your treasure chest!
Congratulations, you have now finished Sculpting! As you wrap up this topic, take a few moments to reflect on all that you have achieved, including the various learning tasks to hone your skills.
You have learnt how to:
- digitally sculpt surface details of models using Mudbox
- use Mudbox to follow basic sculpting processes
- use Substance 3D Painter to texture models.
| Learning task # | Learning Task Name | Duration (Hours) | |
|---|---|---|---|
| 1 | Design a treasure chest for modelling in Maya | 2 |
|
| 2 | Model and UV treasure chest in Maya | 6 |
|
| 3 | Create sculpted detail for your treasure chest in Mudbox. | 4 |
|
| 4 | Create materials and textures for chest | 8 |
|
The skills and tools you have practiced using will be integral to the next (and final) module Final Image. You’re almost there!