In this topic we’ll:
- explain email etiquette for different aspects of email and for different situations
- provide you with tips for organising your emails
- describe what mail merge is and explain how it works
- describe the common data sources used for mail merge.
By the end of this topic you’ll be able to:
- Apply email etiquette when writing and sending emails.
- Recall emails within certain parameters depending on your email client.
- Create an out of office reply.
- Organise your emails.
- Send bulk emails using mail merge.
There are three key parts to sending an email:
- who you are sending the email to
- the subject line
- the message.
We will expand on each of these below as well as other considerations for using correct email etiquette.
Who you are sending the email to
When you sending an email you have three separate fields for recipients:
- To
- Cc
- Bcc
It's important to use these fields thoughtfully to ensure effective communication and to respect the privacy and preferences of the recipients.
The table below describes each type of recipient field and when to use them.
| To |
This field is where you enter the primary recipient(s) of your email. These are the individuals or groups to whom the email is addressed directly. Use this field for recipients who are the main targets of your message or those who are expected to take specific actions or respond to the content. |
| Cc |
Cc stands for carbon copy. This field is used for secondary recipients or individuals who should receive a copy of the email for informational purposes. Including someone in this field notifies them about the email, but it indicates that the message is not primarily directed at them, and they are not the main audience. Use this field when you want to keep others in the loop but don't necessarily require their direct involvement or response. |
| Bcc |
Bcc stands for blind carbon copy. This field is similar to the Cc field, but it has an additional layer of privacy. The recipients in this field are not visible to the other recipients of the email. Use this field when you want to protect the privacy of certain recipients or when sending a message to a large group of people who may not know each other. It's often used in professional settings when sending announcements or newsletters to a large audience. |
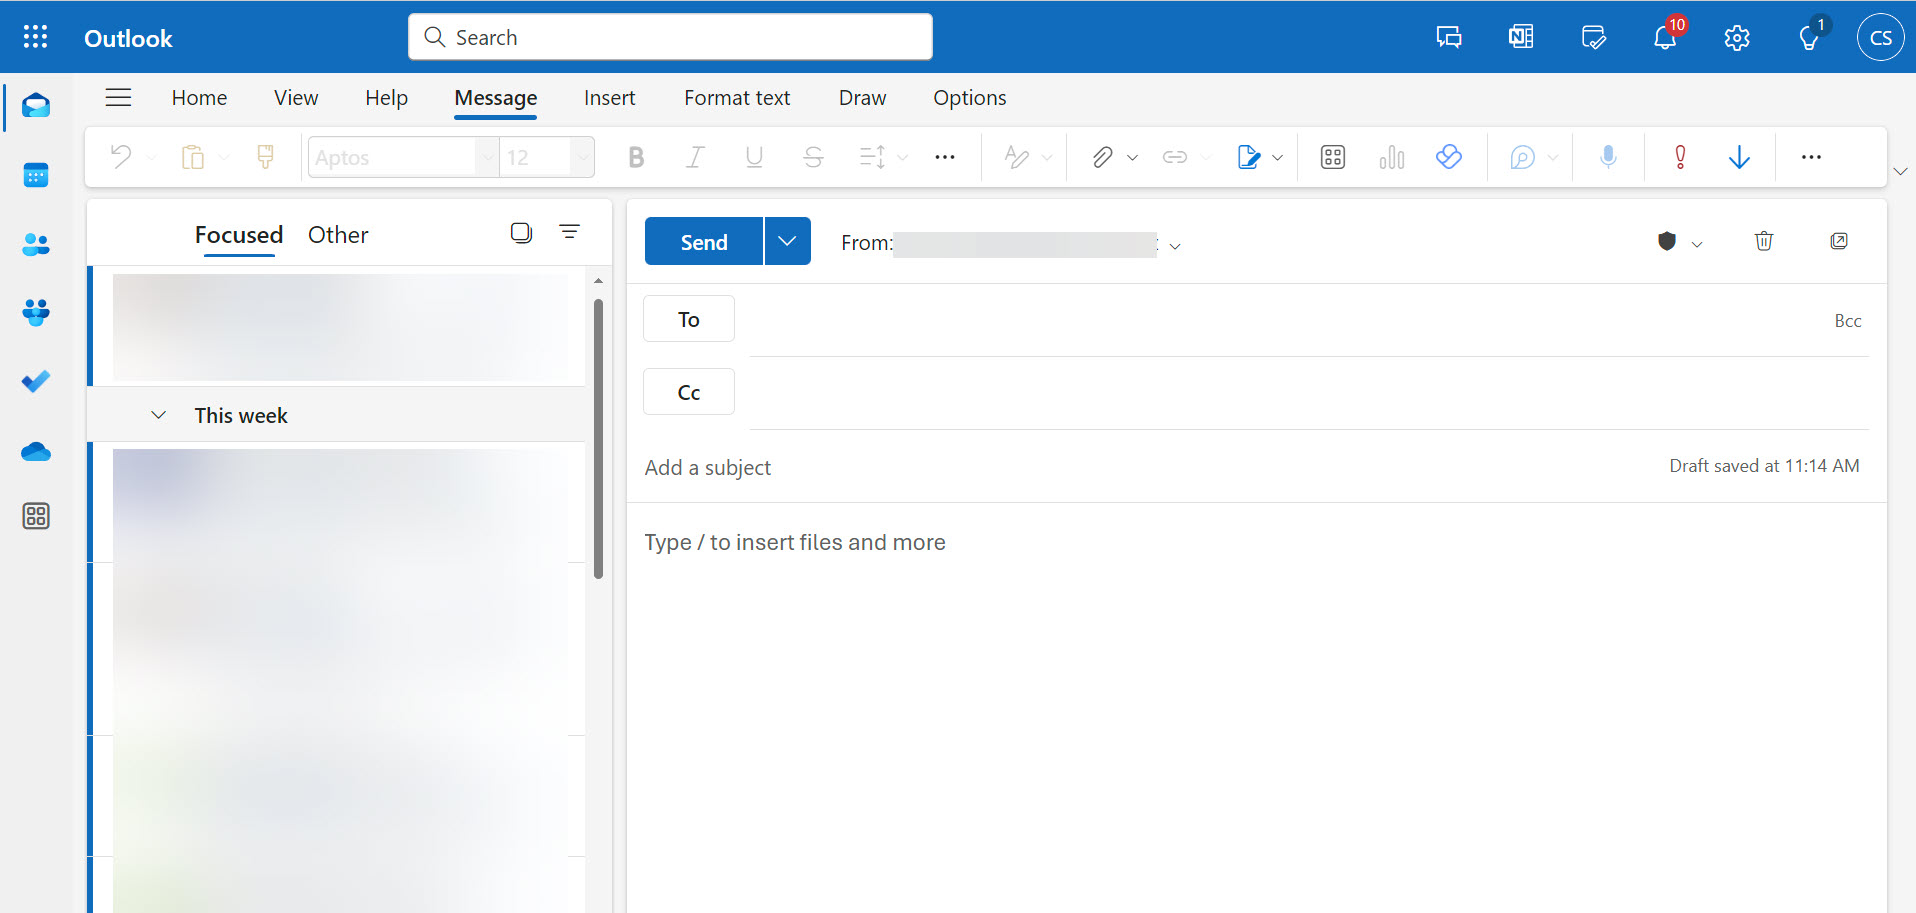
Note that in some email applications the Cc and Bcc may not be visible immediately. As shown here, in Microsoft Outlook: Web, you need to click the small “Bcc” text to the right of the “To” box, to add a Bcc recipient.
The subject line
The subject line is the first thing recipients see and can significantly impact whether they open and read your message.
The table below describes considerations when writing subject lines.
| Clarity | Keep the subject line clear and concise. Ideally, it should be brief and to the point, summarising the main purpose or content of the email. |
| Relevance | Make sure the subject line accurately reflects the content of the email. Misleading subject lines can lead to confusion and may reduce trust. |
| Specificity | Try to avoid overly generic phrases that don't provide much information, such as "Hello" or "Important." Be specific about the content or purpose of the email. |
| Including key information first | Front-load important information in the subject line. This ensures that even if the entire subject line isn't visible at first glance, the crucial details are. This could be the case if people are viewing emails on mobile devices. |
| Using actionable language | Where appropriate, use action verbs or words that convey the action you are looking for in response to the email. This can also motivate recipients to open and read the email promptly. |
| Avoiding all caps and excessive punctuation | Writing in all capital letters or using excessive punctuation (e.g., multiple exclamation points) can make the email seem unprofessional or overly urgent. Use them sparingly. |
Sentence case and title case
Sentence case is when you capitalise only the first word of the sentence (and any proper nouns). For example: "Important update on our project meeting." It is easier to read than title case and can feel conversational and less formal.
Title case is when you capitalise the first letter of each major word in the sentence. For example: "Important Update on Our Project Meeting." It looks more formal and can convey a sense of importance or formality.
Some organisations have a specific style guide or preference for the case to maintain consistency across communications. Check if your organisation has any guidelines. If not, then as a general guideline, you might choose sentence case for a more casual or everyday tone, and title case for a more formal or business-oriented tone. Whichever you choose, be consistent in your approach to maintain a professional appearance in your email communication.
Below are some examples of subject lines. These are in sentence case for easy reading.
- Rebranding project: Milestone achieved and next steps
- Action required: Time-sensitive task for the rebranding project
- Follow-up: Action items from our recent discussion
- Approval needed: Final draft of budget proposal
- Reminder: Submission deadline for the quarterly report approaching
- Q4 financial report now available for review
- Proposal for cross-department collaboration
The message
The message is made up of:
- a greeting
- the main body
- a sign-off, and usually an email signature.
Email greetings and sign-offs
These two articles provide good advice for email greetings and sign-offs:
Reading
Article Title: Email greetings: Best ways to address an email formally and casually
Article Summary: Join us for a deep dive into email greetings.
Article Title: Professional email sign-offs: Best closing lines
Article Summary: Learn the best closings for a professional email.
Email signatures were mentioned at the end of the second article. Your organisation should have a template for your signature – if in doubt, ask your team leader.
If you copy someone else’s email signature to create your own, take extra care to make sure you’ve changed all of their information to be your own. It looks unprofessional if your signature has someone else’s name, email address, or phone number in it.
Māori greetings and sign-offs
The Māori language is considered a national taonga (treasure) and is undergoing a significant revival… You can help support Te Reo Māori by making an effort to get pronunciation right and using simple words and phrases in everyday conversation.Matt Crawford
Reading
Article Title: Māori greetings and sign-offs for letters and emails
Article Summary: Download this one-page resource guide of Māori greetings and sign-offs as a good reference.
Article Title: Te Aka Māori Dictionary
Article Summary: If you would like to check the correct pronunciation of te reo words (as well as the definitions), the Te Aka Māori Dictionary is a good resource.
Article Title: How to use macrons (tohutō) on your devices
Article Summary: The lines over some vowels in written Māori are called tohutō, or macrons. Unfortunately, the computer keyboards we use aren’t designed for typing te reo Māori, so macrons aren’t built in. Thankfully, changing a few settings makes adding a macron as simple as typing a capital letter.
Body
The body of an email is the main content after the email greeting and before the sign off. Here are some things to consider when writing the body of an email:
- Clearly state the purpose of your email if you haven’t done so already.
- Provide context or background information.
- Be brief, concise and to the point.
- If there is enough text to justify it, then divide the text up into paragraphs for better readability.
- Make sure each paragraph has a clear focus
- Ideally you will not exceed three short paragraphs
- If you need more than three paragraphs then you can use headings to break the content into sections
- Use bullet points or numbered lists for clarity where appropriate
- Clearly articulate any requests or actions required from the recipient
- If applicable, specify deadlines
- Include any additional information required for context
- Provide any supporting documents by attaching or linking them (ensuring recipients have access) and indicate the relevance of each within the email
Business emails are one type of format for professional writing. Professional writing considerations are covered further in the next topic.
Official information
In some cases, such as within government agencies, or local government agencies, your work emails are subject to the Official Information Act (OIA) or the Local Government Official Information and Meetings Act 1987 (LGOIMA). This means that your emails may be provided to others in response to an official information request.
It is good practice to keep your work emails professional regardless of OIA and LGOIMA but particularly important in that case.
If your organisation is subject to OIA or LGOIMA then this should have been covered in your induction and there will be policies and procedures to adhere to. If you are unsure, ask your team leader.
Forwarding emails
Forwarding emails requires careful consideration to maintain professionalism and effectively communicate with recipients.
The table below provides some etiquette tips for forwarding emails.
| Include a brief explanation |
Before forwarding an email, provide a brief explanation of why you are forwarding it. This helps the recipient understand the context and relevance. If the forwarded email requires additional context or explanation, include a note before or after the forwarded content to provide clarity. If you're forwarding an email as part of an ongoing conversation or thread, acknowledge the previous communication to provide context to the recipient. |
| Use a clear subject line | Modify the subject line if necessary to accurately reflect the content you're forwarding. A clear subject line improves understanding and organisation. |
| Consider privacy | Be mindful of the privacy of the original sender and any other recipients. If the content is sensitive or confidential, consider checking with the original sender before forwarding. |
| Remove unnecessary information | Before forwarding, review the email content and remove any unnecessary or irrelevant information. This helps to keep the message concise and focused. |
| Verify links and attachments | Ensure that any links or attachments in the forwarded email are still valid and relevant. Broken links or outdated attachments can cause confusion. |
| Adhere to your organisation’s policies | Some organisations may have specific guidelines regarding the forwarding of emails to ensure proper communication and information security. |
Forwarding an email as an attachment in Gmail
Reading
Article Title: Send emails as attachments
Article Summary: Take a look at this guide for how to forward an email as an attachment.
Forwarding an email as an attachment in Microsoft Outlook: Desktop
- Open the email you wish to forward as an attachment.
- Click on the ellipsis button (...), found in the top right corner of the email window.
- Select ‘Forward as Attachment’.
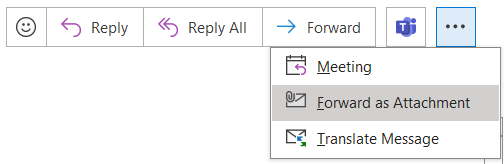
Screenshot showing how to select the ‘Forward as Attachment’ option from the email window in Microsoft Outlook: Desktop.
Forwarding an email as an attachment in Microsoft Outlook: Web
- Open the email you wish to forward as an attachment.
- On the main Outlook Ribbon, click on the down arrow next to the ‘Forward’ symbol.
- Select ‘Forward as attachment’.
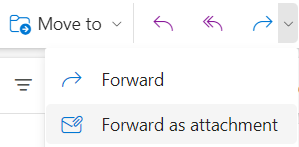
Screenshot showing how to select the ‘Forward as attachment’ option from the main Outlook Ribbon in Microsoft Outlook: Web.
Downloading emails
You should carefully consider whether or not it is appropriate or necessary to download an email or email thread (series of emails). As with forwarding emails, ensure that you are not in breach of privacy or your organisation’s policies. Refer to the relevant guidance below:
In Gmail
Reading
Article Title: Download emails to your computer
Article Summary: Take a look at this guide for how to download emails in the email client’s format.
To download an email as a PDF:
- Open the email you wish to download.
- Click on the print icon.
- Select the option to ‘Save as PDF’.
- Edit settings as required.
- Click ‘Save’.
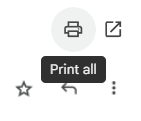
Screenshot showing the icons in an email in Gmail with the print icon selected.
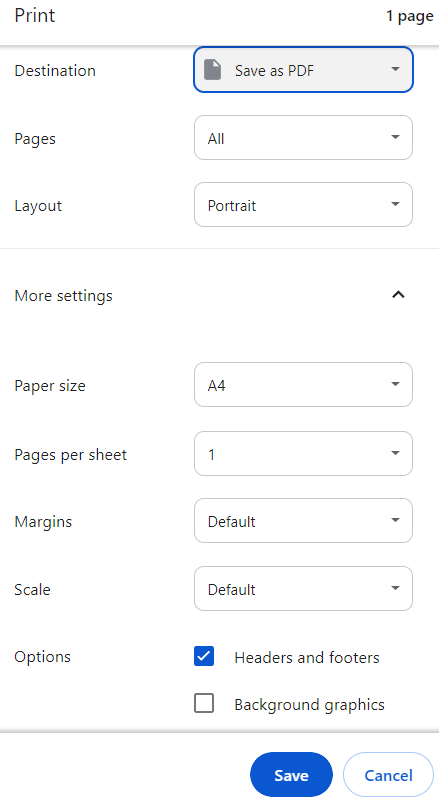
Screenshot showing the option to ‘Save as PDF’ an email from Gmail.
In Microsoft Outlook
Reading
Article Title: Save an Outlook message as a .eml file, a PDF file, or as a draft
Article Summary: Take a look at this guide which explains how to download an email in a range of formats, including the mail client’s format and PDF.
Read requests
Read requests are a way to find out when an email you sent was opened. When you send the email you can request a read receipt. A read receipt is sent to you as an email with the time and date of when your message was opened.
Read requests are not used often. As a general rule, don’t use them unless you are told otherwise by your team leader. Instead, if you need to know if someone has read an important or urgent email, call the recipient, or send a follow up email if you haven’t received a reply yet.
Recalling emails
For whatever reason, you may have the need to recall an email – that is to effectively “unsend” an email. There are, however, parameters around this and it varies between email clients (applications) as does the process. Take a look at the videos below to learn how recalling emails work in Gmail and Microsoft Outlook.
Video Title: How To Recall Email In Gmail – Full Guide
Watch Duration: 1:20
Video Summary: Learn how to recall and unsend email in gmail.
Source: YouTube
Video Title: How To Recall An Email In Outlook (Unsend Email) – Full Guide
Watch Duration: 1:27
Video Summary: Learn how to recall and unsend email in Outlook.
Source: YouTube
Out of office reply
An out of office reply notifies people who email you that you are currently unavailable. This helps manage expectations and reduces frustration if they are expecting a prompt response.
When setting an out of office reply, you should include, where possible:
- When you will return and when the recipient can expect a response – this helps to avoid unnecessary follow-up emails while you're away.
- Who to contact in your absence and how to contact them to ensure that urgent matters can still be addressed promptly by someone else on your team.
Reading
Article Title: Create a vacation reply
Article Summary: A guide to setting your out of office reply in Gmail.
Article Title: Send automatic replies (out of office) from Outlook
Article Summary: A guide to setting your out of office reply in Microsoft Outlook.

Organising emails effectively can really boost your efficiency and productivity. The following table provides general tips for organising your inbox.
| Use folders or labels | Create folders or labels to categorise your emails. For example, you can have folders for different projects, clients, or types of communication. Sort emails into these folders as soon as you read them. |
| Prioritise and flag emails | Mark important emails as "Priority" or use flags to highlight items that need your attention. Prioritise emails based on urgency and importance. |
| Use a clear subject line | Write clear and specific subject lines that summarise the content of the email. This helps when searching for emails later. |
| Archive or delete unnecessary emails |
Regularly archive or delete emails that are no longer needed. If you are unsure of your organisation’s policy on deleting emails, ask your team leader or manager. Keep your inbox clutter-free to make finding important emails easier. |
| Maintain a filing system | Develop a consistent filing system that makes sense to you. Group related emails together for easy retrieval. |
| Use search effectively | Familiarise yourself with the search function in your email client. Instead of scrolling through your inbox, use search terms or filters to quickly locate specific emails. |
| Unsubscribe from unnecessary newsletters | Reduce email clutter by unsubscribing from newsletters or promotional emails that you no longer find useful. |
| Keep a clean inbox | Strive to keep your inbox as close to zero as possible. Respond, file, or delete emails promptly. |
| Flag follow-up emails | Flag or mark emails that require follow-up. Set reminders or use a task management system to ensure you address these emails in a timely manner. |
| Regularly review and clean up | Schedule regular reviews to assess and clean up your email folders. Archive or delete outdated emails to maintain an organised system. |
Linked below are online how-to guides that relate to the tips in the table above.
In Gmail
- Create labels to organize Gmail
- Split your emails using Gmail priority inbox
- Add or remove inbox categories & tabs in Gmail
In Microsoft Outlook
Another way to improve your productivity is to schedule ‘email time’. Instead of checking emails constantly throughout the day, allocate specific time slots for email management. This helps you stay focused on other tasks without constant interruptions.
Activity: Organising your emails
There is no time like the present and the sooner you organise your emails, the better. Using the advice and guides above, organise your emails.
Mail merge overview
Mail merge is a software feature commonly used for tasks such as creating personalised letters, mailing labels, envelopes, or email campaigns. It streamlines the process of generating large volumes of customised documents, saving time and effort compared to creating each document manually, and it can be done in emails, which is our focus here.
It involves merging a template document with a data source, typically a spreadsheet or a database, to generate individualised documents for each entry in the data source.
Here is an overview of how mail merge typically works (this applies to both creating print documents from merge data and merging to email):
- Create a template document: Start by creating a document in your word processing software (such as Microsoft Word, Google Docs, or Gmail) that serves as the template for your mail merge. This document will contain fixed content as well as placeholders for personalised information, such as recipient names and addresses.
- Prepare the data source: Next, you need to prepare your data source, which is usually a spreadsheet (e.g., Microsoft Excel or Google Sheets) or a database. Each row in the data source represents information for an individual recipient, with columns containing various fields like name, address, city, and so on.
- Connect data source to template: In your word processing software, you'll use the mail merge feature to connect your template document to the data source. You'll specify which fields from the data source correspond to the placeholders in your template document
- Insert merge fields: Insert merge fields (also known as mail merge fields or placeholders) into the template document where you want personalised information to appear. These fields will be replaced with data from the corresponding columns in your data source during the merge process.
- Preview and complete merge: Preview the merged documents to ensure that the data is correctly populated. Then, complete the merge process to generate individualised documents for each recipient. Depending on your software, you can either print the merged documents directly, save them as separate files, or send them as emails.
Mail merge template document
As explained above, this template document will contain fixed content as well as placeholders for personalised information, such as recipient names and addresses.
Below is an example of an email template document:

Your organisation may already have a template for you to use. If not, the template example above, the email etiquette guidance from earlier in this module and the mail merge how-to guides and video tutorials later in this module will help guide you to create one.
Mail merge data sources
Data sources for mail merge typically consist of structured datasets containing information about recipients, such as their names, addresses, email addresses, and other relevant details. The table below outlines common data sources used for mail merge.
| Spreadsheets | Microsoft Excel or Google Sheets are commonly used as data sources for mail merge. Each row in the spreadsheet represents a recipient, and each column contains different data fields, such as first name, last name, email address, etc. |
| Databases | Data stored in databases, such as customer relationship management (CRM) systems or membership databases, can be used for mail merge. These databases can contain detailed information about individuals or organisations, including contact information, preferences, and transaction history. |
| Contact management systems | Contact management systems or address books, such as Microsoft Outlook or Google Contacts, can serve as data sources for mail merge. These systems store contact information for individuals or groups and can be synchronised with mail merge tools. |
| Text files | Plain text files or CSV (comma-separated values, .csv) files can also be used as data sources for mail merge. These files contain structured data that can be easily imported into mail merge software. |
| Form responses |
If you've collected information through online forms or surveys, you can use the collected responses as a data source for mail merge. This is particularly useful for gathering information from event registrations, feedback forms, or subscription forms. Generally this involves exporting the form responses as an Excel (.xlsx) or CSV list and opening this in a spreadsheet. |
| Mailing list services | Some mailing list services or email marketing platforms provide built-in features for mail merge, allowing users to create personalised email campaigns using data stored within the platform. |
Your organisation should point you to an existing data source if they expect you to perform a mail merge. You may also be asked to manage this data source or a mailing list by keeping the data up to date or adding or removing members. Managing data is covered later in this programme.
If sending mail merge emails to people outside of your organisation, ensure that you have permission to email recipients. This can be through explicit opt-in forms, subscription confirmations, or other consent mechanisms. Avoid purchasing email lists or sending emails to individuals who haven't opted in.
Mail merge how-to
Linked below are online how-to guides for mail merge.
Reading
Article Title: Send personalized emails with mail merge
Article Summary: A how-to guide for mail merge in Gmail.
Article Title: Use mail merge to send bulk email messages
Article Summary: A how-to guide for mail merge in Microsoft Outlook.
Video tutorials on mail merge are usually specific to the type of data source you are using. Below are two video tutorials which may or may not work for you. If they do not use the data sources relevant to you then they may still be helpful as an overview. Alternatively, or in addition, you can search YouTube for a tutorial specific to your type of data source.
Video Title: How to Mail Merge in Gmail | Send Bulk Emails on Google Sheets
Watch Duration: 5:52
Video Summary: A guide on how to use mail merge in Gmail.
Source: YouTube
Video Title: How to Mail Merge in Outlook | Mail Merge in Microsoft Outlook
Watch Duration: 3:51
Video Summary: A guide on how to use mail merge in Outlook.
Source: YouTube
You’ve reached the end of this topic. By now you should know how to:
- Apply email etiquette when writing and sending emails.
- Recall emails within certain parameters depending on your email client.
- Create an out of office reply.
- Organise your emails.
- Send bulk emails using mail merge.
