Popular online payment methods
If you’ve bought something online, then you’ve probably used an online payment method. The most common are credit cards, debit cards, automated clearing houses (ACH) like PayPal, and direct debit. These methods are generally instant and allow the customer to pay without visiting their bank website.
In the case of direct debit, the customer can authorise ongoing payments. This allows you to take money directly from their bank account whenever a bill is due.
Benefits of online payment
Small businesses get paid up to twice as fast with online invoice payments. In some cases, they get paid instantly.
Customers love online payment too because it’s quick and easy. Plus they have the option to pay by credit card, which gives them extra financial flexibility.
How does online payment work?
Businesses can accept online payments through a merchant service provider. There are many respected providers out there, and they shouldn’t charge you anything to get set up (although there will be transaction fees).
Choose a merchant service provider that can integrate with your invoicing software. Most should. Once the service is switched on, a 'pay now' button will appear on your invoices. When you email the invoice to a customer, they can click the button to pay you instantly.
What is a merchant service?
Merchant service providers are specialist companies that handle online payments for you. Generally speaking, some of them focus on debit and credit card processing, others focus on ACH processing, and a third category looks after direct debit. It’s unlikely you’d need to offer all of these payment options.
You’ll need online invoicing software to make it work. Just find the section for add-on apps and pick your preferred provider. There’s generally a wizard to guide installation. Or if you have a tech-savvy accountant or bookkeeper, ask them to do it.
What are merchant service fees?
While it should cost you nothing to set up a merchant service provider and accept online payment, there will be transaction fees. For debit and credit cards, the fee works out to between 2% and 4% of the invoice value. For direct debit, the fee will depend on the size of the transaction but should never get any higher than about $2.
Just because you know how to accept payments online, doesn't mean you have to do it every time. You can switch it on and off. To help keep costs down, businesses tend not to offer online payment on invoices of more than $5,000.
How do I account for the transaction fee?
When doing your business accounts, you’ll need to treat the transaction fee as an expense. You’ll want to match it with the payment so you can correctly calculate your profit on the order. Smart accounting software can do that for you, automatically.
(Source: Xero Small Business Guides).
Technical help and support with Xero
- Xero supports users in several ways, including extensive support articles, learning courses and materials, and online support.
- Search Xero Central for the information you need. If you can't find an article that answers your question, contact our support team by raising a case.
- Xero provides unlimited free 24/7 online support to all subscribers. Any user within an organisation can contact us for support.
- View and manage cases raised in My cases.
- You can include file attachments or invite Xero support into your organisation.
- When you contact us, we direct your request to the team best suited to answer your question and make sure they have all the necessary information to help you.
- We don’t have a support phone number, but we do call customers if we need to. If you come across a phone number on the internet that claims to be Xero support or charges for support, it's fraudulent.

Before we are able to process any transactions in Xero, we need to set up our customer. This process is a vital part for the transactions to process smoothly.
Ensure that each part is completed correctly.
Add a New Contact
A new contact will have to be added in order to create an account in Xero. This could be a situation where the company you work for has a new client.
When you add a new contact, it shows under the All contacts group. The same contact will show in the Customers or Suppliers group when you enter an invoice, bill or credit note transaction for them.
- Click the plus icon and select Contact.
- Enter your contact's name. If you can, try using the English or basic Roman alphabet so you can check if a contact already exists with that name.
- Select a contact if there's a match. Xero automatically populates the address when available.
- (Optional) Enter your contact's details.
- Click Save.
Contracts can only have one postal and one street address saved. When editing the address on a transaction, it will also update the address saved against the contacts details.
BPAY is an easy and secure way to manage your bills with one payment method, all through your online banking. You can choose when, how much and from which account to pay from.
BPAY allows your business to have better cash flow, as money is cleared within one business day.
Reconciliation is also made efficient with BPAY customer reference number (CRN) which is unique to each customer.
Follow the instructions below to set up BPAY in Xero.
Credit card payments can be accepted when paying online invoices. This is through applications such as Stripe, GoCardless and more.
With an integrated system, digital invoices can have a pay now button, this will allow businesses to safely accept global card and direct debit payments.
Follow the instructions below, provided by Xero to add a payment method.
What you should know
- Payments services can’t be used for direct debit payments. Visit our App Marketplace (Xero website) to find apps that offer this service.
- When a customer makes an online payment via their Xero invoice, the payment service provider is responsible for the payment and deposits the funds into your bank account.
- You need the advisor or standard user role to use payment services in Xero.
Payment methods

Add a payment service
If you use a payment service that doesn't integrate with Xero, you need to get a custom URL from your service provider. The custom URL allows you to apply the payment service to a branding theme so you can accept online payments.
You can sign up for and connect a new payment service account with the payment service provider directly or in Xero as follows:
- In the Payment Services screen
- For Stripe, GoCardless and PayPal accounts, from an approved or a repeating invoice template in classic invoicing. In new invoicing, do this from a draft or approved invoice.
You can add accounts for multiple providers, or multiple accounts for a single provider.
We suggest that you refer to the steps for the relevant payment service provider.
Apply the payment service to a branding theme
Add your payment service account to a branding theme so your customers can pay their invoices online. To do this:
- Click on the organisation name, select Settings, then click Payment services.
- Under Active Payment Services, click Manage Themes.
- For the branding theme you want, select the payment service provider.
- Click Save.
You can apply multiple payment services to a branding theme. If you apply multiple payment services, your customer can select which payment method to use on the online invoice.
The default payment services that display on an invoice depend on the branding theme you’ve selected for the invoice. Follow the same steps to change the payment service for a branding theme.
You can also change the payment service attached to a branding theme. This would change the default payment service applied to invoices. To do this:
- Click on the organisation name, select Settings, then click Invoice Settings.
- Next to the branding theme, you want to update, click Options, then select Edit.
- Under Payment Services (Credit Card, PayPal or Direct Debit), choose the new service for the branding theme.
- Click Save.
Add a payment service account to your invoice
When you add a payment service account to an invoice, Xero adds a Pay Now payment button on the online invoice. You can then email the invoice to the customer who uses this button to pay you via the payment service. They don’t need to have a Xero login to do this.
In classic invoicing, you can do this from an approved invoice or a repeating invoice template. In new invoicing, do this from a draft or approved template.
Refer to the steps for the relevant payment service provider.
When a customer pays you online, Xero marks the invoice as paid (you don't receive an alert or notification). Xero displays the transaction reference ID from the payment gateway in the transaction's Reference field.
For payments made using a custom URL payment service, you need to manually apply a payment to the invoice. You can also apply for a payment by reconciling the statement line once the funds show in your account.

Add a direct debit service so payments can be collected automatically when you send invoices from Xero. Allow customers to pay via direct debit for recurring and one-off payments.

Business motivations for using direct debit include:
- Cash flow increase
- Customer retention
- Billing cycles
- Subscriptions and memberships.
- Go to Business and select Invoices. Open an Awaiting Payment invoice. Click Get set up now, under Online payments. If you already have a payment service-connected, this will say Manage[1].

-
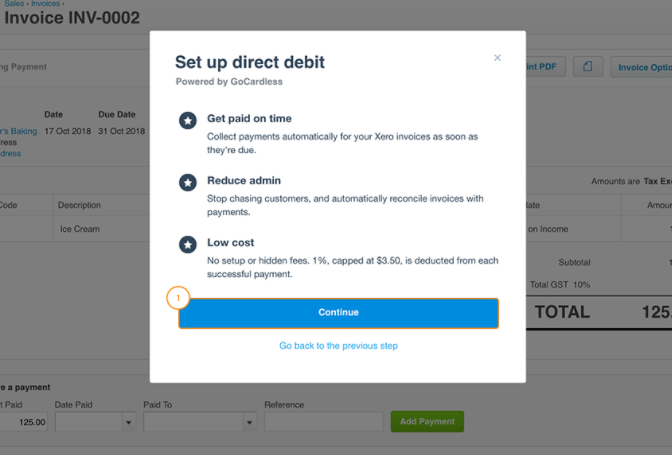
Click Get started now next to Direct Debit.
-
Read the information about GoCardless, and click Continue to be taken to the GoCardless for Xero site.
-
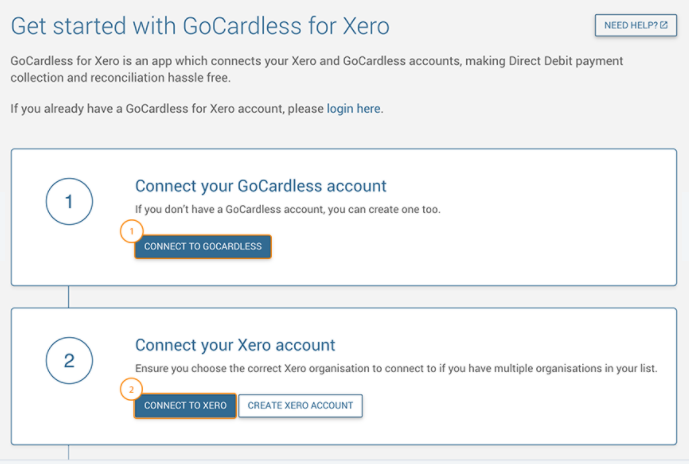
Click Set up now on the GoCardless for Xero page.
-
Click to create or connect to GoCardless. These login details will be separate to your Xero login details. Next, click Connect to Xero.
-
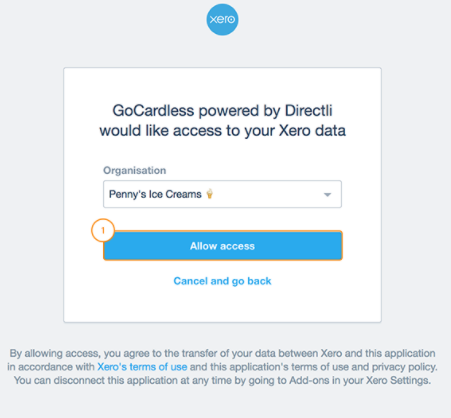
Enter your Xero email address and password. Select which Xero organisation you would like to connect GoCardless with and click Allow access.
-
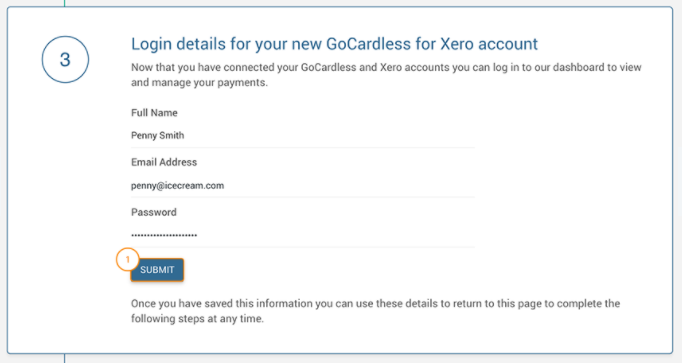
Log in to the dashboard using your GoCardless details. Click Submit.
-
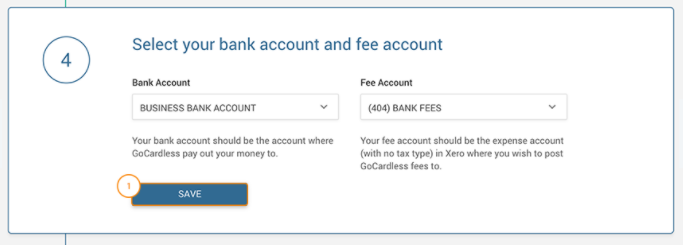
Select a Bank Account for GoCardless payments and a Fee Account for fees, then Save.
-
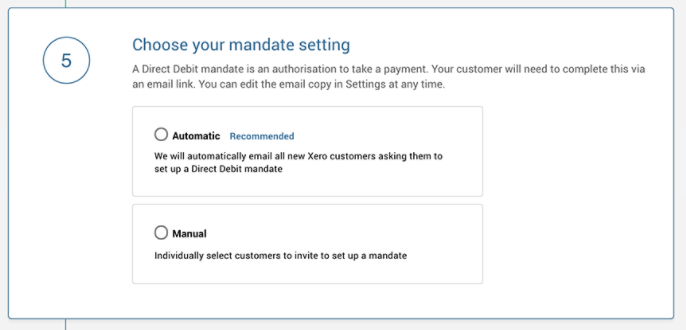
Choose the mandate settings for your Xero customers- whether they'll be Automatically emailed to set up a mandate, or added Manually.
-
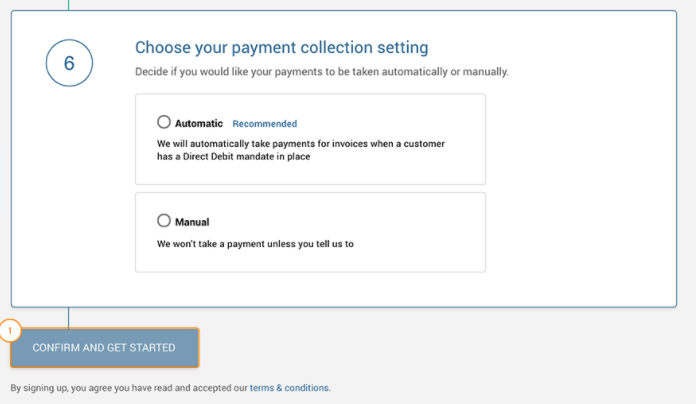
Choose your payment collection settings- whether they will be taken Automatically with a mandate set up, or Manually. Click Confirm and get started. You will receive a notification via email if extra verification is required for the account.
Xero allows you to add a standard or custom branding theme for PDF invoices, quotes, customer credit notes, customer statements, and purchase orders.
You can also edit a branding theme or delete it.
Add or edit a standard branding theme
Add a standard branding theme to customise how your PDF invoices, quotes, customer credit notes, customer statements, and purchase orders display.
You can add multiple themes to use in different situations, such as different payment terms or varying logos. There’s no limit to the number of standard themes you can add.
We’ve added a security check to Xero to protect your data. If you can’t access and change a branding theme you may need to verify your account.
Add a standard theme
- Click the organisation name, select Settings, then click Invoice settings.
- Click New Branding Theme.
- Enter a name to help identify the theme.
- Adjust the other options as needed, such as page margins, font, etc. You can also enter your contact details and invoice or quote terms.
- Click Save.
Copy a standard theme
- In Invoice settings, find the theme you want to copy.
- Click Options, then select Copy.
- Enter a name for your new theme.
- Click Save.
Edit a standard theme
- In Invoice settings, find the theme you want to edit.
-
Click Options, then select Edit.
- Make the changes you want and click Save.
Add or edit a custom branding theme
We’ve added a security check to Xero to protect your data. If you can’t access and change a branding theme you may need to verify your account.
Rules for using custom templates
- You must use Microsoft Word 2007 or later to customise your templates.
- Customised templates must contain the required TableStart and TableEnd fields.
- Make sure you insert, move, and delete fields and static text correctly.
- Your custom template must have a file size of 1MB or smaller.
- The Preview function isn’t available for custom templates.
- Certain files can't be converted into a PDF. You shouldn't use these in your templates: WordArt, ClipArt, animated GIFs, interlaced PNGs, embedded files like Excel or Powerpoint.
Add a custom theme
Use a custom branding theme to customise your PDF documents further. You can add up to 15 different custom themes.
- Click the organisation name, select Settings, then click Invoice settings.
-
Click the New Branding Theme arrow, then select Custom .docx.
- Enter a name for your custom theme and click OK.
Edit a custom theme
- In Invoice settings, find the custom theme you want to edit.
-
Click Download to export copies of all your templates.
- Open the downloaded ZIP folder and save the template files to your computer.
- In Microsoft Word, open the saved template you want to edit.
- Insert and remove any fields, add your logo, and adjust other areas to customise the template.
- Save the template to your computer. Make sure the template is still in the .docx file format.
- Go back to the branding theme in Invoice settings and click Upload.
- Under the template type, click Browse and locate the customised template you want to upload.
- Click Upload.
Below is a survival invoice guide created by Xero.
/sites/default/files/uploads/SOE/2010/xero-invoicing-survival-guide-au_0.pdf

Xero allows you to set up a bank account in Xero to record small expenses paid for using petty cash.
Xero allows you to introduce funds to your petty cash account, by transferring funds from another bank account in Xero, or cash sales received.
You can record your petty cash purchases using spend money transactions, then reconcile them using Mark as Reconciled.
Set up a petty cash bank account
Set up a bank account in Xero dedicated to petty cash. This isn't a physical bank account, it's just somewhere to record purchases made with your petty cash fund.
You need to have the adviser or standard user role to manage petty cash in Xero.
In Xero, petty cash should be set up as a bank account, not a current asset account. This is so you can transfer money to and from your other bank accounts in Xero, and record purchases using spend money transactions. Check with your accountant or bookkeeper if you're unsure of the best way to manage petty cash for your business.
Add a new bank account, with the following settings:
- In the Find your bank search box, enter Petty Cash, then click Add it anyway.
- For Account Name – enter Petty Cash, or something similar so you can identify the accounts on reports.
- For Account Code – (optional) enter a unique code for your Chart of Accounts.
- For Account Type – select Other.
- For Account Number – enter 000-000 as the BSB and Petty Cash as the Account Number.
Introduce funds to your petty cash account
From another bank account in Xero
If you've withdrawn funds from another bank account to use as petty cash, create a Transfer Money Transaction to move the funds between the accounts.
- Reconcile the transfer from the bank account the funds were withdrawn from.
- On the bank statement line for the payment going out of your account, select the Transfer tab, then select your petty cash account as the account the funds were transferred to.
- In your petty cash account, manually reconcile the account transaction created for the transfer.
From cash sales received
If you want to top up your petty cash fund using cash sales, you can add a receive money transaction in the petty cash bank account.
Record your petty cash purchases
Record purchases made with your petty cash fund by creating spend money transactions in your petty cash bank account.
You can add a photo or scanned image of your receipts to the transaction if required.
Reconcile your petty cash account
Reconcile the transactions in your petty cash account in Xero using the Mark as Reconciled function. You can reconcile each transaction as you record it, or reconcile all transactions at a later date.