The third and fourth steps in the accounting cycle are posting from the journal to the ledger and preparing a trial balance.
A computer system records the transactions in a database, while a manual system uses a series of books or spreadsheets to record the transactions. The principles of accounting are the same whether your organisation uses a computer based or manual system.
The main body of accounts is the general ledger and it is the main accounting record of a business using a double entry accounting system. Each account has its own page in the general ledger. For each account, the increases and decreases are recorded for the accounting period, usually one month.
The aim of a double entry accounting system is to have a balanced, up-to-date, properly posted ledger. A double entry system posts a debit and credit for each transaction to reflect that we get something and give something up with each transaction.
Each general ledger page can show the account name and number, a date column, a description column (for transaction notes), a column for posting cross-reference, debits and credits columns, and a balance column. The cross-reference can be a code showing the journal, page, and transaction number for the other side of the transaction.
All of the accounts that are in the general ledger make up the chart of accounts. The chart of accounts is simply a list of the accounts classified into assets, liabilities, equity, income and expenses. with an identification code and a brief description.
A trial balance that lists all the ledger accounts is generated at the end of the reporting period to check if the double-entry principles have been followed.

There are several transactions that in an organisation constitute a special transaction. These transactions can occur on a regular basis, such as interest paid on bank accounts or scheduled payments taken from a bank account or can be special one-off transactions such as the introduction of extra capital.
In a manual accounting system, special transactions are processed through the general journal.
Special transactions include:
- Introduction of additional capital-increasing the owner's equity in the business.
- Dr Bank
- Cr Capital Account
- Drawings of cash or goods-decreasing the owner's equity. If the owner makes a drawing, the amount the business owes the owner is reduced.
- Dr Drawings
- Cr Bank
- Dr Drawings
- Cr Inventory
- Recording depreciation or amortization for the period
- Dr Depreciation
- Cr Accumulated Depreciation
- Recording an allowance for bad debts
- Dr Bad Debts Expense
- Cr Allowance for Doubtful Debts
- Recording any accrued revenue
- Dr Accounts Receivable accrued
- Cr Sales
- Recording previously billed but unearned revenue as a liability
- Dr Sales
- Cr Unearned Sales (Liability)
- Recording any accrued expenses
- Dr Insurance (expense)
- Cr Accrued Expense (liability)
- Recording any previously paid but unused expenditures as prepaid expenses
- Dr Prepaid Expense
- Cr Rent Expense
In Xero special transactions are processed as adjustments through manual journal entries.
In a manual system, as transactions occur they are recorded in a journal. The entries are then totalled at the end of a period (weekly, monthly, annually) and transferred to the ledger.
Each ledger account has its own page in the general ledger. It contains information about the opening and the closing balances of a particular account and the periodical debit and credit adjustments on the basis of journal entries. The most important information that a ledger account provides is the periodical (usually monthly or annual) closing balance. The ledger accounts are essential in the formation of trial balances and also the financial statements of the company.
Ledger account can be presented in a T- Account format or a running balance format.
T-account format

Running balance format

source: Pakaccountants.com. 2021. What is Running balance method of maintaining ledgers and journals? [online] Available at: https://pakaccountants.com/running-balance-method-in-accounting/ [Accessed 22 June 2021].
Today accounting systems do this automatically and there is no need to manually post from the journal to the ledger.
To view journals in Xero you need to run a Journal Report.
In the Accounting menu, select Reports.
Under Accounting, click Journal Report.
Select the date range to search and the order to display the journals.
Click Update.

A general ledger is a summary of all the ledger accounts used by a company.
Example of a manual general ledger system.

In Xero the General Ledger report shows all transactions from all accounts in a chosen date range.
To run the report:
In the Accounting menu, select Reports.
Under Accounting, click More reports to expand the section if the report is hidden.
Click General Ledger.
Select a time frame, then click Update to view your report.


A double-entry accounting system should always be in balance. To be in balance the total debits should equal the total credits.
The trial balance is a report run at the end of an accounting period, listing the ending balance in each account. The report is primarily used to ensure that the total of all debits equals the total of all credits, which means that there are no unbalanced journal entries in the accounting system that would make it impossible to generate accurate financial statements.3
Interim reports
Interim reports are reports of a financial period shorter than a fiscal year. These reports are usually produced during three (3) quarters of each financial year. These reports include the following financial statements:
- Balance sheet
- Income statement
- Statement of cash flows
The Balance Sheet is a financial statement that summarises a company’s total assets (current, non-current and intangible assets), liabilities (financial obligations), and shareholders’ equity (investments and retained earnings) at a specific point in time, usually at the end of an accounting period. It provides a snapshot of a company’s financial position, including the economic resources the company owns, owes, and the sources of financing for those resources.
The Income Statement or Profit and Loss Statement (P&L), summarises the total revenues and expenses incurred by the business, showing the profitability (net income or net loss) over a specified period of time, usually a month, quarter or year.
The Cash Flow Statement summarises all cash inflows and cash outflows of a business over a period of time. This statement is different from the Balance Sheet and Income Statement because it only takes into account cash money activity; it does not account for non-cash activity such as sales or purchases on credit or depreciation.
Generating Reports in Xero
Access and browse reports4
Access the reporting area of Xero to run reports, and find draft, published or archived reports or use custom templates.
Access reports
Access the full range of reports from All Reports under the Reports menu.

Browse for a report
The Drafts, Published and Archived tabs hold reports created by you or someone else in your organisation.
Click:
- Drafts to access reports that have been saved as draft. Draft reports are editable, and can be deleted. Published to view reports saved as published.
- Published reports are read-only. They can only be deleted by someone with the Adviser user role, but can be archived by other users.
- Archived to view published reports that have been archived. You can restore archived reports.
- Custom for reports with custom settings someone has saved for your organisation.
- Summary if you want to run a report from scratch.
Click the sort icon to change the order of your reports.

Search for a report
- Select the type of report that you are looking for. For example, if you're looking for a report you saved as a draft, select the Drafts tab.

- Enter your term in the search box. You can search for reports:
- By report name. For example, you could enter 'balance' if you are looking for a Balance Sheet.
- By a person's name (whoever prepared the report).


Customise a report with the Report Settings menu
Use the Report Settings menu to further customise your report. The available choices depend on the report type.
You can only customise a draft report.
Open the Report Settings menu

Click Report Settings to expand the menu options.
About the report settings
The settings available depend on the report you're using. Below are some common options available in many reports.
Accounting basis
Choose Accrual to display revenue earned and expenses that occurred during the date range you selected.
Choose Cash to display revenue received and expenses paid during the date range you selected.
For example, bill or invoice payments, spend or receive money transactions.
Numbers
Numbers will show to 2 decimal places by default. To show only round numbers, clear the Show decimals checkbox.
Layout
Set whether transaction data is grouped or summarised on your report and what variable it is gathered by. Select:
- Standard for no grouping.
- Group By... to list transactions by your selected variable
- Summarise By... to display sum totals only for your selected variable
Columns
Select the checkbox for each column you want to show on the report. Clear a checkbox to hide a column.
Apply filters
Click Add a filter and select a column to filter by, then enter or select details. As you add more filters, the report displays results based on all your filters combined.
When you update the report, the filters show at the top in a text block you can edit or delete. You can edit, move or delete text blocks.
Click Update to run and view
After you've made your choices, click Update to close Report Settings and view your report. If you close the report, it will reset to its default settings next time you open it.
Save a draft of the report to keep the current format. If the layout is one you'd like to use again in the future, consider saving it as a custom report.
Sort and reorder columns
Once you've run your report and refined your results, you can:
- Sort the report in ascending or descending order of the data in any column by clicking on the column heading.
- Reorder the columns by dragging and dropping them into a different order.
Edit custom reports
Update reports on the Custom tab, or add a new one based on an existing custom report by giving it a new internal name.
Update an existing custom report
- In the Reports menu, select All Reports.
- Click Custom.
- Click to open the report you want.
- Apply the report settings you want to save for reuse.
- (Optional) Click into the report title to give it a new title.
- Click Save As, then click Custom.
- Keep the same name (internal reference).
- (Optional) Select Make this the default view for this report. This gives your custom settings to this type of report (eg Balance Sheet), whenever someone runs it from now on.
- Click Save.
Create a new custom report from an existing one
- In the Reports menu, select All Reports.
- Click Custom.
- Click to open the report you want.
- Apply the report settings you want to save for reuse.
- (Optional) Click into the report title to give it a new title.
- Click Save As, then click Custom.
- In Name, enter a new internal reference for the report. This will create a new custom report when you save it.
- (Optional) Select Make this the default view for this report. This gives your custom settings to this type of report (eg Balance Sheet), whenever someone runs it from now on.
- Click Save.
Export a report to print or save as a spreadsheet
Export one of Xero's new style reports as a printable file, Microsoft Excel spreadsheet, or Google Sheets spreadsheet. You can do this from the Drafts, Custom, Published or Archived tabs or from within a report when you have it open.
- In the Reports menu, select All Reports.
- Select the tab the report is on. (Custom, Drafts, Published or Archived.)
- Click the menu icon menu to the right of the report you want to export, then select your preferred export format: printable (PDF), Google Sheets or Excel.
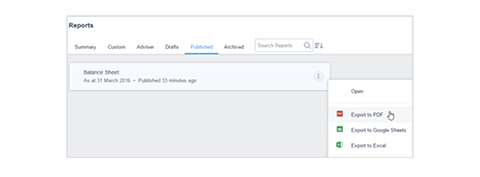
- Save or open your exported report.

You can also export reports from the Export button within the report itself.
When you authenticate your connection to Google Drive and export to Google Sheets, a connection is made to your Xero account. You can break the connection at any time.
Favourite a report to add it to the Reports menu
Favourite a report on the All Reports screen so you can easily access it from the main Reports menu or the All Reports screen.

- In the Reports menu, select All Reports.
- Click ... to expand a section if the report is hidden. After you favourite it, you won't have to expand the section to access this report.
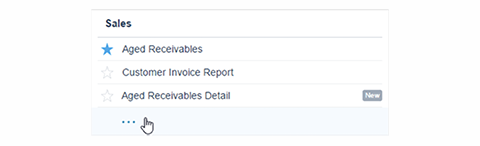
- Click the empty star next to the report you want to add to the Reports menu.

Click a filled-in star to remove a favourite from the Reports menu.
Publish a report
Save a draft report to the Published tab as a read-only, final version. You can only publish reports if you have the Adviser user role. You can publish a report from the Drafts tab or from within the report itself.
Published reports are only visible within your Xero organisation to user roles with access to view published reports.
Publish a report from the Drafts tab
- Go to Reports, then click All Reports.
- Select Drafts.
- Click the menu icon menu to the right of the report you want to publish, then select Publish.
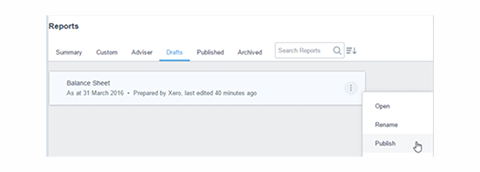
- Set up print styles for the report. Options vary depending on the type of report.
- Click Save or Publish.

Publish a report from within the report itself
- On newer reports, click Save As, then select Published. If you see a Publish button, click Publish instead.
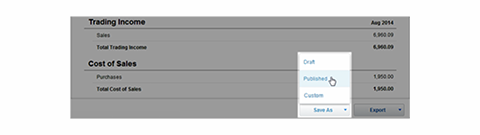
- Set up print styles for the report. Options vary depending on the type of report.
- Click Save or Publish.


Sometimes a trial balance will not be in balance. If this happens, the irregularities preventing balance should be identified and remedied.
Fixing an Incorrect Trial Balance
Depending on what format you use to keep your general ledger, fixing an incorrect trial balance can be a simple matter of changing a single number or if you are using a handwritten ledger retracting your steps to try and locate the errors.
If your trial balance does not balance try these steps:
- Check to see if the debit and credit columns balance. Sometimes it may be a simple addition error.
- Check for entries that may have been included in the wrong column. For example, you would not expect to see GST payable as a debit.
- Count the number of accounts listed in your trial balance and compare to the number of ledger accounts. You may have omitted a balance.
- Check that you have not transposed any numbers when you have carried the balance across from the ledger to the trial balance.
- Calculate the difference between the debit and credit columns and see if you can find that amount in your general ledger
- Divide the difference between the debit and credit columns totals by two and look for that amount in the trial balance. You may have included a balance in the wrong column.
- Review each ledger account. Pay special attention to amounts, rather than descriptions, which can be entered incorrectly, contain transposed numbers or contain an addition or subtraction error.
- Check your posting from the journal to the ledger. You may have transposed a number.
- Change any incorrect ledger entries in your documents once you have found them and you have determined that your trial balance will be correct once you make the changes.
If the trial balance cannot be made to balance, then it will have to be referred to a responsible person in the organisation. The organisation will have a process in place for resolving irregularities with trial balances.
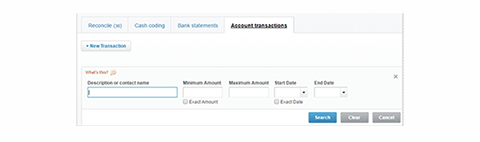
Search for a transaction in Xero
Search for account transactions5
Here's how to search for account transactions that you've entered in a bank account in Xero. The search includes all transactions in that account, including invoice, bill and expense claim payments, spend and receive money transactions, bank account transfers, and reconciliation adjustments.
- Go to Accounts, then click Bank Accounts.
- Click on the bank account name.
- Click Search.
- Enter the required search fields. You can use a combination of fields to narrow your search.
- Click Search.

View a history and notes summary for transactions and user activity6
View a summary of the actions made by all users to your transactions. This audit trail also shows any notes recorded against your organisation's transactions. Only users with the Adviser user role can access the History & Notes Activity report. Only Advisers who are also Payroll Admins can view payroll transactions.
History and Notes Activity report
Below every invoice, bill, contact, inventory item, fixed asset, and other transactions in Xero, you can see a history of the changes made to the item, and any attached notes. For example, the History & Notes section of a paid invoice shows the invoice creation, approval, paid and sent dates, and any notes.
The History & Notes Activity report summarises any history and notes across your organisation, and the history of branding theme changes. You can search for all activity by period, item, and user. Once you've run the report, you can filter your results to narrow the search further.
The report includes the main actions performed in Xero and not actions made for payroll transactions, organisation settings, reporting, printing or exporting.
View the history and notes activity
- Go to Adviser, then click History and Notes Activity.
- Select the Period to run the report on. The options Last week, Last month and Last year run backwards from today's date.
- (Optional) From the Items and User lists, select other options to apply to your search.
- Click Update. The most recent items that match your search criteria (1000 maximum) are shown.
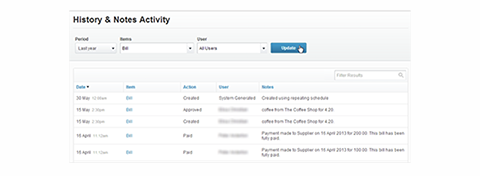

Filter your history and notes results
In the Filter Results field, enter the letters or words from any of the results in the Date, Item, Action, User or Notes columns. Your search results filter immediately.

Manual Instructions
The life of a business is divided into accounting periods to allow owners, managers and interested parties to analyse the business’ performance. An accounting period may be a week, month, three months or a year. Businesses choose their own accounting periods based on their business needs. Financial statements are reports that summarise important financial accounting information about a business. There are three main types of financial statements:
- Statement of Financial Performance, also known as the Profit and Loss
- Statement or Revenue Statement Statement of Financial Position, also known as the Balance Sheet
- Cash flow Statement.
Together they give owners, managers and interested parties a clear picture of a company’s financial position.
Statement of Financial Performance
Statement of Financial Performance shows you how profitable a business was over an accounting period, such as a month, quarter, or year. It shows you how much the business made (revenue) and how much the businesss spent (expenses).
Preparing a Statement of Financial Performance
- Prior to preparing a Statement of Financial Performance all sales and expense transactions for the period must be accurately recorded in the accounting system.
- The figures used to generate a Statement of Financial Performance are accumulated year to date figures from the general ledger.
Steps in preparing a Statement of Financial Performance
- Identify the business’ revenue. Revenue can be defined as the money received from selling goods and services. Businesses may have more than one revenue source. Each revenue source has its own line. Revenue sources are totaled together to calculate total revenue.
- Identify the business’ cost of goods sold (COGS). COGS can be defined as the cost of making the goods that a business sells. Service businesses don’t sell a physical product, therefore they don’t have COGS.
- Calculate gross profit. Gross Profit. Gross Profit = Revenue – COGS. Gross Profit tells you how profitable the products the business sells are.
- Identify the business’ expenses. Expenses can be broken up into:
- Administrative expenses - general expenses not specific to any division.
- Overheads- refer to the fixed costs of running a business that don’t vary from month to month (in contrast with operating costs, which can fluctuate)
- Selling, general, and administrative expenses - this encompasses everything except for COGS, direct costs, research and development expenses, and interest on business loans.
- Calculate Net Profit. Net profit = Gross profit – Expenses. Net Profit tells you how profitable the business is overall.
Below is an example of a Statement of Financial Performance

Statement of Financial Position
A Statement of Financial Position is a snapshot of a business finances at a point in time. It shows business owners, managers and interested parties the value of a business’ assets, and liabilities (i.e., debts) at a particular point in time. Balance sheets are broken up into three general categories: assets, liabilities, and equity.
Below is an example of a Statement of Financial Position

Preparing a Statement of Financial Position
- The most appropriate tool for preparing a Satatement of Financial Position is an adjusted trial balance.
- The financial position of a business is determined by comparing what the business owns against what the business owes.
- Prior to preparing a Statement of Financial Position the asset, liability and owners equity accounts must be adjusted to reflect all transactions that have occurred during the period.
- There are 3 different sections in a balance sheet, represented by the following formula: Assets – Liabilities = Owners Equity.
- Assets are items of value owned by or owed to the business
- Liabilities are amounts owed by the business.
- Owners Equity is the net worth of the business.
Steps in preparing a Statement of Financial Position
- Determine the reporting date and period. Often, the reporting date is the final day of the reporting period
- Identify the business’ assets. Assets will often be split into the following line items:
Current Assets:- Cash and cash equivalents
- Short-term marketable securities
- Accounts receivable
- Inventory
- Other current assets
- Long-term marketable securities
- Property
- Goodwill
- Intangible assets
- Other non-current assets
- Current and non-current assets are subtotaled, and then totaled together.
- Identify the business’ liabilities. Liabilities will often be split into the following line items:
Current Liabilities:- Accounts payable
- Accrued expenses
- Deferred revenue
- Current portion of long-term debt
- Other current liabilities
- Deferred revenue (non-current)
- Long-term lease obligations
- Long-term debt
- Other non-current liabilities
Current and non-current liabilities are subtotaled, and then totalled together.
- Calculate owners equity. Common line items found under owners equity include:
- Capital
- Retained earnings
- Net Profit
- Add total liabilities to total owners equity and compare to assets. If they are not equal, then there is an error and you need to check your workings.
Test your understanding
In this excel workbook, follow the instructions below using the following document provided by Surf & Skate.
- Prepare a Profit and Loss Report for the period 01/07/2020 – 30/04/2021
- Prepare a Balance Sheet as at 30/04/2021.

Xero Instructions
The profit and loss statement is one of the key reports that all businesses use to check the financial health of their business and the viability of their business plan.
Before you run this report you need to ensure that all of your bookkeeping is accurate and fully up to date otherwise this report will not reflect the true financial position of your business.
Run a profit and loss statement in xero.
From the Accounting tab select Reports from the drop down menu.

Under the Financial section choose Profit and Loss. If you star this report it will show on your drop down menu when you click Accounting from the top menu.
Select Profit and Loss. At the top of the screen you will see the date range, to view last months report select Last Month or enter the date range or manually enter another date range, then click Update.

Once you have selected your date range and updated the report you can either view it on the screen or export to PDF, Excel or Google Sheet.
Run a balance sheet report in xero
From the Accounting tab select Reports from the drop down menu.

Under the Financial section choose Balance Sheet. If you star this report it will show on your drop down menu when you click Accounting from the top menu.

Select Balance sheet. At the top of the screen you will see the date range, to view last months report select End of Last Month or manually enter another date, then click Update.
Once you have selected your date range and updated the report you can either view it on the screen or export to PDF, Excel or Google Sheet.
Test your understanding
Access your Xero Course.
Generate the following reports for Surf and Skate:
- Profit and Loss Report for the period 01/07/2020 – 30/04/2021
- Balance Sheet as at 30/04/2021.
Check your answer against the model answer in the excel workbook.