In this topic we will cover the following:
- Prepress
- Proofing
- Printing and production.
Prepress brings multiple processes together to create a final document, ready for print and production. Preparing a final document to be printer ready includes checking dielines, resolution, colour space, bleed and slug, and proofing.
If there are going to be any aspects of the design or document that may cause issues during printing and production, this is the time to fix it.
Working with your printer
Print companies work with a wide variety of files. However, if you want to achieve reliable, predictable, and consistent results, it is always recommended to set your documents up correctly using the specifications your print company provides.
Checking all these requirements might seem time-consuming and unnecessary. However, it is an important part of the printing process, helping you to avoid costly mistakes.
You can set up preflight profiles in Adobe InDesign to speed up your prepress checks.
The golden rules
These rules and specifications will help make sure your designs print as you envisioned.

Dielines
Documents that include a dieline should be set up to the same dimension as the dieline, including the minimum amount of bleed. This makes it easier for your printer to gang-up multiple copies of your design for printing on larger substrates.
Make the dieline a separate linked graphic so that it is easier to adjust, and reuse for other designs.
Your dieline should be in a spot-colour named dieline, with cuts specified as solid lines and folds specified as dashed lines. All strokes should be set to a weight of 0.25pt.
Set your dieline to overprint. Overprint means that your original artwork will still print under the artwork you design. This makes it possible to print the artwork and dieline separately from the same ripped file, eliminating chances for error.
Resolution
For documents designed to be viewed close-up or documents you might hold in your hands like books, magazines, and brochures; rasterized images like photographs should have a resolution of 300ppi.
Images below 300ppi risk being pixelated once printed. If your images are very high resolution, they will take more effort for your computer to work with and could cause slowdowns and crashes.
A good range to work within is 80–120% of the target resolution, so between 240 and 360ppi for a target resolution of 300ppi. Images outside this range should be resampled in software.
Colour space
Effective colour management helps ensure accuracy. Start by making sure your document is in the correct colour space for printing. Set your Adobe Illustrator files to CMYK and convert your images to flattened, CMYK files too.
The next level of control is using matching colour profiles. Your camera will likely have embedded a colour profile into your images when you shot them. Images downloaded from the web will usually have profiles assigned. You can set a working profile in Adobe InDesign then make sure the same profile is assigned to all your linked graphics.

Getting colours right the first time
There are a number of checks you can do in prepress to ensure colours are how you intended them to be.
Before sending a file to print:
- Delete all unused colours.
- Is everything that you want to print in black actually in black?
- Is everything you want to print in registration actually in registration, and not in black?
- Are all spot colours accounted for?
- Confirm that all images are converted to CMYK format and not RGB, including logos and icons.
- Does your colour-fall match the printer’s expectations. If the printer is expecting a four-color job, then supplying a file with special spot colours will cause confusion.
- Check the substrate and finishing techniques. If the job is being printed on uncoated stock, check your imported swatches and then set any spot colours as uncoated, and not coated or unspecified (Ambrose and Harris 2016).

Bleed and slug
Bleed and slug can be set in both Adobe InDesign and Adobe Illustrator documents. Bleed is a small amount of space outside the edges of the document, intended to be trimmed off.
Why would you want to trim off some of your artwork?
Documents are trimmed in large volumes of stacked sheets using a large guillotine. If your artwork ends at the trim line, a slight movement in the sheets can result in the unprinted white edge being visible after trimming. To avoid this, any artwork that finishes on the edge needs to extend over it. 3mm of bleed is usually sufficient however, you should confirm this with the print company you are using.

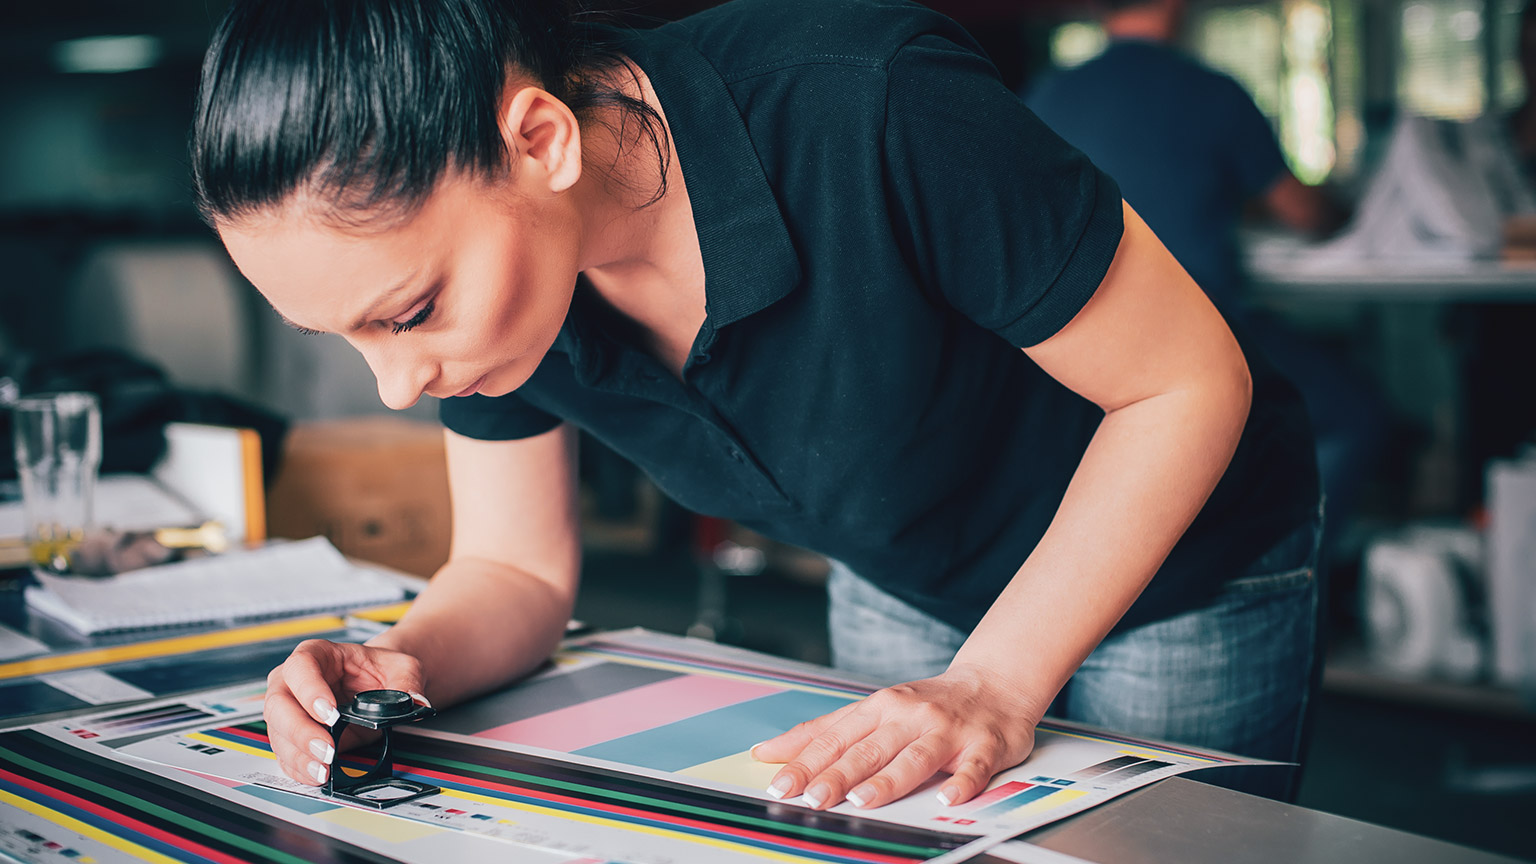
Proofing helps ensure accurate reproduction of a design. It is essential to read every line of text and look out for typos. PDFs can be used to check text and layout, but printed proofs should be used to evaluate a physical proof in your hands.
Why is it necessary to evaluate physical proofs? You cannot trust the screen!
Colours can appear vastly different on screen to how they do when printed. Screen outputs use an RGB model rather than CMYK, and a screen display is an active light source. Always print a proof.
Digital proofs
A digital prepress proof provides an approximation of what the final product will look like. They are usually sent from the printer to the designer in PDF format and used for sign-off. It is your last chance to spot any typos. Digital proofs are inexpensive. Prepress proofs do not use actual printing inks so the colour may not be accurate.
Inkjet proofs
Also known as plotter proofs. These are inexpensive and predominately used for checking layout and pagination.
Sherpa or digitally printed proofs
These proofs provide a fairly accurate representation of your final product. The finish is of high quality so you can check image quality and fine design details.
Colours can be calibrated but if the substrate or finishing techniques differs, the colour will not be 100% accurate. If you are using the same substrate and finishing, and plan to digital print for production, a sherpa or digitally printed proof is essentially a print run of one copy and will be accurate.
Wet proof
A wet proof is produced from the printing plates onto the stock that the final print job will print on. It is expensive but provides certainty that the colours are true. It may be possible to only wet proof a part of the document to check specific images and colours.
A wet proof allows the designer to see what their design looks like on specialist paper with specialised finishing techniques.
Scatter proof
A scatter proof allows you to check colours and line weights. It is a short-run wet proof, usually just checking one single page created specifically for this purpose. The page will include all key elements of the full job so you can test each element without printing the entire project.

Contemporary use of the term graphic design often refers to a wide variety of skills, processes and outputs, including motion design, animation, videos, posters, and logos. But not that long ago graphic designers were expected to work primarily in print, creating static work to be output physically and distributed. While the industry has changed, print and printing processes are still important for design professionals to understand.
To turn a design into a final product, several processes must be completed including selecting the print method, prepress, and selecting the stock (or substrate) that the design is to be printed on.
Before printing and production, potential problems should have been identified and corrected through the prepress and proofing stages.
There are two main types of printing used commercially – Offset press and digital.
Offset press
Offset press is also known as offset lithography. A wide variety of products can be printed using offset printing including business cards, magazines, and large posters.

An inked image from a printing plate is transferred (offset) onto a rubber blanket roller. This roller is pressed against the substrate leaving behind the ink. The printing plate is smooth and relies on the principle of water and ink repelling each other. Non-image areas have a water film applied. When the ink roller contacts the non-image areas on the plate, the oily ink is repelled.
Lithography produces good photographic reproduction and fine linework on a variety of stocks. The printing plates are easy to prepare and high speeds are achievable, which helps make it a low-cost printing method.
Offset lithography can be sheet-fed or continuous web press.
- Sheet-fed printing uses cut sheets of paper and is used for lower production runs.
- Web printing uses rolls of paper and is used for high-volume print jobs.
Lithography in packaging
You cannot use offset lithography to print directly onto corrugated cardboard so how do you transfer the print?
Watch the video to for an overview of offset lithography in packaging including pros and cons.
To recap, there are two ways a lithographic print can be applied to corrugated cardboard – Either by applying a lithographic label or through lithographic lamination.
- Lithographic label is like a giant sticker over the corrugated card. The substrate ends up being four layers.
- Lithographic lamination is when the lithographic print is applied to open-faced corrugate resulting in three layers.
Common problems with offset press printing
Offset lithography can be expensive. Cost benefits are really only achieved with medium to long print runs so offset lithography may not be appropriate for small print runs. Unfortunately, as print run increases there is also more wear on the plate which could cause image quality to decrease as the run progresses. Colour control can be challenging and the water in the process could cause the substrate to distort depending on the substrate’s absorbency (Ambrose and Harris 2016).

Digital printing
There are two common types of digital printing available today – Laser and inkjet.
Laser
Laser printers use a light beam, drum, and toner powder to print documents. Electrostatically charged dots on the light-sensitive drum attracts toner powder. This is then transferred to the paper and applied with heat.
The positives
Laser printers print faster than inkjet and can be used for high print volumes. Laser printers are very precise with high-resolution colour printing. Black and white documents are sharp and colour prints are bright and clear.
The downsides
Due to the heating process that occurs during printing, laser printers cannot print on all paper types. Laser printers are expensive at the outlay but running costs over time are less than those for inkjet printers.
Inkjet
Inkjet printers use a traditional ink cartridge. Small nozzles spray ink droplets directly onto the paper to produce the printed document. Inkjet printers using contain black, cyan, magenta, and yellow cartridges. Inkjet printers are widely used as home and home office printers where the print volumes are low.
The positives
Great performance for printing photos, graphics, and image-heavy documents.
The downsides
The ink takes time to dry. This means print runs are slower than those done with a laser printer. Inkjet printers are typically more affordable to purchase than laser printers, but the ongoing expense of purchasing ink can be significant, particularly colour ink.
How does digital compare to offset printing?
Digital printing is used mostly for small print runs with short timeframes. The start-up cost is low, but there is cost per unit is high – Making them great for low volume or test prints, but less appropriate for high-volume print jobs. Proofs and prototypes are often done with digital printing for these reasons. But there are limitations on the material you can print onto.
In terms of cost, offset printing is the opposite with high start-up costs but low cost per unit. Offset printing is significantly faster than digital printing so can push through high volumes of printing in less time. The consumables in digital printing can also be expensive, contributing to a high cost per unit.
Generally, the quality of offset printing is superior to that achieved with digital printing. However, investment and competition have improved the quality of digital printing and the quality is beginning to approach that achieved with offset. The quality of digital printing can vary significantly between providers (Johansson et al. 2011).
Prepress is an important step in getting your design print ready. Work with your printer to ensure you use compatible files and settings. Set up dielines correctly, and consider resolution, colour space, and bleed and slug.
Variously levels of proofing provide assurance that your final printed work will be true to your design. Types of proof include digital, inkjet, sherpa, wet, and scatter.
There are broadly two types of printing common in the industry – Offset and digital. Lithography is a type of offset press. Digital printing can be achieved with a laser or inkjet printer.