Now the fun really starts to begin, it is time to place the concrete.
Step 4: Placing the concrete
- Preparing the mould for concrete placement
- Transporting the concrete
- Placing the concrete in the formwork
- Screeding the concrete
- Finishing the surface of the concrete.
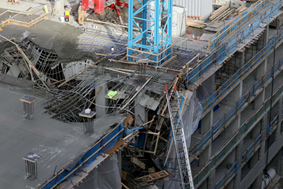
It is important that concrete is added to a clean, well prepared mould. As you will have come to learn, if the mould has not been prepared properly, you are going to end up with a messy and somewhat unstable finished concrete result. The slabs will not set as securely as they should be, and you will literally find cracks in the work which can result in a lot of permanent damage. Failed formwork components can cause structural collapses, falling formwork which has the potential to cause serious injury or death. 9
Causes of failed formwork
In many cases, formwork failures occur when an inexperienced person has designed the formwork. There is also the consideration of carelessness in the formwork not being constructed with accordance to the designs or specification. Other factors may include the stripping of the formwork before it has had time to cure, over loading the formwork with too much concrete or the use of damaged and poor quality formwork components. 9
Early signs of failed formwork
One of the earliest signs of failing formwork is noise. If the formwork is not able to cope with the load of the concrete, you are going to hear it. In addition, you will start to see the formwork sinking or collapsing. If you do see the formwork failing, cease concrete pour immediately. Remember, only enter the zone if it is safe to do so, and ensure a risk assessment has been conducted before anyone enters the zone.
The following image sliders provide a visual representation of failed formwork. 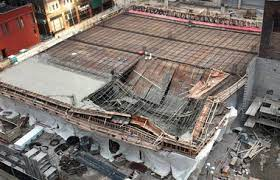
Preventing failed formwork
Now that we know what causes the failed formwork, what can we do.
Consider the following.
The formwork has been designed by an experience person with knowledge of strength and loads. Where several types of formworks are being used, ensure an engineer has completed the design.
Formwork must be erected according to the manufacturer’s instructions and recommendations.
Check that the formwork is securely placed and is in accordance with the manufacturer’s requirements.
- Recheck the formwork is square and level
- Inspect the formwork for damage or defects, if identified, tag and remove from use.
- Remove any sawdust, debris, mud, dirt, larger rocks or pieces of cement etc from the formwork
- Apply form oil. Form oil is a release agent applied in a thin coat to the formwork right before you pour on the concrete. This ensures the form work will strip easily when the concrete has set and it needs to be removed.
- Check the reinforcing is secure, placed at the correct height and spaced according to plans and specs
- Ensure the reinforcing has adequate edge cover according to plans and specs
- Ensure the vapour barrier is flat and smooth and that it is not torn or pierced.
If the formwork that has been erected does not comply with the design, it must be altered until it reaches compliance, and the designer has checked the redesign before it can be used.
Once you are confident that your formwork is ready to accept the concrete, it is time to go ahead and prepare it.
The following steps will help ensure you are ready to pour the concrete.
- Check your plans and specs to confirm the type and strength of concrete required.
- Follow the manufacturer’s instructions to ensure that your ratios are correct.
- Follow the manufacturer and workplace instructions if using a concrete mixer.
- use PPE.
- Check your calculations to ensure that you are preparing the right amount.
- Ensure that your concrete is mixed thoroughly.
- Achieve a workable mix (a workable mix is not too watery or runny).
Types of cement used in concrete
There are three main types of cement that you will come across when mixing concrete. Each has different applications.
General purpose cement (GP)
This cement is made from Portland cement, gypsum and limestone. It can be used for all types of building and construction applications.
Builder’s cement/general purpose blended cement (GB)
This cement is made from GP cement (around 70%) and blast granulated blast furnace slag (around 30%). This can also be used for all types of building and construction applications.
High early strength cement (HE)
This cement is useful when you need the concrete to gain strength as early as possible. Factors that may lead to the use of HE cements may be cold weather (ie cold weather means that it takes longer for concrete to set) or the need to get formwork removed as soon as possible.
The plans and specs should specify which cement to add to the concrete mix and in what ratio.
Mixing methods
Cement can be mixed in a number of ways including:
- mixer trucks
- mixer machine
- by hand in a wheelbarrow or similar
- using a sheet to protect from dirt and debris.
- mixed on a plate or board (for small amounts).
When mixing concrete using a mixer, add components in the following order:
- Aggregate first
- Add sand
- Add cement
- Mix all three materials so the sand is mixed in thoroughly
- Add water
- Get a workable mix.
Concrete portions:
A basic concrete mixture is usually made up of 1 part cement: 2 parts sand: 4-part aggregate. When mixing the concrete, think of baking bread. The dry ingredients go first, once they have been mixed, gradually add the water. The water is the integral ingredient and will literally make or break the concrete. If there is too much water, the concrete becomes weak and if there not enough water, the concrete will not be workable. 4
Hot tip!
Be mindful of using wet sand as a part of the aggregate. The wet sand also adds moisture and will affect the quantity of water you use. Ensure if you are using wet sand, the water component is adjusted to compensate.
The following video illustrates concrete when it is too wet, too dry and the perfect consistency.
Transporting concrete to the site
When transporting the concrete to the work area:
- avoid delays – move directly from mixing to the worksite
- handle the wheelbarrow safely
- maintain situational awareness as you move through the site – what is going on around you? Where are vehicles? Power tools? Hazards?
- use safe manual handling techniques when shovelling and lifting.
So, everything is ready to go. Your formwork is ready, your concrete is mixed and it is time to start adding. Follow these tips to ensure that you achieve a high-quality result in your concrete.
When the time comes to pour the concrete, it is important the formwork maintains its strength and integrity, this is achieved by ensuring the formwork has been checked. In addition to this, the area which the concrete has been poured, needs to be excluded. This is vital because you do not want people accessing the area before the concrete has time to cure and set. Observations are key at the time of pouring, ensure you or someone is monitoring the process to identify any early failures.
The following are some of the signs you can erect when the pour is taking place:


Along with these key practises, also consider the following.
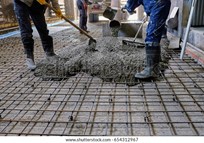
- Avoid delays. Begin adding concrete as soon as it is brought to the worksite, remember the concrete will start setting so ensure you are effectively adding the concrete.
- Work systematically. Begin in one corner and work in rows, placing each load next to the last.
- Do not overload the form work when pouring the concrete.
- Place the concrete into the formwork rather than dropping it from height. It should never be dropped from greater than 1 m.
- Mix each load with the previous loads with your shovel.
- Tamp the concrete around the reinforcing and into the formwork with your shovel. This helps to compact it and to remove air bubbles.
- Add the concrete to the depth specified in the plans and specs.
The following video provides a demonstration from formwork to pouring the concrete.
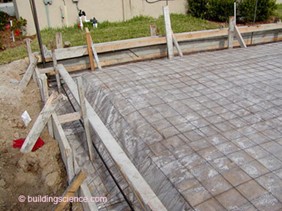
Screeding is the process of levelling the concrete with the top of the formwork. It is done as the concrete is added. A screeding board or screeding tool is drawn back and forwards across the level of the formwork in a sawing motion to smooth off the concrete and to level it into dips and troughs. For wider forms, you may need another person to help you screed. Screeding also helps to compact the top layer of the concrete.
The following video illustrates a detailed demonstration of screeding.
Finishing is the process used to apply different surfaces or textures to the concrete. For example, in some applications, you might want a very smooth finish, in other instances, you might need a rougher surface to create a non-slip surface.
Finishing can begin once the concrete has started to set but remains plastic.
Initially, once the concrete is screeded, it is ‘floated’ and/or trowelled. Floating further smooths and compacts the surface after screeding and fills in any minor cracks. A floated and trowelled slab will be very smooth.
An edge can also be added to the slab.
Other finishing types include:
Broom finish
A stiff-bristled broom is slowly dragged across the concrete to create a non-slip surface. This is done after the water has evaporated from the surface and the concrete is somewhat soft rather than too firm. Where the concrete has a slope for drainage, the brooming should be made towards the drain. Concrete with a broom finish has to be cured.
Trowel finish
A hand trowel is used to smooth out the concrete by pushing and pulling the tool, and using a second trowel to smooth over. Trowelling should not be done on concrete that has not been floated. The person trowelling will use kneel boards/skids to avoid footprints and to keep the surface smooth. A trowelled finish is as flat and as smooth as possible (with the exception of the cove trowel finish, which is a rippled or raised surface).
Machine-trowelled finish
A trowelling machine is used for larger areas of concrete where hand trowelling or using a bull float would take far too long. They come in hand-operated or ride-on variants. The machine is moved slowly across the concrete, and its blades flatten and smooth the surface. The machines include float blades and finish blades.
Wood-float finish
The concrete is finished using the same process as trowelling, however the tool is made from wood, which over time ends up having an imperfect, rough surface from its contact with water. The rough surface thus leaves the concrete with a rougher texture and appearance than the smooth finish of a trowel application.
The following video demonstrates and explains the four basic finishing techniques.