
For each building and construction project, you should break the project into its component tasks. This means that you should break the project down into achievable tasks. At this point, it is essential your organisation skills are up to scratch. The key to a successful project is organisation, if the foundations of the task are not stable, the whole task will fall apart.
Let us take a look at the components of a task.
|
A typical construction task might include: |
|
|
the environmental considerations (hazards and controls). |
How does a process help?
Using this process helps you keep control of the project and ensure that you have everything that you need before you get started.
You can also use the information from this list to prioritise the work and develop a workflow plan. A workflow plan places the tasks into a logical sequence which ensures efficient use of resources as well as helps to ensure safety.
The following video outlines the organisational process of building a deck.
Process in practice
The following scenario provides you with a scope of a construction task along with a completed components task template outlining what you will need to include. For this task, the component task is assembling as you are preparing yourself for undertaking a basic construction task.
Please note, the scenario and components checklist will vary for the type of construction task you are carrying out. You must ensure your list has been contextualised to suit the task you are carrying out. This following scenario has been developed for content examples to give you an idea of basic requirements. When you are physically carrying the task out, the level of detail and information will be more complex.
Scenario
Michelle and Leonardo have just received the plans and specifications they require to carry out a basic construction task. There are quite several other jobs to do so Michelle, (site supervisor) has decided to split the tasks up among her team members to ensure she has enough human resources available for the other tasks. Leonardo has been instructed to follow the plans and specifications for building a deck. The deck is for a duplex being built, so there is no need to consult with a structural engineer, however, compliance with the NCC is required. Michelle provides Leonardo with the plans including information regarding the NCC and Australian standards for the task. In this case, one of the important Australian Standards for this task includes AS 3959 Construction of buildings in bushfire-prone areas.
|
Project title: Constructing a deck for the back yard of a Duplex |
|
|
Provide a brief description of the project. |
Decking for the backyard of a duplex with balustrade |
|
Provide a summary of the information that you got from the plans, drawings and specifications, work orders/ instructions, SWMS and other supporting documents under the following headings:
|
Potential work health and safety issues:
|
|
|
Potential environmental issues:
|
|
Component tasks |
|
|
Use the table below to break the project into its component tasks. For each component task, describe:
|
|
|
Component task |
Assembling components
|
|
What needs to be done? Preparation
|
|
|
How will it be done?
|
|
|
Tools and equipment What tools and equipment are required? Describe the tools and equipment that you will require for this stage of the project. What will you use each one for? How will you check it for serviceability? Don’t forget to include PPE. |
Tool/equipment (include PPE) |
Use |
Serviceability |
|||
|
Safety boots |
PPE |
Properly fitted, correct size, comfortable to wear, not damaged |
||||
|
Safety hat |
PPE |
Properly fitted. Correct size, comfortable to wear not damaged |
||||
|
Hi-Vis clothing |
PPE |
Properly fitted |
||||
|
Safety glasses |
PPE |
Ensure they are not damaged |
||||
|
Masks |
PPE |
Ensure they are not damaged and properly fitted |
||||
|
Eye protection |
PPE |
Ensure they are not damaged |
||||
|
Sunscreen |
PPE |
Check expiry on sunscreen |
||||
|
Hammer |
Hand Tool |
Check to ensure handle is not damaged |
||||
|
Drills |
Power Tool |
In working order and, if cordless drill is charged |
||||
|
Retractable tape measure |
Hand Tool |
All measurements are visible |
||||
|
Spirit level |
Hand tool |
No cracks |
||||
|
String line |
Hand tool |
No damage |
||||
|
Nail Gun |
Power tool |
In working order and electrical wires are away from water |
||||
|
Air compressor and hose |
Power tool |
In working order and electrical wires are away from water |
||||
|
Circular saw or drop saw |
Power tool |
In working order and electrical wires are away from water |
||||
|
Impact driver |
Power tool |
In working order and electrical wires are away from water |
||||
|
Wheelbarrow |
Equipment |
In working order |
||||
|
|
Shovel |
Equipment |
No damage |
|||
|
What materials will you need for this component of the task? You can use this information to build a component list for the whole project. |
Materials should include everything required for this component of the overall task. You can rely on the plans, specifications and work instructions for this information.
|
|||||
|
Estimate how long this component of the overall construction project will take.
|
Two working days, provided the weather conditions are safe and do not interrupt workflow |
|||||
|
How many people will you need to complete this task? |
Can be completed by a single person, however depending on level of experience may need a supervisor or senior team member |
|||||
|
List the relevant laws and regulation, NCC areas, Australian Standards and workplace policies and procedures that applies to this component of the building and construction project. You may like to add notes to yourself about how you will take these things into account. |
Law/regulation/NCC/AS/policy/procedure |
How I will take these into account for this component task. |
||||
|
Laws and Regulations may include:
|
Check the task against each relevant law and regulation |
|||||
|
|
Australian Standards may include:
|
Check the task against each relevant Australian Standard |
||||
|
|
NCC requirements may include:
|
|
||||
|
Policies and procedures may include:
|
|
|||||
|
|
|
|||||
|
|
|
|||||
|
Describe the WHS considerations for this component of the construction task (hazards and controls). |
Hazard |
Controls |
||||
|
Refer to manufacturer instructions on tools and equipment and correct. Familarise yourself with the first aid trained personnel on site |
|||||
|
Untidy worksite with tools, materials left in the way of workers causing potential trip hazard |
Keep worksite tidy, do not leave tools and materials where they cause a trip. |
|||||
|
Asbestos |
Ensure workers have been properly trained on asbestos removal and have all the appropriate PPE Or consult with relevant team members who have the experience, knowledge and training to do so. |
|||||
|
|
|
|||||
|
|
|
|||||
|
|
|
|||||
|
Describe the environmental considerations/hazards for this component of the project (hazards and controls). |
Environmental consideration/hazard |
Controls |
||||
|
Extreme weather, wind, rain, thunderstorms |
Avoid work on heights, do not use electrical tools. If weather is too dangerous, postpone work on the site until weather is no longer a hazard. Familarise yourself with the first aid officer onsite |
|||||
|
Sustainability |
Where possible, ensure off cuts or materials such as wood, has been disposed of in a sustainable manner or where possible, reused for alternate purpose |
|||||
|
Sun exposure/ heat |
Ensure workers are hydrated and have sunscreen and appropriate clothing for extreme heat. (PPE) Familarise yourself with the first aid officer onsite |
|||||
|
|
|
|||||
|
|
|
|||||
|
|
|
|||||
Take a short break from the reading and watch the following video on how to set out a deck should it be attached to a house. The video breaks down the tools and equipment you will need along with the procedure of how to set the deck.
Planning techniques
There are a number of techniques that you can use to help generate ideas and to get you thinking about all of the components of a particular project, for example, building a deck, a shed or a pergola. We are going to take a look at the work flow planning techniques you can implement to keep your project on track and ensure you are covering all the relevant aspects of the build. This plan is a generic piece which can be modified to suit the project you are undertaking. Keep this plan in mind when the time comes for you to choose what basic construction task you are going to carry out.
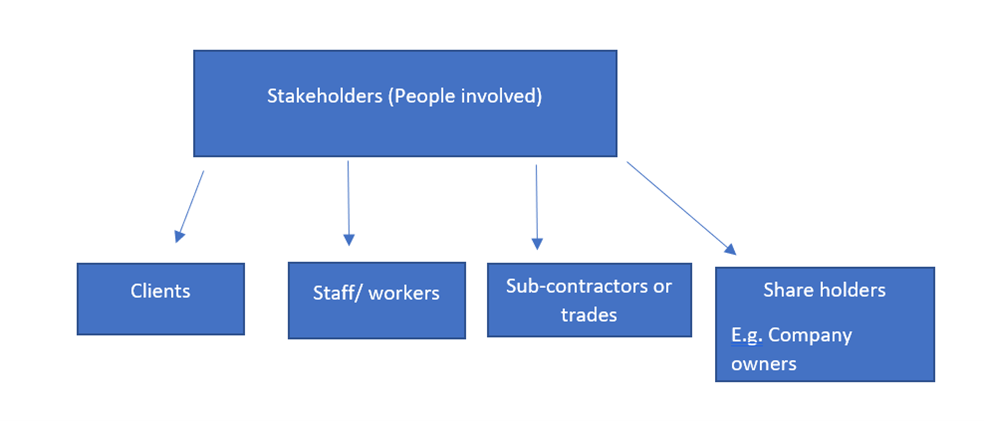
Right at the beginning of planning, you need to establish a big picture, that is, the final product. Let’s say you are building a pergola, you know at the end of the project you want a sturdy, practical, useful pergola that has satisfied the needs of your client, you may also want to consider how this project is unique. Now you know what the project is, you need to develop the plan in which you are carrying it out, remember, your plan needs to include the relevant people you will need to be involved in the final build (relevant personnel have been included in the following diagram.)2

Each stage of the process has factors that will influence outcomes. When in the master planning stage, there are inputs and outputs that need to be considered, this also includes what may go wrong throughout the project. This is a networking opportunity where you can discuss past projects with your team members and workplace supervisor. These human resources are a wealth of knowledge to you, and it is integral you take the opportunity to ‘pick their brain’ as to what experiences they have had with projects to help you with the project you are working on.2
Some of the inputs and outputs have been illustrated in the following table
|
Inputs |
Outputs |
|
Budget. How much is this project going to cost? Ensure you factor in the materials, time, trades that may be required. |
Plans and specifications. What is the overall design of the pergola? |
|
Requirements. What is needed for the job? |
Registers? Do you need to register the project with a local council before you can begin to build? |
|
Sites. Where are you building the project? Is it in a back yard? If so, what is the area like? Is the area level enough, what additional work needs to be considered before you can begin building |
Contractors |
Positive outcomes
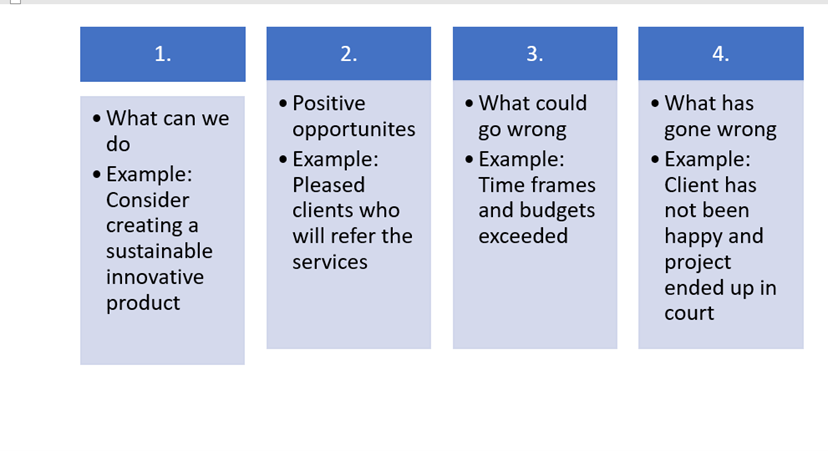
During the planning process, you want to outline the positives as well as the risks that come with undertaking a project. At the end of the day, you want a quality product which keeps your client or customer happy as the experience of those involved in the process. The culture and foundations you build are integrated around positivity. When you are starting a project, you must keep in mind the positive outcomes as they key focus rather than directing all of the energy and resources into the negative risks that may occur. Essentially, the client or customer will make or break, if the customer is happy with their final product, they are more than likely to recommend your services to others. This is why, you must ensure you keep lines of communication open with not only the trades and those you are working on the job with, but your higher management stakeholders and of course, the client.2
The following diagram stipulates the recommended ‘mind frame’ you should set yourself in when you are starting a project.
Risks
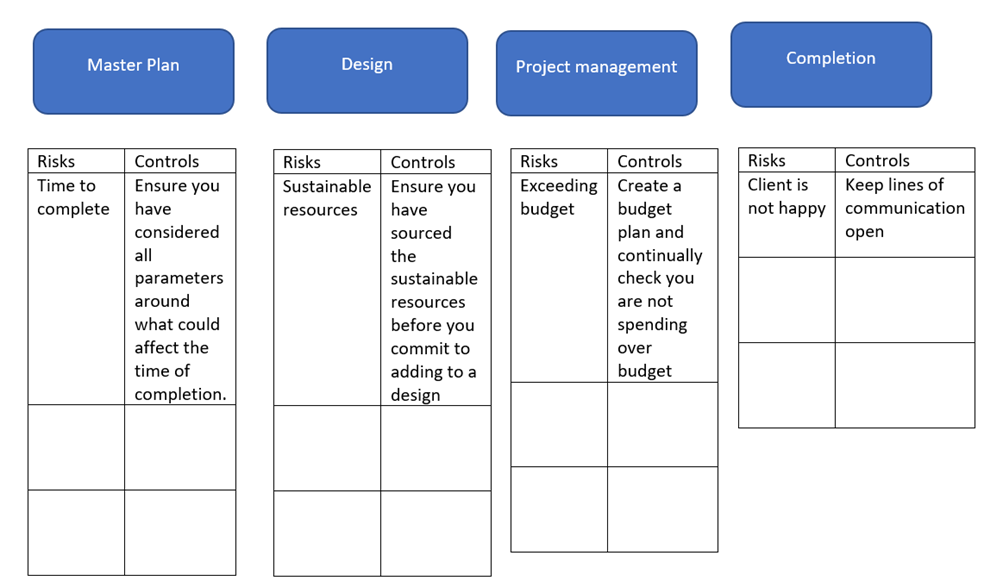
When it comes to the risks of a project, this stretches beyond the risk of injury that you have come to learn. The safety risks are still integral yes, but in the planning stages, you will need to consider what could go wrong with the actual project, you may also want to consider when you are networking with your team members, if any of their past experiences have seen projects similar to this go wrong. This will help troubleshoot and prevent similar experiences repeating themselves. The risks do not stop at the master plan stage of the project, they extend on to design, project management and of course the completion. It is a good idea to display the risks and controls with each phase of the project. See the following diagram as an example of how you may wish to set your workflow plan out to determine the risks for each phase.
Breaking down the techniques
Now that you have developed a deeper understanding of workflow planning techniques, you will now learn how to put the theory into practice.
Once you have broken the project down into its component tasks and analysed each of them, you can use that information to develop a workflow plan. The workflow plan provides you with a road map for the project. It should place each task into a logical sequence which maximises efficiency.2
When developing a workflow plan consider the following:
Consider the availability and access to tools, resources, and equipment. Ensure you have factored any speciality equipment you may need. Are there resources that are at risk of being over-utilised on a particular day? Would your use of equipment create a noise hazard if used at the same time as someone else on site?
Consider your access to trades. Do you need a licensed scaffolder to erect a scaffold for you, is someone in your team able to do this or does it need to be sourced elsewhere?
Safety issues. Consider the safety risks that are associated with the project, for example, are there too many people on the site at one time, or are the electricians working at the same time as the plumbers in the same area?
Ensure your workflow maximises efficiency and quality.
One of the best ways to ensure your tasks stay on track is to develop a list. Click the link to download the components task list. [NEED TO HYPERLINK]
Having a checklist or a component task list can help you can keep your tasks in order and organised.
|
Component task (ensure that tasks are listed in a logical order) You may like to include a brief explanation for why you placed each component task in a particular order as a reminder to yourself. For example, a scheduled delivery of timber needs to arrive when appropriate personnel is onsite to check the order and materials are all there. |
|
1. Read the plans and specifications |
|
2. Conduct a site inspection and identify hazards or risks
|
|
3. Ensure team members have access to the relevant PPE |
|
4. Carry out measurements for the area |
|
5. Locate relevant tools and equipment needed. For example, hammers, saws, concrete mixer etc. |
|
6. Order materials including specific types of timber |
|
7. Set up the site, including the tools and equipment onsite. |
|
8. Cut and modify materials to size according to the measurements in the plans and specifications, ensure you have accounted for any waste.
|
|
9. Assembly process |
|
10. Clean-up site, including appropriate disposal of waste. |

Another important stage in the planning and organising process is to develop a components list. The components list is a list of everything that you need for the project along with the relevant quantities. For each project you carry out, for example building a shed, you will need to ensure you have enough resources to complete the job.
Below is a sample template on how to develop a components list. Ensure at this point you have calculated the quantities of each of the materials that you will require.
|
Material |
For use in component tasks |
Quantity required |
|
List the materials in this column |
List the component tasks that each material will be used in here so that you will know when you will need them. |
List the total quantity required so that you know how much to obtain/order |
|
Concrete Mix |
Used for slab to build the shed on |
The slab will need to be measured according to the size of the shed you are building, and the concrete quantity will need to be calculated to fit. |
|
Sustainable/ timber |
Used to build the decking |
Must be measured and cut according to the details that have been provided on the plans and specifications |
|
|
|
|
Take a short break from the reading. The following videos demonstrate the laying of a concrete slab to prepare for a shed and the process of putting a simple shed together. Please note, these videos are separate and do not correlate with one another.

By this stage of your construction project, you should have an idea of how big your project is going to be. For example, what are the dimensions for the outdoor shed you are building. Determining the quantities, you need will ensure you have enough materials and resources to complete the project. Time is always key and one of the biggest time wasters is not having enough materials before you begin building. The last thing you want, or need is to be sending team members off site to Bunnings for materials that should have been accounted for when preparing the calculations. This is another contributing factor to the organisation of your project before you start building.
Determining calculations and formula.
The area calculation is useful for things like working out how big the area is required for building a shed or how much plasterboard to order. But how do you apply that in practice?
Step 1: calculate the area that you are working on.
Area = Length x Width
Step 2: find out from the manufacturer how the material is supplied. For example:
- you will require 48.5 standard sized bricks to build one square metre of wall
- one sheet of 2400 x 1200 x 10 mm plasterboard covers 2.88 m2.
Step 3: calculate how much of the material you will require to cover the area by either multiplying or dividing.
Consider the following scenario.
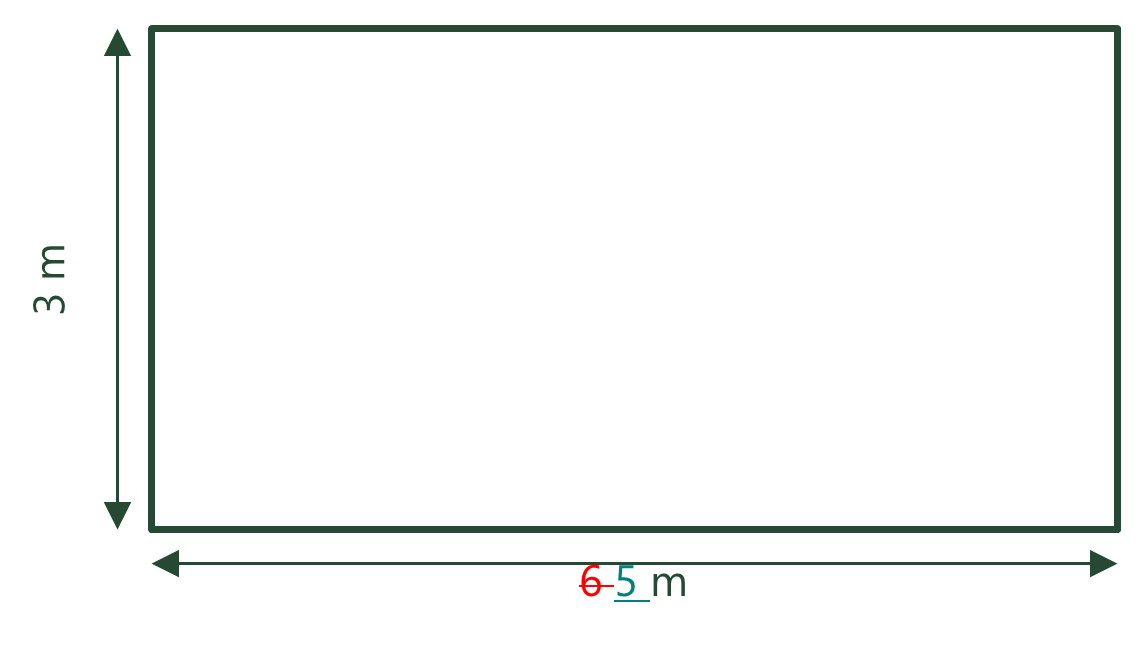
You have been asked to order the materials for plasterboard and have been given the following dimensions.
5m x 3m.
The wall is 6 m wide and 3 m high, so the area is 15 m2. (A = L x W).
One key factor to remember when you are working out the quantities of materials, you would not be able to order part of something. For example, you cannot order half a brick or a piece of a sheet of plasterboard so you would round up, it is better to have too much then not enough. If you needed 12.2 pieces of plasterboard, you would order 13 pieces of plasterboard.
Bricks
When determining the quantity of bricks, you need a total of 48.5 bricks to build 1m2 of wall. When calculating the total number of bricks you will need, you need to multiple the area by 48.5.
Considering the scenario where the area was 15m2 the following calculations would need to be made to determine the number of bricks that would be required to complete the job.
Quantity = 15( A) x 48.5
The number of bricks required = 727.5.
Now, remembering you are not able to order half a brick, you will need to round up the number. Therefore, the number of bricks required for the job= 728.
Plasterboard
To calculate the plasterboard, we again start with the area of 15 m2. This time, however, we know from the manufacturer that a single board covers more than one unit of measure – it covers 2.88 m2. So in this case we divide.
Quantity = 15 (A) / 2.88
The number of boards required = 5.20
Remembering, you are not able to order half, you would order 6 boards.
Calculating concrete
When you are calculating the amount of concrete that you will need, there are some key concepts that you should keep in mind. These include:
You will need to know the area and the thickness of the slab so that you can calculate the volume. That will give you the volume of the concrete that you require.
You should factor in 10% waste.
Concrete is usually ordered in increments of 0.2 (although some companies accept orders in increments of 0.1).
The following video outlines the process you will need to calculate the volume of a concrete slab. Be mindful, when you are calculating the quantities of slabs, you need to be accurate with your own dimensions.