Whether you are building a shed, a pergola, a deck or even a house, there are certain processes you need consider. While the process is very similar for tasks, there are aspects within these steps that may change depending on the task you choose.
Let us place these steps into practice when looking at building a deck.
Step 1: PPE
Utilise appropriate PPE for each part of the task. For building a deck, there area number of processes that need to be considered, therefore you must be organised with your PPE. This task would require:
- safety hat
- hi-vis clothing
- safety boots
- gloves
- safety glasses/ goggles
- face mask, especially when cutting timber and mixing any concrete
- sun protection (sunscreen)
Step 2: Tools and equipment
For this type of project, you will need a number of hand and power tools at your disposal. You will need to carefully select your tools and equipment, check them for serviceability to ensure they are in working order and if not, tag and remove them from use and report the fault if necessary. The following is a short list of some of the types of tools and equipment you may use,
- hammer
- hand saw
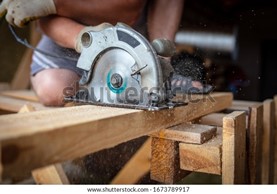
- drop saw/ circular saw
- drill
- shovel
- spirit level
- retractable tape measure
Step 3: Manufacture the components
When you are considering the manufacturing, the components ensure the sequence of how you are going to build the deck. For example, you would not commence building until you have properly reviewed the plans and specifications, nor would you start if you have not measured the area.
As you use the tools and equipment, ensure you are working with them safely and efficiently.
- Check each component for quality and accuracy against plans and specifications.
- Ensure you have double checked the measurements of the timber
- Read the instructions for mixing concrete for determining quantities and ratio.
Step 4: Assemble the components
- Select the most appropriate assembly process for building the deck,
- Accurately set out the site
- Assemble the components using quality techniques
- Work safely and efficiently
- Check each component for quality and accuracy
Step 5: Clean up
- Clean up the site, this is particularly important because you are essentially building an addition to a client’s outdoor area. You will need to ensure you have properly cleaned the area for them including sweeping any dust or debris, hosing any dirt away and ensuring the deck is ready for use. If the deck requires additional time before it can be used, ensure the client has been provided with the relevant information as to when they are able to use it, however it should not be more than a day.
- Store tools and equipment in the relevant storage location and ensure it has been secured, this may be as simple as a padlock or locked shed. Tools may
- Dispose of waste safely. This includes relevantly sorting materials according to their waste management, for example, recyclable materials in the correct skip bin.
In construction, it is a mandatory legislative requirement that you have access to quality PPE specific to the construction industry. Whenever you are on site, no matter how big or small the job is, it will be expected that you are equipped with all of the relevant PPE to ensure your own safety and the safety of others. It is however important to consider, PPE is not a solution to the hazard, it is there to protect you.
The following table serves as a reminder of the types of PPE and its use.
|
Image of PPE |
Type of PPE and use of protection |
 |
Safety boots Used for foot protection |
|
|
Safety helmets Used for head protection |
|
|
Safety goggles Used for eye protection |
|
|
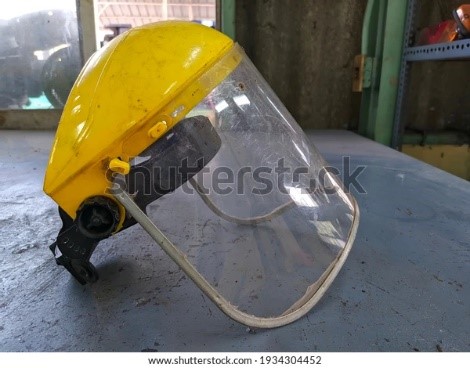
Face masks/ shields Used for face protection |
|
|
Earmuffs Used for hearing protection |
|
|
Sun and barrier cream Used for hearing protection |
 |
Hi vis clothing Used for clear visibility of workers |
|
|
Gloves Used for protecting hands from both physical and chemical hazards. |


When it comes to PPE, you would not use every single type of PPE there is available for all tasks. Some projects may not require all of them. So, when it comes to PPE, ensure that you:
- Choose the right PPE for the tasks you are doing.
- Check the PPE to make sure there are no problems (no tears, rips, holes, loose fittings/fasteners etc) and if you do happen to find any item of your PPE is not in appropriate working order, you will need to notify the workplace supervisor to then arrange for replacement PPE.
- Put the PPE on before you enter the site and make sure it fits you properly – it is not going to help you in an accident if your boots are too big and your feet are slipping out of them, in this instance, they will not protect you and they present a trip hazard.
Importance of tools and equipment
As you will have come to learn, different types of tools and equipment are used for different tasks. Being able to identify a particular tool and its use is important. For example, a good tradesperson would never use a wood chisel as a screwdriver or a flat-bladed screwdriver as a chisel.
There will rarely be a day in your building or construction career that you do not rely on tools and equipment at work. Tradespeople who use their tools effectively and maintain them in good working order are more likely to, work efficiently, work safely and produce quality outcomes.
During your career, you will work on several jobsites, carry out various projects and as a result use a variety of tools and equipment. No matter where you are, you need to be aware of workplace requirements, workplace policies, procedures and work instructions because they may change depending on the site. Before using any equipment, you should be familiar on these processes which will typically be covered in a site induction.
It is important to remember, when using tools and equipment always ensure you:
- wear appropriate PPE
- follow the manufacturer instructions
- check the tools for serviceability
- remove any tools from service and report issues immediately if you find faults
- follow your organisations policies and procedures when using tools and equipment
- work safely
- maintain situational awareness (that is, stay aware of what is going on around you)
- ask for advice if you are unsure or using a new tool for the first time.
Types of tools and equipment
Throughout your career, you will come across various types of tools and equipment that will be used to undertake construction work. The following table illustrates some of many different types of tools and equipment you may use when you are carrying out a basic construction task such as building a deck, a pergola, or a shed.
|
Type of tool/equipment |
Use of tool and equipment |
|
Retractable tape measure |
Measuring less than 10m |
|
Hand saw |
Cutting timber |
|
Hammer |
Driving/removing nails, dowel pins, spikes/stakes |
|
Clamps |
Joining materials, securing materials for cutting etc |
|
Tin snips |
Cutting thinner sheets of metal
|
|
Shovel/spade |
Moving building materials (cement, stone, sand), earthworks/excavation/trenching |
|
Mattock |
Suitable for: breaking up/moving building materials (cement, stone, sand), earthworks/excavation/trenching |
|
Crowbar/fencing bar |
Demolition, prying things apart, pulling out nails |
|
Circular saw |
Making longer, straight clean cuts |
|
Reciprocating saw |
A variety of materials, demolition |
|
Angle grinder |
Suitable for: grinding, cutting (cement, reo, metal, etc), sanding, polishing, sharpening, removing mortar (tuckpointing) |
|
Drill
|
Drilling, as a screwdriver etc
|
|
Driver drill |
Driving in or loosening screws and bolts |
|
Extension lead |
Running power |
|
Portable residual current device |
Reducing risk of electrocution |
|
Air compressor and hoses |
Pneumatic tools |
|
Pallets |
Stacking materials for transport |
|
Straps |
Securing materials for transport |

Nearly all tools and equipment come with manufacturer instructions and/or specifications. They may be a simple document which describes the best way to store and maintain the tool. Or, for a power tool, the instructions may incorporate safety instructions, guidance for use, set-up instructions and so on.
Regardless of the complexity of the instructions and specifications from the manufacturer, it is important to review them and use the tool in line with them. Make sure you have read and understood these instructions before you use the tool. Instructions and specifications should also be readily accessible to anyone else who may use the tool.
Manufacturer specifications vary depending on the brand and model of the tool or equipment that you are using. Do not assume that, because you are familiar with one model from a brand, that a model that looks the same will have the same specifications. Always review the manufacturer instructions before beginning work.
As you will learn, instruction manuals can be lengthy and complex documents, though it is integral you read and understand them before you start using any type of tool, especially power tools. The following instruction manual provides you with the instructions for using a Makita circular saw.

One aspect that needs to be considered is the assembly of some components of a project. Components of a project can often be assembled off-site either by you or by a third party. This can be done for any of the following reasons:
- safety
- access to equipment
- efficiency
- limited access to site
- weather.
There are many components that can pre-manufactured, that is, already made and you will need to only install them. Some of these may include:
- handrails,
- roof trusses,
- stairs
- joinery.
There are also a number of tasks that can be completed ahead of time to maintain, this helps to maintain efficiency and effective time management. Some of these tasks may include:
- sanding
- painting
- filling
- pre-drilling
- priming.
How do you know what to pre-prepare?
Starting is both the most exciting and sometimes the most nerve-wracking part of the process. You will be full of mixed feelings about getting started but may be faced with feelings of uncertainty as to where to start. Thankfully, when extra care is taken, much of this work will be done in your planning and preparation stage. When you review the plans and specifications for the job, you will identify each component of the task and develop a workflow plan. This may change slightly as the job unfolds but, generally, you will have a plan in place for what you will do when.
Component manufacturing techniques
Regardless of what you are manufacturing, sheds, pergolas, decks, granny flats, there are some basic techniques that you should follow. These may include:
- working safely
- wearing your PPE
- following workplace quality guidelines and standards
- checking your plans and specs
- checking the compliance requirements of NCC/Australian Standards/legislation
- checking and re-checking measurements and calculations to ensure accuracy (before and after cutting)
- seeking advice and guidance if you are unsure
- checking each finished component for:
- accuracy
- quality
- consistency with plans/specs/compliance requirements.
Remember, at any stage, if you are unsure of how to use a tool or type of equipment, even if you are finding understanding the plans difficult, ask for help, in any case, you need to ask your workplace supervisor. At such an early stage of your career, you will find that you will be full of questions and your experience is only just starting to grow. You can only add to this toolbelt by networking, asking questions and following the examples set out by your experienced and fellow team members.

As for manufacturing components, by the time you arrive at the assembly stage, you will have a detailed understanding of what the task entails, and you will have all of your materials, tools, and equipment in place and ready to go. You will have also identified the assembly process that you are going to use. We are going to look closely at the levelling process.
Levelling
The first step is to set out and level the site. When it comes to the term levelling, this essentially means a surface is flat, even, uniform, horizontal or parallel to a horizontal line. It is important you understand, that when carrying out any construction task, no matter how big or small, they must be level, right from the beginning. Why is this important? Well, to put it simply, if the site is not level, the overall structural integrity will be compromised.
Levelling terms
There are several terms you may come across when you are carrying out any sort of levelling. These terms have been identified as follows:
Identifies any flat surface that is horizontal to the ground.
The datum is the reference point where you transfer a level. This is usually carried out on a wall or column.
The site datum also known as the Temporary Benchmark (TBM) refers to the position the new building levels are compared. They are identified by clear markers that have been positioned on the ground.
Simple levelling is identified as the difference between the heights of 2 points.
Compound levelling refers to the difference of 2 or more points that are in relation to each other, for example, pegging and checking the extension of a house (or building).
Spot levels are taken at each intersection of a grid.
Reduced level refers to the level on a new building when compared to the datum may be above or below the datum. 1
Levelling tools and equipment
Just as you have tools and equipment for cutting and measuring timber, you also need specific tools and equipment for levelling. Some of these you may have heard as you have progressed through your learning or heard while onsite. Here is a re-cap of these tools:
- Spirit level
- String lines
- Straight edges
- Water level
- Plumb bobs
- Laser level
- Automatic (dumpy level)
- Levelling staff1.
Setting out and levelling the site
Before you start setting out and levelling the site, you must of course, read the plans and specifications to identify the details required for the task. Setting out is the process of transferring the details you find in the plans and specifications. You will need to ensure you when setting out the onto the block where the building or structure will be built. During setting out, you will transfer:
- the external dimensions of the structure
- the structure’s shape
- the structure’s position on the block in relation to the boundaries.
The importance of accuracy
Setting out forms the basis for everything else that happens during the build. It is critical that the set out accurately reflects the plans – right from ensuring that the building will be built on the correct block!
Where does the information for setting out come from?
- The floor plan provides the perimeter dimensions of the building (see a sample floor plan on the next page).
- The site plan provides:
- distances from boundaries
- existing buildings
- main services.
Techniques for setting out
When it comes to setting out your worksite, there are several techniques that you can use, depending on the type of levelling tool you are using. While these techniques may differ, the overall outcome is the same, a level worksite. While there are several techniques you will come across throughout your career, we are going to look at the techniques for setting out using a spirit level1.
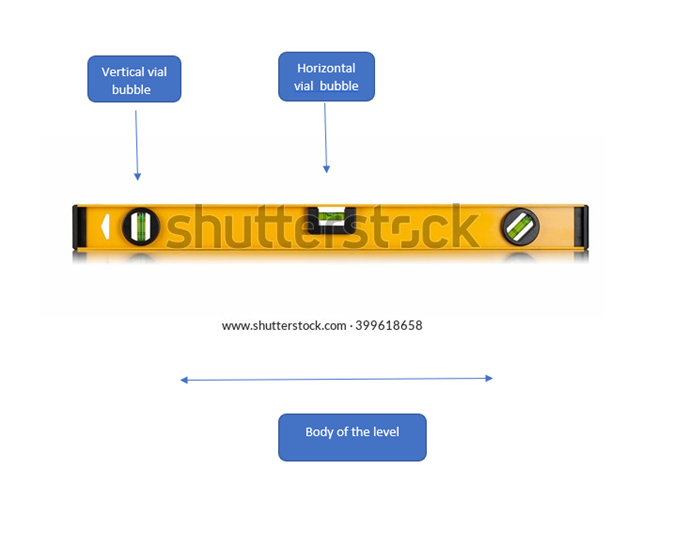
A spirit level is a common tool that is essential for basic levelling tasks. But before you use the spirit level, you must ensure that the tool is providing accuracy.
The following process outlines the steps you need to take when checking the accuracy of your levels with horizontal and vertical vials.
The following diagram labels the vials and body of a spirit level
Horizontal readings
- Place the level on a flat surface.
- Mark two points, one at the end of the level to make the end mark, and another long the body of level that is in line with the horizontal vial, which becomes the test point.
- Read the vial and be mindful of the bubble’s position.
- Turn the level around 180 degrees from each end, and set the level back on the test surface, line up the vial test point.
- Take the second reading.6
Vertical readings (plumb readings)
- Place the level against a vertical doorframe or flat wall.
- Make two marks, one at the end of the level to make the end mark and another along the body of the level inline with the vertical vial which makes the test point.
- Read the vial and be mindful of the bubble’s position.
- Turn the level from side to side and place it back on the wall and align it with your test point.
- Take the second reading.6
The following video provides you with a demonstration on checking accuracy and transferring levels using a spirit level both vertically and horizontally.

Using a plumb bob
When using a plumb bob, it is important to consider they come in various shapes and sizes. Usually, they are used to text the corner of a building for plumb. The plumb bob is suspended on a plate and the measurements are taken at the top and the bottom. To ensure the measurements are even, the frames are adjusted until an even measurement can be taken. 1

Assembling techniques
As you have probably come to learn, there is a lot of planning and preparing that needs to occur before you can actually start assembling. Before you rush in all tools going, there are techniques that are applicable regardless of what you are assembling, there are some basic techniques that you should follow.
When you are assembling, consider the following techniques.
- Work safely, no matter the task, you must always work safely and responsibly. Construction can be very dangerous and there is little room for complacency. Wear your PPE. No matter how small a task may seem to you, ensure you are always equipped with your PPE. The one day you do not wear your safety boots could be the day you drop the hammer onto your foot.
- Follow workplace quality guidelines and standards, ensure you have familiarised yourself with the relevant guidelines and standards applicable to your place of employment. These guidelines and standards will have been developed according to regulations, Australian Standards, and legislation.
- Always check your plans and specs, they have every detail you need for the task at hand. If you are not sure, ask your workplace supervisor for further clarification should you need it.
- Check the compliance requirements of NCC/Australian Standards/legislation, these should be pinned to your task bar for easy access should you need them.
- Check and re-check set out, level, measurements, and calculations to ensure accuracy (before and after cutting)
- Seek advice and guidance if you are unsure.
Once you have finished your project, another check does not go astray. You should also check each finished stage for accuracy, quality, and consistency with plans/specs/compliance requirements.
 Cleaning up correctly is just as important a part of doing the task as planning and organising but cleaning up does not just mean sweeping the floor, especially if you are at the end of a building project. You also need to consider how you are going to dispose of waste and if it has been done so in an environmentally and sustainable manner. If you have come into contact with hazardous materials, they too need to be disposed of carefully. There is a lot involved in this process, so to make this easier, you have been provided with a checklist which you can use to ensure you have covered all aspects of the site clean-up.
|
No. |
Check the following: |
Complete? |
|
1 |
Follow the site’s procedures for safe environmental clean up |
Y / N |
|
2 |
Follow the site’s procedure to ensure that the clean-up process does not put yourself or others at risk of injury or harm |
Y / N |
|
3 |
Always consider the principles of reduce, reuse and recycle |
Y / N |
|
4 |
Avoid contaminating stormwater when cleaning tools, equipment, materials and the work area |
Y / N |
|
5 |
Clean concrete from all tools and equipment |
Y / N |
|
6 |
Follow manufacturer instructions for cleaning and servicing tools and equipment |
Y / N |
|
7 |
Check tools and equipment for defects and/or damage before storing them |
Y / N |
|
8 |
Report any faults in tools and equipment and immediately remove them from service |
Y / N |
|
9 |
Check and clean PPE |
Y / N |
|
10 |
Clean and dry all tools and equipment before storing them |
Y / N |
|
11 |
Store tools and equipment securely and according to manufacturer specifications and instructions |
Y / N |
|
12 |
Store tools and equipment according to workplace specifications |
Y / N |
|
13 |
Ensure tools and equipment has been stored and locked in the appropriate storage facility. |
Y/N |
It is also important to consider, if you are removing hazardous waste such as liquids or possible asbestos, there are specific procedures that need to be considered. Asbestos poses a great risk to anyone who comes into contact with it, so should you find, or suspect material has asbestos, it is advised you immediately notify your workplace supervisor. Do not under any circumstances touch or disturb the material, there are specially trained personnel that will need to be contacted to safely remove the asbestos from the area. In the meantime, the area should be blocked off with appropriate signage and barricades to ensure no one else in the team or passers-by disturb the material.
In other cases, hazardous liquids must be disposed of off site to a relevant waste facility, in many cases, the waste materials will need to be tracked until they arrive at the appropriate facility.