Install and manage Windows applications
Installing and configuring software applications is a crucial part of the IT support role.
In this topic, you will learn the tools and features used in Windows® to follow best practices for software management. You will also use Task Manager to examine processes and performance of the operating system and applications.
Application installation and configuration
When you are selecting, installing and configuring software applications, you need to consider both compatibility and security concepts.
OS requirements (compatibility)
Every software application is designed to run under a specific operating system. When purchasing, you need to make sure you select the version for your OS. You cannot purchase software for macOS® and then run it on Windows. Additionally, a software application might not be supported for use under newer operating systems. For example, if you have been using Version 1 of the Widget App on Windows 7 and you subsequently upgrade to Windows 10, the Widget App might need to be upgraded to Version 2 for full compatibility.
System requirements
'System requirements' refers to the PC specification required to run the application. Some applications, such as 3D games, may have high requirements for CPU and GPU (graphics). There will also be specific RAM and disk space requirements:
- Random Access Memory (RAM)—most applications will require at least 2 GB of system memory.
- Drive space—applications can have quite high disk space requirements. For example, Microsoft Office needs at least 3 GB of disk space.
The application's documentation may specify additional requirements (such as a microphone, speakers or headset).
Installation and deployment options
Most applications are installed from a setup file. The setup file packs the application's executable(s), configuration files and media files within it.
During setup, the files are extracted and installed to the program directory.
A setup file can be distributed on CD/ DVD, it could be run from a USB drive, or it could be downloaded from the Internet.
When an organisation wants to deploy an application to a number of desktops, they are likely to use a network-based installer. In this scenario, the setup file is simply copied to a shared folder on the network and client computers run the setup file from the network folder.
In Windows, you can use policies—Group Policy Objects (GPOs)—to set a computer to remotely install an application from a network folder without any manual intervention from an administrator. Products such as centrally-managed antivirus suites often support 'push' deployment tools to remotely install the client or security sensor on each desktop.
Permissions and other security considerations
One advantage of using a tool such as GPO to deploy applications is that a user does not have to log on to the local client with administrator privileges.
Write/modify permissions over folders to which the application executable files are installed are restricted to administrator-level accounts. This prevents unauthorised modification of the computer or the installation of programs that could threaten security policies. The setup file for a deployed application can run using a service account.
To run an application, the user needs to be granted read/execute permission over the application's installation directory. Any files created using the application or custom settings/preferences specific to a particular user should be saved to the user's home folder/profile rather than the application directory.
When selecting applications for installation on desktops, proper security considerations need to be made in respect of potential impacts to the device (computer) and to the network.
The principal threat is that of a Trojan Horse; that is, malicious software (malware) whose true purpose is concealed. Such malware is likely to be configured to try to steal data or provide covert remote access to the host or network once installed.
A setup file could also be wittingly or unwittingly infected with a computer virus.
These security issues can be mitigated by ensuring that software is only installed from trusted sources and that the installer code is digitally signed by a reputable software publisher.
As well as overt malware threats, software could impact the stability and performance of a computer or network:
- the software might consume more CPU and memory resource than anticipated or use an excessive amount of network bandwidth
- there could be compatibility problems with other local or network applications
- the software could contain unpatched vulnerabilities that could allow worm malware to propagate and crash the network.
Ideally, applications should be tested in a lab environment before being deployed more widely. Research any security advisories associated with the software, and ensure that the developer has a robust approach to identifying and resolving security issues.

Windows programs and features
In Windows, local applications are installed to the Program Files directory on the boot partition (for example, C:\Program Files). Most applications will also write configuration data to the registry and may add folders and files to the user's home directory (or to the All Users directory for settings shared by all users).
To ensure that all these folders, files and registry settings are created correctly, applications should be installed and removed using the supplied Setup program.
64-bit Windows and 32-bit applications
Many of the software applications available for Windows are still 32-bit. These applications can usually be installed under 64-bit versions of Windows. They run within a special application environment called WOW64 (Windows on Windows 64-bit). This environment replicates the 32-bit environment expected by the application and translates its requests into ones that can be processed by the 64-bit CPU, memory and file subsystems.
In a 64-bit Windows environment, 32-bit application files are installed to the Program Files (x86) folder while 64-bit applications are stored in Program Files (unless the user chooses custom installation options). Windows' 64-bit shared system files (DLLs and EXEs) are stored in %SystemRoot%\system32; that is, the same system folder as 32-bit versions of Windows. Files for the 32-bit versions are stored in %SystemRoot%\syswow64.
Installing desktop applications
Launch the program's setup application and complete the setup wizard to install it. In order to install a program successfully, you should exit any other applications or files.
You may also need to disable antivirus software.
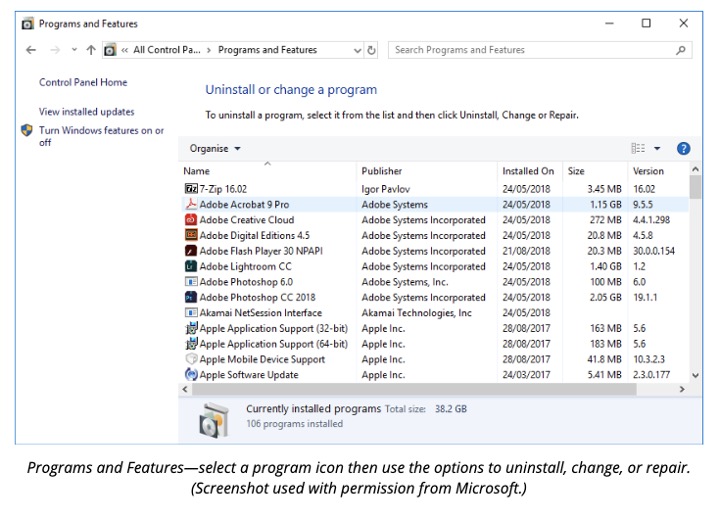
Using Program and Features
'Programs and Features' allows you to uninstall a program or add or remove component features of software such as Microsoft Office.
There is also usually a repair option, which will reinstall the components of the program.
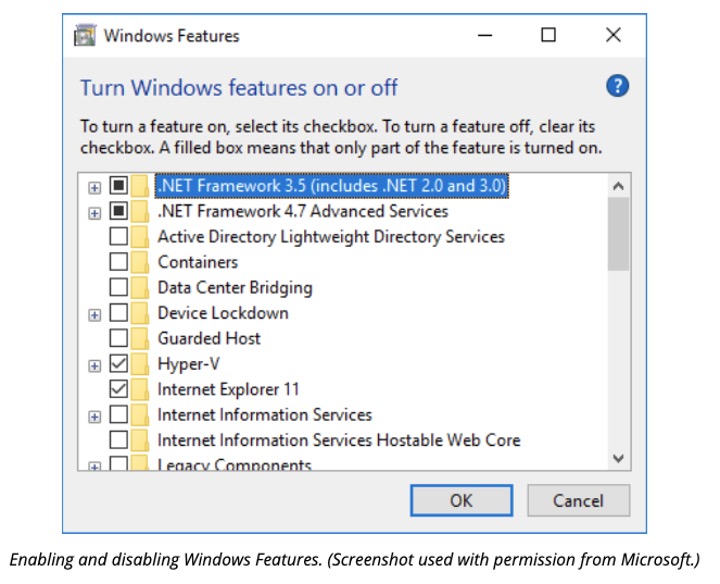
Enabling Windows features
To use Programs and Features to enable or disable optional Windows components, click the Turn Windows features on or off link then check the boxes for the features you want to enable (or uncheck boxes to remove those features).
Most configuration options for software are quite specific to each program. You can use menus such as File→Options, Edit→Preferences, or the Help menu to change the configuration settings.
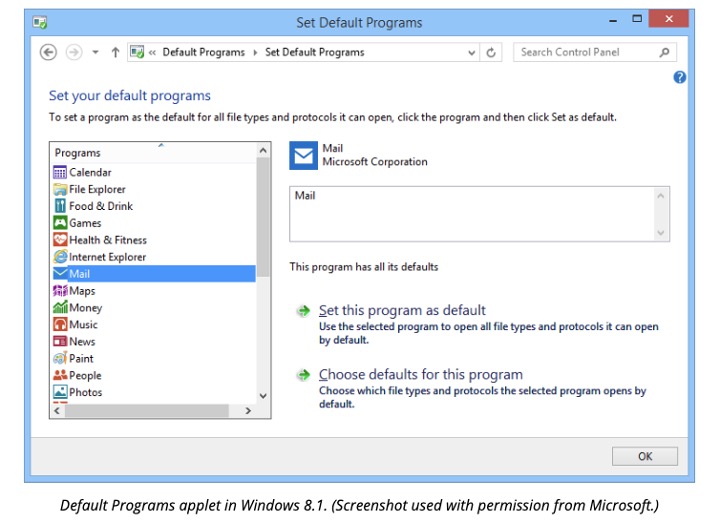
Default Programs
Use the Default Programs applet to set the programs you wish to use for particular tasks or to configure individual file associations (choosing which application is used to open files with a particular extension).
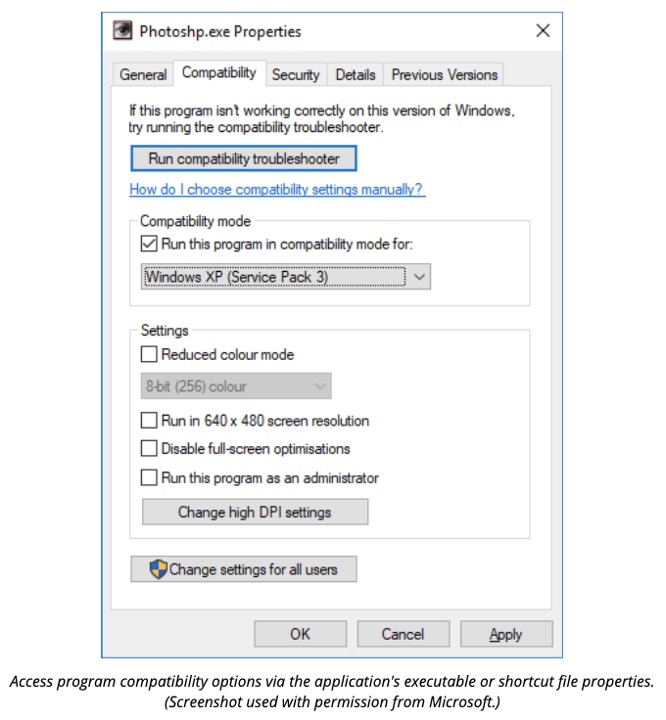
Compatibility mode
One of the challenges for Microsoft in releasing a new version of Windows is to provide compatibility for hardware and software developed for previous versions.
Windows provides a degree of support for legacy DOS and Windows 9x programs, and each version provides support for earlier 2000/XP/Vista/7/8 versions. The Properties dialogue box for executable files and the shortcuts to such programs have a Compatibility tab. It allows you to configure the program's original operating system environment and force it to use compatible display settings.
Features such as User Account Control and its greater protection for system folders (Program Files and the system root), the Aero desktop compositing engine, and 64-bit Windows versions have made application compatibility even more challenging.
UAC problems can be solved by running the program as an administrator, and there is an option to turn off advanced desktop compositing effects. There is a Program Compatibility Troubleshooter wizard (right-click the shortcut or executable) to help.
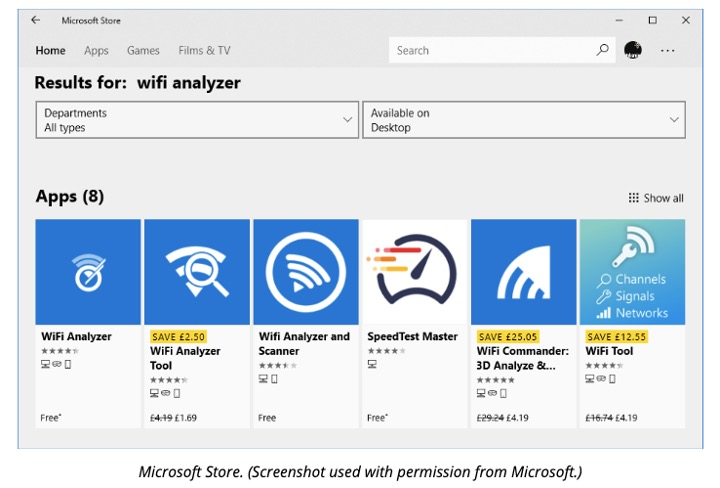
Microsoft Store apps
Windows 8 introduces support for a different kind of program, referred to variously as a Windows app, Store app, Universal app, or Modern/Metro app.
These apps run across any kind of Windows device, including Windows-based smartphones and tablets.
Windows apps are not installed via Programs and Features but via the Microsoft Store. Users must sign into the Microsoft Store using a Microsoft account then apps can be transferred between any Windows device where the user signs in with that Microsoft account.
Unlike desktop applications, store apps run in a restrictive 'sandbox'.
This sandbox is designed to prevent a store app from making system-wide changes and prevent a faulty store app from 'crashing' the whole OS or interfering with other apps and applications.
This extra level of protection means that users with only standard permissions are allowed to install store apps. Installing a store app does not require confirmation with UAC or computer administrator-level privileges.
Apps can be uninstalled via the app's shortcut menu on the Start Screen. You can choose to uninstall an app from that device only or from all devices, wiping any data stored by the app in your account in the process.
A 'service' is a Windows process that does not require any sort of user interaction and so runs in the background (without a window). Services provide functionality for many parts of the Windows OS (such as allowing logon, browsing the network or indexing file details to optimise searches).
Services may be installed by Windows and by other applications (such as antivirus, database or backup software).
Service console
You might want to disable non-essential services to improve performance or security.
You can prevent a service from running at startup by setting it to Manual or prevent it from running completely by setting it to Disabled. Note that this may cause problems if other services depend upon it.
If something is not working properly, you should check that any services it depends upon are started.
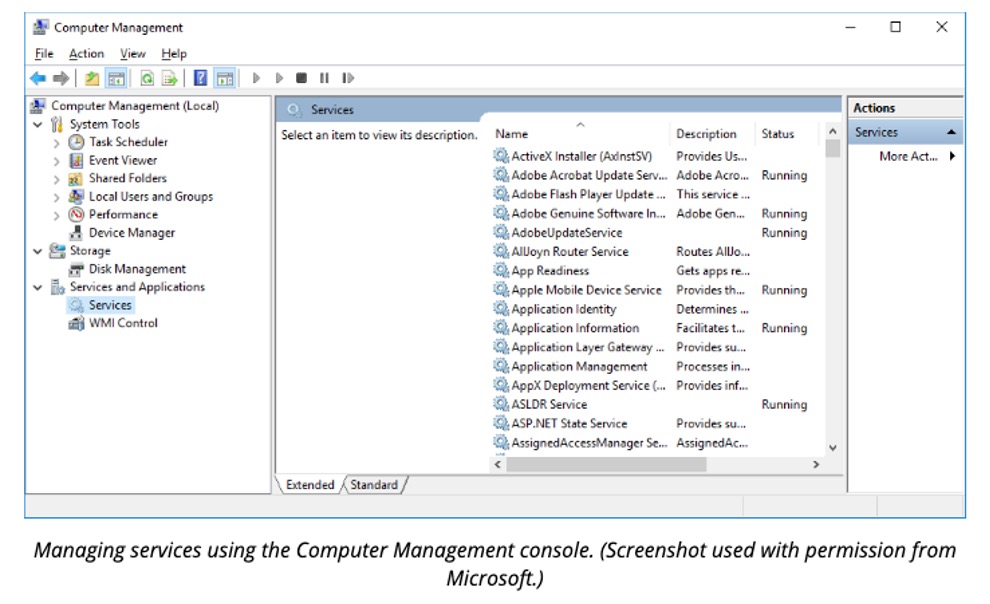
To configure services, open the Computer Management console, then expand Services and Applications from the tree and click the Services icon.
Alternatively, you can run the services.msc command. The services snap-in displays a list of installed services in the right-hand panel. Clicking a service displays information about it in the left-hand panel.
The shortcut menu for a service allows you to start, stop, pause/resume or restart (stop then start).

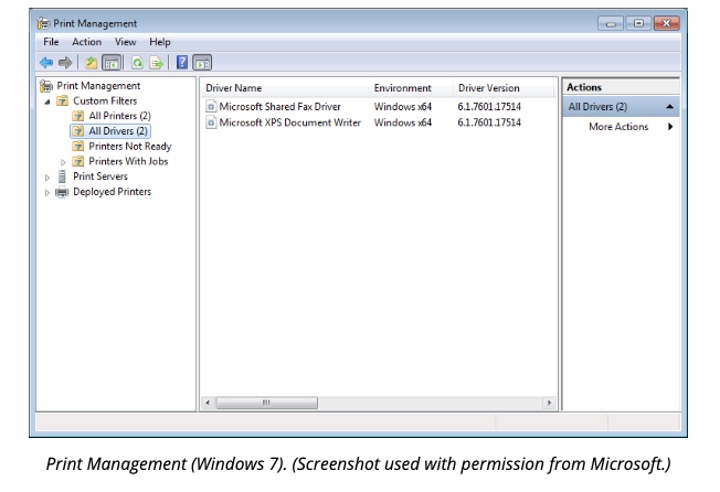
Print management
If you use Windows to host a printer (acting as a print server), you need to make drivers available for the different client operating systems that may be connecting to the printer.
Windows comes with a Print Management snap-in (in Administrative Tools), where you can manage drivers and monitor the status of printers.
Component services
The Component Object Model (COM+, Distributed COM [DCOM] and ActiveX) is a means for developers to link software applications and leverage Windows services. For example, COM OLE (Object Linking and Embedding) allows an Excel® spreadsheet to be saved within a Word document or a custom software application could use COM to write to the event log.
The Component Services snap-in (accessed via Administrative Tools) enables you to register new server applications or reconfigure security permissions for existing services.
Data Sources
The Data Sources or ODBC Data Sources snap-in (from Administrative Tools) enables you to control data connections set up on the local computer.
A Data Source allows a client application to share data from a server application. For example, an Excel spreadsheet could be set up with a data connection to an SQL Server®.
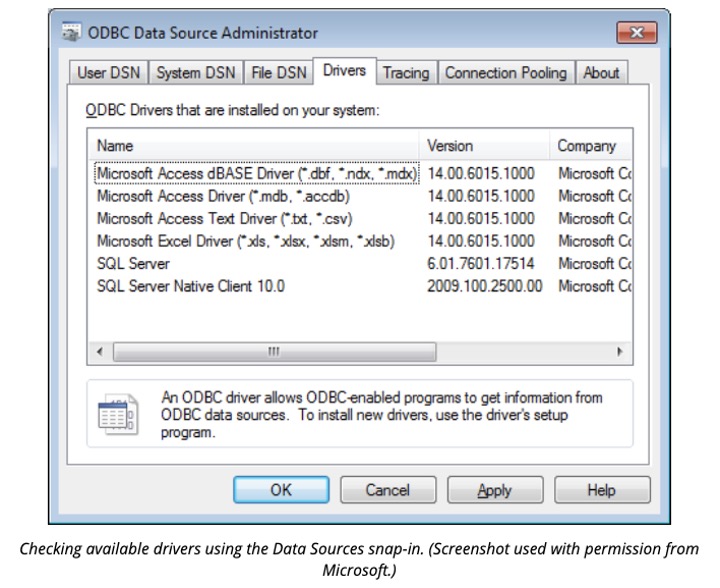
An Open Database Connectivity (ODBC) data source consists of a driver for the server application plus the location of the data (a file or a server). You may also need to supply the table name and logon credentials.
Typically, drivers get added when an application is installed.
Users can set up new data sources using the My Data Sources folder that is added within their Documents folder in their profile.
The Task Manager utility (taskmgr.exe) allows the user to shut down applications that are not responding.
An ordinary user can end an unresponsive application that they ran initially, but administrative rights are required to end processes that were not started by the user. This protects the system by ensuring malware cannot disable antivirus software or other protections.
In addition to this functionality, Task Manager can be used to monitor the PC's key resources.
The quickest way to open Task Manager is to press Ctrl+Shift+Esc.
Task Manager has been significantly overhauled in Windows 8 and Windows 10. First, we will examine the Windows 7 version and the Windows 10 version will follow thereafter.
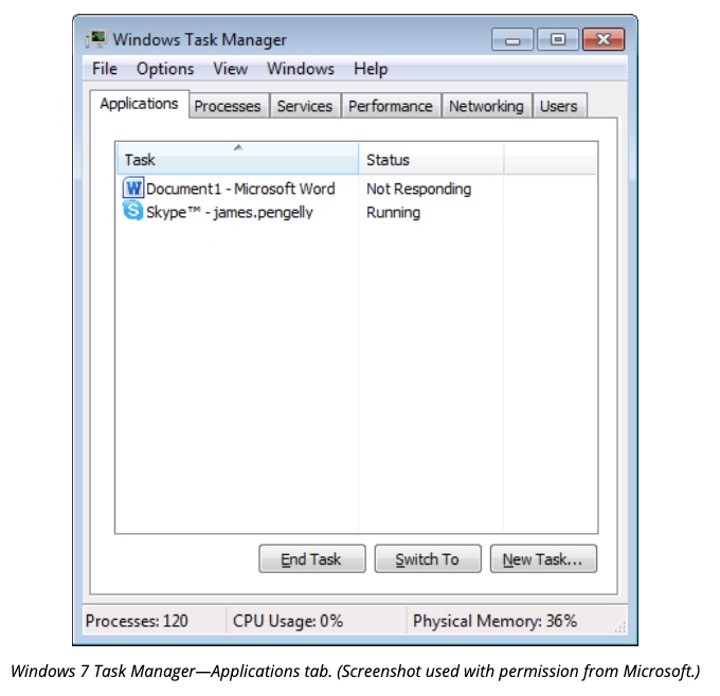
Applications tab
The Applications tab shows applications currently running in a desktop window. The shortcut menu for each allows you to force the application to close ('End Task'), manage its window, and show the process associated with the application.
If an application is not responding, forcing it to close may result in the loss of any unsaved data. You are prompted to confirm what you want to do:
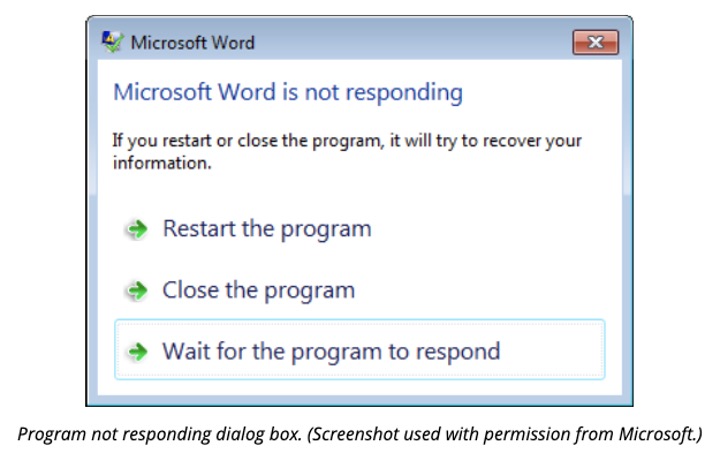
Some applications, including those in Microsoft Office, can try to recover unsaved information from autosave and temp files.
Processes tab
The Processes tab shows CPU utilisation and memory usage for each process.
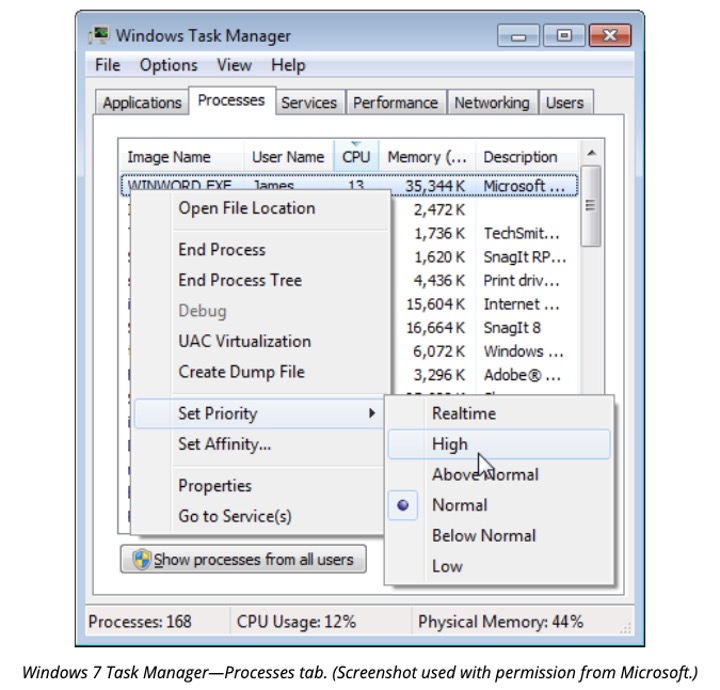
To view system-level processes (those not running under the logged-on user account), you must select Show processes from all users option. You would examine these values to discover whether a particular application was misbehaving. For example, an application may 'leak' memory by not freeing it up when it has finished using it.
To show more than the default CPU and Memory Usage, select View→Select Columns and check the items that you want to look at. If a process is not responding or if you suspect it is faulty, you can right-click and select End Process to terminate it.
In some circumstances, you may want to privilege one task over another, or conversely, set one task to have fewer resources than others. You can do this by right-clicking the process and choosing an option from the Set Priority submenu. For example, if you had a Voice over IP application and its priority was not already set to Above normal, changing its priority might improve call quality as the CPU would privilege that process over ones set to any other level.
You can choose to open the folder containing the process and inspect its file properties.
This can be useful if you suspect a malware infection—you should check that the process is installed to a valid location. Sometimes a single process (such assvchost.exe) will 'host' multiple services; conversely, there may be multiple versions of the process running. You can use the Go to Service(s) option in the process's shortcut menu to view them.
Services tab
You can use the Services tab to show which services are running, start and stop services, or open the services management console.
Each running service is associated with a host process through its Process ID (PID). You can use the Go to Process option in the process's shortcut menu to view it.
Performance tab
The Processes tab shows which applications might be using (or over-using) system resources. You can also use Task Manager to get a snapshot of overall system performance. Select the Performance tab to view resource usage.
On a system with multiple processors, you should see multiple graphs for CPU Usage (one for each CPU).
If this is not the case, select View→CPU History→One Graph per CPU. (Note that physical, multicore, and Hyper Threaded processors are all represented.)
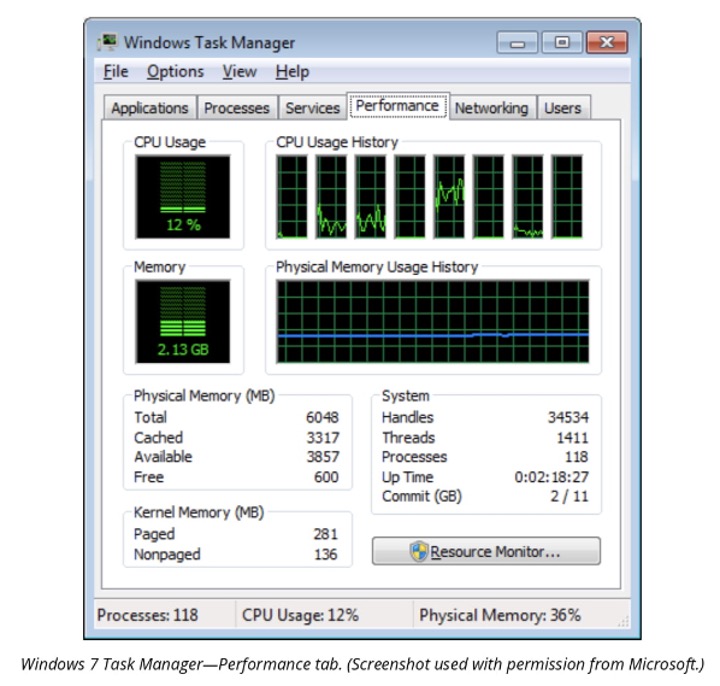
The following memory usage is displayed:
- Physical Memory—usage of system RAM (not including the pagefile).
- Kernel Memory—physical and paged memory used by Windows core files.
- System summary—showing handles, threads and processes (software objects being managed by the CPU), system uptime and the commit charge (overall memory usage, including physical memory and pagefile).
High peak values are nothing to worry about, but consistently high utilisation means that you should consider adding more resources to the system (or run fewer processes!).
CPU and physical memory obviously require physical upgrades. Windows will normally change the pagefile dynamically if it is running out of space. If it has been set manually, you should increase it using the Performance Settings button on the Advanced page of System Properties.
There is also a link to Resource Monitor, which shows additional live performance information.
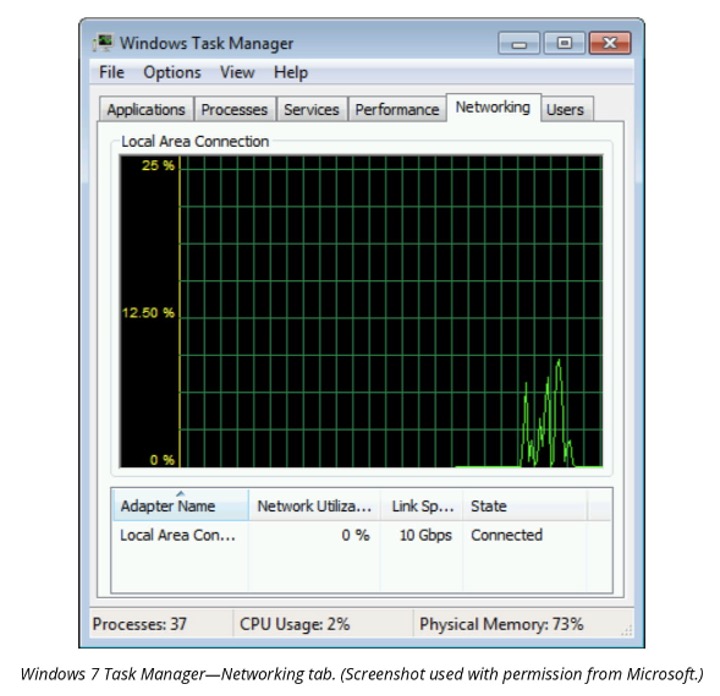
Networking tab
The Networking tab shows the status and utilisation of the network adapter(s).
Utilisation is expressed as a percentage, so if the link is 10 Gbps (as shown), '10%' utilisation shows that the computer is transferring about 1 Gbps currently.
Users tab
The Users tab shows who is logged on to the machine. An administrator can disconnect or log off other users or send them a notification (to inform them that the computer will be shut down, for instance).
Windows 10 Task Manager
In Windows 10, you can open Task Manager via the Ctrl+Shift+Esc key combo, by right-clicking the taskbar, or by using the Windows+X menu.
Task Manager may start in a 'compact' mode; click the Show details button to expand it.
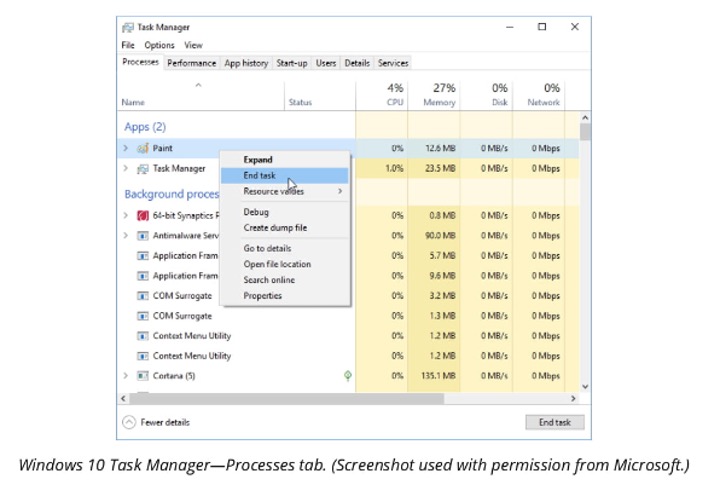
In Windows 10, the functions of the Applications and Processes tabs are consolidated across the Processes and Details tabs.
On the Processes tab, you can expand each app or background process to view its sub-processes and view more clearly what resources each is taking up.
The shortcut menu allows you to end a task. There is also an option to search for information about the process online and a further option is to view more information about a process via the Details tab.
You can identify services associated with a process via the shortcut menu on the Details tab.
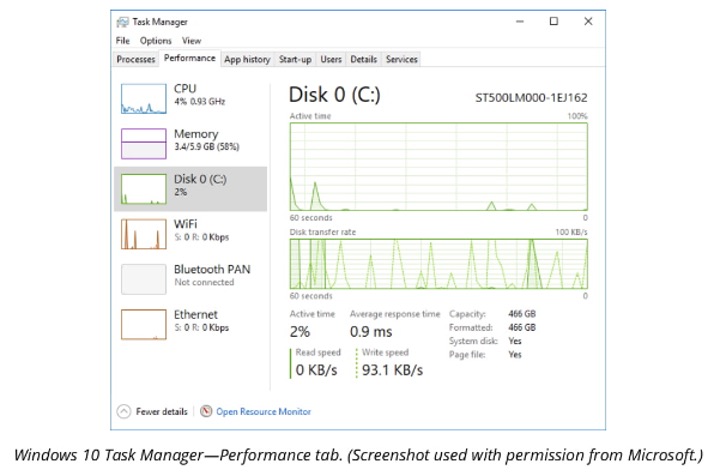
The Performance tab provides more information about the CPU, memory, disk and network subsystems; while the App History tab shows usage information for Windows Store apps.
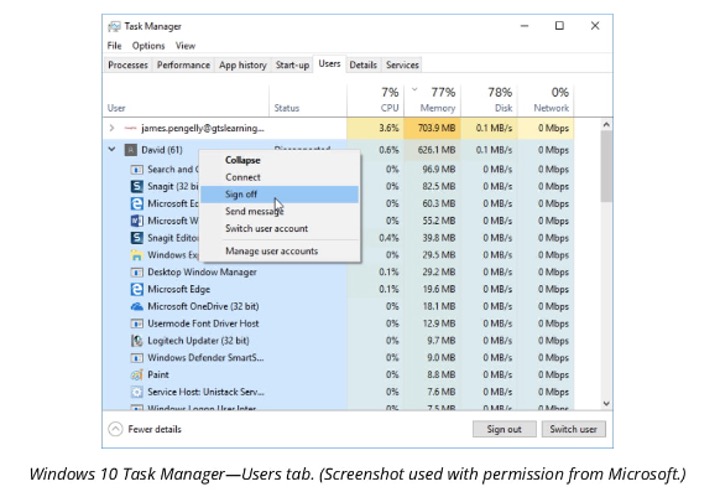
The Users tab lets you see who is logged on (and allows you to send them a message or sign them out) plus information about the processes they are running and the resource utilisation associated with their account.
The Startup tab lets you disable programs added to the Startup folder (type 'shell:startup' at the Run dialog box to access this) or set to Run using the registry. Right-click the headers and select Startup type to show how the program is launched.
It also shows how much impact each item has on boot times.
The taskList and taskKill Commands
You can also identify which service is running in which process (and vice versa) at a command line using the taskList command.
taskList shows a list of processes(images) along with a PID, session name and number, and memory usage (in kilobytes). You can run the command with the /fi switch to apply various filters (for example, taskList /fi "memusage gt 150000" shows processes using more than150 MB)—check the online help for details. Using taskList /svc shows a list of services within each process.
The taskKill command can be used to end processes and services. Use taskKill /pid processid or taskKill /im ImageName to end a task by PID or image name, respectively.
Use the /t switch to also halt any child processes.
The /f switch terminates the process without any user notification (for the user to save changes, for instance) and will also terminate it even if it is currently displaying a dialogue box.
You can run the command with an appropriate filter (/fi "Criteria").
You can use a PID, image name, service name, or window title or target multiple images using a filter for CPU time, memory usage, or status ("Not Responding", for instance).
Activity
Consider the following scenarios and submit your answers in the forum.
You need to install a desktop application across a network of 500 Windows PCs.
What is the most efficient means of doing this, and what security considerations should you make?
An installer program may present up to 3 options in Programs and Features. Two are Uninstall and Change.
What is the third?
How would you configure a legacy Windows 98 application to work with Windows 10?

Try answering the practice questions on the learn.comptia.org website

Practically every technical deployment will face unforeseen issues. The IT project team members should address unexpected changes by using a process that keeps stakeholders informed and that minimises impact on the overall project, especially the project's timelines and goals.
Change management
'Configuration management' means identifying all components of the information and communications technology (ICT) infrastructure (hardware, software and procedures) and their properties. 'Change management' means putting policies in place to reduce the risk that changes to these components could cause service disruption (network downtime).
ITIL Configuration management model
IT Infrastructure Library (ITIL®) is a popular documentation of good and best practice activities and processes for delivering IT services. Under ITIL, configuration management is implemented using the following elements.
- Service assets are things, processes or people that contribute to the delivery of an IT service.
- A Configuration Item (CI) is an asset that requires specific management procedures for it to be used to deliver the service. Each CI must be identified by some sort of label. CIs are defined by their attributes, which are stored in a Configuration Management Database (CMDB).
- 'Baseline' is a fundamental concept in configuration management. The baseline represents 'the way it was'. A baseline can be a configuration baseline (the ACL applied to a firewall, for instance) or a performance baseline (such as the throughput achieved by a server).
- A Configuration Management System (CMS) embodies the tools and databases that collect, store, manage, update and present information about CIs. A small network might capture this information in spreadsheets and diagrams. There are dedicated applications for enterprise CMS.
One of the goals of the CMS is to understand the relationships between CIs. Another is to track changes to CI attributes (and therefore variance from the baseline) over time.
The purpose of documentation in terms of change and configuration management is as follows:
- identify each component (CI) and label it
- capture each CI and its (relevant) attributes in a CMDB
- capture relationships between CIs (this is best done using diagrams)
- capture changes to a CI as a job log and update the CMDB.
Document changes
Each individual system, server and network component should have a separate document that describes its initial state and all subsequent changes.
This document includes configuration information, a list of patches applied, backup records and even details of suspected breaches. Printouts of hash results, last modification dates of critical system files and contents of log files may be pasted into this book.
System maintenance can be made much smoother with a comprehensive change document. For instance, when a patch is available for an operating system, it typically applies in only certain situations. Manually investigating the applicability of a patch on every possible target system can be very time-consuming; however, if logs are available for reference, the process is much faster and more accurate.
Documented business processes
Depending on the requirements of your organisation, you might need general business processes to be documented, or you might need every single thing that happens throughout the workday documented. The latter usually applies to businesses that need FDA or other governmental approval to produce and sell goods and services.
At the minimum, you should document changes made to systems such as when a new employee comes onboard or when an employee leaves and what happens to their hardware and software when those events occur.
You will also want to document how various tasks are completed throughout the organisation, including:
- how systems are configured
- how the network is configured
- what criteria is required for making changes to any equipment that is deployed
- how and when to replace equipment
- and many other aspects of having an organisation filled with computing devices.
SOPs and work instructions
The main difficulty in implementing a workable configuration management system is in determining the level of detail that must be preserved. This is not only evident in capturing the asset database and configuration baseline in the first place, but also in managing Moves, Adds and Changes (MACs) within the organisation's computing infrastructure.
In terms of computing tasks, a CMS will require that configuration changes be made only when there is a valid job ticket authorising the change. This means that the activity of all computer support personnel, whether it be installing new devices or troubleshooting, is recorded in job logs.
In a fully documented environment, each task will be governed by some sort of procedure. Formal configuration management models often distinguish between 2 types of procedural documentation:
- A Standard Operating Procedure (SOP) sets out the principal goals and considerations (such as budget, security or customer contact standards) for performing a task and identifies lines of responsibility and authorisation for performing it.
- A Work Instruction is the step-by-step instructions for performing an installation or configuration task using a specific product or technology and credentials.
Change management documentation
To reduce the risk that changes to configuration items will cause service disruption, a documented management process can be used to plan for change in a planned and controlled way.
Change requests are usually generated when something needs to be corrected, new business needs or processes are identified, or there is room for improvement in a process or system currently in place.
The need to change is often described either as reactive--where the change is forced on the organisation, or as proactive--where the need for change is initiated internally.
Changes can also be categorised according to their potential impact and level of risk (major, significant, minor or normal, for instance). In a formal change management process, the need or reasons for change and the procedure for implementing the change is captured in a Request for Change (RFC) document and submitted for approval.
Change request documentation should address:
- the purpose of the change
- the scope of the change
- a risk analysis of both performing the change and not performing the requested change
- a documented plan for carrying out the change
- a method to acquire end-user acceptance that the change was performed to their satisfaction and that the change was properly implemented
- a backout plan in case unforeseen problems arise when the change is made
- document all changes that were made.
Change board approval
The RFC will then be considered at the appropriate level and affected stakeholders will be notified. This might be a supervisor or department manager if the change is normal or minor. Major or significant changes might be managed as a separate project and require approval through a Change Advisory Board (CAB).
Process for instituting change to operational policies and procedures
Regardless of whether an organisation is large enough to require formal change management procedures and staff, the implementation of changes should be carefully planned, with consideration for how the change will affect dependent components.
For most significant or major changes, organisations should attempt a trial implementation of the change first.
Every change should be accompanied by a rollback (or backout) plan, so that the change can be reversed if it has harmful or unforeseen consequences. Changes should also be scheduled sensitively if they are likely to cause system downtime or other negative impacts on the workflow of the business units that depend on the IT system being modified.
Most organisations have a scheduled maintenance window period for authorised downtime.
When the change has been implemented, its impact should be assessed and the process reviewed and documented to identify any outcomes that could help future change management projects.
Guidelines for using change management best practices
Consider the following collective best practices guidelines for using change management.
- Create a separate document for each individual system, server and network component that describes its initial state and all subsequent changes. This document would include:
- configuration information
- supplied patch list
- record of backups
- details about suspected security breaches.
- Configuration management using ITIL should be implemented using:
- service assets
- configuration items
- Configuration Management Database (CMDB)
- baselines
- Configuration Management System.
- Document the need or desire for a change using an RFC document.
- RFCs should be considered at the appropriate level and affected stakeholders notified.
- Major or significant changes might be managed as a separate project and require approval through a Change Advisory Board (CAB).
- Follow documented SOPs and Work Instructions when performing moves, adds and changes.
- Implementation of changes should be carefully planned, with consideration for how the change will affect dependent components.
- For most significant or major changes, organisations should attempt to trial the change first.
- Every change should be accompanied by a rollback (or remediation) plan.
- Changes should also be scheduled sensitively if they are likely to cause system downtime or other negative impacts on workflow.
- When the change has been implemented, its impact should be assessed and the process reviewed and documented to identify any outcomes that could help future change management projects.
Check your knowledge
Answer these two questions about programming and scripting.
Activity
Consider the following questions and post your answers in the forum.
- Why are documented business processes essential for effective change management?
- What are the main components of an RFC?
- What is a change board?

Try answering the practice questions on the learn.comptia.org website.