In this topic, we will cover:
- What is an app?
- Overview
- Servers
- Cloud database
- API
- Webpack.
An app is a software program that runs on a platform. These can be either mobile apps, which run on devices such as smartphones and tablets; or web apps, which run through a web browser via the internet.
- Mobile apps are often built for a specific platform, like Android or iOS. But you can also build a hybrid mobile app that works in both environments, with some limitations.
- Web apps are essentially responsive websites that adjust to the size of the device. They are accessible on any device through an internet browser.
Microsoft Word is an example that uses both. Aside from the desktop app, Microsoft offers a web app for Word that is responsive and runs on a browser, and a mobile version that can be installed on mobile devices and does not rely on an internet connection.
New technology has also introduced a new type of app: the progressive web app (PWA). PWAs are a hybrid of mobile and web apps, using emerging web browser APIs and features to bring the mobile app user experience to browser-based web applications.110
Websites, mobile apps, and web apps
Mobile apps are downloaded and installed through an app store or marketplace, like Google Play or the Apple App Store. These apps live and run on the device and may have access to the device’s resources and features, like the camera function or GPS.
Web apps are often confused with mobile apps because they can look and feel a lot like them. However, there are some key functionality and usability differences.
Web applications are the focus of this module.
Web apps
Before we build a web app, let us explore the key differences between web apps and websites or mobile apps.
Web apps are accessed through an internet browser
Web apps can store data in your browser’s cache, so some features may be accessed even when you are offline. However, if you do not have internet access, you will probably find your functionality is limited.
Web apps are not local to the system
There is no need to download or install web apps. They can have access to device features (such as GPS and camera), but often not to the same extent as mobile apps, which can limit some functionality – especially more advanced features you may want to build.
Web apps are designed for interaction
Users normally log into a secure account and perform actions on the web app to accomplish a task, such as sending an email or creating a document. Where websites usually have content that is static and publicly available, web apps require authentication features for those secure user accounts.
Benefits of web apps and responsive websites
Although web apps are not built for specific devices, responsive design is their guiding principle when it comes to user experience. Here are some benefits of web apps.
- Lower development costs – Web apps cost less to build than mobile apps. They do not require environment-specific builds, so one version can be used on all operating systems. Web apps also generally require less development time and specialised skills.
- Search engine optimisation – Web apps can be displayed in Google search results, helping you reach your target audience.
- Accessibility – Web apps offer access on a wide range of devices through the browser, regardless of the operating system. There is no need to download anything, so visitors can be sent directly to your app.
- Update frequency — Web apps and websites have a common code base, so updates are quick and easy. Developers push updates to a server, and users see them instantly.
- Ease of launch — There is no need for app store or marketplace approvals with a web app. They have excellent speed-to-market – just release and go!
- Ease of sharing — With a web app, users simply share the URL to share content.110

Frontend technologies are responsible for presenting information to the user. It uses languages such as HTML, CSS, and JavaScript, which are responsible for the content, style, and interactive capabilities of a website or an app.

On the other hand, backend development is responsible for how an application is transmitted over the web. All websites come from servers that respond to requests from clients. When you visit a site, your web browser sends an HTTP request to a server that contains the site data. If successful, the server responds with the requested data.1 Backend languages include SQL, Java, PHP, Ruby on Rails, Python, and .Net.2

Why do we need a backend?
There are three main reasons we need a backend.
- Data permanence – The backend offers a database to store user information. Data persistence makes the internet possible. Each time you login to a website, you are retrieving data from a database. Think of your social media accounts as an example. Your preferences and settings are all accessed via server data.
- User experience – User-specific information is held by a backend database, which customises user experience based on personal data and preferences. Personalised sessions improve functionality, leading to better engagement with an interface.
- Data security – This is arguably the most important aspect of the backend. Developers need to set up robust firewalls to protect sensitive data, such as personal details and banking information. Without a backend, servers would be giving browsers direct access to database information.1
The client-server architecture
Modern applications employ the client-server architecture. This architecture separates application software into two categories: clients and servers (frontend and backend). The separation helps better utilize available computing resources and share data processing loads. The client and server application can be hosted on the same machine, but it is more efficient and effective when hosted and executed on different machines connected via a network.
The client-server architecture aids efficiency by allowing different clients to consume a server resource. These clients could be single-page applications (SPAs), mobile applications, or non-interactive clients such as CLIs or daemons.
Nowadays, most JavaScript applications are bundled and deployed as single-page applications running on vanilla (handwritten) JavaScript, Vue, React, Polymer, or Angular, and consuming and pushing data to a backend application running on Node.js. The frontend/backend model of building software is common not only in the JavaScript community, but the developer community at large. These applications are also deployed to cloud servers.
Introduction to cloud server
Cloud servers are virtual servers that run within a cloud computing environment. There are various benefits to hosting and deploying your applications on the cloud.
- They are economically efficient.
- You have the freedom to modify the server software to your needs.
- Cloud servers scale very well.
- They are stable and secure.
In fact, many companies have moved their infrastructure to the cloud to reduce cost and complexity. It is a great option for small, mid-sized, and enterprise scale businesses. It is also a great choice if you do proof-of-concepts (POCs).
A generic JavaScript application involves a:
- Frontend: HTML, CSS, and JavaScript.
- A few CSS frameworks that can be used on the frontend are:
- Bootstrap: The most popular CSS framework in the world
- Bulma: A modern CSS framework based on Flexbox
- Tailwind: A utility-first CSS framework for rapid UI development.
- A few JavaScript frameworks that can be used on the frontend are:
- React
- Vue
- Angular
- Preact
- Polymer
- Svelte
- Mithril.
- A few CSS frameworks that can be used on the frontend are:
- Backend: JavaScript running on a Node.js server.
- Some frameworks that can be used on the backend are:
- Express: Fast, unopinionated, minimalist web framework for Node.js
- Hapi: Rich framework for building applications and services
- Koa: Next generation web framework for Node.js
- Sails: Realtime MVC framework for Node.js.
- Examples of databases that can be used are:
- MongoDB
- MySQL
- PostgreSQL’.3
- Some frameworks that can be used on the backend are:
What is a server?
A server is just a computer that listens for requests and responds accordingly. Though there are machines specifically designed and optimised for this task, any computer connected to a network can operate as a server. When designing apps, you will frequently use your own computer as a server.

The server runs an app that contains logic about how to respond to various requests based on the HTTP verb and the Uniform Resource Identifier (URI). An HTTP verb and URI pair is called a route, and matching them based on a request is called routing. Some of these handler functions will be middleware. Middleware is any code that executes between the server receiving a request and sending a response. These middleware functions might modify the request object, query the database, or otherwise process the incoming request.
Often, programmers will use a framework like Node Express or Ruby on Rails to simplify the logic of routing.4
Node.js
‘Node.js is an open source, cross-platform runtime environment that allows JavaScript developers to create a variety of server-side tools and apps. Here are the key features of Node:
- Great performance! Node was designed to optimize throughput and scalability in web applications, and is a good solution for many common web-development problems (for example, real-time web applications).
- Code is written in "plain old JavaScript", which means that less time is spent dealing with "context shift" between languages when you're writing both client-side and server-side code.
- JavaScript is a relatively new programming language and benefits from improvements in language design when compared to other traditional web-server languages (for example, Python, PHP). Many other new and popular languages compile/convert into JavaScript so you can also use TypeScript, CoffeeScript, ClojureScript, Scala, LiveScript, and more.
- The Node package manager (npm) provides access to hundreds of thousands of reusable packages. It also has best-in-class dependency resolution and can be used to automate most of the build toolchain.
- Node.js is portable. It is available on Microsoft Windows, macOS, Linux, Solaris, FreeBSD, OpenBSD, WebOS, and NonStop OS. Furthermore, it is well-supported by many web hosting providers, which often provide specific infrastructure and documentation for hosting Node sites.
- It has a very active third-party ecosystem and developer community, with lots of people who are willing to help.
You can use Node.js to create a simple web server using the Node HTTP package.’5
How to install Node.js and npm
‘Installation of Node.js and npm is straightforward using the installer package available from the official Node.js website.
- Download the installer from Node.js.
- Run the installer.
- Follow the installer steps, agree to the license agreement, and click the next button.
- Restart your system/machine.
-
Now, test NodeJS by printing its version using the following command in Command Prompt:
> node -v
-
Also test npm by printing its version using command:
> npm -v
- A simple way to test Node.js work in your system is to create a JavaScript file which prints a message.
-
Let us create a test.js file:
/* test.js file */
console.log("Node is working");
- Run the test.js file using Node command
> node test.jsin command prompt.6E:\> node -v v0.11.13 E:\> npm -v 1.4.9 E:\> node test.js Node is working E:\>
Web frameworks
Node.js does not directly handle common web-development tasks, especially if you want to add specific handling for distinct HTTP verbs (for example, GET, POST, DELETE), handle requests at different URL paths ("routes"), serve static files, or use templates to dynamically construct the answer. You can either create the code yourself or use a web framework.
Some of the most popular web frameworks are:
- Express
- Symfony
- Django
- Ruby on Rails.
We are going to put our focus on Express (Node. js/JavaScript).
Express (Node. js/JavaScript)
‘Express is the most popular Node.js web framework, and is the underlying library for a number of other popular Node.js web frameworks. It provides mechanisms to:
- Write handlers for requests with different HTTP verbs at different URL paths (routes).
- Integrate with "view" rendering engines in order to generate responses by inserting data into templates.
- Set common web application settings like the port to use for connecting, and the location of templates that are used for rendering the response.
Add additional request processing "middleware" at any point within the request handling pipeline.
While Express itself is fairly minimalist, developers have created compatible middleware packages to address almost any web development problem. There are libraries to work with cookies, sessions, user logins, URL parameters, POST data, security headers, and many more.’5 You can find a list of middleware packages maintained by the Express team on the Express site (along with a list of some popular third-party party packages).
Watch the video on how to set up Express on your computer.
What is a cloud database?
A cloud database is a database that is hosted in the cloud rather than on-premise. The database itself can be made available as a Software-as-a-Service (SaaS) application, or simply hosted in a virtual machine on the cloud. Applications can then use a network to access all the data stored in a cloud database from any device.
Any database can be deployed in the cloud. Traditional SQL databases and more recent NoSQL databases are both included. MongoDB Atlas is a general-purpose document database that runs on Amazon Web Services (AWS), Microsoft Azure, and Google Cloud.55
Advantages of a cloud database
Using NoSQL cloud database development results in a secure and cost-effective collection of technologies. Platforms like MongoDB Atlas typically include a full set of reporting metrics, as well as analytical and security requirements from firms with world-class standards. Some of the advantages are:
- Comprehensive and agile access
- Flexible data structures
- Infinite scalability
- Solid reliability.
Comprehensive and agile access
Cloud databases provide unrivalled versatility and flexibility. MongoDB Atlas, for example, is a fully-managed cloud database service that provides continual updates to both the software and the service.
Flexible data structure
It might be difficult to keep track of the specifics of database deployments. Cloud-based solutions help to overcome these problems. Datasets from public, private, and hybrid clouds may be rapidly accessed by your apps.
Infinite scalability
Your database must increase in tandem with your user base. Cloud databases, such as MongoDB Atlas, are designed to provide flexible maximum scalability. With no application downtime, you can change the instance size, RAM, or storage capacity of your clusters.
Solid reliability
When you move your database development to the cloud, every dataset is constantly accessible. You do not have to be concerned about hardware problems or data loss anymore. Rest certain that there is a solid disaster recovery plan in place to keep your applications up and running at all times.
Database deployment
MongoDB Atlas
MongoDB Atlas is a multi-cloud database service created by the MongoDB team. Atlas makes it easy to deploy and manage databases while also giving you the flexibility you need to create scalable, high-performance global applications on the cloud providers of your choice. The free version provides developers with 512MB storage. Go ahead and create a database for your app on MongoDB Atlas.
Make certain to follow these instructions:
- Sign up for a MongoDB Atlas account.
- You will be presented with a dialogue window containing numerous form fields.
- Give your cluster a name, a cloud provider, and a region, as shown here:
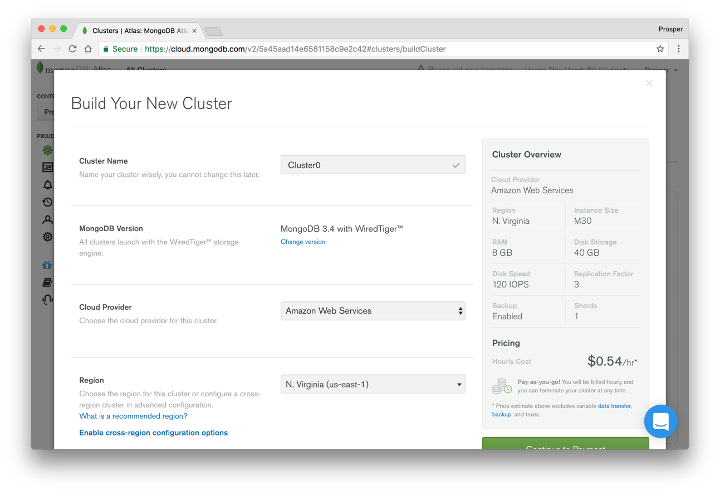
- Go to Instance size and scroll down. You may select a plan for your app here. Prototyping, proofs of concept, and demos are all possible with the free version.

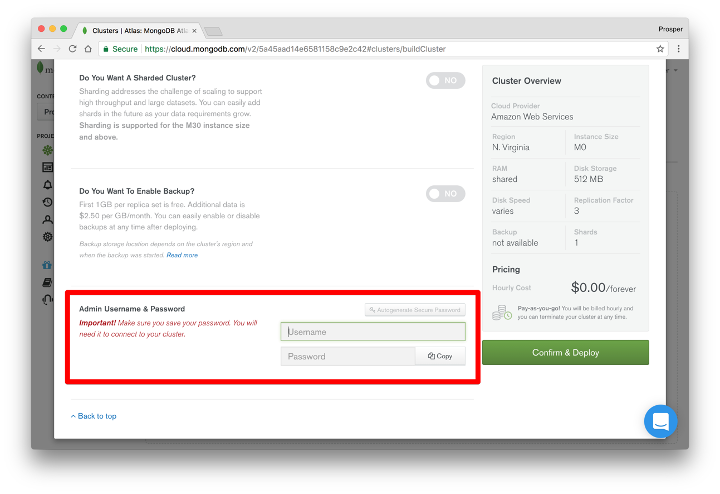
- At the bottom of the page, enter a username and password for your app to connect to your cluster.
- Select Confirm and Deploy from the drop-down menu. Confirm that you are not a robot, and your cluster will be generated in 7–10 minutes. It is worth noting that this is the longest time a service has taken to provision a new database cluster.
- When provisioning is complete, your dashboard should look like this:
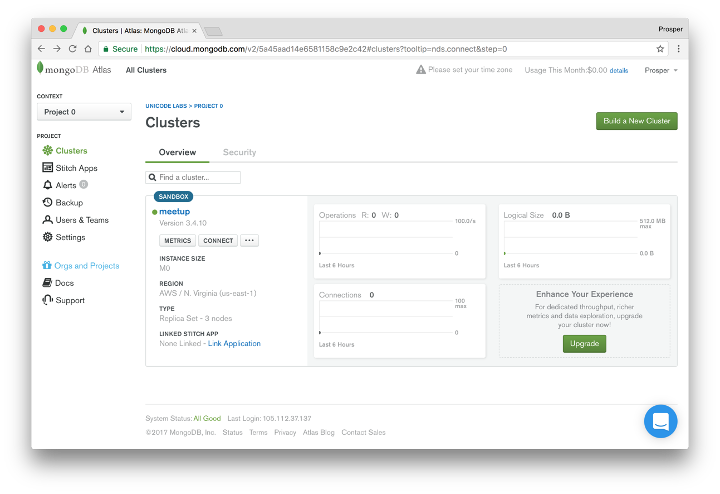
- The next step is to click the Connect button. You will be asked to whitelist an IP address, or you can simply allow access from anywhere. This feature is particularly good for security reasons.
- Choose the “connect your application” connection method. You will then be offered various Node versions. Use the latest option in the menu.
- Select the MongoDB driver appropriate for your use case and copy the respective URI connection string. You can grab the entire connection string from your own Mongo cluster, then update the database name and password in your own connection string.
Note: Replace test with the name of your database, else all your data will be stored in test database.’3
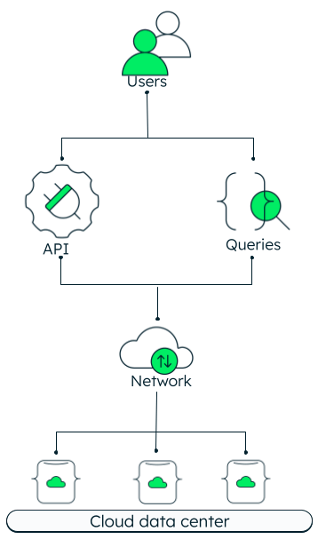
The application programming interface (API) allows software programs to communicate with each other, using a predefined set of commands.45 One programme can call another’s API to access its data or functionality. You use an API every time you use an app like Facebook, send an instant message, or check the weather on your phone. Think of an API like the waiter at a restaurant: the waiter takes your order (user input) and communicates with the chef (other API) to deliver your food (data/functionality).
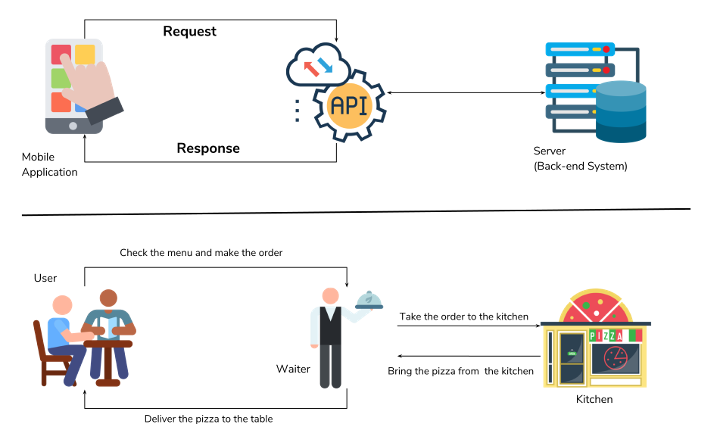
Here is an example of a real-world API. When looking for flights on the internet, you have a range of alternatives to pick from, including different cities, departure and return dates, and more. You can select a departure city and date, as well as a return city and date.
In this scenario, the travel service communicates with the airline's API. The API is the mechanism through which the online travel provider may request information from the airline's database to reserve seats, baggage options, and so on. The API then sends the airline's response to your request back to the online travel service, which displays the most up-to-date, relevant information.

API calls can be made on React using Axios or Fetch.
Axios
When developing online applications, there are many situations when you will want to consume and show data from an API. There are various approaches, but one of the most popular is to use Axios.
Axios is a popular library used to send asynchronous HTTP requests to REST endpoints. It is suitable for obtaining data during server-side rendering because it employs promises by default and runs on both the client and the server. Because it uses promises, you can use it in conjunction with async/await to create a clean and simple API. This library is extremely useful to perform CRUD operations.
- Axios is used to communicate with the backend. It supports the Promise API native to JS ES6.
- We use Axios make API requests in our application. We get the data in Return, then use this data in our project.46
Axios is a third-party API. Although it is simple to use, it does not come as a native JavaScript API, so we need to manually import it into our project.47
How you install Axios differs depending on which frontend framework you use.
Installing Axios for React
Before you install Axios, your React project app should be ready to install this library. Use the following steps to create an app and install Axios.
-
Use this command to create a new app:
npx create-react-app new_app
-
Enter in the directory created in the first step:
cd new_app
-
Install the Axios library using the following command:
npm install --save axios
-
Once this is done, you can start the server using the following command:46
npm start
Simple POST request with a JSON body using Axios
This example sends an article object to the /api/articles route, then assigns the id from the response to the React component state property articleId so it can be displayed in the component render() method.
componentDidMount() {
  // Simple POST request with a JSON body using axios
  const article = { title: 'React POST Request Example' };

  axios.post('https://reqres.in/api/articles', article)
    .then(response => this.setState({ articleId: response.data.id }));
}
POST request using Axios with React hooks
This version sends the same POST request from React using Axios, but uses React hooks from a function component, instead of lifecycle methods from a traditional React class component. The useEffect React hook replaces the componentDidMount() lifecycle method to make the HTTP POST request when the component loads.
The second parameter to the useEffect React hook is an array of dependencies that determines when the hook is run. Passing an empty array causes the hook to only run once when the component first loads, like the componentDidMount() lifecycle method in a class component.
useEffect(() => {
  // POST request using axios inside useEffect React hook
  const article = { title: 'React Hooks POST Request Example' };

  axios.post('https://reqres.in/api/articles', article)
    .then(response => setArticleId(response.data.id));

  // empty dependency array means this effect will only run once (like componentDidMount in classes)
}, []);
POST request using Axios with async/await
This sends the same POST request from React using Axios, but uses an async function and the await JavaScript expression to wait for the promises to return (instead of using the promise then() method as previous).111
async componentDidMount() {
  // POST request using axios with async/await
  const article = { title: 'React POST Request Example' };
  const response = await axios.post('https://reqres.in/api/articles', article);

  this.setState({ articleId: response.data.id });
}
Installing Axios for Vue
Enter the following command line to install Axios.
npm install --save axios
Then add method in main.js so that Axios can be used globally.
import Vue from 'vue';
import App from './App';
import axios from 'axios';
Populating data with a GET request
You can use Axios directly in your components to fetch data from a method or lifecycle hook:
<template>
  <div>
    <ul v-if="posts && posts.length">
      <li v-for="post of posts">
        <p><strong>{{post.title}}</strong></p>
        <p>{{post.body}}</p>
      </li>
    </ul>
    <ul v-if="errors && errors.length">
      <li v-for="error of errors">
        {{error.message}}
      </li>
    </ul>
  </div>
</template>
<script>
  import axios from 'axios';

  export default {
    data() {
      return {
        posts: [],
        errors: [],
      }
    },

    // Fetches posts when the component is created.
    created() {
      axios.get('http://jsonplaceholder.typicode.com/posts')
        .then(response => {
          // JSON responses are automatically parsed.
          this.posts = response.data;
        })
        .catch(e => {
          this.errors.push(e);
        });
    }
  }
</script>
The async/await version would look like this:
<!-- Template code -->
<script>
  import axios from 'axios';

  export default {
    data() {
      return {
        posts: [],
        errors: [],
      }
    },

    // Fetches posts when the component is created
    async created() {
      try {
        const response = await axios.get('http://jsonplaceholder.typicode.com/posts');
        this.posts = response.data;
      } catch(e) {
        this.errors.push(e);
      }
    },
  }
</script>
This code will retrieve "posts" from JSONPlaceholder and populate an unordered list with the "posts". Any "errors" encountered will appear in a separate unordered list.
Next, we will use axios.post() to make a POST request.
Pushing data with a POST request
You can use Axios to send POST, PUT, PATCH, and DELETE requests.
<template>
  <div>
    <input v-type="text" v-model="postBody" @change="postPost()" />
    <ul v-if="errors && errors.length">
      <li v-for="error of errors">
        {{error.message}}
      </li>
    </ul>
  </div>
</template>
<script>
  import axios from 'axios';

  export default {
    data() {
      return {
        postBody: '',
        errors: []
      }
    },
    methods: {
      // Pushes posts to the server when called
      postPost() {
        axios.post('http://jsonplaceholder.typicode.com/posts', {
          body: this.postBody
        })
          .then(response => {})
          .catch(e => {
            this.errors.push(e)
          });
      }
    },
  }
</script>
The async/await version would look like this:
<!-- Template code -->
<script>
  import axios from 'axios';

  export default {
    data() {
      return {
        postBody: '',
        errors: [],
      }
    },
    methods: {
      // Pushes posts to the server when called
      async postPost() {
        try {
          await axios.post('http://jsonplaceholder.typicode.com/posts', {
            body: this.postBody,
          });
        } catch(e) {
          this.errors.push(e);
        }
      }
    }
  }
</script>
Creating a common base instance
A frequently overlooked but useful capability of Axios is the ability to create a base instance that allows you to share a common base URL and configuration across all calls to the instance. This comes in handy if all your calls are to a particular server, or need to share headers, such as an Authorization header:
import axios from 'axios';

export const HTTP = axios.create({
  baseURL: 'http://jsonplaceholder.typicode.com/',
  headers: {
    Authorization: 'Bearer {token}',
  },
});
You can now use HTTP in your component:
<template>
  <div>
    <ul v-if="posts && posts.length">
      <li v-for="post of posts">
        <p><strong>{{post.title}}</strong></p>
        <p>{{post.body}}</p>
      </li>
    </ul>
    <ul v-if="errors && errors.length">
      <li v-for="error of errors">
        {{error.message}}
      </li>
    </ul>
  </div>
</template>
<script>
  import { HTTP } from './http-common';

  export default {
    data() {
      return {
        posts: [],
        errors: []
      }
    },
    created() {
      HTTP.get('posts')
        .then(response => {
          this.posts = response.data
        })
        .catch(e => {
          this.errors.push(e)
        });
    }
  }
</script>
Now that you know how to populate and push data, jump to 1:04 in the following video for a step-by-step guide to Vue and Axios.64
Fetch
Fetch is JavaScript’s built-in API used to retrieve server responses or API endpoints. This API provides the fetch() method that retrieves the requests’ responses. Unlike the Axios API, handling JSON data with fetch() calls for a double-process.
- The first step of this process involves making an actual request by passing a ‘path’ or an ‘URL’ (from where the resource is to be fetched) to
fetch()as a compulsory argument. - The second step is to call the
json()method on the response that is returned as a promise from the initial request. This converts the data response into JSON format before it is displayed to the browser.48
We recommend using Axios instead of Fetch for React. Continue on to learn some basic HTTP requests for Vue.
Application Programming Interface (API) is a software middleman that allows two apps to communicate with one another. You use an API every time you use an app like Facebook, send an instant message, or check the weather on your phone.
Fetch for Vue
Look at the following examples on how to send HTTP GET requests from Vue to a backend API using fetch().
Simple GET request using fetch
This sends an HTTP GET request from Vue to the npm API to search for all Vue packages using the query "q=vue", then assigns the total returned in the response to the component data property totalVuePackages so it can be displayed in the component template.
created() {
  // Simple GET request using fetch
  fetch('https://api.npms.io/v2/search?q=vue')
    .then(response => response.json())
    .then(data => (this.totalVuePackages = data.total));
}
GET request using fetch with async/await
This version sends the same GET request from Vue using fetch, but uses an async function and the await JavaScript expression to wait for the promises to return (instead of using the promise created() method as in the example preceding).
async created() {
  // GET request using fetch with async/await
  const response = await fetch('https://api.npms.io/v2/search?q=vue');
  const data = await response.json();

  this.totalVuePackages = data.total;
}
GET request using fetch with set HTTP headers
This sends the same GET request again from Vue using fetch, with the HTTP Content-Type header set to application/json.
created() {
  // GET request using fetch with set headers
  const headers = { 'Content-Type': 'application/json' };
  fetch('https://api.npms.io/v2/search?q=vue', { headers })
    .then(response => response.json())
    .then(data => (this.totalVuePackages = data.total));
}
Case study: SnapShot
SnapShot is gallery app created using React hooks, Context API, and React Router. The routes were set up for four default pages and a search page. The images are displayed using the Flickr API, and Axios to fetch data.49
See the project on GitHub. Read through the case study and play around with the demo. Have a go at navigating between the default pages, and use the search function to look for other types of images.
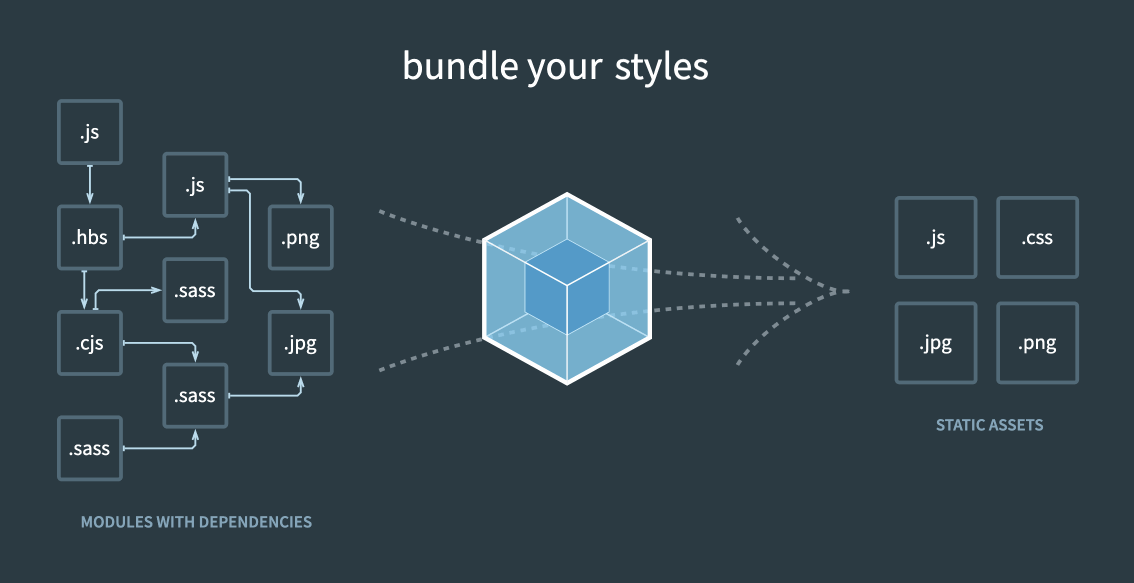
Webpack is a static module bundler for modern JavaScript applications. When webpack processes your application, it internally builds a dependency graph from one or more entry points. Then it combines every module your project needs into one or more bundles, which are static assets to serve your content from.20
Boilerplates or ready-made templates are essential to start coding your prototype with your chosen framework. This requires downloading/adding several modules/libraries (dependencies). Webpack builds boilerplates/templates by bundling these dependencies through an automated process.21
Since version 4.0.0, webpack does not require a configuration file to bundle your project. It is used in both React and Vue “under the hood,” so if you are using one of these frameworks, manual configuration is not necessary. However, a basic understanding of the key concepts following will enrich your learning, and be needed if you decide to customise the default presets to better suit your needs.
Entry points
An entry point indicates which module webpack should use to begin building out its internal dependency graph. Webpack will assess which other modules and libraries that entry point depends on (directly and indirectly). By default, its value is './src/index.js', but you can specify a different (or multiple) entry point/s by setting an entry property in the configuration. For example:
module.exports = {
  entry: './path/to/my/entry/file.js',
};
Output
The output property tells webpack where to emit the bundles it creates and how to name these files. It defaults to ./dist/main.js for the main output file, and the ./dist folder for any other generated file.
You can configure this part of the process by specifying an output field in your configuration:
const path = require('path');

module.exports = {
  entry: './path/to/my/entry/file.js',
  output: {
    path: path.resolve(__dirname, 'dist'),
    filename: 'my-first-webpack.bundle.js',
  },
};
In this example, we use the output.filename and the output.path properties to tell webpack the name of our bundle and where we want it to be emitted to. The path module being imported at the top is a core Node.js module that gets used to manipulate file paths.
Loaders
Out of the box, webpack only understands JavaScript and JSON files. Loaders allow webpack to process other types of files, and convert them into valid modules that can be consumed by your application, and added to the dependency graph.
At a high level, loaders have two properties in your webpack configuration:
- The test property identifies which file or files should be transformed.
- The use property indicates which loader should be used to do the transforming.
const path = require('path');

module.exports = {
  module: {
    rules: [
      {
        test: /\.txt$/,
        use: 'raw-loader',
      },
    ],
  },
  output: {
    filename: 'my-first-webpack.bundle.js',
  },
};
This configuration has defined a rules property for a single module with two required properties: test and use. This tells webpack's compiler when it comes across a path that resolves to a '.txt' file inside of a require()/import statement, to use the raw-loader to transform it before it gets added to the bundle.
Plugins
While loaders are used to transform certain types of modules, plugins can be leveraged to perform a wider range of tasks like bundle optimisation, asset management, and injection of environment variables.
To use a plugin, you need to require() it and add it to the plugins array. Most plugins are customisable. Since you can use a plugin multiple times in a configuration for different purposes, you need to create an instance of it by calling it with the new operator.
const HtmlWebpackPlugin = require('html-webpack-plugin');
const webpack = require('webpack'); // to access built-in plugins

module.exports = {
  module: {
    rules: [
      {
        test: /\.txt$/,
        use: 'raw-loader',
      },
    ],
  },
  plugins: [
    new HtmlWebpackPlugin({
      template: './src/index.html',
    }),
  ],
};
In this example, the html-webpack-plugin generates an HTML file for your application, and automatically injects all your generated bundles into this file.
Mode
By setting the mode parameter to either development, production, or none, you can enable webpack's built-in optimisations that correspond to each environment. The default value is production.
module.exports = {
  mode: 'production',
};
Browser compatibility
Webpack supports all browsers that are ES5-compliant (IE8 and below are not supported). It needs Promise for import() and require.ensure(). If you want to support older browsers, you will need to load a polyfill before using these expressions.
Environment
Webpack 5 runs on Node.js version 10.13.0+.20
Knowledge check
Connecting a MongoDB database with Node.js
Now that you have learned about databases and servers, have a go at putting it into practice.
Your task is to connect a MongoDB database from a Node.js script and retrieve a list of databases.
Before you start:
- Make sure you have a version of Node.js that is supported.
- Node 4.x or higher is required for the current version of MongoDB Node.js Driver.
- A MongoDB database is required.
- Atlas, MongoDB's fully-managed database-as-a-service, is the simplest way to get started with MongoDB.
If you get stuck, leave a question/comment about it in the forum. Then, revisit the topic and see if you can troubleshoot the issue on your own.
Once you have successfully managed to connect your database and server, jump back into the forum. Tell your peers how you solved the issue, or try helping someone out by answering their question.