
Photography helps you capture anything you feel is important to remember. One photograph is powerful enough to not only remind you of an event or detail, but can bring you right back to the feelings, sounds, and even smells of the moment.
A great photo can capture the essence of many feelings including love, happiness, serenity, and movements without needing to use any typography.
If you have ever taken photos that appear too light and bright or conversely too dark, the photo was likely not well exposed.
Photos that are dark and not bright enough, are referred to as underexposed. It is difficult to make out details in underexposed photos because it is too dark. Not enough light was allowed to get to the sensor.
Photos that have a blown out look and are too bright are referred to as overexposed. It is difficult to make out details in these photos because it is too bright. Too much light was allowed to get to the sensor.
Compare the following three photos. The first is underexposed, the second is overexposed, and the third is well (or “correctly”) exposed.
5 Mistakes to Avoid with Product Photography by Andrea Mendoza 2020 Copyright © PICSERA Inc.
Exposure is the process of allowing light to reach the camera’s sensor or with film cameras, the film surface.
There are three main factors that affect exposure: Shutter speed, Aperture and ISO.
Aperture
Aperture = depth of field.
Aperture is the size of the opening inside your lens. It controls how much light is allowed to reach the sensor when the shutter is open. They are measured as F-stops, where the letter F is followed by a number. The number will dictate whether the aperture size allows more or less exposure.
The lower the F stop, the brighter the picture will be as it gives more exposure, whereas the higher the F stop will show less exposure, therefore, making the image darker.
The table below will be able to provide you with a clearer understanding of the relationship between F-stop, aperture, and exposure and how they work together.

A small aperture, for example f/22, will allow less light into your camera. So, you will need to use a slower shutter speed, to ensure your photo is not too dark or underexposed.
A large aperture, for example f/2.8, will allow more light into your camera. So, you will need to use a faster shutter speed, to make sure your shot is not too light or overexposed.
Apertures also affect the depth of field. Smaller apertures give a wider focal depth or depth of field, where you can make out a lot of detail in the shot. Conversely, a larger aperture results in a shallow depth of field where the subject is in focus, but the rest of the scene is not. Compare the following two images.

Source: The Complete Guide to Ecommerce Product Photography. https://www.shopify.com.au/blog/ecommerce-photography
The image on the left has a large aperture of f/2.8 and the image on the right has a small aperture of f/11.
Remember, a bigger F number is a smaller aperture and results in a greater depth of field.
A smaller F number is a bigger aperture and results in a shallow depth of field.
Image usability
As the aperture decreases (ƒ/ stop number increases), the depth of field increases. This can compromise overall image resolution, flaunting a softened look through diffraction (the bending of light). This can have a positive effect on an image however it can also impact the usability of an image, especially when viewed on large screens or banners.
Wide apertures have smaller numbers (such as ƒ/ 1 - ƒ/ 5.6). The wider the aperture, the more light is permitted through the lens and onto the sensor. These lenses perform well in low light scenarios however much less depth of field is available than with small apertures.

Shutter speed
Shutter speed = Motion blur.
The term shutter speed refers to the length of time the shutter is open, allowing light onto the camera sensor. Shutter speeds typically available are 1/500, 1/250, 1/125, 1/60, 1/30, 1/15, and 1/8. These figures indicate that, for example, a shutter speed of 1/500 implies the shutter is open for one 500th of a second.
Some cameras can extend to 1/8000th of a second!
Typically, the longest shutter speed available is 30 seconds, this could be extended further using a remote trigger if required.
Shutter speeds can be manipulated to capture images within different lighting situations as well as capture fast-moving objects with either crisp detail or induce a creative effect such as a motion blur type effect.

As an example, the water drops appear sharply focussed even though they are moving quickly.
Freezing movement with flash
The other method of freezing a subject's motion is to use a fast flash. In a darker environment, less ambient light will reflect from the subject so keeping the shutter open for a moderate amount of time will not cause blur. During the time the shutter is open, a short flash can be used to provide enough reflected light for a well-exposed image. As an example, the burst of a balloon can be captured with a fast flash.

Implying movement with second or rear curtain flash sync
Freezing motion with flash in a darkened room tends to give a well-exposed subject with dark surroundings. If you require the background to be exposed correctly, this can be achieved with additional flash units directed at the background only. Secondary flash units can be set to detect the initial flash from the camera and then follow a programmed sequence to light the background.

Panning a moving subject
This method captures a moving subject by following or panning its movement in the viewfinder. The subject remains in focus when the photograph is taken as there is no relative motion, and the background becomes blurred. This effect is stylistic and may give the result you want to achieve. No special camera settings are required but ensure that focusing and metering are correct for the moving subject. As an example, the movement of this car is obvious as the camera pans its motion.

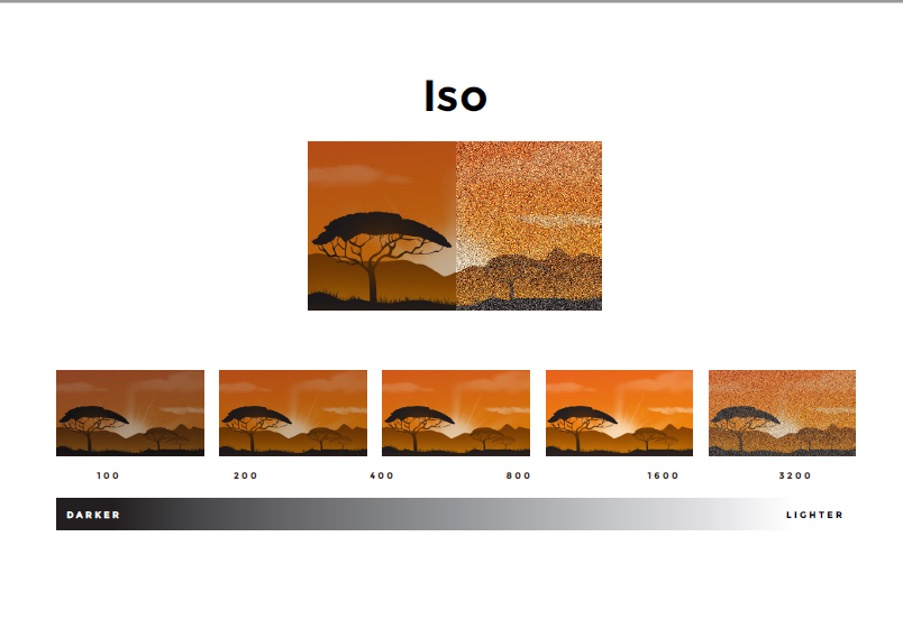
ISO

ISO = Grain + light sensitivity.
ISO stands for International Organisation for Standardisation, however, in the area of photography, think of ISO as the camera's sensitivity to light. This is the third variable within the exposure triangle, working alongside shutter speed and aperture to achieve the overall brightness of the image. ISO values are typically denoted as a number such as ISO 100, 200, 400, 800, 1600, 3200, with powerful cameras extending to ISO 6400, ISO 12800, ISO 25600 and beyond.
Some digital cameras can offer the availability of an ISO range with the menu options, allowing the camera to determine the optimal ISO based on the manual manipulation of shutter speed and aperture.
The larger the ISO the brighter the image. However, during low light situations, increasing the ISO can provide some benefit however risks the element of 'noise' in the image, displaying as 'snow' in the image.

Exposure triangle
Knowing how each of the three variables within the exposure triangle works independently and alongside its two counterparts is essential to ensure sound camera knowledge and desired photographic output to meet the needs of any brief.
If the shutter speed is the most important thing in your shot, consider using shutter priority mode (TV) and letting the camera work out the aperture and ISO settings.
If the aperture is the most important thing, use aperture priority mode (AV) and let the camera figure out the shutter speed and ISO setting.
In the following video, the photographer explains the relationship between aperture, shutter speed, and ISO.
When learning how these variables work, play, and explore all ranges and combinations to see what images can result using different settings.
The outcomes can be seen either through the viewfinder of the camera when you preview the image on the camera or during the post-production or editing phase when viewed on a larger screen.
Natural and artificial light sources each have benefits – and some disadvantages.

Natural
Natural lighting is produced by the sun or moon and is free. It can be easy to use when you are starting out and have limited gear. Natural light can be manipulated with diffusers and reflectors. However, natural light can change very quickly with time of day and weather. It can also be very unpredictable.
Natural lighting is good for street and documentary photography, and times when you do not have the luxury of setting up controlled lighting.

Artificial
Artificial lighting is produced by lamps, flash units, and other artificial sources. It is easy to control and available whenever you want it. Artificial lighting can mimic natural light if you have the right equipment. With the exception of inbuilt flash, artificial lighting is not free and requires kit which is not always very portable.
Artificial lighting is good for product and fashion photography, or when natural light is not available.
Artificial lighting can be continuous or strobe (flash) lighting.
Continuous lighting
Continuous lighting is constant. Once they are turned on, they stay turned on and illuminate the area until turned off. Because the light is constant, you can see exactly how the light affects the image. Being able to see the light continuously means you can make adjustments easily.
Strobe lighting
Strobe lighting works in bursts, such as the flash on your camera. You can only see how the light affects the image in the short period that the strobe lighting bursts on. Some strobe lights have modelling lights which are continuous and allow you to preview the light, but these are weaker than the actual strobe light and expensive.
Strobe lights are generally more powerful than continuous lights. This is useful if you need to overpower ambient light or are trying to make dramatic effects. In outdoor photography, strobe lighting can help overpower harsh sunlight so the sky is not overexposed and the subject is well lit.
Lighting setup
High key and low key
Lighting can be high key or low key, and everything in between. In the following video Lindsay Adler, a fashion and portrait photographer, explains the difference between the two.
High key and low key lighting create different moods.
High key
Associated with a lot of whites and light tones. Everything is brighter. High key images have an optimistic, youthful, happy mood and are light and airy.
Low key
Associated with darker tones, shadows, and deep blacks. Images are dramatic, mysterious, and moody.
Three-point lighting
While you could use any number of lights in photography, three-point lighting is considered standard. Each light in a three-point lighting set up has a distinct role: Key light, fill light, and backlight. If you have fewer than three lights available, understanding three-point lighting will allow you to prioritise and manipulate the lights you do have.

Key light
Primary and brightest light source. The key light provides the overall exposure. It is usually positioned off to the side of the subject, creating shadow on the opposite side.
Fill light
Mirrors the key light and fills in shadow, illuminating details. This light is less bright than the key light. The difference in brightness between the key and fill lights can be manipulated to impact the feel and mood of a shot. The fill light is not necessarily a light. It could be a reflector, bounce card, or anything else that bounces light back onto the subject.
Backlight
Also known as the rim light or hair light. This light source shines on the subject from behind. It creates depth in the image by creating a rim of light around the subject, differentiating them from the background./p>
Watch the following video to see how the key light, fill light, and backlight work in practice.
Photography helps you capture anything you feel is important to remember. It can transport a viewer to a place they have never been or make them feel intense emotions. A great photograph is powerful enough to not only remind the viewer of an event or detail but can bring them right back to the feelings, sounds, and even smells of the moment.
Composition is often the difference between an okay photo and a great photo.
Framing
Framing shots allows you to control what information the viewer receives and how they interpret what they see. These two photos are examples of good framing.
Framing can be used to:
- Create drama and impact.
- Balance the hierarchy and aesthetics of your image
- Lead the eye towards the main focal point
- Give the sense of depth and layers.
Rule of thirds
The rule of thirds refers to a composition which is roughly divided into 3, horizontally and/or vertically. Place your subject in the left or right third of the shot, where the horizontal and vertical lines intersect, leaving the remaining two thirds open.

We have a natural tendency to want to place the main subject in the middle however placing it off centre using the rule of thirds will lead to a more attractive composition.
Other composition guides
As well as the rule of thirds, it is worth experimenting with other composition guidelines such as the phi grid, symmetry, golden or Fibonacci spiral, and golden triangles.
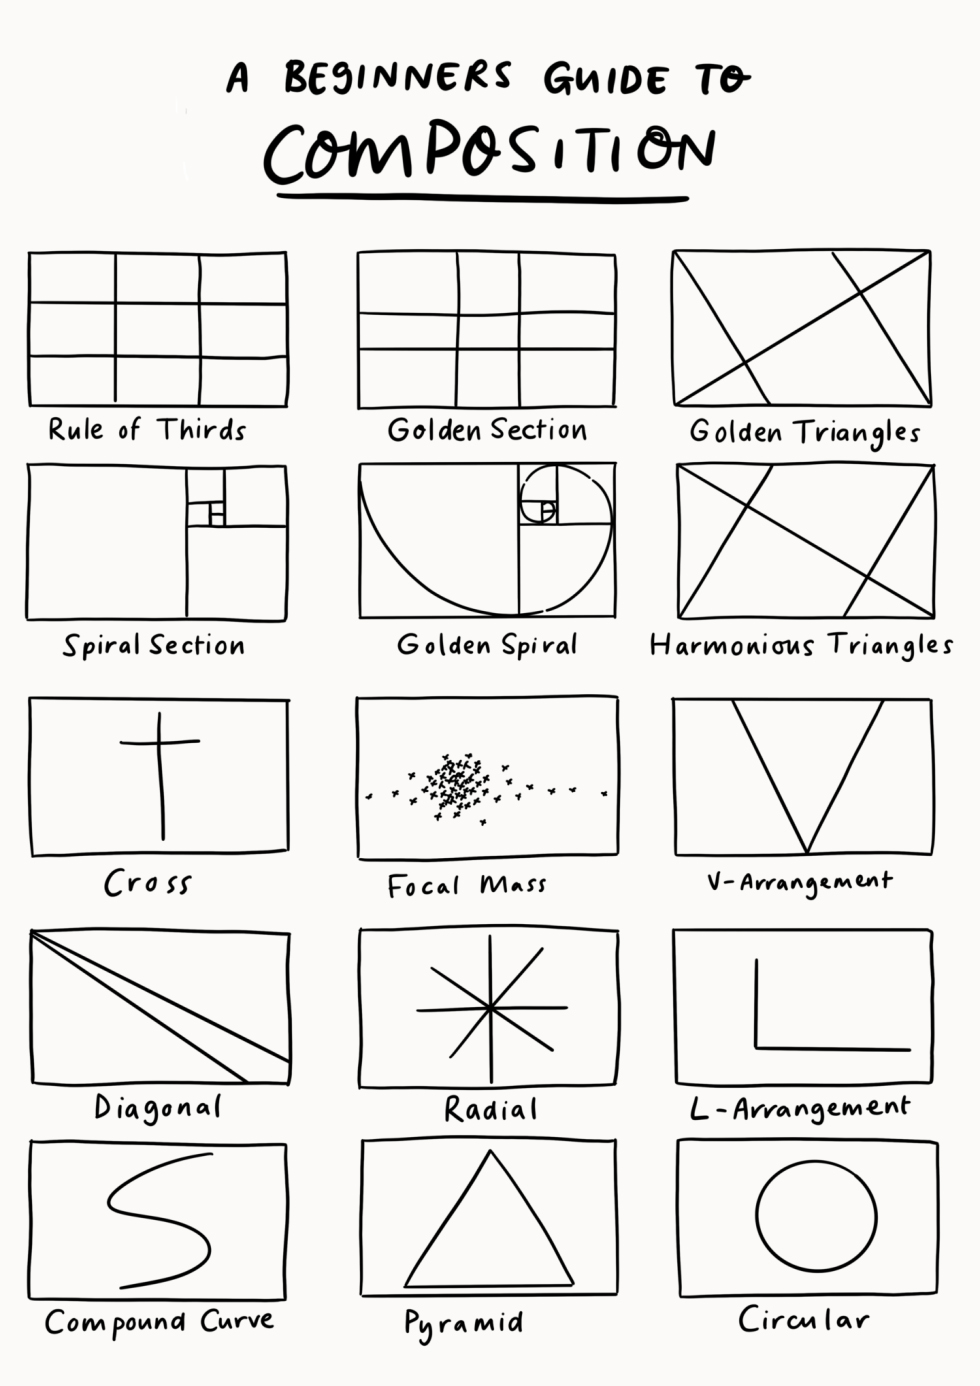
From A Beginners Guide to Composition by Emma Cownie, 2020, https://emmafcownie.com/2020/02/02/the-art-of-the-large-landscape-painting/
Watch the following video for an overview with examples of the golden spiral in photography. The photographer highlights other composition guides and how they compare with the golden spiral.
Focal point
The focal point is the part of the image that you want the audience to focus on. A central focal point can seem very formal whereas an asymmetrical focal point usually adds interest to the image.
The audiences’ eyes generally need to focus on one area in the photo - the focal point. Without a focal point, you may find they simply glance at your shots with minimal interest before they move on. A focal point can draw the viewer into the image.
Natural lines and shapes can help guide the audience to a focal point. In the following image, the book and the blurred background all lead to one central focal point.
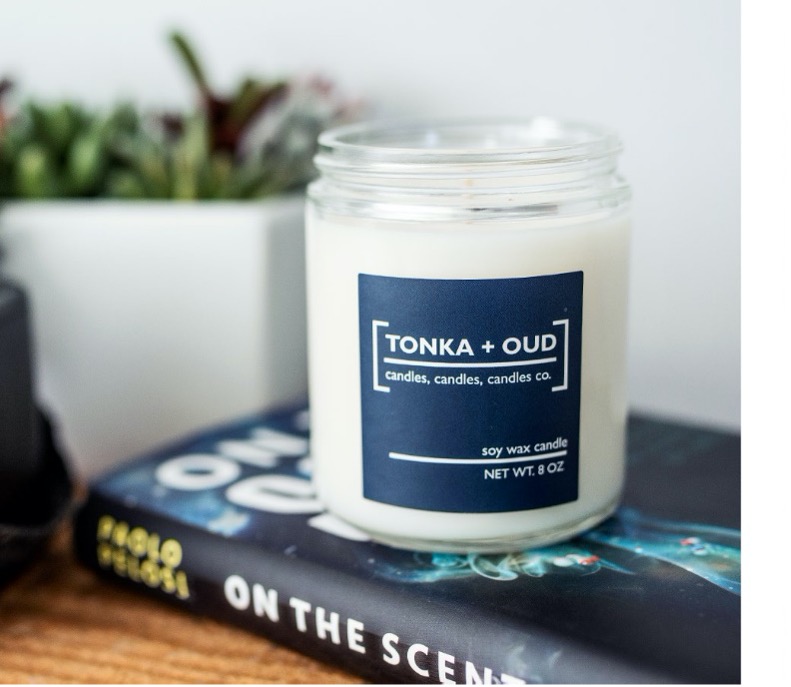
Product photography: focusing and composing your shot by candlescience © 2022, CandleScience Inc. All Rights Reserved
Depth of field
We previously looked at how aperture not only affects exposure, but also depth of field. Manipulating the depth of field is another useful composition tool. Depth of field is an important creative tool used to define subjects within a photograph by choosing what to show sharply and in detail, and what to hide or obscure.
- A wide depth of field, achieved with a small aperture, results in an image in focus from foreground to background. A lot of detail is visible.
- A shallow (or narrow) depth of field, achieved with a large aperture, results in only part of the image being in focus.
Landscape photography often uses a wide depth of field, whereas macro photography, such as the close up of the butterfly, uses a shallow depth of field.
Orientation
When composing your images, you also need to consider orientation. Should the photo be oriented portrait or landscape? The default orientation using a DSLR camera is landscape, and smartphone cameras default to portrait.
Usually, horizontal (landscape) orientation is used for landscape photography, and vertical (portrait) orientation is used for portrait photography - hence the names. However, this is not always the case and image composition is worth considering to maximise impact of a photo and ensure it is fit for the application it will be used in.
It is useful to identify where the strongest line is that you want to emphasise.

It is becoming increasingly important to consider the application and format the image will be used in. For example, if you are posting to Instagram, it is preferable to shoot in portrait format.
Of course, the aspect ratio and orientation can always be changed post-shoot with photo editing software.
Photo time!
Exploring Shutter Speed
There is one easy way we can explore shutter speed and that is to practice how to freeze and show motion.
Note: Look at the topic "Features of standard digital cameras shutter speed" to refresh your memory.
Set your camera on shutter priority mode (S or Tv) which will ensure your camera focuses on this technique.
Using your camera take 1 photo of an image that demonstrates the freezing concept.
An example may include an action shot of someone on a skateboard jumping
