What are arrays for?
We can wrap up variables of the same type into one variable to make our lives easier. For example, if we needed to move 50 variables of the same type it would be easier to refer to and move them as a group, rather than having to refer to and move them one by one.
Imagine moving 20 basketballs from A to B, why not put them in a cage on wheels and move them from A to B all in one go? Much easier! Much faster! Much less likely to make mistakes, forget one, or drop one at C instead of B by mistake.
So, we give the group of variables a name (array name) and use that to look up the group (array).
We introduced you briefly to arrays in CS102 Developmental Principles I. Let’s recap quickly.
Single-dimensional array
A single-dimensional array is a list of data or variables of the same type.
The array points to the first piece of data in the list.
Example: Imagine a list (one column) of product names. We might group these together into a single array and name it ‘products’.
| Skirt |
| Shorts |
| Shirt |
| Blouse |
| Belt |
| Socks |
| Sweater |
| Scarf |
| Hat |
Memory access violation
Before we go any further, it is important to note that the first item or ‘element’ in an array is number 0, not 1. This is important because if you accidentally try to change something outside of your array in production, you may not even realise that you’ve changed data outside of the array by mistake. For example, if your array has 25 items, they will go from 0 to 24. Accessing 25 will take you to data outside of this array. This is called a memory access violation. You might get a notification/warning in development, but you probably won’t in production. So, you’ll need to be careful about this.
Creating a single-dimensional array
Creating a single-dimensional array is pretty simple. You begin by allocating memory space for your variables and then you assign the data to the indexes. For this example, let’s use something simple like integers. Each integer takes 4 bytes of memory. Let’s say we have 20 integers we want to include in our array.
Step one - Allocate 80 bytes of memory for this array (20 integers x 4 bytes each).
int main()
{
  int singlearray[20];
}
intis short for "integers" and indicates the variable's type.singlearrayis the name of the array.20indicates how many integers in the array.
This code will allocate 80 bytes of memory, for 20 new integers (integers take 4 bytes each).
Step Two – Set the variables in the array
Now, you could set them one by one, if they are all different, like this.
int main()
{
  int singlearray[20];
  singlearray[13] = 4;
}
Just looking at the new (second) line of code here, you will see:
singlearrayis the name of the array.13is the index, or number of the variable in the array that is being changed.4is that value that is being stored in the 13th index ofsinglearray.
You might need to repeat that 20 times to set the integer for each index. But the beauty of them being in an array means that if you need to make the same change to all of them, you can do it all at once.
You can use a ‘for loop’ to go through and change all of them at once. Let’s change them all to the number 2.
int main()
{
  for(int i = 0; i < 20; int++)
    singlearray[i] = 2;
}
- The
iis short for "index". This shows that we want to start editing at index position0(the position of the first variable). - The
i < 20;expression shows that we want to edit all variables that are at index positions smaller than20. This does not mean we are leaving out the 20th variable, as you will remember the first one was at index0, so that means the 20th variable is at index19, which is less than20, so it will be included. - The
singlearray[i] = 2;expression shows that in the array calledsinglearraythe indexes specified should be equal to2.
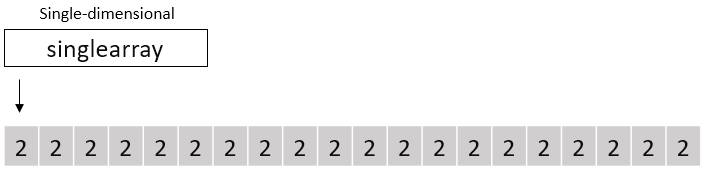
Now all 20 variables in your single-dimensional array hold the same value — the integer 2.
Here is another way of looking at it, here is a diagram of a single-dimensional array, this is where most of the memory is used as it contains data.
In the following example arrays are used in a program to store student marks. Five student grades will be stored:
// C++ program to store the marks of 5 students in an array and displaying in
// the screen loops
#include <stdio>
#using namespace std

int main()
{
  // declare the array
  float marks[5] = { 35, 55.5, 64, 78, 56 };
  int i;
  for(i = 0; i < 5; i++) {
    // displays the marks in the same order as it is stored one below the other.
    cout << marks[i] << endl;
  }
}
Two-dimensional array
A two-dimensional array is an array of arrays. It is a table of rows and columns. They hold data that belong to the same entity (For example – student, item in a super market, customer in a bank etc)
A 2D array points to the list of pointers pointing to the first piece of data in each of the lists.
Example: Imagine a column of products with their prices in the next column. ‘Products’ would be an array, and ‘prices’ would be an array, and an array that points to both arrays (because they are related) might be called ‘ProductInfo’ and would be a 2D array.
| Skirt | 25 |
| Shorts | 30 |
| Shirt | 35 |
| Blouse | 27 |
| Belt | 20 |
| Socks | 10 |
| Sweater | 40 |
| Scarf | 17 |
| Hat | 21 |
Creating a two-dimensional array
int main()
{
  int** 2darraya = new int*[2];
}
int**is short for "integer pointers" and indicates the type of variables to be stored in this array.2darrayais the name of the array.- The
new int*[2];expression creates a new array, of integer pointers. - The
2indicates we want to point to two arrays, so we will need two integer pointers (int*).
Here is a diagram of this two-dimensional array, these don’t take much memory as they only contain pointers. You can see the first single-dimensional array is still there, along with another single-dimensional array, and the 2D array is pointing to both single arrays. It is an array of arrays.
The following coding segment example illustrates a 2 dimensional array with a matrix:
...
...
int a[2][3] = {{1, -3, 2}, {3, 0, 4}};
...
int i, j;
for(i = 0; i < 2; i++) {
  for(j = 0; j < 3 j++) {
    cout << a[i][j] << "\t";
  }
  cout << "\n";
}
The resultant output will look like this:
"1   -3.   2
1.   0.   4"
Here is another example of a simple program that illustrates the printing of tow-dimensional arrays/matrices in C++:
// C++ program to print the elements of a two-dimensional array
#include <iostream>
#using namespace std

int main()
{
  // an array with 3 rows and 2 columns.
  int array [3][2] = {{0, 2}, {1, 3}, {9, 5}};
  // output each array element's value.
  for(int i = 0; i < 3; i++) {
    for(int j = 0; j < 2; j++) {
      cout << "Element at array[" << i << "][" << j << "]: ";
      cout << array[j][j] << endl;
    }
  }
  return 0;
}
This will return the following output:
"Element at array[0][0]: 0"
"Element at array[0][1]: 2"
"Element at array[1][0]: 1"
"Element at array[1][1]: 3"
"Element at array[2][0]: 9"
"Element at array[2][1]: 5"
Multi-dimensional array
A multi-dimensional array is an array of arrays of arrays.
A multi-dimensional array points to the first pointer in a list of pointers that point to the first piece of data in each of the lists.
Example: Imagine a cube of data tables, or simply adding the dimension of time to your data, for example, I want to know what the price (X) of product (Y) was at a given date and time (Z).

Creating a multi-dimensional array
To create a multi-dimensional array, follow the same method as used to create a two-dimensional array, only you’ll be adding a third or fourth or fifth dimension.
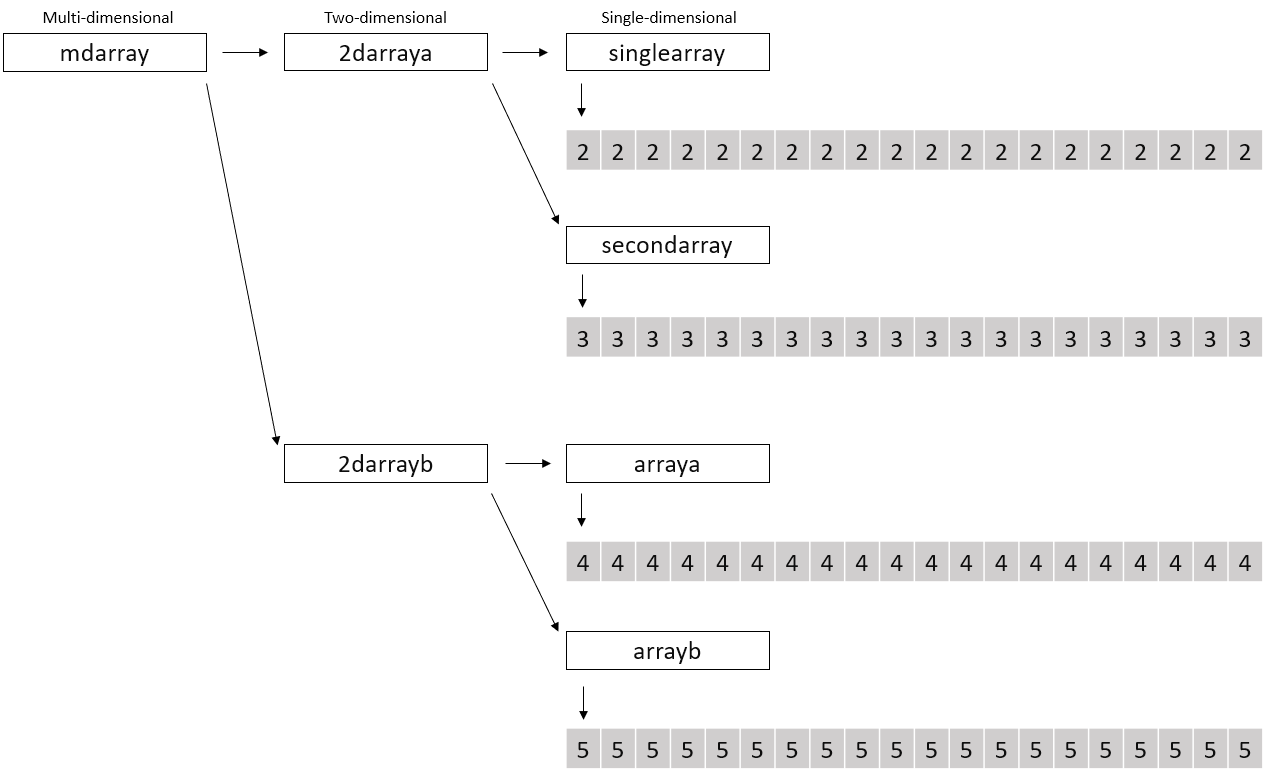
Here is a diagram of a multi-dimensional array, these also don’t take much memory as they only contain pointers. This MD array is pointing to two 2D arrays. It is an array of arrays of arrays.
Now that you understand multi-dimensional arrays have a look at this w3schools tutorial (w3schools, n.d.) which will show you how to create all dimensions and assign the variables all in one go, have a go at all the exercises in this tutorial to cement your learning as you go.
What is a Function?
A function in C++ refers to a block of code – a group of statements – that performs a specified task. Functions are given a name (relevant to the task) that takes input, processes it, and returns an output. The data passed through the function are called parameters. You can divide your code into different functions and it is suggested that this division should be related to the specific tasks it is written to perform.
They are the the building blocks of C++ and the place where all program activity occurs.
Each C++ program has at least one function, the main() function. This is primary - the entry point - function where your source code begins execution. All other functions are called or implemented through the main() function.
The main() Function:
The main function must be present in every C++ program. The compiler will raise an error, if you try to compile a program without main. The main() function does not have a declaration as it is built into the language, but it must a a return value (it cannot be void). If a return value is not specified the compiler supplies a value of zero.
Why use Functions?
Imagine that you are writing a program and you want a particular task, like displaying value from 1 to 10, to occur several times. To do that you have to write few lines of code and then repeat those lines every time you display the values.

You could copy and paste those lines of code in every part of the program you need those values to display. However, this can lead to a lengthy, difficult to maintain program, where if you needed to alter those particular lines of code, you would have to do so at every instance where those lines are written.
A better way of doing this is to write these lines inside a function and call that function every time you want to display values. The idea behind functions is to combine common tasks that are done repeatedly. Therefore, where you have different data/values (called parameters) to enter for a task, you will not need to write the same code again. You will simply call the function with those different parameters.
There benefits of using functions include:
- Each function groups related code together, therefore making it easier for programmers to understand code.
- Using functions eliminates code repetition.
- Functions facilitate code reuse. You can call the same function to perform a task at different sections of the program or even outside the program.
Types of Functions
There are two types of functions in C++ - Built-in Functions and User-defined Functions.
Built-in Functions
These are functions that are already present in C++; their definitions are already provided in the header files. The compiler picks the definition from header files and uses them in the program.

The C++ Standard Library provides a rich collection of functions for performing common mathematical calculations, string manipulations, character manipulations, input/output, error checking and many other useful operations. This makes the programmer's job easier, because these functions provide many of the capabilities programmers need. The C++ Standard Library includes:
- iostream
Contains function prototypes for C++ standard input and standard output functions. - cstring
Contains the definition of class string from the C++ standard library. - cstdlib
Contains various functions related to conversion between text and numbers, memory allocation, random numbers, and other utility functions. - ctime
Contains function prototypes related to date and time manipulations in C++ - cmath
Contains function prototypes for math library functions. - array; vector
Needed when creating arrays or vectors. - stacks
Required for creating stacks. - iomanip
Contains function prototypes for stream manipulators that format streams of data. - exceptions
Contains exception handling tools.
The following Repl uses the sqrt() function from the <cmath> library to output the square root of a number provided by the user. This example is from guru99using.com
User-defined Functions
C++ allows programmer to define their own function. A user-defined function groups code to perform a specific task and that group of code is given a name (identifier). User-defined functions can be categorised as:
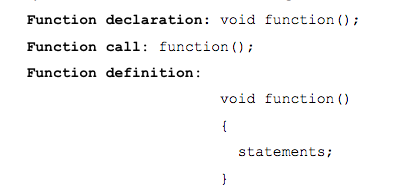
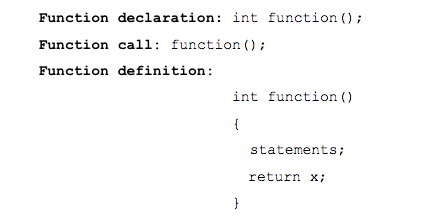
Functions with no argument or return value
When a function has no arguments, it does not receive any data from the calling function. Similarly, when it does not return a value, the calling function does not receive any data from the called function.
The syntax for these functions uses the following:
The following Repl includes a function called value that calculates the value of an investment after a period at a given interest rate.
Consider forking the preceding Repl and completing the following challenges.
-
Change the values for the variable year, period, amount and inrate.
-
Modify the code to allow the user to input the amount, term, and interest rate for an investment.
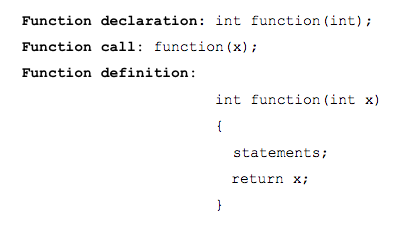
Functions with argument but no return value
When a function has arguments, it receives any data from the calling function, but it returns no values.
Following the syntax format introduced above you will use the following (note the differences in the syntax from the previous example):
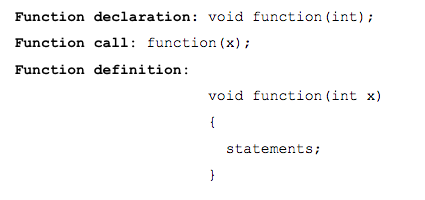
The following Repl includes a function called function that accepts three arguments and outputs using printf.
Functions with no argument but return value
There could be occasions where we may need to design functions that may not take any arguments but returns a value to the calling function. An example for this is getchar() function. This is a function that has no parameters, but it returns an integer (an integer type data that represents a character.)
Following the syntax format functions with no argument but have a return value uses:
The following Repl includes a function called sum that calculates the sum of the square root of two integers. the function does not take in any arguments but does return an int value.
As you read through the program can you see how the function works to produce the stated output. Have a think about other kinds of problems this function could be used for (more that 2 values?, what about the mean or median of a group of values?)
Function with argument and return value
The final type of function has both arguments and return values. The syntax formats are as follows (note how the syntax includes all the features of the other categories):
The following Repl includes a function called function that accepts two arguments and returns an int value.
Click on the link to view the different functions above being used in a situation where a prime number is checked.
Programiz (n.d) C++ User-defined Function Types
You will be introduced to these user-defined functions later in the section when you consider the purpose of Pointers.
The general syntax of a function is:

Where:
- return-type - this specifies the type of data that the function returns. A function may return any type of data except an array. Some functions perform the desired operations without returning a value. In this case, the return_type is the keyword void
- function-name - This is the actual name of the function. The function name and the parameter list together constitute the function signature
- parameter list – A parameter is like a placeholder. When a function is invoked, you pass a value to the parameter. This value is referred to as actual parameter or argument. The parameter list a comma-separated list that refers to the type, order, and number of the parameters of a function. Parameters are optional; that is, a function may contain no parameters. Regardless, the parentheses ( ) are still required.
-
all function parameters must be declared individually, each including both the type and name. That is, the parameter declaration list for a function takes this general form:
f(type varname1, type varname2, . . . , type varnameN)
Examples of correct and incorrect parameter lists are given below: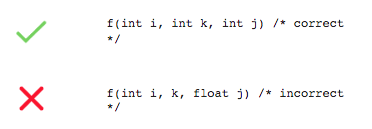
- function body - contains a collection of statements that define what the function does
Return Values
When you write a user-defined function, you get to determine whether your function will return a value back to the caller or not. To return a value back to the caller, two things are needed. Check out this example:
In this example, function getValueFromUser has a return type of void, and function main has a return type of int. Note that this doesn’t determine what specific value is returned -- only the type of the value. Now run the program – what output do you get?
While this program is a good attempt at a solution, it doesn’t quite work. When function getValueFromUser is called, the user is asked to enter an integer as expected. But the value they enter is lost when getValueFromUser terminates and control returns to main. Variable num never gets initialised with the value the user entered, and so the program always prints the answer 0. What is missing is some way for getValueFromUser to return the value the user entered back to main so that main can make use of that data.
We have learnt that we get to determine whether the function will return a value back to the caller or not. To return a value back to the caller, two things are needed:
- The function has to indicate what type of value will be returned. This is done by setting the function’s return type, which is the type that is defined before the function’s name. In the example, function getValueFromUser has a return type of void, and function main has a return type of int. Note that this doesn’t determine what specific value is returned -- only the type of the value.
- Inside the function that will return a value, a return statement is used to indicate the specific value being returned to the caller. The specific value returned from a function is called the return value. When the return statement is executed, the return value is copied from the function back to the caller. This process is called return by value. See this example:
Click here to check the output of this simple function that returns an integer value. Run the compiler – does it print 5 and 7? Let’s look at what is happening:
- Execution starts at the top of main.
- In the first statement, the function call to returnFive is evaluated, which results in function returnFive being called. Function returnFive returns the specific value of 5 back to the caller, which is then printed to the console via std::cout.
- In the second function call, the function call to returnFive is evaluated, which results in function returnFive being called again. Function returnFive returns the value of 5 back to the caller. The expression 5 + 2 is evaluated to produce the result 7, which is then printed to the console via std::cout.
- In the third statement, function returnFive is called again, resulting in the value 5 being returned back to the caller. However, function main does nothing with the return value, so nothing further happens (the return value is ignored).
Note: Return values will not be printed unless the caller sends them to the console via std::cout. In the last case above, the return value is not sent to std::cout, so nothing is printed.
Let’s take it a step further. We want the caller to enter a value, and write a function that will double that integer and print out the result. Click here to view the sample function. Run the compiler and enter a number, does the output give your number entered doubled?
Let’s consider what function is doing:
- When this program executes, the first statement in main will create an int variable named num. When the program goes to initialise num, it will see that there is a function call to getValueFromUser, so it will go execute that function.
-
Function getValueFromUser, asks the user to enter a value, and then it returns that value back to the caller (main). This return value is used as the initialisation value for variable num.
Activity: Run the program a few times, entering different value to prove to yourself that it works.
- When the input is 5, expect the out to be 10;
- When the input is 10, expect the out to be 20;
Void Return Values
We have learnt that functions are not required to return a value. To tell the compiler that a function does not return a value, a return type of void is used. A void return type (meaning nothing is returned) is used when we want to have a function that doesn’t return anything to the caller (because it doesn’t need to).
The following Repl includes a void returning function that accepts two arguments and outputs a pattern based on the users' input.
Things to note about return values:
- First, if a function has a non-void return type, it must return a value of that type (using a return statement). Failure to do so will result in undefined behaviour. The only exception to this rule is for function main(), which will assume a return value of 0 if one is not explicitly provided. It is best practice to explicitly return a value from main, both to show your intent, and for consistency with other functions (which will not let you omit the return value).
- Second, when a return statement is executed, the function returns back to the caller immediately at that point. Any additional code in the function is ignored.
- Third, a function can only return a single value back to the caller each time it is called. However, the value doesn’t need to be a literal, it can be the result of any valid expression, including a variable or even a call to another function that returns a value. In the getValueFromUser() example above, we returned a variable holding the number the user typed.
Finally, note that a function is free to define what its return value means. Some functions use return values as status codes, to indicate whether they succeeded or failed. Other functions return a calculated or selected value. Other functions return nothing. What the function returns and the meaning of that value is defined by the function’s author. Because of the wide variety of possibilities here, it’s a good idea to document your function with a comment indicating what the return values mean.
Function Rules
C++, like any other programming language, has rules that determine whether a particular piece of code know about or has access to another piece of code or data. You may see these referred to as ‘scope rules’. Take a few minutes to read about C++ Scopes (Microsoft, 2021)
The rules for functions are as follows:
- Each function is a discrete block of code.
- A function's code is private to that function and cannot be accessed by any statement in any other function except through a call to that function.
- The code that constitutes the body of a function is hidden from the rest of the program and, unless it uses global variables or data, it can neither affect nor be affected by other parts of the program.
Stated another way, the code and data that are defined within one function cannot interact with the code or data defined in another function because the two functions have a different scope.Schildt 2003, p.139
- Variables that are defined within a function are called local variables. A variable comes into existence when the function is entered and is destroyed upon exit of the function.
- Local variables cannot hold their value between function calls unless the variable is declared with the static storage class specifier. In those cases, the compiler treats the variable as if it were a global variable for storage purposes only. The variables scope is limited to within the function only.
- In C++ you cannot define a function within a function.
Recursion in Functions
Recursion is the process of defining something in terms of itself. In C++ a function can call itself, and when it does it is referred to a recursive function. They are just functions that are invoked repeatedly. It is an effective approach to dissolve the issues like complex mathematical computations tasks. This is done by distributing the task into sub-tasks.
It’s not a coding requirement to always use a recursion process in your program for the repetition. Any problem that is resolved through recursion can also get solved through iteration. However, the recursive function is more efficient in programming as the code is very short and easily understandable while performing the same task. The recursion process is always recommended for issues like searching and sorting, or tree traversals. They are particularly useful in dealing with complex mathematical computational tasks.
The basic syntax for recursive functions is:

The concept is to divide a problem into many smaller problems and then add all the base conditions that can stop the recursion.
There are two different types of recursion: Direct and indirect recursion.
In the following example a recursive function is being used to return a Fibonacci series of numbers (a series of numbers in which each number (Fibonacci number) is the sum of the two preceding numbers). Note the following attributes of the program:
- A call to the recursive function defined as fib (int n) which takes input from the user and store it in ‘n’.
- A for loop to generate the term which is passed to the function fib ( ) and returns the Fibonacci series.
- The base case is set with the if statement by checking the number =1 or 2 to print the first two values.
- The recursive function goes on with the loop to print the series 1,1,2.
Run the program and enter ‘3’ for the number of terms. Do you get the following output?
Now experiment with entering different numbers of n terms. What happens if you enter 100? Do you see how the series is calculated?
Function Prototypes
In C++ all functions must be declared before they are used. This is normally accomplished using a function prototype. Prototypes are required when programming in C++. When you use prototypes, the compiler can find and report any illegal type conversions between the type of arguments used to call a function and the type definition of its parameters. The compiler will also catch differences between the number of arguments used to call a function and the number of parameters in the function.
The general form of a function prototype is:

Whilst the use of parameter names is optional, their use is encouraged as they enable the compiler to identify any type mismatches by name when an error occurs. Function prototypes help you trap bugs before they occur. In addition, they help verify that your program is working correctly by not allowing functions to be called with mismatched arguments.
The following Repl courtesy of codecrackers.com includes four function prototypes before the int Main.
Activity
Here are two examples of outputs from the program example above. Have a look at them, work out how you would achieve the following outputs:
Summation = 15
Subtraction = 5
Multiplication = 50
Division = 2
Summation = 10 Subtraction = 10 Multiplication = 0 Division = Divide by Zero Error..!! Press any key to exit...exit status 1
Why does the error appear?
There is much to learn about using functions in C++ as they are one of the backbones of programming. In the video playlist below, Saldina Nurak, aka CodeBeauty takes you a series of tutorials on the fundamentals of functions in C++. The videos include a practical demonstration of the use of functions in the building of an ATM application.
You were briefly introduced to the C++ Library in CS102 Development Principles I. In this section you will be introduced to the Standard Function Library.
Using the Standard Function Library in C++ means that you don’t have to rewrite many simple programming instructions. It is a large library of sub-libraries, each of which contains the underlying code for several functions.
In order to make use of these libraries, you link to each library in the broader library through the use of header files.
Think of it this way. When you import the input/output library, you are actually taking down a copy of all of the code within that library. This is what lets you use those functions that reside in the library. But the beauty of this setup is that you don't see any of that underlying code. You don't need to.
You will already have some familiarity with function library header files, as when you start programming you use the header file <iostream> first up for the input output controls - You can't write information to the screen or collect data from the user without it.
Using iostream as an example the syntax for making library functions available in your program is as follows:
#include <iostream>
The following table outlines common header files you will use in your programming. You will also be introduced to other functions in the library throughout the course.
| Function | Description | Example(s) |
|---|---|---|
iostream |
Input/output | Controls for input and output |
cstring |
Functions for strings | Create string variables\compare strings |
cstdlib |
Miscellaneous utilities |
Memory allocation\numeric string conversion\process control |
ctime |
Date and time | running time\clock and time calculations/conversions |
cmath |
Math functions | Mathematical formulas (such as trig and exponents) |
array; vector |
Arrays and vectors | Needed when creating arrays and vectors |
stack |
Stacks | Required for creating stacks |
exception |
Exception handling tools | Trap expectations, which helps prevent program crashes. |
Click here to download a PDF that provides a list of common library header files as well as a breakdown of available mathematical and character functions.
Consider this example:
The following Repl is intended to output the value of 25 to the power of 3. However, this example will encounter an error when it is compiled.
This program will not compile (give it a go if you would like). Instead, it will give the following error.
error: use of undeclared identifier 'pow'
Fortunately, in many compilers, you can access the help file to determine the list of the reference files. When this error is searched, it will identify that the library for math is missing. Adding this line to the top of the code by uncommenting "#include
Consider forking the Repl and uncommenting line #include <cmath>, to see the program compile correctly.
Cppforschool.com have provide some neat tasks for you to complete using the functions library. The activities are posted below along with links to solutions to check your coding. Enjoy!
- Write a program which input principal, rate and time from user and calculate compound interest. You can use library function. CI = P(1+R/100)T – P Click here for the solution
- Write a program to compute area of triangle. Sides are input by user. Area = sqrt(s*(s-a)*(s-b)*(s-c)) where s=(a+b+c)/2. Click here for the solution
- Write a program to check character entered is alphabet, digit or special character using library functions. Click here for the solution
- Write a program which display a number between 10 to 100 randomly. Click here for the solution
- Write a program which accept a letter and display it in uppercase letter. Click here for the solution
- Write a C++ program to implement the Number Guessing Game. In this game the computer chooses a random number between 1 and 100, and the player tries to guess the number in as few attempts as possible. Each time the player enters a guess, the computer tells him whether the guess is too high, too low, or right. Once the player guesses the number, the game is over. Click here for the solution
The key to effective use of C++ is the definition and use of user-defined types. C++ gives you six ways to create these custom data types. In the next few sections of this module, you will be introduced to the three most primitive variants user-defined types:
- Structures which are a sequence of elements (called members) of arbitrary types.
- Unions are a structure that holds the value of just one of its elements at any one time.
- Enumerations are a data type with a set of named constants.
The other user-defined data type will be introduced in Semester 2 of the course.
What are Structures in C++
Structures is a user-defined data type that allows multiple variables (data elements) to be grouped together under a single name. Whereas arrays allow you to define variables which combine multiple data items that are the same at contiguous memory locations, structures allow you to combine multiple items of different data types. It is a convenient way of keeping related information together.
Generally, all the variables (which are called members) that make up a structure are logically related. They are used to represent a record. For example, the information stored in your academic record at Yoobee (your name, National Student Identification number, your Yoobee Student ID, the modules you are enrolled in, and your grades would be represented in a structure.
We could easily create different variables (studentName, NSN, modulesEnrolled, gradeAchieved …) to store this information separately. But given there are hundreds of students enrolled in this course we would need to create different variables for the information for each student enrolled (studentName1, NSN1, modulesEnrolled1, gradeAchieved1 …. studentName2, NSN2, modulesEnrolled2, gradeAchieved2 ……..etc). You can imagine how long the code would be to achieve this, and it would look quite messy as well. It is complicated further because no relationship exists between the variables
Using a structure you can group the related information under a single name, say “Student”.
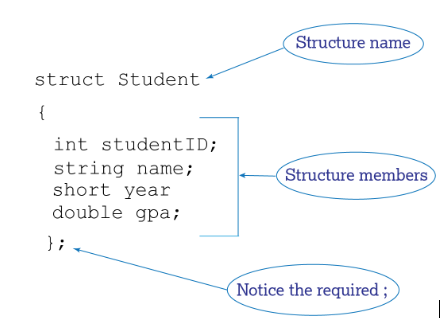
Structure Declaration Format
A structure declaration forms a template that may be used to create structure objects (that is, instances of
a structure). The keyword struct informs the compiler that a structure is being declared.
The declaration format for structures is as follows
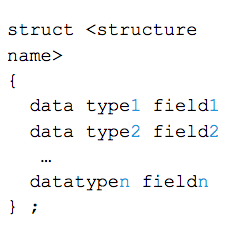
When declaring structures remember the following points:
- struct names commonly begin with an uppercase letter
- The structure name is also called the tag
- Multiple fields of the same type can be placed in a comma-separated list

- Fields in a structure are all public by default
- The declaration must terminate with a semicolon ; - this is because a structure is a statement
At this point, no variable has been created. Only the form of the data has been defined. When you define a structure, you are defining a compound variable type, not a variable. Not until you declare a compound variable does one actually exist.
Defining Structure Variables
When a structure variable (such as Student) is declared, the compiler automatically allocates sufficient memory to accommodate all of its members. By default C++ allocated 32 bits of memory but you are able to allocate memory to the variable dynamically by defining the data type. The basic data type memory allocations apply. Members are allocated in memory in declaration order.
Taking the example introduced above here is a example of a structure declaration with variables defined, using StudentID, Name, Year (of study), and GPA (grade point average).
In this task refer to structure member definitions above and fill in the gaps with the correct memory size (in bytes) below:
| Bytes | ||
| Student | studentID | 2 |
| Student | year | 2 |
| Student | gpa | 8 |
In the example below a structure is being used to calculate the Grade Point Average of a student, using points(grades) awarded, and the number of credits achieved.
Note the use of syntax for defining member data types, use of the semi-colon, and other aspects of the code.
Accessing Structure Members
In the above example you will notice the use of the dot ( . ) operator to access structure members. The structure variable name followed by a period and the member name references that individual member. The general form for accessing a member of a structure is:

In the example above you see s1.creditsAttempted as an example.
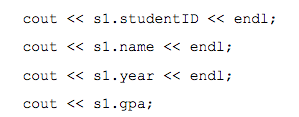
Displaying Structure Members
To display the contents of a struct variable, you must display each field separately, using the dot operator. Not the correct way to display members.
Wrong:

Correct:
Comparing Structure Members
Similar to displaying a struct, you cannot compare two struct tags directly.

Instead, you should compare member variables:

Intitialising a Structure
You cannot initialise members in the structure declaration, because no memory has been allocated yet.
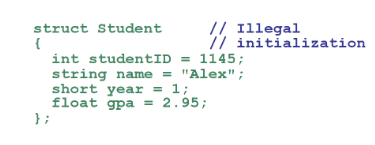
Structure members are initialised at the time a structure variable is created. You can initialize structure members with either an initialisation list or a constructor
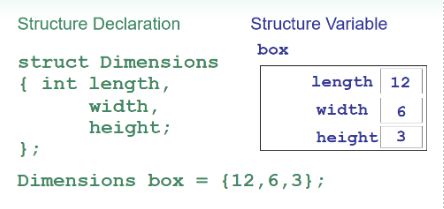
Initialisation List:
An initialisation list is an ordered set of values, separated by commas and contained in { }, that provides initial values for a set of data members.

The order of list elements matters: First value initialises first data member, second value initialises second data member, and so on. The elements of an initialisation list can be constants, variables, or expressions

Check out this example of an initialisation list:
You are able to use partial initialisation where you can initialise just some members, but you cannot skip over members. For example:

You should note the following problems with using initialisation lists:
- You can’t omit a value for a member without omitting values for all following members.
- Initialisation lists do not work on most modern compilers if the structure contains any string objects. They will, however, work with C-string members.
Constructors:
Constructors are normally written inside the struct declaration. The constructor name is the same as the name of the struct, has no return type and is used to initialise data members.
The syntax of a structure with a constructor is as follows:
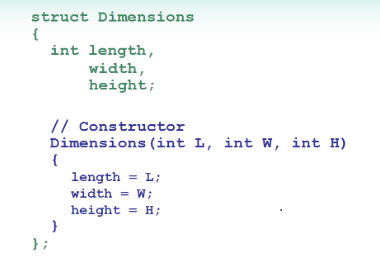
Here is an example using portion of code in a program that gives a calculation of vacation days:
Nested Structures
A structure may be either complex or simple. The simple elements are any of the fundamental data types of C++ i.e., int, float, char, double. However, a structure may consist of an element that itself is complex i.e., it is made up of fundamental types e.g., arrays, structures etc.
Therefore, an element of a structure may have to be an array or a structure in itself. A structure consisting of such complex elements is called a complex structure and makes use of nested structures. Nested structures are essentially one structure that is nested inside another structure
The following code fragment illustrates this:
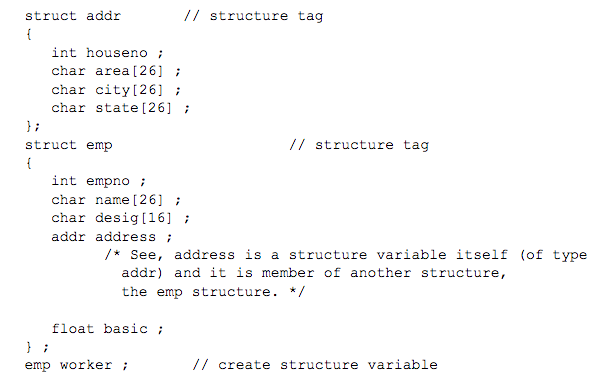
In this example not that the structure emp has been defined having several elements including a structure address also. The element address (of structure emp) is itself a structure of type addr. An important tip to note is that when nesting structure you need to make sure that the inner structures are defined before the outer structure.
To access members of a structure the dot operator is used.
Structures and Arrays
We have learnt that arrays and structures are derived types that allow several values to be treated together as a single data object. The difference between the two is that arrays are collections of analogous elements, whereas structures assemble dissimilar elements.
Arrays and structures can be combined together to form complex data objects. There may be structures contained within an array and there can also be an array as an element of a structure.
Array of Structures:
Since an array can contain similar elements, the combination having structures within an array is an array of structures. To declare an array of structures, you must first define a structure and then declare an array variable of that type. Let’s say for example you are the membership secretary of the local daffodil growers, and you need to store the addresses of the 150 members. To do so you would need to create array (you have covered both single and multidimensional arrays already in this course)
To declare a 150 element array of structures (type addr) you would type

Arrays within Structures
When a structure element happens to be an array, it is treated in the same way as arrays are treated. The only thing to be kept in mind is that, to access it, its structure name followed by a dot (.) and the array name is to be given.
Simply put, a union is a memory location that is shared by two or more different types of variables. It is a datatype defined by the user, and all the different members of the union have the same memory location. It is the member of the union that occupies the largest memory that decides the size of the union.
Programmers use union when the user is looking to use a single memory location for different multiple members.
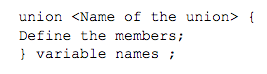
Unions are very much similar to structures, and they are defined/declared in the same way. The usual syntax is
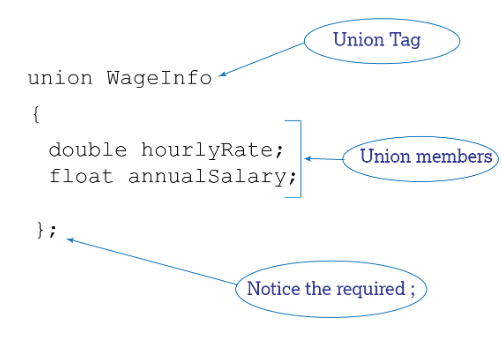
An example of a union declaration is provided below:
TheCherno(2018) provides a succinct overview of unions in C++ in his usual enthusiast manner, and clearly describes the role of unions and why you might use them.
Enumerations are a user-defined data type. It enables you to create a new data type which has a fixed range of possible values, and the variable can select one value from the set of values. Essentially it is a set of name values, which can be used instead of normal integer variables. The following example shows a scenario in which it would be appropriate to use enumerations.
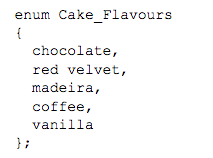
Let’s suppose you are the owner of a cake shop, and you sell a limited range of cake flavours. You want your customers to select only from that range of flavours in your shop. An enumeration is used with ‘cake flavour’ as the name of enumeration, and the different flavours are its elements.
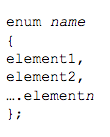
The syntax for enumerations is enum and the format is as follows:
In the example of the cake shop the format would be
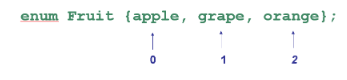
The values of each element are associated with integers and, by default, starts at 0, numbering consecutively e.g., chocolate is 0, red velvet is 1, etc. You can alter these values in the declaration of the enumeration
Why use Enumerations?
Here are some of the reasons using enumerations in your coding.
- Enumerations are generally used when you expect the variable to select one value from the possible set of values. It increases the abstraction and enables you to focus more on values rather than worrying about how to store them.
- It is also helps to make your code cleaner and more readable
Enumerations are:
- A data type created by the programmer
- They contain a set of named constant integers
They are formatted in the following way:

Here are some examples:

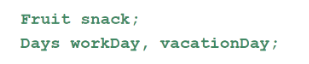
To define variables, use the enumerated data type name.
The variables may contain any valid value for the data type.

Enumerated data type values are associated with integers, starting at 0.
You are able to override the default association of integers.

- Enumerated data types improve the readability of a program.
- Enumerated variables cannot be used with input statements, such as cin
- They will not display the name associated with the value of an enumerated data type if used with cout.
See the coding example and output below:
In the following video The Cherno (2017) gives a succint overview of enumerations, and demonstrates how they can be used in code to replace integer variables [Length 7:44]
Have a go at the following exercises:
-
Find all the things that are wrong with the following declaration

-
Follow the instructions to complete the following program segment.

// Write an if/else statement that will print out "primary colour"
// if colour is red , blue, or yellow, and will print out
// "mixed colour" otherwise . The if test should use a relational// expression.
Welcome to Pointers
By the end of this section, you will be familiar with pointers, pointers in functions, arrays referring through pointers, pointers of pointers, and pointer references and dynamic memory allocation.
Let’s begin by looking at the very basics.
What is a pointer?
A pointer is an integer variable that holds a memory address.
The address is the location of another object in the memory, normally another variable.
Pointers are also used to create data structures such as linked list, stack, queues, trees, graphs, and more. Throughout the course you will learn more about all these things, for example, a linked list uses pointers to transverse forwards and backwards through its variables by pointing to the following or the previous variable in the list.
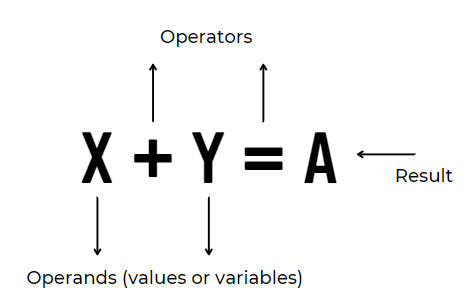
There are two special pointer operators. * and &. View the image below to see an illustration of operators and operands if you’re not sure.
The & is a unary operator that returns the memory address of its operand. (A unary operator works on only one operand in an expression). & = Addressof.
Let’s get stuck in by watching Pointers in C++ (The Cherno, 2017) [16:58] to get a good grounding in your understanding of the basics of pointers.
The Cherno uses a fantastic illustration in his video to help you understand what memory is and how it works. Imagine a row of houses along one side of a street, with a beginning and an end, this row represents memory. Each house is one byte of memory. Just as each house on the street has an address, each byte of memory has an address too.
Different variable types use a different amount of memory space.
Char – 1 byte
Short – 2 bytes
Float – 4 bytes
Int – 4 bytes
Every variable is allocated a section of memory large enough to hold a variable of that type. For example, a variable of the integer type would be allocated 4 bytes of memory.
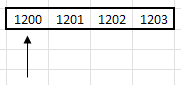
When you create data in that memory you may need to recall that data or change that data at some point, so it has an address, the address is the address of the first byte of memory allocated to that variable.
Imagine Char is a normal house taking up only one space on the road, 1 byte. Whereas Float takes up the space of 4 houses, 4 bytes. But there is still only one family living in the float house, so they still only have one address. For example, if you have a float, which is 4 bytes, and the bytes were located at 1200, 1201, 1202, and 1203 in the memory, the address of that float would be the first byte – in the case pictured below the address for this variable would be 1200.
Pointer declaration
Here are two examples showing you how to declare a pointer
Example 1
-
The format of a pointer declaration is: variabletype *pointername;
for example,
Int *ptr;
We have created a pointer and called it ptr. It is pointing to a variable that is an integer. -
Then we create an integer value: variabletype variablename = value
for example,
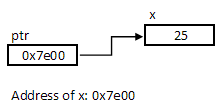
Int x = 25; -
Now we can set the value of the pointer to be the address of x: pointername = &variablename;
for example,
Ptr = &x;
The image below illustrates our ptr now containing 0x7e00, which is the address of x.
Example 2
-
Declaring a pointer called ptr2
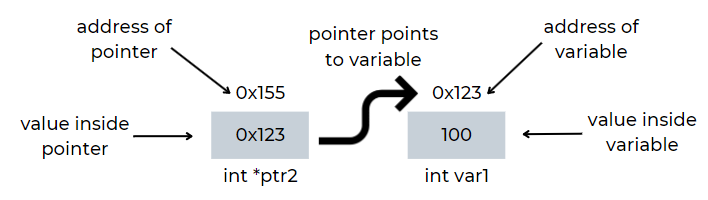
Int *ptr2; -
Creating an integer with the value of 100
Int var1 = 100; -
Setting the value of pointer to the address of var1.
Ptr2 = &var1;
The image below demonstrates our ptr2 containing the address of var1.
Initialising pointers
Set the base type of your pointers to the same type as the object you are pointing it to.
| int *ip | Pointer to an integer |
| double *dp | Pointer to double |
| float *fp | Pointer to float |
| char *cp | Pointer to character |
| short *sp | Pointer to short integer |
Valid initialisations
Here are a few examples of how you can code valid initialisations of pointers.
Example 1:
Int myValue;
int *p;
p=&myValue;
In this example, you created a valid initialisation by matching the type of the integer to the type of the pointer.
Example 2:
Char answer;
char *p = &answer;
In this example you created a valid initialisation by creating a pointer with the type char, which matches the type of the variable the pointer is pointing to.
Example 3:
double price = 12.5;
double *marker;
*marker=price;
In this example you made a valid initialisation by creating a variable called price with the value of 12.5 and type = double, and then creating a pointer with a matching type of double called marker, and then setting the pointer called marker to point to the variable called price.
Invalid initialisations
Here are a couple of examples of invalid initialisations of pointers.
Example 1:
float myFloat;
int *p = &myFloat;
In this example you have a variable called myFloat which is a Float type, however the pointer you have created to point to that variable is an integer type. The mismatched types make this an invalid initialisation.
Example 2:
Int *p = &myValue;
int myValue;
This final example is also invalid because you must declare the variable before you assign the pointer to it.
Pointer base types
The base type of the pointer states what type of variables the pointer is pointing to.
All pointers of all types can point to variables anywhere in memory.
All pointer arithmetic is done relative to its base type, so it is important to declare the pointer correctly (remember the different memory allocation for different base types – int = 4 bytes, char = 1 byte etc).
As we saw in the video, pointer base types don’t change anything for the computer, the computer will still output the same answer if the type doesn’t match, but if they are not matching it could cause warnings and errors at compilation time or runtime. Therefore, it is always best practice to keep these tidy.
Advantages and disadvantages of pointers
For this activity, sort the following statements about pointers into the advantages or disadvantages column.
Null Pointers
If you don’t know the address yet that you want to point the pointer to, rather than leaving it empty, you should set the pointer to NULL. This is called a null pointer and returns a 0.
0 (zero) refers to a part of the memory which is reserved for the operating system, which your program cannot access, so when you assign it to null, essentially you are saying that this pointer contains nothing. This is much better than leaving it unassigned, because a pointer will always point to something if left empty, and your program may end up accessing the wrong data (something random) this way.
Best practice is to assign a pointer to a variable’s address straight away when you create it, or if you can’t do it right away, then save yourself a headache later by setting it to null.
Here are a few examples of null pointers:
int *p = NULL;
int *ptrToInt = 0;
int *ptrToDouble = 0;
char *ptr = nullptr;
You will get the same result, whether you assign it to ‘NULL’, ‘0’, or ‘nullptr’. These are all examples of null pointers. Support for null pointers is built in to most common STL libraries, such as iostream.
Let’s look at a couple examples of pointers using what we’ve learned so far.
Notes:
- Read the comments (comments/documentation are always preceded with //) to follow what’s happening. //comments do not print or affect the program.
- cout stands for ‘character out’ and tells the program what text to output.
- endl = new line
- \n = new line
- \t = horizontal tab space
Example 1
Example 2
Pointers activity
For this activity, use a free online C++ coding tool such as http://cpp.sh/ and write your own program with the following output.
Value of var2 variable: 15
Address stored in intptr2 variable: xxxxxxxxxx
Value of *intptr2 variable: 15
Feedback:
Well done on writing your first code with pointers. If you would like another go, try writing a different version of the example 2 program.
What you will note when you are learning to write code is that there can be a lot of trial and error. Part of the work is in understanding the errors you get back and working out how to fix them.
Example 3
This example is showing a very simple pointer to a pointer. We will learn more about these later in the topic.
Types of Pointers
There are several different classifications / types of pointers.
- Pointers to arrays
- Pointers to pointers
- Pointers to functions
- Pointers with structures
- Dynamic memory allocation
Continue to learn all about them.
Introduction to Pointers to arrays
There is a close relationship between pointers and arrays.
Here’s a quick example to illustrate this:
char str[80], *p1;
p1 = str
Value of pointer “p1” has been set to the address of the first array element in str.
If you wanted to access the fifth element in str, you could do it two ways, through the array or through the pointer:
Through the array: str[4]
Through the pointer: *(p1+4)
(We used 4 because the first element in an array always starts at position zero).
Array names can be used as pointer constants, and pointers can be used as array names. A pointer constant is a pointer where the value cannot be changed.
As we learned earlier in the multidimensional arrays section, array elements are stored together in memory.
In this example, ‘numbers’ is the address of numbers[0] – the first short element in the array called numbers. Each short is 2 bytes, so we are creating an array called ‘numbers’ and allocating 20 bytes of memory, 2 bytes for each of the 10 elements.
short numbers[] = {10, 20, 30, 40, 50}
The expression *numbers or *(numbers+0) would retrieve the value of the first element in the array, which is 10.
And so it follows that retrieving the fourth element of the array ‘numbers’ would go like this: *numbers[3] or *(numbers+3) and the output would be 40.

When you add a value to a pointer, such as *(numbers+2) you are actually adding the value stated times the size of the data type of the pointer. In this case, the pointer type is short, which is 2 bytes. So, if you add one to numbers, you are actually adding 1 * sizeof (short) to numbers. This means:

Have a look at the following example. Read the comments to help you follow what is happening.
To prepare you for this example, let’s have a quick look at for loops.
For loop
The for loop contains three statements inside the brackets and a code block that follows.
Statement 1: runs one time before the code block
Statement 2: the condition for running the code block
Statement 3: is run every time after the code block has been executed.
For example:
Example 1
Notes for this example:
cin stands for character input, and this is where the program requires an input
Array names are pointer constants
Firstly, what is a pointer constant? A pointer constant is a pointer where the value is fixed, you cannot change it after declaration. So, an array name is a pointer to the first element in an array and this address cannot be changed.

These statements are legal:

But these statements are illegal:
Pointer arithmetic
You cannot use arithmetic on arrays, only on pointers. Pointers can be manipulated by the following operators:
| ++ | Access the next value from the array |
| -- | Access the previous value from the array |
| < | Less than |
| > | More than |
| <= | Less than or equal to |
| >= | More than or equal too |
Read through C++ pointers vs arrays (Tutorials Point, n.d.) to understand the difference in an example.
Referencing and dereferencing
You will have noticed this in our code already. Referencing is when you are asking for the address of what your pointer is pointing to, however dereferencing is when you are asking for the value of what the pointer is pointing to.
There are three different ways the * is used in our code:
* is used for multiplication
* is used to declare a pointer
* is a deference operator, it is used to request the value of what a pointer is pointing to.
See C++ Dereference (W3Schools, n.d.) for an example of this.
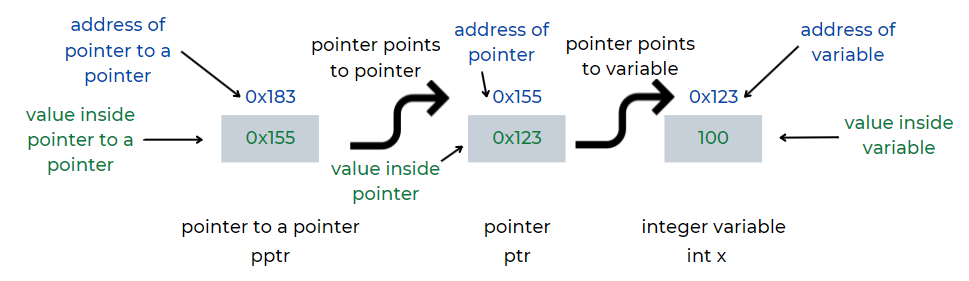
** represents a pointer to a pointer – which is also sometimes called a multiple indirection or a chain of pointers.
Here is an example:

Here is an image to illustrate this.
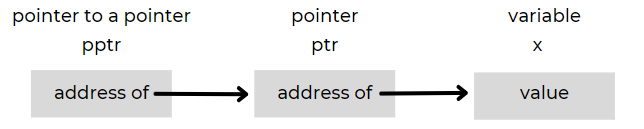
Or illustrated more simply:
Example
What is a pointer to a function?
A pointer to a function, otherwise known as a function pointer, is a variable that holds the address of a function. Once you have set a pointer to that function, then you can just use the pointer to call that function.
This can save you time writing the same piece of code to perform the same function multiple times, it also helps to reduce mistakes writing it out so much, and means if you need to change that code, you only need to change it in one place in the program instead of in several places.
Function pointers allow you to assign a function to a variable.
Note that the return types of functions are usually either a value, reference, or a pointer.
Watch Saldina explaining “Function pointers for beginners” (CodeBeauty, 2021) [22:26] to learn all about them – skip to the 1:30 timestamp to begin.
Types of functions
There are four main types or classifications of functions which you can point to, the first three in the list are referring to the way you pass the parameters to the function – by values, pointers, or reference, and the last one is specifically looking at functions that return pointers.
- Function pass by value / Function call by value
- Function pass by pointers / Function call by pointers
- Function pass by reference / Function call by reference
- Function returns pointers
We will briefly revisit these in the series of images below.
Function pass by value / Function call by value
The code below shows an example of call by value, passing the actual values as the arguments of the function. Note that when you use pass by values, the original variable does not get changed by the function.
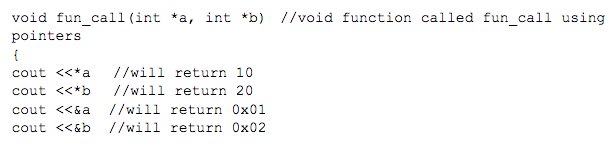
Function pass by pointers / Function call by pointers
Pass by pointer will create a copy of the pointer to manage the manipulation.
The code below shows an example of a function pass by pointers, passing the pointers to the arguments of the function instead of direct values.
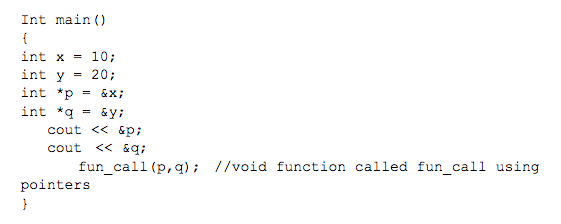
Example 1
Illustrated by the image below.
Example 2
Illustrated by the image below.
Example 3
Function pass by reference / Function call by reference
It is critical to understand the difference between passing by value and passing by reference. When you pass by value, the function does not change the value of the original variable. It remains the same afterwards.
However, if you pass by reference, the original variable will be changed according to the function.
Watch Yunus explain this with a brief example in “C++ Tutorials - Passing by Value VS Passing by Reference” (Yunus Kulyyev, 2019) [3:24].
Pass by reference activity
For this activity
- Visit C++ functions pass by reference (W3Schools, n.d.)
- Click on the green button to Try it Yourself
- Review the code and the result.
You will note that in both sections of cout, the program is calling firstNum and secondNum, but the program is giving a different result for the second section. This is because the program is passing by reference, so the value of the original variable is being changed by the function.
Function returns pointers
Functions can return values, references, or pointers. Let’s have a quick look at functions returning pointers.
This image shows the different parts of the code for function returns pointers.
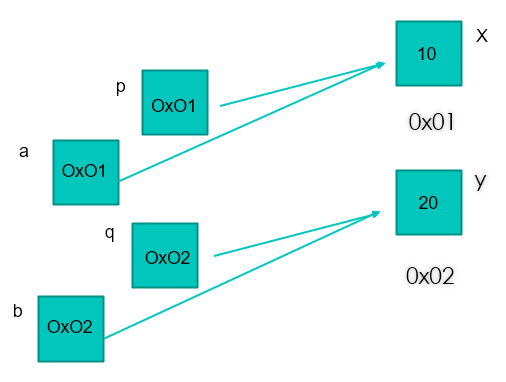
Pointer variables can be created for user defined data types like structures or classes as well.
Before we go any further, for a recap on structures, read through C++ Structures (Programiz, n.d.).
Pointers to structure allows you to refer the structure elements without creating a copy of the structure.
In a pointer with structure, the elements in the structures are accessed by the operator “->”.
For example,
p-> could also be written, (*p).x
Read C++ Pointers to structure (Programiz, n.d.) for an example of this in use.
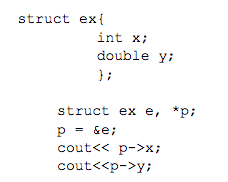
Pointers with structures activity
Using the code example in the article above, use C++ shell to write a program that will take the following inputs:
- Book title – 40 characters
- Author – 30 characters
- Publishing date – string
- Price – double.
And output something along the lines of this:
Dynamic memory allocation is another application of pointers. It allows the programmer to define / manage the allocation and deallocation of memory on Heap at runtime, using the operators new and delete.
Memory allocation with the new operator
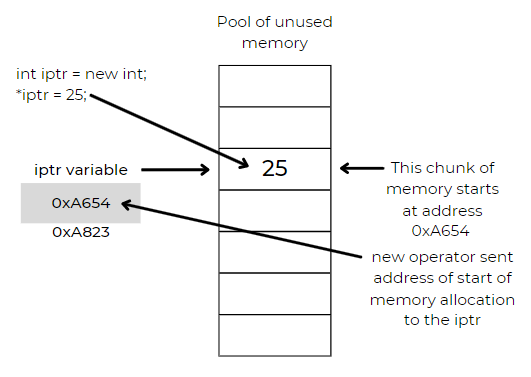
The operator ‘new’ assigns the address of the beginning of the memory allocation to the pointer.
Syntax: new PointerVariable;
Example 1

The image below illustrates what’s happening in the example.
Example 2
int iptr = new int[50];
Enough memory would be allocated for 50 integers, and the ‘new; operator would assign the address of the start of the memory allocation.
Memory management in C++
Read about some important things you need to know and understand about the basics of memory architecture in Dynamic memory allocation in C++ (studytonight, n.d.).
What is the difference between declaring a normal array and allocating dynamic memory?
“There is a substantial difference between declaring a normal array and allocating dynamic memory for a block of memory using new. The most important difference is that the size of a regular array needs to be a constant expression, and thus its size has to be determined at the moment of designing the program, before it is run, whereas the dynamic memory allocation performed by new allows to assign memory during runtime using any variable value as size.” (cplusplus, n.d.)
Memory deallocation with the delete operator
C++ has no garbage collection system to automatically deallocate memory, so, to avoid this, which is called memory leak and keep memory freed up for other use, you need to write into your program the deallocation of memory using the delete operator. Remember that dynamic memory is allocated to heap, so every time you use new or delete you are calling heap.
Also, you could get a bad allocation, where you don’t have enough memory available for the allocation. It is best practice to write a way of handing this into your program. Read the Operators delete and delete[] section of Dynamic Memory (cplusplus, n.d.) to learn how.
You also should write in a way to handle dangling pointers. These are pointers that are left pointing to a memory location where the object has been deleted. To illustrate this, see the image below.
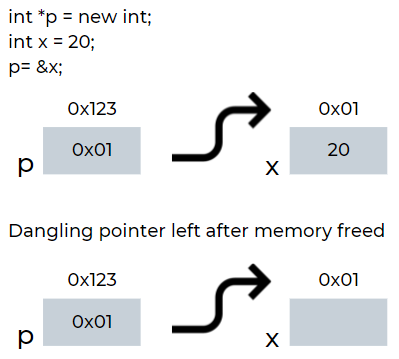
In the delete operator examples below, you can see that the pointers have been set to nullpointers after the delete operator was used to delete the memory in question.
Syntax :
delete PointerVariable;
Example 1

Example 2

Welcome to GitHub
You already learned a bit about Git and GitHub in CS102 Topic 5 and should have already set up your GitHub account and installed Git and GitHub on your computer.
In this topic we will go into a bit more depth and provide you with some good resources for the critical tasks you will need to be able to perform.
What are Git and GitHub?
Together Git and GitHub form a version control system that helps you and your team collaborate on projects.
Git is the local repository for your code, it is a desktop tool that holds your git seed and tracking, whereas GitHub is the online repository for your code (cloud-based) and hosting service, accessed via the GitHub website. Like two ends of the same stick.
What is a version control system?
A version control system is so important when programming, especially when you’re working in a team, and multiple people might be working on the program code all at the same time.
Version control systems are smart and powerful tools that help you to manage all the changes that are being made to your program code. It records all the changes and when they are made and by whom, which means that you can access or even reinstate previous versions of the source code or even just revert specific sections of code if needed.
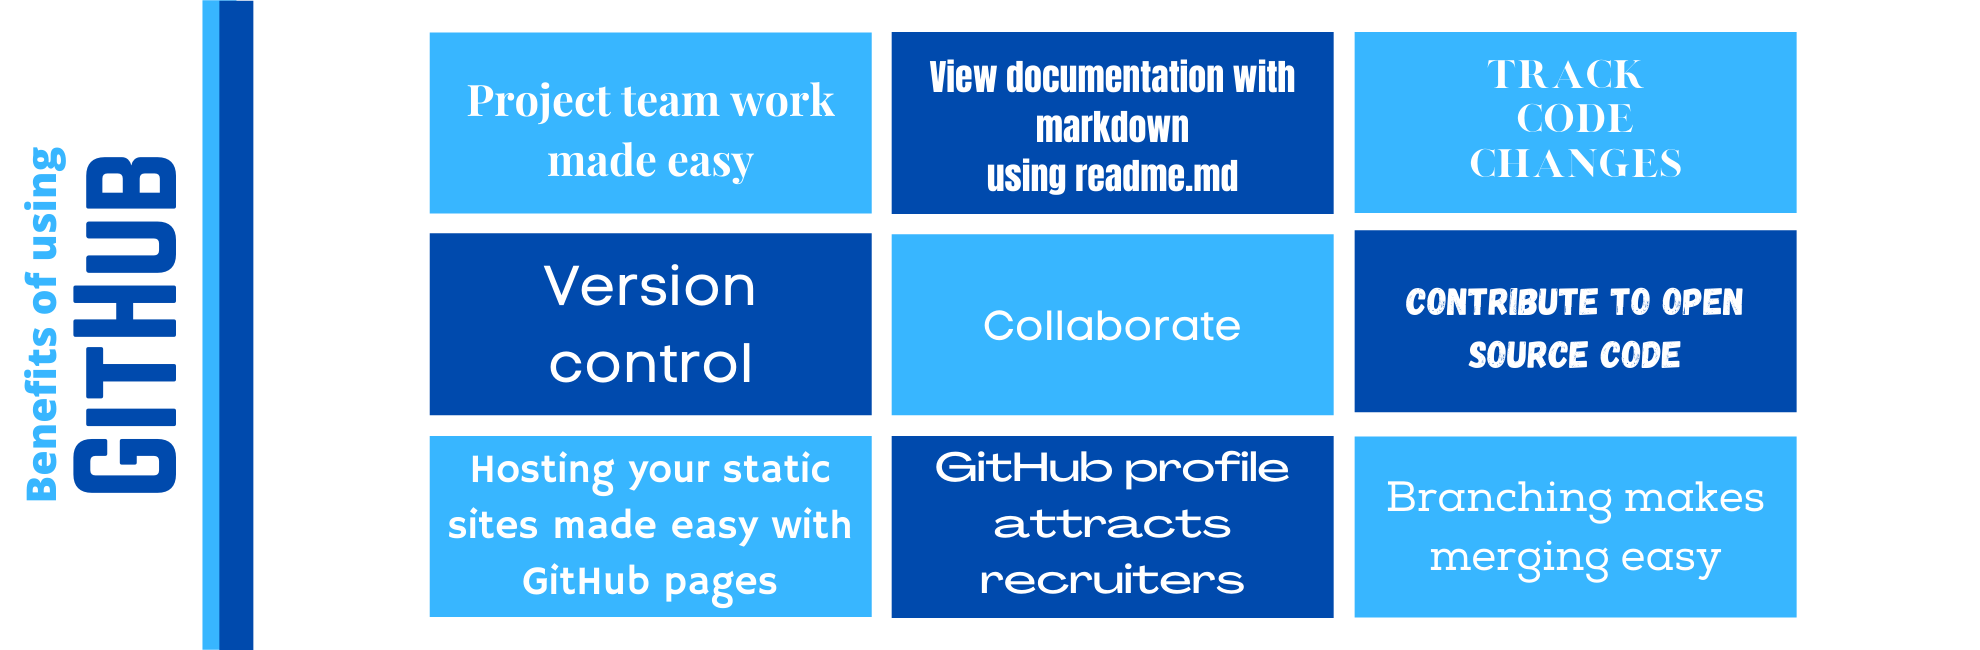
The image below lists some of the other benefits of using GitHub.
Command Line Interface (CLI)
Some commands are just not available in the GUI (graphics user interface) – such as ssh tunneling, but you can use them using a command line interface (CLI). Command prompt is the name for the built in CLI in Windows, you may have used it before for various tasks, but as a software developer using GitHub and Git, you will find that you can perform a lot of functions much faster using the CLI. You don’t have to spend time finding the command you want in a series of menus. Just type it straight into the CLI. It is sometimes just referred to as cmd as this is what you type into the start menu to run it.
We recommend you download GitBash as that has some more commands that you will want to use as a developer.
Using CLI strips away the colours and images and allows you to learn exactly what you are doing with your commands much faster, and then when you use the GUI in future, you will have a better understanding of what you are doing.
It’s important to note that when you’re working on full stack web development in other languages, CLI is the only way to use package management tools such as npm.
Watch 15+ terminal commands every developer should know (Web Dev Simplified, 2021) [20:14] to see the CLI in action and learn some great commands to get you started.
Before you get started
Let’s chat about a few things you will need to understand before you get started.
You will either begin with a folder on your local computer or one on GitHub, here is an explanation of getting the folder copied to the other location, so you have it both locally and remotely, and ready to work on.
- If you have a folder in your local repository (Git), you will need to push (upload) it to the online repository (GitHub). The GitHub repository is called ‘remote’ but in commands it is called ‘origin’.
- Alternatively, you may have a folder in your GitHub repository that you want to copy down to your local computer, this is called cloning, and the cloned repository is called your local repository.
Now the project is both local and remote. You will need to push and pull changes between the two locations to keep the project up to date in both places. For example, if you update code in your local repository (Git) you will need to push it to the remote location. Or, if you update code on GitHub, you will need to pull it to update your local repository with the most recent changes. You can push and pull whenever you need to.
Installing Git
We did cover this is CS102, but in case you haven’t done it yet, here are the instructions for downloading and installing Git on your local machine.
Initialising GitHub
Before you begin working on any project you will need to initialise Git by running the git init command. This will create a new empty local repository to start a new project, or if you have an existing project, you will need to run git init to convert the project to a Git repository.
Readme.md
Initialising will also create a readme.md file. Use this to record important information about your project, such as a description, contacts for the project, keys, style guide, and instructions for new users on how to get started with the project.
Use section headings when writing in your md files, so that GitHub can automatically create a table of contents for your file. Section headings also have links so that you can link directly to any section heading.
.gitignore
Git ignore is a way of marking files that you do not want to be pushed from your local repo to the remote origin. This way you can protect files which should not be made publicly accessible. Our local repo will keep these separately, for safe local use with our code.
Beware
It would be wise to keep backups of your code and related files to start with, while you are getting used to how GitHub and Git work.
Once the project is initialised, most other Git commands are now available for you to use.
Clone a repository
Here are some notes for you, while you learn how to create and clone a repository on GitHub.
- When creating a new repository, choose the private option if you do not want to share your code or public if you do want to share it.
- Commands you may need to use in cmd:
- git branch -M main
- git remote add origin ‘URL for your new project’
- git push -u origin main
- dir (will show the directories)
- dir /a (will show the hidden directories)
- git init (will initialise or reinitialise Git)
- git status (display files, red until uploaded to GitHub)
- git add . (will add all files in your folder to be pushed to GitHub. This is called staging).
Before you watch the step-by-step video below, read Git, GitHub, & Workflow Fundamentals (Nemerever, 2019). This article has a great section on the workflow which may help you to understanding staging and more.
After reading the notes and article above, go ahead and watch how to clone a repository step-by-step on Create and clone a new repository on GitHub (Kahan Data Solutions, 2021) [5:09].
Push and pull - best practice
As we mentioned earlier, pushing is when you upload your project to the remote origin (cloud), and pulling is when you download the latest version from remote to your local computer.
Get yourself into a routine of pushing your project to the cloud at the end of each session as you may find yourself wanting to work on your project from different machines at different times.
For example, you’ve been working on your project from a public or lab computer during the day and then want to continue working on it from home later that night. You will need to push it to the cloud before you leave the lab, so that you can pull the most up-to-date version to your home computer later to continue working on it. (Of course, if it’s the first time you’re accessing it on your home computer, you will be cloning the repo, not simply pulling it).
Let’s have a look at pushing and pulling.
Push
As you saw in the workflow fundamentals article earlier, you will need to add your changes from the working directory to the staging area first, before you can push them to the remote origin.
What are commits?
Each change is called a commit, it is also known as a revision. It saves a snapshot of your entire repo with your new changes in it.
Each time you make a commit, GitHub:
assigns a unique code to it (called a SHA or hash)
saves who made the changes
saves when the changes were made
saves your “meaningful message”.
This is all part of effective version control.
How to push
Firstly, navigate the directory to the project folder, and then pushing your changes to the remote origin is done in three steps:
- git add . // sends changes from the working directory to the staging area, where they wait to be uploaded together with any other changes you want to push at the end of the session.
- git commit -m “meaningful descriptive message”// takes a snapshot of local repo with all changes and assigns hash and other info as explained above.
- git push origin (or ‘git push origin branch-name’ if working in a team using branches).
Have a read through the example in Git push to GitHub (W3Schools, n.d.).
Team projects
Your team will need to choose one person to be the project administrator, their job will be to:
- create the team repository with readme file. They will need to readme file up to date throughout the project life
- add collaborators to the project
- create branches for the collaborators and a dev one.
Adding collaborators
Watch How to add collaborator to repository in GitHub 2020 (Andreas Waatz, 2020) [2:39] to see a demonstration of how to add collaborators to your team project.
Branches
Once you have added all your collaborators to the project you will need to create branches for them to work on. You will need one for each person, plus a dev branch. This is in addition to the master branch.
Dev branch
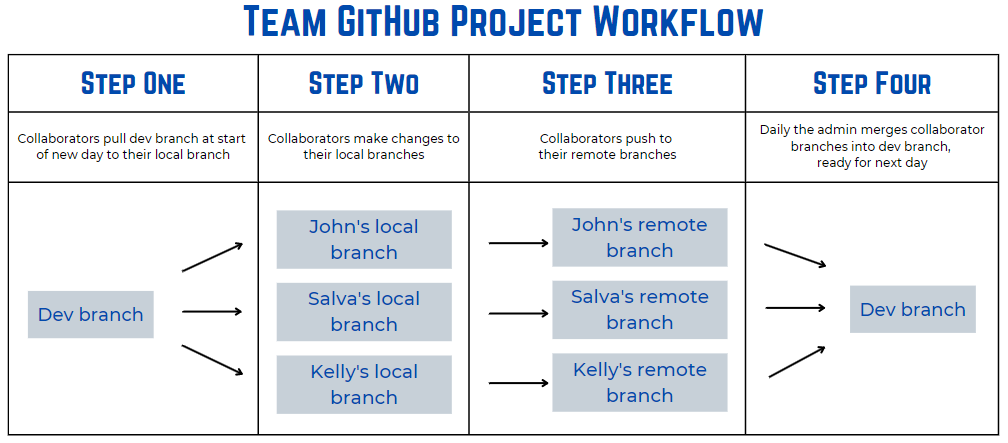
At the start of each day collaborators pull the most up-to-date version of the project to their local branch using git pull origin dev. They will work on it and then push their changes up to their remote branch. Each day, at a pre-arranged time the admin will merge the branches into the dev branch ready for the following day.
Have a look at the illustration below to understand the workflow of using the dev branch in team collaboration.
We will begin by learning the basics of working with branches. In this video the presenter does an excellent job of explaining how branches work and how to use them, using an example of how a developer would use branches for their own coding use, in Git.
Watch Git tutorial 6: Branches (Create, Merge, Delete a branch (codebasics, 2016) [12:42].
Creating, merging, and deleting branches for a team project
Now you’ve seen how you would use branches by yourself, let’s look at it from a team perspective. In this video, we will see how to manage branches within a team and how the admin will merge and delete branches, in GitHub.
Watch Git & Github Tutorial for beginners #11 – Collaborating on GitHub (The Net Ninja, 2017) [12:11].
Best practice for collaboration
- It’s helpful to note that if you are using Visual Studio to develop your code, it will display on screen which branch you are in, this is important to ensure you don’t accidentally edit the wrong branch.
- Always mark your code with a comment line with your name, so that once merged, all team members can see who wrote which part.
- Use functions for any processes you are assigned to work on.
Conflicts
As you merge code from a team of collaborators into one, you will come across conflicts, where two or more people have written code affecting the same lines. Here are a few tips that might come in handy:
- One way to reduce the incidence of conflicts is to break the program down into smaller parts called modules (functions).
- If each collaborator commits at least once a day the conflict rate will drop as well.
- Use the resolve conflicts button to review the proposed changes and talk together about how best to resolve it. Fix it up in there and merge again or else you will have to have the conflicting parties rework it on their own local repo and then add, commit, and push once again before reattempting the merge.
Iterative process
Working collaboratively like this on writing code is very much an iterative process, the code is changed bit by bit, and this helps to be able to revert easily to any previous point in time.
But it only works if everyone involved remembers to both:
- push at least at the end of each day
- pull at the start of each day, to ensure you are working with everyone else’s updates as well, not just your own.
Exercises
We have covered a lot of the basics of using Git and GitHub, and we hope you are excited to get started using this powerful tool. As any developer who has been introduced to it part way through their career will tell you, it’s a complete game changer!!
Activity
Please visit W3Schools’ Git & GitHub section (W3Schools, n.d.), and work your way through the content there to recap what you have learned and then complete the Test Yourself With Exercises section at the bottom of each page:
- GitHub get started
- GitHub edit code
- Pull from GitHub
- Push to GitHub
- GitHub branch
- Pull branch from GitHub
- Push branch to GitHub
- GitHub flow
- GitHub pages
Test Yourself With Exercises – don’t miss this part!
Resources
We think you will benefit from these great GitHub resources. Have a look and then bookmark them.
- Git cheat sheet from GitHub
- Git cheat sheet from Atlassian
- Git & GitLab exercise
- Git branching exercise
- Git branching and merging
Check the sample solutions on C++ Basic: Exercises, practice, solution if you need simple programs to practice with
What is a linked list?
A linked list is a linear data structure in which elements (also known as nodes) are stored at noncontiguous memory locations. This means the list elements are not stored in the same area of the memory. The elements in a linked list are linked using pointers that point to the next element. These are necessary so each element can be found within the memory. If you don’t understand pointers, you should go to the topic and revise your learning. You will also need to be familiar with dynamic memory allocation and structures.
A linked list consists of nodes where each node contains a data field (value) and the memory reference link (address pointer) to the next node in the list. The first node is referred to as the Head Node. When the list is complete the last link points to a NULL value which indicates that there are no more nodes.
There are three types of linked lists:
- Singly Linked List
- Doubly Linked List
- Circular Linked List
These will be further outlined later in this topic.
Pointers in linked lists
A pointer is a variable whose value is the address of another variable. Pointers allow you to refer to the same space in memory from multiple locations. This means you can update memory in one location and the change can be seen from another location in your program. You also save space by being able to share components in the data structures (such as linked lists). It’s also used for Dynamic memory allocation. If you need to, go back and revise or revisit pointers to understand their connections to creating linked lists.
What are linked lists used for?
In the real world some of the applications of linked lists data structure are:
- Implementing Stacks and Queues
- To implement graphs
- Implementing Hash Tables: Each bucket of the hash tables can itself be a linked list (open chain hashing)
- UNDO functionality in Photoshop, word and other software applications – linked list of actions (states).
The cache in your browser that allows you to hit a back button (a linked list of URL’s)
Linked lists
A linked list is where the data is stored in a ‘node’. The node is split into two parts, the first part is what you are going to store (the actual value), the next piece holds a pointer with an address which points to the next node wherever it is stored in the memory. Linked lists are not stored sequentially in memory, they can be stored in any area of memory hence the need for pointers from one piece of data to another to ‘link’ the list together.
The first node of a nonempty linked list is called the head of the list. To access the nodes in a linked list you need to have a pointer to the head of the list. Starting with the head, you can access the rest of the nodes in the list by following the successor pointers stored in each node. The pointer in the last node is set to NULL to indicate the end of the list.
A visual representation of a linear linked list looks something like the following diagram.
Diagram Linked List Linear Data Structure: (This is a singly linked list)
The Data part of the node is where the value of the list is stored, the Next part shows where the node stores the address link to the next node. The last node pointer is set to a NULL value to indicate the end of the list.
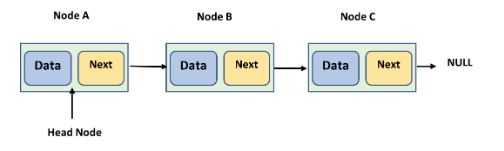
A linked list is used to store multiple pieces of data. In situations where only one piece of data needs to be stored, you would use an integer or a string, but where there are multiple items, this can get very unorganised if you have lots of different variables. Lists allow a collection of data to be grouped together, but you need to remember that a linked list is not stored sequentially in memory, it is stored in different places as opposed to an array which is sequential and stored in sequence within memory.
In realty when linked list data is stored in memory it will more likely look like this:
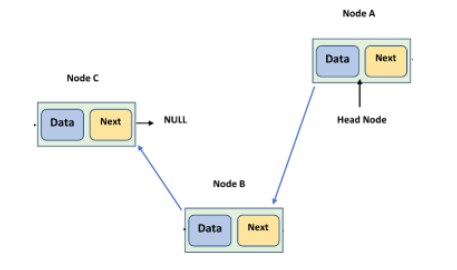
The structure of linked lists
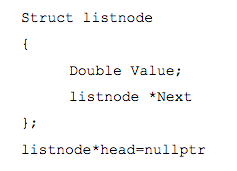
- Here listnode is the type of a node to be stored in the list.
- The structure member value is the data portion of the node.
- The structure member next, declared as a pointer to listnode, is the successor pointer that points to the next node.
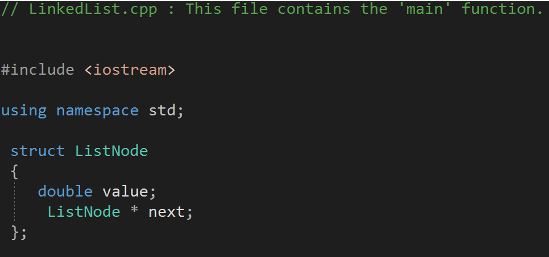
The listnode structure has an interesting property.
- It’s a self-referential data type, or self-referential data structure which contains a pointer to a data structure of the same type, and this can be said to be a type that contains a reference to itself.
- Having declared a data type to represent a node, we can define an initially empty linked list by defining a pointer to be used as the list head and initialising its value to nullptr.
Now we can create a linked list that consists of a single node storing 12.5 as follows:

To create a new node and store 13.5 in it we can use a second pointer to point to a newly allocated node.

Note: We have made the second node the end of the list by setting its successor pointer (secondptr->next) to nullptr, and have changed the pointer of the list head to point to the second node.
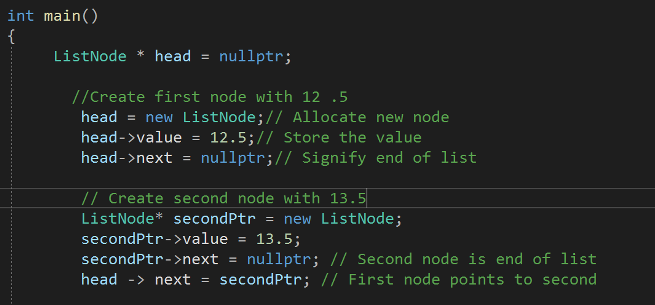
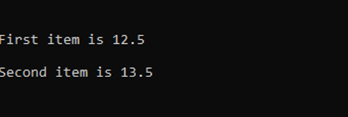
Using constructors to initialise nodes.
A constructor in C++ is a special method that is automatically called when an object of a class is created. To create a constructor, use the same name as the class, followed by parentheses (). This sets the value or puts in the condition appropriate to the start of an operation; for example, ‘the counter is initialised to one’
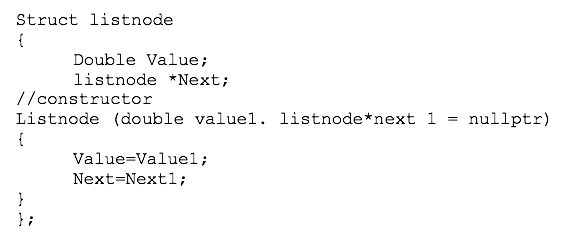
Traversing a list
This is the process of beginning at the head of a list and going through the entire list while doing some processing at each node. For example, we would have to traverse a list if we needed to print the contents of every node in the list.
To traverse a list, where the list head pointer is NUMBERLIST, we take another pointer ptr and point it to the beginning of the list.

We can then process the node pointed to by ptr by working the *ptr or by using the structure pointer operator ->. For example, if we wanted to print the value at the node, we could write the code:

Once the processing at the node is done, the pointer is moved to the next node if there is one by writing:

replacing the pointer to a node by the pointer to the successor of the node. Then to print out the entire list use the code:
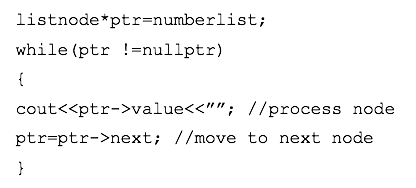
To delete a node
In a linked list there are three possibilities for deleting a node:
- If it is the first node.
- If it is the middle node
- If it is the last node.
Deleting a node in a linked list can be achieved by connecting the predecessor node with the successor node of the linked list.
We need to first search for the availability of the node within the list and if it’s available, make its previous node point to the node after the one we want to delete. In the following diagram Node B becomes ‘temp’.
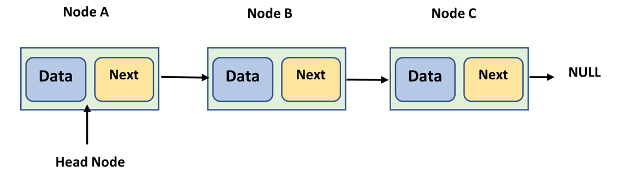
We want to delete node B by connecting node A with Node C. This will leave node B still in memory, but it should be deleted to clean it up. To do this we create an extra pointer variable called ‘temp’. Before joining Node A with C, we will keep the address of B in the temp variable. Then once node A is joined with node C, node B can be deleted using ‘delete’.
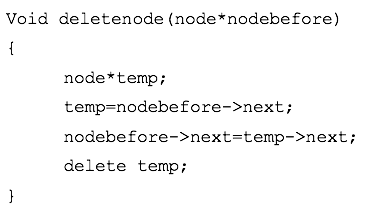
To delete the head node, we would modify this:
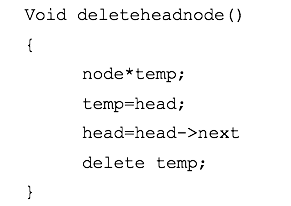
In the above example, the head node, node A is pointing to the next node, node C, and we are deleting the node that it was previously pointing to, node B.
CodeVsColour provides a complete C++ program illustrating how to insert and delete in a linked list. It also shows how to display all nodes of a linked list and delete a node using its value.
For further learning and quick reference, the following videos provide lots of information and different ways of implementing linked lists.
There are different ways to code a linked list. LinkedIn learning has a quick tutorial that is handy for quick reference learning. https://www.youtube.com/watch?v=m7rrk65GiXY
Simple Snippets have a range of you tube tutorials on Linked lists from theory through to links to their website to find the associated to support the theory. youtube.com/watch?v=IJrQCCmuaqc
Linked list program example – in simple terms
As linked lists consist of nodes, you need to declare a structure which defines a single node. Structures have been covered in another area of this course, so if you need to, go back and revise structures as you work through this topic. If you have never created a linked list, here is a simple example to practice with. You might like to see if you can add a node, delete a node, and create a circular linked list by inserting new code.
To store the values A, B & C in a linked list (using three nodes like the linear diagram example);
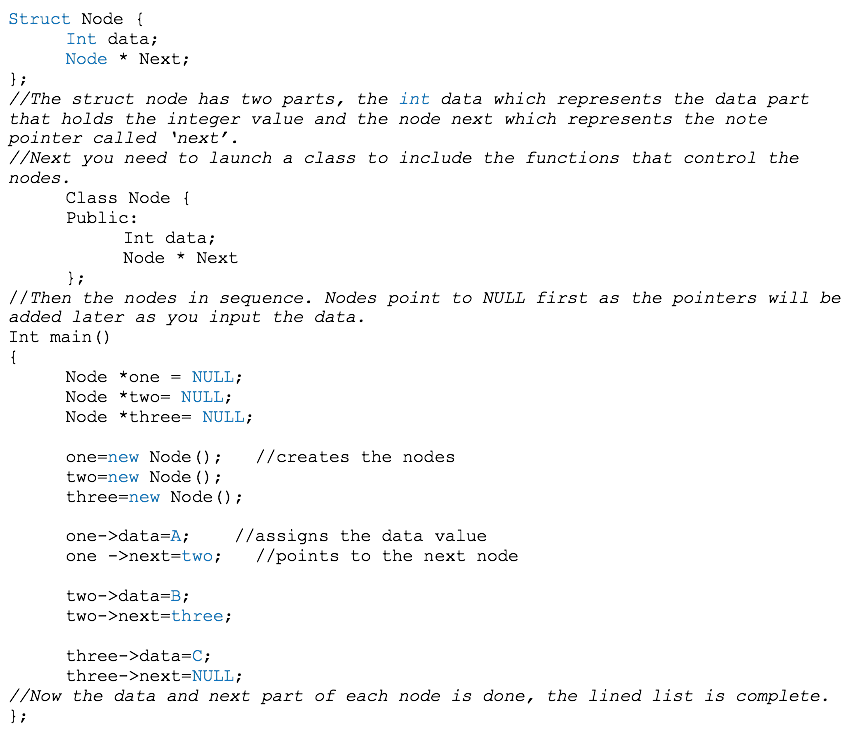
Arrays vs Linked Lists
Linked lists can be more complex to code and manage than arrays, but they have some distinct advantages:
- Nodes can be added or removed from the middle of the list without any other node having to move.
- Adding or deleting a node is quicker.
- There is no need to define the initial size.
- It can shrink or grow in size easily.
There are also disadvantages:
- No random access – must go through whole list to find what you want.
- Dynamic memory allocation and pointers are required which can complicate code, increase risk of memory leaks and segment faults.
- Larger memory usage as each node must store an extra pointer.
Arrays vs Linked Lists
Static Array
A static array stays the same size and cannot be added to. Where there are 6 elements in an array, the size remains the same so no further elements can be accepted into the array. Both the logical length and the physical length is 6.
Dynamic Array (Vector)
This can be used like a normal array in memory but allows you to create a new array in memory to increase the size of the array. For example, when coding a program, where the user is being asked to fill information, or information is gathered from a file, or a database, there needs to be space available in memory for that information to be stored. A dynamic array allows tor expansion past the logical length. To insert a value into the middle of a dynamic array (vector) all the elements after the insertion point, need to move one position towards the array end to make room for the new value. Likewise, removing a value requires all the elements to move back toward the beginning.
It is advisable to use a dynamic array over a static array to allow for expansion unless you are absolutely 100% certain sure that you are never going to need more than a specified number of elements.
Arrays/dynamic arrays vs Linked Lists
Linked lists are not as popular as dynamic arrays in terms of performance. The linked list uses more memory as it stores two elements within each node, - the ‘data’ element and the ‘next’ element. The advantage of a linked list is that is doesn’t have to be sequential within memory so it can point anywhere, and if you are always going to be going one element after the other it’s a good choice, because you can go from one element to the next and keep moving down the list. However, if you are wanting to find one specific element you must go through the entire list to find it and start from the beginning each time you want to search for an element.
When using a dynamic array, elements are stored sequentially one after the others so you can go straight to the element you want by coding the move so there is no need to go through the entire list to find it and because the size of an array is fixed, locating one element is done by using the name of the array and the index of the element you are searching for.
An advantage of using a linked list over an array is that it is easy to add another node (element) to a linked list simply by adding another node and a pointer, or to decrease the size of the list by taking a pointer to bypass the node which is no longer required. A disadvantage is that you cannot access a linked list randomly, meaning you can’t find the 15th element of the list without going through nodes 1 – 15 first because the address for each successive node is in the previous node.
Types of linked lists:
Singly Linked List - Every node contains some data and a link to the next node.

Doubly Linked List – every node contains some data, a link to the next node and a link back to the previous node.

Circular Linked List – every node contains some data, a link to the next node, but the tail or last node links back to the first node to create a circular structure.
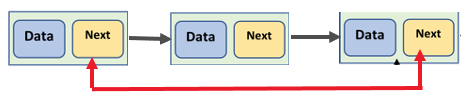
To increase your understanding of these different types of linked lists, Simple Snippets gives a further outline of the three types at 15:37 - 19:49 mins.
Introduction to file handling
In this section we are going to learn about how we can use text files in our programming.
Why do we need files though? Rather than keeping data hidden away in the program, where it gets wiped every time, we keep the data in files outside the program and then access them when needed using our code.
We can write programs to deal with files in three ways:
- read from files (read only)
- create and write to files (overwrite)
- append (add text to the end of existing content in a file)
Headers
We begin by announcing that we want to use the fstream library (stands for filestream) to be able to work with files in our program using the header:

Note that you will still need to include the #include <iostream> header because that contains the functions for our program to read and write in/out (cout and cin) from / to the user’s console. So your program should start with these headers at a minimum if your program is going to be using files:
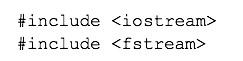
Data type
Then we choose the data type we wish to use from the library fstream, depending on whether we want to read, write / append, or do both:
- ofstream – stands for output file stream – to create, write, append to a file
- ifstream – stands for input file stream – to read a file
- fstream – stands for file stream – to read and create, write to a file.
Let’s say we want to simply read a file, we can use:
ifstream fileHandle; // for fileHandle you will choose a short name / alias to use to refer to your file
Opening the file
In the next line we specify which file we want to open, using the open function open(), which takes in two parameters:
File path/name.ext, the placeholder we are using for this is file.dat
Mode – depending on what we plan to do with the file.
fileHandle.open(filelocation&name, mode)
Note:
- If you don’t provide a path for the file, it will be looking for the file in the project folder.
- If the file doesn’t exist yet, it will create the file and place it according to the file path indicated. If
- no file path it will save it in the project folder.
Modes
The most common modes are:
| ios::in | Open the file for reading |
| ios::out | Create, and open the file for writing (will overwrite) |
| ios::app | Open the file for writing at the end of any existing content |
| ios::trunc | Open the file and delete all existing data |
| iso::ate | Open the file and move the cursor to the end of the file (like append) |
| ios::binary | Open the file in binary mode |
Example 1

In this example, you are saying you want to open hazelsfile in the read-only mode.
You can also apply more than one mode if you need to. These must be separated using a | .
Example 2

In this example, you are saying you want to open davidsfile in the mode for writing, and you want all existing data in the file deleted. File will be created if non-existent.
Example 3

In this example, you are saying you want to open jennysfile in the mode for writing and for reading. File will be created if non-existent.
Writing to a file
Once you have covered off the steps above, writing to a file is easy. Use the following two steps:
Assign the text you want to write to an appropriate variable
Tell the program to write the variable to the file.
Example

See this illustrated in the image below.
Reading a file
Sometimes you may only want to call the data that’s in the file. Let’s have a look at how you would write that.
Example
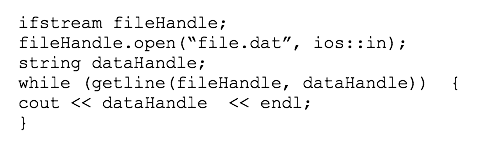
See this illustrated in the image below.
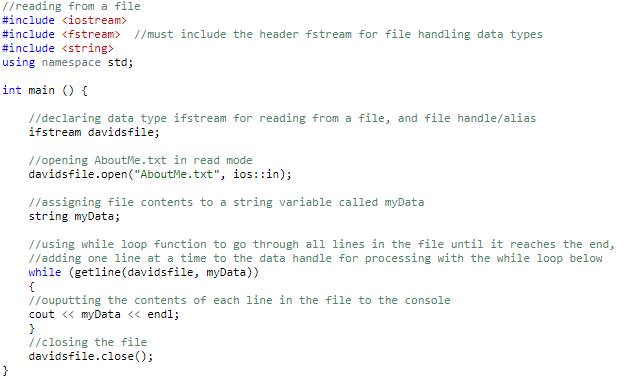
Running this program will result in the console displaying the contents of the file, line by line.
My name is David Jones.
I am 29 years old.
Reading from a set position in the file
Another way of reading a file is from a certain position in the file. Read Set position with seekg() in C++ file handling (GeeksforGeeks, 2022) to find out how.
Writing and reading
Visit C++ Files (W3Schools, n.d.) for an example that uses writing and reading, make sure you run the example at the bottom of the page to see it in action.
After watching C++ file handling for beginners! The easiest way to read/write into text files! (codebeauty, 2021) [19:18], go back to the start of the video and perform Saldina’s three examples on your own computer:
- Write to your txt file
- Append to your txt file
- Read from your txt file
You can use C++ shell to write your code.
Exceptions are abnormal (anomolous or exceptional) conditions that disrupt the flow of a program. They are runtime problems, unexpected conditions or abnormal situations that, if not dealt with, will led to the program terminating unexpectedly and prematurely. The general idea of exceptions is to separate error detection from its handling and make unhandled errors stop the program execution. The general idea of exceptions is to separate error detection from its handling and make unhandled errors stop the program execution.
Exception handling helps to create robust and fault tolerant programs.
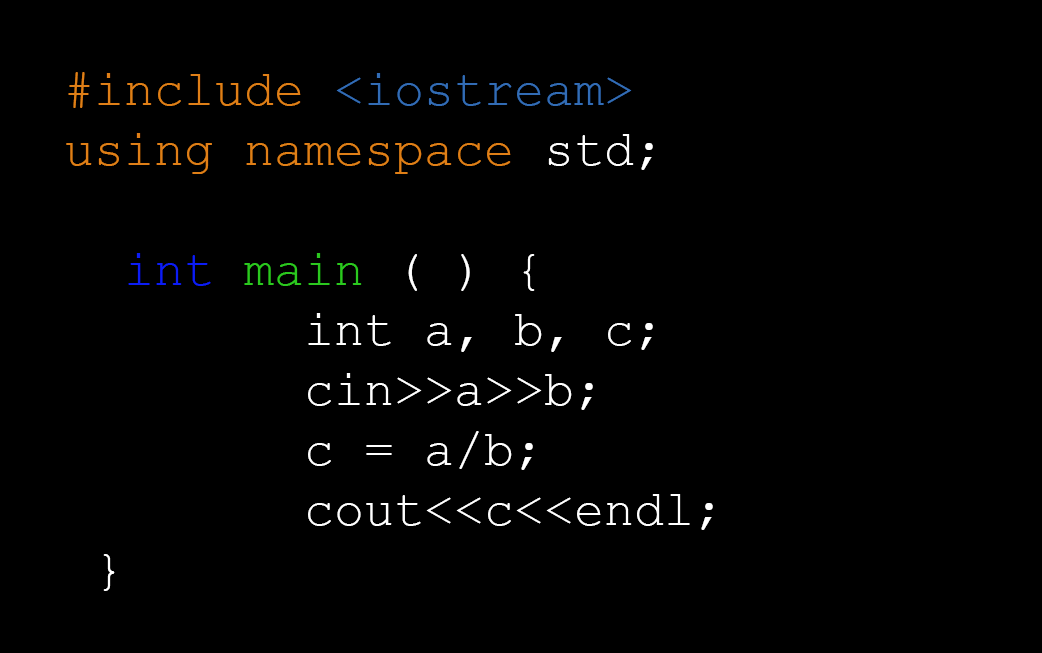
Some common failures where you would use exception handling include:
Memory not allocated - Sometimes your storage is full and you cannot allocate memory
Division by zero errors
Invalid function parameters – this usually occurs in function overloading
Let’s take a simple statement:
In this statement we want to divide integer ‘a’ by integer ‘b’ to get ‘c’ (c= a/b). Simple enough, but what if b=0?
This will cause the program to terminate prematurely, because any number divided by zero in not defined. It causes a ‘divide by zero’ error. This is a common mathematical problem that we can use exception handling to overcome.
We will use this example to illustrate the exception handling process shortly, but firstly let’s take some time to consider common errors that occur in programming that a knowledge of exception handling can help overcome.
Standard Exceptions in C++
Using the <exceptions> keyword you can access the standard exception expressions from the Library.
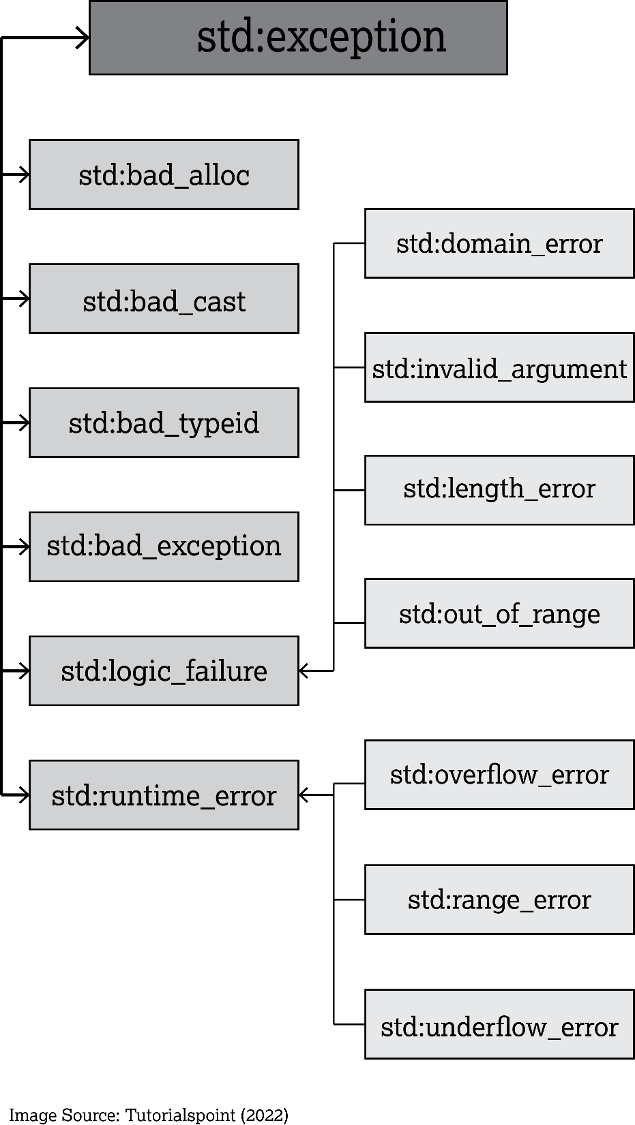
Exceptions provide a way to transfer control from one part of a program to another. C++ exception handling is built upon three keywords: try, catch, and throw.
- throw − A program throws an exception when a problem shows up. This is done using a throw keyword.
- catch − A program catches an exception with an exception handler at the place in a program where you want to handle the problem. The catch keyword indicates the catching of an exception.
- try − A try block identifies a block of code for which particular exceptions will be activated. It's followed by one or more catch blocks.
Handling Exceptions: Throw
Using the ‘divide by zero’ exception let’s look at the process.
-
The following statement causes the exception to be thrown.

- The throw key word is followed by an argument , which can be any value
- The line containing a throw statement is known as the throw point.
- When a throw statement is executed, control is passed to another part of the program known as an exception handler.
Handling Exceptions: Try/Catch
- The first part of the construct is the try block
- This starts with the keyword try and is followed by a block of code executing any statements that might directly or indirectly cause an exception to be thrown
- The try block is immediately followed by one or more catch blocks, which are the exception handlers
- A catch block starts with the keyword catch, followed by a set of parentheses containing the declaration of a exception parameter
Check out this coding example below
Rethrowing an Exception
It is possible for try blocks to be nested. For example, look at this code segment:
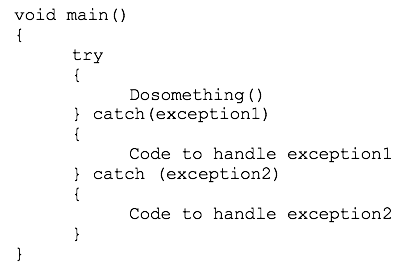
Sometimes, both an inner and an outer catch block must perform operations when a particular exception is thrown.
These situations require that the inner catch block rethrow the exception so the outer catch block can catch it.
Here is another example:
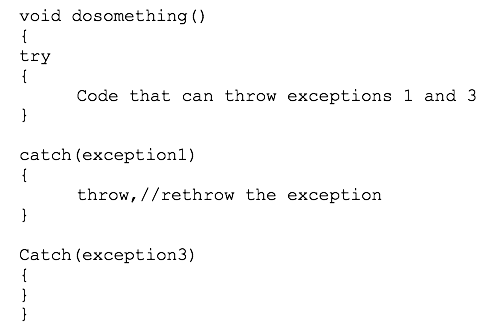
A catch block can rethrow an exception with the throw; statement with no parameter. For example, suppose the doSomething function (called in the try block above) executes code that potentially can throw exception1 or exception3. Suppose we do not want to handle the exception1 error in doSomething, but instead want to rethrow it to the outer block . The code segment illustrates how this is done.
What is a function template?
Use a function template instead of writing the same function out multiple times to provide for each data type needed.
We all know that when you repeat the same code multiple times, there is potential for human error. So instead, we write a template that we can use to perform the same function with multiple different data types. We will pass the data type as a parameter. When the data type is provided the compiler can use the template with the version of the code needed for that data type.
Watch Saldina explain step by step how to use function templates in C++ Functions (2020) - What are generic functions and templates? Programming tutorial (codebeauty, 2020).
Let’s look at an example below, but first note the three sections of code.
- Top – declaration: call the libraries you will be using, define functions / templates
- Middle – main application code
- Bottom – the functions.
Scenario
In this scenario we are wanting to find the bigger out of the two values. We will have three sets of data with three different data types – int, double, and string.
If we weren’t using a template, we would use ‘overloaded functions’. Overloaded functions is having more than one of the same function name, but each one functions differently. In the example below you will see the function GetBigger three times, but it is performing three different operations. Have a look:
Note: You might be wondering why John is Bigger than Alice? That’s because strings are sorted alphabetically. If you put these two inputs in alphabetical order, John is lower down the list which means the name John is Bigger than the name Alice.
Now, you can see in the code above that we are looking at one function called getBigger which we are using with three different data types: double, int, and string, which is called function overloading – writing that out three times both at the declaration and at the bottom.
Let’s use a function template instead and see what happens. Check this out.
For this activity, you will need to:
- write a simple program using C++ Shell to perform a sum on three pairs of data, each with different data types
- version 1: without a function template
- version 2: with a function template
- add // comments to explain what is happening at each step.
When you run the two versions of the program you will be able to see the benefit of using a template.
Standard Template Library (STL)
The standard template library or STL for short is part of the C++ Standard library and is a collection of algorithms, iterators, and containers you can use in your programs. It was created by Alexander Stepanov in 1994, and later it became part of the standard library.
Using the STL makes your programming faster, less buggy, easier and quicker to read, and more efficient as the compiler is conditioned for using STL code.
There are three main components to the STL:
- Algorithms
- Iterators
- Containers
Have a look at the image below to see how these three are connected and what they are, and then continue on to begin learning about containers first.
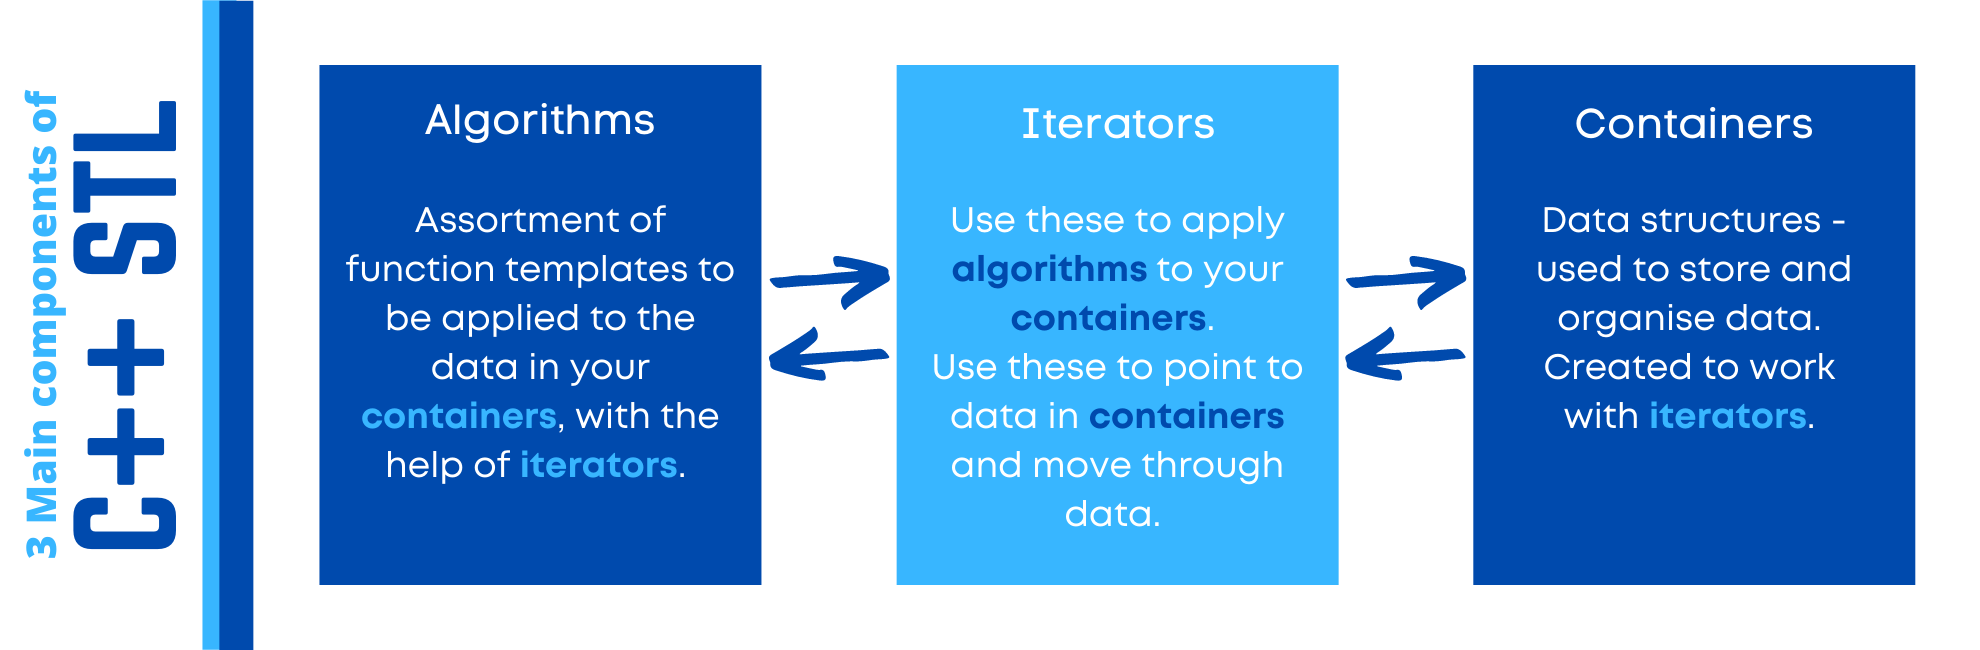
STL Containers
As you saw in the image above, containers are the data structures that hold groups of data.
The three main container types are sequence containers, associative containers, and container adapters.
Wikipedia (2022) explains the difference between sequential and associative containers well, “Associative containers are designed to be especially efficient in accessing its elements by their key, as opposed to sequence containers which are more efficient in accessing elements by their position.”
And then we have adapters, which can be used to alter the way data is stored and accessed in a sequence container.
See the image below for the three main types of containers available in the STL, and then we’ll look into each kind in more detail before looking at some examples.
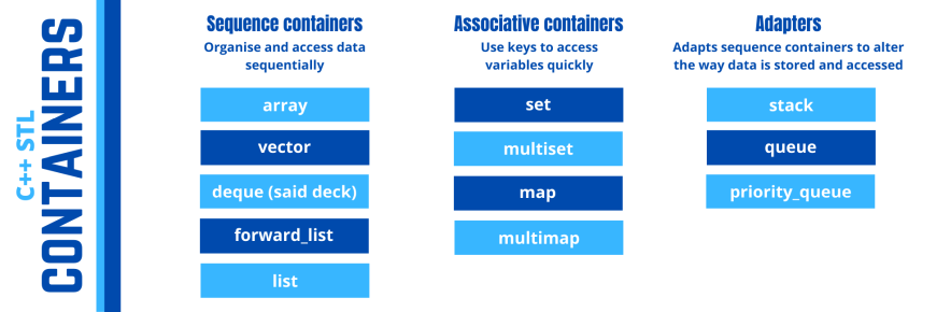
Sequence containers
Data is stored in an orderly or logical fashion. Data is accessed by moving forwards and sometimes backwards.
| Class | Header file | Description |
|---|---|---|
| array | <array> |
Fixed-size data structure, similar to built-in array, but more efficient, and knows its own size. |
| vector | <vector> |
Expandable/dynamic array. Data is allocated at the end only. This will increase the size of the array if needed. |
| deque | <deque> |
Double-ended queue. Dynamic array where you can add to and delete from the beginning or end. |
| forward_list | <forward_list> | Singly-linked list. Can only traverse through the list in beginning to end direction. Allows data to be added to or deleted from anywhere in the list (non-contiguous allocation). |
| list | <list> |
Doubly-linked list. Same as forward_list but uses more memory to give quicker access to elements – allows traversing through elements from beginning to end and backwards (each element has a next tag as well as a previous tag). Easier iteration. |
Associative containers
Data is accessed using identifiers.
| Class | Header file | Description |
|---|---|---|
| set | <set> | The set stores sorted elements. You can set it to store the elements in descending order also. The value of the element is its identifier, so cannot be changed, and as such, there can be no duplicates. |
| multiset | <set> | Same as set, but duplicates are allowed. |
| map | <map> | Values in the map are each stored with their own key (identifier), these are called key-value pairs. There can be no duplicates. The map stores sorted key-value pairs; sorting is performed on the keys. You can set it to store in descending order also. |
| multimap | <map> | Same as map, but duplicates are allowed. |
| unordered set | <unordered_set> | Same as set, but unsorted. |
| unordered mulitset | <unordered_set> | Same as multiset, but unsorted. |
| unordered map | <unordered_map> | Same as map, but unsorted. |
| unordered multimap | <unordered_map> | Same as multimap, but unsorted. |
Container adapters
These are also known as abstract data types, meaning they can be implemented with other data structures as well.
| Class | Header file | Description |
|---|---|---|
| stack | <stack> | Used to adapt other containers such as deque, to use the LIFO approach – last item in is first item out. In other words, values are added and deleted from the end only. |
| queue | <queue> | Used to adapt other containers such as deque, to use the FIFO approach – first item in is first item out. In other words, values are added to the end, but are deleted from the front. |
| prority_queue | <queue> | Elements are stored in an order; by default, it's greatest to smallest, but you can set it to smallest to greatest as well. If you set it to smallest to greatest, then the highest priority is given to the smallest number, resulting in the smallest number being the first to be removed from the queue. |
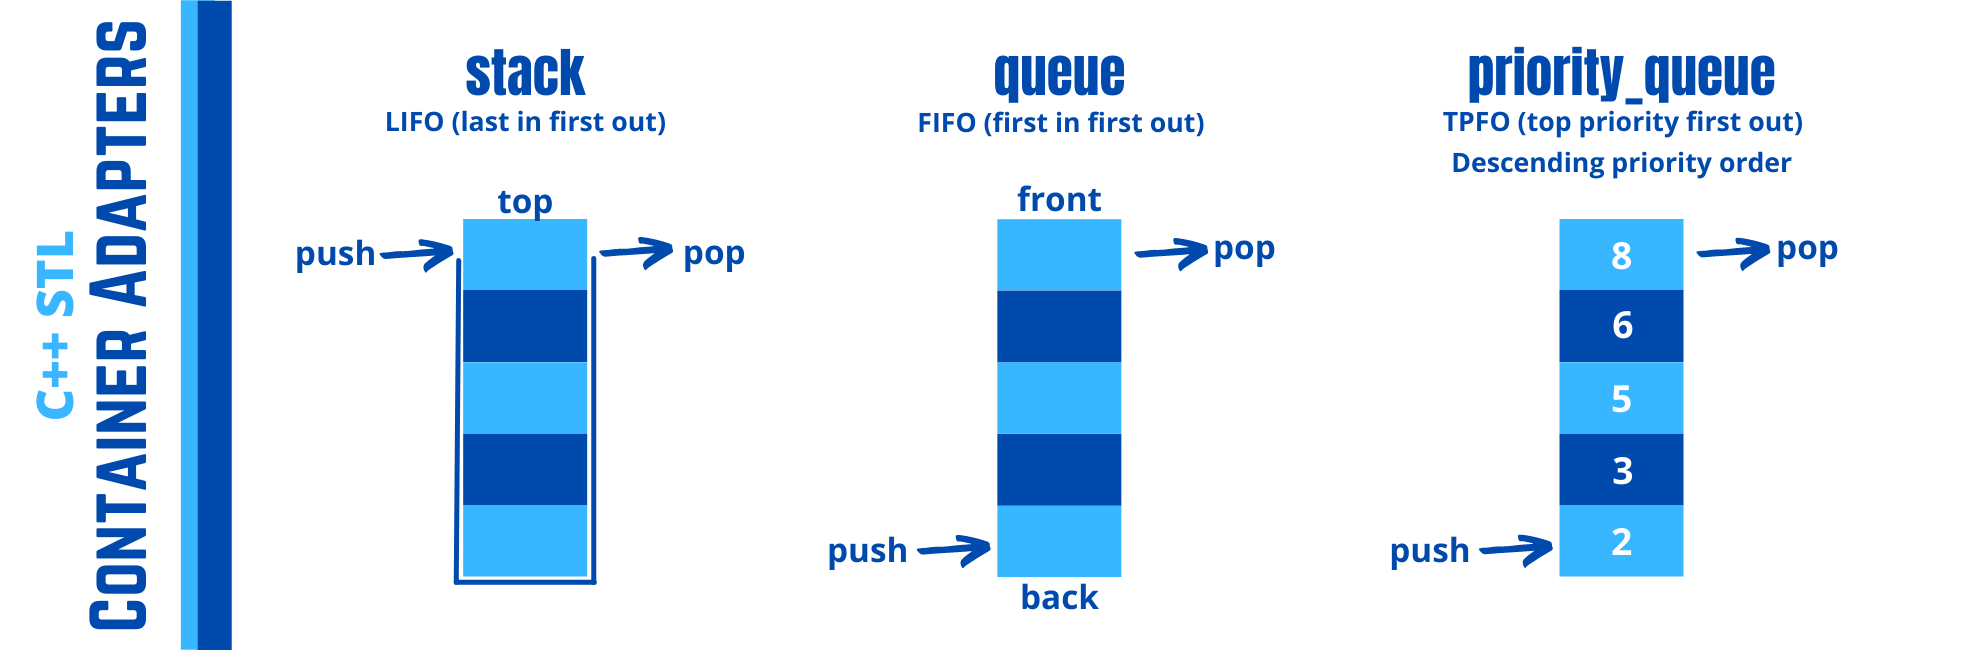
Container type activity
Arrays
To create an array, you will first include the array header file.

The syntax is very simple for defining arrays:

Another example would be to set all values to zero at the time of definition:

Note that any data type can be used.
In the infographics earlier we mentioned that array containers know their own size. You can check the size using:

Read Array class in C++ (GeeksforGeeks, 2016) to see how different functions can be applied to Array containers, make sure you read the //comments as you go so you can see what is happening step by step.
STL - Array challenge
For this coding challenge, you will need to:
- Create an integer array object of size 10
- Use a for loop to initialise the array elements to multiples of 2 for the integers 0 through to 9
- Print out the values stored in the array.
Hints:
- Use the loop control variable
- Use the size() function in the for loop
- Use a range-based for loop for printing out the array elements.
Feedback:
Here is what it should look like:
Vectors
Vectors are dynamic arrays; they work in the same way as arrays however their size is not defined nor fixed. It will grow and shrink as you add elements and delete them.
Data type cannot change once vector defined.
To create your vector, use the vector header file:

Defining vectors
Here are a few examples of defining vectors:
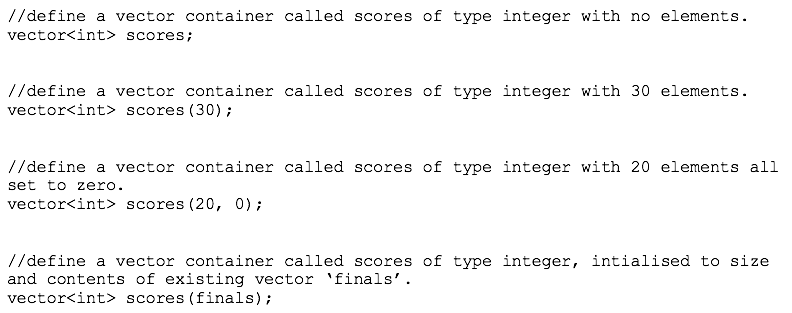
You can check the size of a vector called scores using:

You can add a new element with value 75 to the back of a vector called scores using:

Read Vector in C++ STL (GeeksforGeeks, 2015) to see how different functions can be applied to Vector containers, make sure you read the //comments as you go so you can see what is happening step by step.
STL - Vector challenge
For this coding challenge, you will need to:
- Create a vector
- Add five elements, one at a time, each being the name of a friend
- Insert your own name as the third element in the vector
- Remove the last element of the vector
- Print out elements of the vector
- Print out the size of the vector.
Feedback:
Your code should look something like this:
Deque
Deque is pronounced ‘deck’ and it is short for double-ended queue. It is an indexed sequence container that is dynamic, it shrinks or grows as elements are added or removed from either end.
Unlike a vector, data is not stored contiguously, so different elements of a deque may be stored in different parts of the memory. The container holds the location information about what is stored where. This means, if it continues to grow and gets too big for the space where it began, it’s not a problem, it will continue to allocate to available memory wherever it can be found, whereas a vector in this situation might need to be reallocated to a larger memory space.
To create your deque, use the deque header file:

To define your deque:

Read Deque in C++ Standard Template Library (STL) (GeeksforGeeks, 2015) to see how different functions can be applied to deque containers, make sure you read the //comments as you go so you can see what is happening step by step.
Example
Here is an example of adding and removing elements from the front and back of a deque. Run the script to see the output.
Stack
Stack is a last in-first out (LIFO) data structure. Elements are pushed and popped from the top of the stack.
To create your stack, use the stack header file:

To define your stack:

Read C++ Stack (Programiz, n.d.) to see how different functions can be applied to stack adapters, and to read a good explanation of using the while loop on stacks.
Example
Here is an example of adding and removing elements from the bottom of a stack.
Note that there are two different ways the pop function is used in this program.
The first is to remove the top element from the stack, easy, when you run it, you will see that Paddy was removed, but the second way it is being used is inside the while loop, where it’s function is to pop the top element off the top of the stack (only inside the loop) to allow the next item to come to the top to be accessed/read, while the stack is still not empty. The ! in !myStack.empty() means not empty.
Running this program would result in the following output (note that Paddy is gone from the list, he was the last one added):

Queue
Queue is a container adapter which provides the first in, first out (FIFO) data structure, in other words elements are added to the back end and removed from the front.
To create your queue, use the queue header file:

To define your queue:

Read C++ Queue (Programiz, n.d.) to see how different functions can be applied to queue adapters and how to access data in a queue.
Example
Here is an example of adding elements to the back and removing elements from the front of a queue.
STL – Queue activity
For this activity, you will need to:
- Create a queue called vegetables
- Add 5 different vegetable names as 5 elements
- Remove one element from the list
- Print out the final list of values (using a while loop).
Feedback:
Your program should look something like this:
Map
Map is an associative container type data structure, which is also known as dictionaries. In this data structure, you will recall that elements are stored sorted in key-value pairs.
To create your map, use the map header file:
To define your map:

Read Map Container in STL (Studytonight, n.d.) to see how different functions can be applied to maps and how to access data in a map.
Example
Here is an example of adding and modifying key-value pairs in a map.
Remember that elements are stored in sorted order. So, when you run this program, you get the elements printed in alphabetical order by the keys.
STL Containers activities
Introduction to STL iterators
To iterate means to repeat the same set of steps a number of times. Iterators help us to ‘repeat the same set of steps’ on various elements by pointing to and moving through data in a container.
Iterators hold the address of a specific element in the container.
Due to the different properties of the many container types, containers have iterators designed specially to point to and access data within them.
The container type defines the iterator to be used. For example:

Here, iterator x is an iterator for a vector container of integers, and iterator y is an iterator for a vector container of strings.
The container class also defines the functions that can be used to move the iterator though the container. For example:

Some iterators work the same as pointers. They point to data in a container and allow us to iterate through the data in the container using ++. However, there are different functions and benefits for different iterators.
Remember that for a forward_list, you can only move forward through the list, so for this you would have a certain iterator, and you would need a different iterator for a list container, which allows movement forwards and backwards. These two different containers require iterators that work differently, due to the differences in the container properties.
Begin by reading Introduction to iterators in C++ (Singh, 2017), to learn about the 5 types of iterators, their properties and benefits and to see some examples.
And then read Iterators in C++ STL (Singh, 2016) to see how iterators use functions to iterate through data within containers.
Example
In this example, you can see how an iterator is used to traverse through the elements in a vector container. The main benefit here is that the iterator has a function called end() – which means you don’t need to know and specify the number of elements, like you would if you were using a pointer.
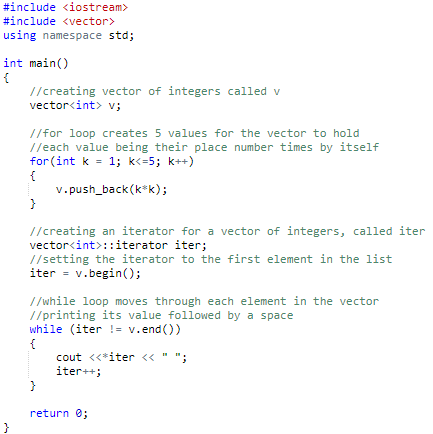
Running such a program would result in the following output:

STL Iterators activities
Introduction to STL Algorithms
Including the header #include <algorithm> will provide a set of algorithms that can be applied to manipulate data within containers using iterators to specify the range.
Algorithms work on the values in the containers, they can’t alter the size of a container.
Most common algorithms in the STL
Here are some of the most common algorithms used from the STL. They perform operations such as sorting, searching, counting, finding the biggest or smallest value, and shuffling. As you can see, some of them will manipulate data, and others are just observing.
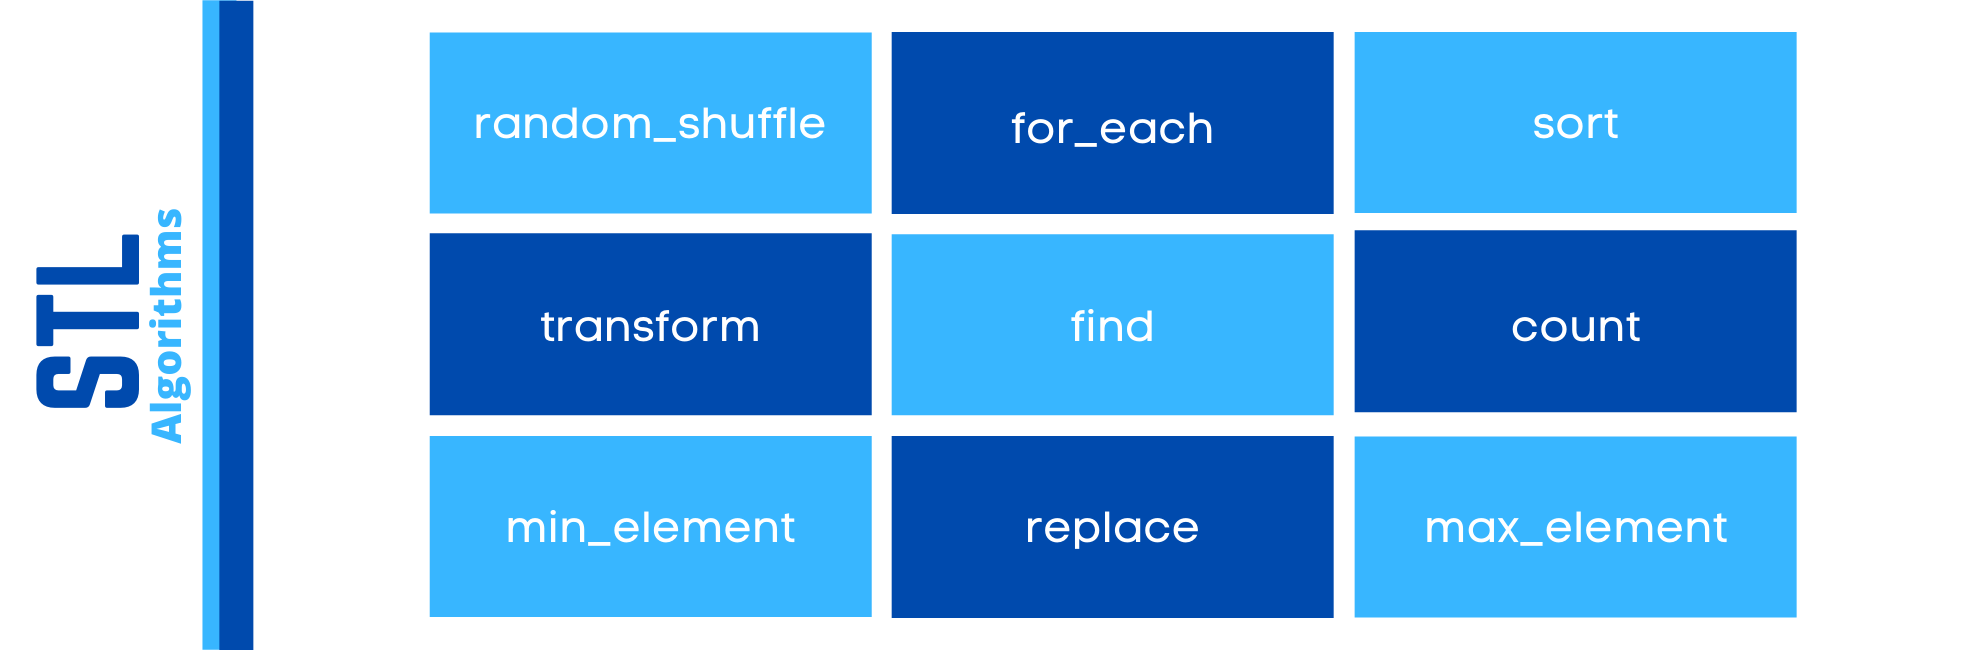
Read this short Overview of algorithms in C++ STL (Studytonight, n.d.), and continue on to the following few pages if you would like to see more examples of the most common algorithm types.
STL - Algorithm challenge
For this coding challenge, you will need to write a program to give you the following output:
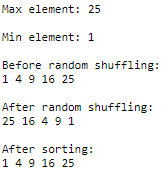
To do this, you will need to:
- Create a vector
- Use a for loop to add 5 elements, use their place number times by itself as the value for each one. For example the second one will be 4 (2*2), and the fourth one will be 16 (4*4).
- Print the biggest value
- Print the smallest value
- Use a for loop to print all values with pre-text: “Before random shuffling: ”
- Shuffle the elements
- Create iterator, set to first item in container
- Use a while loop and the iterator to print all values with pre-text: “After random shuffling: ”
- Sort the data in the container
- Use a for loop to print all values with pre-text: “After sorting: ”
Feedback:
Your program should look something like this.
STL – Algorithms activities
Preprocessor
A preprocessor is a text processor that manipulates the test of a source files as part of the first phase of code translation. The preprocessor doesn’t parse (breakup a sentence or group of words into separate components) the source text, but it does break it up into tokens to locate any macro calls. The compiler usually invokes the preprocessor in its first pass, and the preprocessor can also be invoked separately to process text without compiling.
A visual example:
Preprocessor flow chart
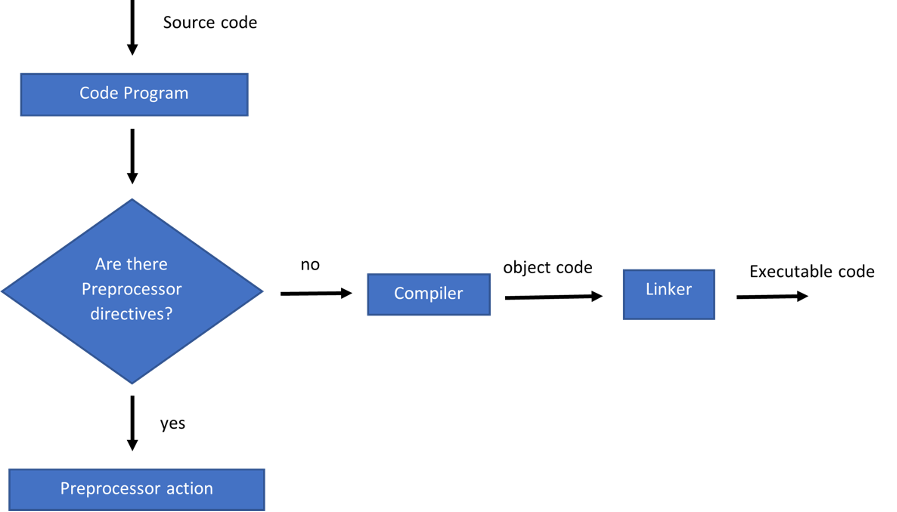
Preprocessor directives
Preprocessor directives are one of the unique features of C++. Before a program gets compiled by the compilers, the source code gets processed by the compiler. This technique is called preprocessor and the process is called preprocessing. A preprocessor is made up of lines of code, the compiler examines the code before the compilation of code begins and resolves all directives before any code is generated by regular statements. Preprocessor directives can appear anywhere in a source file, but they apply only to the rest of the source file, after they appear.
Preprocessors modifies data to conform with the input requirements of another program. The preprocessor directives only extend along a lone single line of code, as soon as a new line character is found, the directive ends.
Some features of preprocessor include:
- All preprocessor directives are preceded by a hash sign (#).
- Because it is not a statement there is no need for a semicolon (;) at the end.
- Continue a preprocessor directive to extend through more than one line of code by placing a backslash (\) at the end of the line.
- Preprocessor can be placed anywhere in a program
Preprocessor directives such as #define and #idef, are typically used to make source programs easy to change and easy to compile in different execution environments. Directives in the source file tell the preprocessor to take specific actions.
- All preprocessor directives in C++ begin with #, and they do not need to end with a semicolon (;) because this is not a statement in C++.
- The # operator is generally called the stringize operator and turns the argument it preceded into a quoted sting.
- The ## operator is also known as the token pasting operator. It is used in a macro definition to concatenate two tokens into a single token.
There are four main types of preprocessor directives:
- Macros
- File Inclusion
- Conditional Compilation
- Other Directives
Macros
A piece of code which is given a name and whenever this name is encountered by the compiler it replaces the name with the actual piece of related code. Macros basically help reuse code at different places multiple numbers of times without having to retype the entire code again. These not only save time, but results in error-free code. There is no semi-colon at the end of macro definition.
Use the #define directive to define a macro. This directive creates a symbolic constant and these symbolic constants are called a macro.
-
#define is an identifier and a character sequence. Each time the identifier is recognised in the source code, the character sequence will be substituted. The identifier that is defined is also known as the Macro name and the character sequence that will replace the identifier is known as the Macro replacement.
The general form of the directive is: #define macro-name replacement-text
Simple example of preprocessor directive:
The preprocessor searches the macro named msg and substitutes “Hello Coders”.
-
#undef – this directive is usually paired with the #define direction to create an area in source program where an identifier has a special meaning. It is used to undefine or remove the current definition of the existing macro. Note: This does not replace macros.
Example:
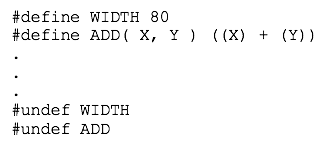
- Macros with arguments - Arguments can be passed to macros. Macros defined with arguments work similarly as functions. You will find more information on macros later in this topic.
File Inclusion
The #include directive tells the compiler to include a specified file at the point where the directive appears in the source code program. There are two types of files which can be included by the user in the program.
Header or standard files (printf(), scanf(), cout, cin and various other input-output or other standard functions are contained within different header files. To use those functions the user needs to import a few header files which define the required functions. These files must be included for working with these functions. Different functions are declared in different header files. I/O in the ‘iostream’ where functions performing string operations are in ‘string’ files. Where the filename is to be included the ‘<’ and ‘>’ brackets tell the compiler to look for the file in the standard directory.
-
Syntax: #include “user-defined file” Including using “”:
When using the double quotes (“”), the preprocessor accesses the current directory in which the “header file” is located. This is mainly used to access any header files of the user’s program or user-define files.
-
Syntax: #include <header file> Including using <>:
While importing file using angular brackets (<>), the preprocessor uses a predetermined directory path to access the file. It’s mainly used to access system header files located in the standard system directories.
Example:
The #include directive is used to include the functionality of the <iostream> and <cmath> header in the program.
- User defined files – when a program becomes very large it’s best practice to divide it into smaller files and include these whenever needed. These files resemble the header files, except for the fact that they are written and defined by the user itself. This saves the user from writing a particular function multiple times. Once a user-defined file is written it can be imported anywhere in the program using the #include preprocessor.
Conditional Compilation
These directives help to compile a specific portion of the program or to skip to a compilation of a specific part of the program based on some conditions. They test a constant expression or identifier to determine which text blocks to pass on to the compiler, and which ones to remove from the source file during preprocessing. These can come with various preprocessing commands #ifdef, #ifndef, #if and #endif, #else, and #elif. These directives allow the inclusion of discarding of part of the program code if a certain condition is met.
Example: (code courtesy of Coding Ninjas)
Other Directives
#error – the #error directive emits a user-specified error message at compile time, and then terminates the compilation. It is used mainly for debugging purposes. This directive is most useful during preprocessing to notify the develop of a program inconsistency, or the violation of a constraint. The error message this directive emits includes the token-sting parameter.
Syntax:

In the syntax, the argument error_message can contain one or more words with or without quotes.
Example:
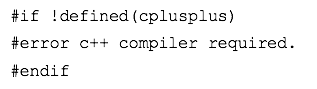
#line – supplies a line number for compiler messages. It tells the preprocessor to set the compiler’s reported values for the line number and filename to a given line number and filename. This directive is also used for debugging purposes.
Syntax:

In this syntax, de-const is a decimal constant and a string-const is a string constant.
As well as the above directives, there are two more directives that aren’t commonly used.
#pragma – this directive is a special purpose directive used to turn on or off some special features. These are compiler specific (they vary from compiler to compiler – are machine specific or operating system specific). A pragma can be used in a conditional directive to provide new preprocessor functionality, or to provide implementation-defined information to the compiler.
#pragma start up and #pragma exit – help specify the functions needed to run before program startup and just before program exit.
Syntax:
In this syntax the name is the name of pragma.
The # and ## operators:
These are two special operators. The # operator is used to convert text into a string to be displayed and the ## operator or token pasting operator is used to concatenate two tokens.
Example:
In this code we define makestr with argument str. It has body #str. When we print this makestr with the help of the argument “Hello Coders”, because the of the #str, the argument is converted into a string. The concatenate function is defined with two arguments, str1 and str2. We specify str1##str2, which means str1str2. When we call concatenate (a,b) in the main function, it evaluates ab.
NueralNine talks about preprocessor directives in C++. Watch the very detailed tutorial for C++ beginners in which he outlines some very in depth knowledge of both theory and implementation, including example code. (12:52m)
Compiler
Computers only understand one language and that consists of sets of instructions made of ones and zeros. This is known as machine language.
High level languages have been developed to make programming easier. High level programs also make it easier for programmers to understand and inspect other programs easier.
A computer’s machine language is a program that allows a user to input two numbers, add the numbers together and display the total, could include these machine language instructions as displayed in the table below:
|
00000 |
10011110 |
| 00001 | 11110100 |
| 00010 | 10011110 |
| 00011 | 11010100 |
| 00100 | 10111111 |
| 00101 | 00000000 |
This code written in C++ accomplishes the same purpose:
C++ makes the program a lot easier as opposed to machine language. Because there is such a contrast between machine language and high level languages, high level languages have to be translated and rewritten into machine language at some point. This is done by the compilers, interpreters or assemblers that are built into various programming applications. C++ is designed the be a compiled language, meaning, that it is generally translated straight into machine language that can be understood by the system which makes the program highly efficient. To do this a set of tools known as the development toolchain, whose core are a compiler, and its linker are required.
Put simply, a compiler is a computer program which converts the source code written in a programming language into another computer language which the computer understands. For compiling C++ program code a C++ compiler is needed to covert the source code into machine codes. Geeks for geeks set out how to install compliers for different operating systems.
The Cherno covers how the C++ compiler works in depth and in an easy-to-understand format with examples.
Macro
Macros are a piece of code within a program that is given a name and whenever this name is encountered by the compiler, it replaces the name with the actual piece of code. Using macros allows coders to re-use code. The #define directive is used to define a macro. In some cases, using macro instead of a function can improve performance by requiring fewer instructions and system resources to execute.
Once you have defined a macro, you can’t redefine it to a different value without first removing the first definition. The #undef directive removes the definition of a macro. Once you’ve removed the original definition, you can redefine the macro to have a different value.
In C++ inline functions are often used as a preferred method over macros. The C++ inline function capability supplants function-type macros. The advantages of using inline functions over macros are:
- Type safety. Inline functions are subject to the same type checking as normal functions whereas macros are not type-safe.
- Correct handling of arguments that have side effects. Inline functions evaluate the expressions supplied as arguments before the function body is entered, therefore there’s no chance that an expression with side effects will be unsafe.
Macros can create problems if they aren’t defined and used carefully. You can use parenthesis ( ) in macro definitions with arguments to preserve the proper precedence in an expression. Also note that macros may not handle expressions with side effects correctly. You can find more information regarding defining directives here.
Geeksforgeeks offer the following programs to illustrate the use of macros in C++:
Program 1:
In this program whenever the compiler finds AREA(1.b) it replaces it with the macros definition – (1*b) 1 multiplied by b. The values passed to the macro template AREA(1.b) is replaced by the statement (1,b) therefore, AREA(1,b) will be equal to 10*5. 10 multiplied by 5.
Macros with arguments:
The #define creates a macro which is the association of an identifier or parameterised identifier with a token string. After defining the macro the compiler can substitute the token strong for each occurrence of the identifier in the source file. If the macro accepts argument, the actual arguments following the macro name are substituted for formal parameters in the macro body. The process of replacing a macro call with the processed copy of the body is called expansion of the macro call.
In practical terms, there are two types of macros.
-
Object-like macros are a simple identifier that will be replaced by a code fragment. It is commonly used to replace a symbolic name with a numerical or variable represented as a constant.
Example:
-
Chain macros are macros inside of macros. The parent macro is expanded first then the child macro is expanded.
Example:
-
Multi-line macros can have multiple lines. To create a multiline macro you need to use (/) backslash-newline.
Example:
-
Function-like macro are the same as a function call. It replaces the entire code instead of a function name. A pair of parenthesis () is necessary after the macro name. Note: If a space in inserted between the macro name in the definition and the parenthesis the macro will not work. A function-like macro is only lengthened if it’s name appears with () after it. The pointer will get the address of the real function and lead to a syntax error if this is not done.
Example of function-like macro:
Video
Again, The Cherno explains Macros from the preprocessor stage through to a macro being used. There are multiple videos in the series that can help clarify topics you learn here and guide you as you continue to practice the many different elements into your coding.
References and further resource sites to investigate.
These references and additional resources will support your learning.